A permission is the right that a user or group has to access a particular functionality in Alfresco.
In order to create very granular control over the types of functionality that users can access within the Records Management system, Alfresco has defined nearly 60 unique permissions.
A role for a user or group in the Records Management system is a collection of those privileges. The large number of granular permissions provides very detailed control over the way in which a role can be defined.
For each of the five Records Management groups that we've already seen, there are a corresponding set of five roles, and there is a one-to-one mapping of each group to a role.
The top-level node of the Records Management File Plan, the rm site documentLibrary node, is secured by applying those roles as access control entries to the documentLibrary node. Children of this root node for the File Plan inherit the same access controls unless specifically overridden.
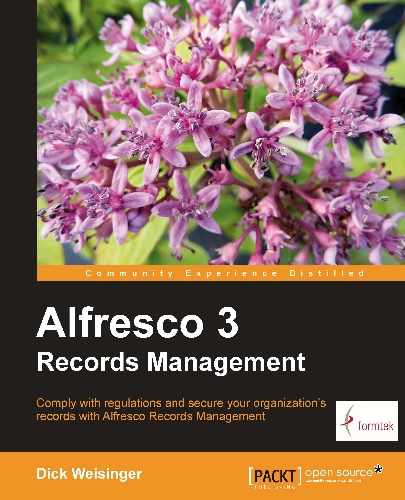
If we go to the Alfresco JSF Explorer client, we can see how the access controls are applied to the File Plan root node. In the client, we navigate to the space called Company Home / Sites / rm / documentLibrary.
From the More Actions drop-down, we can click on Manage Space Users. There we can see that the five groups have been associated with the appropriate roles and applied to the root node. Actually, what we're seeing in the Roles column of this page is a list of permissions (really permissionGroups) rather than the name of the Records Management roles:
Unless a user belongs to one of the five Records Management role groups (or other role groups that may have been defined via the Define Roles tool), that user will not have the permissions to perform operations in any part of the File Plan.
In order to provide the flexibility of roles that can be easily edited from the user interface, Records Management roles are really a sort of super-role that consists of many individual roles or permissionGroups, most of which consist of only a single permission.
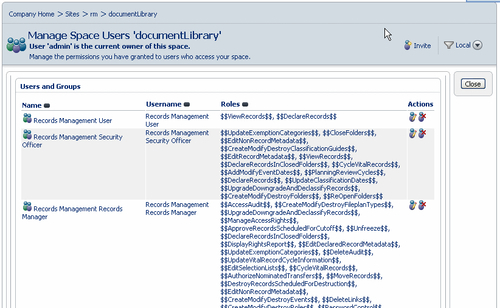
A similar view of the permissions that are associated with the documentLibrary node of the Share Records Management site is available through the Node Browser. A partial listing of all the permissions assigned to this node is shown in the screenshot below:
Neither Share nor the Alfresco JSF Explorer client has a standard interface for editing roles. Roles are normally set up as permissionGroups and defined within an XML permission model file. For Records Management, the ability to edit roles with the ability to easily add or delete permissions to the role was added as a feature of the Management console.
Note
The roles tool for Records Management can't be used for editing any roles outside of Records Management.
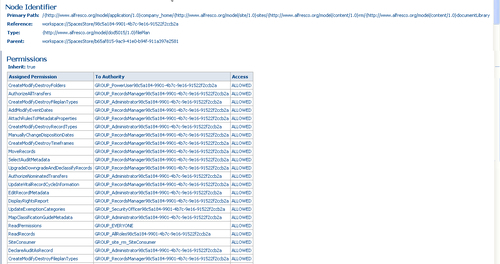
We can get to the Records Management Define Roles tool by going into the Management console and then clicking on the Define Roles entry in the left-hand navigation panel:
The Define Roles tool consists of a table with two columns. The entries in the first column show the available Records Management Roles. In this screenshot, we can see the five default roles. When one of the role entries in the first column is highlighted, then the second column, labeled Capabilities, shows the set of permissions that are enabled for that role.
In the next table, we can see a comparison of the default permissions that are available for each of the five Records Management roles.
We notice that the Records Management Administrator and Records Manager roles are very similar. The main distinction between the two is that the Administrator is able to manage access controls:
|
Capabilities |
Administrator |
Power User |
Records Mgr |
Security Officer |
User | |
|---|---|---|---|---|---|---|
|
Records | ||||||
|
Declare Records |
|
✓ |
✓ |
✓ |
✓ | |
|
Move Records |
|
✓ |
✓ | |||
|
Undeclare Records |
|
✓ |
✓ | |||
|
View Records |
|
✓ |
✓ |
✓ |
✓ |
✓ |
|
Folder Control | ||||||
|
Close Folders |
|
✓ |
✓ |
✓ |
✓ | |
|
Create Modify Destroy Folders |
|
✓ |
✓ |
✓ |
✓ | |
|
Declare Records in Closed Folders |
|
✓ |
✓ |
✓ |
✓ | |
|
Re-Open Folders |
|
✓ |
✓ |
✓ |
✓ | |
|
Metadata Control | ||||||
|
Edit Declared Record Metadata |
|
✓ |
✓ | |||
|
Edit Non-Record Metadata |
|
✓ |
✓ |
✓ |
✓ | |
|
Edit Record Metadata |
|
✓ |
✓ |
✓ |
✓ | |
|
Vital Records | ||||||
|
Cycle Vital Records |
|
✓ |
✓ |
✓ |
✓ | |
|
Planning Review Cycles |
|
✓ |
✓ |
✓ |
✓ | |
|
Update Vital Record Cycle Information |
|
✓ |
✓ | |||
|
References and Links | ||||||
|
Change or Delete References |
|
✓ |
✓ | |||
|
Delete Links |
|
✓ |
✓ | |||
|
Events | ||||||
|
Add Modify Event Dates |
|
✓ |
✓ |
✓ |
✓ | |
|
Create Modify Destroy Events |
|
✓ |
✓ | |||
|
Cutoff | ||||||
|
Approve Records Scheduled for Cutoff |
|
✓ |
✓ | |||
|
Create Modify Destroy in Cutoff Folders |
|
✓ |
✓ | |||
|
Disposition and Transfers | ||||||
|
Authorize Nominated Transfers |
|
✓ |
✓ | |||
|
Authorize All Transfers |
|
✓ |
✓ | |||
|
Delete Records |
|
✓ |
✓ | |||
|
Destroy Records |
|
✓ |
✓ | |||
|
Destroy Records Scheduled for Destruction |
|
✓ |
✓ | |||
|
Manually Change Disposition Dates |
|
✓ |
✓ | |||
|
Trigger An Event |
|
✓ |
✓ | |||
|
Update Trigger Dates |
|
✓ |
✓ | |||
|
Hold Controls | ||||||
|
Extend Retention Period Or Freeze |
|
✓ |
✓ | |||
|
Unfreeze |
|
✓ |
✓ | |||
|
View Update Reasons for Freeze |
|
✓ |
✓ | |||
|
Audit | ||||||
|
Access Audit |
|
✓ |
✓ | |||
|
Delete Audit |
|
✓ |
✓ | |||
|
Declare Audit As Record |
|
✓ |
✓ | |||
|
Enable Disable Audit By Types |
|
✓ |
✓ | |||
|
Export Audit |
|
✓ |
✓ | |||
|
Select Audit Metadata |
|
✓ |
✓ | |||
|
Roles and Access Rights | ||||||
|
Create Modify Destroy Roles |
|
✓ |
✓ | |||
|
Create Modify Destroy Users and Groups |
|
✓ |
✓ | |||
|
Display Rights Report |
|
✓ |
✓ | |||
|
Manage Access Controls |
|
✓ | ||||
|
Manage Access Rights |
|
✓ |
✓ | |||
|
Password Control |
|
✓ |
✓ | |||
|
File Plan Metadata, Lists, and E-mail | ||||||
|
Attach Rules to Metadata Properties |
|
✓ |
✓ | |||
|
Create and Associate Selection Lists |
|
✓ |
✓ | |||
|
Create Modify Destroy File Plan Metadata |
|
✓ |
✓ | |||
|
Create Modify Destroy File Plan Types |
|
✓ |
✓ | |||
|
Create Modify Destroy Record Types |
|
✓ |
✓ | |||
|
Create Modify Destroy Reference Types |
|
✓ |
✓ | |||
|
Edit Selection Lists |
|
✓ |
✓ | |||
|
Make Optional Parameters Mandatory |
|
✓ |
✓ | |||
|
Map E-mail Metadata |
|
✓ |
✓ | |||
|
Classified Records | ||||||
|
Create Modify Destroy Classification Guides |
|
✓ |
✓ |
✓ | ||
|
Create Modify Destroy Time Frames |
|
✓ |
✓ | |||
|
Map Classification Guide Metadata |
|
✓ |
✓ | |||
|
Update Classification Dates |
|
✓ |
✓ |
✓ | ||
|
Update Exemption Categories |
|
✓ |
✓ |
✓ | ||
|
Upgrade Downgrade and Declassify Records |
|
✓ |
✓ |
✓ |
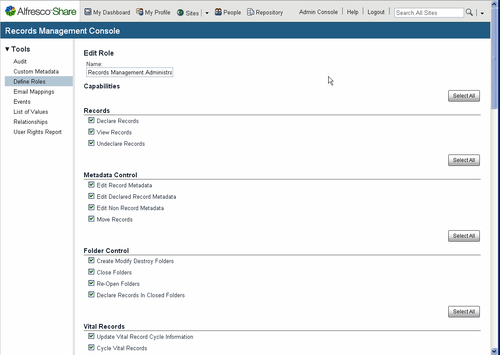
A role shown within the Define Roles tool can be edited by first highlighting the role name in the first column on the tool and then clicking on the Edit Role button.
On the Edit Role page, it is possible to edit the permissions that are assigned to the role. Because there are so many permissions, they have been grouped into related feature categories. It is possible to select all permissions of a feature category by selecting the Select All button to the upper-right of that group of entries.
After the new permission settings for the role is complete, we can then click on the Save button at the bottom of the page to update the settings.
Note that there is no user interface to create new permissions, only the ability to assign or remove permission settings for a given role:
A new role can be created by clicking on the New Role button in the Management Console. We note that the pages for creating and editing roles are very similar. When creating a new role, it is necessary to assign a unique name for the role and to then fill out the checkboxes for permissions that are to be assigned to the role.
When we're finished, we press the Create button. The new role will be created and added to the list of available roles. You might be wondering how do we then associate a group with this new role, and do we then need to manually create a group and associate it with the role? It turns out that we don't need to worry about any of that.
If, after creating a new role, we go to the Share Admin Console and navigate into the Groups area, we'll see that a new group has been created with the same name as the new role name that we just created. The group and role are automatically linked.
We can also go over to the Alfresco JSF Explorer client and look at the access controls that are set on that space after creating the new role. When we do that, we can verify that the access controls have automatically been applied to the File Plan root node.
Existing roles can be deleted by clicking on the Delete Role button in the Management Console.
If we try deleting the new role that we just created, we get a popup message that the role was successfully deleted. If we then go back and look in the Groups tool in the Administration Console, we'll see that the group has also been removed. Similarly, if we go to the Explorer client and check the access control entries for the File Plan root node, we'll see that the entry for the new role that we created has now been removed.
So, we see that, behind the scenes, the Records Management console is automatically keeping the Records Management groups, roles, and access control entry information in sync for us.