We now have a good understanding of the elements that go into defining a content model, and we've seen a few code snippets that show examples of each of the element types, but let's now try to bring all the pieces together by looking at the steps needed to define a new content model from scratch.
Our main goal with the example that we will walk through next is to see what's involved in creating a content model. Therefore, at this point, let's not focus too much on the details of exact properties and metadata. When we look at the File Plan later, we'll want to be more thorough in our analysis. For now, we'll focus on a very high-level outline of the documents within a fictitious company that we will call Typical Company, Inc, and that we will abbreviate as TC.
Before we even start thinking about what sort of XML we need to put together for the TC model description file, it will be a lot easier and quicker overall if we first carefully design what the structure of our content model will look like.
The model that we'll define needs to identify the document types that we will manage. We aren't concerned with the Records Management part of the puzzle just yet. In a later section in this chapter, we'll look in detail at the structure of the Records Management Content Model and see how any document or content type in Alfresco can be placed under Records Management.
A typical company is comprised of a number of departments, and the types of documents in each of those departments are distinctly different. We will classify our documents primarily along department lines. Finance, for example, deals with documents related to general accounting, accounts receivable, accounts payable, payroll, and taxes, to name a few. Whereas, the Legal department has documents related to contracts, litigation, and patents. The metadata associated with each of these different types of documents varies widely.
For the TC model, we will create a base content type called tc:generalDoc. tc:generalDoc is actually a child type of cm:content. By inheriting from cm:content, we will automatically have access to the mechanics for storing and managing arbitrary binary content, like Microsoft Office documents, PDF files, images, and text files. We will also make use of a few aspects that are already defined within the standard Alfresco Content Model. cm:auditable is one of them. This aspect taps into the auditing capability of Alfresco. With it, we can track detailed information about any changes that happen to the documents, such as who made the change, when the change was made, and exactly what was changed. cm:titled is another aspect that tc:generalDoc inherits from. It defines the properties in a standard way for the document title and description. The following diagram shows the relationship between types and aspects for the TC model:
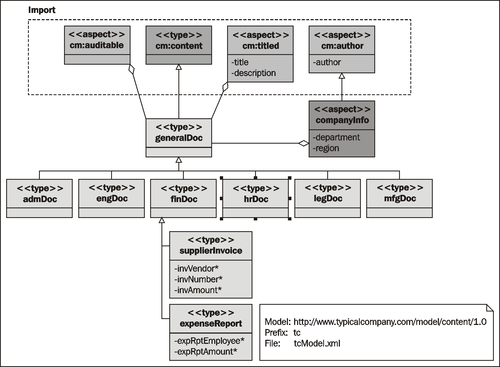
tc:generalDoc also inherits from the aspect tc:companyInfo properties that maintain the author name, the department, and the global regions in which the company operates. The tc:companyInfo aspect is defined in the TC model. tc:companyInfo is a child of a pre-existing aspect called cm:author, from which it inherits the property for the author name.
Let's divide our base type hierarchy pretty much along department lines. For now, let us consider the documents used within each of the company's six departments (Administration, Engineering, Finance, Human Resources, Legal, and Manufacturing) as the primary document types. These six new document type groups all inherit from tc:generalDoc. Metadata that is relevant across the entire group of documents can be inserted into these types.
To avoid making this example too complex, we will limit ourselves to looking at two content types specific to the Finance department — invoices and expense reports. To do that, we will create two types, namely, tc:supplierInvoice and tc:expenseReport, that both inherit from the type tc:finDoc.
Each model in Alfresco is defined within a single XML model file. We'll call the file for the model that we've just designed tcModel.xml. This custom model file needs to be deployed into the directory tomcatsharedclassesalfrescoextensionmodel when it is complete. Let's look in detail now at the contents of this model definition file.
The file begins with an XML declaration tag. Next, the<model> tag defines the name for the model. This tag encloses the entire model definition. Descriptor information for the model includes the<description>, <author>, and<version> tags.
Note
To avoid potential problems when defining the model name, you should choose a name that is in lowercase and does not contain any spaces or special characters.
<?xml version="1.0" encoding="UTF-8"?>
<!-- Definition of new Model -->
<model name="tc:typicalcompany" xmlns="http://www.alfresco.org/model/dictionary/1.0">
<!-- Optional meta-data about the model -->
<description>Typical Company Model</description>
<author>Dick Weisinger</author>
<version>1.0</version>
The definitions from other models, that this model references, are imported. In our model, we will create properties that reference basic Alfresco content data types defined in the Dictionary model. We also inherit from types and aspects that are defined in the standard Alfresco Content Model. Both of these models are imported here. Any existing model file could be potentially imported in order to reuse previously defined elements.
Each import reference to the external content model includes a long-name uri and a short-name prefix. The prefix is used as a shorthand that is pre-appended to element names from these external models to identify clearly what their origin is:
<!-- Imports are required to allow references to definitions in other models -->
<imports>
<!-- Import Alfresco Dictionary Definitions -->
<import uri="http://www.alfresco.org/model/dictionary/1.0" prefix="d"/>
<!-- Import Alfresco Content Domain Model Definitions -->
<import uri="http://www.alfresco.org/model/content/1.0" prefix="cm"/>
</imports>
In a similar way to the syntax used to define the import of external models, we next define the long and short names for this namespace. The uri typically identifies the company or individual by whom the namespace is managed. For Typical Company, we will use the prefix
By convention, the uri for the model namespace typically ends with the version number of the model. The prefix is shorthand to minimize the possibility of naming clashes with the names of elements in other models. The prefix is being bound to this uri for use in this file. The uri is the true identifier for the namespace. If you were to import this file later into another model definition file, you may decide to use a different prefix in that file to refer to this same uri, but it is best practice to consistently use the same prefix across all files:
<namespaces>
<namespace uri="http://www.typicalcompany.com/model/content/1.0" prefix="tc"/>
</namespaces>
Next, we get into the actual definition of the various parts of the content model. We start with the definition of the global constraints that will be used within the model.
For the TC model, we will define a single constraint. This constraint will later be associated with the tc:region property that we define in the tc:companyInfo aspect. This constraint, tc:regionList, is a list of global regions that Typical Company breaks down as its sales regions:
<constraints>
<constraint name="tc:regionList" type="LIST">
<title>List of Company Regions</title>
<parameter name="allowedValues">
<list>
<value>North East</value>
<value>MidWest</value>
<value>South</value>
<value>South West</value>
<value>West</value>
<value>Europe</value>
<value>Asia</value>
<value>South America</value>
</list>
</parameter>
<parameter name="caseSensitive"><value>true</value></parameter>
</constraint>
</constraints>
Next, we define the types for the model. The first type declared is tc:generalDoc. This type inherits from the standard Content Model type cm:content. Because of that, all properties defined by cm:content will come along as part of this definition. In addition to that, tc:generalDoc also applies a number of mandatory-aspects. These aspects are applied immediately whenever a node of this content type is created.
For example, the aspect cm:auditable brings with it properties used for auditing purposes like cm:created, cm:creator, cm:modified, cm:modifier, and the date and time accessed, cm:accessed. The aspect cm:titled brings with it the properties cm:title and cm:description:
<types>
<type name="tc:generalDoc">
<title>General Document</title>
<parent>cm:content</parent>
<archive>true</archive>
<mandatory-aspects>
<aspect>cm:auditable</aspect>
<aspect>cm:titled</aspect>
<aspect>tc:companyInfo</aspect>
</mandatory-aspects>
</type>
Next, we define the types that inherit from tc:generalDoc:
<type name="tc:admDoc">
<title>Administrative Document</title>
<parent>tc:generalDoc</parent>
</type>
<type name="tc:engDoc">
<title>Engineering Document</title>
<parent>tc:generalDoc</parent>
</type>
<type name="tc:finDoc">
<title>Financial Document</title>
<parent>tc:generalDoc</parent>
</type>
<type name="tc:insDoc">
<title>Insurance Document</title>
<parent>tc:generalDoc</parent>
</type>
<type name="tc:legDoc">
<title>Legal Document</title>
<parent>tc:generalDoc</parent>
</type>
<type name="tc:mfgDoc">
<title>Manufacturing Document</title>
<parent>tc:generalDoc</parent>
</type>
Next, we define the two special content types that inherit from the tc:finDoc type used for financial documents: tc:supplierInvoice and tc:expenseReport. Note that all the properties defined for these types are specified as mandatory:
<type name="tc:supplierInvoice">
<title>Supplier Invoice</title>
<parent>tc:finDoc</parent>
<properties>
<property name="tc:invVendor">
<title>Vendor for Invoice</title>
<type>d:text</type>
<mandatory>true</mandatory>
<index enabled="true">
<atomic>true</atomic>
<stored>false</stored>
<tokenised>false</tokenised>
</index>
</property>
<property name="tc:invNumber">
<title>Invoice Number</title>
<type>d:int</type>
<mandatory>true</mandatory>
</property>
<property name="tc:invAmount">
<title>Invoice Amount</title>
<type>d:double</type>
<mandatory>true</mandatory>
</property>
</properties>
</type>
<type name="tc:expenseReport">
<title>Expense Report</title>
<parent>tc:finDoc</parent>
<properties>
<property name="tc:expRptEmployee">
<title>Employee Reporting Expense Report</title>
<type>d:text</type>
<mandatory>true</mandatory>
<index enabled="true">
<atomic>true</atomic>
<stored>false</stored>
<tokenised>false</tokenised>
</index>
</property>
<property name="tc:expRptAmount">
<title>Amount of Expense Report</title>
<type>d:double</type>
<mandatory>true</mandatory>
</property>
</properties>
</type>
</types>
Finally, we define the custom aspects that are used in the TC Content Model. We have a single new aspect, tc:companyInfo, which is an aspect that inherits from the parent aspect cm:author. This aspect has two properties, namely, tc:department and tc:region:
<aspects>
<aspect name="tc:companyInfo">
<title>Department/Region Source information</title>
<parent>cm:author</parent>
<properties>
<property name="tc:department">
<title>Department</title>
<type>d:mltext</type>
<index enabled="true">
<atomic>true</atomic>
<stored>false</stored>
<tokenised>false</tokenised>
</index>
</property>
<property name="tc:region">
<title>Region</title>
<type>d:text</type>
<constraints>
<constraint ref="tc:regionList" />
</constraints>
</property>
</properties>
</aspect>
</aspects>
</model>
With our content model definition ready, we can now go ahead and install it into Alfresco. There are two options for doing this: bootstrap deployment and dynamic deployment.
With bootstrap deployment, the new model is recognized and automatically installed when the Alfresco server starts. Usually, when a model is fully debugged and ready, it will be deployed in this way. The most efficient way to distribute a model to others is by defining the files for bootstrap deployment.
Let's look at how bootstrap deployment works. In the previous section, we created the model file tcModel.xml and saved it into the extension area tomcatsharedclassesalfrescoextensionmodel. However, Alfresco won't automatically recognize the model file without a Spring definition file first referencing it. When the server starts, Spring looks for context configuration files that end in -context.xml. For the model file to be picked up, it needs to be referenced from a Spring context file.
We will create a Spring context file called typicalcompany-model-context.xml that references the new content and save it to the tomcatsharedclassesalfrescoextension
directory. In this file, we define a Java bean with a unique id called typicalcompany.dictionaryBootstrap. The definition specifies the location of our model file tcModel.xml. We also reference a properties file to hold any labels associated with the model definition. The properties file is called typicalcompany-model.properties
and is stored in the same directory as the
tcModel.xml
file. Note that the model file reference includes the complete filename with the .xml extension. However, when referring to the labels file, we need to omit the .properties extension. If this isn't done, these files won't be properly identified. The context file looks like this:
<?xml version='1.0' encoding='UTF-8'?>
<!DOCTYPE beans PUBLIC '-//SPRING//DTD BEAN//EN' 'http://www.springframework.org/dtd/spring-beans.dtd'>
<beans>
<!-- Registration of typical company content models -->
<bean id="typicalcompany.dictionaryBootstrap" parent="dictionaryModelBootstrap" depends- on="dictionaryBootstrap">
<property name="models">
<list>
<value>alfresco/extension/model/tcModel.xml</value>
</list>
</property>
<property name="labels">
<list>
<value>alfresco/extension/model/typicalcompany- model</value>
</list>
</property>
</bean>
</beans>
There isn't much in the properties file right now. If needed, more can be added to this file later:
tc_typicalcompany.description=Typical Company Model
An alternative deployment method to the bootstrap method we just described is dynamic deployment. Dynamic deployment lets you iteratively develop and test the creation of your new content model without having to continually stop and restart the server to test your new changes.
Instead of referencing the model in a configuration file read on server startup, the content model file is deployed directly to the content repository. This is done by first uploading the model file into the repository folder Company Home Data DictionaryModels. Beginning in Share version 3.2R, full access to the Alfresco repository is now available directly from Share, and starting with version 3.3, access to the Alfresco repository in Share is turned on by default.
We can access the Alfresco repository via the Repository link along the top of the Share window. Once in the repository, we can then navigate to the Data DictionaryModels folder. If you have already installed the new content model via the bootstrap approach described in the previous section, and if you would like to try using the dynamic method to install a model using the same type name, first remove any content you had created of that type, remove the model bootstrap files, and then upload the tcModel.xml
file to the
Models
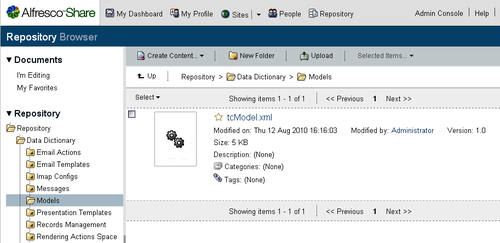
Once the file is uploaded, bring up the dialog to edit the document metadata. In the list of metadata, we can find the Model Active checkbox. We can check that box to activate the model:
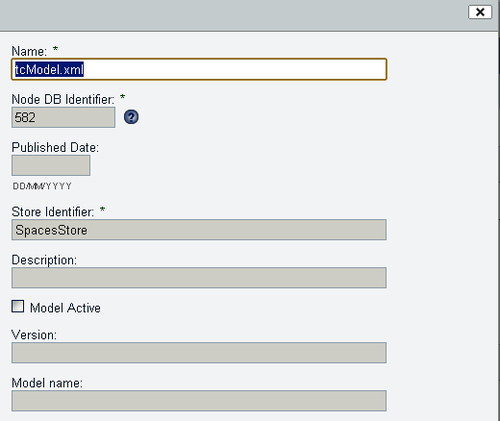
Once the Model Active field is set, the model will become available for use. Each time you subsequently upload a new copy of the model file or edit the XML in the file via the Share inline edit option, the updated model is re-registered and re-activated immediately after being saved. This makes it easy to do interactive development on a model without the need to continually restart the system after every change to the model.
To deactivate a model added via the repository, uncheck the Model Active metadata field. To completely delete the model, remove the model file from the repository.
Note
A content model can be removed only if there are no nodes in the repository that are currently associated with the model. Removing property definitions from the model and then saving the model when content is currently stored with those properties will cause errors. It's best to use a development environment during the iterative process of first building a content model.
Even though the new model is deployed, we're not able to immediately see any signs of it in the Share user interface. By default, the only content type that can be created in Share is of type cm:content. New models aren't of much use if we aren't able to access them from the user interface. But we can change that.
When we upload new content to the Document Library area of a site, we are presented with a Flash-based form that allows us to navigate to a local directory and to then select multiple files for upload. By default, there are no options on this form that allow the user to select which content type will be assigned to the files when they are uploaded.
There are two files specific to the Flash-based upload form that need to be overridden to give us the option of selecting from additional content types on upload. The override files need to be placed in the tomcatsharedclassesalfrescoweb-extensionsite-webscriptsorgalfrescocomponentsupload directory.
The first one is a JavaScript file that contains a function that defines the array of allowed content types. This is the only function contained in this file. If we decide to expose only invoices and expense report content types from the TC model, the file flash-upload.get.js will be modified to look something like the following:
function getContentTypes()
{
// TODO: Data webscript call to return list of available types
var contentTypes = [
{
id: "cm:content",
value: "type.cm_content"
},
{
id: "tc:supplierInvoice",
value: "type.tc_invoice"
},
{
id: "tc:expenseReport",
value: "type.tc_expense"
}
];
return contentTypes;
}
model.contentTypes = getContentTypes();
Each content type element of the JavaScript array has a value that refers to the label of string in a properties file. The value for the id is the name of the content type that will be displayed. The second file that needs to be defined is the properties file flash-upload.get.properties. First we copy the contents of the original file from tomcatwebappsshareWEB-INFclassesalfrescosite-webscriptsorgalfrescocomponentsupload and then we add the following lines to the bottom of the file:
type.tc_general=Company General
type.tc_adm=Administration
type.tc_eng=Engineering
type.tc_fin=Finance
type.tc_ins=Insurance
type.tc_leg=Legal
type.tc_mfg=Manufacturing
type.tc_invoice=Invoice
type.tc_expense=Expense Report
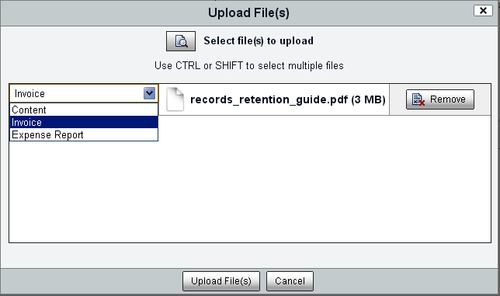
With these files in place, when we now go to upload new content, we see the changes reflected in the upload form. A drop-down is added that allows the user to select from additional content types:
After uploading new content to the repository, one of the actions available is to be able to change the type of that content. For example, if we uploaded a file and assigned the file to be of type cm:content, we could later change the type to tc:expenseReport.
Again, by default, there are no mappings defined that allow changes between different content types. If you select the Change Type action, a dialog is displayed, but no change selections are available.
Options for the Change Type action mappings can be made in the share-config-custom.xml file found in the tomcatsharedclassesalfrescoweb-extensions directory.
When we look in this file, we find a section of it with the following code:
<types>
<type name="cm:content">
</type>
<type name="cm:folder">
</type>
</types>
This is the section of the code that we want to change. We will add<subtype> elements within the cm:content type block to define the mapping. Since tc:supplierInvoice and tc:expenseReport are content types that inherit from cm:content, it is possible to change nodes that have been assigned cm:content. Changing the type from something like tc:supplierInvoice back to an ancestor type like cm:content, which has fewer properties, isn't allowed:
<types>
<type name="cm:content">
<subtype name="tc:supplierInvoice" />
<subtype name="tc:expenseReport" />
</type>
<type name="cm:folder">
</type>
</types>
The way this mapping works is that when the Change Type action is selected for a document of type cm:content, the subtypes defined here for that type will be displayed from the dialog dropdown. If we then select the Change Type action for a document of any type other than cm:content, no change options will be available.
For example, while this isn't the behavior that we want, to demonstrate more clearly how the content change mapping works, consider the following change mapping type definitions:
<types>
<type name="cm:content">
subtype name="tc:generalDoc" />
</type>
<type name="cm:generalDoc">
<subtype name="tc:supplierInvoice" />
<subtype name="tc:expenseReport" />
</type>
<type name="cm:folder">
</type>
</types>
In this case, we are able to change the content type from cm:content to tc:generalDoc, but no other type directly, while a document of type tc:generalDoc can be changed to either type tc:supplierInvoice or tc:expenseReport.
Going back to the first definition, if we make this change to the configuration file, Change Type options will begin to appear in the dialog. That's great, but the text that appears for the items in the drop-down list will show items like tc_supplierInvoice and tc_expenseReport. We need to create a property file with the mappings that will correctly define the text labels for these items.
To do that, we first create the property file that contains the type labels for our new model. We can create a new file tcmodel.properties and place this file in the tomcatsharedclassesalfrescoweb-extensionmessages directory:
type.tc_generalDoc=Company General
type.tc_admDoc=Administration Document
type.tc_engDoc=Engineering Document
type.tc_finDoc=Finance Document
type.tc_insDoc=Insurance Document
type.tc_legDoc=Legal Document
type.tc_mfgDoc=Manufacturing Document
type.tc_supplierInvoice=Invoice Document
type.tc_expenseReport=Expense Report Document
Then we need to wire this file into Spring so that it can be identified as a properties file. We can do that by creating or extending an existing custom-slingshot-application-context.xml file located in the tomcatsharedclassesalfrescoweb-extension directory. This new file will reference the tcmodel.properties file:
<?xml version='1.0' encoding='UTF-8'?>
<!DOCTYPE beans PUBLIC '-//SPRING//DTD BEAN//EN' 'http://www.springframework.org/dtd/spring-beans.dtd'>
<beans>
<bean id="webscripts.resources" class="org.springframework.extensions.surf.util. ResourceBundleBootstrapComponent">
<property name="resourceBundles">
<list>
<value>webscripts.messages.webscripts</value>
<value>alfresco.messages.common</value>
<value>alfresco.messages.slingshot</value>
<value>alfresco.web-extension.messages.tcmodel</value>
</list>
</property>
</bean>
</beans>
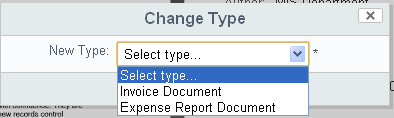
After we add these files and restart the Alfresco server, we are then able to see the changes. If we upload a file of type cm:content and apply the Change Type action, we will see the following dialog that allows us to change the content type. When we select a new type from the list, we will immediately see that the metadata properties available for the document are updated to reflect the new properties available in the type:
Now that we have created the new content type and are able to assign the type from the interface when new content is created, we can verify that the type information is being correctly saved by using the Node Browser to look at the information in the repository.
You will recall that the Node Browser is a tool available in the Alfresco JSF Explorer client from the Administration area of the client. If you bring up the Explorer client and log in as the user admin and navigate to the Node Browser, you will be able to navigate to a new content item that has the new content type.
One way to get a quick reference to the content item is to note that the node reference is appended at the end of the Share URL when you view the details page for the item.
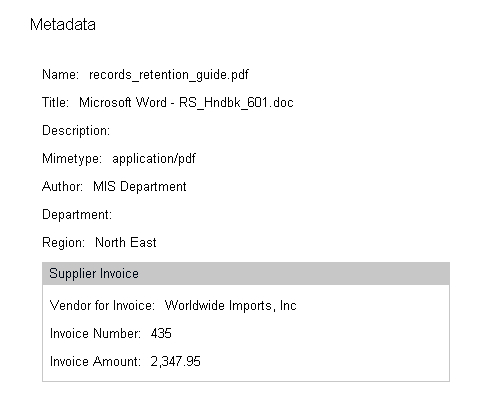
In the Node Browser, we are able to see that the correct type has been applied. We are able to see Properties from the new TC model, as well as Properties inherited from the System and Standard Content models. We can also see all of the Aspects that are currently applied to this node:

You may have noticed that the forms for editing and viewing metadata for the new document type are showing a lot of properties that most users would not be interested in seeing. What's happening is that we have not yet configured a Share property form to display the metadata for our new types, and by default, all the properties for the type are being dumped into the edit and view property forms.
We can configure and customize the property forms so that they look a bit more appealing, and also remove the properties that don't need to be seen by the end user. Custom forms for Share are added to the share-config-custom.xml file. This file is placed in the tomcatsharedclassesalfrescoweb-extension directory.
We will add three new<config> tag elements to this file. The first specifies that we want to be able to include a CSS file to control the look of the form. We will call that file typical.css and it is placed in the tomcatwebappssharecustomform directory:
<!-- Typical company Creation Forms -->
<config>
<forms>
<dependencies>
<css src="/custom/form/typical.css" />
</dependencies>
</forms>
</config>
Next, we include the configuration for the tc:supplierInvoice form. This form will be used to display type properties for all nodes of this type, as determined by the node-type evaluation. In a similar way, we also define a<config> element for the type tc:expenseReport (not shown):
<config evaluator="node-type" condition="tc:supplierInvoice">
<forms>
<form>
<edit-form template="/2-column-edit-form.ftl" />
<field-visibility>
<hide id="sys:node-uuid" />
<hide id="sys:store-protocol" />
<hide id="sys:store-identifier" />
<hide id="sys:node-dbid" />
<hide id="cm:created" />
<hide id="cm:creator" />
<hide id="cm:modified" />
<hide id="cm:modifier" />
<hide id="cm:accessed" />
<hide id="cm:contains" />
<hide id="rma:identifier" />
<hide id="rma:dbUniquenessId" />
<show id="cm:name" />
<show id="cm:title" force="true" />
<show id="cm:description" force="true" />
<show id="mimetype" for-mode="view" />
<show id="cm:author" force="true" />
<show id="tc:department" force="true" />
<show id="tc:region" force="true" />
<show id="tc:invVendor" />
<show id="tc:invNumber" />
<show id="tc:invAmount" />
</field-visibility>
<appearance>
<set id="Invoice Documents"
appearance="bordered-panel" label="Supplier Invoice" />
<field id="tc:region">
<control template="controls/selectone.ftl">
<control-param name="options">North East,MidWest,South,South West,West,Europe,Asia,South America</control-param>
</control>
</field>
<field id="tc:invVendor" set="Invoice Documents" />
<field id="tc:invNumber" set="Invoice Documents" />
<field id="tc:invAmount" set="Invoice Documents" />
</appearance>
</form>
</forms>
</config>
In the form definition, we mark a number of properties as hidden within the<field-visibility> element, and we explicitly mark properties that we want to be visible, like the new tc:invVendor, tc:invNumber, and tc:invAmount properties.
We override the standard template used to display the properties when in edit mode, specifying our own custom template file 2-column-edit-form.ftl. That file is placed into the tomcatsharedclassesalfrescoweb-extensionsite-webscripts directory.
In the<appearance> section of the form definition, a bordered panel is defined by the<set> element and the invoice-specific properties are then grouped into the panel by referring to that element. The panel border will be visible on the default view form, but it won't be displayed with the custom edit form template.
The property tc:region is displayed as a dropdown using the control template called selectone. The elements for the dropdown are listed in the definition of the selectone control.
Note
The form template used here was adopted from the form example available on the Alfresco wiki at http://wiki.alfresco.com/wiki/Forms_Examples
This is the FreeMarker code that is used to define the form display template:
<#import "/org/alfresco/components/form/form.lib.ftl" as formLib />
<#if error?exists>
<div class="error">${error}</div>
<#elseif form?exists>
<#assign formId=args.htmlid + "-form">
<#assign formUI><#if args.formUI??>${args.formUI}<#else>true</#if></#assign>
<#if formUI == "true">
<@formLib.renderFormsRuntime formId=formId />
</#if>
<div id="${formId}-container" class="form-container">
<div class="logoimg"><img class="logoleft" src="/share/custom/form/images/typicallogo.png"><span>Finance Document</span></div>
<#if form.showCaption?exists && form.showCaption>
<div id="${formId}-caption" class="caption freshstart">
<span class="mandatory- indicator">*</span>${msg("form.required.fields")}</div>
</#if>
<#if form.mode != "view">
<form id="${formId}" method="${form.method}" accept- charset="utf-8" enctype="${form.enctype}" action="${form.submissionUrl}">
</#if>
<div id="${formId}-fields" class="form-fields">
<#list form.structure as item>
<#if item.kind == "set">
<@renderSetWithColumns set=item />
<#else>
<@formLib.renderField field=form.fields[item.id] />
</#if>
</#list>
</div>
<#if form.mode != "view">
<@formLib.renderFormButtons formId=formId />
</form>
</#if>
</div>
</#if>
<#macro renderSetWithColumns set>
<#if set.appearance?exists>
<#if set.appearance == "fieldset">
<fieldset><legend>${set.label}</legend>
<#elseif set.appearance == "panel">
<div class="form-panel">
<div class="form-panel-heading">${set.label}</div>
<div class="form-panel-body">
</#if>
</#if>
<#list set.children as item>
<#if item.kind == "set">
<@renderSetWithColumns set=item />
<#else>
<#if (item_index % 2) == 0>
<div class="yui-g"><div class="yui-u first">
<#else>
<div class="yui-u">
</#if>
<@formLib.renderField field=form.fields[item.id] />
</div>
<#if ((item_index % 2) != 0) || !item_has_next></div></#if>
</#if>
</#list>
<#if set.appearance?exists>
<#if set.appearance == "fieldset">
</fieldset>
<#elseif set.appearance == "panel">
</div>
</div>
</#if>
</#if>
</#macro>
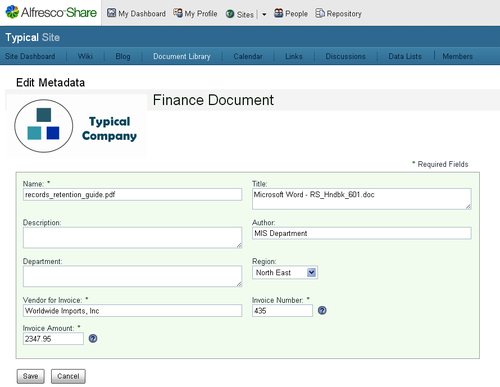
Now, on the details page for a document of type tc:supplierInvoice, we see a form that looks as follows:
The edit form that uses the new custom template for the tc:supplierInvoice type now looks like the following: