Let's now look in greater detail at the steps needed to create a disposition schedule. The disposition schedule is best created and associated with the Category immediately when the Category is created. We'll see below that the addition or editing of a disposition schedule will have some restrictions once Folders and records begin to be placed into the Category.
While strictly not part of the disposition, a review period can be scheduled for records that are filed under a Category. During the creation of the File Plan structure, we saw how reviews could be specified as part of the Category definition.
Once the Category is created, the information that specifies the review period is saved as metadata and can be changed at a later date:
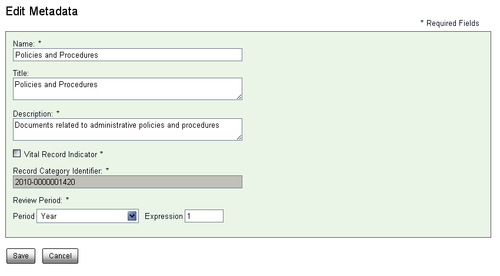
The review period for a record is recurring. That is, after one review is completed, the next review will be scheduled based on the specified frequency of reviews. Reviews are typically associated with vital records. In fact, reviews are mandatory when dealing with vital records. But even for record Categories that will not hold vital records, a review period can be specified.
Based on the review period entered for the Category and the date when the record was filed, the value of a metadata field called the Next Review Date is calculated. The value for the review date can be seen on the details page of the record to be reviewed:

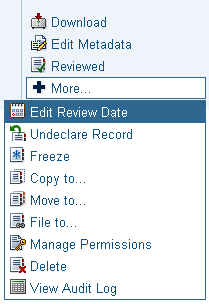
Once a record is reviewed, the next review period for the record is automatically rescheduled. Rescheduling can be done by using the Edit Review Date option:
Once the new Category has been created, the disposition schedule for it should be specified next. That can be done by going to the View details screen for the record Category.
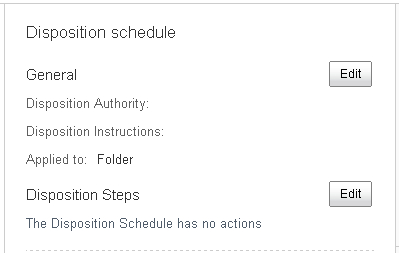
On the details page for the Category, the center section of the screen has an area where the disposition information can be entered. The entry of the information is split into two parts, namely, General and Disposition Steps:
Note
The disposition schedule is attached to a Category and applies to the folders and records under that Category. We will see in Chapter 8 that electronic and the stub placeholders for non-electronic records are both filed in similar ways, and the steps of the disposition are applied identically to both types of records.
In the General section, information is edited by clicking on the first of the two Edit buttons.
On the screen that is displayed next, text labels can be entered that describe the Disposition Authority and Disposition Instructions. The Disposition Authority corresponds to the name of the Authority document or policy with which these instructions comply. The Disposition Instructions is a text label that summarizes the steps that make up the disposition schedule. The label entered here for the Disposition Instructions gets displayed as part of the metadata for each record under this Category to indicate the nature of the disposition.
The Applied to drop-down specifies if the disposition is to be applied at the Folder or at the record level. As discussed earlier, and as we will see below, this flag plays an important role in the functioning of the disposition:

When the disposition is attached at the Folder level, then the date for the next step of the disposition to be run is shown as the Disposition As Of Date field attached at the Folder level and the records within the Folder do not track this date. In the other case, when the disposition is attached at the record level, then the Disposition As Of Date field is part of the metadata for each record under the Category, and the Folders under the Category do not track this field:

After clicking on the second of the two Edit buttons, the one marked Disposition Steps, we see the following screen displayed. Within this screen, the steps for the disposition can be configured:
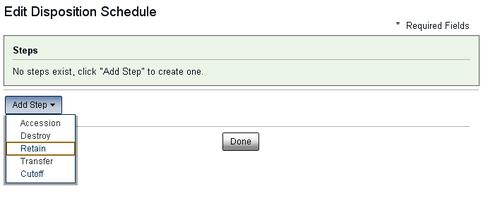
Disposition steps are added sequentially in the order in which they are to be executed for the disposition. There are only five types of steps that can be added, and there are rules about the order in which these step types can be added.
The allowable disposition step types are as follows:
|
Type of disposition Step |
Description |
|---|---|
|
Cutoff |
The point in time from which a retention period begins. |
|
Retain |
A period of time during which the record is held before being destroyed. |
|
Transfer |
The transfer of records from one location to another. |
|
Destroy |
The deletion of content from the record that prevents the reconstruction of it. |
|
Accession |
Accession means to acquire property. In this context, it is the process of transferring both records and their metadata to NARA, the National Archives. This is a step that is reserved for government agencies. |
The rules for adding disposition steps are as follows:
- The first step must be of type Cutoff or Retain
- No two steps in the disposition schedule can be of the same type
- No steps can be added once the Destroy step has been used
In most cases, the disposition schedule is very simple and consists of just two or three steps. The rules are such that it is possible to create nonsensical schedules, such as a disposition with the three steps of Retain-Accession-Cutoff, but in practice, the rules for structuring the steps work quite well.
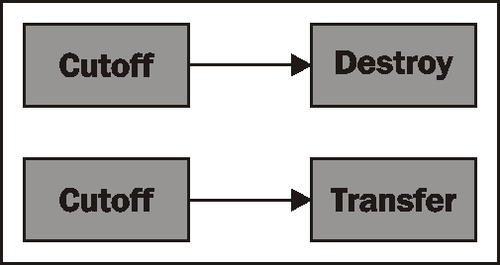
Examples of disposition schedules are shown in the next diagram. Here we see, for example, Cutoff followed by Destroy and Cutoff followed by Transfer:
Next, we will look at the details of how to configure the disposition steps. Built into each step is the notion of a waiting period. The action for the step cannot occur until it is triggered by some event or some amount of time that has elapsed. While one possible step in the disposition schedule is a step type explicitly called Retain, the waiting period of the trigger actually often serves the purpose of modeling retention so that an explicit Retain step is not needed.
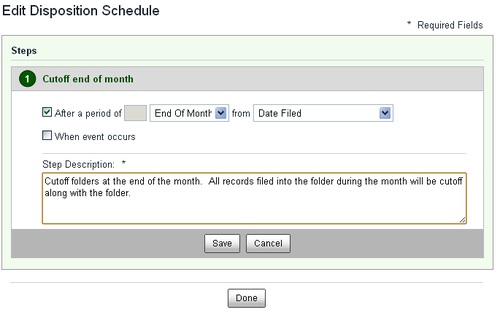
Let's look at a simple yet often recurring disposition schedule. In this case, similar to the example we discussed earlier, consider the schedule for cutoff of a Folder at the end of each month, followed by a one-month retention, and then destruction. We will model the cutoff, retention period, and destruction with just two steps.
First, we select Cutoff as the first step type to add. Next, we configure the cutoff to occur at the end of the month after being filed. This means that Folders under this record Category and all records filed during the month are cutoff at the end of the month. Note that it is mandatory to enter a description on this screen to explain what happens during this step of the disposition. When we have finished adding information for this step, we click on Save:
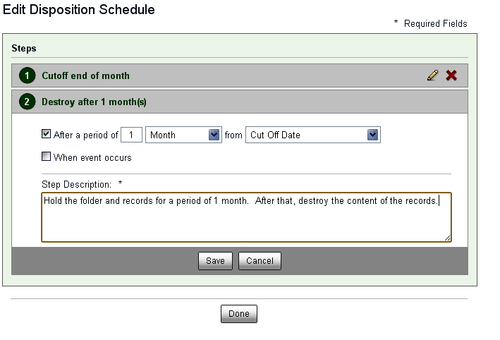
Then, we add the Destroy step. In configuring this step, we need to specify how long the records are retained prior to destruction. Our example calls for a retention period of one month. We can enter that period information, a description for the step, and then finally click on Save.
With that, we have completed the specification for the steps of a simple disposition schedule. We can now click on the Done button. After that, there is nothing else we need to do in setting up the disposition for this Category:
In both of the steps for the disposition that we just created, we used time-based triggers to specify when an action would occur. Cutoff occurred at the end of the month, and destruction occurred after a one month retention.
A time period is specified by entering a value for the time period unit and the period value. To activate the time period fields on the form, it is first necessary to click on the checkbox next to the label After a period of.
The available unit types of Immediately, Day, Week, Month, Quarter, and Year are straightforward to understand. A Week offsets a date by seven days and a Quarter offsets the date by three months. The period value is a multiplier that specifies how many units are to be offset, such as by 2 Quarters or 4 Weeks.
Also easy to understand are the period unit values of End of Month, End of Quarter, and End of Year. It is also possible to specify a period value with these "End of" type units. For example, 2 End of Month means the last day of the next month.
Other available unit types include Financial End of Month, Financial End of Quarter, and Financial End of Year. The calendar for the fiscal year is something that, as we might expect, is configurable. It is set up in a configuration file located in the Alfresco repository source area. By default, these values are specified relative to a fiscal year beginning September 1st. The file to configure the definition for the organization's fiscal year is tomcatwebappsalfrescoWEB-INFclassesalfrescoperiod-type-context.xml.
There is also a unit type called XML Duration. Using this type of format, we can create an arbitrary date offset. XML Duration is based on a standard notation for representing date offsets or durations defined by the standard ISO 8601.
Note
More information about ISO 8601 time and time durations can be found here at http://www.w3.org/TR/xmlschema-2/#adding-durations-to-dateTimes
An ISO 8601 duration is represented as a string in the format PnYnMnDTnHnmnS. "p" is always used at the beginning of the string to mark the string as containing an ISO 8601 time duration. "Y" refers to years; "M" refers to months; "D" refers to days, "T" is used to separate the date from the time; "H" refers to hours; "m" refers to minutes; and "S" refers to seconds. For example, the string "P1M2D" would mean an offset of one month and two days.
Tip
As of Alfresco version 3.3.1, there is a bug in creating disposition steps that does not allow us to enter the XML Duration value.
The period offset is relative to one of the following four events listed in the dialog drop-down:
- The date filed
- The publication date
- The cutoff date
- The disposition action date
The date filed and the publication date are properties that are defined in the aspect called rma:record. Note that the date filed is set the first time that the document is placed into the records File Plan. The date filed is stored in the property rma:dateFiled. Note that this is not the same as the date that the record was declared. When a document is declared a record, the aspect rma:declaredRecord is applied to the document and the property rma:declaredAt within that aspect tracks the date of declaration.
The publication date is the property rma:publicationDate. It is a mandatory property that must be completed before a document can be declared as a record.
The cutoff date is the property rma:cutOffDate. It is attached to the record at the time of cutoff when the aspect rma:cutOff is applied.
The disposition action date refers to the date on which the previous step action was completed.
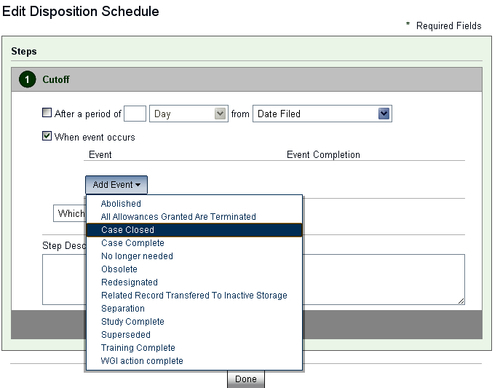
In addition to time-based triggers, it is also possible to specify event-based triggers. To activate the controls on the dialog to specify an event-based trigger, we must first click on the checkbox next to the label When event occurs.
After doing that, the form will dynamically reconfigure itself to expose a button with a drop-down menu. From the list of menu items displayed when clicking on this button, we can select the name of the event that we would like to be able to trigger off of. The values in the drop-down list are strings that will later be used to label a button associated with a record or folder. A user will later click on that button to trigger the action for this step of the disposition.
After selecting the event from the drop-down menu, it will be added to the list of events that can trigger the action:
It is possible to combine a time-based trigger with one or multiple event-based triggers. It is also possible to specify multiple event-based triggers. When more than one trigger is configured, it is necessary to also select a flag to indicate the precedence of the triggers.
The two options for handling precedence are either that the action will not occur until all trigger conditions have been met, or that the action will occur when one of the trigger conditions is met. The two options that we use can be specified in a drop-down that appears immediately below the event-trigger button.
