
In this recipe, we will continue the process started in the two recipes prior to this one and build our application for both development and distribution to the iTunes store.
- Building your application for development.
i. Open your project in Titanium Studio; we are using the
LoanCalcapp from Chapter 1 as an example, however, you may use any project you wish. Ensure that the Application ID in Titanium Studio (on the Edit tab) matches the ID you used when creating your provisioning profiles. In our case, this ID iscom.packtpub.loancalc.ii. Switch across to the Test & Package tab, and choose Run on Device. Titanium Studio should automatically have the iPhone option highlighted. If it doesn't, then you either aren't on a Mac (required) or perhaps don't have the necessary XCode tools installed. You can download XCode from http://developer.apple.com/xcode.
iii. On the file selection icon next to the Upload Provisioning Profile text box, select the development profile you created for
LoanCalc. Presuming you installed your WWDR Certificate and Development Certificate properly as per the previous recipe, you should now see a screen similar to the one shown in the following screenshot: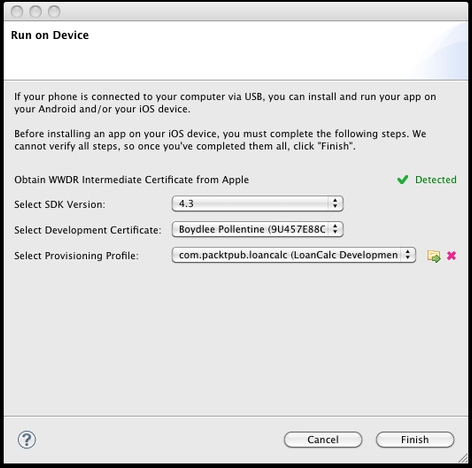
iv. Press the Finish button to have Titanium Studio kick off the build process. During this process your application will be built and added to your list of apps in the iTunes library. You will need to sync your iPhone or iPod Touch in order to get your app running on your device.
- Building your applications for distribution.
i. First, we need to create your new application in iTunes Connect, on the Apple Developer website. Navigate to the iTunes Connect section on the Apple Developer website in your browser and click Manage Applications. The next screen that loads will list all of your current apps (if you have created any). To create a new one, click Add New App in the top left corner. Add in the information requested, including the app name (Packt LoanCalc in our example) and select the
LoanCalcapp from the product identifier list. The SKU can be any code you wish, e.g. packtpub001. Fill in the information on the next two screens with a description, keywords, screenshots, and data about your application. When finished, you should be forwarded to a screen that looks like the one shown: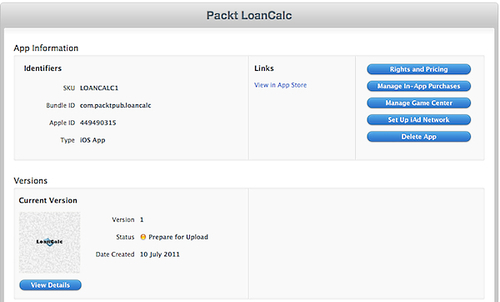
ii. Now, if you're ready to upload, press the View Details button in the bottom left, and on the next page that loads, press the Ready To Upload Binary button that appears in the top right of the screen. Apple will ask you a couple of security questions. Answer these and your App status will changed from Prepare for Upload to Ready for Upload.
iii. Switch back to Titanium`Studio, make sure your project is selected in the Project explorer page, and then select the Distribution button followed by the Distribute – App Store option.
iv. You should now be faced with a similar screen to the one you used to package your app for development testing. Enter in a distribution location (any will do, we have chosen the
Downloadsfolder for this example), and choose your Distribution profile that you saved from the previous recipe. Your Distribute screen in Titanium Studio should now look something like this: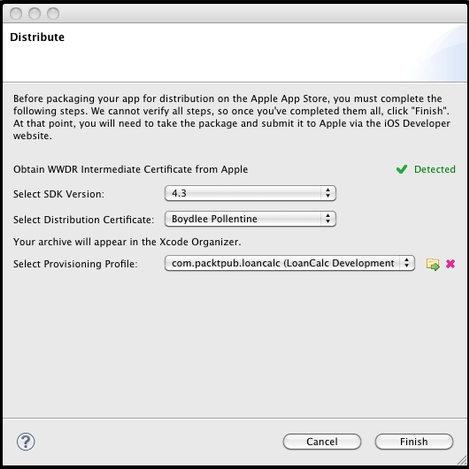
v. Hit the Finish button to start the build process. If you get an error about a missing file in the
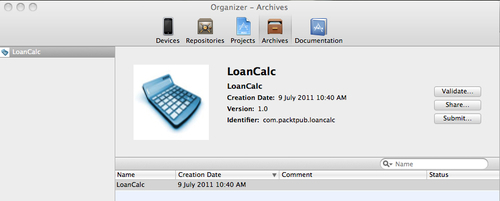
Users/[your username]/Library/MobileDevice/Provisioning Profilesdirectory, then simply copy the Distribution profile saved on your computer to this directory and rename it to the name of the missing file in the error dialog.vi. When this process is complete, XCode should load and the Organizer window should appear on screen with your application archived and ready to be submitted to the iTunes store, as seen in the following screenshot:
vii. Hit Submit on this screen and follow the prompts. If everything has been done correctly (and according to Apple's rules), your app should be uploaded to the iTunes server and you should receive email confirmation of it being received within a few minutes!
Note
You can check on the progress of your submission at any time via the iTunes Connect section of the developer program website. Approval usually takes between 1-2 weeks. However, this tends to fluctuate depending on the number of submissions and whether your app is rejected or requires changes before approval will be granted. Apple will send you emails at each stage of the submission cycle, including when you first submit the app, when they start reviewing it, and when they approve or reject it.