We're going to start this chapter with the simplest form of social communication, both in terms of use and in terms of development—e-mail.
If you are intending to follow the entire chapter and build the PhotoShare app then pay careful attention to the first Getting ready section for this recipe, as it will guide you through setting up the project.
To prepare for this recipe, open up Titanium Studio and log in if you have not already done so. If you need to register a new account, you can do so for free directly from within the application. Once you are logged in, click on New Project, and the details window for creating a new project will appear. Enter in PhotoShare
as the name of the app, and fill in the rest of the details with your own information.
Our project has now been created using Titanium Studio. Let's get down to business! Open up the app.js file in your editor and remove all existing code. After you have done that, type in the following and then hit save:
// this sets the background color of the master UIView (when there are no windows/tab groups on it)
Titanium.UI.setBackgroundColor('#000'),

//this variable will hold our image data blob from the device's gallery
var selectedImage = null;

var win1 = Titanium.UI.createWindow({
  title:'Tab 1',
  backgroundImage: 'images/background.jpg'
});

var label = Titanium.UI.createLabel({
  width:  280,
  height: 'auto',
  top: 20,
  left: 20,
  color: '#fff',
  font: {fontSize: 18, fontFamily: 'Helvetica', fontWeight: 'bold'},
  text: 'Photo Share:
Email, Facebook & Twitter'
});
win1.add(label);

var imageThumbnail = Titanium.UI.createImageView({
  width: 100,
  height: 120,
  left: 20,
  top: 90,
  backgroundColor: '#000',
  borderSize: 10,
  borderColor: '#fff'
});
win1.add(imageThumbnail);

var buttonSelectImage = Titanium.UI.createButton({
  width:  100,
  height:  30,
  top: 220,
  left: 20,
  title: 'Choose'
});
buttonSelectImage.addEventListener('click',function(e){
  //obtain an image from the gallery
  Titanium.Media.openPhotoGallery({

    success:function(event)
    {
      selectedImage = event.media;

      // set image view
      Ti.API.debug('Our type was: '+event.mediaType);
      if(event.mediaType == Ti.Media.MEDIA_TYPE_PHOTO)
      {
        imageThumbnail.image = selectedImage;
      }
    },
        cancel:function()
        {
            //user cancelled the action from within
            //the photo gallery
        }
    });
});
win1.add(buttonSelectImage);

var txtTitle = Titanium.UI.createTextField({
    width: 160,
    height: 35,
    left: 140,
    top: 90,
    value: 'Message title...',
    borderStyle: 2,
    backgroundColor: '#fff'
});
win1.add(txtTitle);

var txtMessage = Titanium.UI.createTextArea({
    width: 160,
    height: 120,
    left: 140,
    top: 130,
    value: 'Message text...',
    font: {fontSize: 15},
    borderStyle: 2,
    backgroundColor: '#fff'
});
win1.add(txtMessage);

win1.open();
The previous code lays out our basic application and integrates a simple photo gallery selector, much as we did in the previous chapter (Chapter 4, Enhancing your Apps with Audio, Video, and the Camera). We will now create a new button which will call a function to create and display the e-mail dialog when tapped:
//create your email
function postToEmail() {
  var emailDialog = Titanium.UI.createEmailDialog();
  emailDialog.subject = txtTitle.value;
  emailDialog.toRecipients = ['[email protected]'];
  emailDialog.messageBody = txtMessage.value;
  emailDialog.open();
}

var buttonEmail = Titanium.UI.createButton({
  width:  280,
  height:  35,
  top: 280,
  left: 20,
  title: 'Send Via Email'
});

buttonEmail.addEventListener('click', function(e){
  if(selectedImage != null) {
    postToEmail();
  } else {
    alert('You must select an image first!'),
  }
});

win1.add(buttonEmail);
Once you have completed typing in your source code, run your app in the simulator or on your device. You should be able to select an image from the photo gallery, and then type in a title and message for your e-mail using the text fields. This will happen before clicking on the
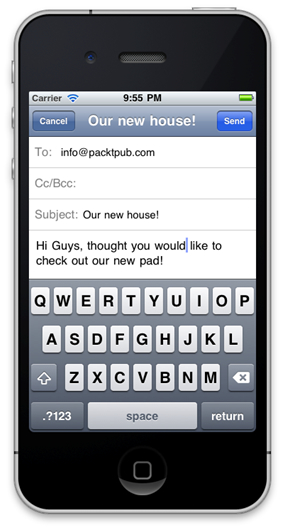
buttonEmail object to launch the e-mail dialog window with your message and title attached. Note that if you are using the simulator and you don't have some photos in the gallery already, the best way to obtain some is by visiting http://images.google.com in mobile Safari, and searching for images. You can then save them to the photo gallery on the simulator by clicking on and holding the image until the Save Image pop-up appears.
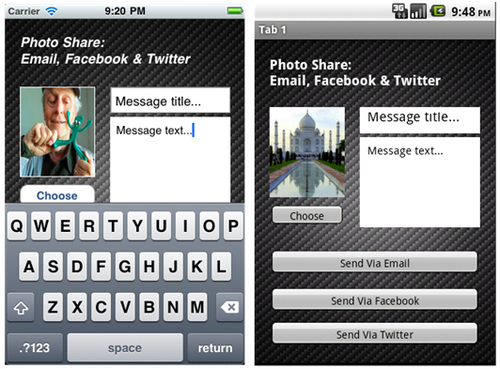
The first block of code is creating our layout view with a single window and a number of basic components, all of which has already been covered in chapters 1 through 4.
The EmailDialog itself is created using the Titanium.UI.
createEmailDialog() method and only requires a few simple parameters in order to be able to send a basic e-mail message. The
subject, messageBody
and toRecipients
parameters are standard e-mail fields. While it is not necessary to provide these fields in order to launch an e-mail dialog, you will normally provide at least one or two of these as a matter of course. While the subject and messageBody fields are both simple strings, it should be noted that the toRecipients parameter is actually a basic array. You can add multiple recipients by simply adding another array parameter. For example, if we chose to send our e-mail to two different users, we could write the following:
    emailDialog.toRecipients = ['[email protected]',
                                '[email protected]'];
You can also add BCC or CC recipients in the same manner, using the
ccRecipients and
bccRecipients methods of the e-mail dialog respectively. Finally, we launch the e-mail dialog using the
open() method, at which point you should see something like the following standard e-mail dialog appear in your application: