The OptionDialog is a modal-only component that allows you to show one or more options to a user, usually along with a cancel option, which closes the dialog. We are going to create this component and use it to present the user with an option to choose an image from the camera or the device's photo library.
If you are intending to follow the entire chapter and build the Holiday Memories app, then pay careful attention to the first Getting ready section for this recipe, as it will guide you through setting up the project.
To prepare for this recipe, open up Titanium Studio and log in if you have not already done so. If you need to register a new account, you can do so for free directly from within the application. Once you are logged in, click on New Project, and the details window for creating a new project will appear. Enter in Holiday Memories as the name of the app, and fill in the rest of the details with your own information.
Pay attention to the app identifier, which is written normally in reverse domain notation (that is com.packtpub.holidaymemories). This identifier cannot be easily changed after the project is created and you will need to match it exactly when creating provisioning profiles for distributing your apps later on. You can obtain all of the images used in this recipe, and indeed the entire chapter, by downloading the following source files:
Now our project has been created using Titanium Studio. Let's get down to business! Open up the app.js file in your editor and remove all existing code. After you have done that, type in the following and then hit save:
//this sets the background color of the master UIView (when there are no windows/tab groups on it)
Titanium.UI.setBackgroundColor('#000'),

//create tab group
var tabGroup = Titanium.UI.createTabGroup();

//
//create base UI tab and root window
//
var win1 = Titanium.UI.createWindow({
  title:'Photos',
  backgroundImage: 'images/background.png',
  barColor: '#000',
  url: 'photos.js'
});
var tab1 = Titanium.UI.createTab({
  icon:'images/photos.png',
  title:'Photos',
  window:win1
});

//
//create tab and root window
//
var win2 = Titanium.UI.createWindow({
  title:'Video',
  backgroundImage: 'images/background.png',
  barColor: '#000'
});
var tab2 = Titanium.UI.createTab({
  icon:'images/movies.png',
  title:'Video',
  window:win2
});

//
//create tab and root window
//
var win3 = Titanium.UI.createWindow({
  title:'Audio',
  backgroundImage: 'images/background.png',
  barColor: '#000'
});
var tab3 = Titanium.UI.createTab({
  icon:'images/audio.png',
  title:'Audio',
  window:win3
});

//
//add tabs
//
tabGroup.addTab(tab1);
tabGroup.addTab(tab2);
tabGroup.addTab(tab3);


//open tab group
tabGroup.open();
Now we need to create our first Window's JavaScript file that we will call photo.js. Create this blank file in your Resources folder and open it in your IDE. Enter in the following code to create the "Choose Photo" button which will instantiate your OptionDialog:
var win = Titanium.UI.currentWindow;

//our dialog with the options of where to get an
//image from
var dialog = Titanium.UI.createOptionDialog({
  title: 'Choose an image source...',
  options: ['Camera','Photo Gallery', 'Cancel'],
  cancel:2
});

//add event listener
dialog.addEventListener('click',function(e) {
  Ti.API.info('You selected ' + e.index);
});

//choose a photo button
var btnGetPhoto = Titanium.UI.createButton({
  title: 'Choose'
});
btnGetPhoto.addEventListener('click', function(e){
  dialog.show();
});

//set the right nav button to our btnGetPhoto object
//note that we're checking the osname and changing the
//button location depending on if it's iphone/android
//this is explained further on in the "Platform Differences" chapter
if(Ti.Platform.osname == 'iphone') {
  win.rightNavButton = btnGetPhoto;
}
else {
  //add it to the main window because android does
  //not have 'right nav button'
  btnGetPhoto.right = 20;
  btnGetPhoto.top = 20;
  win.add(btnGetPhoto);
}The code in the first block of code is creating our Navigation view with tabs and windows, all of which has been covered in Chapter 1, Building Apps using Native UI Components and Chapter 2, Working with Local and Remote Data Sources. Our first tab and window use the photo.js file, the contents of which are visible here in our second block of code on the previous page.
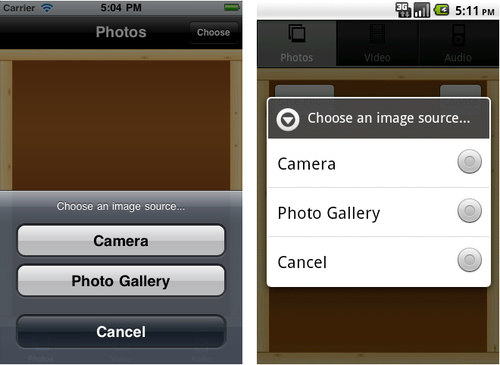
The OptionDialog itself is created using the Titanium.UI.createOptionDialog() method and only requires a few simple parameters. The title parameter, in this case, appears at the top of your button options and is there to just give your user a brief message about what their chosen option will be used for. In our case, we're simply notifying them that we'll be using their chosen option to launch the appropriate image capture application. The options array is the important property here and contains all of the button selections you wish to present to the user. Note that we have also included a cancel item in our array, and there is a corresponding cancel property with the same index as part of our createOptionDialog()
. This will draw the button style for cancel a little differently when our OptionDialog is presented on screen.
Finally, we added an event listener to our OptionDialog and we are outputting the chosen button index to the Titanium Studio console, using the e.index property. We will use this flag in our next recipe to launch either the camera or photo gallery depending on the user's selection. The OptionDialog shown next provides the user with two image source options: