In order to track our movements and draw a route on the map, we need to create an array of points, each with its own latitude and longitude value. The MapView will take in this array of points as a property called route, and draw a series of lines to provide a visual representation of the route to the user.
In this recipe, we will create a timer that records our location every minute, and adds it to the points array. When each new point is recorded, we will access the Google Directions API to determine the distance and add that to our overall tally of how far we have traveled.
Note
Note that this recipe will not work on Android devices, as there is currently no support for Android routing in Titanium. However, it will work as described here for the iPhone and iPod Touch. There is an unsupported method of routing in Android, which you can read about at http://bit.ly/pUq2v2. You will need to use an actual iPhone or iPod Touch device to test this recipe, as the emulator will not be able to get your current location.
Complete source code for this recipe can be found in the /Chapter 3/Recipe 6 folder.
Within your mapView click event, after the console logging to determine which button was tapped and which annotation, type in the following code:
//create the event listener for when annotations
//are tapped on the map
mapview.addEventListener('click', function(e){
  Ti.API.info('Annotation id that was tapped: ' + e.source.id);
  Ti.API.info('Annotation button source that was tapped: ' +      e.clicksource);
  Ti.API.info('Annotation button title that was tapped: ' + e.title);

  if(timerStarted == false && (e.clicksource == 'rightButton' && e.title == 'Start location'))
  {
    Ti.API.info('Timer will start...'),
    points = [];

    //set our first point
    Ti.Geolocation.forwardGeocoder(txtStartLocation.value, function(e){
      points.push({latitude: e.coords.latitude,
        longitude: e.coords.longitude
      });
      route.points = points;

      //add route to our mapview object
      mapview.addRoute(route);

      timerStarted = true;

      //start our timer and refresh it every minute
      //1 minute = 60,000 milliseconds
      intTimer = setInterval(recordCurrentLocation,
      60000);
    });

  }
  else
  {
    //stop any running timer
    if(timerStarted == true &&
    (e.clicksource == 'rightButton'
    && e.title == 'End location'))
    {
      clearInterval(intTimer);
      timerStarted = false;
      alert('You travelled ' + distanceTraveled
      + ' meters!'),
    }
  }
});
There are some variables we need to create now that need to be globally accessible to this
JavaScript file. Add the following code to the very top of your app.js file:
//create the variables
var timerStarted = false;
var intTimer;

//this array will hold all the latitude and
//longitude points in our route
var points = [];

//this will hold the distance traveled
var distanceTraveled = 0;

//route object
var route = {
  name: 'Exercise Route',
  color: "#00f",
  width: 2
};
Next, we need to create the function for obtaining the user's new current location and determining how far the new location is from our previous location. Create this new function above the click event for the mapView component:
//this function records the current location and
//calculates distance between it and the last location,
//adding that to our overall distance count
function recordCurrentLocation()
{
  Ti.API.info('getting next position...'),
  points.push({latitude:-27.466175,
    longitude:153.030426
  });
  route.points = points;

  //get the current position
  Titanium.Geolocation.getCurrentPosition(function(e) {
    var currLongitude = e.coords.longitude;
    var currLatitude = e.coords.latitude;
    points.push({latitude: e.currLatitude, longitude: e.currLongitude});

    //add new point to route
    route.points = points;

    //remove the old route and add this new one
    mapview.removeRoute(route);
    mapview.addRoute(route);
  });

  //ask google for the distance between this point
  //and the previous point in the points[] array
  var url = 'http://maps.googleapis.com/maps/api/directions/json?travelMode=Walking&origin=' + points[points.length-2].latitude + ',' + points[points.length-2].longitude + '&destination=' + points[points.length-1].latitude + ',' + points[points.length-1].longitude + '&sensor=false';
  var req = Ti.Network.createHTTPClient();
  req.open('GET', url);
  req.setRequestHeader('Content-Type', 'application/json; charset=utf-8'),
  req.onreadystate = function(){};
  req.onload = function()
  {
    //record the distance values
    Ti.API.info(req.responseText);
    var data = JSON.parse(req.responseText);
    Ti.API.info("distance.text " + data.routes[0].legs[0].distance.text);
    Ti.API.info("distance.value " + data.routes[0].legs[0].distance.value);
    distanceTraveled = distanceTraveled + data.routes[0].legs[0].distance.value;
  };
  req.send();
}There are a number of things happening in this recipe, so let's break them down logically into their separate parts. First, we are obtaining the user's current location again on the start button's click event, and adding that as the first point in our points array. In order for our mapView component to use the array of point locations, we need to create a route object. This route object contains the array of points, plus the visual information such as the route's line, color, and thickness.
From there, we are creating a timer using setInterval(). This timer will only start when both the timerStarted variable is set to false, and when we can determine that the button tapped was indeed the right "start" button on one of our annotations.
Our timer is set to execute every 60 seconds, or as required by the code, 60,000 milliseconds. This means that every minute the function called recordCurrentLocation()
will be executed. This function does the processing for determining our current location, and adds the new location to our "points" array. It then performs an HTTP request call to the Google APIs, which performs a distance calculation between our newest point, and the point location that we were at previously. This new distance is added to our total distance variable, called distanceTraveled.
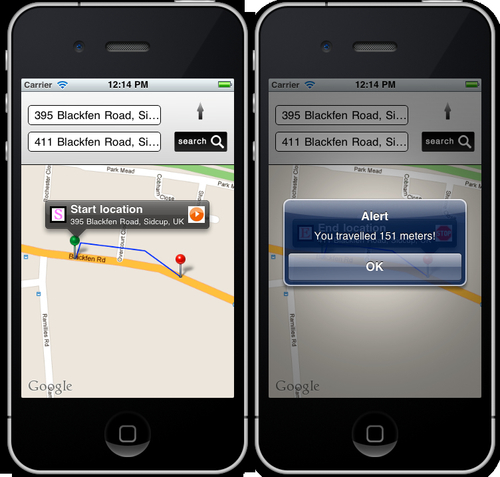
Finally, whenever the user taps the stop button on the end annotation, the timer is stopped and the user is presented with an alertDialog showing the total value for how far they have traveled in meters. The following screenshot shows the route being drawn from our start to end location, and then the alert with the distance traveled when the stop button is tapped.