Lesson 7
Manage User Accounts
Goals
![]() Recognize various user account types and user attributes
Recognize various user account types and user attributes
![]() Create and manage user accounts
Create and manage user accounts
![]() Adjust login and fast user switching settings
Adjust login and fast user switching settings
With the exception of macOS Recovery or single-user mode, you must log in with a user account to perform any task on a Mac. Even when a Mac starts up and displays the login window (the screen where you log in)—and you haven’t yet authenticated—macOS is using system user accounts to maintain background services. Every file and folder on a Mac disk, and every item and process, belong to a user account. This lesson focuses on local user accounts that are available on a single Mac.
Reference 7.1 User Accounts
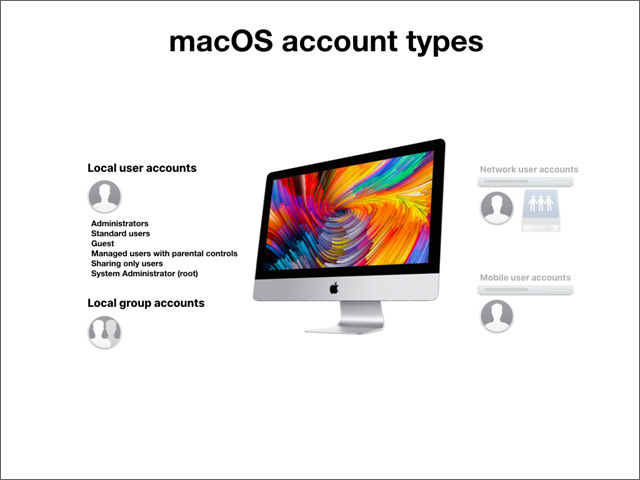
When you configure your Mac for the first time, Setup Assistant creates your first administrator account. This administrator account is a local user account, because macOS stores information about that user in the local user database on your Mac. This lesson focuses on local user accounts, but macOS can use other types of user accounts as well, including:
![]() Network user accounts—A network user account is available to multiple Mac computers and is stored on a shared directory server such as Active Directory that centralizes identification, authentication, and authorization information. The home folder for a network user account is usually stored on a network file server. A Mac must be able to contact both the shared directory server and the home folder server in order to use a network user account. For more information, open the Directory Utility User Guide at http://support.apple.com/guide/directory-utility, select Active Directory, and then select “Set up home folders for user accounts.”
Network user accounts—A network user account is available to multiple Mac computers and is stored on a shared directory server such as Active Directory that centralizes identification, authentication, and authorization information. The home folder for a network user account is usually stored on a network file server. A Mac must be able to contact both the shared directory server and the home folder server in order to use a network user account. For more information, open the Directory Utility User Guide at http://support.apple.com/guide/directory-utility, select Active Directory, and then select “Set up home folders for user accounts.”
![]() Mobile user accounts—A mobile user account is a network user account that has been synced with the local user database so that you can use a mobile user account even when your Mac can’t contact the shared directory server. The home folder for a mobile user account is usually stored on the startup disk. This is often used with Active Directory and is outside the scope of this guide. For more information about mobile accounts, open the Directory Utility User Guide at http://support.apple.com/guide/directory-utility, select Active Directory, select “Configure domain access,” and then select “Set up mobile user accounts.”
Mobile user accounts—A mobile user account is a network user account that has been synced with the local user database so that you can use a mobile user account even when your Mac can’t contact the shared directory server. The home folder for a mobile user account is usually stored on the startup disk. This is often used with Active Directory and is outside the scope of this guide. For more information about mobile accounts, open the Directory Utility User Guide at http://support.apple.com/guide/directory-utility, select Active Directory, select “Configure domain access,” and then select “Set up mobile user accounts.”
Local User Account Types
If your Mac has multiple users, set up a local account for each person so users can configure their own settings and options without affecting other users. macOS offers several different local account types to provide greater flexibility for managing user access. Because each account type allows different levels of access, be aware of each account type’s potential security risk.
There are seven local account types on a Mac (six user account types and the group account type):
![]() Administrator
Administrator
![]() Standard
Standard
![]() Managed with parental controls
Managed with parental controls
![]() Guest
Guest
![]() Sharing only
Sharing only
![]() System Administrator (root)
System Administrator (root)
![]() Group
Group

Administrator Accounts
You can use your administrator user account (also called an administrator account) to add and manage other users, install apps, and change settings that affect all users of a Mac. The first new user account you create when you first set up your Mac is an administrator account.
Your Mac can have multiple administrators. You can create new administrators and convert standard users to administrators. Administrator accounts are part of a group called admin.
Don’t set up automatic login for an administrator. If you do, someone could restart your Mac and gain access with administrator privileges. To keep your Mac secure, don’t share administrator names and passwords.
By default, administrator account users don’t have access to other users’ items except for shared items like the Public folders. Despite this, administrator account users can bypass many restrictions in the graphical environment and use Terminal if needed.
Because an administrator account is the initial account type created when you configure your Mac for the first time using Setup Assistant, many use the administrator account as their primary account type. This enables you to change almost anything on your Mac (something that administrators need to do). Also, this enables you to make changes or install software from sources other than the App Store that can make macOS insecure or unstable.
Some organizations assign a Mac to a user and allow the user to use an administrator account for daily use. Other organizations configure each Mac with an administrator account that the IT department uses. Then they provide each user with a standard account for daily use.
When you have an administrator account, you can make changes to many parts of macOS. This includes deleting or changing passwords for other administrator user accounts. You can disable current administrators or change standard users into administrators. If you open poorly or maliciously written software, you could cause harm to other users’ home folder items or compromise the security of macOS.
Any administrator user can enable the root account or change an existing root account password. Two tools that enable you to make these changes are Terminal and Directory Utility. Directory Utility is in the /System/Library/CoreServices/Applications folder.
You can create additional standard accounts for more secure daily use, but managing macOS requires access to at least one administrator account.
If you need to assist a user, but don’t want that user to see your user account when they log in, read Apple Support article HT203998, “Hide a user account in macOS,” to learn how to hide a user account on the macOS login window.
System Integrity Protection (SIP) prevents all user account types from modifying core macOS files, even administrator accounts. Find out more about SIP in Lesson 15, “Manage System Resources.”
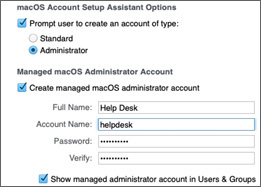
A mobile device management (MDM) solution can modify Setup Assistant to configure an account called a managed administrator user account, or a managed administrator, on a Mac. This is possible only for Mac computers that are enrolled in Apple Business Manager or Apple School Manager and required to enroll in your organization’s MDM solution. You can use your MDM solution to hide the managed administrator, and to change the password for the managed administrator. The following figure illustrates that you can use Apple’s MDM solution, Profile Manager, to create a managed administrator during Setup Assistant.
Note ![]()
You can find out more about Apple management technologies by reading http://help.apple.com/deployment/macos/ and http://help.apple.com/profilemanager/.
Standard Accounts
Standard user accounts are secure if an appropriate password is set. They have read access to most items, preferences, and apps. Users with standard accounts also have full control over their own home folder, which allows them to install apps in their home folder.
Standard account users are allowed to take advantage of nearly all the resources and features of a Mac, but they generally can’t change anything that might affect other users on it. Exceptions include:
![]() Standard account users can install apps and app updates from the App Store.
Standard account users can install apps and app updates from the App Store.
![]() Standard account users can choose when to update software when they receive a notification that macOS software updates are available.
Standard account users can choose when to update software when they receive a notification that macOS software updates are available.
Even though standard account users are allowed full access to the App Store, they aren’t allowed to manually modify the /Applications folder or use other installation methods that might modify shared parts of macOS. This means that standard account users aren’t allowed to install many items that are distributed outside the App Store. Apple maintains tight control over App Store distribution. This control means content remains safe for standard account users to install.
More Info ![]()
If your organization needs to restrict users from installing apps, system updates, or App Store items, you can create managed accounts, or use an MDM solution to configure Mac computers. For example, you can use MDM to configure a Mac to restrict the App Store to display only apps installed by MDM and software updates. For more information visit https://help.apple.com/deployment/mdm/, click “MDM restrictions,” then click “macOS restrictions.”
A managed account is a standard account with parental controls enabled, as covered in Reference 7.3, “Restrict Local User Access.”
Guest Account
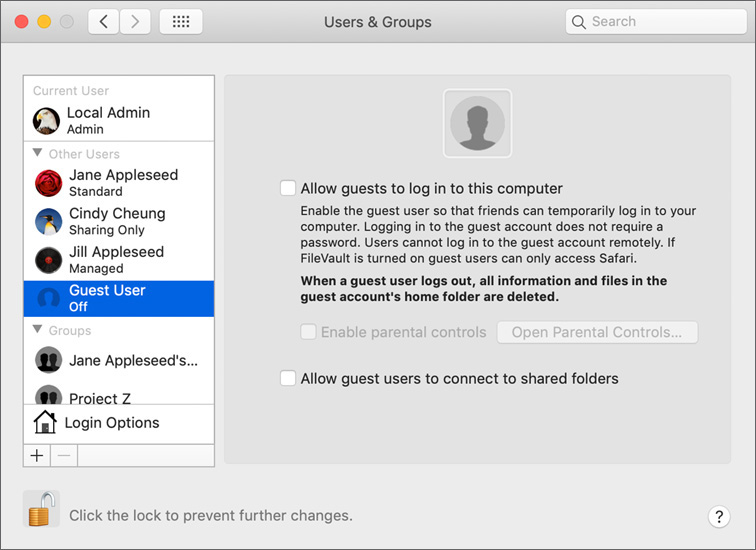
There is a special account called the guest user, or the guest account. In Users & Groups preferences, select Guest User to configure it. The guest account is disabled by default in macOS. Select “Allow guests to log in to this computer” to enable the guest account. If you turn on Find My Mac, then macOS enables the guest account. When the guest account is enabled, it is similar to a standard user, but it doesn’t require a password. Anyone with physical access to the Mac can use the guest account to log in.
When the guest user logs out, the guest account home folder is deleted, including any home folder items that would normally be saved, like preference files or web browser history. The next time someone logs in as a guest, a new home folder is created for that user.
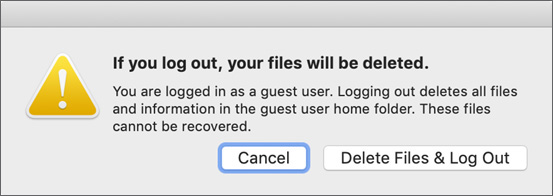
FileVault affects how a guest account operates. If you’ve enabled FileVault and someone logs in to your Mac with the guest account, your Mac restarts. Safari is the only app the guest user can use. A guest account doesn’t have access to the startup disk.
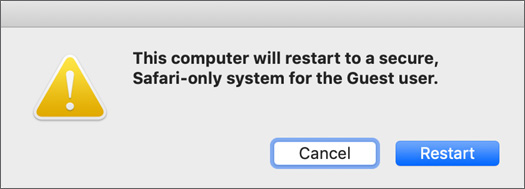
When the user with the guest account quits Safari or restarts the Mac, the guest account home folder is deleted, and the Mac restarts.
If you don’t enable FileVault, the guest user has access to the /Users/Shared folder and other users’ Public folders. Unlike the guest user’s home folder, the contents of these other folders remain after the guest logs out. This means that a guest user could run malicious apps or fill the disk with unwanted files. Guest users can restart or shut down a Mac, potentially allowing them to attempt to compromise macOS during startup.
There are some steps you can take to further limit the guest user’s access to files on your Mac. You can use parental controls, which enable you to restrict a guest user from running unapproved apps or restarting a Mac. Giving the guest user limited access, as covered in Reference 7.3, is a safe way to provide temporary user access. Additionally, you can change the access permissions on shared folders so that a guest user isn’t allowed to copy items to the disk. Changing file and folder permissions is covered in Lesson 13, “Manage Permissions and Sharing.”
The “Allow guest users to connect to shared folders” option allows another person to connect to your Mac computer’s shared folders if you turn on your Mac computer’s file sharing service, which is covered in Reference 25.1, “Enable Host-Sharing Services,” without a password.
Sharing-Only Accounts
When you want to share files with someone on a different computer but you don’t want that person to be able to log in to your Mac, create a sharing-only user account. Users of sharing-only accounts have access only to shared files and folders. Sharing-only accounts have no home folder, and those users can’t log in to the Mac user interface or Terminal. Sharing-only accounts are, by default, allowed file sharing access to users’ Public and Drop Box folders. Like a guest user, these users could fill a disk with unwanted files.
You can configure a sharing account to require a password, and you can set file and folder permissions in the account.
Sharing-only accounts are safer than guest user accounts for file sharing.
Root User Account
You can use the root user account (also called the System Administrator account, the root account, or just root) to perform tasks that require more privileges than administrator user accounts have.
Since many macOS processes run as the root account, the root account must exist. macOS wouldn’t be able to start up without processes run with root privileges.
The root account can:
![]() Access most files in other users’ home folders
Access most files in other users’ home folders
![]() Read, write, and delete many nonsystem files
Read, write, and delete many nonsystem files
![]() Modify many system settings
Modify many system settings
![]() Install software
Install software
The root account can’t change items that are protected by SIP. And now in macOS Mojave, the root account can’t access additional files, including:
![]() /Library/Application Support/com.apple.TCC
/Library/Application Support/com.apple.TCC
![]() Many files in users’ home folders
Many files in users’ home folders
The root account is unlike an administrator account. An administrator account doesn’t have access to files in another user’s home folder (except Public and Drop Box folders and files stored at the top level of the other user’s home folder).
The default macOS configuration doesn’t have a password set for the root account. So you must set a password for the root account before you can log in with the root account or authenticate as the root account. Any administrator can use their own password to use the sudo command to run a command with root privileges in the CLI.
Any administrator user can choose to set a password for the root account or change an existing root account password using Directory Utility. Anyone with access to macOS Recovery can reset the password for any local account, including the root account. If security is a concern in your environment, you should enable FileVault, set a firmware password to restrict macOS Recovery access to your startup disk, or both. Enabling FileVault is covered in Lesson 12, “Manage FileVault.” Setting a firmware password is covered in Lesson 10, “Manage Password Changes.”
Local Group Accounts
A group account is a list of user accounts. Groups give you greater control over file and folder access. macOS has several built-in groups to facilitate secure processes and sharing. For instance, all user accounts are members of the staff group. Administrator user accounts are also members of the admin group. The root account has its own group (called wheel). Using groups to manage sharing is discussed in Lesson 13, “Manage Permissions and Sharing.”
Standard accounts are members of the staff group. Administrator accounts are members of both the staff group and the admin group.
Reference 7.2 Configure User Accounts
In this section, you examine different ways to manage local user accounts.
Users & Groups Preferences
From Users & Groups preferences, local users can manage basic settings for their accounts.
Any administrator account user can unlock Users & Groups preferences and manage attributes for local accounts.
Create and Edit New User Accounts
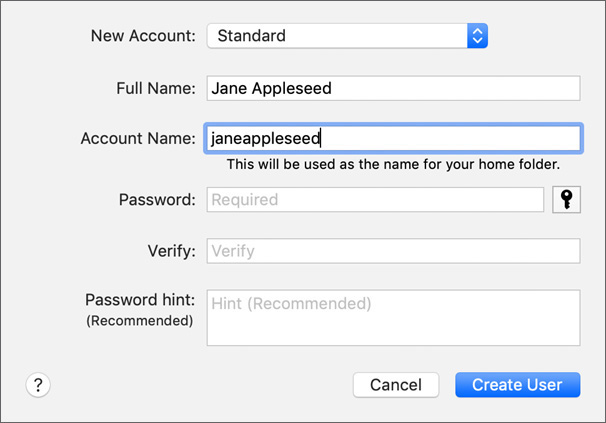
From Users & Groups preferences, after authenticating as an administrator, you can manage any account by selecting it from the list and modifying items to the right. Click Add (+) at the bottom of the Users & Groups list to create a new account. A dialog appears where you can define the basic attributes for a new user account.
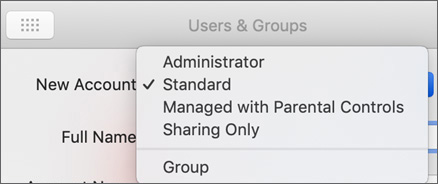
The New Account menu at the top of the user creation pane enables you to define the type of local user account being created: Administrator, Standard, Managed with Parental Controls, or Sharing Only.
When you create a new local user account, enter a full name. macOS automatically enters an account name based on the full name, but you can change that account name. Enter an initial password for the user. You can also enter an optional password hint, but the text can’t match the user’s password.
Setup Assistant for Additional Users
After you’ve completed Setup Assistant for the first time on your Mac, the first time you log in to your Mac with an additional user account, you see an abbreviated version of Setup Assistant for that user. Setup Assistant is described in Reference 3.1, “Configure a Mac with a New Installation of macOS Mojave.”
Just as in the full Setup Assistant process, at some screens you need to take action or make a selection; at other screens, you only need to read and then click Continue; and at other screens, you can click the option to set up a feature later. Here is the abbreviated Setup Assistant process:
You see the Data & Privacy screen.
You see the “Sign In with Your Apple ID” screen, where you are asked to enter an Apple ID. You can click Set Up Later, or you can provide your Apple ID. There are more details about providing your Apple ID during Setup Assistant in Lesson 3, “Set Up and Configure macOS.”
If you provided an Apple ID, then you’ll see the iCloud Keychain screen.
If your Mac has a microphone, then you’re prompted to enable Ask Siri.
If you enabled Ask Siri and your Mac supports Hey Siri, then you’re prompted to speak phrases to set up Hey Siri.
If you provided an Apple ID, then you might see the iCloud Drive screen or the “All your files in iCloud” screen, depending on the state of your Apple ID.
If your Mac supports Touch ID, then you’re prompted to set up Touch ID. You can click Set Up Touch ID Later, or click Continue to set up Touch ID.
If you set up Touch ID, then you’ll see the Apple Pay screen.
You see the Choose Your Look screen.
If your Mac supports True Tone Display, then you see the True Tone Display screen.
Mac computers that are enrolled in an MDM solution might show different Setup Assistant options than the defaults shown here. In certain managed situations, some of the default screens might be skipped.
User Account Attributes
On a Mac, Open Directory maintains local user account information. Open Directory stores this information in a series of XML-encoded text files in a protected location inside the /var/db/dslocal/nodes/ folder. The text files contain lists of user account attributes and their associated settings. Only the root user account can read these files, and only if System Integrity Protection (SIP) is turned off.
You can also access many user attributes from Users & Groups preferences after you unlock Users & Groups preferences. Control-click a user account to display the Advanced Options dialog and view the attributes.
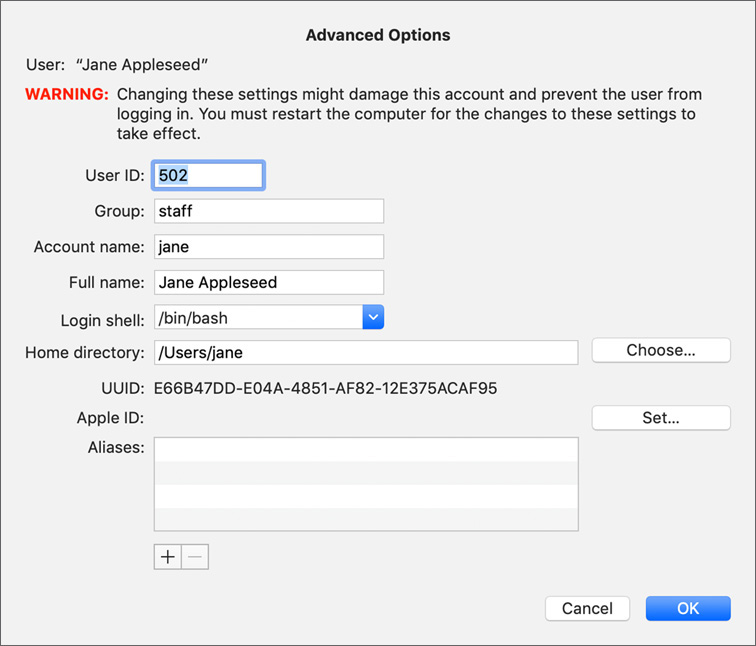
You can edit user account settings. For example, you can modify the location of a user’s home folder by editing the Home Directory setting in the Home Directory field.
User account settings include:
![]() User ID—A number that identifies an account with file and folder ownership. This number is usually unique to each account on a single Mac, though overlaps are possible. User accounts start at 501, whereas most macOS system accounts are below 400. The user ID is unique from other users’ IDs on a local Mac. Other Mac computers use similar ID numbers between Mac computers. For example, the first local user you create on a Mac will have the ID number 501. When you delete a user account, the user’s ID becomes available, and the next user you create gets the lowest available ID.
User ID—A number that identifies an account with file and folder ownership. This number is usually unique to each account on a single Mac, though overlaps are possible. User accounts start at 501, whereas most macOS system accounts are below 400. The user ID is unique from other users’ IDs on a local Mac. Other Mac computers use similar ID numbers between Mac computers. For example, the first local user you create on a Mac will have the ID number 501. When you delete a user account, the user’s ID becomes available, and the next user you create gets the lowest available ID.
![]() Group—The user’s primary group. The default primary group for local users, even administrator accounts, is the staff group. An administrator account is also a member of the admin group.
Group—The user’s primary group. The default primary group for local users, even administrator accounts, is the staff group. An administrator account is also a member of the admin group.
![]() Account name—Also called the “short name.” This is the name you use to uniquely identify an account and, by default, to name a user’s home folder. A user can use either the full name or the account name, interchangeably, to authenticate. Other accounts in macOS must have a unique name, and the name can’t contain special characters or spaces. Special characters not allowed include commas, slashes, colons, semicolons, brackets, quotes, and symbols. Allowed characters include dashes, underscores, and periods.
Account name—Also called the “short name.” This is the name you use to uniquely identify an account and, by default, to name a user’s home folder. A user can use either the full name or the account name, interchangeably, to authenticate. Other accounts in macOS must have a unique name, and the name can’t contain special characters or spaces. Special characters not allowed include commas, slashes, colons, semicolons, brackets, quotes, and symbols. Allowed characters include dashes, underscores, and periods.
![]() Full name—The full name of the user. It can be long and contain nearly any character. Other accounts in macOS must have a unique full name. You can change the full name later.
Full name—The full name of the user. It can be long and contain nearly any character. Other accounts in macOS must have a unique full name. You can change the full name later.
![]() Login shell—This file path defines the default command-line shell in Terminal by the account. Any user who is allowed to use the command line in Terminal has the path set to /bin/bash by default. Both administrator and standard users are given this access.
Login shell—This file path defines the default command-line shell in Terminal by the account. Any user who is allowed to use the command line in Terminal has the path set to /bin/bash by default. Both administrator and standard users are given this access.
![]() Home directory—This file path defines the location of the user’s home folder. All users except for sharing-only account users, who don’t have home folders, have this set to /Users/name, where name is the account name.
Home directory—This file path defines the location of the user’s home folder. All users except for sharing-only account users, who don’t have home folders, have this set to /Users/name, where name is the account name.
![]() Universally Unique ID (UUID)—Sometimes referred to as Generated UID (GUID), this alphanumeric attribute is generated by a Mac during account creation and is unique across space and time. After the attribute is created, no system will create an account with the same UUID. It is used to refer to the user’s password and for group membership and file permissions. UUIDs created on one Mac are unique to that Mac.
Universally Unique ID (UUID)—Sometimes referred to as Generated UID (GUID), this alphanumeric attribute is generated by a Mac during account creation and is unique across space and time. After the attribute is created, no system will create an account with the same UUID. It is used to refer to the user’s password and for group membership and file permissions. UUIDs created on one Mac are unique to that Mac.
![]() Apple ID—Used to associate the local Mac user account with an Apple ID that can be used to reset the local account password. This is optionally configured if the user enters an Apple ID during Setup Assistant or signs in to iCloud. Setting or changing an Apple ID from the Advanced Options pane in Users & Groups doesn’t affect the user’s iCloud service configuration.
Apple ID—Used to associate the local Mac user account with an Apple ID that can be used to reset the local account password. This is optionally configured if the user enters an Apple ID during Setup Assistant or signs in to iCloud. Setting or changing an Apple ID from the Advanced Options pane in Users & Groups doesn’t affect the user’s iCloud service configuration.
![]() Aliases—Used to associate a local Mac user account with other service accounts. For example, a user’s Apple ID can be associated with a local account. This attribute is optional for macOS, but it is required for integration with Apple Internet services like iCloud.
Aliases—Used to associate a local Mac user account with other service accounts. For example, a user’s Apple ID can be associated with a local account. This attribute is optional for macOS, but it is required for integration with Apple Internet services like iCloud.
Local user account passwords are stored as an encrypted attribute to enhance security. Password management is covered in detail in Lesson 10.
Reference 7.3 Restrict Local User Access
macOS includes parental controls preferences that enable you to restrict what users can do on a particular Mac. You can’t apply parental controls to an administrator user. Parental controls are part of MDM, too, so you can apply them to multiple Mac computers if you need to.
Tip
Use the Action menu (gear icon) at the bottom of the parental controls user list to copy and paste complex settings from one user to another. From this menu, you can enable parental controls to be remotely managed from another Mac.
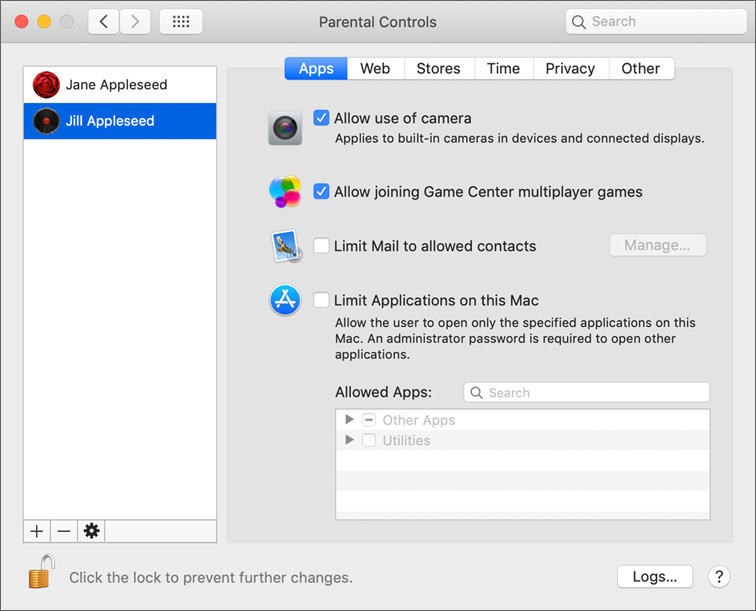
Parental controls management options include the following:
![]() Apps—Disallows camera and Game Center use, limits contacts in Mail, and limits app access.
Apps—Disallows camera and Game Center use, limits contacts in Mail, and limits app access.
![]() Web—Enables you to automate Safari website content filtering or manually manage a list of permitted websites, or use a combination of both automatically and manually permitted websites.
Web—Enables you to automate Safari website content filtering or manually manage a list of permitted websites, or use a combination of both automatically and manually permitted websites.
![]() Stores—Disables iTunes, iTunes U, and Apple Books stores; restricts music and books with explicit and sexual content; and sets age ratings for movies, TV shows, and apps.
Stores—Disables iTunes, iTunes U, and Apple Books stores; restricts music and books with explicit and sexual content; and sets age ratings for movies, TV shows, and apps.
For more information about iTunes U, which enables instructors to bring a classroom together on iPad, read Apple Support article HT207420, “About iTunes U.”
![]() Time—Sets weekday and weekend use time limits, and prevents access during defined bedtime hours on school nights and weekends.
Time—Sets weekday and weekend use time limits, and prevents access during defined bedtime hours on school nights and weekends.
![]() Privacy—Limits changes to privacy settings, preventing users from choosing which apps and services can access potentially private user information.
Privacy—Limits changes to privacy settings, preventing users from choosing which apps and services can access potentially private user information.
![]() Other—Disables Siri and system dictation, limits printer and scanner edits, prevents optical disc burning, restricts explicit language in Dictionary, and prevents Dock modifications.
Other—Disables Siri and system dictation, limits printer and scanner edits, prevents optical disc burning, restricts explicit language in Dictionary, and prevents Dock modifications.
![]() Logs button—Maintains Safari and app use logs. The logs record allowed and attempted-but-denied access attempts.
Logs button—Maintains Safari and app use logs. The logs record allowed and attempted-but-denied access attempts.
Many third-party apps don’t honor parental controls content filters or account limit settings. Examples include the Firefox browser and the Outlook email client. You can use parental controls to restrict access to these apps.
Read more about restricting access to the App Store in Lesson 18, “Install Apps.”
Reference 7.4 Configure Login and Fast User Switching
With fast user switching, macOS enables multiple users to be logged in on a single Mac at the same time. Multiple users can access some resources simultaneously, which might be a security concern for your organization.
You can also manage login window behavior on multiple Mac computers with an MDM solution.
Manage User Login Items
You can adjust items that automatically open during login from the Login Items pane of Users & Groups preferences. The list of items to open applies only to the currently logged-in user.
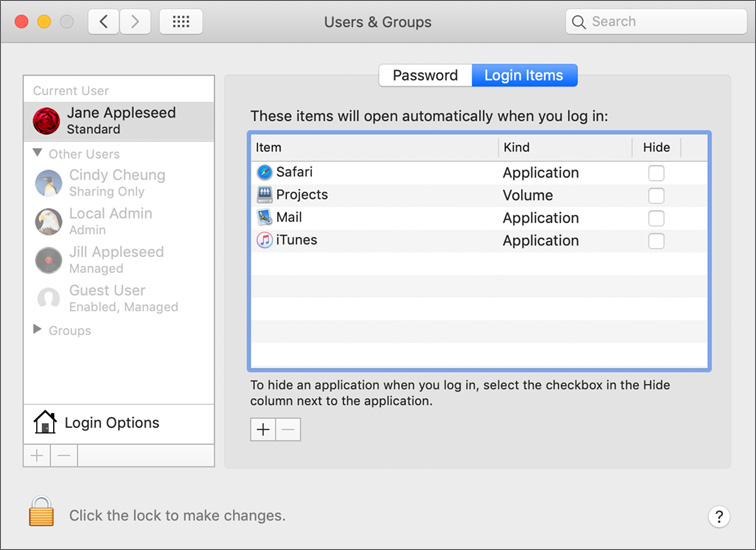
Drag items to the Login Items list or click the Add (+) button and browse for an item to add them. Select an item from the list and click the Remove (–) button to remove it. Select a Hide checkbox to make an app open but hide it from view.
Manage System Login Window Options
Authenticate as an administrator user and click Login Options at the bottom of the user accounts list to adjust the systemwide behavior of the login window.
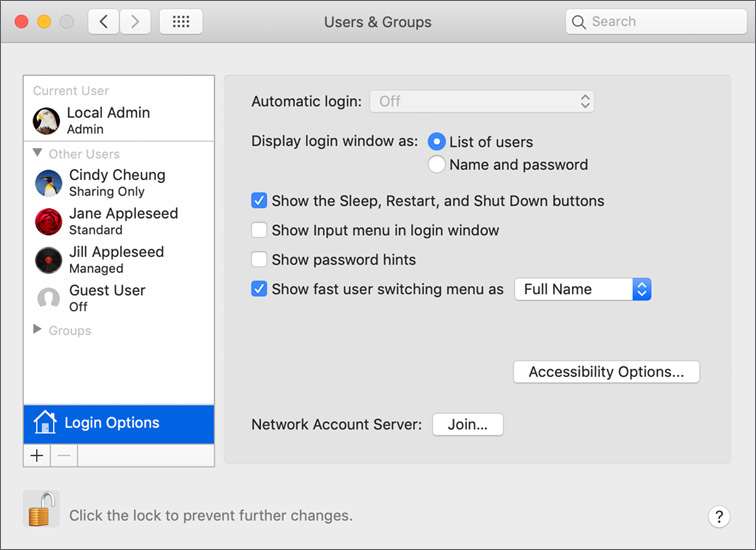
With login window options, you can:
![]() Enable or disable automatic login as a Mac starts up. This option is off by default. You can define only one account for automatic login.
Enable or disable automatic login as a Mac starts up. This option is off by default. You can define only one account for automatic login.
![]() Choose whether the login window shows a list of available users, the default setting, or blank name and password fields. If your Mac displays the list of available users, an unauthorized user can select one and guess the password to log in. If your Mac doesn’t display available users, an unauthorized user must guess a username and password to log in.
Choose whether the login window shows a list of available users, the default setting, or blank name and password fields. If your Mac displays the list of available users, an unauthorized user can select one and guess the password to log in. If your Mac doesn’t display available users, an unauthorized user must guess a username and password to log in.
![]() Select the availability of the Restart, Sleep, and Shut Down buttons. Mac computers in environments that require more security shouldn’t have these buttons available at the login window.
Select the availability of the Restart, Sleep, and Shut Down buttons. Mac computers in environments that require more security shouldn’t have these buttons available at the login window.
![]() Specify whether users can use the input menu. This gives users access to non-Roman characters, like Cyrillic or Kanji, at the login window.
Specify whether users can use the input menu. This gives users access to non-Roman characters, like Cyrillic or Kanji, at the login window.
![]() Determine whether the login window shows password hints after three failed password attempts.
Determine whether the login window shows password hints after three failed password attempts.
![]() Disable the fast user switching menu or adjust the look of the menu items. The fast user switching menu can appear as the user’s full name, the account name, or the generic user icon.
Disable the fast user switching menu or adjust the look of the menu items. The fast user switching menu can appear as the user’s full name, the account name, or the generic user icon.
![]() Enable users to use accessibility items at the login window, including VoiceOver audible assistant technology, Zoom, Accessibility Keyboard, Sticky Keys, Slow Keys, and Mouse Keys.
Enable users to use accessibility items at the login window, including VoiceOver audible assistant technology, Zoom, Accessibility Keyboard, Sticky Keys, Slow Keys, and Mouse Keys.
![]() Configure a Mac to use network accounts hosted from a shared network directory.
Configure a Mac to use network accounts hosted from a shared network directory.
You can configure a three-line message for the login window from Security & Privacy preferences, as covered in Lesson 9. If your organization requires a full login banner, configure it with the instructions in Apple Support article HT202277, “About policy banners in OS X.”
Fast User Switching
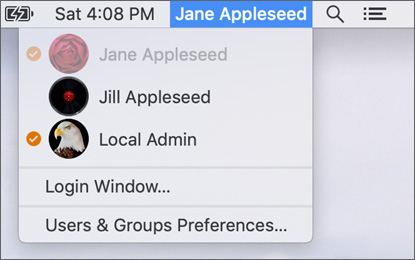
Fast user switching lets a Mac switch between user accounts without users having to log out or quit apps. This enables a user to keep work open in the background while one or more other users are logged in to the Mac. Returning users can resume tasks after they log in.
The fast user switching menu doesn’t appear until you create additional local user accounts. This menu item appears on the far right, next to the Siri menu item (or next to the Spotlight menu item if Siri is not enabled). By default, the fast user switching menu appears as the user account full name of the currently logged-in user. If you don’t see this menu item, you can turn it on from the Login Options pane of Users & Groups preferences. When another user is logged in, select that user’s name from the fast user switching menu and have the user enter his or her user name to switch to that user.
Fast User Switching Contention
macOS apps by Apple are fast user switching savvy. As an example, when you switch between accounts, iTunes automatically mutes or unmutes your music and Mail continues to check for new messages in the background. In rare circumstances, resource contention may occur when more than one user attempts to access an item.
Examples of fast user switching resource contention include:
![]() App contention—Some apps are designed for one user at a time use. If other users try to open these apps, they see an error dialog or the app won’t open.
App contention—Some apps are designed for one user at a time use. If other users try to open these apps, they see an error dialog or the app won’t open.
![]() Document contention—Sometimes one user has a document open and remains logged in with fast user switching. This can prevent other users from fully accessing the document. As an example, Microsoft Office apps such as Word and Excel allow other users to open a document as read-only and display an error dialog if the user tries to save changes. Other apps don’t allow different users to open the document at all. In the worst-case scenario, an app allows two people to edit a file simultaneously but saves only changes made by the user who saved last—and it doesn’t give an error message.
Document contention—Sometimes one user has a document open and remains logged in with fast user switching. This can prevent other users from fully accessing the document. As an example, Microsoft Office apps such as Word and Excel allow other users to open a document as read-only and display an error dialog if the user tries to save changes. Other apps don’t allow different users to open the document at all. In the worst-case scenario, an app allows two people to edit a file simultaneously but saves only changes made by the user who saved last—and it doesn’t give an error message.
![]() Peripheral contention—Some peripherals can be accessed by only one user at a time. Peripheral contention can happen if a user leaves an app that’s communicating with a peripheral running. The peripheral won’t become available to other apps until the user quits the original app.
Peripheral contention—Some peripherals can be accessed by only one user at a time. Peripheral contention can happen if a user leaves an app that’s communicating with a peripheral running. The peripheral won’t become available to other apps until the user quits the original app.
Fast User Switching Storage Issues
When one user attaches an external storage device to a Mac, it is available to other users, even if they weren’t logged in when the device was attached.
Mounted disk images behave differently. Only the user who mounted the disk image has full read/write access to it. Other users may have read access to the mounted disk image.
Shared network volumes remain secure with fast user switching. By default, only the user who originally connected to the network volume can access it. Even if multiple users attempt to access the same network volume, macOS automatically generates multiple mount points with different access for each user. The exception to this is the network home folder shares used by network accounts. While one network user can successfully log in, additional network users from the same server won’t be able to access their network home folders. For this reason, fast user switching doesn’t support network accounts.
Resolving Fast User Switching Issues
Because resources and apps act differently, fast user switching issues aren’t always consistently reported or readily apparent. If you are experiencing access errors for files, apps, or peripherals, see if other users are logged in. If so, have them log out and try to access the items again.
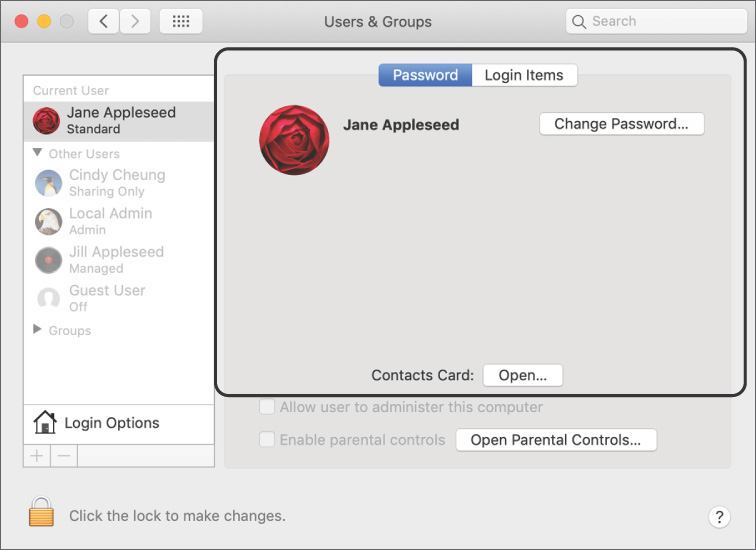
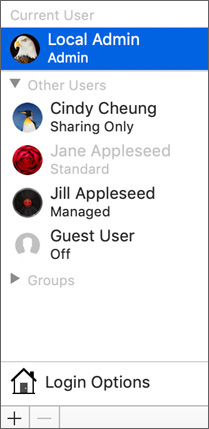
You can’t change a password or manage a user account for a logged-in user. Logged-in user accounts are dimmed, as Jane’s is in the following figure.
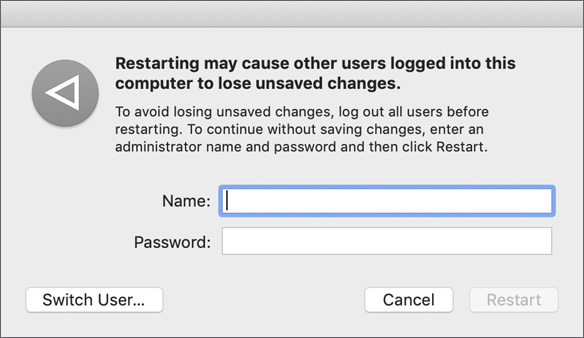
If you can’t log out the other users, you can force the other users’ suspect apps to quit or to force the other users to log out by restarting the Mac. Forcing an app with open files to quit might result in data loss. You can force an open app to quit, using techniques covered in Lesson 20, “Manage and Troubleshoot Apps.”
If you restart a Mac, you might encounter other issues. If other users are logged in, you have to force their open apps to quit before you restart. macOS provides an authenticated restart dialog to enable you to force-quit apps, but you might lose data from open apps.
Exercise 7.1 Create a Standard User Account
![]() Prerequisite
Prerequisite
![]() You must have created the Local Administrator account (Exercise 3.1, “Configure a Mac for Exercises”).
You must have created the Local Administrator account (Exercise 3.1, “Configure a Mac for Exercises”).
![]() This exercise is required for most of the remaining exercises.
This exercise is required for most of the remaining exercises.
You created an administrator account when you first configured your Mac. In this exercise, you create an additional account (a standard user account) so that you understand the user experience.
You can also link the new account to an Apple ID so that you can access Apple iCloud services with it. Doing this enables you to complete subsequent exercises that use iCloud.
Create a Standard User Account
If necessary, log in as Local Administrator (password: Apple321!).
Open System Preferences, and click Users & Groups.
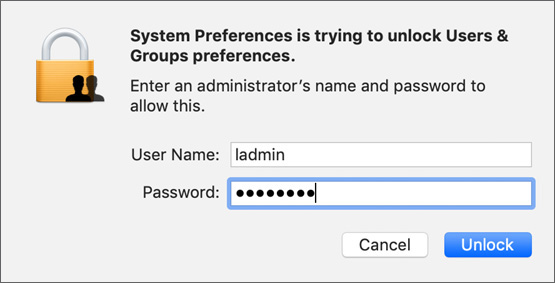
Click the lock button and authenticate as the Local Administrator user to access Users & Groups preferences.
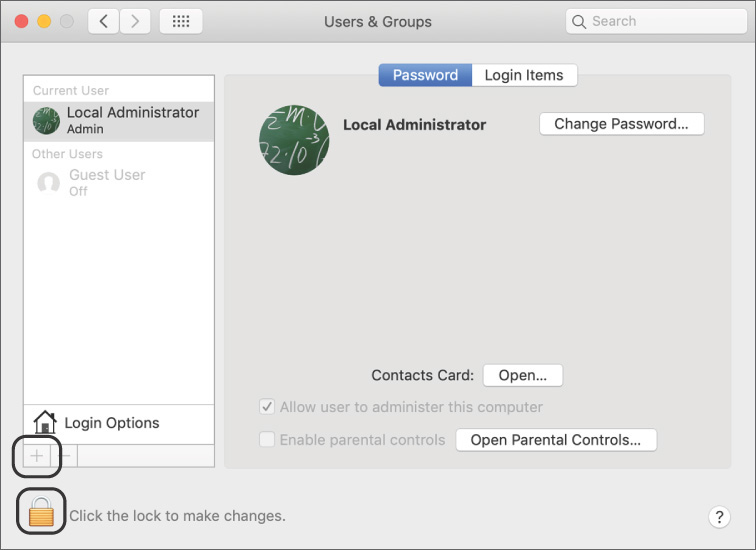
Click the Add (+) button beneath the account list, and enter the following information:
New Account: Standard
Full Name: Johnny Appleseed
Account Name: johnny
Password: Apple321!
Remember the password, as you need to reenter it periodically as you use this Mac. You can provide a hint to help you remember the password.
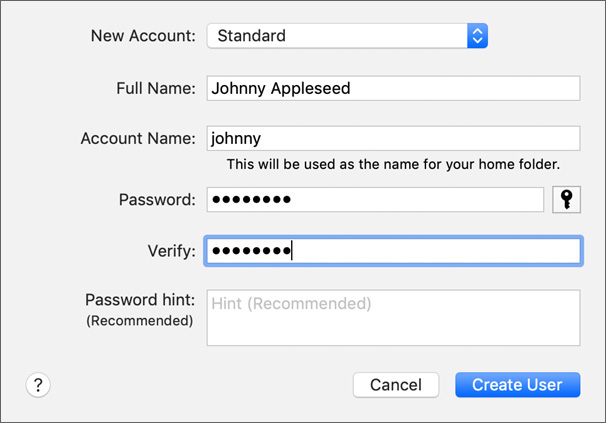
Click Create User.
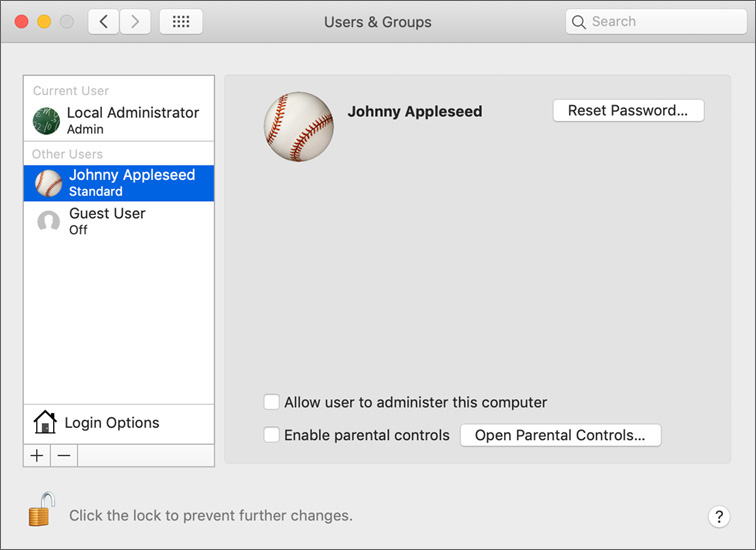
Because FileVault is enabled, Johnny’s account is enabled too and is able to unlock the startup volume at the next startup.
Because you authenticated as an administrator, you can configure other account properties here, including changing Johnny’s user icon, granting Johnny admin rights, or using Parental Controls preferences to limit the account.
Log In to the New User Account
In these steps you log in to Johnny’s user account to verify that you created it correctly. Ensure that you’re connected to the Internet before you attempt this exercise
From the Apple menu, choose Log Out Local Administrator.
In the dialog that asks if you are sure, click Log Out.
At the login window, select Johnny Appleseed and enter the password.
At the Data & Privacy screen, read Apple’s privacy policy, and then click Continue
You are now logged in as Johnny Appleseed. Because this account isn’t associated with an Apple ID, you’ll use an Apple ID, provided by your facilitator, to connect Johnny’s account with the Apple ID.
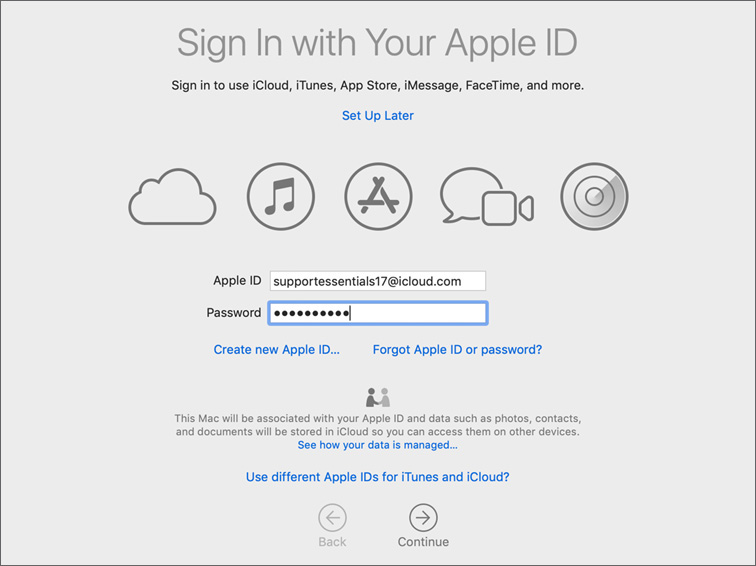
At the “Sign In with Your Apple ID” pane, enter your Apple ID.
You use this ID to set up iCloud on your Mac.
If you have an Apple ID with two-factor authentication, you are prompted to verify your identity through one of your devices. Follow the prompts to finish authenticating.
If the facilitator-provided Apple ID isn’t two-factor enabled, and you see the Apple ID Security screen that says “Use two-factor authentication”; please deselect the option and click Continue.
At the “Don’t upgrade” Apple ID security dialog, click Don’t Upgrade.
If a “Terms and Conditions” screen appears, read through the terms, and if they are acceptable, click Agree. Click Agree in the confirmation dialog.
At the iCloud Keychain screen, select “Set up later,” and click Continue.
At the Siri screen, deselect Enable Ask Siri, and click Continue.
At the “All your files in iCloud” screen, deselect “Store files from Documents and Desktop in iCloud Drive,” and click Continue.
You can experiment with this feature, but if you turn it on for the Johnny Appleseed account, it may interfere with subsequent exercises.
If you are prompted to set up Touch ID, click Continue; click Set Up Touch ID Later and then click Continue in the confirmation dialog.
These exercises don’t require Touch ID.
If you see the Apple Pay screen, click Set Up Later.
At the Choose Your Look screen, choose your preferred appearance, and click Continue.
If you see True Tone Display, click Continue.
Adjust Johnny Appleseed’s Preferences
Just as you did with the Local Administrator account, you can adjust Johnny Appleseed’s preferences to enable alternative access to content.
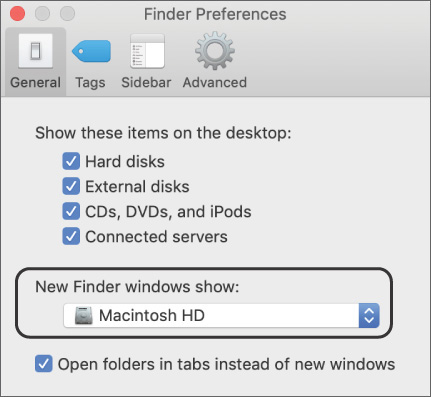
In the Finder menu bar, choose Finder > Preferences.
Select General to see the “Show these items on the desktop” list.
From the “New Finder windows show” menu, choose your system volume (typically Macintosh HD).
Click the Sidebar button at the top of the Finder Preferences window.
Select “johnny” in the Favorites section of the sidebar and “Hard disks” in the Locations section.
Close the Finder Preferences window.
Navigate to the /Applications folder (choose Go > Applications or press Shift-Command-A).
Just as you did in the Local Administrator account, drag the TextEdit app to the left side of the dividing line in Johnny’s Dock.
Navigate to /Users/Shared. Since Johnny’s Finder preferences are set to show the hard disks on the desktop, you can open Macintosh HD from the desktop, open Users, and open Shared.
Drag the ParticipantMaterials folder to the right side of the dividing line in Johnny’s Dock.
Open System Preferences, and click Desktop & Screen Saver preferences.
Select a different desktop picture.
Adjust Mouse and Trackpad preferences, like you did for the Local Administrator account.
Examine Johnny Appleseed’s Account
If necessary, open System Preferences, and then open Users & Groups preferences.
You have different options than you had when you logged in as Local Administrator. For instance, you can’t allow yourself to administer the Mac or turn on parental controls for yourself. You can configure a Contacts card or add login items (which will open every time you log in). Also, you can’t select any account other than your own.
In the lower-left corner, click the Lock icon, and authenticate as Local Administrator (either the full name Local Administrator or the account name ladmin). This unlocks Users & Groups preferences and enables you to make changes to other user and group accounts while you remain logged in as Johnny.
Control-click Johnny’s account in the account list, and choose Advanced Options from the shortcut menu.
The Advanced Options dialog appears and displays the hidden attributes of the Johnny Appleseed account.
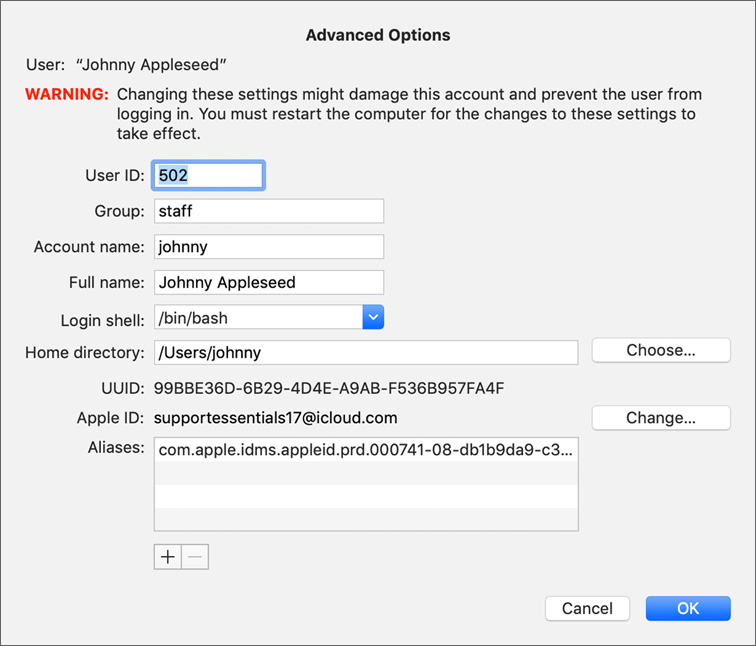
Your attributes list might have entries that relate to your Apple ID. This depends on whether you linked the account to iCloud and how you configured your iCloud account.
Click Cancel (or press Command-Period) to dismiss the dialog.
Leave System Preferences open for the next exercise.
Exercise 7.2 Create a Managed User Account Using Parental Controls
![]() Prerequisite
Prerequisite
![]() You must have created the Local Administrator account (Exercise 3.1, “Configure a Mac for Exercises”).
You must have created the Local Administrator account (Exercise 3.1, “Configure a Mac for Exercises”).
In this exercise, you create a managed account (one with parental controls applied) and view its restrictions.
Create an Account with Parental Controls
If necessary, log in as Johnny Appleseed, open Users & Groups preferences, and authenticate as Local Administrator. You can use the account name ladmin instead of the full name Local Administrator.
Click the Add (+) button under the account list, and enter the following information:
New Account: Managed with Parental Controls
Age: 4+
Full Name: Mary Appleseed
Account Name: mary
Password: Apple321!
Remember this password. You will need it periodically as you complete these exercises. You can provide a hint in the “Password hint” field to help you remember it.
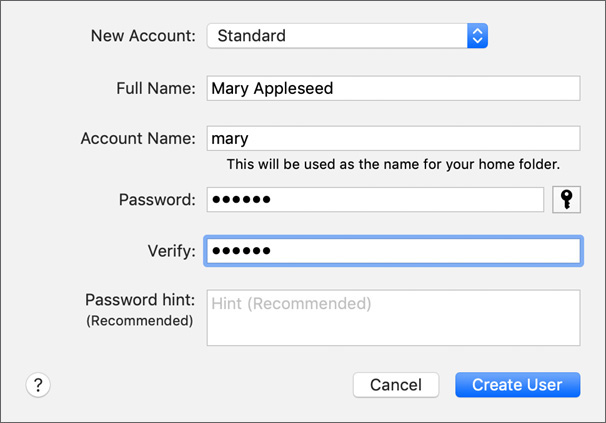
Click Create User.
Verify that Mary Appleseed’s account is selected in the account list.
Since you created the account as managed, the “Enable parental controls” checkbox is selected.
Click Open Parental Controls.
This takes you to Parental Controls preferences.
If you are prompted to authenticate, enter the Local Administrator’s account name and password.
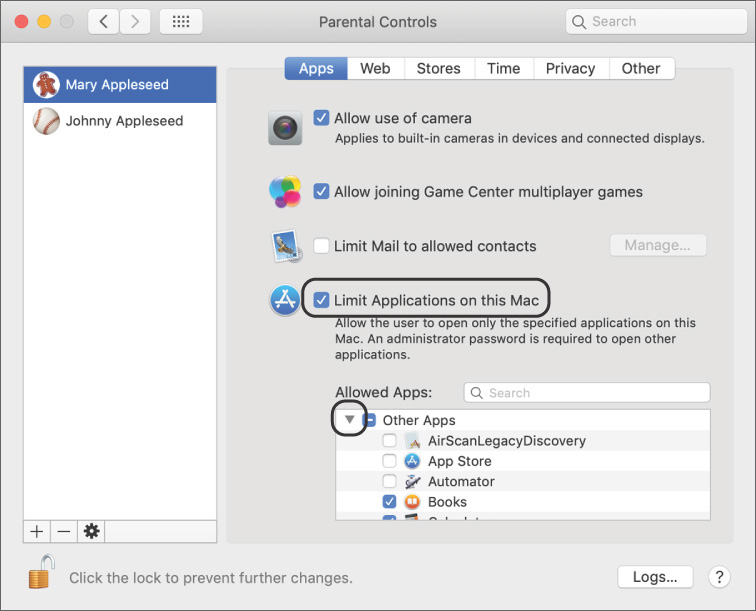
Under the Apps pane, ensure that “Limit Applications on this Mac” is selected.
Click the Other Apps disclosure triangle to see what apps are allowed by default.
Click the Web button to configure Mary’s web restrictions.
Ensure the “Allow access to only these websites” option is selected, and leave the default site list.
Click through the Stores, Time, Privacy, and Other buttons of Parental Controls to see other restrictions.
In the Other button, select “Prevent the Dock from being modified.” Leave other settings at their default settings.
Quit System Preferences, and log out of the Johnny Appleseed account.
Test the Managed User Account
Log in to Mary Appleseed’s user account to see the effects of Parental Controls.
At the login screen, select Mary Appleseed, enter the password (Apple321!), and press Return.
At the Data & Privacy screen, read Apple’s privacy policy, and then click Continue.
At the “Sign In with Your Apple ID” screen, select Set Up Later, and click Skip in the confirmation dialog.
If you are prompted to enable Siri, deselect that option and click Continue.
If you are prompted to set up Touch ID, click Continue; click Set Up Touch ID Later, and then click Continue in the confirmation dialog.
These exercises don’t require Touch ID.
At the Choose Your Look screen, choose your preferred appearance, and click Continue.
If you see the True Tone Display screen, click Continue.
Because you restricted Mary’s ability to modify the Dock, the interface looks different.
In the Finder, choose Go > Applications.
Open Automator. At the dialog that says “The application Automator can’t be opened,” click OK.
At the prompt that reads “You don’t have permission to use the application Automator,” click OK.

Because Automator is not in the allowed Applications list, Mary is restricted from opening the app. In order for her to use Automator, a user with administrative permissions would need to allow use of the app.
Open Safari. If Safari is not shown on the first screen of apps, click the right arrow to show more apps.
Use the Safari address bar to navigate to www.wikipedia.org.
Since Wikipedia isn’t on the list of allowed sites, an error message appears.
Click Add Website, and authenticate as Local Administrator.
If necessary, reload the page by going to the menu bar and choosing View > Reload Page, or by pressing Command-R.
This time, the Wikipedia front page loads.
Quit Safari and log out as Mary Appleseed.