Lesson 5
Use macOS Recovery
Goals
![]() Access macOS Recovery utilities
Access macOS Recovery utilities
![]() Reinstall macOS from macOS Recovery
Reinstall macOS from macOS Recovery
![]() Create an external macOS Recovery disk
Create an external macOS Recovery disk
One of the most useful macOS features for troubleshooting is macOS Recovery. You can use macOS Recovery to reinstall macOS and also access administration and troubleshooting utilities. macOS Recovery is on the primary system disk. This gives you easy access to recovery utilities without the need for additional media.
In this lesson, you learn how to access macOS Recovery. You also explore the utilities available from macOS Recovery. Finally, you learn how to create an external macOS install disk that you can use when local macOS Recovery isn’t available.
Reference 5.1 Start Up from macOS Recovery
Mac computers running macOS Mojave include a hidden macOS Recovery system on the local system disk. This built-in recovery system doesn’t appear in Disk Utility or in the Finder when a Mac is running macOS.
Start macOS Recovery from the Built-In Recovery System
To start up from macOS Recovery, restart or turn on your Mac, and then immediately press and hold Command-R. Release the keys when you see the Apple logo, a spinning globe, or a prompt for a firmware password. When you see the macOS Utilities window, you’ve started up from macOS Recovery.
After macOS Recovery fully starts, the macOS Utilities window appears. From there you can install, reinstall, or upgrade macOS and choose from a variety of maintenance apps.
If macOS Recovery doesn’t start or isn’t installed on the local system disk, you have some alternatives for accessing it.
Start macOS Recovery over the Internet
If the local built-in recovery system is missing, some Mac computers automatically attempt to access macOS Recovery over the Internet. This applies to Mac computers released in mid-2010 or later with available firmware updates installed.
macOS Recovery installs different versions of macOS depending on the key combination you use while starting up. Turn on or restart your Mac, and then immediately press and hold one of these combinations:
![]() Command-R—Install the latest macOS that was installed on your Mac, without upgrading to a later version.
Command-R—Install the latest macOS that was installed on your Mac, without upgrading to a later version.
![]() Option-Command-R—Upgrade to the latest macOS that is compatible with your Mac. If you haven’t already updated to macOS Sierra 10.12.4 or later, Option-Command-R installs the macOS that came with your Mac, or the version closest to it that is still available.
Option-Command-R—Upgrade to the latest macOS that is compatible with your Mac. If you haven’t already updated to macOS Sierra 10.12.4 or later, Option-Command-R installs the macOS that came with your Mac, or the version closest to it that is still available.
![]() Option-Shift-Command-R—Install the macOS that came with your Mac, or the version closest to it that is still available. If you haven’t already updated to macOS Sierra 10.12.4 or later, Option-Shift-Command-R is not available.
Option-Shift-Command-R—Install the macOS that came with your Mac, or the version closest to it that is still available. If you haven’t already updated to macOS Sierra 10.12.4 or later, Option-Shift-Command-R is not available.
If successful, this process re-creates the local built-in recovery system. Read Apple Support article HT204904, “How to reinstall macOS from macOS Recovery,” for more information about the differences in the key combinations.
Read Apple Support article HT201314, “About macOS Recovery,” for more details about macOS Recovery.
Start macOS Recovery from a Time Machine Disk
Time Machine backup service automatically creates a hidden recovery system on external storage devices used for Time Machine backup disks. To access macOS Recovery, connect the Time Machine external storage device to your Mac, and then start up or restart while you press and hold the Option key. This opens the Mac computer’s Startup Manager, where you can use the arrow and Return keys or the mouse or trackpad to select the Time Machine external storage device. Lesson 17, “Manage Time Machine,” covers this topic in greater detail.
Start macOS Recovery from an external disk
If your Mac cannot connect to the Internet to use macOS Recovery over the Internet, you can use another Mac to create an installer on an external disk. Read Reference 5.3, “Create a macOS Recovery Disk,” for more information.
Reference 5.2 macOS Recovery Utilities
When you start up from macOS Recovery, you can access several administration and maintenance utilities.
When you start up from macOS Recovery, you can use Ethernet and Wi-Fi networks if they provide Dynamic Host Configuration Protocol (DHCP) services to automatically configure network settings. macOS automatically enables Ethernet if you connect your Mac to the network with an Ethernet cable. If you don’t connect your Mac to the network with an Ethernet cable, macOS should automatically connect to a Wi-Fi network. If it doesn’t, select one from the Wi-Fi menu.
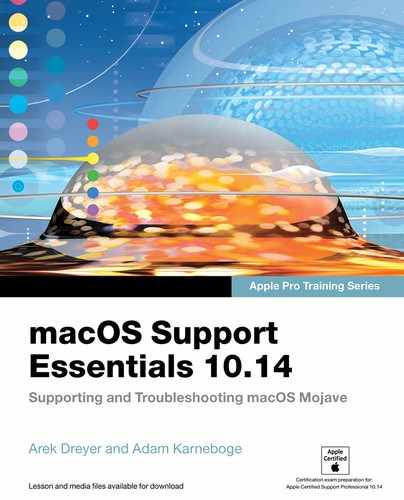
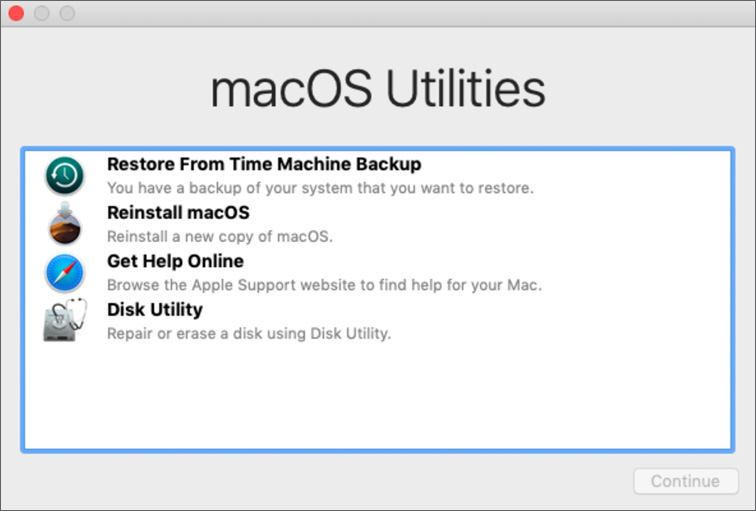
From the macOS Utilities window in macOS Recovery, you can access the following functions:
![]() Restore From Time Machine Backup—Use this option to restore a full Mac Time Machine backup from either a network or a locally connected external storage device. Read Lesson 17 for more information.
Restore From Time Machine Backup—Use this option to restore a full Mac Time Machine backup from either a network or a locally connected external storage device. Read Lesson 17 for more information.
![]() Install macOS or Reinstall macOS—Use this option to open the macOS Installer.
Install macOS or Reinstall macOS—Use this option to open the macOS Installer.
![]() Get Help Online—This option opens Safari, which takes you to the Apple Support website.
Get Help Online—This option opens Safari, which takes you to the Apple Support website.
![]() Disk Utility—Use Disk Utility to manage disks, add, and manage volumes, and manage Redundant Array of Independent Disks (RAID) sets. It’s useful when you start up a Mac from macOS Recovery because you can use it to manage a system disk that you can’t manage when you use it as a startup disk. You can also use Disk Utility to prepare a disk for a new macOS installation or attempt to repair a disk that fails installation. Read Lesson 11, “Manage File Systems and Storage,” for more information.
Disk Utility—Use Disk Utility to manage disks, add, and manage volumes, and manage Redundant Array of Independent Disks (RAID) sets. It’s useful when you start up a Mac from macOS Recovery because you can use it to manage a system disk that you can’t manage when you use it as a startup disk. You can also use Disk Utility to prepare a disk for a new macOS installation or attempt to repair a disk that fails installation. Read Lesson 11, “Manage File Systems and Storage,” for more information.
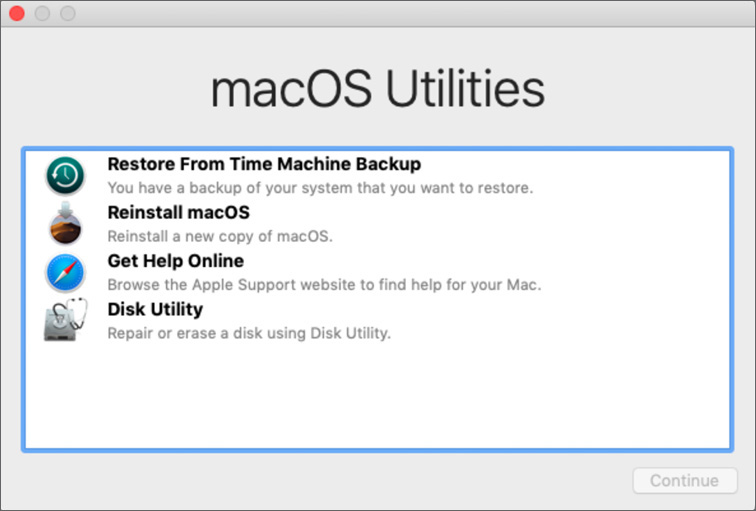
![]() Choose Startup Disk (by clicking the close button, quitting, or choosing Startup Disk from the Apple menu)—If you attempt to quit the macOS Utilities window, you see a prompt to click Choose Startup Disk. Use Choose Startup Disk to select the default macOS startup disk. You can override the default startup using the startup modes discussed in Lesson 28, “Troubleshoot Startup and System Issues.”
Choose Startup Disk (by clicking the close button, quitting, or choosing Startup Disk from the Apple menu)—If you attempt to quit the macOS Utilities window, you see a prompt to click Choose Startup Disk. Use Choose Startup Disk to select the default macOS startup disk. You can override the default startup using the startup modes discussed in Lesson 28, “Troubleshoot Startup and System Issues.”
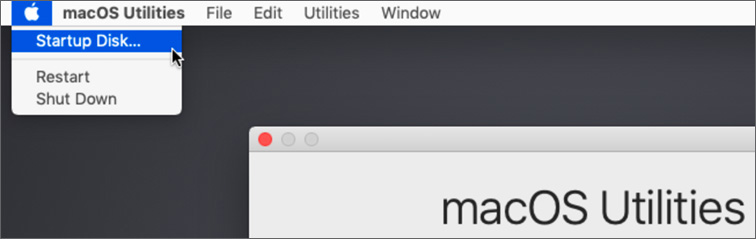
macOS Recovery has a few extra features in the Utilities menu at the top of the screen:
![]() Startup Security Utility—This utility enables you to secure a Mac computer’s startup process by disabling alternate startup modes without a password. You can disable or enable this feature and define the required password. If your Mac has an Apple T2 Security Chip, Startup Security Utility offers two additional options. Learn more about firmware passwords in Lesson 10, “Manage Password Changes.”
Startup Security Utility—This utility enables you to secure a Mac computer’s startup process by disabling alternate startup modes without a password. You can disable or enable this feature and define the required password. If your Mac has an Apple T2 Security Chip, Startup Security Utility offers two additional options. Learn more about firmware passwords in Lesson 10, “Manage Password Changes.”
![]() Network Utility—This is the main network and Internet troubleshooting utility in macOS. Use it in macOS Recovery to troubleshoot network issues that could prevent the download of macOS installation assets. Network Utility is further discussed in Lesson 23, “Troubleshoot Network Issues.”
Network Utility—This is the main network and Internet troubleshooting utility in macOS. Use it in macOS Recovery to troubleshoot network issues that could prevent the download of macOS installation assets. Network Utility is further discussed in Lesson 23, “Troubleshoot Network Issues.”
![]() Terminal—This is your primary interface to the command-line interface (CLI) of macOS. The most useful command you can enter from here is resetpassword, followed by pressing the Return key. Read Lesson 4, “Use the Command-line Interface,” for more information about the CLI.
Terminal—This is your primary interface to the command-line interface (CLI) of macOS. The most useful command you can enter from here is resetpassword, followed by pressing the Return key. Read Lesson 4, “Use the Command-line Interface,” for more information about the CLI.
The resetpassword command enables you to reset the password of any local user account on a selected system disk. This includes standard users, administrator users, and the root user. You can run resetpassword only from macOS Recovery. Find out more about the Reset Password assistant in Lesson 10.
Note ![]()
macOS Recovery utilities can be used to compromise Mac security. Any Mac with a default startup disk that can be overridden by an unauthorized user during startup isn’t secure. Use the Startup Security Utility to help protect your Mac computers. Read Lesson 10 for more information.
Reference 5.3 Create a macOS Recovery Disk
Sometimes a Mac doesn’t have a local built-in recovery system. For example, if you replace the internal disk with a new blank disk, nothing is on the new disk. Also, Mac computers on RAID sets and disks with nonstandard Boot Camp partitioning won’t have a local built-in recovery system.
macOS Mojave includes a command-line tool, named createinstallmedia, in the macOS Installer (Install macOS Mojave) that converts a standard disk into a macOS Recovery disk. This tool copies a macOS Recovery system and the macOS installation assets to an external storage device. To use createinstallmedia, you must have an external storage device with at least 12 GB available, and it must be formatted as Mac OS Extended. The macOS Installer includes the option—downloadassets to download on-demand assets that may be required for installation. If you don’t have a copy of Install macOS Mojave, you can get it from the App Store. When you download macOS Mojave, you download the latest version of Install macOS Mojave that’s available. Exercise 5.2, “Create a macOS Install Disk,” outlines the steps to create this disk type.
Exercise 5.1 Use macOS Recovery
![]() Prerequisite
Prerequisite
![]() Your Mac must have a hidden macOS Recovery volume. This volume is created and updated by the macOS Mojave upgrade or installation process.
Your Mac must have a hidden macOS Recovery volume. This volume is created and updated by the macOS Mojave upgrade or installation process.
In this exercise, you start up your Mac in macOS Recovery. You also review the included utilities and how macOS Recovery can reinstall macOS.
Note ![]()
You won’t perform an installation, but you’ll get an opportunity to look at the steps leading up to the installation.
Start Up Using macOS Recovery
To access the installer and other utilities in macOS Recovery, start up from macOS Recovery.
If your Mac is on, shut it down by choosing Shut Down from the Apple menu.
Press the power button on your Mac, press and hold Command-R until the Apple logo appears on the screen, and then release the keys.
When you press and hold Command-R during startup, the Mac attempts to start up using a recovery partition on the hard disk.
If macOS Recovery isn’t available on your Mac, Mac computers with newer firmware can start up from an Apple server over the Internet and get access to macOS Recovery.
If your Mac doesn’t start up to macOS Recovery, you may not have held Command-R long enough. If this happens, click the Shut Down button (at the Login Window) or press Command-Q (at the Setup Assistant) and try again.
If a language selection screen appears, select your preferred language and click the right-arrow button.
After macOS Recovery starts up, you see macOS Utilities. This window is the primary interface for macOS Recovery.
Examine the macOS Recovery Utilities
While using macOS Recovery, you have access to utilities for recovering, repairing, and reinstalling macOS. In this part of the exercise, you get to know some of these utilities.
View macOS Recovery Help
Use Safari to view the built-in instructions for macOS Recovery and to browse the web.
Select Get Help Online, and then click Continue.
Safari opens and displays a document with information about how to use macOS Recovery.
Read the document.
This document is stored in macOS Recovery, but as long as you have an Internet connection, use Safari to view online documentation such as Apple Support articles.
If a dialog indicates that Safari wants to use the login keychain, leave the Password field blank and click OK.
Click in the “Search or enter website name” field, enter apple.com, and press Return.

Safari displays the Apple website.
If Safari displays a message saying “You are not connected to the Internet,” join a wireless network using the Wi-Fi icon near the right side of the menu bar.
Near the top right of the page, click the Support link (https://www.apple.com/support).
You are taken to the Apple Support site. If you were experiencing a problem with your Mac, look for solutions and information. You use Apple Support resources later in this book.
From the menu bar, choose Safari > Quit Safari (or press Command-Q) to return to the macOS Utilities screen.
When you close a window in Safari, you don’t quit Safari. To quit a Mac app, choose Quit App Name from the app menu (the menu next to the Apple menu, named for the current app). Or you can use Command-Q.
Examine Disk Utility
Disk Utility enables you to repair, image, reformat, or repartition your Mac disk.
Select Disk Utility, and then click Continue.
In the device list on the left, you see your startup disk and a Base System disk image. Because your startup disk is encrypted, it is dimmed. If you are in the Show All Devices view, you see the primary entry for each disk device and an indented list of volumes on each device.
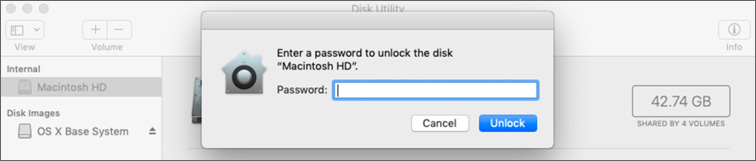
Select the entry for your startup volume. Typically, it is named Macintosh HD.
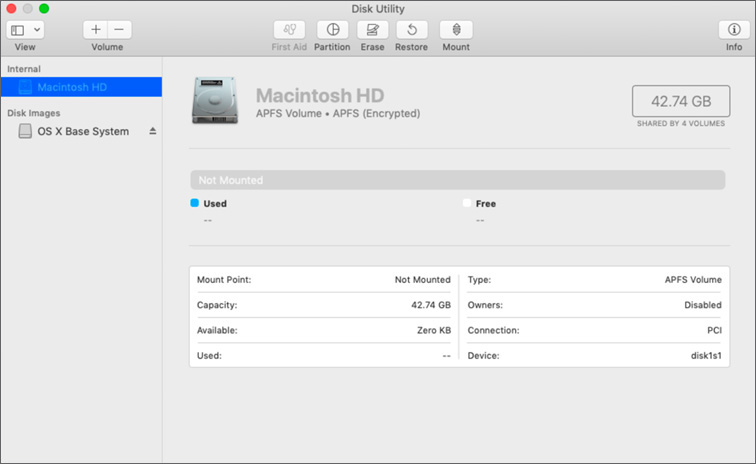
Click Mount in the Disk Utility toolbar, and enter your Local Administrator password (Apple321!) to unlock your startup volume.
View the other buttons in the Disk Utility toolbar. These buttons represent functions that are discussed in detail in Lesson 11, “Manage File Systems and Storage.”
With Disk Utility you can use First Aid to verify or repair the startup volume file structure or erase the volume before you reinstall macOS Mojave.
From the menu bar, choose Disk Utility > Quit Disk Utility or press Command-Q.
You are returned to the macOS Utilities window.
Examine Time Machine Restoration
If you backed up your Mac with Time Machine, macOS Recovery can do a full system restoration from that backup. Reference 17.2, “Configure Time Machine,” covers setting up Time Machine.
Select Restore From Time Machine Backup, and click Continue.
The Restore from Time Machine screen appears, with notes on the restoration. This restoration interface erases current content and replaces it from the backup.
Click Continue.
The Select a Backup Source screen appears. If you configured a Time Machine backup target, it would be available here as a source for restoring macOS.
Click Go Back to return to the Restore from Time Machine screen.
Click Go Back again to return to the macOS Utilities screen.
Examine the macOS Installer
Here you examine reinstallation, but you don’t perform a reinstall. When you complete these steps, you experience the reinstallation, but you don’t have to wait while macOS is copied to your Mac.
Select Reinstall macOS, and click Continue.
The Installer app opens.
Click Continue.
Read the license agreement, and click Agree.
In the license confirmation dialog, click Agree to indicate you have read and agree to the terms of the software license agreement.
The installer displays a list of volumes where you could install or reinstall macOS.
Note

Don’t click the Install button. If you do, the installer reinstalls macOS.
Quit the installer.
Verify Your Startup Disk and Restart
The Choose Startup Disk utility enables you to select the volume to start up from. If you encounter problems with your internal disk during startup, connect a second disk, with macOS installed, and use Startup Disk to configure your Mac to start up from the new disk.
From the Apple menu, choose Startup Disk.
Startup Disk lists all available startup volumes. The options might include Network Startup or one or more NetBoot images, depending on what Startup Disk finds on your network.
Verify that your normal startup volume (typically named Macintosh HD) is selected. If necessary, select it.
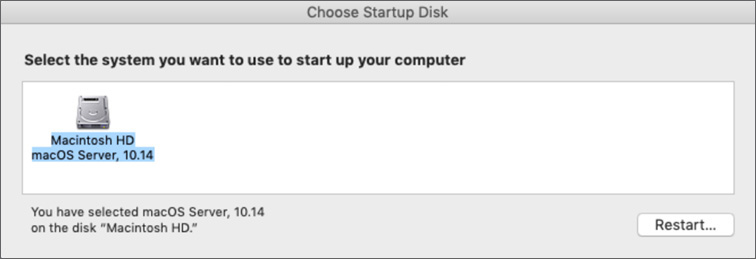
Click Restart.
In the confirmation dialog, click Restart.
You could also restart without using the Startup Disk utility by choosing Restart from the Apple menu.
Exercise 5.2 Create a macOS Install Disk
![]() Prerequisites
Prerequisites
![]() You need an erasable external disk with a capacity of at least 12 GB.
You need an erasable external disk with a capacity of at least 12 GB.
![]() You must have created the Local Administrator account (Exercise 3.1, “Configure a Mac for Exercises”).
You must have created the Local Administrator account (Exercise 3.1, “Configure a Mac for Exercises”).
In this exercise, you create a macOS install disk, which includes the macOS Recovery environment, tools, and installation assets. When you create a macOS install disk this way, you can reinstall macOS without downloading the installer app from the App Store. Record the version of the macOS installer that you use. If you need to, you can get an updated installer from the store.
Get a Copy of the Install macOS Mojave App
In class, the facilitator probably gave you a copy in the ParticipantMaterials/Lesson5 folder. Otherwise, you can download the installer using the following steps:
Log in as Local Administrator (password: Apple321!).
From the Apple menu, choose App Store. For more about the App Store, see Lesson 18, “Install Apps.”
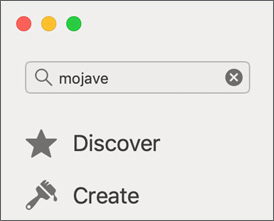
In the search field of the App Store window, enter Mojave and press Return.
Find macOS Mojave in the search results, and click the View button next to its name.

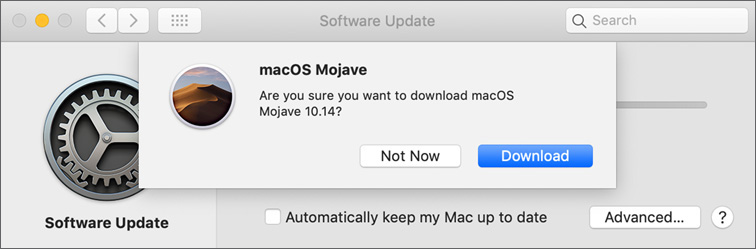
Click the Get button. Software Update preferences opens, and finds the update.

When you are asked if you are sure you want to download macOS Mojave 10.14, click Download.
When the installer app finishes downloading, it opens.
Quit both Install macOS Mojave and the App Store.
Reformat the External Disk
Most new external disks come preformatted with the Master Boot Record (MBR) partition scheme. To allow a Mac to start up from MBR, reformat the disk with the GUID partition map (GPT) scheme. For more information about disk formats, see Lesson 11, “Manage File Systems and Storage.”
Note ![]()
This operation erases all content on the external disk. Don’t perform this exercise with a disk that contains important content.
Open Disk Utility. It’s in /Applications/Utilities.
Connect the external disk to your Mac.
If you are prompted for a password to unlock the disk, click Cancel.
You don’t need to unlock the disk to erase it.
In the toolbar, choose View > Show All Devices.
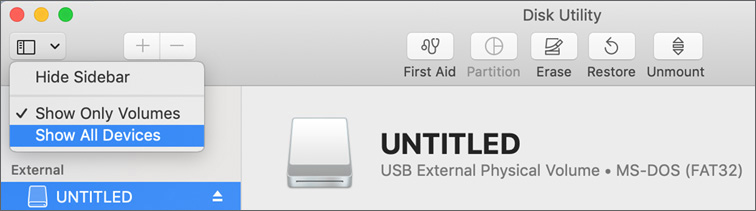
Select the external disk device entry in the Disk Utility sidebar. Select the device entry, not the volume entry indented beneath it.
Check the partition map listed at the bottom of the window.
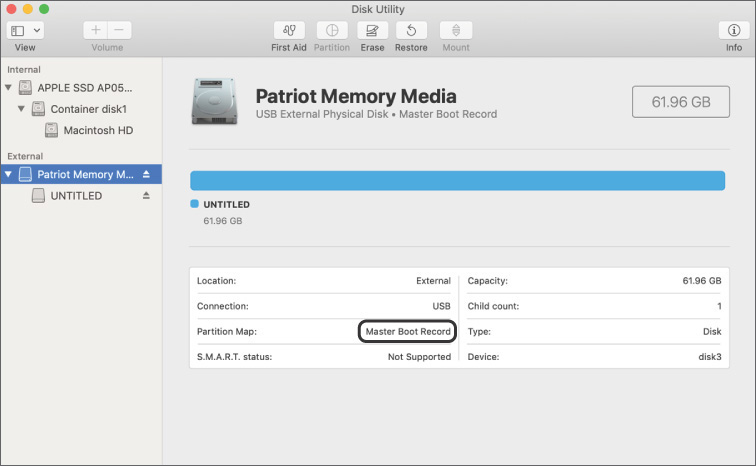
You might not know the partition scheme that’s currently on the disk, or the disk could include the GUID scheme. In either case, erase the disk.
You can partition the disk and use part of it for the installer volume. See Reference 11.4, “Manage File Systems,” for more information about partitioning.
Click the Erase button in the toolbar.
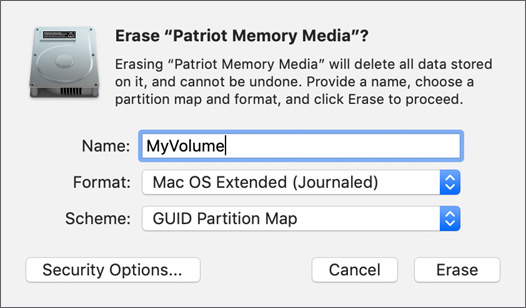
Give the disk a descriptive name, choose Mac OS Extended (Journaled) from the Format pop-up menu, and choose GUID Partition Map from the Scheme pop-up menu.
Click the Erase button.
When the process finishes, click Done to dismiss the erase dialog.
Verify that the Partition Map entry is GUID Partition Map.

Quit Disk Utility.
Create a macOS Install Disk
Open Terminal.
Switch to the Finder, and navigate to the Install macOS Mojave app and do one of the following:
 If your facilitator provides a copy of the installer apps, open the Lesson5 folder in ParticipantMaterials. If you downloaded the installer app from the App Store, open the Applications folder.
Control-click the Install macOS Mojave app, and choose Show Package Contents from the shortcut menu that appears.
Read Reference 14.2, “Examine Packages,” for more information.
In the installer package, open the Contents folder, and open the Resources folder.
Drag the createinstallmedia file from the Finder into Terminal.
This inserts the full path to createinstallmedia in Terminal.
Switch back to Terminal, and press Return.
This executes the createinstallmedia tool as a command-line program. It prints a usage summary and explains how to use the tool.
Enter sudo followed by a space to start another command, but don’t press Return until step 11.
Drag createinstallmedia from the Finder to Terminal again.
In Terminal, enter --volume (enter two hyphens before volume) followed by a space.
Drag the MyVolume (or whatever you named it) volume icon from the desktop to Terminal.
At this point, the command should look something like this:

Switch to Terminal, and press Return.
This operation requires admin access.
Enter the Local Administrator account password (Apple321!), and press Return.
This operation erases the disk, so you are prompted to confirm the operation.
Verify that the volume name (listed after /Volumes/) is the one you intend to use, enter Y, and press Return.
Wait while the install disk is prepared. This may take several minutes, depending on the type and speed of the external disk you use.
When the process finishes, Terminal displays several lines, ending with Install media now available at "/Volumes/Install macOS Mojave."
Quit Terminal.
Test the macOS Mojave Install Disk
Test the installer disk, but don’t reinstall macOS.
Go to the Apple menu and choose Restart; then click Restart in the confirmation dialog to restart your Mac.
Press and hold the Option key until you see a row of icons.
Click the install disk icon.
Click the arrow that appears under the icon.
The Mac starts up in the installer environment, which is like the recovery environment. Explore it, but don’t reinstall macOS.
When you finish exploring the installer environment, go to the Apple menu and choose Restart to restart your Mac.