Lesson 3
Set Up and Configure macOS
Goals
![]() Complete initial macOS configuration
Complete initial macOS configuration
![]() Adjust common system settings
Adjust common system settings
![]() Identify and install a configuration profile
Identify and install a configuration profile
This lesson covers initial setup and ongoing macOS configuration. You use Setup Assistant to set up a new Mac. After that, you use System Preferences and configuration profiles.
Reference 3.1 Configure a Mac with a New Installation of macOS Mojave
If you’re using a new Mac for the first time or you have just completed an upgrade to macOS Mojave, you’ll see Setup Assistant. For new Mac computers or installations of macOS on a previously blank disk, Setup Assistant guides you through the preliminary configuration.
If you just upgraded an existing Mac with a previous version of a Mac operating system, you’ll still see Setup Assistant, but you’ll be presented with fewer configuration steps. Most importantly, you will be prompted to enter your Apple ID and password to complete the iCloud setup. Apple ID and iCloud are covered later in this lesson.
Even if you previously set up iCloud on an existing Mac, when Setup Assistant is running you need to reenter your authentication information to complete the upgrade to macOS Mojave.
iCloud is optional and free of charge. Many macOS features require iCloud.
After you turn on a new Mac, Setup Assistant starts automatically. It guides you through setting up your Mac by providing step-by-step screens. The screens you will see vary based on the features of your Mac and the choices you make while using Setup Assistant. Each screen varies in what you’re required to do:
![]() Take action or make a selection
Take action or make a selection
![]() Read, then click Continue
Read, then click Continue
![]() Click the option to set up a feature later
Click the option to set up a feature later
These are the screens that require you to agree to something or make a selection or configuration:
![]() Region selection
Region selection
![]() Keyboard setup
Keyboard setup
![]() Apple terms and conditions acceptance
Apple terms and conditions acceptance
![]() First account creation
First account creation
You can use System Preferences to change most of the settings you selected in Setup Assistant.
Device Enrollment is a feature of Apple Business Manager and Apple School Manager. If your organization uses Apple Business Manager or Apple School Manager, you can use Device Enrollment to automate mobile device management (MDM) enrollment and simplify initial Mac setup. You can use your MDM solution to prevent some Setup Assistant screens from appearing. Unless otherwise indicated, this book describes the Setup Assistant process for a Mac that’s not automatically enrolled using Device Enrollment. For more information about Device Enrollment, read Apple Support article HT204142, “Use Device Enrollment,” and “Mobile device management settings for IT,” at https://help.apple.com/deployment/mdm/.
Language
If you see the Language screen, select your language, then click the right arrow to continue. You can change your system language settings later from Language & Region preferences.
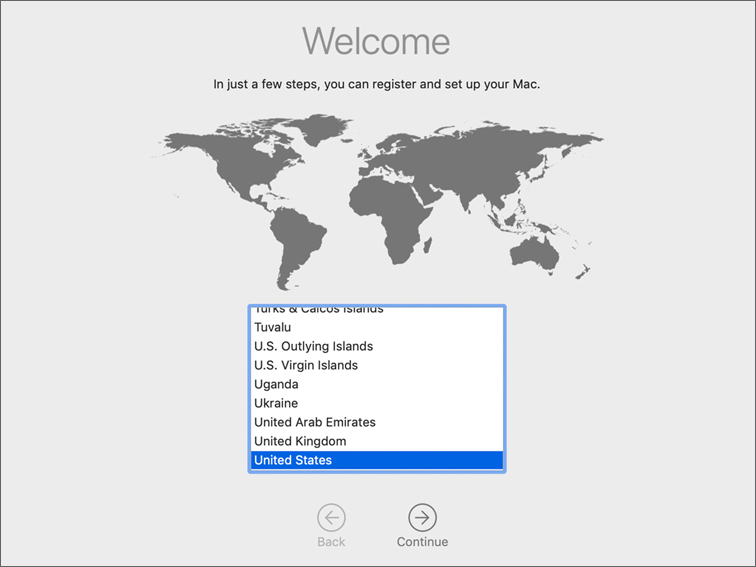
Welcome
The Setup Assistant screen requires that you select your region. This information is used to set regional language and keyboard options and to set the appropriate Apple online stores. You can change your Region settings later from Language & Region preferences.
During the initial stages of Setup Assistant, you can choose to enable VoiceOver to interact with macOS using only audio cues. At the Welcome screen, you can press the Esc (Escape) key to learn how to use VoiceOver. At any point you can use a keyboard shortcut to switch between turning VoiceOver on or off:
![]() Press Command-F5 (you might need to press the Fn [Function] key to access the F5 key).
Press Command-F5 (you might need to press the Fn [Function] key to access the F5 key).
![]() If your Mac has Touch ID, press and hold the Command key and then quickly press Touch ID three times at the right end of the Touch Bar.
If your Mac has Touch ID, press and hold the Command key and then quickly press Touch ID three times at the right end of the Touch Bar.
Find out more about assistive technologies from Apple’s accessibility website, www.apple.com/accessibility.
Keyboard
You must select the primary keyboard layout. You can change your keyboard layout settings later from Keyboard preferences.
Network Settings
Setup Assistant attempts to establish a connection to the Internet by automatically configuring Mac network settings. It attempts to automatically configure with the Dynamic Host Configuration Protocol (DHCP) on an Ethernet network or open Wi-Fi network. If a connection is made this way, you won’t be prompted to set up networking.
Setup Assistant tries to figure out which type of network connection you need to set up and presents you with the appropriate configuration screen. If your Mac isn’t connected to Ethernet with an Ethernet cable, you’ll see the Wi-Fi network setup screen, where you can select a wireless network and authenticate to it. You can postpone setting up networking at this point and do it later from Network preferences. Lesson 21, “Manage Basic Network Settings,” covers this topic in detail.
Remote Management
If your organization uses Apple Business Manager or Apple School Manager, and your Mac is assigned to use an MDM solution, then you will see the Remote Management screen. Click Continue to enroll your Mac with the MDM solution. If your MDM solution allows your Mac to skip enrollment, the Remote Management screen displays a Skip button.
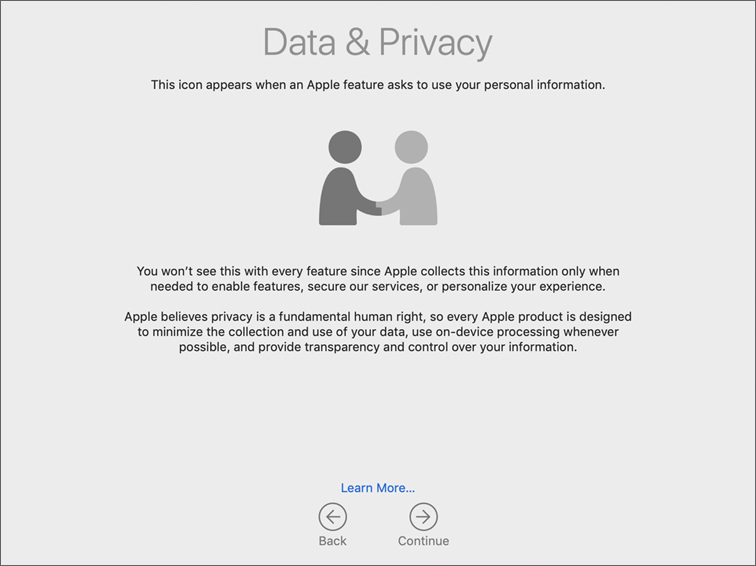
Data & Privacy
The Data & Privacy screen displays the icon that appears when an Apple feature asks to use your personal information. Click the Learn More link to read more about privacy at Apple, or visit www.apple.com/privacy. Lesson 9, “Manage Security and Privacy,” covers security and privacy in macOS in detail.
Transfer Information
When you use the optional Transfer Information utility (also called Migration Assistant), you can transfer computer and user information from another computer or from an external backup device to your Mac. If you use Transfer Information, you can skip most of the remaining Setup Assistant screens because the configuration is gathered from the previous computer or external storage device. Lesson 8, “Manage User Home Folders,” covers transferring information with Migration Assistant in detail.
If you don’t have a computer or external storage device to migrate settings and data from, leave the default choice, and click Continue to proceed with the Setup Assistant process.
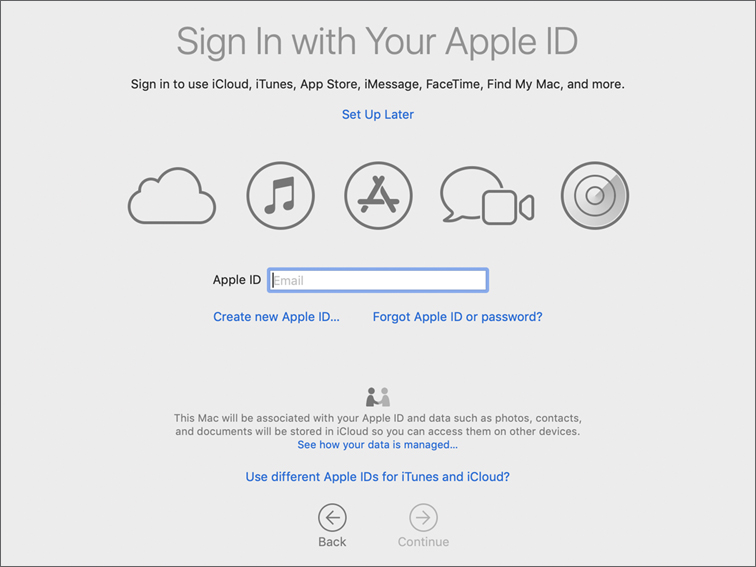
Sign In with Your Apple ID
New Mac computers and Mac computers that are upgraded to macOS Mojave might prompt you to enter your Apple ID authentication. At the “Sign In with Your Apple ID” screen, you can enter an existing Apple ID, recover a lost Apple ID or password, create a new Apple ID, or click Set Up Later to go to the next to step.
Apple ID
You can set up an Apple ID at no cost. It provides login access for Apple online stores and services. If you’ve made online purchases from Apple, you already have an Apple ID.
After you enter or create an Apple ID during Setup Assistant, the account is configured for several services, including Messages, FaceTime, and iCloud. Additionally, if you ever used the Apple ID to buy anything, it’s already configured in the App Store and Apple Books Store. But you still must enter your Apple ID password to buy items. In later Setup Assistant screens, this Apple ID is pre-entered for you.
If you use one Apple ID for iCloud, and a different Apple ID for store purchases, then you can click “Use different Apple IDs for iTunes and iCloud?” You’ll first see the “Sign In to iCloud” screen, which prompts you to enter your Apple ID for iCloud. Then you’ll see the “Sign In to iTunes and the App Store” screen, which prompts you to enter your Apple ID for store purchases.
For more information about Apple ID, see the Apple ID Support website, support.apple.com/apple-id.
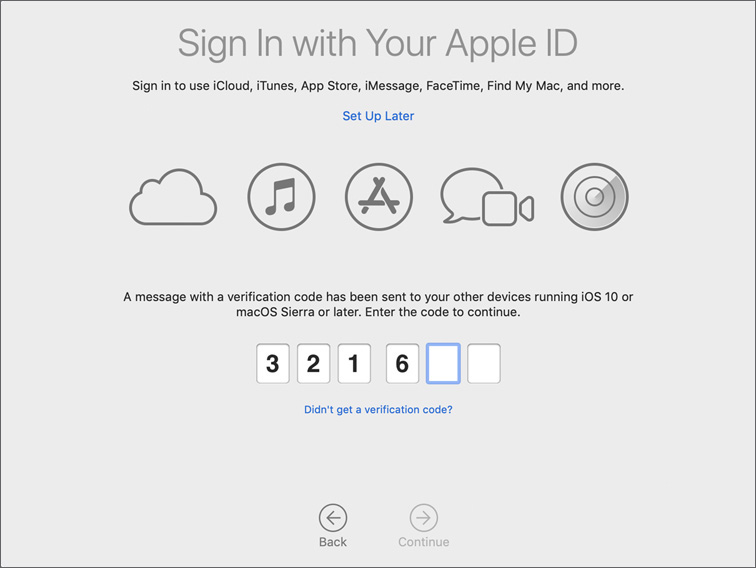
Two-Factor Authentication
To improve your Apple ID security, you should enable two-factor authentication. Two-factor authentication is available for Apple IDs with iCloud enabled and at least one device that’s using iOS 9 or OS X El Capitan 10.11 or later.
When you enter or create an Apple ID in Setup Assistant, you might encounter the following:
![]() If you enter an Apple ID that has two-factor authentication enabled, you are prompted to verify your Apple ID with additional steps.
If you enter an Apple ID that has two-factor authentication enabled, you are prompted to verify your Apple ID with additional steps.
![]() If your Apple ID has two-step verification enabled, you might be informed that your Apple ID was updated to use two-factor authentication.
If your Apple ID has two-step verification enabled, you might be informed that your Apple ID was updated to use two-factor authentication.
![]() If you’re creating a new Apple ID, you are prompted to enter your birthday, then provide your name and an existing email address to use for your Apple ID, or you can click “Get a free iCloud email address.” After you provide and verify a password for your new Apple ID, you’re prompted to enter a phone number that can be used with a text message or phone call to verify your identity. After you verify your identity with a text message or phone call, your Mac turns on two-factor authentication for your Apple ID, and it configures your Apple ID to consider your Mac a trusted device for two-factor authentication.
If you’re creating a new Apple ID, you are prompted to enter your birthday, then provide your name and an existing email address to use for your Apple ID, or you can click “Get a free iCloud email address.” After you provide and verify a password for your new Apple ID, you’re prompted to enter a phone number that can be used with a text message or phone call to verify your identity. After you verify your identity with a text message or phone call, your Mac turns on two-factor authentication for your Apple ID, and it configures your Apple ID to consider your Mac a trusted device for two-factor authentication.
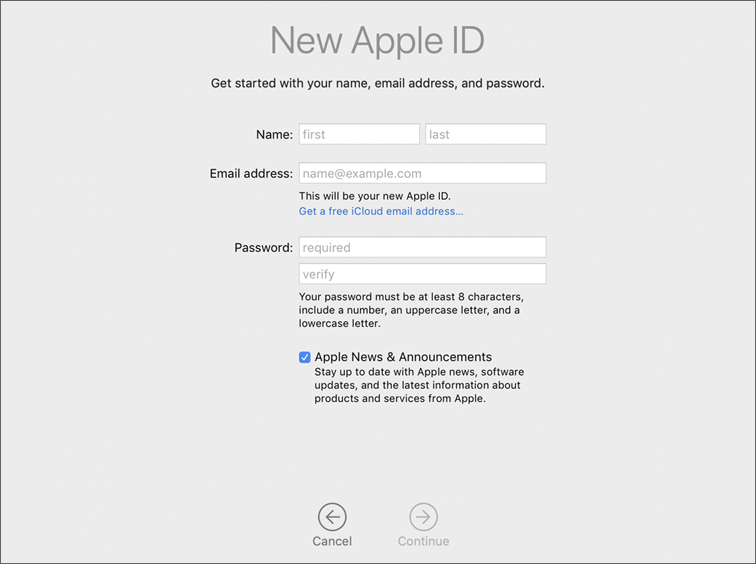
![]() If you’re entering an Apple ID that hasn’t been used in a while and doesn’t have additional security features enabled, you are prompted to update your security settings, including optionally enabling two-factor authentication.
If you’re entering an Apple ID that hasn’t been used in a while and doesn’t have additional security features enabled, you are prompted to update your security settings, including optionally enabling two-factor authentication.
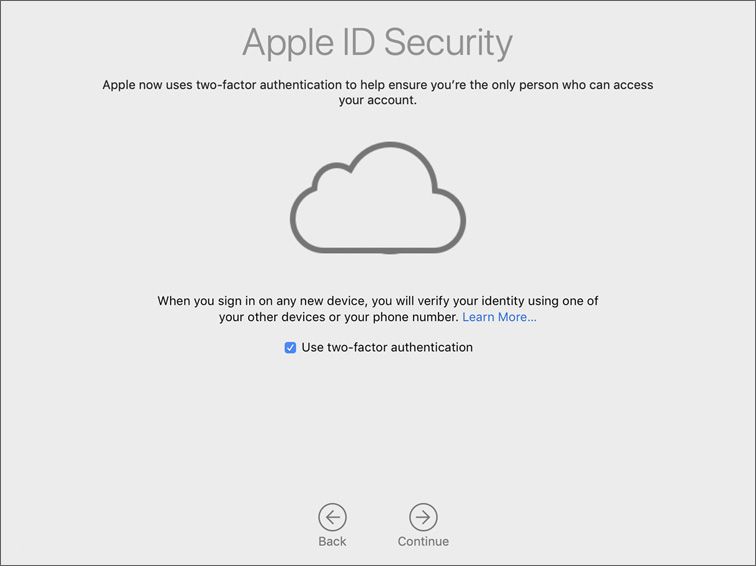
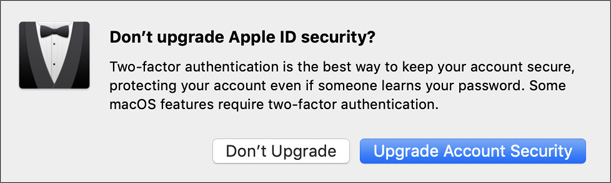
If you disable the option to use two-factor authentication, Setup Assistant displays information about the benefits of using two-factor authentication.
Once your Apple ID is enabled for two-factor authentication, two-factor authentication is permanently enabled for your Apple ID. For more information about two-factor authentication, see Apple Support article HT204915, “Two-factor authentication for Apple ID,” article HT205075, “Availability of two-factor authentication for Apple ID,” and article HT207198, “Switch from two-step verification to two-factor authentication.”
iCloud
iCloud is a free cloud-storage and communication service that you can set up on current Apple devices. Though not required for completing Setup Assistant, iCloud is the easiest way to share information between macOS, iOS, and even non-Apple devices.
Only Apple IDs that are signed in to iCloud on an Apple device have access to iCloud services. If an existing Apple ID was never used for iCloud, entering this account during Setup Assistant upgrades the Apple ID to include iCloud services. Setup Assistant configures your Mac to use iCloud for most services.
The following iCloud services are enabled by default in most cases: iCloud Drive, Photos, Contacts, Calendars, Reminders, Safari, Siri, Notes, and Find My Mac. If the Apple ID you entered has two-factor authentication turned on, iCloud Keychain will be enabled. If the Apple ID you enter belongs to the @mac.com, @me.com, or @icloud.com domain, Mail is also configured.
If you enter an Apple ID that belongs to someone under the age of 13 (made possible with Apple School Manager or Family Sharing), no iCloud services are enabled by default.
After setup, you can verify and modify iCloud service settings from iCloud preferences. iCloud is covered throughout this guide, including Lesson 9, “Manage Security and Privacy,” Lesson 18, “Install Apps,” Lesson 19, “Manage Documents,” and Lesson 24, “Manage Network Services.”
For more information about iCloud, see the iCloud Support website, support.apple.com/icloud.
Terms and Conditions
You must accept the Apple terms and conditions to complete Setup Assistant. The content of the Terms and Conditions page varies depending on whether you entered an Apple ID in the previous step. When you accept the terms and conditions, you don’t send personal or technical information to Apple. In fact, you can accept Terms and Conditions even if your Mac is offline and never accesses the Internet.
For more information about Apple terms and conditions, visit the Apple Legal website, www.apple.com/legal/.
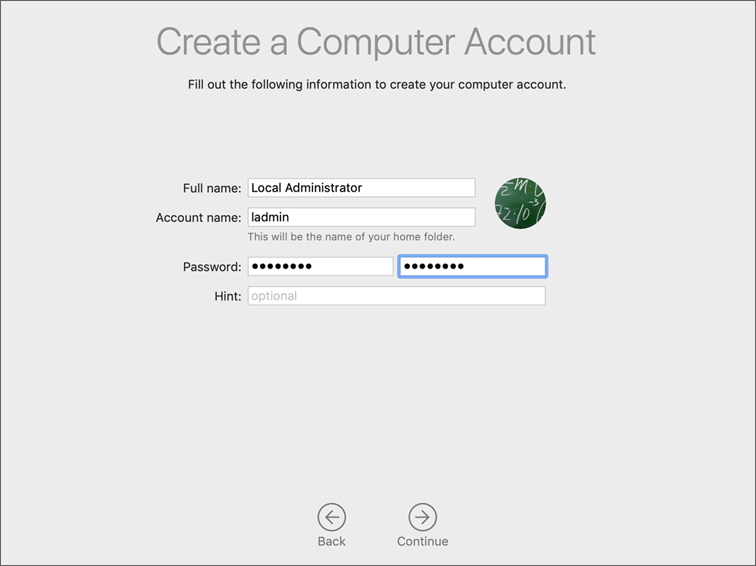
Create a Computer Account
In the “Create a Computer Account” screen, you must create the initial administrator user account for the Mac. At first, this account is the only administrator user account allowed to modify system settings, including the creation of additional user accounts. Until you create additional administrator user accounts, you must remember the authentication information for this account.
Apple ID Provided During Setup
If you previously entered an Apple ID, that information is used to configure services for a new local administrator account. Setup Assistant automatically populates the full name based on your full name associated with your Apple ID. Then Setup Assistant uses the full name to prepopulate the account name, which is used to create the user’s home folder. You can change the full name or account name here.
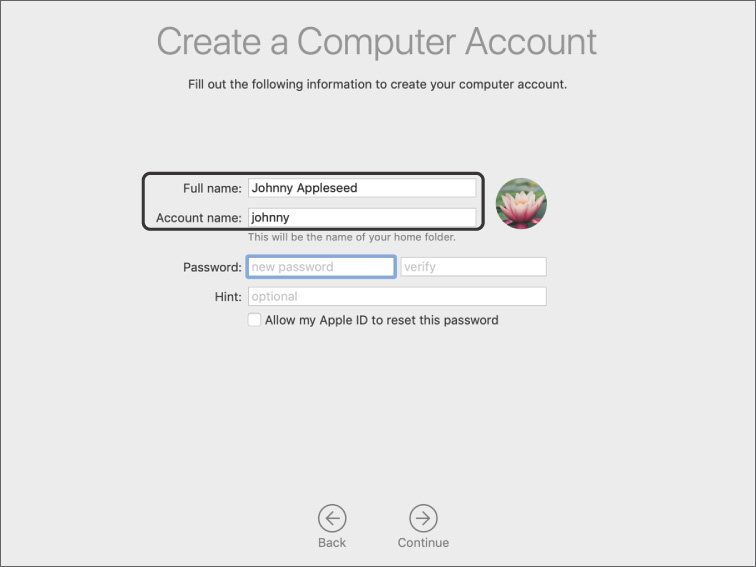
You must provide a new password for the local administrator account. The password you define for this account cannot match the Apple ID password.
You can define a password hint, which is a clue intended to help you if you forget this account’s password. Although you can define more than one word for the password hint, you can’t set the password hint to the same text as the password.
Apple ID Not Provided During Setup
If you didn’t enter an Apple ID during Setup Assistant, the name fields won’t be prepopulated. After setup, you can modify local user accounts from Users & Groups preferences, and adjust iCloud settings from iCloud preferences. Additional user account creation and management are detailed in Lesson 7, “Manage User Accounts.”
iCloud Keychain
After you create the local administrator account, you might see the iCloud Keychain screen. If you provided an Apple ID that doesn’t have two-factor authentication, the iCloud Keychain screen appears with two choices: “Set up iCloud Keychain” and “Set up later.” This feature securely saves your private information, like service user names and passwords, to your iCloud account. This enables access from multiple devices.
If you don’t set up iCloud Keychain now, you can do it later from iCloud preferences. Lesson 10, “Manage Password Changes,” covers this topic in greater detail.
Express Set Up
The Express Set Up screen enables you to quickly configure several options at once.
If you click Customize Settings, you see these screens in Setup Assistant:
![]() Enable Location Services
Enable Location Services
![]() Analytics
Analytics
![]() Siri (for Mac computers that have a built-in microphone)
Siri (for Mac computers that have a built-in microphone)
If you click Continue, the screens are skipped. It’s the same as if you click Customize Settings and then enable each option for each of the three screens.
Enable Location Services
If you enable Location Services, you allow macOS and apps to locate your Mac using a Wi-Fi–based geolocation technology. You need Location Services for Find My Mac, which you can enable later during Setup Assistant. You can further adjust Location Services in Security & Privacy preferences. Lesson 9, “Manage Security and Privacy,” covers Location Services in greater detail.
Time Zone
If you enable Location Services, macOS sets the time zone based on the Mac location. This requires an Internet connection and Location Services to be enabled.
If you don’t enable Location Services, you see the Select Your Time Zone screen. In this screen, if you enable the option to “Set time zone automatically using current location,” you’ll be prompted to turn on Location Services. Otherwise, select a city in your time zone.
After setup, you can verify and modify settings from Date & Time preferences. Regardless of your Location Services choice, macOS sets the date and time using Apple time servers.
Analytics or iCloud Analytics
macOS can send diagnostic and usage information to Apple and third-party developers. If you decide to share this information, you enable developers to improve system and app performance. If providing this kind of feedback is a privacy concern for you, you can disable this option. If you click Continue at the Express Set Up screen, this option is enabled. After setup, you can verify and modify these settings from Security & Privacy preferences, as covered in Lesson 9.
Siri
If you click Continue at the Express Set Up screen and your Mac has a built-in microphone, then Siri is enabled. If you don’t want to use Siri, leave it disabled during Setup Assistant. After setup, you can verify and modify Siri settings from Siri preferences, as covered in Lesson 9.
Set Up “Hey Siri”
Some newer Mac computers support Hey Siri, a feature that enables you to say, “Hey Siri,” and then make your request. If you enable Siri and your Mac supports Hey Siri, then Setup Assistant will ask you to speak various phrases to set up Hey Siri. Or you can click Set Up “Hey Siri” Later. For more information, read Apple Support article HT209014, “Devices that support ‘Hey Siri.’”
iCloud Drive
If you previously entered an Apple ID that wasn’t upgraded to support iCloud Drive, you are prompted to upgrade your stored iCloud documents. You must do this once if you want to access content that you stored in iCloud on OS X Yosemite 10.10 and later or iOS 8 and later devices. If you are setting up a new Apple ID with iCloud, or if you are using iCloud Drive, you don’t need to upgrade your account.
All Your Files in iCloud
Users signed in with an Apple ID that supports iCloud Drive see the option to store files from their Documents and Desktop folders in iCloud Drive.
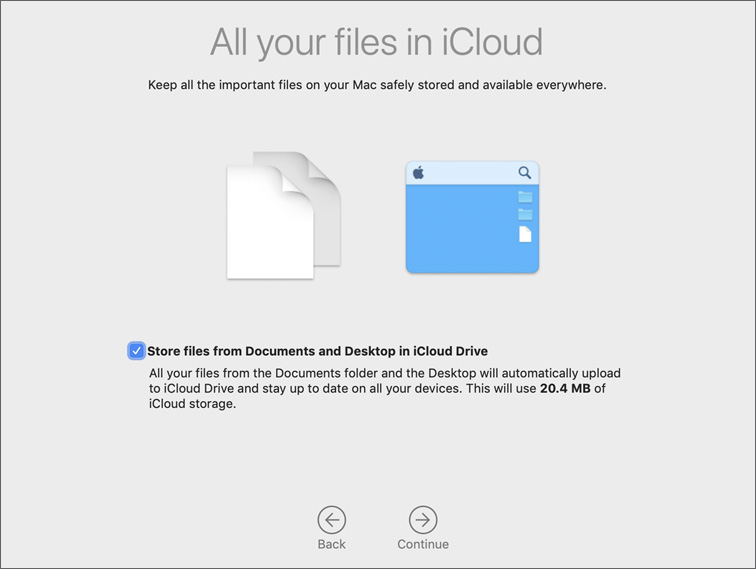
If you choose not to upgrade to iCloud Drive or move the Documents and Desktop folders to iCloud Drive, you can do so later from iCloud preferences. Lesson 19, “Manage Files,” covers this topic.
FileVault Disk Encryption
You can use FileVault to protect your startup disk. If you complete Setup Assistant on a late-model portable Mac that doesn’t have FileVault enabled, you might be prompted to enable FileVault. You see this screen in new Mac computers and Mac computers you upgrade to macOS Mojave only if the Mac has a single local user account and that account is signed in to iCloud.

If you select the option to turn on FileVault, you can save a FileVault recovery key to iCloud. If you don’t choose to allow iCloud to unlock the disk, you see another screen showing the FileVault recovery key. In this case, you are responsible for remembering the recovery key.
Note ![]()
macOS sometimes says “iCloud account” instead of “Apple ID.” Because you access Apple services, including iCloud, with Apple ID authentication, this book uses “Apple ID” when it describes Apple service authentication.
Mac computers with the Apple T2 Security Chip integrate security into software and hardware to provide encrypted-storage capabilities. The startup disk in Mac computers with the T2 chip is encrypted. Even so, you should turn on FileVault so that your Mac requires a password to decrypt your data. Read Apple Support article HT208344, “About encrypted storage on your new Mac,” for more information.
If your Mac doesn’t have the T2 chip and you turn on FileVault, macOS begins to encrypt the system volume contents. Encryption finishes in the background while your Mac is connected to power.
After you turn on FileVault, you need your account password to unlock the encrypted startup disk after you restart your Mac. If you create additional user accounts, the additional users can also unlock the encrypted start disk at startup. If you lose all your user account passwords, your startup disk remains locked unless you reset an account password with your iCloud account or with a FileVault recovery key.
If you don’t enable FileVault, you can do so later from Security & Privacy preferences. Lesson 12, “Manage FileVault,” covers this topic in greater detail.
Touch ID
MacBook Pro computers featuring Touch ID present additional setup screens. If you don’t set up Touch ID, you can set it up later in Touch ID preferences. Read Apple Support article HT207054, “Use Touch ID on your Mac” for more information.
Apple Pay
If you enabled Touch ID and provided your Apple ID, you see the Apple Pay screen. If you don’t set up Apple Pay, you can set it up later in Wallet & Apple Pay preferences.
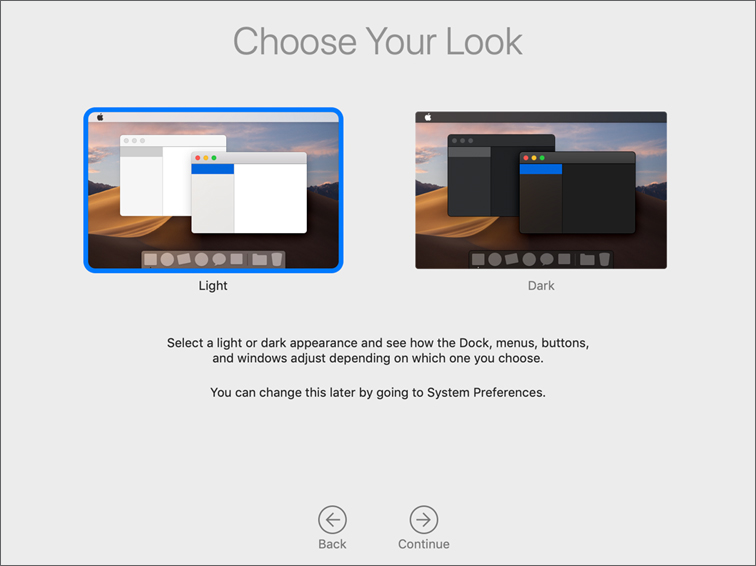
Choose Your Look
Dark Mode is a new look in macOS Mojave that helps you focus on your work. Select a light or dark appearance and see how the Dock, menus, buttons, and windows adjust. You can use System Preferences to change the look later.
True Tone Display
MacBook Pro models introduced in 2018 feature a technology called True Tone that makes images on your display and Touch Bar appear more natural. True Tone technology uses multichannel sensors to adjust the color and intensity of your display and Touch Bar to match the ambient light. Click and hold the See Without True Tone Display button to see what your display looks like no matter what time of day it is.
You can turn True Tone on or off in the System Preferences Displays pane. Read Apple Support article HT208909, “Use True Tone on your MacBook Pro,” for more information.
Reference 3.2 Manage System Settings
After you complete Setup Assistant, you can modify macOS and user settings with System Preferences and configuration profiles.
Open System Preferences
There are at least five ways to open System Preferences.
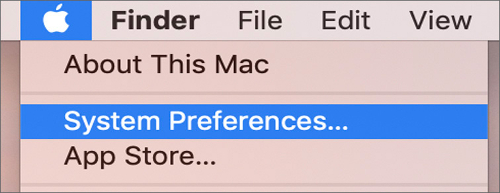
![]() You can open System Preferences from the Apple menu.
You can open System Preferences from the Apple menu.
![]() You can open System Preferences from the /Applications folder.
You can open System Preferences from the /Applications folder.
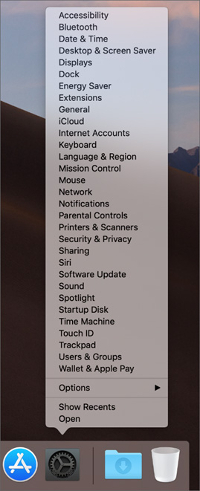
![]() You can open System Preferences from the Dock. The Dock is a convenient place to keep items you use frequently. It’s at the bottom of your screen after the first time you log in. If you see a red badge on the System Preferences icon in the Dock, you need to take one or more actions. For example, if you didn’t fully set up iCloud, the badge appears on the icon in the Dock. When you click the icon, iCloud preferences opens and you can complete setup. Click and hold System Preferences in the Dock to see the preferences you can configure. With a default installation of macOS, System Preferences is in the Dock, but you can remove it.
You can open System Preferences from the Dock. The Dock is a convenient place to keep items you use frequently. It’s at the bottom of your screen after the first time you log in. If you see a red badge on the System Preferences icon in the Dock, you need to take one or more actions. For example, if you didn’t fully set up iCloud, the badge appears on the icon in the Dock. When you click the icon, iCloud preferences opens and you can complete setup. Click and hold System Preferences in the Dock to see the preferences you can configure. With a default installation of macOS, System Preferences is in the Dock, but you can remove it.
![]() Open System Preferences from Launchpad. It’s an easy way to find and open apps. Click Launchpad in the Dock, or pinch-close your thumb and three fingers on your trackpad, then click System Preferences.
Open System Preferences from Launchpad. It’s an easy way to find and open apps. Click Launchpad in the Dock, or pinch-close your thumb and three fingers on your trackpad, then click System Preferences.
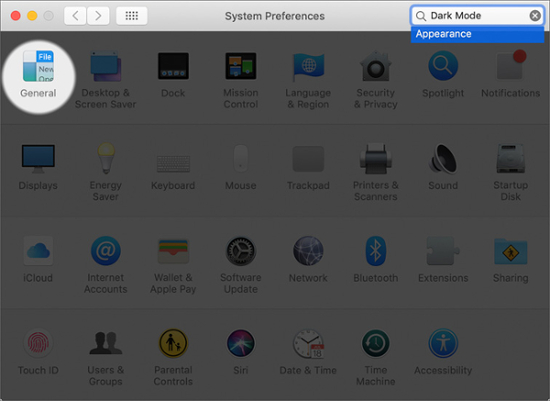
![]() Open System Preferences from Spotlight.
Open System Preferences from Spotlight.
Use System Preferences
System Preferences organizes options for your Mac into preferences. For example, use Dock preferences to set options for your Dock. System Preferences displays preferences icons in four or five unlabeled rows. The first four rows show personal, hardware, Internet, and system settings preferences that are built into macOS. A fifth row appears if you install additional preferences.
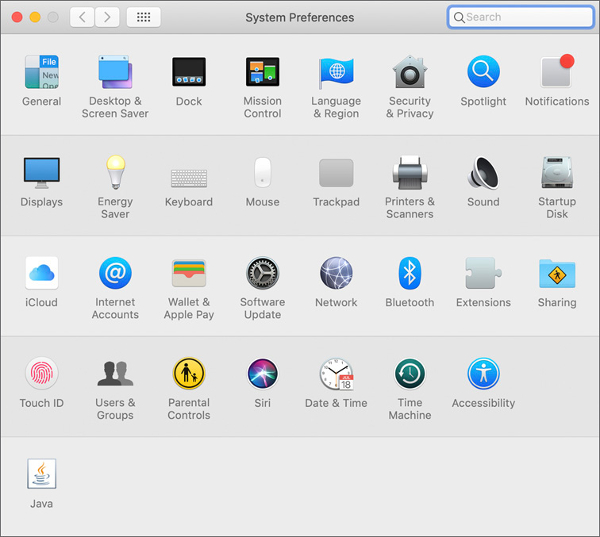
In System Preferences, the View menu gives you quick access to preferences. You can organize preferences alphabetically or by category. You can hide some preferences when you choose View > Customize.
If you’re not sure which preferences you need, enter a search term in the Search field in the upper-right corner of System Preferences. System Preferences lists the options that match your search term and highlights the preference panes where they’re located.
Click a preferences icon to access its settings. Most System Preferences changes are instantaneous and don’t require you to click an Apply or OK button. Click the Show All button (a grid of squares) from any of the preference panes to return to the System Preferences pane.
Some preferences have a lock button in the lower-left corner. These preferences can be accessed only by an administrator user account.

If you are logged in as a non-administrator user, more preferences are locked than if you are logged in as an administrator user. For example, if you are logged in as an administrator user, Time Machine preferences won’t show the lock button. If you’re logged in as a non-administrator user, Time Machine preferences is locked.
The lock button also appears outside System Preferences. The lock icon is an indication that access to an item requires administrator authentication, often when the item represents a change that affects all users.
Most System Preferences panes include a Help button (question mark) in the lower-right corner for more information about the options.
Configure Appearance, Accent, and Highlight Color
Setup Assistant asks you to select Light Mode or Dark Mode. You can always use System Preferences to change your selection. In System Preferences, open General preferences:
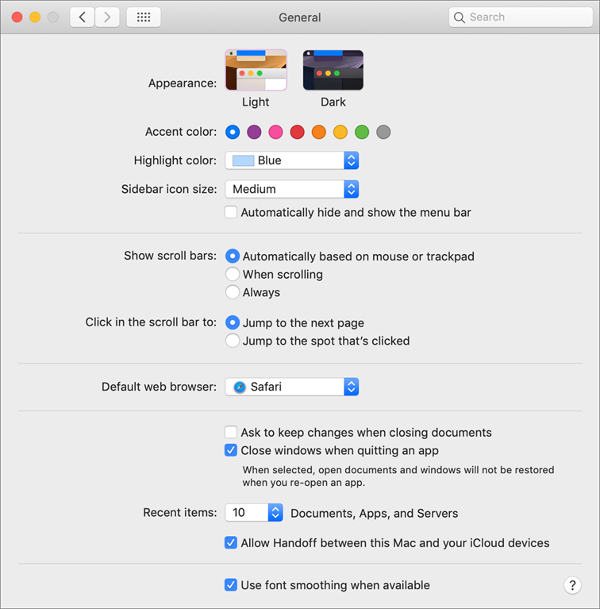
For Appearance, select Light or Dark. When you update the Accent color, the Highlight color changes, and you can further adjust the Highlight color. The changes you make happen immediately, and System Preferences updates the look of the graphics in the Appearance preview.

Configure Dynamic Desktop
By default, your desktop picture changes throughout the day, based on your location and time zone. You can configure this in the Desktop & Screen Saver preferences. In the following figure there are two built-in Dynamic Desktop themes you can use.
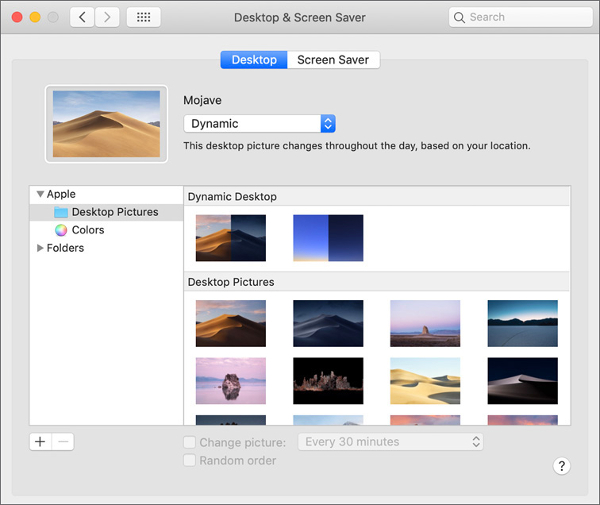
If you use the default Mojave Dynamic Desktop, you can click the menu and choose a desktop that is still.

If you select the other option in Dynamic Desktop, Solar Gradients (light blue on the left and dark blue on the right), your desktop picture also changes throughout the day.
Configure Accessibility
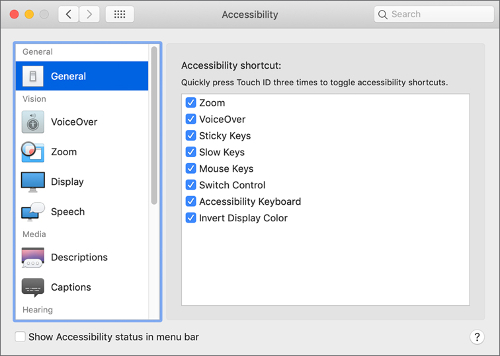
In System Preferences, click Accessibility to configure the settings.
Use the General pane in Accessibility preferences to toggle accessibility shortcuts that appear in the Accessibility Options shortcut panel, which you can use to quickly enable or disable accessibility options.
At any point when you are logged in, you can use a keyboard shortcut to open the Accessibility Options shortcut panel:
![]() Press Option-Command-F5.
Press Option-Command-F5.
![]() If your Mac has Touch ID, quickly press Touch ID three times.
If your Mac has Touch ID, quickly press Touch ID three times.
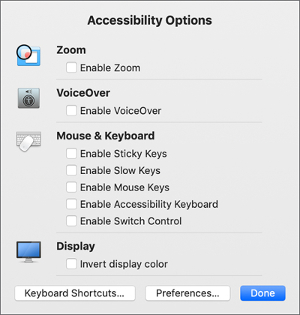
In the Accessibility Options shortcut panel, select accessibility options to turn them on. Or use the Tab key to navigate, and press the Space bar to select an option. Press Return or click Done to close the Accessibility Options shortcut panel.
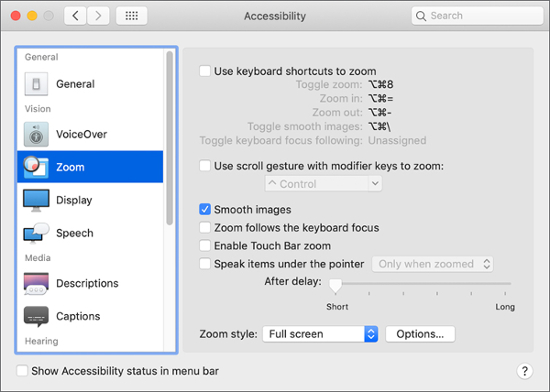
As another example of Accessibility preferences, you can use the Zoom pane to configure how to make the entire screen larger, or enlarge just the portion of the screen where you move the pointer.
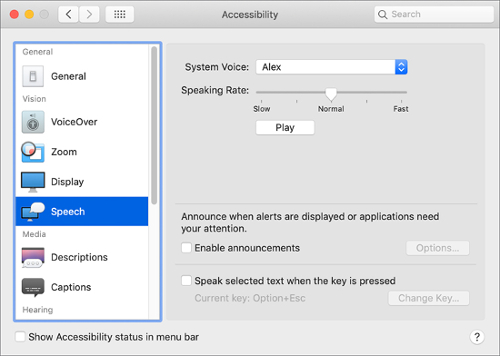
Use the Speech pane of Accessibility preferences to customize the voice that your Mac uses. You can turn on announcements when alerts are displayed or apps need your attention. You can turn on the option for your Mac to speak the selected text when you press a keyboard shortcut.
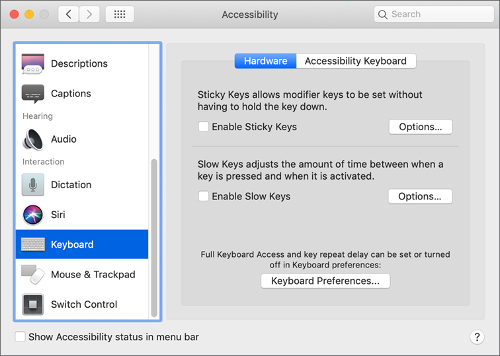
Open the Keyboard pane of Accessibility preferences to turn on Sticky Keys and Slow Keys. Sticky Keys enables you to use modifier keys (like Shift, Fn [Function], Control, Option, and Command) in keyboard shortcuts without holding down modifier keys. When Sticky Keys is turned on, each time you press a modifier key, its symbol appears in the upper-right corner until you use it in a keyboard shortcut.
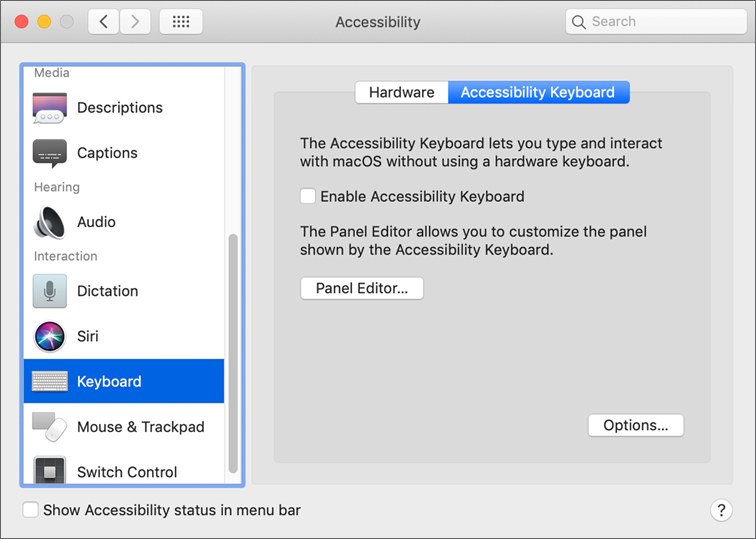
At an alternative to using the hardware keyboard, you can use the onscreen Accessibility Keyboard to type and interact with macOS.

Turn on the Accessibility Keyboard in the Accessibility Keyboard pane.
The Switch Control pane enables you to use one or more adaptive devices to enter text, interact with items on your screen, and control your Mac.
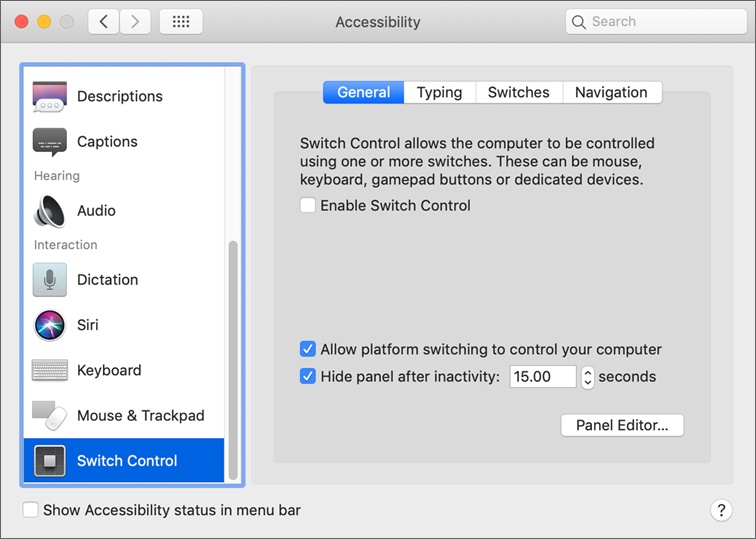
When you turn on Switch Control, the Switch Control Home panel appears.

You can use the Panel Editor to add custom panels to the Switch Control or Accessibility Keyboard panel collection.
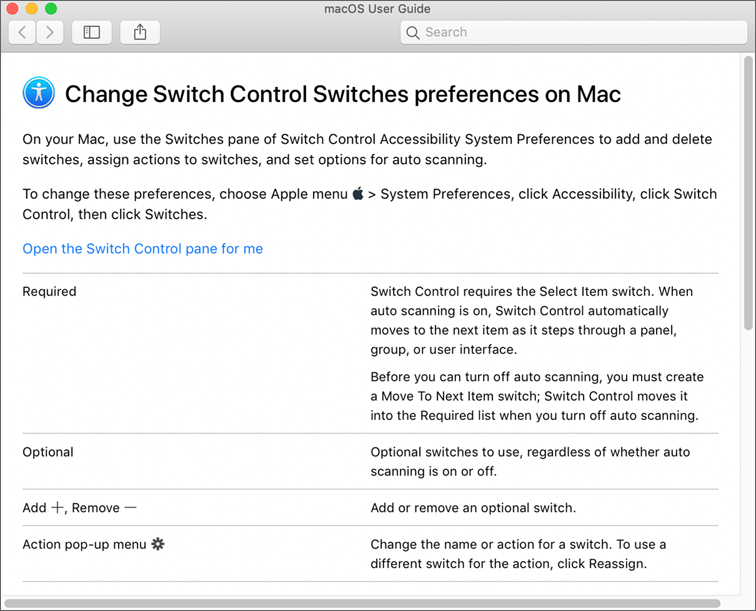
In Accessibility preferences, select an item in the left column and click the Help button (question mark) to read more about that topic. For example, with Switch Control selected in the Accessibility pane of System Preferences, click Switches, then click Help to read “Change Switch Control Switches preferences on Mac.”
Configuration Profiles
Configuration profiles, trust profiles, and enrollment profiles enable you to configure and manage Apple devices.
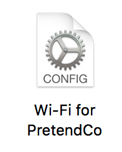
A profile is a document that includes instructions for settings. For example, configuration profiles might contain settings for Internet accounts or Network preferences. Profile documents have the .mobileconfig filename extension and an icon that looks like a gear.
When you install a profile, user and system settings are automatically configured based on the profile’s content. You are able to create a configuration profile that contains a variety of settings and share the profile with multiple users. The users can install the profile instead of manually configuring settings.
Configuration profiles contain settings that automatically configure certain functions. Trust profiles contain digital certificates, which are used to validate and secure service connections. Enrollment profiles are used to establish a connection to a profile management service, more commonly known as MDM. Apple and third-party developers provide software for creating configuration profiles. Apple offers an MDM solution called Profile Manager, a service of the Server app.
You can share profiles just like you share documents. For example, you can share a profile through email, from a website link, or using AirDrop (which is covered in Lesson 25, “Manage Host Sharing and Personal Firewall.”) You can automatically push profiles to a Mac that’s enrolled in an MDM solution like Profile Manager. You can find out more about Profile Manager at help.apple.com/profilemanager/mac/.
Install Configuration Profiles
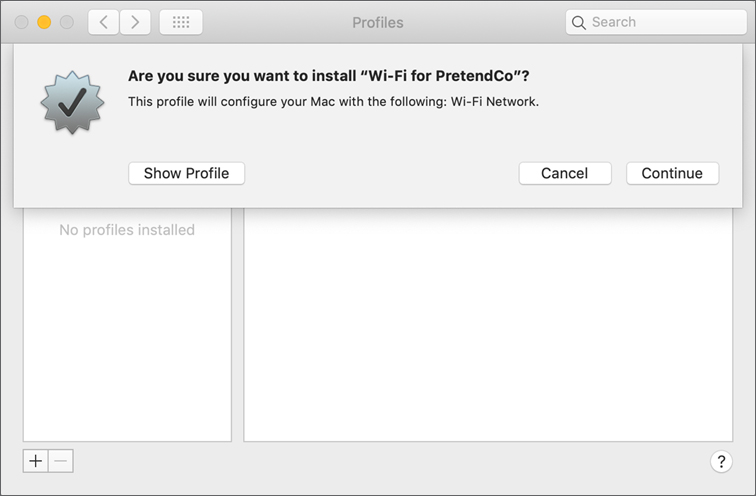
The Profiles preference pane appears only when profiles are installed. If you have a profile that must be manually installed, double-click the file to install it. This opens the profile document in the Profiles pane of System Preferences.
From Profiles, any user can install, verify, or remove a profile.
You might have to provide administrator authentication to install or remove some profiles. For example, a profile that enrolls your Mac in your organization’s MDM solution requires that you authenticate as an administrator.
Exercise 3.1 Configure a Mac for Exercises
![]() Prerequisite
Prerequisite
![]() Your Mac must have a new installation of macOS Mojave 10.14 and must not have been configured.
Your Mac must have a new installation of macOS Mojave 10.14 and must not have been configured.
In this exercise you learn how your initial configuration settings affect macOS. You configure a clean macOS installation on a Mac as if you just took it out of the box. You use Setup Assistant to answer some questions and create the initial administrator user account.
Configure macOS with Setup Assistant
In the Welcome screen, select the appropriate region and click Continue. If the VoiceOver tutorial begins, you can either listen or move forward. VoiceOver is an assistive technology.
At the Select Your Keyboard screen, select the appropriate keyboard layout, and click Continue.
Setup Assistant evaluates your network environment and tries to determine whether you are connected to the Internet. This can take a few moments.
If you are asked to select your Wi-Fi network or how you connect to the Internet, respond for your Internet connection type.
Ask your facilitator how you should configure your Mac. Your Wi-Fi network might be named PretendCo and require the password Apple321!.
If you aren’t asked about your Internet connection, your Mac network settings are already configured via DHCP, and you may move to step 4. After your network connection is configured, click Continue.
At the Data & Privacy screen, read Apple’s privacy policy, and then click Continue.
In the “Transfer Information to This Mac” screen, select “Don’t transfer any information now,” and click Continue.
If you were replacing a Mac, other options would assist you in migrating user data and system information from the old Mac to the new one.
If the “Sign in with Your Apple ID” screen appears, select “Set Up Later,” and then click Skip in the confirmation dialog that appears.
You set up an Apple ID account in a later exercise.
At the “Terms and Conditions” screen, read the macOS Software License Agreement. When you are done, click Agree.
In the confirmation dialog that appears, click Agree.
At the “Create a Computer Account” screen, enter the following information and then click Continue:
Note

Create this account as specified here. If you don’t, future exercises might not work as written. This book uses bold text to indicate text you should enter exactly as shown.
Full name: Local Administrator
Account name: ladmin
Password: Apple321!
Don’t provide a password hint.
You may optionally change the account picture.
Note
On the Mac you use for your daily work, never use a password such as Apple321!. It’s easy to guess, so it’s not secure.
At the Express Set Up screen, click Continue. Your Mac enables Location Services, Analytics, and Siri, which share diagnostics and usage data with Apple and, by proxy, third-party developers.
If you are prompted to set up Touch ID, click Continue; click Set Up Touch ID Later, and then click Continue in the confirmation dialog. These exercises don’t require Touch ID.
If you are prompted with the Siri screen, deselect Enable Ask Siri, and click Continue.
At the Choose Your Look screen, choose your preferred appearance, and then click Continue.
If the True Tone Display screen appears, click Continue.
Your Mac is now set up and ready for use.
Exercise 3.2 Configure System Preferences
![]() Prerequisite
Prerequisite
![]() You must have created the Local Administrator account (Exercise 3.1, “Configure a Mac for Exercises”).
You must have created the Local Administrator account (Exercise 3.1, “Configure a Mac for Exercises”).
In this exercise, you configure preference settings to ease navigation and provide a consistent classroom experience. You also configure app and system preferences. In a production environment, you can change preferences for yourself and your users.
Adjust the Finder Preferences
The default Finder settings make it easy for users to find and work with their files. You can configure the settings so that you can access files outside of a user’s home folder.
The Updates Available notification might appear at any time during this exercise or while you’re using your Mac. During this exercise, click Later, and select Remind Me Tomorrow from the pop-up menu.
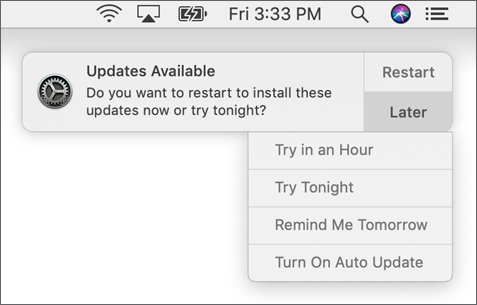
You install software updates in Lesson 6, “Update macOS,” exercises.
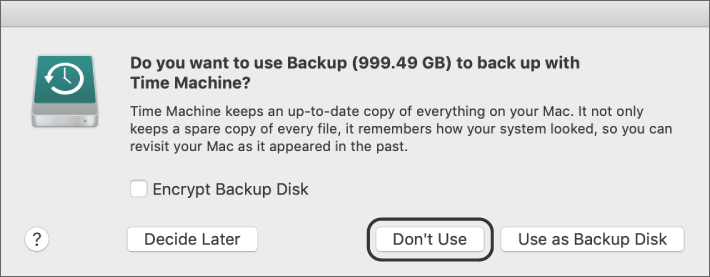
If dialogs open with a “Do you want to use some volume to back up with Time Machine?” prompt, click Don’t Use in each dialog.
From the menu bar, choose Finder > Preferences. If you prefer, you can use the keyboard shortcut Command-Comma.
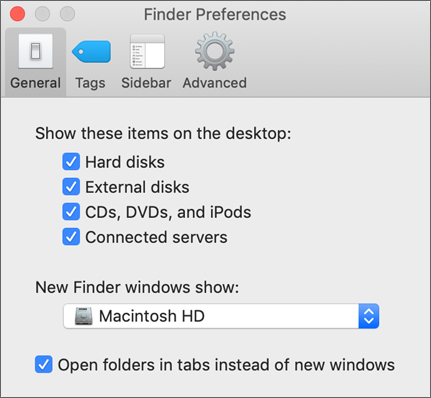
If necessary, click General in the toolbar, then select “Hard disks” and “Connected servers” to have macOS display them on your desktop.
From the “New Finder windows show” menu, choose your startup volume (named Macintosh HD on a fresh installation of macOS).
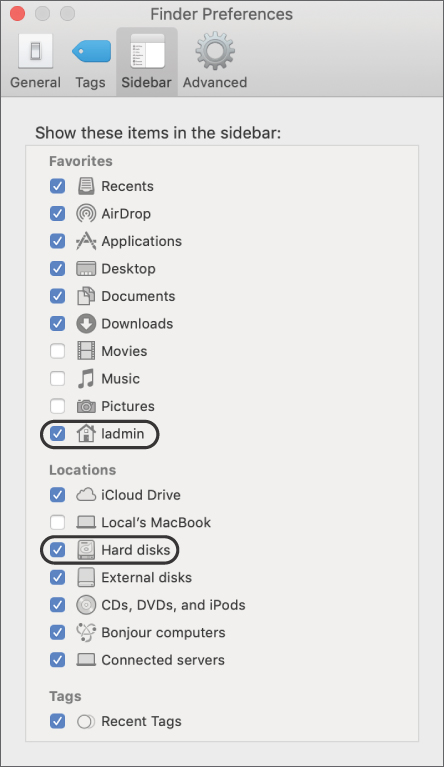
In the toolbar of the Finder Preferences window, click the Sidebar button.
Select “ladmin” in the Favorites section of the sidebar and “Hard disks” in the Locations section. “Hard disks” should be fully selected (a checkmark in the checkbox), not just partially selected (a dash in the checkbox).
Close the Finder Preferences window. You can use the Command-W shortcut if you wish.
Set the Computer Name
When performing the exercises in a classroom setting, your Mac has the same name as the other participants’ Mac computers. To avoid confusion, give your Mac a unique name.
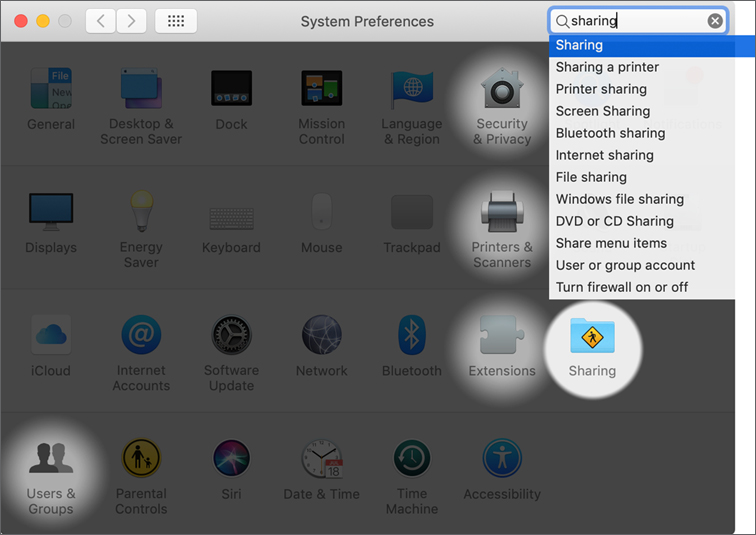
From the Apple menu, choose System Preferences.
In System Preferences, click the icon for Sharing preferences.
If you aren’t sure where to find something in System Preferences, use Spotlight in the top right of the window. It searches for matching or related settings and highlights the preference panes where they are located.
Enter a unique name for your Mac in the Computer Name field. If you are performing these exercises in a class, enter Mac-NN, where NN is your participant number.
Press Return.
Your local host name (.local name) displayed under your computer name updates to match your new computer name.

From the left sidebar, select the Remote Management checkbox.
Remote Management allows your facilitator to control the keyboard and mouse, gather information, and update your Mac throughout the course, enabling him or her to assist you with steps if necessary.
A dialog asks what you want users to be able to do using Remote Management.
Press and hold the Option key while clicking one of the checkboxes to select all options in the dialog.
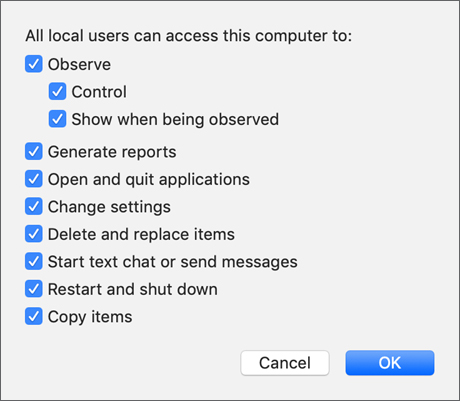
Click OK.
Adjust Your Trackpad and Mouse Preferences
In macOS you can customize the user interface. For example, depending on what you are used to, you might want to change the default scrolling behavior. Also, you can control how macOS recognizes primary and secondary mouse clicks (analogous to left- and right-clicks in other operating systems).
Since Control-click works as a secondary click, these exercises describe it as Control-click.
Click the Show All (grid icon) button in the toolbar.
The Show All button shows all System Preference pane icons and can aide your navigation.

If you are using a trackpad, select the Trackpad pane.
 Adjust the “Tap to click” and “Secondary click” options to your liking. A secondary click opens shortcut menus, equivalent to clicking the right mouse button or Control-clicking. Click Scroll & Zoom, and use the “Scroll direction: Natural” option to adjust which direction it works. The default is that if you move two fingers up you move the window contents up. Check the other options under Scroll & Zoom and More Gestures and make appropriate changes.
If you are using a mouse, select the Mouse pane.
If your mouse has a scroll wheel or equivalent, use the “Scroll direction: Natural” option to adjust in which direction it works. The default is that if you push the wheel up you move the window contents up. If your mouse has multiple buttons, use the menu on the left side of the mouse image to control which button is the primary button. You use this button to select. It’s usually the left button. Use the menu on the right side of the mouse image to control which button is the secondary button. You use this button to open shortcut menus. It’s usually the right button, or Control-click.
Enable FileVault
Note ![]()
If you lose the passwords and the recovery key for a FileVault-encrypted volume, you won’t have access to the content stored in it. If you are performing this exercise on your own Mac and have files you don’t want to risk losing, back up your Mac before starting this exercise.
In this exercise, you turn on FileVault to encrypt your startup volume. Enabling encryption on your startup volume is a best practice and can be done at any time. You will able to continue to work on your Mac while the startup volume is being encrypted.
Open the Security & Privacy pane in System Preferences.
Click FileVault.
Unlock the preference pane, and authenticate as Local Administrator (password: Apple321!).
Click Turn On FileVault.

If a dialog appears saying “A recovery key has been set by your company, school, or institution,” it means your Mac was preloaded with an institutional recovery key (described in Apple Support article HT202385, “Set a FileVault recovery key for Mac computers in your institution”). In this case, click Continue and skip to step 9. You will also not be able to perform Exercise 12.2, “Use a FileVault Recovery Key.”
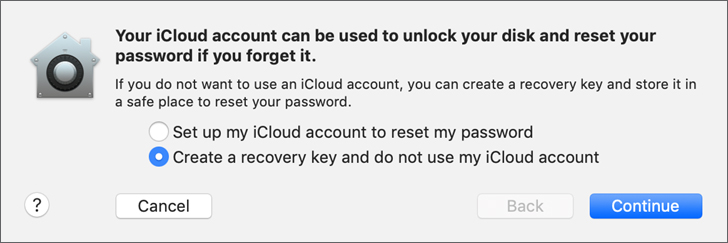
If an institutional key wasn’t set, a dialog appears giving you the choice between allowing your iCloud account to unlock the disk or creating a recovery key. The dialog will be slightly different if you haven’t linked the Local Administrator account to an Apple ID.
Select “Create a recovery key and do not use my iCloud account” and click Continue.
Record your recovery key. Your recovery key will be different than the key in this example.
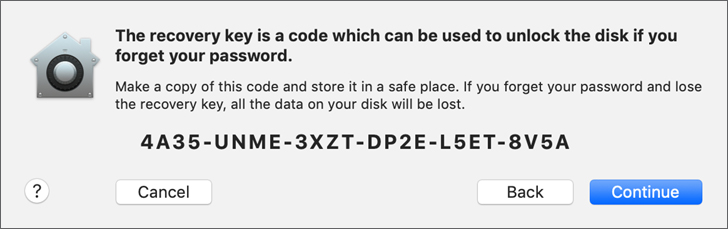
Recovery key: ______________________________________________
You should store the recorded recovery key in a physically secure location. You could take a screenshot of the recovery key window, but you would need to copy it to someplace else to make it available if you get locked out of your Mac.
Click Continue to begin the encryption process.

Encrypting the entire volume might take a while depending on the speed of your Mac, the type of hard disk, and the amount of data. You can use your Mac normally during the encryption process.
Quit System Preferences.
Because System Preferences is a single-window app, you can either click the close button or use the System Preferences menu and select Quit System Preferences.
Exercise 3.3 Download Participant Materials
![]() Prerequisite
Prerequisite
![]() You must have completed Exercise 3.2, “Configure System Preferences.”
You must have completed Exercise 3.2, “Configure System Preferences.”
In this exercise, you download the participant materials (called ParticipantMaterials) required for the rest of the exercises.
Connect to the Classroom Server
Connect to the file server (called server) to download the participant materials.
If necessary, open a new Finder window. Choose File > New Finder Window or press Command-N.
Look for the server named server in the Locations section of the sidebar. If server isn’t shown, click Network to view the shared items.
Select server. If you had to click Network in the previous step, you have to double-click the server icon.
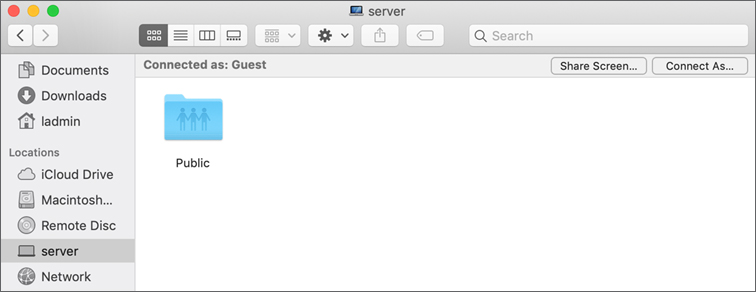
Open the Public folder.
Copy the ParticipantMaterials Folder to Your Mac
In the Public folder, select (single-click) the ParticipantMaterials folder.
Copy the folder by choosing Edit > Copy “ParticipantMaterials” from the menu bar, by pressing Command-C, or by Control-clicking the folder and choosing Copy “ParticipantMaterials” from the shortcut menu.
Open Macintosh HD (either from your desktop or from the Finder window sidebar).
Open the Users folder.
Open the Shared folder.
Paste the ParticipantMaterials folder into the Shared folder by choosing Edit > Paste Item from the menu bar, by pressing Command-V, or by Control-clicking in the Shared folder and choosing Paste Item from the shortcut menu.
This creates a copy of the participant materials on your Mac. If your facilitator included software updates in the participant materials, it may take several minutes to download them. You don’t need to wait for the download to finish.
Put your copy of the ParticipantMaterials folder in a place where you can find it.
Drag the ParticipantMaterials folder into the right section of the Dock. The Dock is divided into up to three sections. The left side holds apps, and the right side holds folders, documents, and other items. The Dock can also display a middle section that holds up to three apps that you’ve recently opened and aren’t otherwise in the Dock. Place the ParticipantMaterials folder in the right section of the Dock, next to other entries—so it is added to the Dock—rather than over another entry, which would move it into that folder. Optionally, drag the ParticipantMaterials folder to the Finder sidebar in the Favorites section. Place it between other entries.
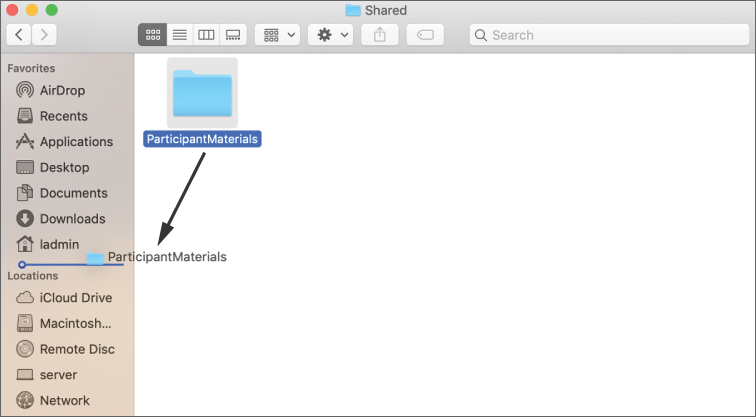
Choose Go > Applications or use the shortcut Shift-Command-A.
Drag the TextEdit app into the left side of the dividing line in your Dock so that you have an easy way to open it.

Wait for the ParticipantMaterials folder to finish downloading.
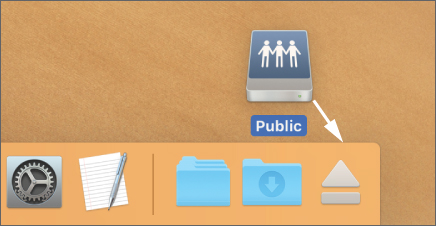
Unmount the Public folder by dragging its icon from the desktop onto the eject icon at the right side of the Dock. The Eject icon replaces the Trash icon when you select something that’s ejectable.
Exercise 3.4 Install a Configuration Profile
![]() Prerequisite
Prerequisite
![]() You must have completed Exercise 3.3, “Download Participant Materials.”
You must have completed Exercise 3.3, “Download Participant Materials.”
You can manually configure settings in macOS for one Mac. You can also configure one or many Mac computers at one time with configuration profiles.
In this exercise, you manage Dock settings with a configuration profile.
Change Your Dock Settings with a Configuration Profile
Locate the Dock at the bottom of your screen and note its configuration. It may differ slightly from the example shown here.

Open the ParticipantMaterials folder. Remember that you placed a shortcut to it in your Dock.
Open the Lesson3 folder.
Double-click Dock.mobileconfig to install the profile.
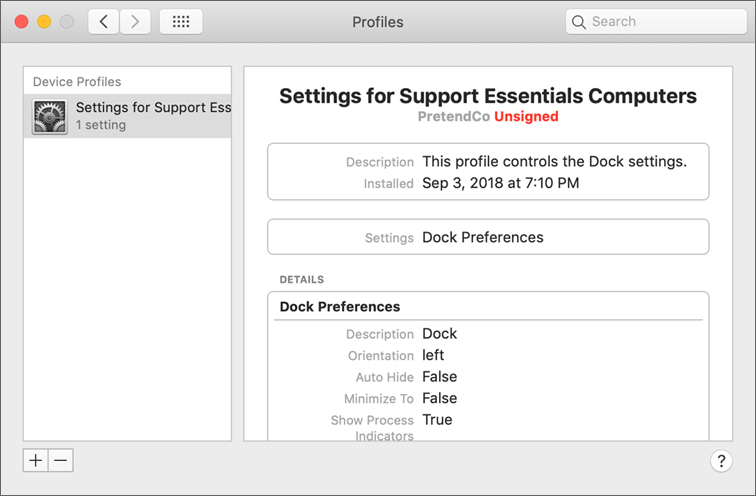
The profile automatically opens in the Profiles pane of System Preferences.
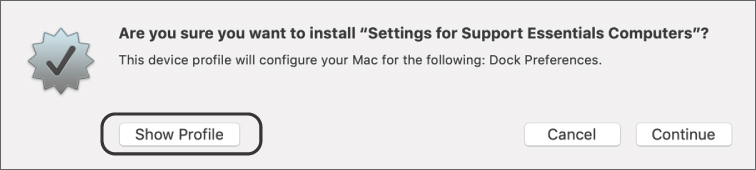
Click Show Profile to display the details of the profile and its payload (the settings it contains). You need to scroll down to see its full contents.
Observe that the Dock orientation has a value of left.
Click Continue.
Click Install.
Enter the Local Administrator account password (Apple321!) when prompted.
The Profiles pane lists the configuration profile as installed.
Observe that the Dock is now on the left side of your screen.
Remove a Configuration Profile
If necessary, open System Preferences, and then click Profiles.
With Settings for Support Essentials Computers selected, click Remove (–).
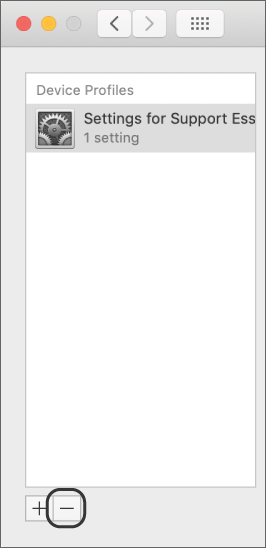
In the confirmation dialog that appears, click Remove.
If necessary, enter the Local Administrator account password (Apple321!) when prompted.
Observe that the profile is removed, and the Dock returns to the bottom of the screen.
Quit System Preferences.
Exercise 3.5 Examine System Information
![]() Prerequisite
Prerequisite
![]() You must have created the Local Administrator account (Exercise 3.1, “Configure a Mac for Exercises”).
You must have created the Local Administrator account (Exercise 3.1, “Configure a Mac for Exercises”).
System Information is the primary tool you use to gather macOS configuration information. System Information displays information and options for repair and warranty coverage of your Mac. In this exercise, you explore its features.
Use About This Mac and System Information
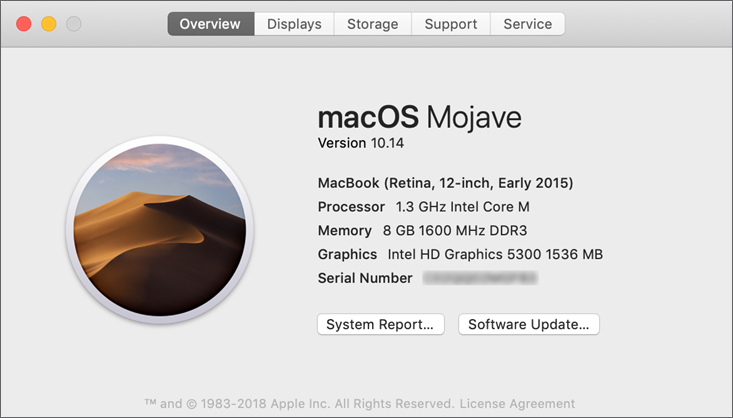
From the Apple menu, choose About This Mac.
A dialog appears showing basic information about your Mac.
Highlight your serial number, and copy using Command-C.
Click the macOS version number (below the large “macOS Mojave”). The build number (a more specific identifier for the version of macOS you are using) is displayed.
Click through the Displays, Storage, and (if it is shown) Memory buttons in the About This Mac window toolbar to view more information about your hardware configuration.
Click Service.
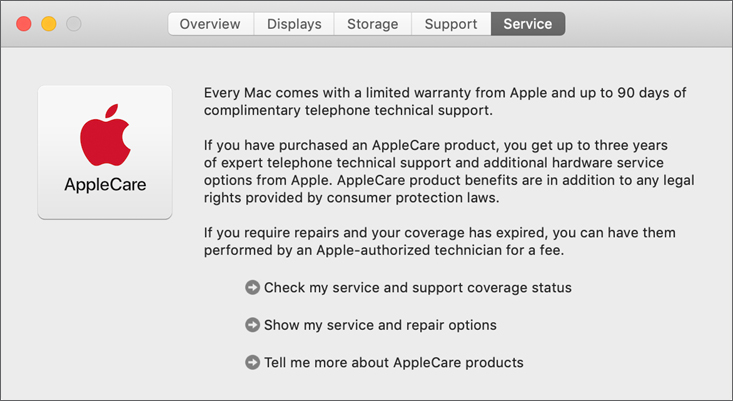
Click “Check my service and support coverage status.”
In the confirmation dialog that appears, click Allow.
Safari opens and displays a coverage check page at apple.com
Paste your serial number, enter the CAPTCHA challenge code, and click Continue.
The coverage page shows your Mac model name and warranty status.
Quit Safari.
In the About This Mac window, click Overview in the toolbar.
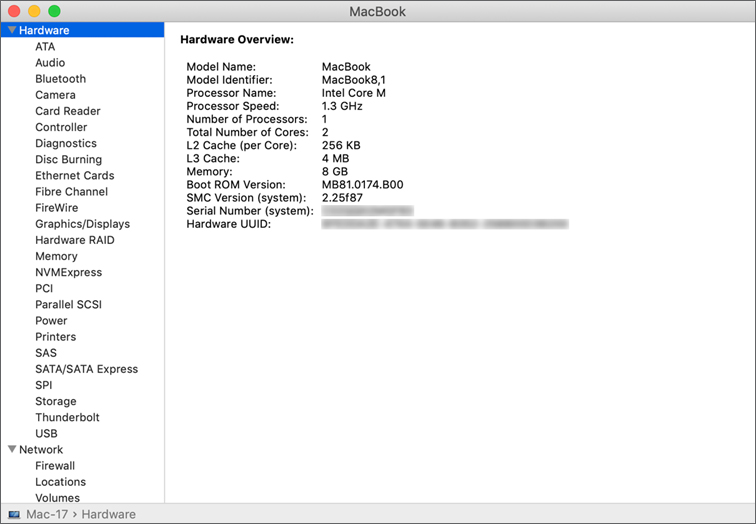
Click the System Report button.
System Information opens and displays a more detailed report about your Mac hardware, network, and software configuration. You can also find System Information in the /Applications/Utilities/ folder or in the Other section of Launchpad. You can directly access System Information from the Apple menu by holding the Option key. This changes the About This Mac menu choice to System Information.
Click information categories in the report sidebar to explore the system. Some categories might take a while to load.
From the menu bar, choose File > Save, enter a name for your report, and click Save.
When you save reports like this, choose a naming convention that includes the Mac name (or other identifier) and the date.
System Information finishes gathering information about your Mac and saves it in a report that documents your Mac computer’s current status.
Quit System Information.