Lesson 27
Manage Printers and Scanners
Goals
![]() Describe the technologies that enable macOS to print
Describe the technologies that enable macOS to print
![]() Configure macOS for printers and multifunctioning devices
Configure macOS for printers and multifunctioning devices
![]() Manage and troubleshoot print jobs
Manage and troubleshoot print jobs
In this lesson, you learn how macOS works with different print and scan technologies and how to manage and troubleshoot printers and multifunctioning devices connected to your Mac.
Reference 27.1 Printing in macOS
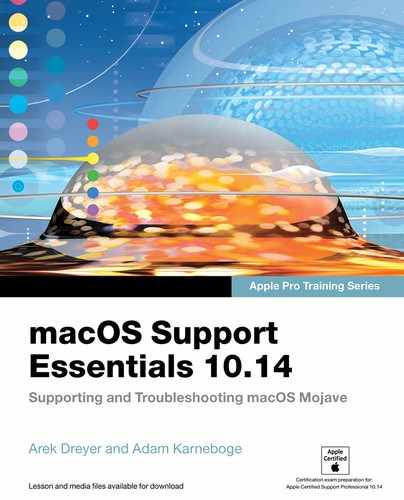
macOS uses a combination of AirPrint and CUPS technologies to enable you to quickly set up printers.
AirPrint
AirPrint is an Apple technology that helps you find printers and then print without downloading or installing printer drivers (software that allows computers to communicate with printers).
AirPrint is built into most popular printer models, listed in Apple Support article HT201311, “About AirPrint,” which is updated monthly. If your printer was made in the last several years, it probably works with AirPrint.
If your printer isn’t AirPrint-enabled, you can make sure it’s compatible with macOS Mojave by checking with the printer manufacturer.
CUPS
macOS uses the open source CUPS printing system to manage local printing. CUPS uses the Internet Printing Protocol (IPP/2.1) standard to manage print tasks and PostScript Printer Description (PPD) files for printer drivers. PPD files can describe PostScript and non-PostScript printers.
More Info ![]()
For more information about PostScript, the technology from Adobe that was the first device-independent Page Description Language (PDL) and also a programming language, read www.adobe.com/products/postscript.html.
A print job starts when you print from an app or use a print command from Terminal. macOS generates a file called a spool file and places it in the /var/spool/cups folder.
The CUPS background process, cupsd, passes the spool file through filter processes known as the print chain. These processes convert the spool file to a format that is understood by the destination printer and communicate the information to the printer. To find out more about CUPS, visit the official CUPS website at www.cups.org.
CUPS Drivers
For printers that don’t support AirPrint, you must associate an appropriate printer driver with the printer before you can use the printer.
Apple supplies printer drivers for most popular printer models, including Brother, Canon, Epson, Fuji-Xerox, HP, Lexmark, Ricoh, and Samsung.
New installations of macOS include only Apple and generic print drivers. macOS upgrade installations install only drivers for printers already in use by the Mac.
macOS includes support for standard PostScript and Printer Command Language (PCL) printers.
A few of the built-in Apple printer drivers are in /System/Library/Printers/Libraries, but third-party printer drivers are installed to /Library/Printers/PPDs/Contents/Resources. You might see other vendor folders that contain ancillary printer driver resources.
After you add a printer configuration, a copy of the PPD with the name of the device is placed in the /etc/cups/ppd folder and two configuration files are modified:
![]() /etc/cups/printers.conf
/etc/cups/printers.conf
![]() /Library/Preferences/org.cups.printers.plist
/Library/Preferences/org.cups.printers.plist
The first time you print or access a printer queue, macOS creates a printer queue app, with the name of the device, in ~/Library/Printers in the user’s home folder.
Reference 27.2 Configure Printers and Scanners
How you physically connect to a printer determines how you configure macOS to print to the printer. For example, directly attached and local network printers are automatically configured with little user interaction. Older printers or network printers might require more configuration.
For best results when you add a new printer, enable the option “Automatically keep my Mac up to date” in Software Update preferences and add printers while you are logged in as an administrator user. Software Update is covered in Lesson 6, “Update macOS.”
Note ![]()
If you want a user to be able to add and remove printers without providing administrator credentials, make that user a member of the lpadmin group. See the man page for dseditgroup for more information.
Configure a Directly Attached Printer
If your directly attached printer isn’t AirPrint-enabled, contact the printer manufacturer for instructions on how to get and install printer drivers. Then connect the printer to your Mac.
If you have an older printer that doesn’t support AirPrint driverless technology, your Mac might automatically install the driver software needed to use that device.
For some older printers, if you see a message prompting you to download new software, be sure to click Install to download and install it.
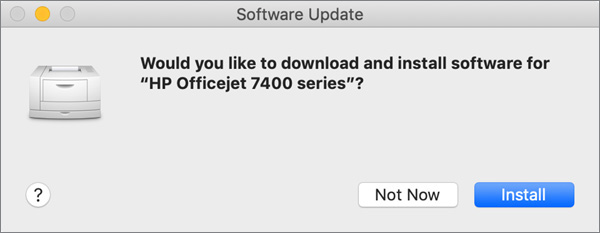
The previous dialog appears only if all the following are true:
![]() You are logged in as an administrator user.
You are logged in as an administrator user.
![]() The “Automatically keep my Mac up to date” option is enabled in Software Update preferences.
The “Automatically keep my Mac up to date” option is enabled in Software Update preferences.
![]() The printer isn’t compatible with AirPrint but Apple has printer drivers available for the printer.
The printer isn’t compatible with AirPrint but Apple has printer drivers available for the printer.
If “Automatically keep my Mac up to date” option is disabled in Software Update preferences, you can attach the printer to your Mac and then open Software Update to check for printer drivers. If printer drivers are available for the printer, then Software Update installs printer drivers silently. You can close Software Update preferences and continue to configure the printer.
If a non-administrator user attaches a new printer for the first time, macOS won’t configure the printer if the driver is missing. Also, if a printer driver for a directly attached printer is unavailable from Apple, then nothing happens automatically when you plug it in. In this case, you must manually acquire and install the printer driver with administrator credentials.
You can verify that the printer was added by opening the Print dialog from any app (File > Print) or from Printers & Scanners preferences. In Printers & Scanners preferences, you can tell that printers are locally connected if their location has the same name as the local Mac computer’s sharing name.

Configure a Local Network Printer
You must be logged in on your Mac with an administrator account to add a local network printer. If your Mac and printer are already connected to the same Wi-Fi network, the printer might be available to you without any setup. macOS can automatically discover standalone printers that support Bonjour (or mDNS), standalone printers that support AirPrint, and any printer shared from another Mac or AirPort wireless base station. If your network printer isn’t AirPrint-enabled, use Software Update preferences to install available printer drivers.
To check whether your Mac can automatically discover your local network printer:
Open an app that enables you to print.
Choose File > Print.
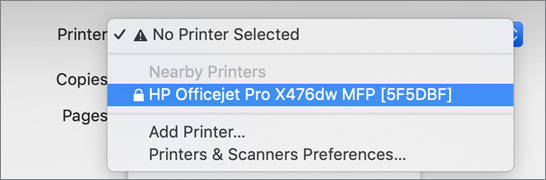
Open the Printer menu, choose Nearby Printers or Printers & Scanners preferences, and choose your printer.
macOS prepares your printer.

Confirm that your printer is available to choose in the Printer menu.

Manually Configure a Printer
If the network printer doesn’t support automatic network discovery with Bonjour, you must configure it manually. Also, if a directly attached printer doesn’t automatically configure, you can manually add it. Add a new printer or multifunctioning device in one of these ways:
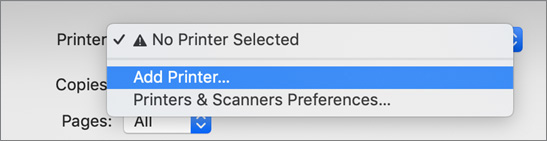
![]() From any app, open a Print dialog by choosing File > Print. Next, from the Printer menu, choose Add Printer.
From any app, open a Print dialog by choosing File > Print. Next, from the Printer menu, choose Add Printer.
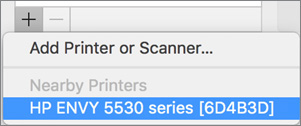
![]() Open System preferences and click the Printers & Scanners icon. Click the Add (+) button at the bottom of the Printers list. If there are nearby network printers, a menu appears enabling you to select those printers.
Open System preferences and click the Printers & Scanners icon. Click the Add (+) button at the bottom of the Printers list. If there are nearby network printers, a menu appears enabling you to select those printers.
If the printer you need to configure doesn’t appear in the menu, select the “Add Printer or Scanner” option to manually configure a new printer. This opens an Add window.
The Add window features several panes for selecting a printer or multifunctioning device. Access these panes by clicking the following buttons in the toolbar:
![]() Default—This browser enables you to select directly attached USB printers and network printers discovered using Bonjour (or mDNS), AirPrint, or network directory services.
Default—This browser enables you to select directly attached USB printers and network printers discovered using Bonjour (or mDNS), AirPrint, or network directory services.

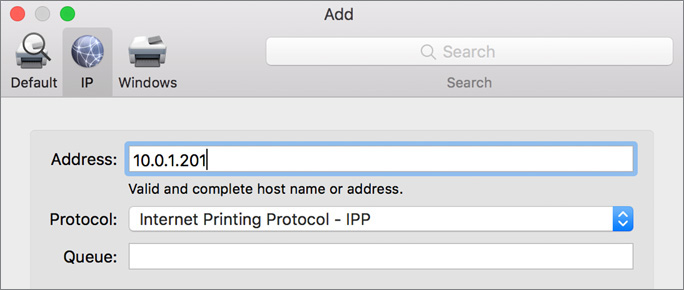
![]() IP—This dialog enables you to manually enter the IP address or DNS host name of a Line Printer Daemon (LPD), IPP, or HP JetDirect printer. You must select the appropriate protocol from the menu and enter the printer’s address. Entering a printer queue is usually optional.
IP—This dialog enables you to manually enter the IP address or DNS host name of a Line Printer Daemon (LPD), IPP, or HP JetDirect printer. You must select the appropriate protocol from the menu and enter the printer’s address. Entering a printer queue is usually optional.
![]() Windows—This browser enables you to select printers shared with the Server Message Block (SMB) printer sharing protocol. Double-click an SMB server and authenticate to access the server’s shared printers.
Windows—This browser enables you to select printers shared with the Server Message Block (SMB) printer sharing protocol. Double-click an SMB server and authenticate to access the server’s shared printers.

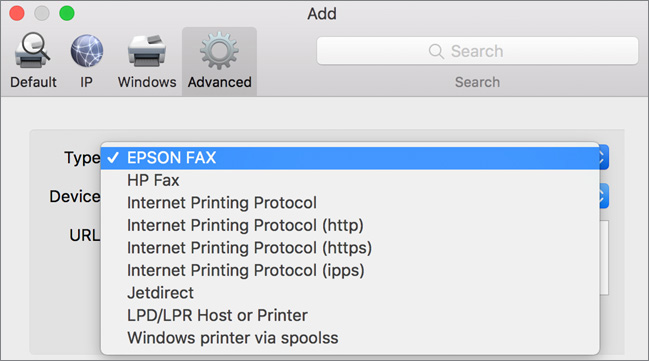
![]() Advanced—This advanced configuration choice enables you to manually enter the printer location. You need to do this only when macOS can’t properly auto-locate a printer. The Advanced button is hidden by default. To see this button, Control-click in the Add window toolbar to see a menu. From this menu choose Customize Toolbar and drag the Advanced button to the toolbar. Then you can start configuring the printer by choosing the printer type.
Advanced—This advanced configuration choice enables you to manually enter the printer location. You need to do this only when macOS can’t properly auto-locate a printer. The Advanced button is hidden by default. To see this button, Control-click in the Add window toolbar to see a menu. From this menu choose Customize Toolbar and drag the Advanced button to the toolbar. Then you can start configuring the printer by choosing the printer type.
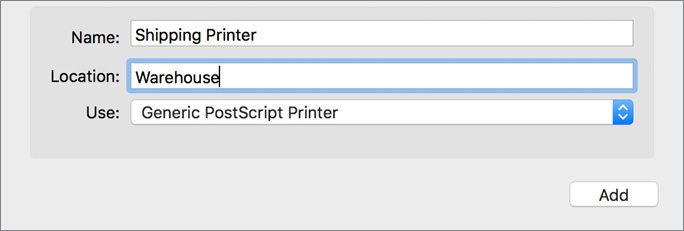
After you select a printer or multifunctioning device from the top half of the new printer configuration dialog, macOS completes the bottom half for you using information it discovered. This includes selecting the appropriate printer driver if possible. The Name and Location fields are there to help you identify the device. Set those to anything you like.
When you add a new printer, the Add window might tell you that “The selected printer software is available from Apple. Click Add to download it and add this printer.”
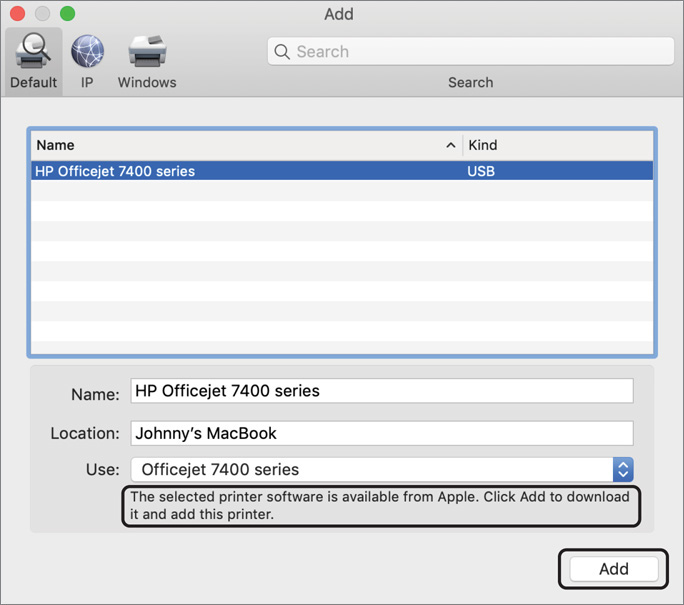
You’ll see this message if the following are true:
![]() You are logged in as an administrator user (or you are logged in as a standard account user who is a member of the lpadmin group).
You are logged in as an administrator user (or you are logged in as a standard account user who is a member of the lpadmin group).
![]() The option “Automatically keep my Mac up to date” is deselected in Software Update preferences.
The option “Automatically keep my Mac up to date” is deselected in Software Update preferences.
![]() You add a printer that your Mac doesn’t already have the driver for.
You add a printer that your Mac doesn’t already have the driver for.
![]() Your Mac is connected to the Internet.
Your Mac is connected to the Internet.
If you meet all the conditions and see the message, click Add to download the printer driver and add the printer.
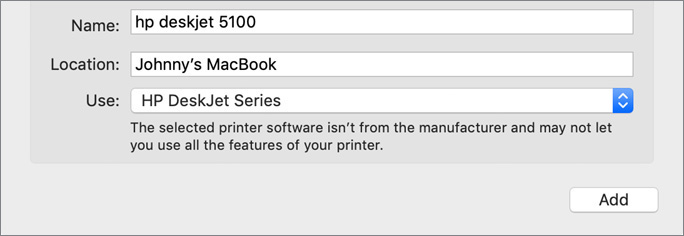
If macOS doesn’t prompt you to download and add the printer driver (or if you aren’t connected to the Internet), macOS selects a generic printer driver, and you see a message that the printer driver might not let you use all the features of the printer.
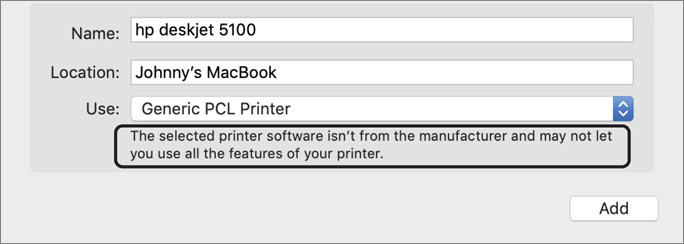
In this case, look at Software Update preferences and check for updates.

If Apple doesn’t provide a suitable printer driver, you might be able to select a built-in printer driver. To select a printer driver, choose Select Software from the Use menu.

You can manually scroll through the list of installed printer drivers, but using the Search field might be quicker. After you select an appropriate printer driver, click OK to use that driver. The following figure displays most of the default printer drivers that come with macOS Mojave; there are two other Zebra printer drivers that are not displayed.

If your Mac already downloaded other printer drivers, the Printer Software window displays additional printer drivers.

After you select the printer driver to use and click OK, the Printer Software window closes. The Use menu displays the printer driver you selected. Click Add to add the printer.
If your Mac doesn’t already have an appropriate printer driver for your printer, you might be able to get a printer driver directly from the printer manufacturer. Try using Software Update to automatically install printer drivers before you try downloading printer drivers from the printer manufacturer. To select a printer driver that you downloaded directly from the printer manufacturer, choose Other from the Use menu; then in the open dialog, select the printer driver and click Open.

If there’s no printer driver available for your printer, you can use a built-in generic printer driver.
If you configure an LPD printer connection, you must manually specify the appropriate printer driver. This step can occur with HP JetDirect and SMB printer connections.

If you configure an IP printer, you see an additional dialog that enables you to select special printer options. After you complete the printer configuration, open the Print dialog from any app, or Printers & Scanners preferences, and verify that the printer is added.
In Printers & Scanners preferences, you can tell which printers are network printers if their location is shown as something different than your local Mac computer sharing name.
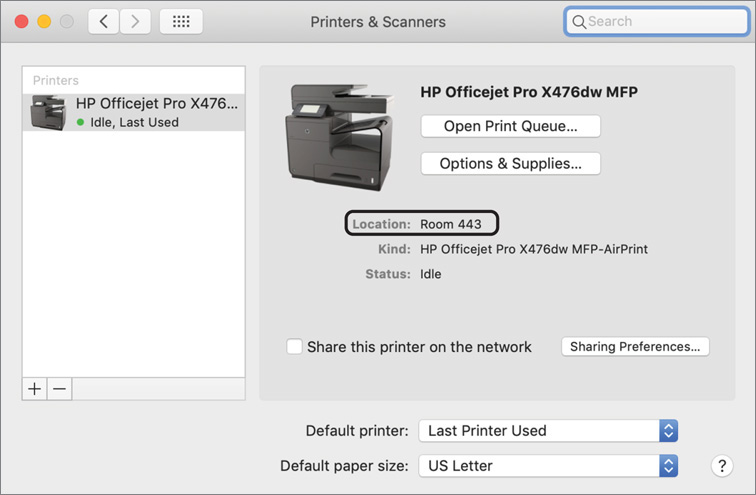
Some printer drivers include additional functionality. The following screenshot shows a printer that was added from Printers & Scanners preferences, rather than from a Print dialog, and that multifunctioning devices show a Scan tab, which indicates that macOS configured the scanning driver software.

More Info ![]()
You can use Terminal to add printers. In Apple Remote Desktop you can go to the menu and choose Manage > Send UNIX Command to create printers on many Mac computers at the same time. See the man pages for lpadmin, cupsenable, and cupsaccept for more information.
Modify an Existing Printer
You might have to edit a printer configuration after you set it up. Depending on the printer model, you may not be allowed to modify the print driver settings from Printers & Scanners preferences. In this case, to change a printer’s selected driver, you must delete the printer and add it again. From Printers & Scanners preferences, you can:
![]() Remove a printer configuration—Select the item you want to delete from the printer list, and then click the Remove (–) button at the bottom of the list.
Remove a printer configuration—Select the item you want to delete from the printer list, and then click the Remove (–) button at the bottom of the list.
![]() Set printing defaults—From the two menus at the bottom of Printers & Scanners preferences, choose the default printer and paper size. Be careful when you set the default printer for Last Printer Used. You will have no permanent default printer and the default destination for print jobs might constantly change.
Set printing defaults—From the two menus at the bottom of Printers & Scanners preferences, choose the default printer and paper size. Be careful when you set the default printer for Last Printer Used. You will have no permanent default printer and the default destination for print jobs might constantly change.

![]() Open a print queue—Select a printer from the list and click the Open Print Queue button. Details on print queues are covered later in this lesson.
Open a print queue—Select a printer from the list and click the Open Print Queue button. Details on print queues are covered later in this lesson.
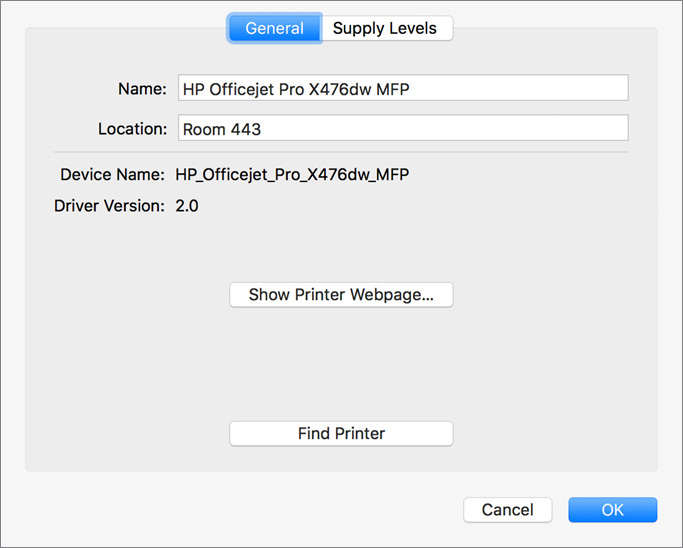
![]() Edit an existing configuration and check supply levels—Select a printer from the list and then click the Options & Supplies button. In the resulting dialog, you can edit the printer configuration—including changing the printer name—and, if available, check the printer supply levels and open the printer hardware configuration utility.
Edit an existing configuration and check supply levels—Select a printer from the list and then click the Options & Supplies button. In the resulting dialog, you can edit the printer configuration—including changing the printer name—and, if available, check the printer supply levels and open the printer hardware configuration utility.
![]() Manage scanning—Select a multifunctioning device from the list and select the Scan button. From this interface, open the scanner image capture interface or enable local network scanner sharing.
Manage scanning—Select a multifunctioning device from the list and select the Scan button. From this interface, open the scanner image capture interface or enable local network scanner sharing.
Share Printers
Your Mac shared print service is made available with IPP printer sharing protocols. Although macOS and Windows are compatible with IPP, different versions of Windows might require additional drivers for IPP. IPP supports automatic printer driver configuration and installation for macOS, so when another Mac user connects to your Mac shared print service, that user’s Mac automatically selects, and downloads if necessary, the appropriate printer drivers.
The CUPS-shared print service also allows other network clients to locate your shared printer configurations with Bonjour. Different versions of Windows might require additional drivers for Bonjour. Alternatively, network clients can enter your Mac computer’s IP address or DNS host name to access your Mac shared print service. Configuring your Mac computer’s identification for providing network services is covered in Lesson 25, “Manage Host Sharing and Personal Firewall.”
Users can’t access shared print services on a Mac in sleep mode. If you want to ensure that your Mac doesn’t sleep, disable your Mac automatic sleep activation or enable “Wake for Wi-Fi network access” from Energy Saver preferences. Read Reference 28.3, “Sleep Modes, Logout, and Shutdown,” for more information.
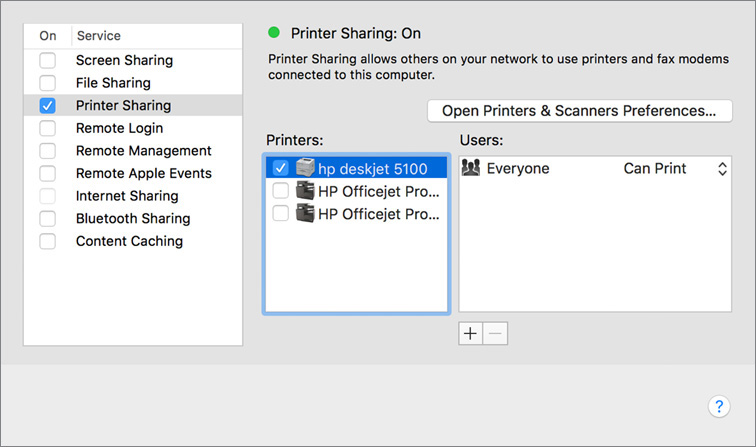
To share printers from your Mac, open Sharing preferences, then unlock if necessary. Select the Printer Sharing checkbox to enable printer sharing. Selecting this checkbox configures cupsd (which is always running in the background) to listen for IPP print service requests on TCP port 631.
If your Mac is configured to use a document scanner, enable scanner sharing from Sharing preferences. This enables you to share the scanner with other Mac computers on a local network.
By default, no printers are shared. To enable sharing for printer configurations, select the checkboxes next to the printers you wish to share. Optionally, you can limit who is allowed to print to your shared printers. By default, all users are allowed access to your shared printing devices. To limit access, select a shared device from the Printers list and then click the Add (+) button at the bottom of the Users list.
A dialog appears where you can select user or group accounts you want to grant access to the printer. When adding accounts, you can also choose to deny access to guest users by selecting No Access for Everyone in the Users list. Also, with limited printing access enabled, users have to authenticate to print to your shared printer.

Share only printers that other Mac users can’t otherwise see. If you share a network printer that’s already available on your network, other Mac users will see that printer listed multiple times in the Nearby Printers list.
Reference 27.3 Manage Print Jobs
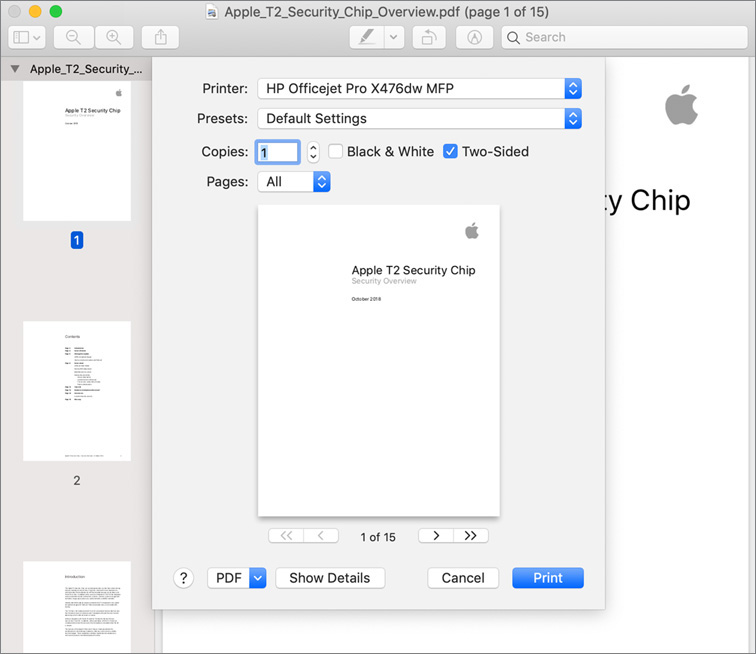
This unified Print dialog features two modes. The basic mode enables you to preview and start a print job using default settings, and the details mode enables you to specify any page or print option and manage print setting presets. Some apps, especially graphic design and desktop publishing apps, use custom dialogs for printing that might look different from the standard Print dialog covered in this lesson.
Start a Print Job
To start a print job using default print settings, from an app choose File > Print (or press Command-P). Some apps bypass the Print dialog and send the print job to your default printer when you use Command-P.
When the Print dialog appears, it sometimes slides out of the app’s window title bar. Sometimes it appears as its own dialog. Most apps show a print preview, and some might show the basic print options. The default printer and print preset are selected, but you choose the number of pages, copies, and duplex (two-sided) options, if available. Customizing printer presets is covered in the next section of this lesson.
When the print job is started, macOS automatically opens the print queue app associated with the destination printer. Although no window opens if the print job is successful, you can click the print queue in the Dock.
Configure Detailed Print Settings and Presets
To start a print job that uses custom print settings, from an app open the Print dialog. When you open the Print dialog, the default printer and print presets are selected, but you can choose other configured printers or presets from the associated menu.
Clicking the Show Details button expands the Print dialog to its full details mode. In the full details mode, you can click the Hide Details button to return to the basic Print dialog mode. The Print dialog also remembers which mode you last used for each app.
On the left side of the detailed Print dialog, you can page through a preview of the print job, much like the preview in the basic Print dialog. Changes you make to the page layout settings are instantly reflected in the preview. On the right side of the dialog, you can configure possible print settings for most apps. The top half features more detailed page setup and print settings.

Settings on the bottom half vary depending on the app you’re printing from and your printer driver. You can choose a category of print settings to modify from the menu that separates the print settings from top to bottom. The settings list and configuration options within vary for different apps, printers, and printer drivers.

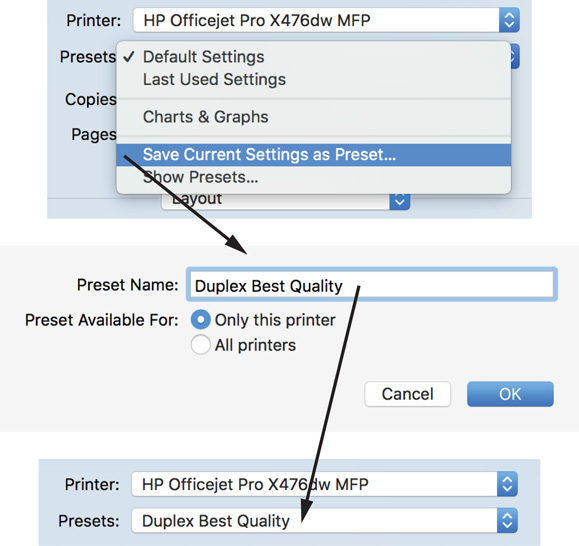
To save the current print settings as a preset, choose Save Current Settings as Preset from the Presets menu. Select whether you want this preset to apply to all printers or just the currently selected printer. By saving a preset, you make it accessible from the Presets menu in the details view of any Print dialog. The print presets are saved in ~/Library/Preferences/ in com.apple.print.custompresets.plist for presets that apply to all printers, and in com.apple.print.custompresets.plist.forprinter.printername.plist for presets for a specific printer, so each user has their own custom print presets. Print presets apply to all apps.
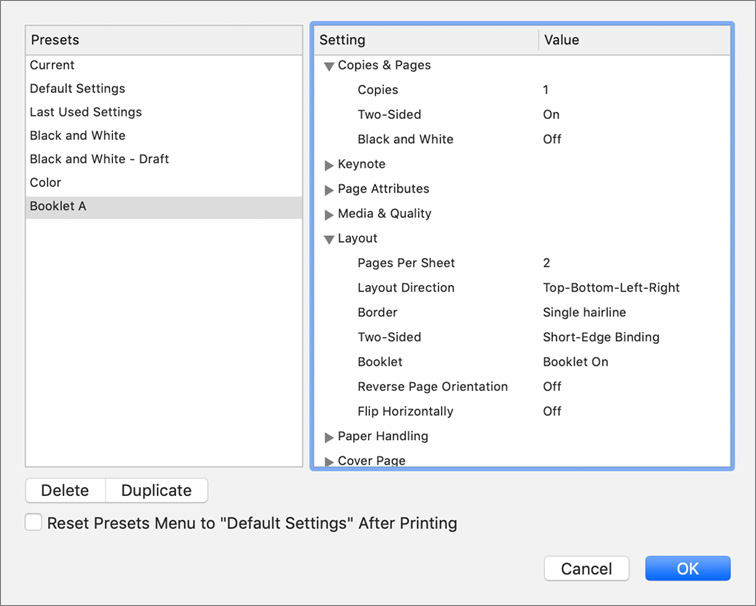
To manage existing print presets, open the print Presets dialog by choosing Show Presets from the Presets menu. In the print Presets dialog, select a preset to see its settings and values, and optionally use the Delete and Duplicate buttons at the bottom of the presets list. If you double-click a print preset you can rename the preset. When you finish managing print presets, click OK to save the changes and return to the Print dialog.
Create PDF Documents
macOS includes built-in Portable Document Format (PDF) architecture and editing tools, including tools to create PDF documents or perform basic editing. Any app that can print can also generate high-quality PDF documents. In any Print dialog, click the PDF button. A menu appears, which you can use to save a PDF to any location.
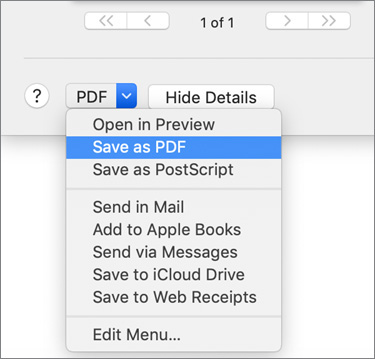
From the PDF menu, you can also choose a PDF service that accepts and processes PDF files. Some preset services are built in, but you can add your own PDF services by choosing Edit Menu from the PDF menu. Or, depending on who needs access to them, you can manually add PDF services to /Library/PDF Services or ~/Library/PDF Services. To create custom PDF services, use Automator to create a Print Plugin or use Script Editor. If your multifunctioning printer supports faxing, you can choose Fax PDF from the PDF menu.
You can also edit PDFs in Preview. Read more about this in Reference 20.2, “Manage App Extensions.”
Manage Printer Queues
When a print job starts, the spool file is placed in /var/spool/cups, and CUPS takes over to process the file and send it to the printer. When you print from the graphical interface, macOS opens a print queue app to manage the print job. If a job completes quickly, the file is in the print queue only for a few moments, and the print queue app quits when the print job is done.
If macOS detects an error with a printer, it stops all print jobs that are in the printer queue. You can still start print jobs, but they just fill up in the queue.
To manage print job queues, access the printer queue app in one of the following ways:
![]() If a printer queue is open, click its icon in the Dock. In the following example screenshot, the printer queue’s Dock icon shows a “2” in the red badge icon, indicating that there are currently two jobs in the queue. Also, as you can see by the orange connection badge icon, this printer queue has network issues that are preventing the print jobs from completing.
If a printer queue is open, click its icon in the Dock. In the following example screenshot, the printer queue’s Dock icon shows a “2” in the red badge icon, indicating that there are currently two jobs in the queue. Also, as you can see by the orange connection badge icon, this printer queue has network issues that are preventing the print jobs from completing.

![]() You can manually open a printer queue from Printers & Scanners preferences by double-clicking the device in the printer list or by selecting the device from the printer list and clicking the Open Print Queue button.
You can manually open a printer queue from Printers & Scanners preferences by double-clicking the device in the printer list or by selecting the device from the printer list and clicking the Open Print Queue button.
![]() You can also manually open a printer queue from the Finder by navigating to ~/Library/Printers and then double-clicking a printer.
You can also manually open a printer queue from the Finder by navigating to ~/Library/Printers and then double-clicking a printer.
When the printer queue opens, you see the printer status and queued print jobs.

To pause or resume the jobs in the printer queue, click the Pause or Resume button (the button toggles between the two modes) in the queue app toolbar. To hold or resume a print job, select it from the job list and click the small Hold or Resume button to the right of the print job progress bar (the button toggles between the two). To delete a job, select it from the job list and click the small x button to the right of the print job progress bar.
You can select a job in the printer queue list and then press the Space bar to open a Quick Look preview window for the print job. For a held job, choose Jobs > Resume Job on Page and then specify a page number to resume printing on. You can reorder print jobs in the printer queue by dragging the job you want to reorder in the list. You can also drag jobs from one printer queue window to another.
Other features are available in the printer queue app toolbar. You can reconfigure the printer by clicking the Settings button in the toolbar. Also, for a supported multifunctioning printer, you can click the Scanner button in the toolbar to open the Scanner interface.
You might want to leave often-used printer queues in the Dock for direct access. Control-click the queue app’s Dock icon and, from the shortcut menu, choose Options > Keep in Dock. A benefit to having your printers in the Dock is that you can drag a document on top of a printer icon to quickly print a single copy of the document.

You can also provide quick access to your printer queues by dragging the ~/Library/Printers folder from the Finder to your Dock. Click this folder in your Dock to see configured devices.
Reference 27.4 Troubleshoot Print Issues
You will probably experience more printing issues that are caused by hardware rather than software. The following is a series of general print system troubleshooting techniques.
![]() Check the printer queue app first. The printer queue lets you know if there is a printer connection issue. At the same time, verify that the queue isn’t paused and that no jobs are on hold. Sometimes deleting old print jobs from the queue helps clear the problem.
Check the printer queue app first. The printer queue lets you know if there is a printer connection issue. At the same time, verify that the queue isn’t paused and that no jobs are on hold. Sometimes deleting old print jobs from the queue helps clear the problem.
![]() Double-check page and print settings. If the job is printing but doesn’t print correctly, double-check page and print settings using the Print dialog details mode.
Double-check page and print settings. If the job is printing but doesn’t print correctly, double-check page and print settings using the Print dialog details mode.
![]() Review the PDF output of the app. The CUPS workflow is app > PDF > CUPS > printer. Verifying whether the PDF looks correct lets you know if the source of the problem is with the app or the printing system.
Review the PDF output of the app. The CUPS workflow is app > PDF > CUPS > printer. Verifying whether the PDF looks correct lets you know if the source of the problem is with the app or the printing system.
![]() Print from another app. If you suspect the app is the root of the problem, try printing from another app. You can also print a test page while in the printer queue app by choosing Printer > Print Test Page.
Print from another app. If you suspect the app is the root of the problem, try printing from another app. You can also print a test page while in the printer queue app by choosing Printer > Print Test Page.
![]() If you have trouble adding a printer and finding an appropriate printer driver, try logging in as an administrator user before you add the printer.
If you have trouble adding a printer and finding an appropriate printer driver, try logging in as an administrator user before you add the printer.
![]() Check the printer hardware. Many printers have diagnostic screens or printed reports that help you identify a hardware issue. Many also have a software utility or a built-in webpage that reports errors. Click the Printer Setup button in the printer queue app toolbar to access these management interfaces. Double-check cables and connections. Lastly, contact the printer manufacturer to diagnose printer hardware issues.
Check the printer hardware. Many printers have diagnostic screens or printed reports that help you identify a hardware issue. Many also have a software utility or a built-in webpage that reports errors. Click the Printer Setup button in the printer queue app toolbar to access these management interfaces. Double-check cables and connections. Lastly, contact the printer manufacturer to diagnose printer hardware issues.
![]() For directly connected printers, use the peripheral troubleshooting techniques outlined in Lesson 26, “Troubleshoot Peripherals.”
For directly connected printers, use the peripheral troubleshooting techniques outlined in Lesson 26, “Troubleshoot Peripherals.”
![]() For network printers, use network troubleshooting techniques described in Lesson 23, “Troubleshoot Network Issues,” and Lesson 24, “Manage Network Services.”
For network printers, use network troubleshooting techniques described in Lesson 23, “Troubleshoot Network Issues,” and Lesson 24, “Manage Network Services.”
![]() Delete and reconfigure printers. From Printers & Scanners preferences, delete and reconfigure a problem printer using the techniques described earlier in this lesson. Doing so resets the device drivers and queue.
Delete and reconfigure printers. From Printers & Scanners preferences, delete and reconfigure a problem printer using the techniques described earlier in this lesson. Doing so resets the device drivers and queue.
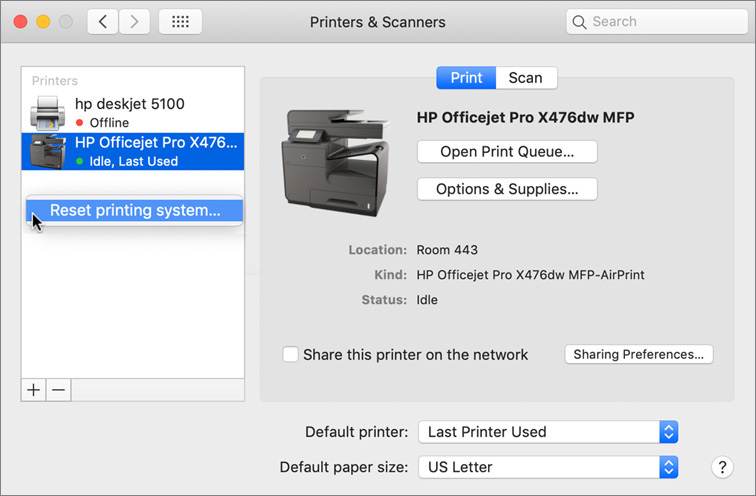
![]() Reset the entire print system. From Printers & Scanners preferences, Control-click in the printers list and choose “Reset printing system” from the shortcut menu. Click OK in the verification dialog. Authenticate as an administrator user. This clears configured devices, shared settings, custom presets, and queued print jobs.
Reset the entire print system. From Printers & Scanners preferences, Control-click in the printers list and choose “Reset printing system” from the shortcut menu. Click OK in the verification dialog. Authenticate as an administrator user. This clears configured devices, shared settings, custom presets, and queued print jobs.
![]() For non-AirPrint printers, remove printer drivers by moving the contents of /Library/Printers to another location.
For non-AirPrint printers, remove printer drivers by moving the contents of /Library/Printers to another location.
![]() Review CUPS log files. Like other system services, CUPS writes important activity to log files. You can access the logs while in any printer queue app by choosing Printer > Error Log. This opens Console to the CUPS error_log file. While in Console, you can check the CUPS access_log and page_log files in /var/log/cups. The CUPS error_log file might not exist if the CUPS service hasn’t logged print errors.
Review CUPS log files. Like other system services, CUPS writes important activity to log files. You can access the logs while in any printer queue app by choosing Printer > Error Log. This opens Console to the CUPS error_log file. While in Console, you can check the CUPS access_log and page_log files in /var/log/cups. The CUPS error_log file might not exist if the CUPS service hasn’t logged print errors.
![]() Reinstall or update printer drivers. You can use Software Update preferences to check for system and printer updates. You can also check the printer manufacturer’s website for the latest printer driver updates. If you’re using an AirPrint-enabled printer, you can check with the manufacturer to see if there’s an update for your printer model (as opposed to a printer driver update).
Reinstall or update printer drivers. You can use Software Update preferences to check for system and printer updates. You can also check the printer manufacturer’s website for the latest printer driver updates. If you’re using an AirPrint-enabled printer, you can check with the manufacturer to see if there’s an update for your printer model (as opposed to a printer driver update).
For advanced print system management and troubleshooting, go to the Mac CUPS at http://localhost:631, and follow the instructions.
For more information, read Apple Support article HT203343, “If you can't print from your Mac or iOS device.”
In Printing preferences, click the Help (question mark) button. One of the topics includes “Solve printing problems on Mac,” at https://support.apple.com/guide/mac-help/solve-printing-problems-on-mac-mh14002.
Exercise 27.1 Configure Printing
![]() Prerequisites
Prerequisites
![]() You must have created the Local Administrator account (Exercise 3.1, “Configure a Mac for Exercises”) and the Johnny Appleseed account (Exercise 7.1, “Create a Standard User Account”).
You must have created the Local Administrator account (Exercise 3.1, “Configure a Mac for Exercises”) and the Johnny Appleseed account (Exercise 7.1, “Create a Standard User Account”).
Configure a Bonjour Printer
In this exercise, you discover and configure a network printer through the Bonjour service discovery protocol. Depending on your classroom, this printer is either a virtual print queue shared from the classroom server or a printer on the classroom network.
If necessary, log in as Johnny Appleseed.
Open Printers & Scanners preferences.
Click the lock button and authenticate as Local Administrator.
Click the Add (+) button under the printer list.

The Add Printer window opens and shows a list of nearby printers.
Tip
Depending on your classroom environment, what you see on your network may vary. See Reference 27.2, “Configure Printers and Scanners,” for more information.
Select the printer you want to use in the printer list.
If you are using a print queue shared from the classroom server, it appears as “VirtualPrinter @ server.”
Depending on the type of printer, one of several things might happen:
 If a driver for the printer is installed on your Mac, is available from the Mac sharing the printer, or is available from the printer, it’s selected and shown in the Use menu.
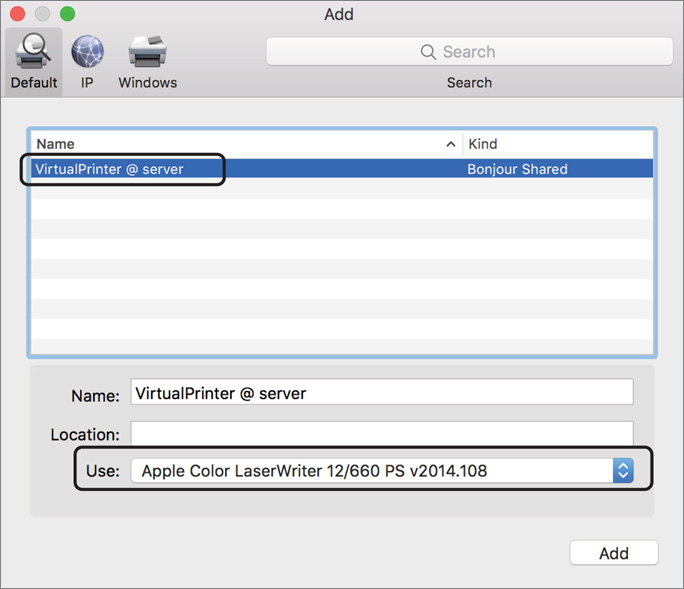 If the driver isn’t available locally, it might be available from the Apple software update servers.
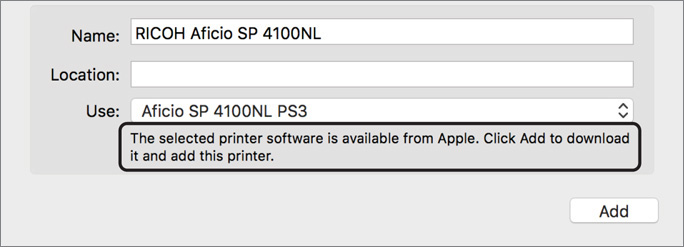
In this case, adding the printer will automatically download and install the appropriate driver package. Depending on the package size and your Internet connection speed, this may take a while.
If the driver isn’t installed locally or available from Apple, a generic driver might be available to provide basic printing.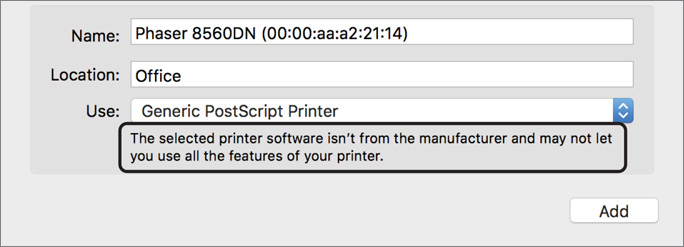
If you want full access to printer features, find and install a driver for the model before you add the printer.
If the driver isn’t installed locally or available from Apple, you are notified to contact the printer’s manufacturer.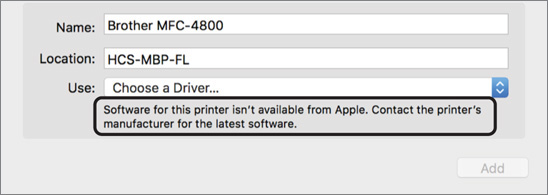
In this case, find and install a driver (probably from the printer manufacturer). Close the Add window and try again after you find and install the appropriate driver.
If the printer is AirPrint compatible, you are able to add it without having a printer-specific driver.
With the printer selected, click Add.
Your Mac fetches information about optional features from the printer (or the Mac sharing it) and completes the setup process. Your Mac is configured to print to this printer.
When the new print queue is set up, select it, and click the Open Print Queue button.

This lets you view and change settings for the print queue. Depending on the printer capabilities, you might see options such as a Scanner button.

Click the Settings button.
A dialog opens that enables you to view and change information about the print queue configuration. These settings are also accessible from Printers & Scanners preferences when you click the Options & Supplies button.
The General pane enables you to configure the name and location displayed for the printer. It might be useful to name printers that would otherwise have their model name listed.
Change the name and location to something more descriptive. If you are using “VirtualPrinter @ server,” use the following:
Name: Pretendco Network Printer
Location: Server
If you are not using a printer shared from the classroom server, enter a more descriptive location such as Training Room.

The other panes in the Settings dialogs vary considerably between different printer models. You probably won’t see all the options in the following screenshots.
If there is an Options button, click it.
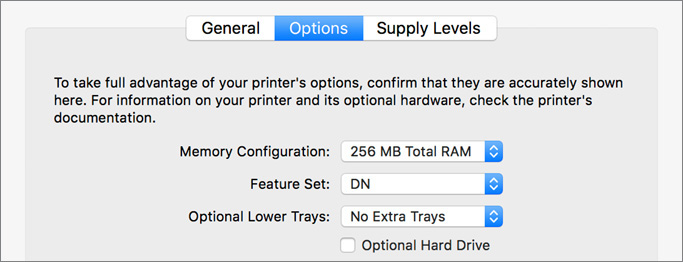
If this printer is shared from a Mac, the Mac controls what options are configured for the printer. If you are connecting to the printer directly, you can change the options.
If there is a Supply Levels button, click it.

If you are connecting to the printer directly and the printer supports it, you can view the printer supply levels.
If there is a Utility button, click it.
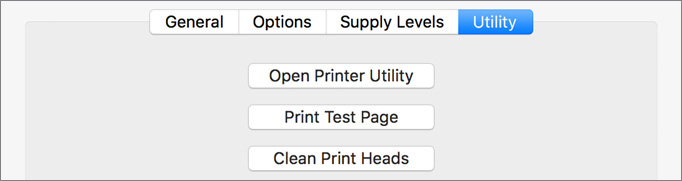
This pane of printer setup gives you access to utilities supplied by this printer driver. The functions vary depending on the printer model. Some drivers include a separate utility program, which you can open from this pane.
Click OK to dismiss the Settings dialog.
Quit the printer queue.
The printer queue isn’t an app, but it acts like one, including the Quit option under the “application” menu.
Exercise 27.2 Manage Printing
![]() Prerequisites
Prerequisites
![]() You must have created the Johnny Appleseed account (Exercise 7.1, “Create a Standard User Account”).
You must have created the Johnny Appleseed account (Exercise 7.1, “Create a Standard User Account”).
![]() You must have at least one print queue set up on your Mac from Exercise 27.1, “Configure Printing.”
You must have at least one print queue set up on your Mac from Exercise 27.1, “Configure Printing.”
In this exercise, you explore the Print dialog, including saving print options as a preset, printing to PDF, and managing PDF workflows.
Print to a Printer
In this section, you print to one of the printers you just set up. If you are printing to VirtualPrinter on Server, it doesn’t connect to a physical printer, so no printed output appears.
If necessary, log in as Johnny Appleseed.
Open the Participant nn.rtf file from your desktop. If this file doesn’t exist, open TextEdit, type text into the blank document that opens, and save it to your desktop as Participant nn (where nn is your participant number, or 1 if you are working on your own).
In the TextEdit menu bar, choose File > Print (Command-P).
In the Print dialog, choose a printer from the Printer menu.
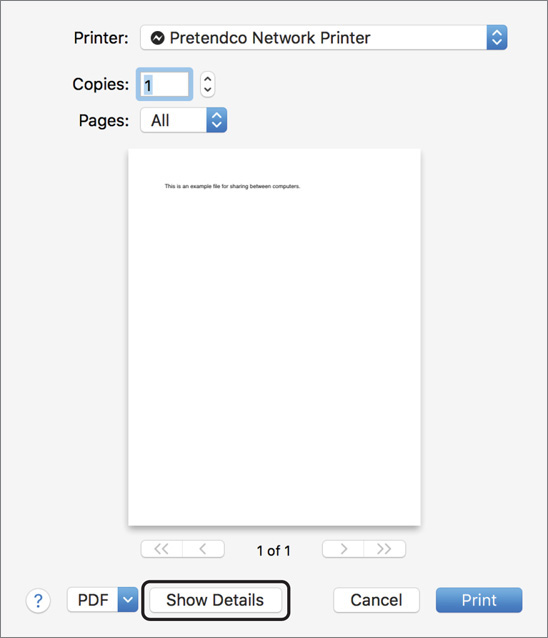
Click Show Details.
The Print dialog expands to show additional print settings.
Choose Layout from the configuration menu (initially set to TextEdit).

From the “Pages per Sheet” menu, choose 6.
From the Border menu, choose Single Thin Line.
As you change settings, the preview on the left shows the effects of your changes.
From the Presets menu, choose “Save Current Settings as Preset.”

Name the preset 6-up with border, make it available for all printers, and click OK.
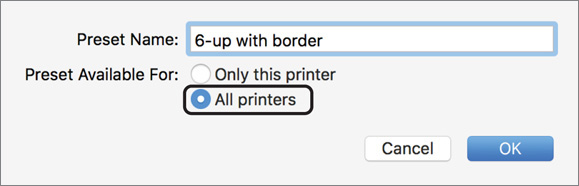
The print settings are available from the Presets menu whenever you print.
Use the Presets menu to switch between Default Settings and 6-up with border, and watch the effect on the print settings.
Click Print.
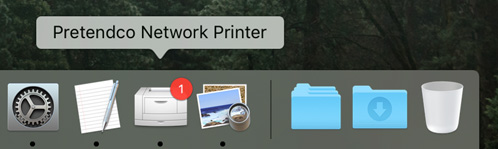
The print queue icon appears in your Dock and shows the number of jobs in the queue (1).
Manage a Print Queue
If possible, click the printer queue in your Dock before it becomes unavailable.
In the queue window, watch the job get sent to the printer (or server) and be removed from the queue.
If the printer queue disappears from the Dock before you have a chance to click it, open Printers & Scanners preferences, select the print queue on the left, and click Open Print Queue.
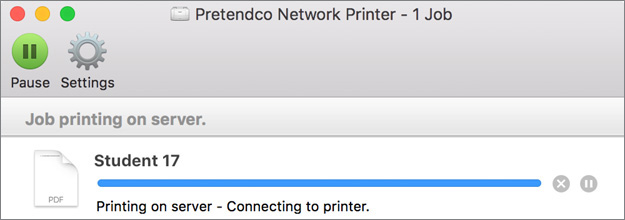
In the print queue window, click Pause.
Switch to TextEdit, and print the document again.
When you are warned that the printer has been paused, click “Add to Printer.”

Switch to the print queue window. If your document isn’t shown, quit the print queue, and reopen it from Printers & Scanners preferences. If the first document didn’t successfully print, you might see your document listed twice.
Your document is shown as “Ready to Print.”
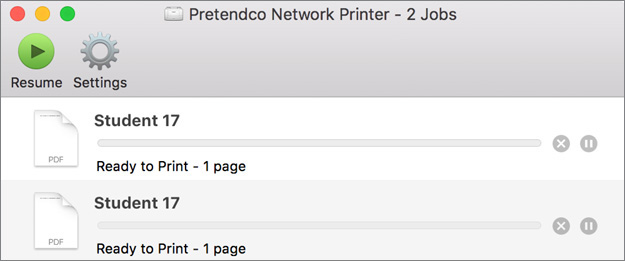
Double-click the document in the print queue, and then press Command-Y or the Space bar.
A Quick Look window opens, enabling you to preview the print job.
Close the Quick Look window, and click the Jobs menu.
This menu has options to hold, resume, or delete print jobs. Most of the options are also available in the print queue window.
Click the delete (“X”) button to the right of the print job. If there are two documents in the queue, delete both of them.
The job is no longer displayed in the print queue.
Quit the print queue.
Print to PDF
Switch to TextEdit, and press Command-P.
Click the PDF button near the bottom left of the Print dialog.

Choose “Open in Preview.”
CUPS produces a PDF version of your document, and opens it in Preview. There are Cancel and Print buttons near the bottom right of the window.
Click Cancel.
This closes the document and quits Preview.
In TextEdit, press Command-P again.
From the PDF menu, choose “Save as PDF.”
Save the PDF to your desktop.
Exercise 27.3 Troubleshoot Printing
![]() Prerequisites
Prerequisites
![]() You must have created the Local Administrator (Exercise 3.1, “Configure a Mac for Exercises”) and Johnny Appleseed (Exercise 7.1, “Create a Standard User Account”) accounts.
You must have created the Local Administrator (Exercise 3.1, “Configure a Mac for Exercises”) and Johnny Appleseed (Exercise 7.1, “Create a Standard User Account”) accounts.
![]() You must have at least one print queue set up on your Mac.
You must have at least one print queue set up on your Mac.
To troubleshoot printing, you must know the print process. In this exercise, you examine print logs and reset the printing configuration.
Examine the CUPS Logs
You can view system and user event logs in Console. In this exercise, you use Console to view CUPS logs.
If necessary, log in as Johnny Appleseed.
Open Console.
Click the disclosure triangle next to /var/log to display the list of logs, and then select “cups.”
Because the CUPS logs are in the hidden folder /var/log, they are displayed under /var/log in Console.
If necessary, select access_log in the second column.
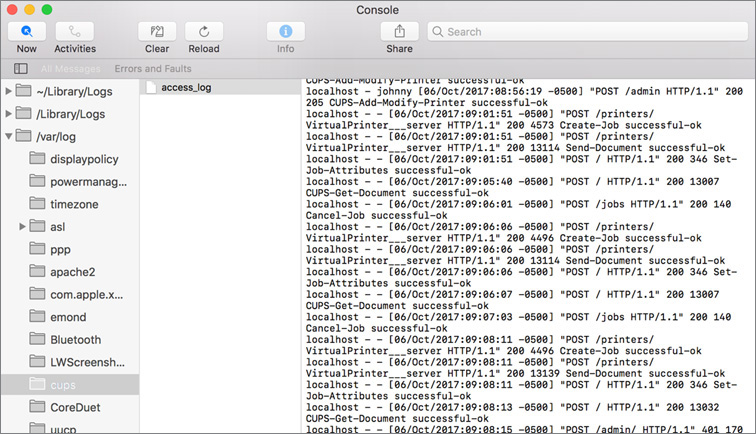
If you printed, entries appear in the access log. There might also be entries in the page log for each job.
If there are page_log and error_log files, select them and examine their contents.
Quit Console.
Reset Printing
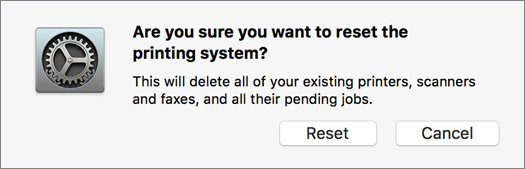
If you can’t print to your printer and you’ve tried other solutions, you can restore the printing system to factory defaults. When you reset your printing system to the factory defaults, you delete printers from your printer list, information about completed print jobs, and printer presets.
Open System Preferences, and click Printers & Scanners.
If necessary, click the lock button, and authenticate as Local Administrator.
Press and hold the Control key, and click in the printer list.
Choose “Reset printing system” from the menu that appears.

Click Reset when you’re asked to confirm.
You can re-add your printers when the process is complete.
Quit System Preferences.