Lesson 15
Manage System Resources
Goals
![]() Explore and understand macOS file layout
Explore and understand macOS file layout
![]() Discover common system files, their location, and their purpose
Discover common system files, their location, and their purpose
![]() Describe System Integrity Protection
Describe System Integrity Protection
![]() Manage font resources
Manage font resources
The macOS system files are streamlined and organized in a layout that is easy to manage and that provides strong security. This lesson focuses on the composition and organization of the files and folders that make up macOS.
Reference 15.1 macOS File Resources
If you look at the root (beginning) of the file system from the Finder, you see four default folders: Applications, Library, Users, and System. If you look at the root from Terminal, you see much more.
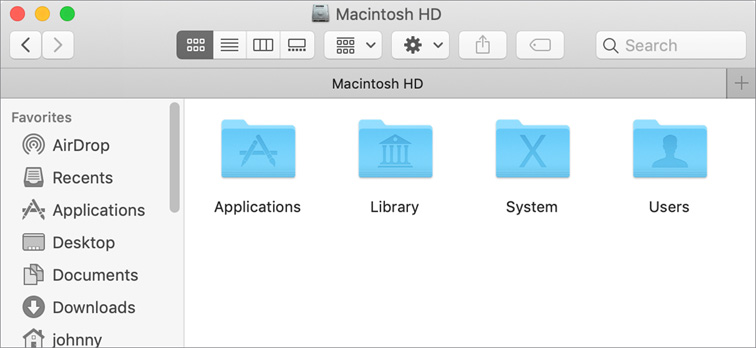
Here are descriptions of the default system root folders you see from the Finder:
![]() Applications—Often called the local Applications folder, this is the default location for apps available to local users. Only administrator users can make changes to the contents of this folder.
Applications—Often called the local Applications folder, this is the default location for apps available to local users. Only administrator users can make changes to the contents of this folder.
![]() Library—Often called the local Library folder, this is the default location for ancillary system and app resources available to users. Only administrator users can make changes to the contents of this folder.
Library—Often called the local Library folder, this is the default location for ancillary system and app resources available to users. Only administrator users can make changes to the contents of this folder.
![]() System—This folder contains resources required by macOS for primary functionality. With System Integrity Protection (SIP) enabled by default in macOS, no user or process can make changes to most of the content of the System folder. Properly created third-party macOS software, including hardware drivers, can function outside of the System folder. Details regarding SIP are covered later in this lesson.
System—This folder contains resources required by macOS for primary functionality. With System Integrity Protection (SIP) enabled by default in macOS, no user or process can make changes to most of the content of the System folder. Properly created third-party macOS software, including hardware drivers, can function outside of the System folder. Details regarding SIP are covered later in this lesson.
![]() Users—This is the default location for local user home folders. Lesson 8, “Manage User Home Folders,” covers this topic in greater detail.
Users—This is the default location for local user home folders. Lesson 8, “Manage User Home Folders,” covers this topic in greater detail.
Library Resources
macOS-specific system resources are in Library folders throughout the system volume. A system resource is a resource that is not a general-use app or a user file. The Library folder keeps user and system resources organized and separated from the items you use every day.
You should be familiar with these system resources:
![]() Application Support—This folder is in the user and local Library folders. Any ancillary data needed by an app might be in this folder. For example, it often contains help files or templates for an app.
Application Support—This folder is in the user and local Library folders. Any ancillary data needed by an app might be in this folder. For example, it often contains help files or templates for an app.
![]() Containers and Group Containers—These folders contain resources for sandboxed apps. There is more information about these folders later in this section.
Containers and Group Containers—These folders contain resources for sandboxed apps. There is more information about these folders later in this section.
![]() Extensions—Also called kernel extensions, these items are found only in the /Library and /System/Library folders. Extensions are low-level drivers that attach themselves to the kernel, or core, of the operating system. Extensions provide driver support for hardware, networking, and peripherals. Extensions load and unload automatically. Extensions are covered in greater detail in Lesson 26, “Troubleshoot Peripherals.”
Extensions—Also called kernel extensions, these items are found only in the /Library and /System/Library folders. Extensions are low-level drivers that attach themselves to the kernel, or core, of the operating system. Extensions provide driver support for hardware, networking, and peripherals. Extensions load and unload automatically. Extensions are covered in greater detail in Lesson 26, “Troubleshoot Peripherals.”
![]() Fonts—Fonts are files that describe typefaces used for both screen display and printing. Font management is covered later in this lesson.
Fonts—Fonts are files that describe typefaces used for both screen display and printing. Font management is covered later in this lesson.
![]() Frameworks—Frameworks are repositories of shared code used among different parts of the operating system or apps. Frameworks load and unload automatically. You can view your Mac computer’s currently loaded frameworks with System Information.
Frameworks—Frameworks are repositories of shared code used among different parts of the operating system or apps. Frameworks load and unload automatically. You can view your Mac computer’s currently loaded frameworks with System Information.
![]() Keychains—Keychains are used to securely store sensitive information, including passwords, certificates, keys, Safari AutoFill information, and notes. Keychain technology is covered in Lesson 9, “Manage Security and Privacy.”
Keychains—Keychains are used to securely store sensitive information, including passwords, certificates, keys, Safari AutoFill information, and notes. Keychain technology is covered in Lesson 9, “Manage Security and Privacy.”
![]() LaunchDaemons and LaunchAgents—These define processes that start with the launchd process. macOS uses many background processes that are started by launchd. LaunchAgents are for processes that need to start up only when a user is logged in, whereas LaunchDaemons are used to start processes that always run in the background, even when no users are logged in. More about launchd can be found in Lesson 28, “Troubleshoot Startup and System Issues.”
LaunchDaemons and LaunchAgents—These define processes that start with the launchd process. macOS uses many background processes that are started by launchd. LaunchAgents are for processes that need to start up only when a user is logged in, whereas LaunchDaemons are used to start processes that always run in the background, even when no users are logged in. More about launchd can be found in Lesson 28, “Troubleshoot Startup and System Issues.”
![]() Logs—Many system processes and apps archive progress or error messages to log files. You can view log files using Console.
Logs—Many system processes and apps archive progress or error messages to log files. You can view log files using Console.
![]() PreferencePanes—PreferencePanes are used by System Preferences to provide interfaces for system configuration. Using System Preferences is covered in Lesson 3, “Set Up and Configure macOS.”
PreferencePanes—PreferencePanes are used by System Preferences to provide interfaces for system configuration. Using System Preferences is covered in Lesson 3, “Set Up and Configure macOS.”
![]() Preferences—Preferences are used to store system and app configuration settings. Every time you configure a setting for any app or system function, it is saved to a preference file. Because preferences play such a critical role in system functionality, troubleshooting preference files is covered separately in Lesson 20, “Manage and Troubleshoot Apps.”
Preferences—Preferences are used to store system and app configuration settings. Every time you configure a setting for any app or system function, it is saved to a preference file. Because preferences play such a critical role in system functionality, troubleshooting preference files is covered separately in Lesson 20, “Manage and Troubleshoot Apps.”
Resource Hierarchy
Library folders are in separate domains: user, local, network, and system (network domains are legacy and outside the scope of this guide). Segregating resources into domains provides increased administrative flexibility, resource security, and system reliability. Resource domains allow for administrative flexibility, because you can choose to allocate certain resources to all users or just specific users. Standard users can add resources only to their own home folder and cannot access other users’ resources.
The system resource domains are, in order:
![]() User—Each user has his or her own Library folder in the home folder for resources. When resources are placed here, only the user has access to them. The user’s Library folder is hidden by default to prevent users from accidentally making changes that could be detrimental. Many apps and processes continue to rely on this location for resources.
User—Each user has his or her own Library folder in the home folder for resources. When resources are placed here, only the user has access to them. The user’s Library folder is hidden by default to prevent users from accidentally making changes that could be detrimental. Many apps and processes continue to rely on this location for resources.
![]() Local—Both /Applications and /Library are part of the local resource domain. Any resources placed in these two folders are available to all local user accounts. By default, only administrator users can make changes to local resources.
Local—Both /Applications and /Library are part of the local resource domain. Any resources placed in these two folders are available to all local user accounts. By default, only administrator users can make changes to local resources.
![]() System—The system domain encompasses the items necessary to provide core system functionality. This includes an app folder located at /System/Library/CoreServices. Many hidden items at the root of the system volume also make up the system resource domain, but the only one you see in the Finder is the /System/Library folder. With SIP enabled, no user or process can modify most of the /System folder.
System—The system domain encompasses the items necessary to provide core system functionality. This includes an app folder located at /System/Library/CoreServices. Many hidden items at the root of the system volume also make up the system resource domain, but the only one you see in the Finder is the /System/Library folder. With SIP enabled, no user or process can modify most of the /System folder.
With different domains containing resources, there may be multiple copies of similar resources available to the Mac and user. macOS handles this by searching for resources from the most specific (those in the user domain) to the least specific (those in the system domain). The following graphic represents the order in which resource contention is resolved from a user’s home folder (1) to the System folder (3).

If multiple similar resources are discovered, macOS uses the resource most specific to the user. For example, if two versions of the font Times New Roman are found—one in the local Library and one in the user’s Library—macOS uses the copy of the font in the user’s Library.
App Sandbox Containers
App sandbox containers enhance running-app security. Sandboxed apps are allowed access only to the specific items they need to function. Most apps built into macOS and apps from the App Store are sandboxed apps.
Sandboxed apps can access special folders that are referred to as containers. macOS manages the content of these containers to ensure that an app isn’t allowed access to other items in the file system. A user opening a document outside of an app container is the only way a sandboxed app is allowed access outside of its container.
App containers are in ~/Library/Containers. When a sandboxed app starts up the first time, macOS creates a container folder for the app, named with its bundle identifier. The bundle identifier identifies an app by its creator and app title. For example, the container folder for News is ~/Library/Containers/com.apple.News.
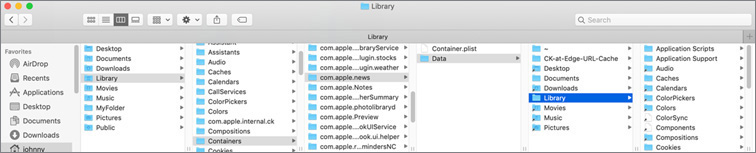
The root content of an app container is a property list file containing app information, a Data folder, and possibly an OldData folder. The Data folder is the app’s current active container. Any OldData folder you find contains previously used app items. The content of the Data folder mostly mimics the user home folder, but with one key distinction: it contains only the items that the app is allowed to access.
Items created and managed by the sandboxed app are the only original items in the container Data folder. If a user enables iCloud Drive, you might also find a CloudKit folder for maintaining items stored in iCloud.
Items that originated from other apps or a user’s file-opening action are represented as symbolic links that point to the original item outside of the container. macOS creates these symbolic links when the user opens an item in the sandboxed app. By representing external items this way, an original item can stay in its original location while also being accessible to a sandboxed app that can see only its own container.
App Group Containers
Although a user can allow sandboxed apps to access files beyond the app container, sandboxing prevents apps from doing this automatically. To facilitate sharing app resources automatically, developers of sandboxed apps can request that macOS create a shared app group container.
The ~/Library/Group Containers folder contains shared app containers. When a sandboxed app starts up the first time and requests access to share app resources, macOS creates a group container folder for the app, named with its bundle identifier.
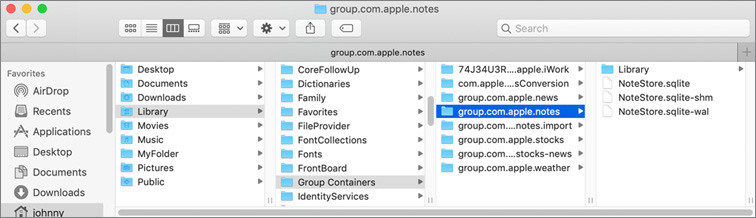
Unlike app sandbox containers that simulate an entire user home folder, app group containers hold only items to be shared between apps. Using Notes as an example, in the previous screenshot you can see the NoteStore database and Notes property list file. In this instance, the Notes data is shared so that other apps can access user note entries. macOS controls access to this to ensure that only Apple-verified processes can access the user’s Notes database.
Troubleshoot System Resources
You might see an error message calling out an issue with a specific item, but you might also experience a situation where the item appears to be missing. macOS ignores a system resource if it determines that the resource is corrupted or missing. Replace the suspect or missing item with a working copy.
When troubleshooting system resources, remember the resource domain hierarchy. Using fonts as an example, you might load a version of a font in the local Library folder, as required by your workflow to operate properly. In spite of this, a user might load another version of the same font in their home folder. In this case, the user might experience workflow problems even though it appears that they are using the correct font.
Logging in with another account is a quick way to determine whether the problem is in the user’s home folder. You can also use System Information to list active system resources. System Information shows the file path of the loaded system resources, so you can spot resources that are loading from the user’s Library.
Reference 15.2 System Integrity Protection
System Integrity Protection (SIP) protects your Mac by preventing potentially malicious software from modifying protected files and folders. SIP restricts the System Administrator account (the root user account) and limits the actions that the root user can perform on protected parts of the Mac operating system.
SIP includes protection for these parts of macOS:
![]() /System
/System
![]() /usr
/usr
![]() /bin
/bin
![]() /sbin
/sbin
![]() Apps that are preinstalled with macOS
Apps that are preinstalled with macOS
![]() /private/var/db/ConfigurationProfiles
/private/var/db/ConfigurationProfiles
Third-party apps and installers can continue to write to the following paths:
![]() /Applications
/Applications
![]() /Library
/Library
![]() /usr/local
/usr/local
SIP allows only processes that are signed by Apple with special entitlements to modify parts of your Mac that are protected by SIP. For instance, Apple software updates and Apple installers are entitled to write to system files. Apps that you download from the App Store already work with SIP.
SIP also helps ensure that only a user, and not malicious software, can change a startup disk. To select a startup disk, click the Apple menu, choose System Preferences, and then click Startup Disk. Or press and hold the Option key while you restart, and then choose from the list of startup disks.
If you upgrade from an earlier version of macOS, the installer might move an item aside if it conflicts with SIP.
Older peripheral and printer driver software might be impacted by SIP. If you discover that a third-party product is impeded by SIP, contact the developer to provide a version compatible with macOS Mojave.
You can temporarily bypass SIP by starting from another, non-SIP-protected system. You could also place your Mac in target disk mode and then connect to another Mac running a previous version of macOS. These methods all enable you to modify a non-SIP-protected system volume. After you’ve made your changes, restart the Mac back to the macOS Mojave system and your changes should remain.
You can disable SIP by using the csrutil command when started from macOS Recovery. The setting is saved to the Mac computer’s firmware, so resetting the parameter RAM enables SIP again. It’s also possible that a software update will reenable SIP.
If SIP is disabled, the root user has unlimited access to any system folder or app on your Mac. Malicious software can obtain root-level access if a user enters an administrator name and password to install the software. This would allow the software to modify or overwrite any system file or app. It’s best practice to keep SIP enabled at all times.
To prevent an unauthorized user from disabling SIP, you can set a computer firmware password to disallow starting from macOS Recovery, as detailed in Lesson 10, “Manage Password Changes.”
For more information about SIP, read Apple Support article HT204899, “About System Integrity Protection on your Mac.”
Reference 15.3 Manage Font Resources
One way to experience the system resource domain hierarchy is by managing fonts. macOS has advanced font-management technology that enables a nearly unlimited number of fonts using nearly any font type, including bitmap, TrueType, OpenType, and all PostScript fonts.
Fonts are installed in the Font folders in the Library folders throughout macOS. A user can manually install fonts by dragging them into ~/Library/Fonts. Administrators can install fonts for all users by dragging them into /Library/Fonts. This flexible font system enables administrators to better control font use. For example, a font vendor licensing model may grant only specific access for an individual user.
Install Fonts Using Font Book
macOS includes a font-management tool, Font Book, which automatically installs fonts for you. Font Book can also be used to organize fonts into more manageable collections, enable or disable fonts to simplify font lists, and resolve duplicate fonts. See Exercise 15.1, “Manage Font Resources,” for detailed instructions for managing fonts.
Note ![]()
Third-party font-management tools interrupt Font Book and take over font management for macOS.
Exercise 15.1 Manage Font Resources
![]() Prerequisite
Prerequisite
![]() You must have created the Local Administrator (Exercise 3.1, “Configure a New Mac”) and Johnny Appleseed (Exercise 7.1, “Create a Standard User Account”) accounts.
You must have created the Local Administrator (Exercise 3.1, “Configure a New Mac”) and Johnny Appleseed (Exercise 7.1, “Create a Standard User Account”) accounts.
In this exercise, you remove a font from /Library/Fonts, where it is available to all users, and install it in a single user’s Fonts folder.
Remove a Font
Use Font Book to watch what happens when you move a font to the Trash.
Verify that no users have fast user switching sessions active. If users other than Johnny are logged in, log them out.
If necessary, log in as Johnny Appleseed.
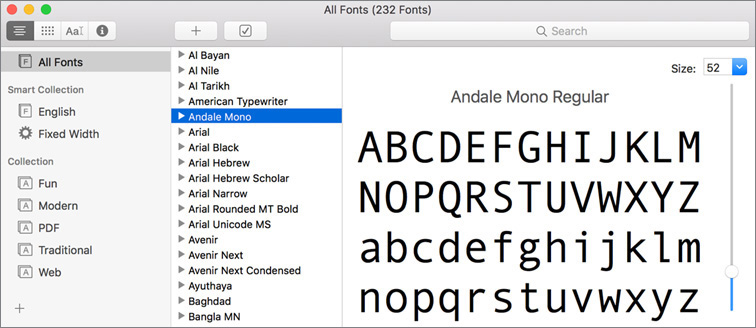
Open the Font Book app, which is in the /Applications folder.
Locate Andale Mono in the Font column.
In the Finder, navigate to the folder /Library/Fonts.
If Macintosh HD isn’t displayed on Johnny’s desktop, find it in the Computer view. Choose Go > Computer (or press Shift-Command-C), and open Macintosh HD > Library > Fonts.
If necessary, to verify your location, choose View > Show Path Bar.
Make sure the path bar at the bottom of the window matches the following screenshot (although the rest may not match unless you are in the column view):

The path bar includes the volume name in the path, so the path /Library/Fonts is displayed as Macintosh HD > Library > Fonts. The fonts in this folder are available to all users.
Locate the file Andale Mono.ttf.
Drag Andale Mono.ttf to the desktop. As you drag, a cursor with a green badge with a plus sign on it appears attached to the pointer. This indicates that the file will be copied rather than moved.
This will be your backup copy of the Andale Mono font.
Move the original Andale Mono.ttf file from /Library/Fonts to the Trash. To do so, authenticate as Local Administrator (password: Apple321!).
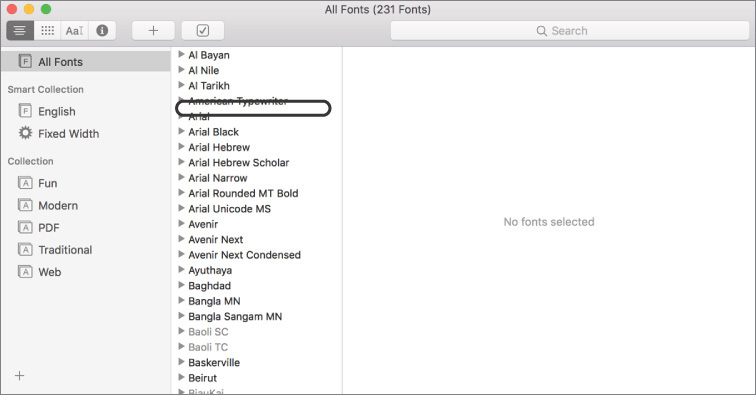
Click the Font Book window to make Font Book the active app.
The Andale Mono font is no longer listed in the Font Book window. Font Book shows a real-time display of the fonts in the macOS search path.
Add a Font for One User
You can use Font Book to install a font that only one user of the Mac can use.
In the Font Book app, choose Font Book > Preferences (Command-Comma).
Ensure that Default Install Location is set to User.
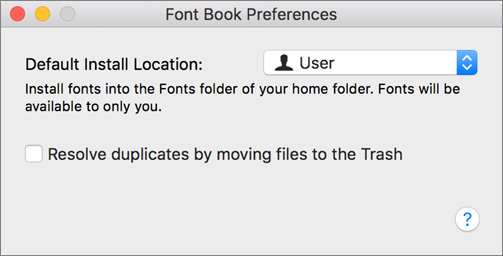
Close Font Book Preferences.
Switch to the Finder, and double-click Andale Mono.ttf on the desktop.
This opens Andale Mono.ttf in Font Book, which shows a preview of the font and gives you the option to install it.
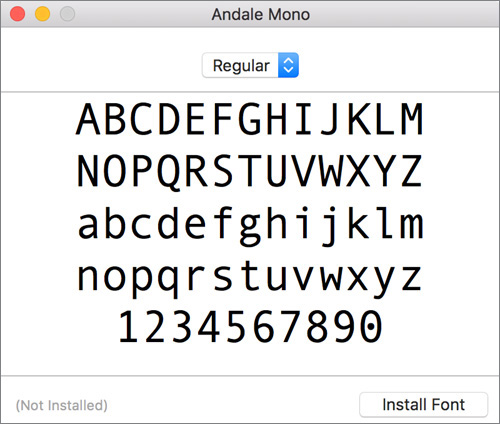
Click Install Font.
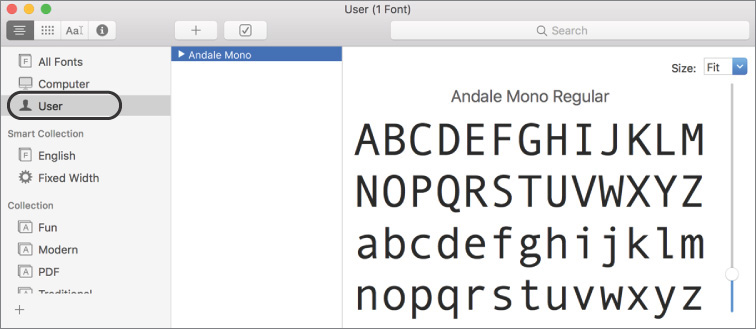
If necessary, select User from the sidebar.
Andale Mono is the only font installed in Johnny’s user account.
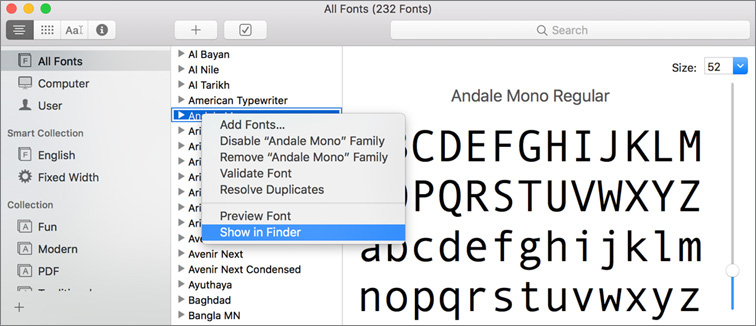
Select All Fonts from the sidebar.
Since this view shows all available fonts, including those installed for the current user and those installed for all Mac users, Andale Mono is back in the list.
Control-click Andale Mono, and choose “Show in Finder” from the shortcut menu.
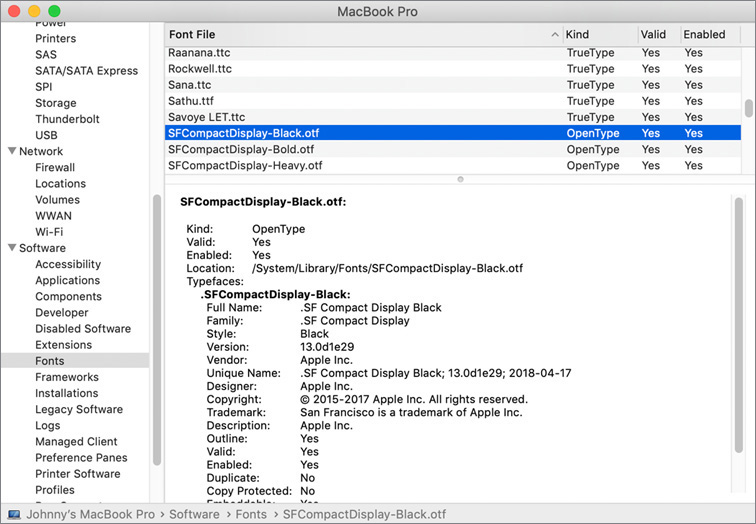
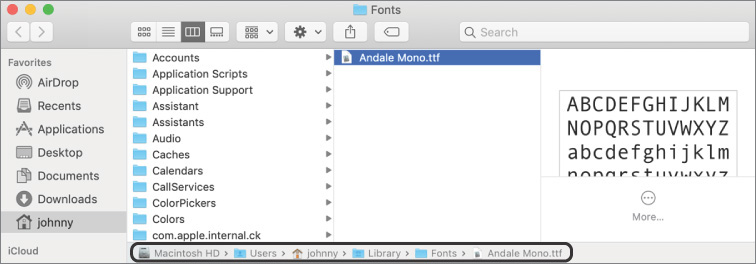
The Finder opens a window that displays the font file. Its path bar shows that the font file is in the Fonts folder in Johnny’s user library, previously referred to as ~/Library/Fonts, /Users/johnny/Library/Fonts, and Macintosh HD > Users > johnny > Library > Fonts. It’s the only font installed there.
Confirm a Font Is Unavailable to Other Users
If you log in as a different user, even as an administrator, you don’t have access to the fonts in Johnny’s Fonts folder.
Use fast user switching to switch to the Local Administrator account.
Open the Font Book app, and look for the Andale Mono font.
Andale Mono isn’t visible in Font Book for the Local Administrator account. At this time, you could add Andale Mono to this account, just as you added it to Johnny’s account. You would have to copy the font file to a location that Local Administrator can access.

Quit Font Book.
Validate Fonts
Since you changed your font configuration, you use Font Book to check your new setup.
Use fast user switching to switch back to the Johnny Appleseed account.
In the Font Book window, select All Fonts in the sidebar, click any font in the Font column, and press Command-A to select all fonts.
From the menu bar, choose File > Validate Fonts.
Font Book reads and validates the font files, and checks for corruption.
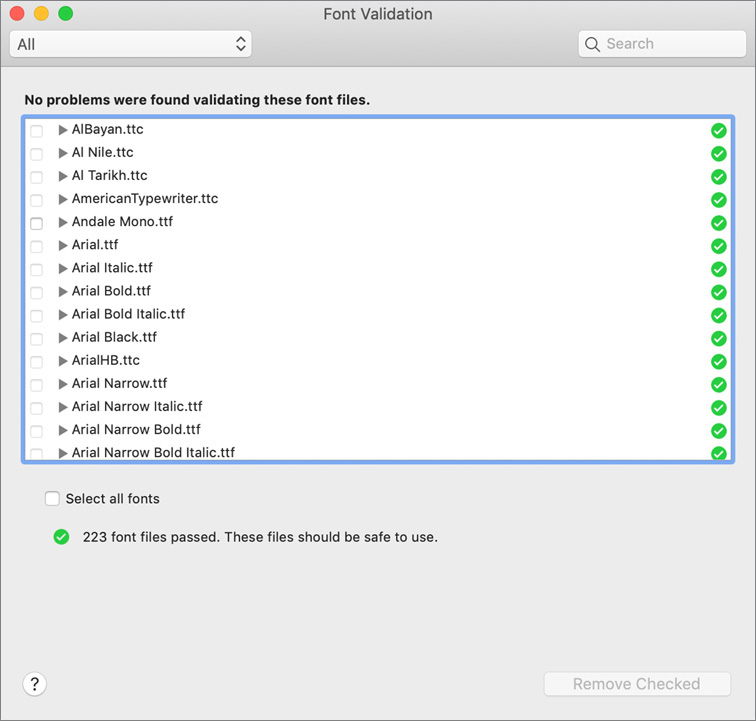
When the validation scan finishes, quit Font Book.
Log out as Johnny Appleseed.
Test System Integrity Protection
Unlike with the user and local libraries, you can’t modify the system library, even if you have administrator rights.
Log back in as Local Administrator.
In the Finder, navigate to /System/Library/Fonts.
Find the file Apple Color Emoji.ttc, and drag it to the Trash.
If you can’t find this file, make sure you’re in the correct Library/Fonts folder. You need to be in the folder that’s in the System folder for this part of the exercise.
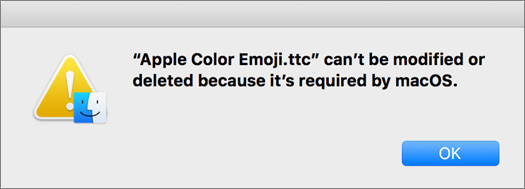
A dialog appears indicating that the file can’t be modified or deleted.
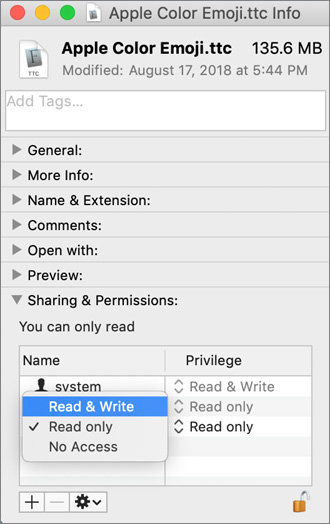
With Apple Color Emoji.ttf selected, choose File > Get Info (Command-I).
If necessary, expand Sharing & Permissions.
Click the small lock button, and authenticate as Local Administrator.
Try to change the privilege level for everyone to Read & Write.
Even though you have authenticated as an administrator, a dialog appears informing you that you don’t have permissions.
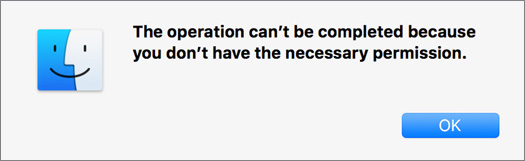
Dismiss the dialog, and close the Info window.
If you want, you can try other methods to make modifications in the /System folder, but System Integrity Protection will block your attempts. For more information, see Reference 15.2, “System Integrity Protection.”
Log out as Local Administrator.