Lesson 26
Troubleshoot Peripherals
Goals
![]() Manage peripheral connectivity
Manage peripheral connectivity
![]() Pair Bluetooth devices to your Mac
Pair Bluetooth devices to your Mac
![]() Troubleshoot peripheral and driver issues
Troubleshoot peripheral and driver issues
macOS is compatible with most popular peripheral standards. At the start of this lesson, you learn how macOS supports different peripheral technologies. Then you learn how to manage and troubleshoot wired and wireless (Bluetooth) peripherals connected to macOS.
Reference 26.1 Peripheral Technologies
A peripheral is any device that you can connect to your Mac and that is controlled by that computer; a network device is shared over the network. This lesson shows you how to categorize peripherals by their connectivity type and device class. This information helps you manage and troubleshoot peripherals.
Peripheral Connectivity
To communicate with macOS, most peripherals use a bus. Bus connections are the most common peripheral connection types because they allow for different peripheral devices. Bus connections also allow multiple peripherals to connect to your Mac simultaneously.
Mac supports USB, FireWire, Bluetooth, and Thunderbolt, and a few other buses that are outside the scope of this guide.
You can examine the status of each of these peripheral buses (and the items they are attached to) with System Information. In System Information, select a bus, and then select a hardware interface to view its information.
USB
USB is standard on every Mac. You can use System Information to see what type of USB ports your Mac has, how fast these ports are, and what’s currently connected to them.
USB is a highly expandable connection platform that allows for daisy-chained connections. You can connect one USB device to your Mac, and then connect another USB device to the first, and so on. The USB specification allows for up to 127 simultaneous devices per host controller. Most Mac computers have at least two externally accessible USB host controllers.
USB Performance
Four USB versions are currently supported by Apple hardware: USB 1.1, USB 2.0, USB 3.0, and USB-C (USB 3.1). Despite significant upgrades in performance, USB ports on Mac computers are backward compatible with USB 1.1 devices. Find out more about USB at the official USB Implementers Forum website: www.usb.org.
USB versions offer the following performance characteristics:
![]() USB 1.1: 1.5-12 megabits per second (Mbit/s)
USB 1.1: 1.5-12 megabits per second (Mbit/s)
![]() USB 2.0: 480 Mbit/s
USB 2.0: 480 Mbit/s
![]() USB 3.0 and USB 3.1 Gen 1: 5 gigabits per second (Gbit/s)
USB 3.0 and USB 3.1 Gen 1: 5 gigabits per second (Gbit/s)
![]() USB 3.1 Gen 2: 10 Gbit/s
USB 3.1 Gen 2: 10 Gbit/s
Mac computers provide different amounts of power to USB peripherals depending on the model. Read Apple Support article HT204377, “Powering peripherals through USB,” for more information.
Some Mac computers have USB-A ports (sometimes referred to as USB 3 ports), which look like this:

USB-C describes the shape and style of a port on your computer and the connectors that you can plug into the port. USB-C ports look like this:

USB-C is a reversible connection that was developed by Intel and Apple.
You can use USB-C ports to do the following:
![]() Charge your portable Mac.
Charge your portable Mac.
![]() Provide power.
Provide power.
![]() Transfer content between your Mac and other devices.
Transfer content between your Mac and other devices.
![]() Connect video output such as HDMI, VGA, and DisplayPort (requires an adapter).
Connect video output such as HDMI, VGA, and DisplayPort (requires an adapter).
![]() Use an adapter to connect to other technologies, such as Ethernet.
Use an adapter to connect to other technologies, such as Ethernet.
This allows for radical simplification in ports. A variety of USB-C adapters are available that allow for simultaneous connection to multiple peripherals, a display, and battery charging. USB-C is the only version of USB that supports target disk mode.
You can find out more about USB and USB-C from Apple Support article HT201163, “Using USB devices with your Mac.”
Thunderbolt
Originally designed by Intel, then later in collaboration with Apple, Thunderbolt represents the latest in peripheral connectivity. This standard folds PCI Express and DisplayPort data into a single connection and cable. Thunderbolt 3 adds USB compatibility and advanced power management.
With the appropriate adapters, a single Thunderbolt connection can provide access to any other networking, storage, peripheral, video, or audio connection. For example, a Thunderbolt display can provide not only a high-definition digital display but also a built-in camera, a microphone, audio speakers, USB ports, FireWire ports, Gigabit Ethernet ports, additional Thunderbolt ports for another peripheral, and even enough power to charge portable Mac computers—all through a single Thunderbolt cable from the Mac to the display.
One Thunderbolt host computer connection supports a hub or daisy chain of up to six devices, with up to two of these devices high-resolution displays. You can use Mac computers with Thunderbolt in target disk mode without the need for a functional operating system, as covered in Lesson 11, “Manage File Systems and Storage.”
Only copper Thunderbolt cabling can deliver power, but it is limited to a maximum 3-meter length. Optical Thunderbolt cabling is available in lengths of up to 100 meters.
Physically, the original Thunderbolt and Thunderbolt 2 connector is identical to the Mini DisplayPort. All of these ports have the same shape, but they use different symbols on the cable and port. Thunderbolt, Thunderbolt 2, and Mini DisplayPort ports all look like this:

Mini DisplayPort devices and cables don’t support the additional PCI Express data used by Thunderbolt. So items that support only Mini DisplayPort should be the last connection in a Thunderbolt daisy chain. You can identify items compatible with Thunderbolt by an icon that looks like a lightning bolt, whereas items compatible with only Mini DisplayPort feature an icon that looks like a flat-panel display.
The latest Thunderbolt 3 standard has adopted the USB-C port.
Because Thunderbolt 3 uses the USB-C, any Mac that includes Thunderbolt 3 can also accept USB-C devices without the need for adapters. Check the specifications for your Mac model to see if it has Thunderbolt 3 (USB-C) ports. If it does, the Thunderbolt 3 (USB-C) ports support Thunderbolt 3 and USB 3.1 Gen 2. If your Mac has a USB-C port that doesn’t support Thunderbolt 3, it supports USB 3.1 Gen 1.
USB-C devices and cables don’t support the additional PCI Express data used by Thunderbolt. So items that support only USB-C should be the last connection in a Thunderbolt daisy chain.
Thunderbolt is the fastest external peripheral bus to date:
![]() Thunderbolt provides two bidirectional 10 Gbit/s channels—this means a total of 20 Gbit/s outbound and 20 Gbit/s inbound. With this first version of Thunderbolt, these channels can’t be combined to provide full bandwidth to a single peripheral. Thus, a single Thunderbolt peripheral has a maximum bandwidth of 10 Gbit/s, but you can use the full bandwidth when multiple peripherals are part of a single Thunderbolt chain. Thunderbolt also features DisplayPort 1.1 signaling, which allows for high-definition display resolutions. Copper Thunderbolt cabling also supplies up to 10 watts of power to connected devices, again providing more power than any previous external peripheral bus.
Thunderbolt provides two bidirectional 10 Gbit/s channels—this means a total of 20 Gbit/s outbound and 20 Gbit/s inbound. With this first version of Thunderbolt, these channels can’t be combined to provide full bandwidth to a single peripheral. Thus, a single Thunderbolt peripheral has a maximum bandwidth of 10 Gbit/s, but you can use the full bandwidth when multiple peripherals are part of a single Thunderbolt chain. Thunderbolt also features DisplayPort 1.1 signaling, which allows for high-definition display resolutions. Copper Thunderbolt cabling also supplies up to 10 watts of power to connected devices, again providing more power than any previous external peripheral bus.
![]() Thunderbolt 2 supports channel aggregation. A single peripheral can take advantage of the full 20 Gbit/s throughput.
Thunderbolt 2 supports channel aggregation. A single peripheral can take advantage of the full 20 Gbit/s throughput.
![]() Thunderbolt 3 provides two bidirectional 20 Gbit/s (20,000 Mbit/s) channels, providing a total of 40 Gbit/s outbound and 40 Gbit/s inbound. Thunderbolt 3 also features DisplayPort 1.2 signaling, which allows for 4K and 5K display resolutions. Finally, Thunderbolt 3 is fully backward compatible with USB-C (USB 3.1) signaling and power delivery.
Thunderbolt 3 provides two bidirectional 20 Gbit/s (20,000 Mbit/s) channels, providing a total of 40 Gbit/s outbound and 40 Gbit/s inbound. Thunderbolt 3 also features DisplayPort 1.2 signaling, which allows for 4K and 5K display resolutions. Finally, Thunderbolt 3 is fully backward compatible with USB-C (USB 3.1) signaling and power delivery.
For more information about Thunderbolt 3, read these Apple Support articles:
![]() HT202488, “About Apple Thunderbolt cables and adapters”
HT202488, “About Apple Thunderbolt cables and adapters”
![]() HT206908, “Apple Thunderbolt 3 (USB-C) to Thunderbolt 2 Adapter requires Thunderbolt 3”
HT206908, “Apple Thunderbolt 3 (USB-C) to Thunderbolt 2 Adapter requires Thunderbolt 3”
![]() HT207097, “Charge your MacBook Pro with Thunderbolt 3”
HT207097, “Charge your MacBook Pro with Thunderbolt 3”
![]() HT207443, “Adapters for the Thunderbolt 3 (USB-C) or USB-C port on your Mac or iPad Pro”
HT207443, “Adapters for the Thunderbolt 3 (USB-C) or USB-C port on your Mac or iPad Pro”
![]() HT208368, “About the Apple Thunderbolt 3 (USB-C) Cable”
HT208368, “About the Apple Thunderbolt 3 (USB-C) Cable”
And read “Thunderbolt 3. The most powerful and versatile port ever,” at www.apple.com/thunderbolt.
FireWire
FireWire is a high-speed, general-purpose peripheral connection originally developed by Apple. FireWire was ratified by the Institute of Electrical and Electronics Engineers (IEEE) as standard IEEE-1394 and was adopted as a standard interface for many digital video devices.
If your Mac supports Thunderbolt 3 (USB-C), Thunderbolt 2, or Thunderbolt, but doesn’t have a FireWire port, you can use an adapter or a combination of adapters to use a FireWire device:
![]() If your Mac has a Thunderbolt 3 (USB-C) port, use a Thunderbolt 3 (USB-C) to Thunderbolt 2 Adapter connected to a Thunderbolt to Firewire Adapter.
If your Mac has a Thunderbolt 3 (USB-C) port, use a Thunderbolt 3 (USB-C) to Thunderbolt 2 Adapter connected to a Thunderbolt to Firewire Adapter.
![]() If your Mac has a Thunderbolt 2 or Thunderbolt port, use a Thunderbolt to Firewire Adapter.
If your Mac has a Thunderbolt 2 or Thunderbolt port, use a Thunderbolt to Firewire Adapter.
Bluetooth
Bluetooth is a wireless technology that makes short-range connections between devices (like your Mac, and a mouse or keyboard) at distances up to 10 meters (approximately 30 feet).
Current Mac computers come with Bluetooth technology built in. You can check to see if your computer supports Bluetooth:
![]() Look for the Bluetooth icon in the menu bar. If the Bluetooth icon is present, your computer has Bluetooth.
Look for the Bluetooth icon in the menu bar. If the Bluetooth icon is present, your computer has Bluetooth.
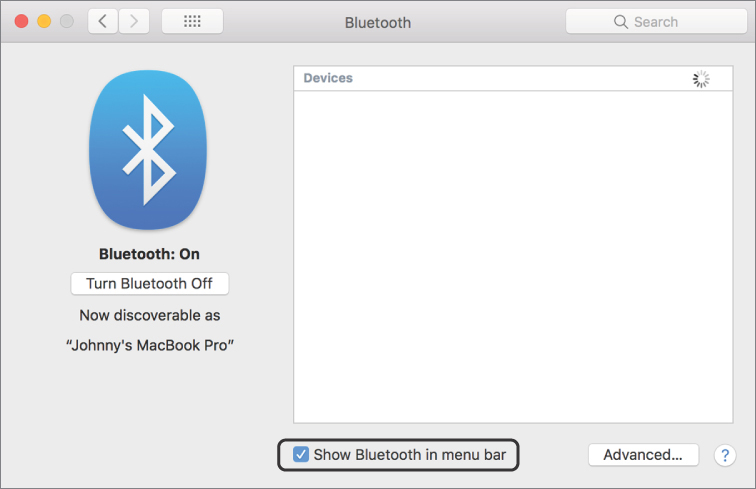
![]() Open System Preferences, and then open Bluetooth preferences. If Bluetooth preferences lists options for enabling Bluetooth and making your device discoverable, Bluetooth is installed.
Open System Preferences, and then open Bluetooth preferences. If Bluetooth preferences lists options for enabling Bluetooth and making your device discoverable, Bluetooth is installed.
![]() In System Information, select Bluetooth from the Hardware section. If the Hardware section shows information, your Mac has Bluetooth installed.
In System Information, select Bluetooth from the Hardware section. If the Hardware section shows information, your Mac has Bluetooth installed.
Mac computers dating from 2011 or later support Bluetooth 3.0 + High Speed (HS) with a maximum transfer speed of up to 24 Mbit/s and Bluetooth 4.0 with low-energy support. Bluetooth low-energy (BLE) mode isn’t very fast, at a maximum of 200 kbit/s, but it uses much less energy, is quicker to pair with devices, and sports a larger maximum range.
Read Apple Support article HT201171, “Using a Bluetooth mouse, keyboard, or trackpad with your Mac,” for more information.
Reference 26.2 Manage Bluetooth Devices
Bluetooth wireless devices are associated with your Mac through a process called pairing. After you pair a device, your Mac automatically connects to it anytime it’s in range.
If your Mac came with a wireless keyboard, mouse, or trackpad, they were pre-paired at the factory. Turn on the devices and your Mac should automatically connect to them when your computer starts up. If you bought the following Apple Bluetooth devices separately, you can use a Lightning to USB Cable or a USB-C to Lightning Cable to automatically pair them with your Mac:
![]() Magic Mouse 2
Magic Mouse 2
![]() Magic Keyboard
Magic Keyboard
![]() Magic Keyboard with Numeric Keypad
Magic Keyboard with Numeric Keypad
![]() Magic Trackpad 2
Magic Trackpad 2
For more information about how to set up an Apple wireless mouse, keyboard, or trackpad, read Apple Support article HT201178, “Set up your Apple wireless mouse, keyboard, and trackpad.”
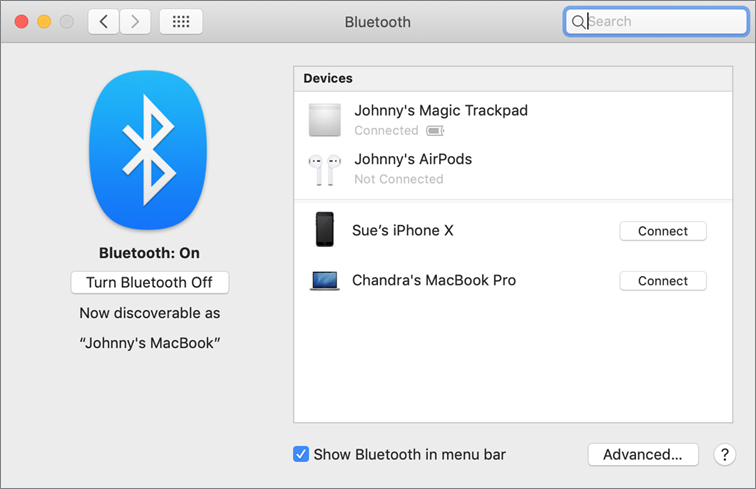
One way to configure Bluetooth devices is to use Bluetooth preferences. Open System Preferences, and then click Bluetooth. The on or off status is displayed in the left side of the window. You can select the checkbox “Show Bluetooth status in menu bar” so that you can quickly see Bluetooth status and manage devices at any time.
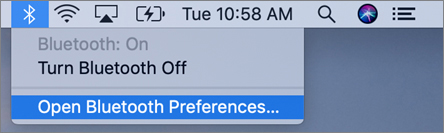
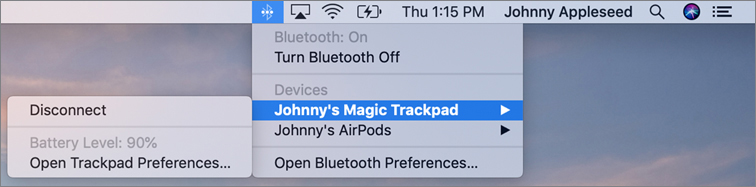
The Bluetooth menu bar icon in the upper right of your display gives you information about the status of Bluetooth and connected devices. And at any time, to manage Bluetooth preferences, you can click the Bluetooth menu bar icon and then choose Open Bluetooth Preferences.
Pair a Bluetooth Device
Before you begin the pairing process, enable Discoverable Mode on the Bluetooth device you’re going to pair with your Mac. Each device is different, so you might have to consult the device user guide to enable Discoverable Mode.
Continuity features use Bluetooth 4.0, but traditional Bluetooth pairing isn’t required. Instead, the Continuity features automatically connect as long as all devices are signed in to the same iCloud account. Find out more about Handoff from Apple Support article HT204681, “Use Continuity to connect your Mac, iPhone, iPad, iPod touch, and Apple Watch.”
When Bluetooth preferences is open, it scans for any Bluetooth devices in range that are in Discoverable Mode.
With Bluetooth preferences open, the Mac puts itself in Bluetooth Discoverable Mode. Discoverable Mode advertises your Mac as a Bluetooth resource to any device within range, which could invite unwanted attention to your Mac.
It may take several moments for the device name to appear. After it does, select it and click the Pair button. For some Bluetooth devices, you must enter a passcode to authorize pairing. Depending on the device, you will perform one of the following:
![]() Complete the pairing with little interaction by using an automatically generated passcode. This often happens with a device that has no method to verify the passcode.
Complete the pairing with little interaction by using an automatically generated passcode. This often happens with a device that has no method to verify the passcode.
![]() Enter a predefined passcode on your Mac, as specified in the device’s user guide, and click Continue to authorize the pairing.
Enter a predefined passcode on your Mac, as specified in the device’s user guide, and click Continue to authorize the pairing.
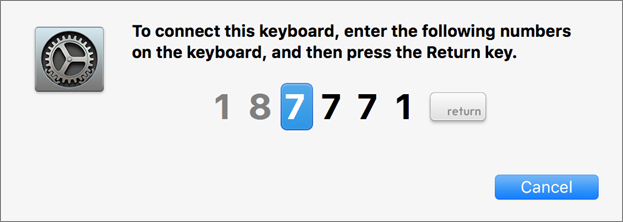
![]() Allow the Bluetooth Setup Assistant to create a random passcode, which you then enter or verify on the Bluetooth device to authorize the pairing. In this example, the passcode is generated automatically.
Allow the Bluetooth Setup Assistant to create a random passcode, which you then enter or verify on the Bluetooth device to authorize the pairing. In this example, the passcode is generated automatically.
The Bluetooth Setup Assistant automatically detects the capabilities of your Bluetooth device and may present you with additional configuration screens. Continue through these screens until you complete the setup. When the pairing is complete, you can verify the pairing by reopening Bluetooth preferences. A device doesn’t have to be currently connected to maintain pairing status with the Mac.
You can use the Bluetooth status menu to verify the status of Bluetooth devices. The Bluetooth status menu displays connected devices using bold letters.
macOS saves Bluetooth input device pairings, like mice and keyboards, to NVRAM so that you can use them prior to macOS fully starting up. This is necessary to support FileVault and startup keyboard shortcuts when using Bluetooth input devices.
Manage Bluetooth Settings
You can adjust settings such as the peripheral’s name from Bluetooth preferences. To access all the Bluetooth management settings, open Bluetooth preferences from either the Apple menu > System Preferences or the Bluetooth status menu > Open Bluetooth Preferences.
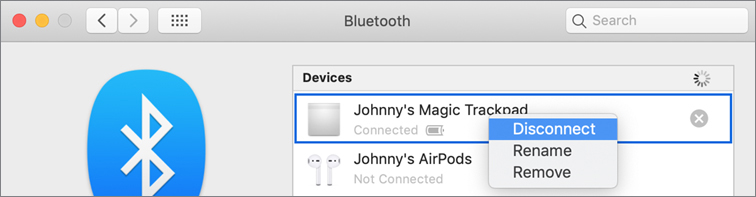
To manage a Bluetooth peripheral, select it from the list and then Control-click to open a shortcut menu. From this menu you can connect or disconnect a device, and possibly rename a device. Some devices, such as iPhone, are named on the device and cannot be changed from Bluetooth preferences. You can also delete a device pairing from this list by clicking the small x button to the right.
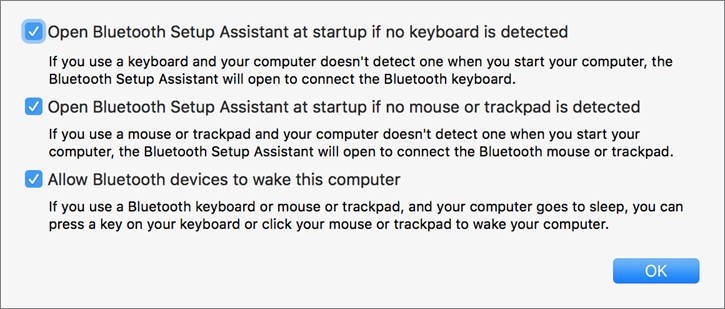
Click the Advanced button at the bottom of the Bluetooth preferences to reveal a dialog where you can adjust additional Bluetooth settings. These settings are especially useful for desktop Mac computers that use only wireless keyboards and mice.
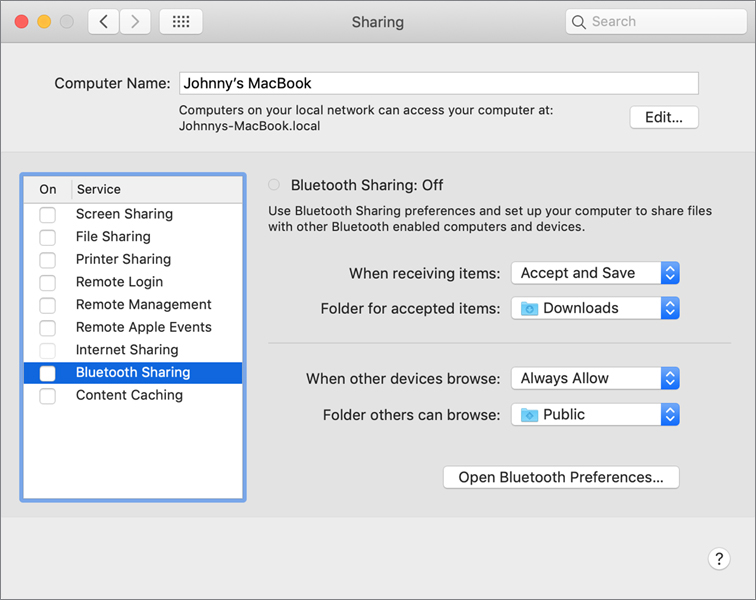
Finally, you’ll find Bluetooth sharing settings in Shared preferences. Like other sharing services, Bluetooth sharing is off by default. Enable Bluetooth sharing as a last resort when traditional file-sharing methods aren’t possible. Lesson 25, “Manage Host Sharing and Personal Firewall,” discusses alternative file-sharing methods, including AirDrop wireless file sharing.
Reference 26.3 Troubleshoot Peripheral Issues
The first part of this section covers how macOS interacts with peripherals and how to identify peripheral issues related to software. You also learn about general troubleshooting.
Peripheral Device Classes
Peripherals are divided into device classes based on their primary function. macOS includes built-in software drivers that allow your Mac to interact with peripherals from all device classes. Although these built-in drivers may provide basic support, many third-party devices require device-specific drivers for full functionality.
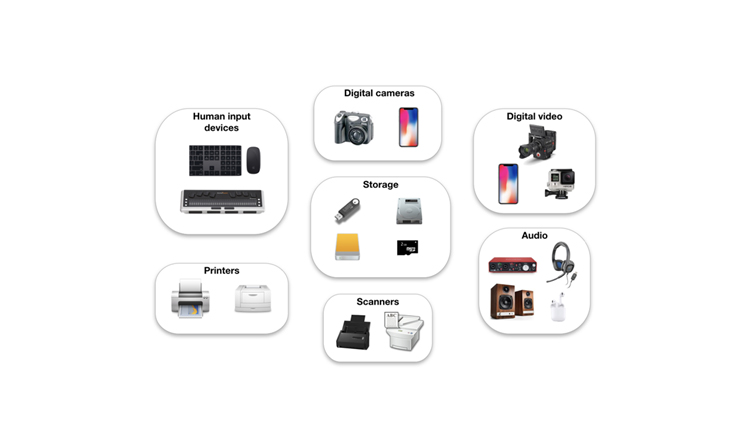
Device classes as defined in macOS include:
![]() Human input devices (HIDs)—Peripherals that allow you to directly enter information or control the Mac interface. Examples are keyboards, mice, trackpads, game controllers, tablets, and Braille interfaces.
Human input devices (HIDs)—Peripherals that allow you to directly enter information or control the Mac interface. Examples are keyboards, mice, trackpads, game controllers, tablets, and Braille interfaces.
![]() Storage devices—Internal disks, flash disks, optical discs, and iPod devices. Storage peripherals are covered in Lesson 11, “Manage File Systems and Storage.”
Storage devices—Internal disks, flash disks, optical discs, and iPod devices. Storage peripherals are covered in Lesson 11, “Manage File Systems and Storage.”
![]() Printers—Printers of all types and fax machines. Printing is covered in Lesson 27, “Manage Printers and Scanners.”
Printers—Printers of all types and fax machines. Printing is covered in Lesson 27, “Manage Printers and Scanners.”
![]() Scanners—Flatbed, negative, slide, document, and drum scanners. macOS uses the Image Capture framework to support scanners. This allows you to control scanners with Image Capture or any other compatible third-party capture app, such as Photoshop. This topic is also covered in Lesson 27.
Scanners—Flatbed, negative, slide, document, and drum scanners. macOS uses the Image Capture framework to support scanners. This allows you to control scanners with Image Capture or any other compatible third-party capture app, such as Photoshop. This topic is also covered in Lesson 27.
![]() Digital cameras—These peripherals include both directly connected cameras and camera storage cards. Many digital cameras, when connected to a computer, extend their internal storage to the computer. In this case, macOS accesses the camera’s internal storage, or any directly attached camera storage cards, as it does any other storage device. An app like Photos then takes over to copy the picture files from the camera storage to the Mac. Some cameras support a tethered capture mode in which they are directly controlled by the Mac and send the captured picture data directly to the Mac. macOS uses the Image Capture framework to support this type of camera. This allows you to use Image Capture or another compatible third-party capture app.
Digital cameras—These peripherals include both directly connected cameras and camera storage cards. Many digital cameras, when connected to a computer, extend their internal storage to the computer. In this case, macOS accesses the camera’s internal storage, or any directly attached camera storage cards, as it does any other storage device. An app like Photos then takes over to copy the picture files from the camera storage to the Mac. Some cameras support a tethered capture mode in which they are directly controlled by the Mac and send the captured picture data directly to the Mac. macOS uses the Image Capture framework to support this type of camera. This allows you to use Image Capture or another compatible third-party capture app.
![]() Video devices—These peripherals include video cameras and video converters connected with USB, FireWire, Thunderbolt, or an expansion bus. macOS uses the QuickTime framework to support these video devices. This allows you to use QuickTime Player or any other compatible video app, such as iMovie or Final Cut Pro.
Video devices—These peripherals include video cameras and video converters connected with USB, FireWire, Thunderbolt, or an expansion bus. macOS uses the QuickTime framework to support these video devices. This allows you to use QuickTime Player or any other compatible video app, such as iMovie or Final Cut Pro.
![]() Audio devices—These peripherals include external audio interfaces connected with USB, FireWire, Thunderbolt, or an expansion bus. macOS uses the Core Audio framework to support these audio devices. This allows you to use any compatible audio app, such as GarageBand or Logic Pro.
Audio devices—These peripherals include external audio interfaces connected with USB, FireWire, Thunderbolt, or an expansion bus. macOS uses the Core Audio framework to support these audio devices. This allows you to use any compatible audio app, such as GarageBand or Logic Pro.
Peripheral Device Drivers
macOS is an intermediary between peripherals and apps. If an app supports a general device class, macOS handles all the technical details of communicating with each model of peripheral in that class.
Here’s an example: for an app to receive input, it needs to receive information from the keyboard, mouse, trackpad, and the like, but it doesn’t need to handle any details about how to interpret the electrical signals from that device, because that’s handled by macOS. This separation of peripherals and apps by macOS enables you to use nearly any combination of the two with few incompatibilities.
macOS uses device drivers, which are specialized pieces of software, to allow peripherals to communicate with your Mac.
For some peripherals, macOS can use a generic driver, but for other peripherals, macOS must use a device driver created specifically for the peripheral. You install most device drivers using an installer utility that places the driver software in the appropriate resource folder on your Mac. macOS implements device drivers in one of three ways: kernel extensions, framework plug-ins, or apps.
When you add support for a new third-party peripheral that requires custom drivers, check the peripheral manufacturer’s website to obtain the latest version of the driver software.
Device driver implementations in macOS include:
![]() Kernel extensions (KEXTs)—macOS Mojave requires user approval to install new KEXTs, but after they are installed, macOS loads and unloads KEXTs automatically as needed. Although some KEXTs are located inside app bundles, most are located in /System/Library/Extensions/ or /Library/Extensions/. Examples of peripherals that use KEXTs are human input devices, storage devices, audio and video devices, and other expansion cards. See Reference 9.7, “Approve Kernel Extensions,” for more information.
Kernel extensions (KEXTs)—macOS Mojave requires user approval to install new KEXTs, but after they are installed, macOS loads and unloads KEXTs automatically as needed. Although some KEXTs are located inside app bundles, most are located in /System/Library/Extensions/ or /Library/Extensions/. Examples of peripherals that use KEXTs are human input devices, storage devices, audio and video devices, and other expansion cards. See Reference 9.7, “Approve Kernel Extensions,” for more information.
![]() Framework plug-ins—This type of device driver adds support for a specific peripheral to an existing system framework. For example, support for additional scanners and digital cameras is facilitated through plug-ins to the Image Capture framework.
Framework plug-ins—This type of device driver adds support for a specific peripheral to an existing system framework. For example, support for additional scanners and digital cameras is facilitated through plug-ins to the Image Capture framework.
![]() Apps—In some cases a peripheral is best supported by an app written just for that peripheral.
Apps—In some cases a peripheral is best supported by an app written just for that peripheral.
Inspect Kernel Extensions
Even though the macOS kernel manages KEXTs without user interaction, you may still need to verify that a specific KEXT is loaded. You can use System Information to view the KEXTs that are currently installed and loaded. After System Information is open, select the Extensions item in the Contents list. After the list appears, you can further inspect KEXTs by selecting them from this list. Click the Loaded column to sort the list by which KEXTs are in use by macOS and which aren’t.
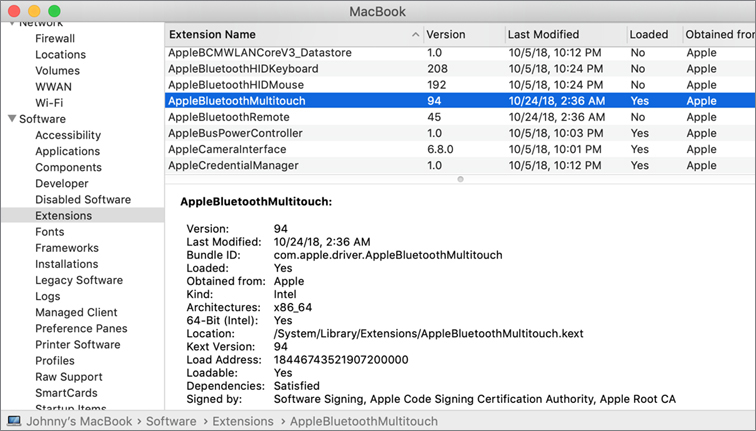
macOS has a 64-bit kernel. macOS ignores any KEXTs that don’t support 64-bit mode or are not properly signed by Apple.
Troubleshoot General Peripheral Issues
Use the following techniques for general peripheral troubleshooting:
![]() Check System Information first. Connected peripherals appear in System Information whether or not their software driver is functioning. So if a connected peripheral does not show up in System Information, then you are almost certainly experiencing a hardware failure. If a connected peripheral appears as normal in System Information, you are probably experiencing a software driver issue. In that case, use System Information to validate whether the expected kernel extensions are loaded.
Check System Information first. Connected peripherals appear in System Information whether or not their software driver is functioning. So if a connected peripheral does not show up in System Information, then you are almost certainly experiencing a hardware failure. If a connected peripheral appears as normal in System Information, you are probably experiencing a software driver issue. In that case, use System Information to validate whether the expected kernel extensions are loaded.
![]() Unplug and then reconnect the peripheral. Doing this reinitializes the peripheral connection and forces macOS to reload any peripheral-specific drivers.
Unplug and then reconnect the peripheral. Doing this reinitializes the peripheral connection and forces macOS to reload any peripheral-specific drivers.
![]() Plug the peripheral into a different port or use a different cable. This helps you rule out any bad hardware, including host ports, cables, and inoperable hubs.
Plug the peripheral into a different port or use a different cable. This helps you rule out any bad hardware, including host ports, cables, and inoperable hubs.
![]() Unplug other devices on the same bus. Another device on the shared bus may be causing an issue.
Unplug other devices on the same bus. Another device on the shared bus may be causing an issue.
![]() Resolve potential USB power issues. The USB interface can prove problematic if devices are trying to draw too much power. Try plugging the USB device directly into the Mac instead of a USB hub.
Resolve potential USB power issues. The USB interface can prove problematic if devices are trying to draw too much power. Try plugging the USB device directly into the Mac instead of a USB hub.
![]() Shut down the Mac, fully power down all peripherals, and turn everything back on. This troubleshooting technique reinitializes the peripheral connections and reloads the software drivers.
Shut down the Mac, fully power down all peripherals, and turn everything back on. This troubleshooting technique reinitializes the peripheral connections and reloads the software drivers.
![]() Try the peripheral with another Mac. This helps you determine whether the issue is with your Mac or the peripheral. If the device doesn’t work with other computers, your Mac is not the source of the issue.
Try the peripheral with another Mac. This helps you determine whether the issue is with your Mac or the peripheral. If the device doesn’t work with other computers, your Mac is not the source of the issue.
![]() Use Software Update preferences to check for macOS updates.
Use Software Update preferences to check for macOS updates.
![]() Use the App Store to check for app updates.
Use the App Store to check for app updates.
![]() Check for third-party app updates.
Check for third-party app updates.
![]() Check the peripheral manufacturer’s website for the latest driver updates.
Check the peripheral manufacturer’s website for the latest driver updates.
![]() Check for peripheral software updates. Like software updates, firmware updates may also resolve peripheral issues.
Check for peripheral software updates. Like software updates, firmware updates may also resolve peripheral issues.
Exercise 26.1 Examine Peripherals Using System Information
![]() Prerequisite
Prerequisite
![]() You must have created the Johnny Appleseed account (Exercise 7.1, “Create a Standard User Account”).
You must have created the Johnny Appleseed account (Exercise 7.1, “Create a Standard User Account”).
In an earlier exercise, you used System Information to view information about your hard disk. In this exercise, you use System Information to identify devices on a bus.
Note ![]()
In a classroom environment that doesn’t provide USB devices, your facilitator might demonstrate this exercise.
Examine Internal Devices
There are several ways to open System Information. In an earlier exercise, you opened it by choosing Apple menu > About This Mac and then clicking System Report. In this exercise you open System Information a different way.
If necessary, log in as Johnny Appleseed.
Click the Apple menu.
Press and hold the Option key.
The first item in the Apple menu changes from “About This Mac” to “System Information.”
With the Option key pressed, choose System Information from the Apple menu.
System Information opens and shows Hardware, Network, and Software information.
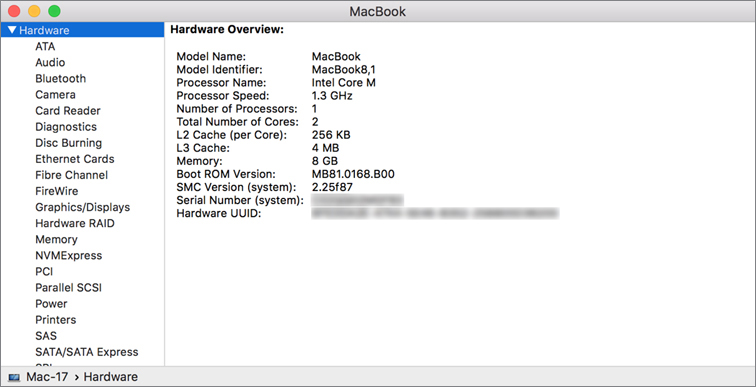
In the Hardware list on the left, click Graphics/Displays.
You see information about your graphics chip, the Intel Iris Pro.
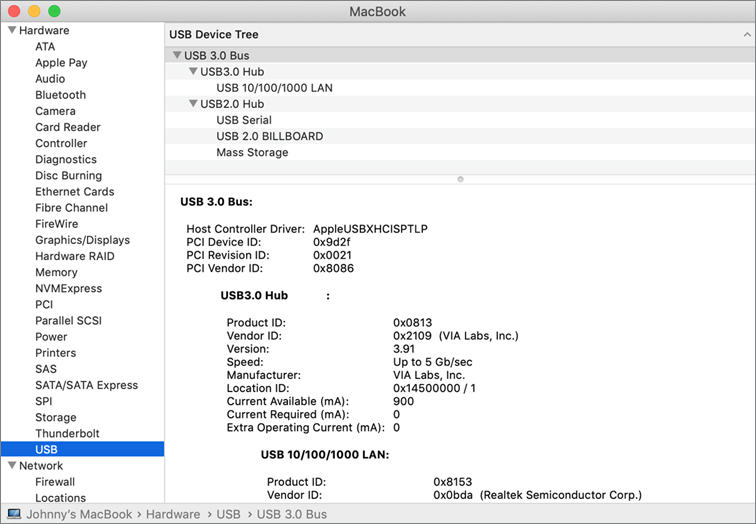
In the Hardware list, click USB to view devices connected to the USB bus. (This is called the USB Device Tree.)
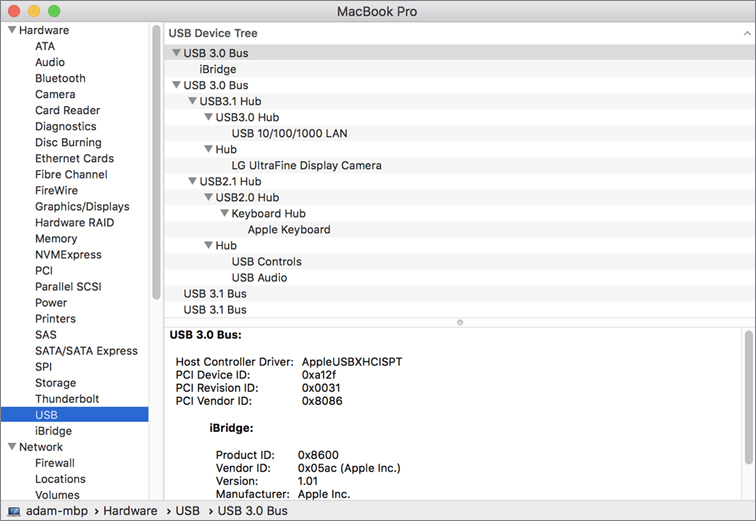
In this example, System Information indicates that there are four USB buses, two of which have devices connected to them. Several of the buses are internal to the Mac.
If a device is connected to a hub, it’s listed beneath the hub and indented. This example shows a Keyboard Hub entry with an Apple Keyboard connected. Although the hub and keyboard are separate devices at the USB level, they are both parts of a single physical device: an Apple USB keyboard. Most USB keyboards contain a built-in hub so you can attach other USB devices to them.
Examine the USB report for your Mac and determine which devices are internal and which are external.
Examine External USB Devices
For this exercise, you need at least one external USB device connected to your Mac. If you are performing these exercises in a classroom environment, your facilitator might provide a device. If no suitable USB device is available, quit System Information and skip this exercise.
If it isn’t already connected, plug in the external USB device, and refresh System Information. Choose File > Refresh Information (Command-R).
Select an external USB device in the USB report for your Mac.
Details about the device appear in the lower pane.
Examine the speed listed for the device.
The speed at which a USB device can run depends on its capability and the speeds of the port and intermediate hubs through which it is connected.
Examine the Current Available and Current Required figures.
Your Mac can supply a certain amount of electricity through each of its USB ports. If there are too many devices on the port, there might not be enough electricity. To prevent this, macOS keeps track of how much electricity is available at each point in the USB bus and disables devices if it calculates that not enough power is available for them.
While viewing the USB information, unplug the device from your Mac (if it is a storage device, eject it first), plug it into a different USB port, choose File > Refresh Information (Command-R).
System Information doesn’t update the window unless you tell it to.
Locate the external device in the report to see whether it changed places or if its statistics changed.
If you have an external hub, try plugging the device in a port, and refresh the display in System Information again.
See if enough power is available from the hub to run the device and whether its speed decreased because it’s connected through a hub.
Quit System Information.