Lesson 10
Manage Password Changes
Goals
![]() Change known passwords
Change known passwords
![]() Reset lost user passwords
Reset lost user passwords
![]() Set a firmware password to secure macOS startup
Set a firmware password to secure macOS startup
![]() Manage Secure Boot and external boot options for Mac computers that have the Apple T2 Security Chip
Manage Secure Boot and external boot options for Mac computers that have the Apple T2 Security Chip
A password change is different from a password reset. You can change a password if you know it, but if you don’t know it, you might be able to reset it. Changing and resetting passwords both result in a new password, but you should reset a password only if a user doesn’t know his or her password.
In this lesson, you learn how to change and reset passwords and how to set a firmware password. You also learn about the ramifications of modifying passwords.
In addition, you learn how to configure the Secure Boot and external boot options features that help secure your Mac with the Apple T2 Security Chip against unauthorized access.
Reference 10.1 Change Known Passwords
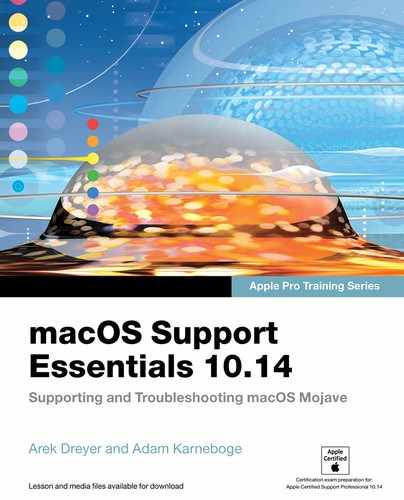
If you know your local computer account password but want to change it, you can do so from the General pane of Security & Privacy preferences or you can select your user account in Users & Groups preferences. In either case, you click Change Password.
You must enter your old password once, followed by the new password twice. You enter the new password twice to avoid typos. Because you are using a local account password, the new password has to conform to the requirement of being three characters or longer for macOS Mojave (unless a profile has been installed that configures a password policy).

Use Password Assistant
To pick a strong password, use Password Assistant, which gauges the strength of your passwords or creates strong passwords for you. Anytime you create or modify a local password that grants access to a substantial resource, like an account or keychain password, you can use Password Assistant. It’s available whenever you see the small key icon next to a password field, as you can see in the previous screenshot showing the local account password change dialog.

Reference 10.2 Reset Lost Passwords
There are multiple ways to reset a local user account password.
Reset the Password of Another User
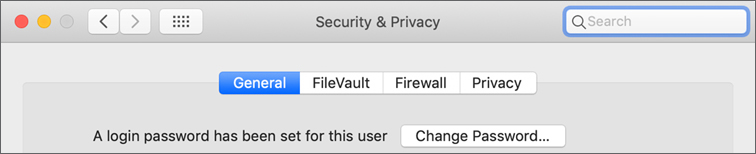
If you have access to an administrator account on a Mac, you can reset other user account passwords from Users & Groups preferences. Authenticate as an administrator, select the user account for the password you want to change, and click Reset Password.
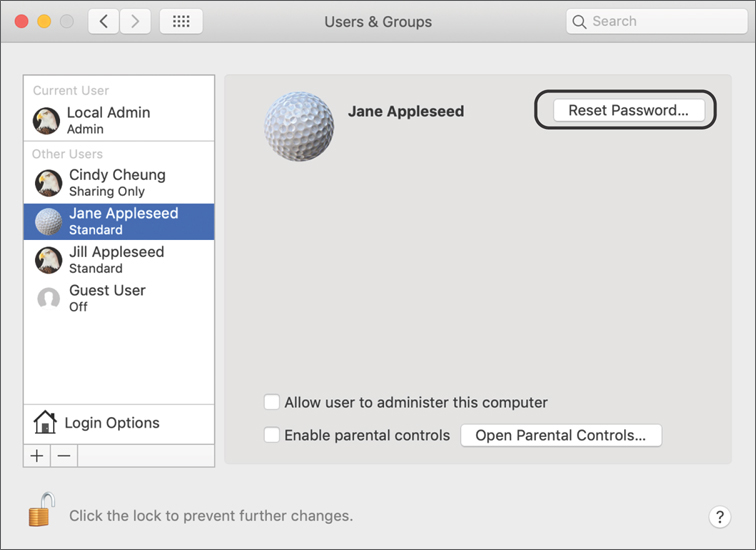
Enter and verify the new password. Optionally enter a password hint, and then click Change Password.
When you log in to your Mac, if your login password doesn’t match your login keychain password, macOS creates new empty keychain items for you and sets their new passwords to match your login password. See Exercise 10.3, “Observe Automatic Login Keychain Creation,” for details.
Reset Your Login Password Using Your Apple ID
You can reset your login password using your Apple ID if you turn on FileVault and select the option “Allow my iCloud account to unlock my disk.” Read Lesson 12, “Manage FileVault,” for more details on FileVault. There are two ways to associate your Apple ID with FileVault.
The first way to associate your Apple ID with FileVault is in Setup Assistant:
When you first use Setup Assistant to create your computer account, provide your Apple ID credentials.
In the FileVault screen, select “Turn on FileVault disk encryption” and “Allow my iCloud account to unlock my disk.”
The second way to associate your Apple ID with FileVault is in Security & Privacy preferences:
Open System Preferences.
Open Security & Privacy preferences.
Click Turn On FileVault.
If FileVault is already on, you can turn off FileVault, wait for decryption to complete if necessary, then click Turn On FileVault.
Select “Allow my iCloud account to unlock my disk.”
If you aren’t already logged in with your Apple ID, select “Set up my iCloud account to reset my password.”
Click Continue.
There are two ways to reset your password using your Apple ID if you enabled FileVault and associated it with your Apple ID.
The first way:
Start or restart your Mac.
Select your user account.
If a question mark doesn’t appear in the password field, enter a wrong password for your user account three times.
Click the question mark in the password field.
Next to “reset it using your Apple ID,” click the arrow.
Confirm that your Mac has a wired Ethernet connection, or if you’re using Wi-Fi, use the Wi-Fi menu item to confirm that you’re connected to an active Wi-Fi network.
Enter your Apple ID, then click Next.
Enter your Apple ID password, then click Next.
If prompted, enter the verification code that was sent to your other devices, and then click Next.
In the Reset Password screen, select a user to reset the password for and then click Next.
Enter and verify a new password. You can enter a password hint if you like.
Click Next.
In the Reset Password Completed screen, click Restart.
The second way:
Start or restart your Mac.
Wait up to 60 seconds until a message similar to this appears: “If you’re having a problem entering your password, press and hold the power button on your Mac to shut it down. Then press it again to start up in Recovery OS.”
Press and hold the power button on your Mac to shut it down, wait a moment after your Mac shuts down, then press the power button again to start up in macOS Recovery.
This screen should appear:
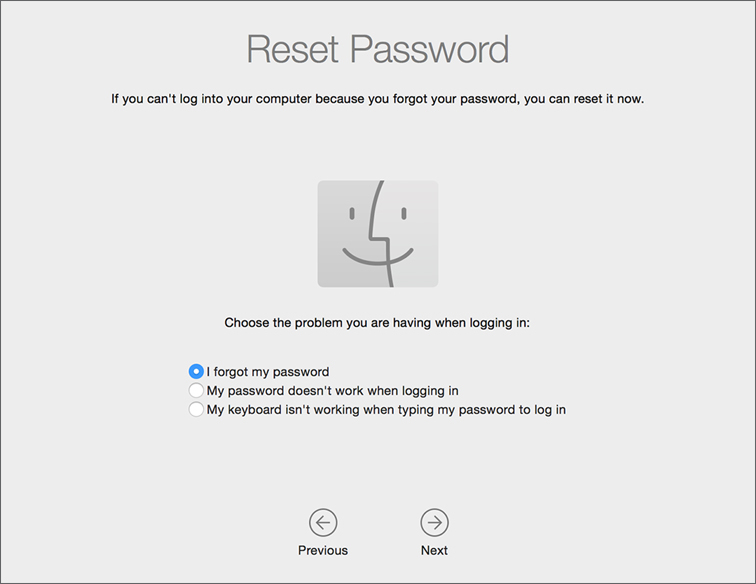
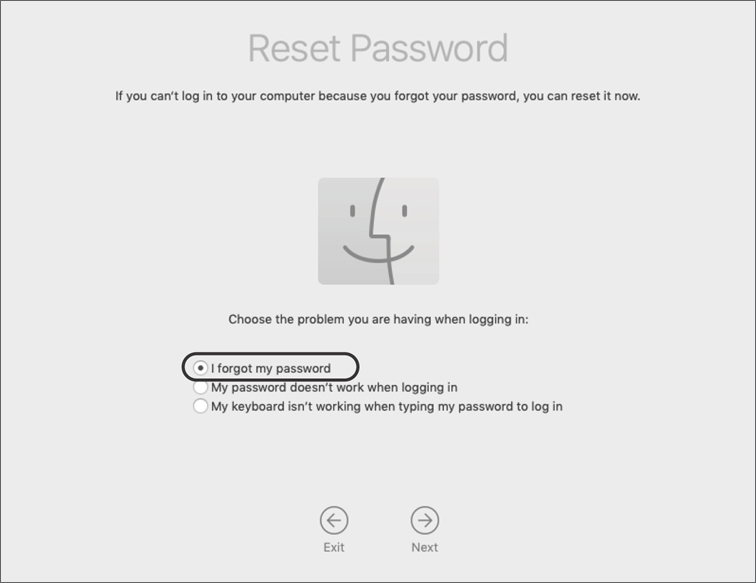
Select “I forgot my password” and then click Next.
Confirm that your Mac has a wired Ethernet connection, or if you’re using Wi-Fi, use the Wi-Fi menu item to confirm that you’re connected to an active Wi-Fi network.
Enter your Apple ID, then click Next.
Enter your Apple ID password, then click Next.
If prompted, enter the verification code that was sent to your other devices, and click Next.
In the Reset Password screen, select a user to reset the password for and then click Next.
Enter and verify a new password. You can enter a password hint if you like.
Click Next.
In the Reset Password Completed screen, click Restart.
Reset Your Login Password Using a Recovery Key
When you turn on FileVault, if you select “Create a recovery key and do not use my iCloud account,” you can use the recovery key to reset your login password.
There are two ways to reset your password using your recovery key if you enabled FileVault and created a recovery key.
The first way:
Turn on or restart your Mac.
Select your user account.
Click the question mark in the password field.
Click the arrow next to “reset it using your Recovery Key.”
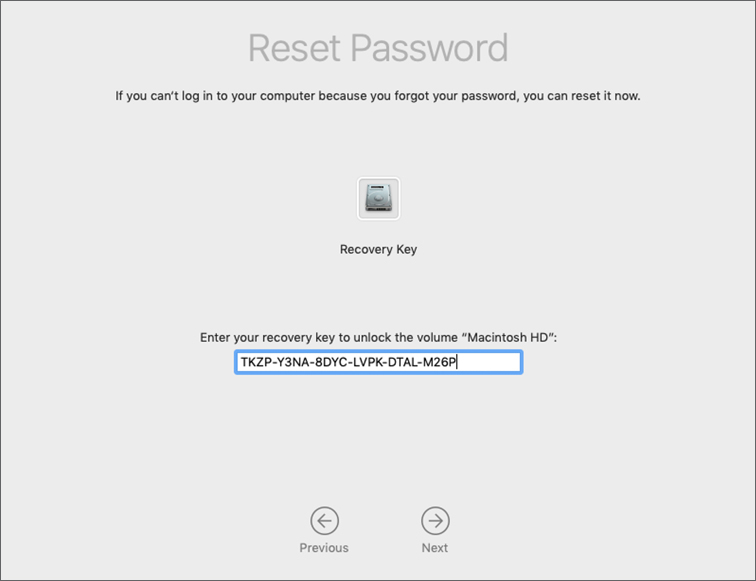
Enter the recovery key, and then click the right arrow.
Follow the onscreen instructions to reset your login password.

The second way:
Start or restart your Mac.
Wait up to 60 seconds until a message similar to this appears: “If you’re having a problem entering your password, press and hold the power button on your Mac to shut it down. Then press it again to start up in Recovery OS.”
Press and hold the power button on your Mac to shut it down, wait a moment after your Mac shuts down, then press the power button again to start up in macOS Recovery.
Select “I forgot my password” and then click Next.
Enter your recovery key, then click Next.
In the Reset Password screen, select a user to reset the password for and then click Next.
Enter and verify a new password. You can enter a password hint if you like.
Click Next.
In the Reset Password Completed screen, click Restart.
Reset Passwords Using macOS Recovery
The Reset Password assistant is available only from macOS Recovery. After you start up from macOS Recovery, choose Utilities > Terminal, type resetpassword, and press Return. The Reset Password assistant opens and provides methods to reset the local user’s account.
The Reset Password assistant presents screens that vary based on the Mac computer’s storage and configuration:
![]() Storage volume selection—If a Mac has more than one attached external storage device, you must select the system volume containing the account password that you wish to reset.
Storage volume selection—If a Mac has more than one attached external storage device, you must select the system volume containing the account password that you wish to reset.
![]() FileVault enabled volume—If the selected volume is protected with FileVault and you stored the recovery key with your iCloud account, enter the password for that iCloud account. If you did not store the recovery key with your iCloud account, you must restart and then use your recovery key to unlock the volume in the login window.
FileVault enabled volume—If the selected volume is protected with FileVault and you stored the recovery key with your iCloud account, enter the password for that iCloud account. If you did not store the recovery key with your iCloud account, you must restart and then use your recovery key to unlock the volume in the login window.
![]() Local user selection—If there is more than one local account user on the selected system volume, you must select the account you want to reset the password for.
Local user selection—If there is more than one local account user on the selected system volume, you must select the account you want to reset the password for.
![]() Local user with associated Apple ID—If the selected local account is associated with an Apple ID, then you may be able to reset the local account password by entering the password for the associated Apple ID.
Local user with associated Apple ID—If the selected local account is associated with an Apple ID, then you may be able to reset the local account password by entering the password for the associated Apple ID.
![]() Local user without an associated Apple ID—If the selected local account isn’t associated with an Apple ID, you can enter a new password for the local account.
Local user without an associated Apple ID—If the selected local account isn’t associated with an Apple ID, you can enter a new password for the local account.
See Exercise 10.1, “Reset Account Passwords in macOS Recovery,” for more details.
Anyone with access to macOS Recovery can use the Reset Password assistant to reset local account passwords. Consider requiring authentication to access the Mac disk from macOS Recovery by either turning on FileVault or using a firmware password, or both. Read Lesson 12, “Manage FileVault,” for more details on FileVault and Reference 10.4, “Secure Mac Startup,” for more details on using a firmware password.
Read Apple Support article HT202860, “Change or reset the password of a macOS user account,” for more details about changing or resetting a password.
Reference 10.3 Manage User Keychains
When a user’s account password is reset (as opposed to changed), the user’s existing login and Local Items/iCloud keychain items are moved aside. A new login keychain and a new Local Items keychain are created with the same password as the user’s login password. The user isn’t notified.
Manage Keychain Files
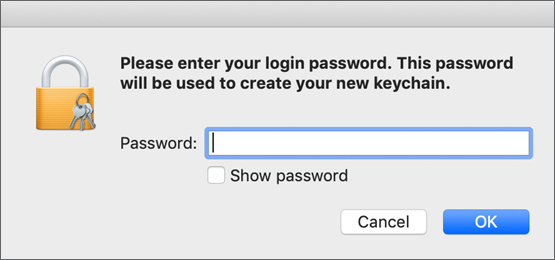
Choose File > New Keychain, and enter a six-, or longer, character password for the keychain to create a new local keychain file. The default location for new keychains is the Keychains folder inside your home folder.
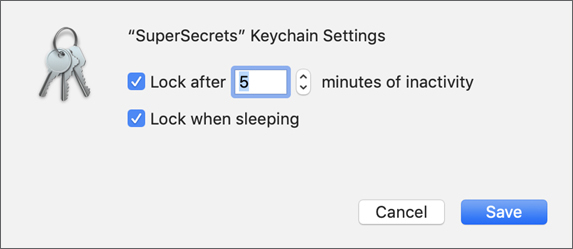
Select a keychain from the sidebar. Then choose Edit > Change Settings for Keychain to adjust keychain settings. A dialog appears where you can change automatic keychain locking settings for a selected keychain file.
To change a keychain’s password, select it from the list, and then go choose Edit > Change Password for Keychain. You must enter the keychain’s current password, followed by a new password and verification.

To delete a keychain, select it from the sidebar and choose File > Delete Keychain. When the Delete Keychain dialog appears, click Delete References to ignore the keychain, or click Delete References & Files to erase the keychain file.
Avoid deleting the original login keychain file manually in the Finder. Don’t delete the Login keychain unless another keychain is available to take its place. A user should have access to at least one local keychain.

Move keychain items between keychains by dragging and dropping an item from one keychain to another. The exception to this is the Local Items/iCloud keychain, for which macOS manages the addition and removal of items.
Reset Keychain Files
If macOS is unable to open a keychain file or retrieve secrets from it, the keychain file may be corrupted. If so, you must replace or reset your keychain.
If you have a Time Machine backup, as covered in Lesson 17, “Manage Time Machine,” you can manually replace a user’s Keychains folder with earlier versions of the files. After you replace the keychain files, restart the Mac and log in as the user. Open Keychain Access to verify the presence of the recovered keychain files.
If the user’s keychain files are corrupted, and the user doesn’t have a backup, you must reset the keychain items. In this case, reset the user’s password, or delete the contents of the user’s Keychains folder and restart the Mac. Log in as the user, and macOS creates new empty keychain items for the user.
Keychain Access allows any user to reset their own keychains. Open Keychain Access > Preferences, and then click Reset My Default Keychains.

After you click Reset My Default Keychains, macOS asks for a password.
Enter a new password, and then click OK. If the password you enter isn’t the same as your login password, the next time you log in, macOS creates new empty keychain items for you that match your login keychain. See Exercise 10.3 for details.
Reset iCloud Keychain
The iCloud Security Code gives you an additional way to add new devices, and it provides a last resort to recover your iCloud keychain if you lose all your devices. If you don’t create an iCloud Security Code and you have disabled iCloud Keychain or your devices are lost, your iCloud keychain contents aren’t accessible and you must reset your iCloud keychain.
If your login keychain password is lost, so is your access to the local instance of the iCloud keychain. If you create a new login keychain, as recommended in the keychain update dialog, the local iCloud keychain is reset. This results in a new empty Local Items keychain and the contents of iCloud Keychain remain in the cloud.
You can reenable iCloud Keychain to access your secrets, but iCloud Keychain will treat your Mac as if it were new. You are prompted to authenticate with an Apple ID and to use either the iCloud Security Code or two-factor authentication to regain access to the iCloud Keychain.
Read more about iCloud Keychain in Apple Support article HT204085, “Set up iCloud Keychain.”
Reference 10.4 Secure Mac Startup
Use Startup Security Utility to configure the features that help secure your Mac against unauthorized access. Startup Security Utility offers additional features for Mac computers that have the T2 chip.
To open Startup Security Utility, start your Mac in macOS Recovery, as covered in Lesson 5, “Use macOS Recovery.” Then from the Utilities menu choose Startup Security Utility.

If your Mac doesn’t have the T2 chip, you can use Startup Security Utility only to turn on or off a firmware password, which is covered in the next section.
If your Mac has the T2 chip, Startup Security Utility offers two additional features to help secure your Mac against unauthorized access: Secure Boot and External Boot. These additional features are explained after the following firmware password section.

Turn On a Firmware Password
A firmware password prevents users who don’t have the password from starting up from any disk other than your designated startup disk. It also blocks use of most startup key combinations.
Even if you don’t set a firmware password, you can enable FileVault to prevent unauthorized access to the startup disk. Lesson 12, “Manage FileVault,” covers FileVault in greater detail.
For example, on a Mac with a firmware password enabled, if you start up while you press and hold the Option key, an authentication window appears and prompts you to enter the firmware password. If you enter the correct firmware password, you can select a different startup disk from Startup Manager. This enables you to start up from another Mac but prevents other users from changing the standard macOS startup process. Startup keyboard shortcuts are covered in Lesson 28, “Troubleshoot Startup and System Issues.”
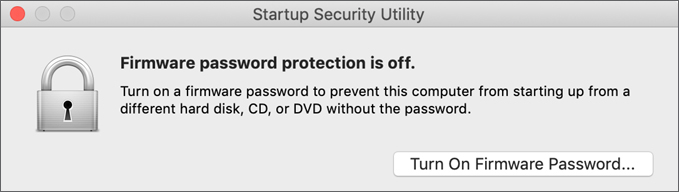
If you want the most security for your Mac, you must set a firmware password. For a Mac without the T2 chip, any user with access to macOS Recovery can set the password if it isn’t already set. For a Mac with the T2 chip, you must provide an administrator password before you can set a firmware password. You set a firmware password with Startup Security Utility. If the firmware password isn’t set, click Turn On Firmware Password and enter the password. Remember this password, and store it somewhere safe.
If a firmware password is set, you can change or disable it, but you must know the current firmware password to do so.
You can also use Find My Mac to remotely lock your Mac with a firmware passcode for one-time use. Read Reference 9.5, “Manage System-wide Security,” for more information. Lost Mode works even while you’re using a firmware password.
If you can’t remember your firmware password or the passcode you used for a remote lock or erase, schedule a service appointment with an Apple Store or Apple Authorized Service Provider. Bring your original receipt or invoice as proof of purchase.
You can find out more about firmware passwords from Apple Support article HT204455, “How to set a firmware password on your Mac.”
Secure Boot
If your Mac has the T2 chip, use Secure Boot to ensure that your Mac starts up using only a legitimate and trusted version of an operating system (OS), including macOS or Microsoft Windows.
There are three Secure Boot settings:
![]() Full Security
Full Security
![]() Medium Security
Medium Security
![]() No Security
No Security
Configure Secure Boot for Full Security
Full Security is the default Secure Boot setting. Full Security is the highest level of security.
If you select the Full Security setting, during startup your Mac verifies that the OS on your startup disk is trusted by Apple. If the OS is unknown or can’t be verified as legitimate, your Mac uses the Internet to download updated integrity information from Apple. The integrity information is unique to your Mac. If FileVault is turned on while your Mac attempts to download updated integrity information, you must first unlock your disk.
If your Mac can’t verify that the OS being used during startup is legitimate even after downloading updated integrity information, then the next steps vary depending on the OS:
![]() macOS: An alert informs you that a software update is required to use this startup disk. Click Update, then reinstall macOS on the startup disk. Or click Startup Disk to use a different startup disk (which your Mac must verify).
macOS: An alert informs you that a software update is required to use this startup disk. Click Update, then reinstall macOS on the startup disk. Or click Startup Disk to use a different startup disk (which your Mac must verify).
![]() Windows: An alert informs you that you need to install Windows with Boot Camp Assistant. For more information about Boot Camp Assistant, read Apple Support article HT201468, “Install Windows on your Mac with Boot Camp.”
Windows: An alert informs you that you need to install Windows with Boot Camp Assistant. For more information about Boot Camp Assistant, read Apple Support article HT201468, “Install Windows on your Mac with Boot Camp.”
If your Mac can’t verify the OS on your startup disk, and your Mac can’t connect to the Internet, then you’ll see an alert that an Internet connection is required. In this case, if you’re using Wi-Fi, use the Wi-Fi status menu item to make sure you’re using an active Wi-Fi network.
If your Mac doesn’t have an Internet connection and your Mac can’t verify the integrity of the OS on your startup disk, then you can click Startup Disk and choose another startup disk, or use Startup Security Utility to change the security level to Medium Security.
Configure Secure Boot for Medium Security
When Medium Security is turned on, your Mac verifies only the signature of the OS on your startup disk. Apple signs macOS, and Microsoft signs Windows. The Medium Security setting doesn’t require an Internet connection, and it doesn’t use updated integrity information from Apple, so your Mac can still start up from an OS even if Apple or Microsoft no longer trusts the OS.
If the OS doesn’t pass verification, an alert appears for macOS or Windows just like it does when High Security is turned on.
Configure Secure Boot for No Security
When you select No Security in the Secure Boot section, your Mac doesn’t enforce any of the security requirements that High Security or Medium Security enforce for your startup disk.
For more information about Secure Boot, read Apple Support article HT208330, “About Secure Boot.”
Configure External Boot Options
Use External Boot to control whether your Mac with the T2 chip can start up from an external hard drive, thumb drive, or other external media. Apple doesn’t support Mac computers that have the T2 chip starting up from network volumes.
The default and most secure setting is “Disallow booting from external media.” When this setting is selected, your Mac can’t be made to start up from any external media. If you attempt to start up from external media, the following happens:
![]() Startup Disk preferences displays a message that your security settings don’t allow this Mac to use an external startup disk.
Startup Disk preferences displays a message that your security settings don’t allow this Mac to use an external startup disk.
![]() Startup Manager enables you to select an external startup disk, but doing so causes your Mac to restart to a message that your security settings don’t allow this Mac to use an external startup disk. You’ll have the option to restart from your current startup disk or select another startup disk.
Startup Manager enables you to select an external startup disk, but doing so causes your Mac to restart to a message that your security settings don’t allow this Mac to use an external startup disk. You’ll have the option to restart from your current startup disk or select another startup disk.
If you select the option “Allow booting from external media,” then your Mac can start up from an external volume, such as an external hard drive, thumb drive, or other external media.
For more information about the Apple T2 chip, read the Apple T2 Security Chip Security Overview at www.apple.com/mac/docs/Apple_T2_Security_Chip_Overview.pdf.
Exercise 10.1 Reset Account Passwords in macOS Recovery
![]() Prerequisites
Prerequisites
![]() You must have created the Local Administrator (Exercise 3.1, “Configure a Mac for Exercises”) and Johnny Appleseed (Exercise 7.1, “Create a Standard User Account”) accounts.
You must have created the Local Administrator (Exercise 3.1, “Configure a Mac for Exercises”) and Johnny Appleseed (Exercise 7.1, “Create a Standard User Account”) accounts.
![]() You must have turned on FileVault (Exercise 3.2, “Configure System Preferences”).
You must have turned on FileVault (Exercise 3.2, “Configure System Preferences”).
![]() Your Mac must have a local hidden macOS Recovery volume. This volume is normally created when you install macOS.
Your Mac must have a local hidden macOS Recovery volume. This volume is normally created when you install macOS.
macOS provides several ways to reset lost account passwords. In this exercise, you use macOS Recovery to reset Johnny Appleseed’s password.
Reset a User Password in macOS Recovery
Restart your Mac, and press and hold Command-R until the Apple logo appears.
If a language selection screen appears, select your preferred language, and click the right-arrow button to continue.
From the menu bar, choose Utilities > Terminal.
If you are prompted to provide an administrator name and password because macOS Recovery is trying to change system settings, select Local Administrator, enter the password (Apple321!), and click OK.
Type the command resetpassword, and press Return.

The Reset Password utility opens.
At the Reset Password screen, select “I forgot my password.”
Enter the recovery key you recorded when you enabled FileVault in Exercise 3.2, “Configure System Preferences.”
Because your startup volume is locked, you can’t select a user to reset until the volume is unlocked.
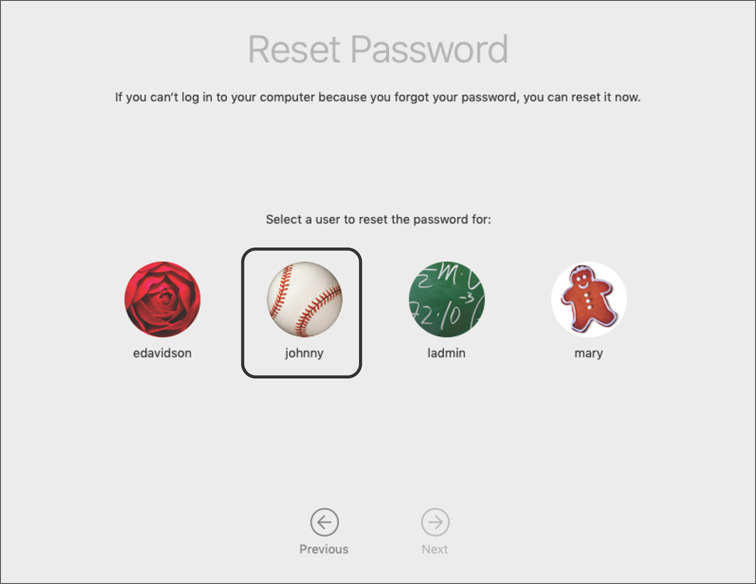
Once your volume is unlocked, select the Johnny Appleseed user account (displayed as “johnny"), and click Next.
Enter password1 in both password fields. Leave the hint field blank.
Click Next.
When you are notified that your user account password is reset, click Restart.
Note

Johnny Appleseed’s login keychain is no longer synchronized with his login password. You may perform Exercise 10.2, “Reset Account Passwords,” next, followed by Exercise 10.3, “Observe Automatic Login Keychain Creation,” or you may skip directly to Exercise 10.3. In any case, reset Johnny’s keychain by performing Exercise 10.3 before going on to any other lesson.
Exercise 10.2 Reset Account Passwords
![]() Prerequisites
Prerequisites
![]() You must have created the Local Administrator (Exercise 3.1, “Configure a Mac for Exercises”) and Johnny Appleseed (Exercise 7.1, “Create a Standard User Account”) accounts.
You must have created the Local Administrator (Exercise 3.1, “Configure a Mac for Exercises”) and Johnny Appleseed (Exercise 7.1, “Create a Standard User Account”) accounts.
macOS provides several ways to reset lost account passwords. In this exercise, you reset Johnny Appleseed’s password as an administrator.
Reset a User Password as an Administrator
If necessary, log in as Local Administrator (password: Apple321!).
Open System Preferences, and select Users & Groups.
Click the Lock icon, and authenticate as Local Administrator.
Select the Johnny Appleseed account.
Click Reset Password.
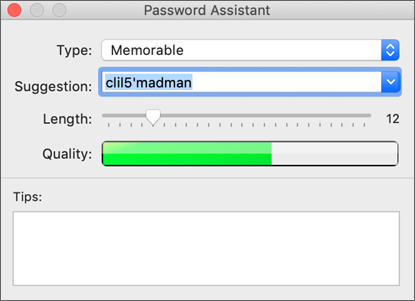
Click the small key icon next to the “New password” field.
Password Assistant opens to help you choose a secure password. It rates the quality of the password (red, to indicate it’s non-secure), suggests a more secure password (in the Suggestion field), and lists tips on how to avoid non-secure passwords.

Click the triangle next to the Suggestion field to show more suggested passwords.

Click one of the suggested passwords. The selected password is copied into the “New password,” Verify, and Suggestion fields, and the Quality bar expands and turns green to indicate a more secure password.
You don’t need to memorize or record this password. You choose another password in the next step.
Close Password Assistant.
In the reset password dialog, enter password2 in the “New password” and “Verify” fields to replace the chosen Password Assistant password.

Click Change Password.
Quit System Preferences, and log out as Local Administrator.
Exercise 10.3 Observe Automatic Login Keychain Creation
![]() Prerequisites
Prerequisites
![]() You must have created the Local Administrator account (Exercise 3.1, “Configure a Mac for Exercises”).
You must have created the Local Administrator account (Exercise 3.1, “Configure a Mac for Exercises”).
![]() You must have created the Johnny Appleseed account (Exercise 7.1, “Create a Standard User Account”).
You must have created the Johnny Appleseed account (Exercise 7.1, “Create a Standard User Account”).
![]() You must have completed Exercise 10.2, “Reset Account Passwords.”
You must have completed Exercise 10.2, “Reset Account Passwords.”
After Johnny’s (or anyone’s) account password is reset, without notification, macOS creates a new login keychain to keep the account password and login keychain password in sync. The login keychain that existed prior to the password reset is archived and is still encrypted with the old account password.
If Johnny remembers his old password, he can manually import the archived login keychain and move the items he needs to the new login keychain. If his password is reset, he won’t be able to recover the old keychain contents.
In this exercise, assume that Johnny’s account password was reset because he forgot his old password. He needs to abandon the old keychain after macOS automatically creates a new one.
Observe the Effects of a New Login Keychain
Log in as Johnny Appleseed (after the previous exercise, his password is password2).
Johnny’s account password was changed, and a new login keychain was created for him.
If a dialog appears indicating that your Mac can’t connect to iCloud, click iCloud Preferences.
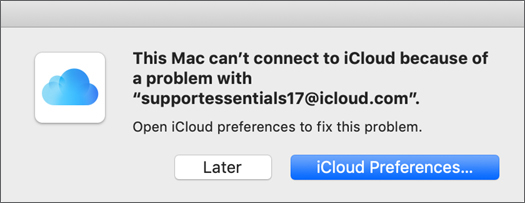
Since Johnny’s keychain was reset automatically, his iCloud credentials are lost and you need to reenter them.
Enter the password for the Apple ID Johnny’s account is linked to, and click Next.

If the Apple ID has two-factor authentication enabled, follow the prompts to finish authenticating.
Quit System Preferences.
Verify the New Login Keychain Creation
Open Keychain Access.
Keychain Access displays the status and contents of your login keychain. The keychain is unlocked, which means that macOS created a new login keychain with the correct password.
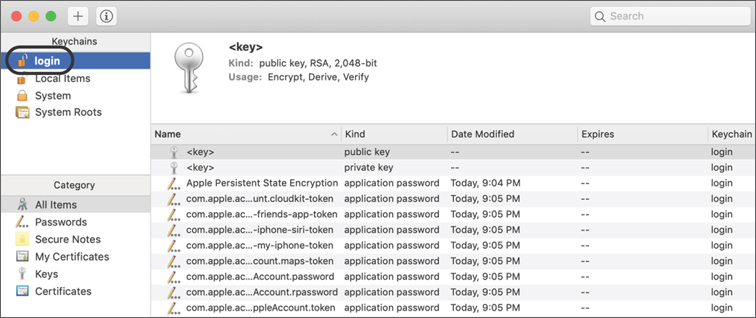
The new keychain normally contains several entries, but it consists only of items that are automatically created in a new keychain plus those items relating to the Apple ID Johnny’s account is linked to. The items that were in the old keychain are no longer available.
Control-click the login keychain and select Lock Keychain “login” to lock the keychain.
Control-click the login keychain and select Unlock Keychain “login” to unlock it.
You are prompted for the keychain password.

Enter Johnny’s current account password (password2), and click OK.
Since this is the new keychain password, it unlocks.
Quit Keychain Access.
Inspect and Import the Archived Login Keychain
In the Finder, navigate to ~/Library/Keychains. Choose Go > Go To Folder, and enter the path.

Find the item named login_renamed_1.keychain-db, and double-click it.
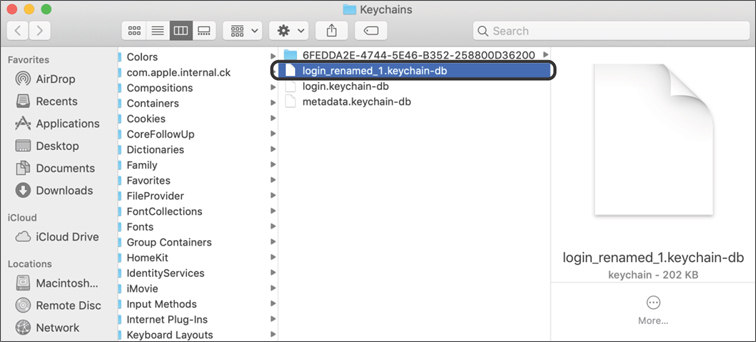
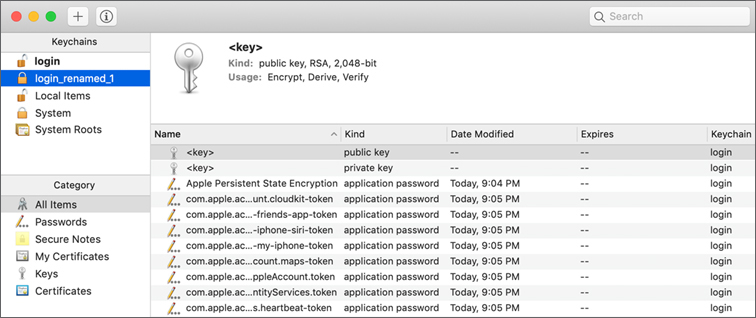
Keychain Access opens, and the archived keychain appears in the Keychains sidebar. Select login_renamed_1 and inspect its contents.
If Johnny remembered the password for this keychain, he could unlock it and drag items such as passwords and certificates that he needs into his new login keychain. Because we are assuming that Johnny doesn’t know his old login keychain password, don’t perform these actions.
Log out as Johnny Appleseed, and then log back in as Johnny Appleseed.
If you are prompted to enter your keychain password for the accountsd or identityservicesd process, click Cancel. You can also use Command-period repeatedly until the prompts go away.
The processes accountsd and identityservicesd are daemons, or background processes.
If necessary, open Keychain Access. Control-click login_renamed_1 and select “Delete Keychain login_renamed_1.”
In the Delete Keychain dialog, click Delete References.

If necessary, continue to click Cancel until you are no longer prompted. Don’t enter Johnny’s password.
Deleting references leaves login_renamed_1.keychain.db inside the ~/Library/Keychains folder. It remains there in case you need it again. If you remove the archived keychain from the keychains list, you prevent macOS from prompting you to unlock it if macOS finds a secret it wants to use in the login_renamed_1 keychain.
Quit Keychain Access and log out as Johnny Appleseed.
Change Johnny’s Password
When you reset Johnny’s account password, macOS created a new keychain. If a user with a standard account changes a password, macOS doesn’t create a new keychain. To test this, change Johnny’s password.
Log in as Johnny Appleseed.
If you are prompted to enter your keychain password for the accountsd or identityservicesd process, click Cancel. You can also use Command-period repeatedly until the prompts go away.
Open the Users & Groups pane in System Preferences and make sure the Johnny Appleseed account is selected.
Click Change Password.
Unlike the Reset Password option you used earlier, this option has a field for the old password. macOS uses this old password to decrypt the login keychain and then re-encrypt it with the new password.
Enter the following:
Old password: password2
“New password” and Verify: Apple321! (or whatever you chose when you originally created his account)
Enter a password hint if you want.
Click Change Password.
Quit System Preferences.
Verify Synchronization
Reopen the Keychain Access utility.
Lock and unlock the login keychain.
Enter Johnny’s current account password (Apple321!) in the Password field, and click OK.
As before, the account password unlocks the keychain.
Quit Keychain Access.
Log out as Johnny Appleseed.
Exercise 10.4 Set a Firmware Password
![]() Prerequisites
Prerequisites
![]() Your Mac must have a local hidden macOS Recovery volume. This volume is normally created when you install macOS.
Your Mac must have a local hidden macOS Recovery volume. This volume is normally created when you install macOS.
In this exercise, you set a firmware password to control your Mac computer’s startup process.
Note ![]()
If you forget your firmware password, you might have to take your Mac to an Apple Authorized Service Provider and provide proof that you own the Mac before the Apple Authorized Service Provider will help you. If you aren’t certain that you’ll remember your firmware password, skip to the next lesson.
Set a Firmware Password
Restart your Mac, and press and hold Command-R until the Apple logo appears.
If a language selection screen appears, select your preferred language, and click the right-arrow button.
From the menu bar, choose Utilities > Startup Security Utility.
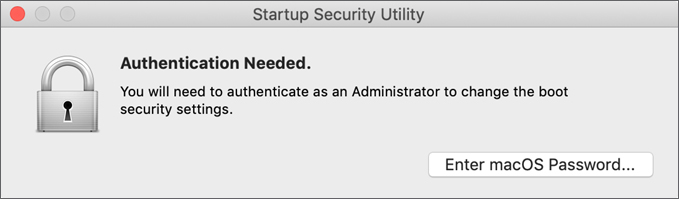
If you are prompted to enter your admin password, click Enter macOS Password.
Click Turn On Firmware Password.

Enter the password apple in both the “New password” and Verify fields.

Click Set Password.
The Startup Security Utility indicates that password protection is enabled.
Click Quit Startup Security Utility.
Test the Firmware Password
From the Apple menu, choose Restart.
Your Mac restarts normally. The firmware password doesn’t interfere with normal startup.
At the login screen, click Restart, and press and hold Command-R until a Lock icon appears.

Alternate startup modes, including macOS Recovery, aren’t available if you don’t enter a firmware password.
Enter the password (apple), and press Return.
Remove the Firmware Password
If you are performing these exercises on your own and want to leave the firmware password enabled, restart your Mac and skip these steps.
If you are performing these exercises in a classroom environment or you don’t want to leave the firmware password set on your Mac, follow these steps to remove the password:
From the menu bar, choose Utilities > Startup Security Utility.
Click Turn Off Firmware Password.
When prompted, enter the firmware password (apple), and click Turn Off Password.

Note
There is no simple way to remove or reset a forgotten firmware password. You might have to take your Mac to an Apple Authorized Service Provider to unlock it.
The Startup Security Utility shows that password protection is disabled.
From the Apple menu, choose Restart.
Your Mac restarts normally.