Lesson 4. Working with Software Instruments
Logic’s palette of software instruments provides a wide array of sound generators for use in professional production. As this list increases, understanding the functions of Logic instruments becomes more and more important in making choices that are suitable to the needs of a project.
In this lesson, you will explore selected instruments that represent each type of sound generator that Logic offers, and you’ll learn how best to integrate your external MIDI hardware. In addition, you will try your hand at programming two powerful instruments: Ultrabeat and Sculpture.
Getting Familiar with the Instruments
Logic Pro 8 comes with 13 powerful software instruments (not including the 20 GarageBand instruments) ranging from emulations of vintage instruments to tools that provide revolutionary ways to create and shape sounds. To better understand the unique characteristics of each instrument and its application, it is helpful to group the instruments according to the way they generate sound.
Synthesizers
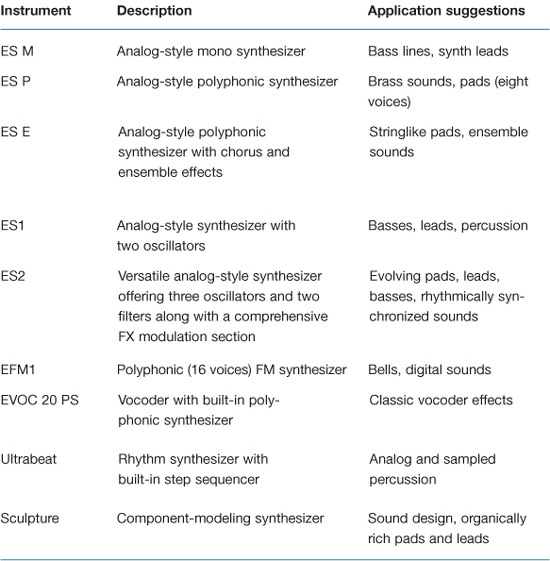
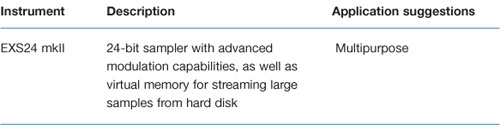
Sampler
Understanding the User Interface
Most of Logic’s software instruments share interface features that represent how sound is generated and shaped. With synthesizers, it is especially important to trace the signal flow through controls that affect a particular aspect of the sound. Let’s look at two instruments in Logic’s synthesizer family and compare their interfaces.
- Choose File > New.
- The Templates dialog appears. In the left (Collection) pane, click the My Templates button.
- In the right (Template) pane, click the Advanced Logic Template.
The template opens, followed by a Save As dialog.
Note
If you didn’t complete Lesson 1, a version of the template used in this lesson is included in the following folder: Logic 8_BTB_Files > Lessons > Templates > Advanced Logic.logic. In order to do the exercises in this lesson, you must copy the file to the following location on your hard drive: ~/Library/Application Support/Logic/Project Templates.
- Click the Cancel button.
A new project file opens based on the template. For this exercise, it is not necessary to build a project folder and include assets. By clicking Cancel, you can open up a project file without any links to assets.
- Select the Inst 1 track.
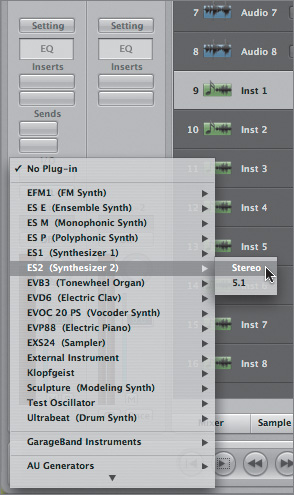
- In the Arrange channel strip, click the Instrument slot to open the Instrument Plug-in menu, and choose ES2 (Synthesizer 2) > Stereo.
Note
Logic’s software instruments come in a variety of formats to accommodate mono, stereo, multi output, or even 5.1 projects. The formats available to you depend on the specific instrument.
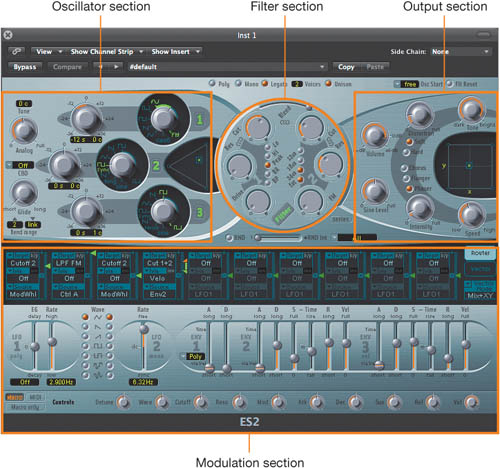
Look at the ES2’s interface and follow the signal flow in this instrument. On the upper-left side, you can see the three oscillators that are an integral part of its sound generation.
Surrounding each oscillator are controls for tuning and mixing.
Moving to the right, you find the filter section, where the frequency spectrum of the raw sound is shaped.
At the far right is the output section for the ES2, with controls for volume and effects (distortion, chorus, flanger, and phaser).
Below the main part of the graphical interface is the modulation section, where you can manipulate any of the ES2’s controls via any other parameter and real-time input.
- If needed, click the Link button on the upper left of the ES2 window.
- Click the Inst 2 track, and from the Instrument Plug-in menu, choose ES1 > Stereo.
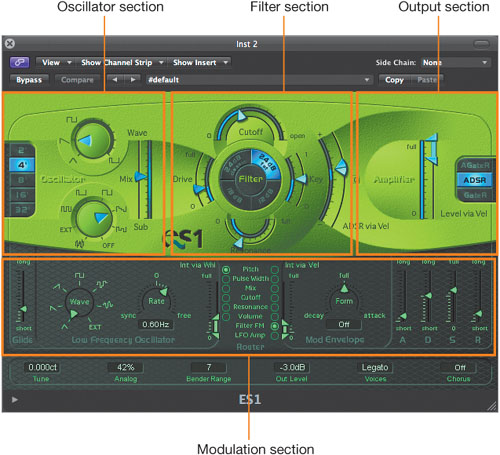
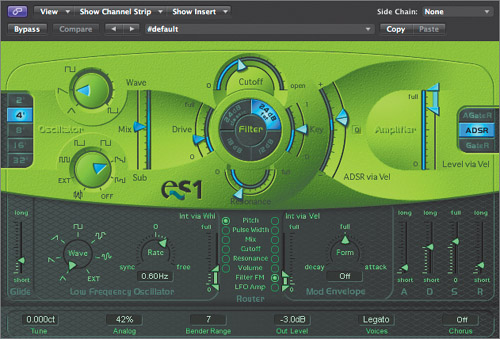
Now look at the ES1’s interface. On the far left are the oscillators, along with controls that directly affect them (octave selection and the mix between the primary oscillator and the sub-oscillator).
To the right of the oscillator section is the filter section, including the Key slider for controlling the cutoff frequency that is modulated by the keyboard pitch.
Farther to the right is the output section.
At the bottom of the synthesizer is the modulation section.
The interfaces you just looked at are nearly identical; the differences in controls pertain to their unique sound-generation processes. In general, a signal flows from left to right in all of the Logic synthesizers, with sections that closely parallel those in ES1 and ES2.
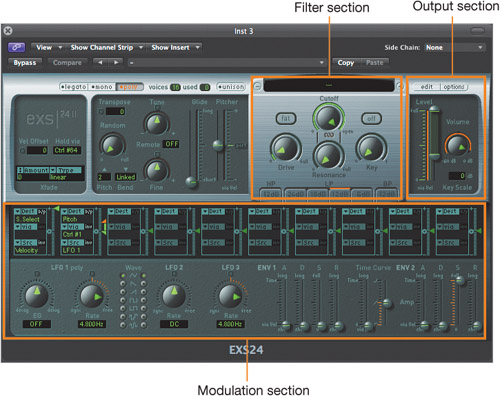
- Click the Inst 3 track, and from the Instrument Plug-in menu, choose EXS24 mkII (Sampler) > Stereo.
Note that even though EXS24 mkII is a sampler, it shares many interface characteristics with the ES2 and ES1 synthesizers. It has filter, output, and modulation sections in similar places (the modulation matrix is identical to the ES2’s).
- Choose File > Close Project.
An alert message appears asking if you want to save the project before closing.
As this project doesn’t contain any project data, it is not necessary to save it.
- Click Don’t Save.
Using Ultrabeat
Ultrabeat’s inspiration stems from the drum machines of the 1980s as well as the currently popular sample-based hardware groove boxes. Ultrabeat is similar to them in functionality, offering both sound generation and integrated step sequencing.
What truly sets Ultrabeat apart, however, are its multiple sound sources (analog synthesis, FM, audio sample, physical modeling), built-in signal processing (bit crushing, distortion, ring modulation, EQ, and stereo effects), sophisticated step sequencing, and highly flexible sound architecture.
Note
Middle C may be designated as either C4 or C3, depending on the manufacturer of your MIDI keyboard. You will need to set the “Display Middle C as” preference to C3 (Yamaha) to accurately follow the directions within this exercise (and others throughout the book). This command can be found in the Preferences > Display > General tab.
- Choose File > Open.
- In the file selector box, navigate to Music > Logic 8_BTB_Files > Lessons and open 04_Software Inst_Start.logic.
- Select the Inst 1 track if not already selected.
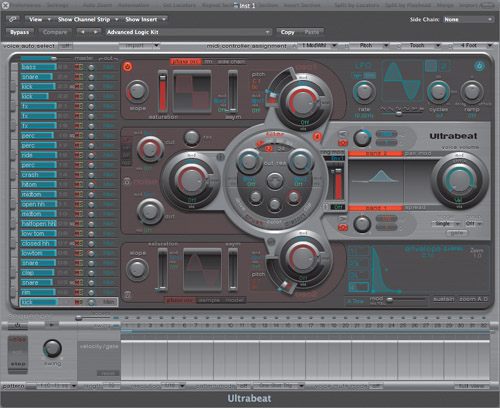
- Double-click Ultrabeat in the Instrument slot to display the Ultrabeat interface.
- In the upper-left corner of the Ultrabeat window, click the Link button.
- Play your MIDI controller’s keys in the C1 to B2 range to hear the various sounds within the kit.
Tip
When you select a software instrument in the track list for the first time, there might be a slight delay (around 100 milliseconds) at first. This is because Logic does not engage live mode until it receives its first MIDI message. The delay doesn’t affect the playback of sequenced material, but it can interfere with live performance and tracking. If you require perfect timing for the first played note, you need to send silent MIDI events in advance (for example, sustain pedal, pitch bend, or modulation wheel).
In addition to two octaves of individually mapped percussion sounds, a kit contains a slot for a sound that is automatically pitch-mapped over three octaves.
- Play keys C3 and above on your MIDI controller.
You should hear an analog synthesizer bass sound that changes pitch as you move up and down the keyboard.
Working with Drum Sounds
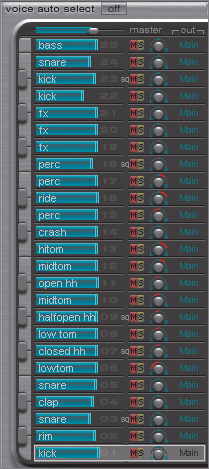
The left side of Ultrabeat’s interface contains the Assignment section, which contains the 25 drum sounds of a drum kit and a mixer. Each drum sound has independent parameters that can be adjusted for volume, soloing, muting, pan position, and audio output.
- Click a few of the drum names (kick, snare, and so on).
The main section of the interface changes with each selected sound. This is because every drum sound has its own independent sound-generation, filter, modulation, processing, and volume settings, which are viewed by clicking its name.
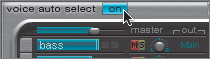
- At the upper left of the interface, click the Voice Auto Select On/Off button so that voice auto select is turned on.
- Play a few notes in the C1 to B2 range, as you did earlier.
The interface changes with each new note played. When voice auto select is on, the most current note triggered is displayed.
- Select the kick drum by clicking the name or playing the appropriate MIDI note (C1) on your MIDI controller.
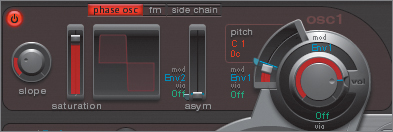
- In the main part of the interface, look at the top oscillator (Osc1).
It is the only oscillator currently active (the power button at the left is lit), so it is responsible for generating the raw sound that makes up the kick drum.
The oscillator is set to Phase Osc, which uses the Slope, Saturation, and Asymmetry controls to shape the waveform into almost any basic synthesizer waveform.
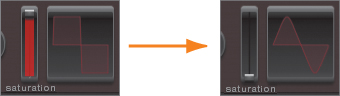
- Drag the Saturation control all the way down to 0.00.
The waveform changes slowly from a square wave to a slightly rounded triangle.
- Repeatedly press the C1 key on your MIDI controller while you drag the Saturation control slowly upward until it reaches the top (1.00).
You can hear the sound change as you transition toward the square wave.
This kick drum needs less “beater” (midrange click) to suit the project you will be working with. You can move to the EQ controls in the processing section of Ultrabeat to see how you can change the sound.
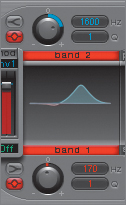
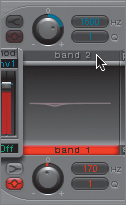
- Look to the right side of the instrument (immediately to the right of the filter section) to find the EQ controls.
Note that the kick drum sound has a slight parametric dip at 170 Hz and a rather large boost centered at 1600 Hz.
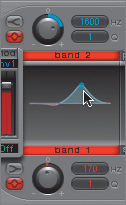
- Position the Pointer tool over the large peak (band 2).
The peak is highlighted, and a dot appears at the apex.
If you are familiar with Logic’s Channel EQ, you’ll recognize the same graphical controls for adjusting the EQ band.
- Drag the peak to the right.
The peak moves along with the mouse movement.
- Drag the dot at the apex of the peak up and down.
The bandwidth narrows and expands accordingly.
- Click the Band 2 button to bypass band 2 of the EQ.
The large peak disappears.
- Audition the kick by clicking the musical keyboard to the left of the Assignment section or playing your MIDI controller (C1).
The kick now has less midrange attack.
- Select the crash cymbal by clicking the name or playing C
 2 on your MIDI controller.
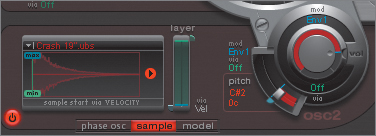
 - In the main part of the interface, look at the bottom oscillator (Osc2).
The power button is on, and Oscillator 2 is set to Sample. In the Oscillator 2 section, you’ll also see an audio waveform display.
The crash cymbal in this kit is generated from an audio sample. Oscillator 2 can be configured for all three types of sound generation offered by Ultrabeat: phase oscillator, sample playback, and even component modeling.
- To try out the other sound-generation modes offered, click the Phase Osc and Model buttons.
- Switch back to Sample mode.
The waveform returns.
The crash sample (Crash 19.ubs, displayed above the waveform) doesn’t work for the project you will be building for this lesson. Let’s load a new sample waveform.
- Click the disclosure triangle next to the sample’s name and choose Load Sample from the pop-up menu.
A file selector box appears, displaying the contents of the Ultrabeat Samples folder.
- Double-click the Crash Cymbals folder and choose Special Crash.ubs.
Note
The .ubs extension signifies a proprietary sample format that has multiple velocity layers built into the file. Although no user-accessible way exists to create files in the .ubs format, you can import velocity-mapped EXS instruments by clicking the Import button at the top of the Ultrabeat window.
- Click the Open button.
- Play the C2 key on your MIDI controller, or click the musical keyboard to the left of the Assignment section to audition the crash.
You should hear a higher-sounding cymbal.
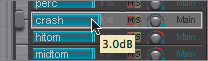
- Drag the blue volume slider (around the name of the crash sound) to the right until the help tag reads 3.0dB.
This is the volume control for the sound.
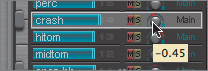
- Hold down the pan knob in the mini crash mixer, and drag the Pointer tool down until the help tag reads –0.45.
The sound is panned further to the left side of the stereo field.
- Audition the sound to hear the results.
Working with the Step Sequencer
At the bottom of Ultrabeat’s interface is an integrated 32-step sequencer that greatly aids in the production of drum loops and beat patterns. These patterns, including any user-created patterns, are saved within each of the Ultrabeat settings.
- Turn on the sequencer by clicking the power button at the upper left of the sequencer.
- Click the Play/Stop button located immediately to the right of the power button.
The sequencer starts and Ultrabeat plays a sequenced pattern.
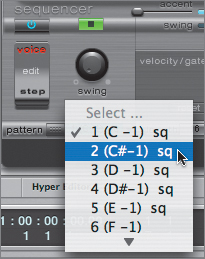
- At the lower-left corner of the Ultrabeat window, click to open the Pattern pop-up menu and choose various patterns, listening to the results.
You’ll notice that slots with sequence data recorded are marked with sq (for sequence). Looking at the list for this drum kit (Advanced Logic Kit), we see that there are patterns contained only within the first 5 of a possible 24 slots; the rest are available for user-programmed patterns.
- From the Pattern menu, choose “1 (C–1) sq.”
- In the Ultrabeat interface, click the Play/Stop button to stop pattern playback.
Sequencing Sounds
The actual sequencing of a given sound takes place in an area called the step grid. Here, events can be graphically inserted and edited to create each element of the pattern.
- Select the snare drum sound (D1).
The snare sound’s sequence is displayed in the step grid.
- To the right of the drum name, click the Solo (S) button to solo the snare drum.
- Click the step sequencer’s Play/Stop button to play the pattern.
The snare sound is triggered whenever an event is displayed in the step grid.
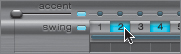
- Click the 2 button above the step grid.
This array of buttons is called the trigger row.
The next time the pattern cycles, you should hear a soft snare attack on step 2.
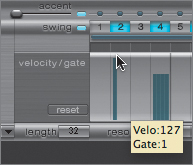
- Drag up the event at step 2 in the step grid until the event stretches to the top.
The next time the pattern reaches this step, the event will be louder.
- Click the Solo button for the snare drum to hear the entire pattern (with all drum sounds).

Applying Swing to the Pattern
The Swing knob, located to the left of the step grid, lets you adjust the rhythmic feel of the pattern by increasing the distance between notes. Notes on odd-numbered steps remain unchanged, while even-numbered notes are slightly shifted. This control affects all drum sounds that have swing enabled in the pattern (different swing amounts cannot be assigned to sounds individually).
- While the sequencer is playing, drag the Swing knob up and down to adjust the value.
Listen to the results.
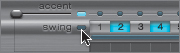
- To the left of the trigger row, click the Swing button to turn off swing for the snare part.
The snare drum sequence’s “feel” changes in relation to the rest of the drum sounds in the pattern.
- Click the Swing button to turn on swing again for the snare drum.
- Drag the Swing knob, setting the swing value back to about 58%.
- Stop playback of the pattern.

Copying a Sequence Part from One Sound to Another
The pattern you are working with uses a different kick drum sound (A![]() 2) from the one you edited in an earlier exercise (C1). In this exercise, you want to use the same sequence part but have it trigger the kick you edited. You can do this by copying and pasting the sequence data from one sound to another.
2) from the one you edited in an earlier exercise (C1). In this exercise, you want to use the same sequence part but have it trigger the kick you edited. You can do this by copying and pasting the sequence data from one sound to another.
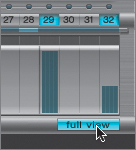
When creating or editing step sequences for multiple sounds, it is advisable to use the full-view function, which displays all sounds at once within the Ultrabeat window.
- In the lower-right corner of the Ultrabeat interface, click the Full View button.
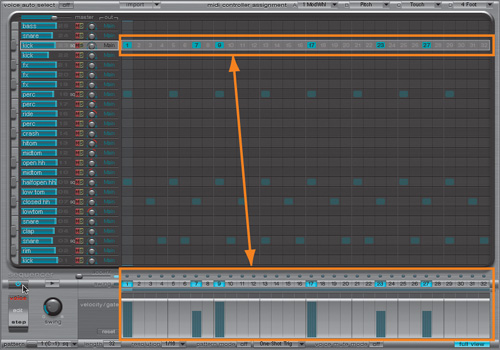
The interface switches to a graphical view of each drum sound’s trigger row.
- Near the top of the interface (A2), click the kick drum sound.
In essence, each row of triggers represents the data created in the step grid, and vice versa.
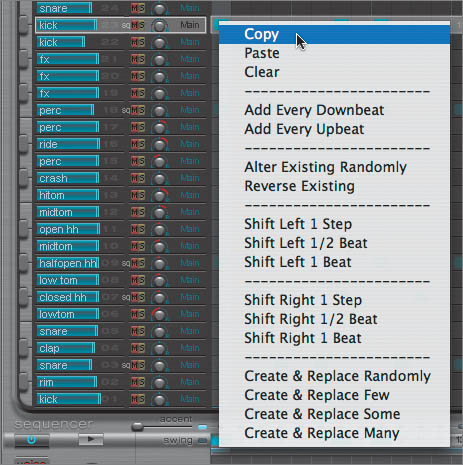
- Control-click the kick drum trigger row within the step grid.
A menu appears containing sound-trigger editing commands.
- Choose Copy.
- At the bottom of the track list (C1), Control-click the kick drum trigger row in the step grid and choose Paste.
- Click the Mute (M) button next to the kick drum that you just copied from (A2) to mute the original kick drum sequence.
- Play the pattern.
The kick drum sequence now triggers the kick you want in addition to the original sound (which is muted).
Automating Parameters in Step Mode
Ultrabeat not only lets you program sound triggers via step sequencing but also lets you do the same for each sound’s parameters. This mode, called Step mode, provides step-by-step automation of any sound-shaping control within the synthesizer.
- Click the Full View button to return to the sound-editing controls.
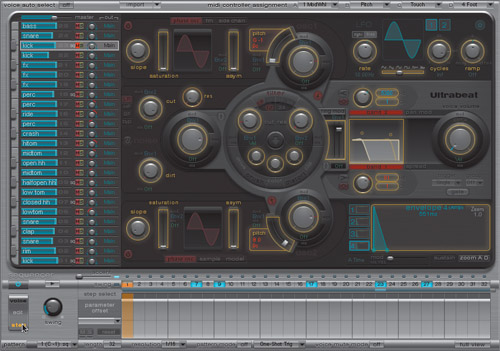
- Click Step on the bottom part of the Edit Mode switch located in the lower left of the interface.
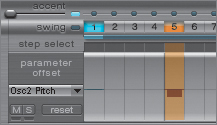
The sound-editing area darkens, and, in the synthesizer, yellow frames appear around all of the parameters that are available for automation. In addition, the step grid changes to display parameter offset instead of velocity/gate.
When in Step mode, the step grid is used to effect changes to the yellow highlighted parameters by offsetting the current sound settings.
- Click the percussion (perc) sound (or play F2 on your MIDI controller) to display the parameters for the tambourine part.
For this exercise, you will be offsetting the pitch of the active oscillator (Osc 2) by changing the speed of the tambourine sample.
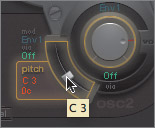
- Click the pitch control for Oscillator 2.
- Click within the step select row for step 5, right below the trigger row.
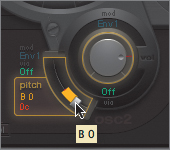
- Drag the Pitch control for Oscillator 2 down to B0.
Notice that the step grid displays your adjustment as a negative offset (below center line) to the original pitch (C3). This offset is expressed as a percentage.
- Click in the step grid for step 9, and drag the value bar down until you reach a value of −32% (the pitch D0 appears in Oscillator 2).
- Using either of the techniques you just explored, change Oscillator 2’s pitch for steps 17 and 25, to F0 and B–1, respectively.
- Play the sequence, and stop when you’ve heard the results.
The pitch of the tambourine sample changes for the altered steps.
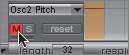
- Click the Mute button located at the lower left of the step grid.
This control enables you to mute the currently displayed parameter offsets, returning the part back to its unaltered state.
- Click the Edit Mode switch to return to Voice mode.


Triggering Patterns Using MIDI
Now that you have done some work on an existing pattern, you can incorporate it into the project. Each pattern in Ultrabeat can be triggered via an incoming or recorded MIDI note; this allows the starting and stopping of patterns on the fly (especially advantageous for live performances).
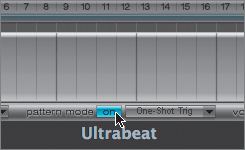
- At the bottom of the window, click the Pattern Mode Off button.
The button now displays the On state.
This enables Ultrabeat to receive incoming MIDI data as pattern triggers.
- To the immediate right, click the triangle button to open the Playback Mode menu, and choose Sustain.
This menu lets you choose how the pattern will be triggered with incoming MIDI notes. Since you have selected Sustain, the pattern will repeat as long as you have the key depressed.
- Play the C–1 through E–1 keys on your MIDI controller, holding down each for a short period of time.
Note
The specific trigger notes were chosen because they are located far below the most commonly used range on a MIDI keyboard. You may have to transpose your MIDI controller (using its octave buttons) to activate the pattern triggers. You can double-check your octave range in the the Transport’s MIDI Activity display at the bottom of the screen.
A different pattern is triggered for each key depressed.
Look at the Pattern menu you accessed earlier. Each pattern has a number designating the slot, as well as a MIDI note number (in parentheses) next to it. The MIDI note number indicates which incoming MIDI note will trigger which pattern.
Recording with Ultrabeat
Now you can create a drum track by using pattern triggers in conjunction with individual sound triggers.
- Close the Ultrabeat interface.
The Inst 1 track that has Ultrabeat instantiated has a blank MIDI region that you will use for your part.
- Select the blank MIDI region on track 1, and at the bottom of the Arrange window, click the Piano Roll button.
The Piano Roll Editor opens.
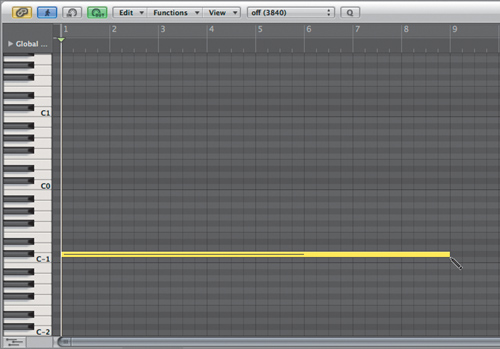
- Zoom out horizontally so that you can see about 16 bars in the timeline, and approximately C–1 to C3 on the piano keyboard at the left of the editor.
- Select the Pencil tool and draw in a C–1 note that starts on measure 1 and lasts for eight bars.
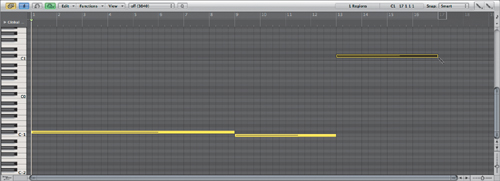
- Draw a C–1 note at measure 9 lasting four bars.
This triggers pattern number 1, the one you edited.
- Draw a C2 note at measure 13 for four bars.
This is the crash cymbal you edited earlier.
- Close the Piano Roll Editor.
- Play the project.
You just created a drum part stringing together two patterns (C
–1 and C-1) and a triggered sound (crash cymbal).
Routing Individual Sounds for Processing
There are times when you might want to process individual aspects of the kit separately, applying different compression and reverb to individual sounds. For instance, the kick oftentimes needs dynamic and ambient treatment different from what the snare drum, cymbals, or toms need. To handle this, you need to isolate the kick drum on its own channel for individual processing. Fortunately, Ultrabeat allows you to route individual sounds through separate virtual “outputs” to accomplish just that.
To use this special function, you need to instantiate Ultrabeat as a multi output instrument. So far you’ve been working with Ultrabeat as a stereo instrument and have done quite a bit of work modifying sounds and patterns. Luckily, Logic allows you to keep all of the current settings when changing from stereo to multi output instantiations.
Note
This holds true for any software instrument: all settings and content contained in a software instrument will be transferred when switching modes (mono, stereo, multi output, and 5.1).
- Open the Mixer by clicking the button at the bottom of the Arrange window.
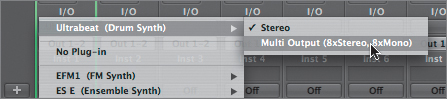
- On the Inst 1 channel strip, click-hold the Instrument slot to open the Instrument Plug-in menu and choose Ultrabeat (Drum Synth) > Multi Output (8xStereo, 8xMono).
The Ultrabeat interface opens after reloading the associated samples and current settings.
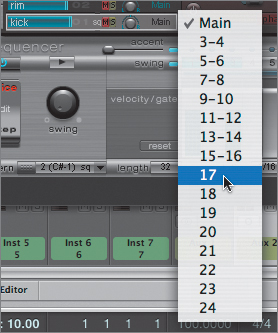
- To the right of the kick drum (C1) Panorama knob, click to open the Output Selection menu and choose 17.
Note
The first eight selections represent stereo routings, and the last eight selections represent mono. You are choosing the first mono routing (17) to send a mono sound (the kick drum).
If necessary, move the Ultrabeat window so you can see the Inst 1 channel strip.
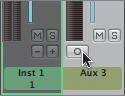
- Just under the Solo button, click the small plus button (+) on the Inst 1 channel strip.
A new Aux 3 channel strip is created immediately to the right of the Inst 1 channel strip. This will be the receiving channel for our kick drum. Notice that the new Aux 3 channel strip that Logic creates is a stereo one. You will need to make it mono in order to receive a mono send from the multi output instrument.
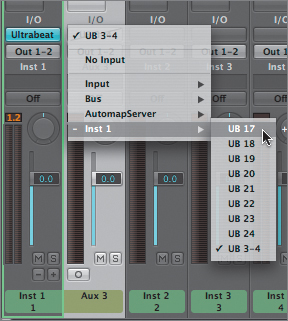
- At the bottom of the Aux 3 channel strip, click the Format button.
- Click-hold to open the Input slot menu for the Aux 3 channel strip and choose Inst 1 > UB 17.
- Play the project.
The kick drum now plays through the Aux 3 channel. Already the kick sounds better, as the new routing allows a dry signal to be sent without being affected by the send on the original Ultrabeat channel. With this routing in place, you can easily continue refining the kick drum sound by inserting separate compression and EQ on the Aux 3 channel.
- Close the Mixer.
- Close the Ultrabeat window.

Using the EXS24 mkII Software Sampler
Hands down, the EXS24 mkII is Logic Pro’s most versatile tool. With 24-bit audio resolution, virtual memory for streaming samples from disk, and an advanced modulation matrix, the EXS24 mkII is a full-featured sampler that can serve as a workhorse for your productions.
To best utilize the EXS24 mkII, you must understand how it functions. Sound generation in this sampler consists of three main components: samples, sampler instruments, and playback parameters. Samples are basically standard digital audio files that are organized into sampler instruments, which are then triggered and processed.
In the following exercises, you will examine each of the main components that create and play back EXS24 mkII sounds.
Opening the EXS24 mkII Instrument Editor
- Select the Inst 2 track.
- In the Arrange channel strip, click the Instrument slot to open the Instrument Plug-in menu and choose EXS24 mkII (Sampler) > Mono.
The EXS24 mkII interface opens.
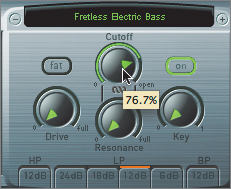
- Click to open the Sampler Instruments menu, and choose 02 Bass > 02 Electric Bass > Fretless Electric Bass.
The EXS24 mkII takes a moment to load the samples into RAM.
- Play your MIDI keyboard to audition the Fretless Electric Bass instrument.
- To the right of the Sampler Instruments menu, click the Edit button.
The EXS24 mkII Instrument Editor opens.
Note
Depending on the size of your display, you might need to resize the EXS24 Instrument Editor to see all of the available information.
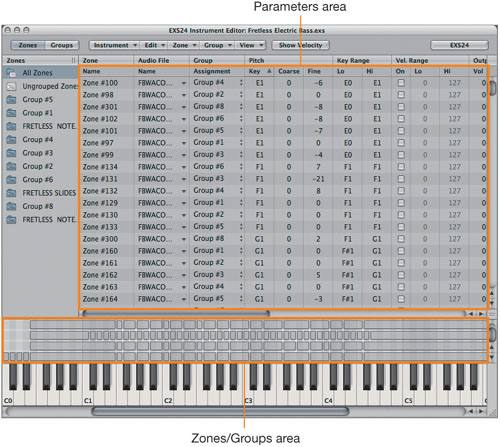
The EXS24 Instrument Editor allows you to peek into the construction of the Fretless Electric Bass sampler instrument. Let’s get familiar with the areas within the editor. The Instrument Editor has two views: Zones and Groups. The following screen shot shows the Zones view.
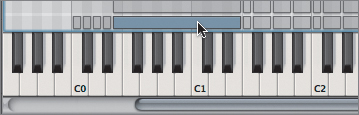
The bottom portion of the window (in the Zones view it is the Zones area) contains the key mapping for each sample. Each gray bar, called a zone, represents a single audio file that is mapped across a range of keys (represented graphically by the piano keyboard at the bottom). These zones can then be assigned into groups, which offer additional control over multiple zones via their own parameters.
Note
Groups that you create are displayed in the Zones column on the far left. You can display the zones associated with a group by selecting the group in this column. This functionality mirrors iTunes’ playlists, down to the ability of dragging and dropping zones into groups.
For each zone, the EXS24 mkII automatically pitch-shifts the audio in relation to the pitch of the keyboard. Zones with the same key range are stacked vertically and can be triggered simultaneously (in layers) or separately, depending on MIDI velocity. Generally, the zones at the bottom are triggered at lower velocities, and the upper zones at higher velocities.
Take a detailed look at one of the zones.
- In the lower left of the Zones area, click the zone that starts on E0 and ends on E1 (see the following figure).
The top portion of the Instrument Editor contains the parameters for each of the zones depicted below. The zone you select in the Zones area will be highlighted in the list of zones in the Parameters area.
Tip
To use your MIDI controller to select zones, choose Zone > Select Zone of Last Played Key. This is similar to Ultrabeat’s Voice Auto Select function that you used earlier in the lesson.
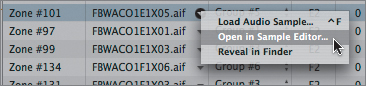
Each zone is listed with a set of parameters (pitch, key range, velocity range, volume, pan, and so on) that control how the audio file will be played. You can also view the audio file referenced by the zone for further editing and for setting loop points.
- In the Audio File column for Zone #101, click the disclosure triangle (this is the zone that you selected by clicking in the Zones area), and choose Open in Sample Editor.
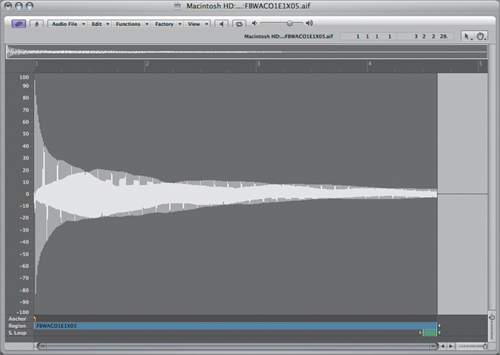
The Sample Editor opens, displaying the audio file used in the zone (FBWACO1E1X05.aif).
Note
You might get an alert message stating that the audio file does not have sufficient access privileges to save an overview. Go ahead and click OK, as this won’t keep you from looking at the file.
- Close the EXS24 and EXS Instrument Editor window (which might be obstructing the view).
Note
You may need to resize the Sample Editor window or drag the zoom sliders to see the entire sound wave.
You now can see a detailed depiction of the audio file used by the selected zone. This illustrates the total integration of the EXS24 mkII with Logic Pro; you can edit samples without ever leaving Logic.
- Click the Play button located at the top of the window.
- Close the Sample Editor.

Processing a Sampler Instrument
Now that you’ve seen how a sampler instrument is constructed, look at how the EXS24 mkII’s controls can shape and process the sampler instrument.
- Reopen the EXS24 mkII interface by double-clicking EXS24 mkII in the Arrange channel strip’s Instrument slot.
- While playing your MIDI controller, drag the Cutoff knob in the filter section, listening to the results.
By default, the Filter mode is set for a low pass (12 dB), so you get a gradual roll-off of some of the high frequencies by reducing the cutoff value.
You could easily continue to sculpt the sound using the instrument’s controls, adjusting the volume envelope, adding distortion, applying low-frequency oscillators to modulate parameters, and so on. This is similar to the way you would work with a subtractive synthesizer, but here you would use the sampler instrument as the sound-generation source instead of a generated raw waveform.
- In the Transport bar, click the Solo button.
This will enable you to hear one part at a time while you work with the various instruments.
- Play the project, listening to how the part plays through the EXS24 mkII.
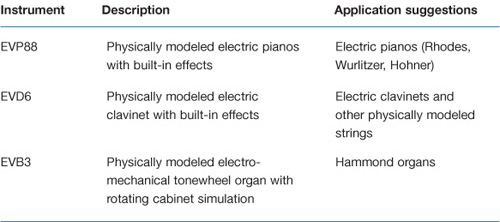
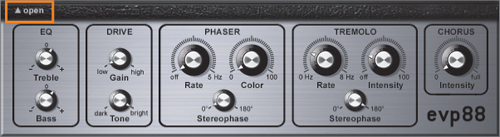
Using the EVP88 Vintage Electric Piano
The EVP88 (like the other instruments in the vintage keyboards line, the EVD6 and EVB3) is a physically modeled instrument dedicated to simulating the sounds of classic electric pianos such as the Fender Rhodes, Wurlitzer 200A, and Hohner Electra. The instrument generates its sound not by triggering samples, but by using complex algorithms that recreate a physical event occurring in the real world. Basically, the EVP88 simulates the physical movement of the various electric piano reeds, tines, and tone bars in the electric and magnetic fields of the pickups found in the original instruments. The result is an extremely accurate and playable instrument that synthesizes the ringing, smacking, and bell-like transients of the attack phase, as well as the hammer action and damper noises.
In this exercise you will load, audition, and then modify a stock sound, listening to the results.
- Select the Inst 3 track.
- In the Arrange channel strip, click the Instrument slot to open the Instrument Plug-in menu and choose EVP88 (Electric Piano) > Stereo.
The EVP88 interface opens.
- Play your MIDI keyboard to audition the instrument.
- To the left side of the instrument, click the Open disclosure triangle.
Additional controls are revealed, including the Model dial, which enables you to select an electric piano model.
When instantiated, the EVP88 defaults to the SuitcaseMkI model (based on the Fender Rhodes Suitcase MkI), with somewhat generic settings. You can add character to the sound via the EVP88’s built-in effects section, which contains processing that has become closely associated with classic recordings of electric piano sounds.
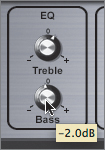
- Drag the EQ parameter’s Bass knob, and lower the Bass EQ a few decibels.
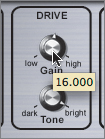
- Drag the Drive parameter’s Gain knob, and raise its level to about 16.
This should add some bite to the sound.
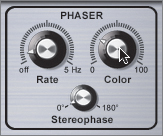
- Drag the Phaser parameter’s Rate and Color knobs, bringing them up a few notches to activate the stereo phaser to your liking.
- Play the project, listening to the electric piano part (and effects) through the EVP88.
Using the EVD6 Vintage Clavinet
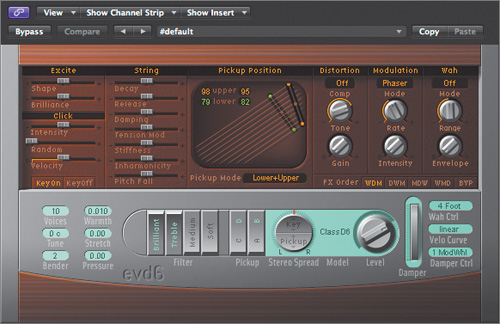
The EVD6 is also a physically modeled instrument, accurately recreating the sound of the classic Hohner D6 electric clavinet, from the buzzing of the strings and key clicks right down to the pickup configuration.
For this exercise, you will load a setting and modify it by using the EVD6’s built-in effects to customize the sound.
- Select the Inst 4 track.
- In the Arrange channel strip, click the Instrument slot to open the Instrument Plug-in menu and choose EVD6 (Electric Clav) > Stereo.
The EVD6 interface opens.
- Click to open the Settings menu and choose 01 Clean Clav > Low Stiff Clav.
- Play your MIDI keyboard to audition the instrument.
The EVD6 also has a complementary effects section, complete with distortion, modulation effects (phaser, flanger, chorus), and wah.
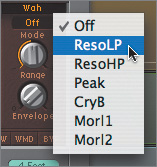
- At the top of the wah section (upper-right side), click to open the Wah Mode pop-up menu (it currently reads Off) and choose ResoLP.
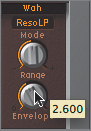
This activates a resonant low-pass wah.
- Drag the Envelope knob up to a value of 2.600.
- Play the project to hear the part (and effects) through the EVD6.
Using the EFM 1 FM Synthesizer
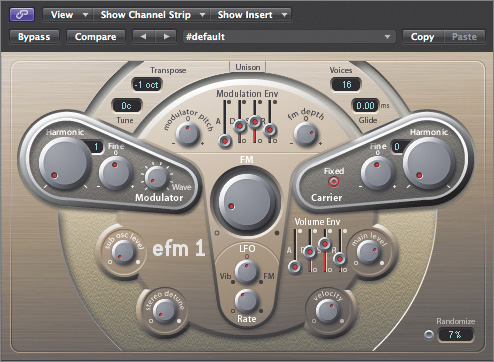
The EFM 1 is a digital synthesizer that uses frequency modulation to generate sound (that is, one oscillator’s audible frequency modulates another, creating new harmonics). The EFM 1, like its famous FM predecessor, the Yamaha DX7, excels at producing metallic timbres such as bells.
- Select the Inst 5 track.
- In the Arrange channel strip, click the Instrument slot to open the Instrument Plug-in menu and choose EFM1 (FM Synth) > Stereo.
The EFM 1 interface opens.
- Click to open the Settings menu and choose 06 FM Bells > Bell Swarm.
- Play your MIDI keyboard to audition the instrument.
- In the center of the interface, drag the FM (Intensity) knob up to increase the amount of frequency modulation between the modulator oscillator and the carrier oscillator.
The amount of harmonics increases.
- Return the FM (Intensity) knob to about the 8 o’clock position to return it back to its previous setting.
- Play the project to hear the part through the EFM 1.
Using the ES1 Virtual Analog Synthesizer
The ES1 was the first software instrument developed exclusively for Logic, kicking off a development surge that led to the multitude of instruments currently available in Logic Pro. It was specifically designed to emulate the subtractive synthesis of vintage analog synthesizers.
- Select the Inst 6 track.
- In the Arrange channel strip, click the Instrument slot to open the Instrument Plug-in menu and choose ES1 (Synthesizer 1) > Mono.
- Click to open the Settings menu and choose 01 Synth Leads > Vintage Classic.
- Play your MIDI keyboard to audition the instrument.
Like the vintage instruments that inspired the ES1, the synthesizer has no dedicated effects section. One of the distinct advantages to using software instruments in Logic is the ability to add effects to the generated sound and create new combinations.
- Click to open the topmost Insert slot pop-up menu in the Arrange channel strip and choose Delay > Tape Delay > Mono.
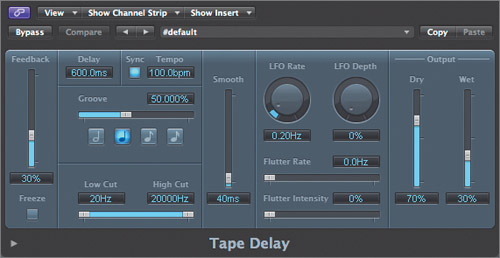
The Tape Delay plug-in opens.
- Play your MIDI keyboard to hear the instrument through the Tape Delay plug-in.
The echo time sounds good, but you need fewer repeats at a lower volume.
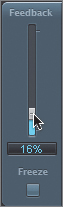
- At the far left of the Tape Delay window, drag the Feedback slider down to about 16%, reducing the number of repeated echoes.
- At the opposite end of the plug-in window, drag the Wet slider down to about 19%, adjusting the amount of wet signal.
- Play the project to hear the part through the ES1 with the tape delay.

Using the ES2 Synthesizer
The ES2 is a versatile and comprehensive synthesizer capable of a great range of sounds. From large-sounding leads to evolving pads, classic analog waveforms to digital waveforms and FM, the ES2 offers a wide array of tools for synthesizer enthusiasts.
- Select the Inst 7 track.
- In the Arrange channel strip, click the Instrument slot to open the Instrument Plug-in menu and choose ES2 (Synthesizer 2) > Stereo.
Tip
The Macro controls of the ES2 are new to Logic Pro 8. These appear in their own area at the bottom of the interface and provide easy access to common controls used in performance. Of special note are the Cutoff and Resonance (Reso) controls, which simultaneously affect both of the ES2’s filters.

Using Instrument Channel Strip Settings
In the previous ES1 exercise, you added a delay effect to enhance the sound. As the combinations of instruments and effects become more involved, it grows tedious to reinsert every component in the chain each time you wish to use that same sound combination. Using Logic Pro’s channel strip settings, you can create and recall settings that contain instrument and effects choices within a single preset.
Logic Pro installs many channel strip settings that fully utilize Logic Pro’s effects and instruments to achieve powerful combinations. This is not unlike the technique utilized by hardware synthesizers that can combine synthesized sound with effects sections to create new and exciting sounds. You can think of instrument channel strip settings as a single patch that happens to use multiple components.
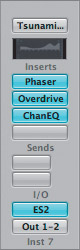
- In the Arrange channel strip, click the Setting button to open the Channel Strip Settings menu and choose 05 Synthesizers > 02 Synth Pads > Tsunami Jet.
The following plug-ins are instantiated:
By recalling a single channel strip setting, you instantiated a combination of an ES2 synthesizer with phaser, overdrive, and Channel EQ components to further enhance the sound.
- Play your MIDI keyboard to hear the combination.
- Play the project to hear the part through the ES2 combination.
- Close the ES2 window.
Using Global Tracks to Create a Quick Arrangement
Software instruments offer the malleability of MIDI with real-time generated audio output. You can compose, perform, arrange, and edit as if you were working with external MIDI hardware. This flexibility also carries over to Logic Pro’s global tracks (such as the Chord track and Signature track), which let you graphically view and edit global parameters for the project.
In this exercise, you will use the global tracks to make a quick arrangement using software instruments.
- Click the Solo button in the Transport bar to turn off Solo mode.
- Play the project to hear all parts.
Tip
If your computer is unable to play the project with all the instruments enabled (due to system overload errors), freeze some of the tracks before playing the project by selecting their respective Track Freeze buttons.
Note that the Signature track at the top of the Arrange area (just below the Bar ruler) is set for D minor, the key of the project. Since the project has a modal feel (Dorian mode on D), let’s create a quick arrangement by changing to E-flat minor (transposing up a semitone) at a certain point within the project.
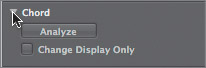
- Click the disclosure triangle in the Chord track.
- In the Chord track, use the Pencil tool to insert a chord event at measure 9.
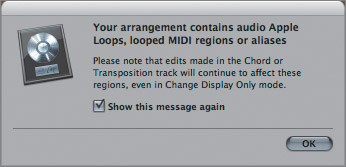
An alert message appears.
This is a warning to indicate that any changes in the Chord (or Transposition) track will have an effect on Apple Loops, MIDI regions, and aliases. Since this is what you are trying to achieve, it is fine to click OK and close the alert message.
- Click OK.
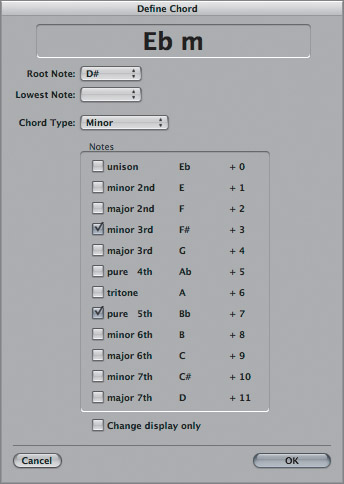
The Define Chord window opens.
- In the Root Note menu, choose D (enharmonic to E
 ).
). - In the Chord Type menu, choose Minor.
The topmost window should display E
m. - Click OK.
The Chord track now has an E
minor chord inserted at measure 9.Note that the Transposition track now displays a +1 event at measure 9, corresponding to the chord change (up one semitone).
- Insert another chord event at measure 13, this time creating a return to the D minor chord.
- Play the project to hear the new arrangement.
All instruments respond to the transposition as if they were classic MIDI instruments.
Note
If you froze the tracks earlier, you will have to refreeze them by de-selecting the Freeze buttons, then selecting them again to effect the key change. This is because when freezing a track, Logic creates and caches 32-bit audio files that are literally a recording of the part (and effects) through the instrument. During playback, this file is read from the disk. If changes are made to the part (such as transposition) after the freeze, you must create new freeze files that incorporate the change.
- Choose File > Save As.
The Save Document As dialog opens.
- In the Save As field, enter 04_Software Instr_Finish.
- In the file selector box, save the file to Music > Logic 8_BTB_Files > Lessons > Completed.
- Click Save.
- Choose File > Close Project.
Sound Design with Sculpture
Sculpture, one of the newer instruments offered in Logic Pro 8, represents a unique approach to synthesis. It uses sophisticated algorithms to recreate the way sound is generated in the natural world. Specifically, it simulates the characteristics of a vibrating string or bar. This technique is called component modeling, and it closely mirrors the sound generation found in Logic’s vintage keyboard instruments (EVP88, EVD6, and EVB3).
One way to wrap your head around Sculpture is to imagine a synthesizer that lets you control how all the components of a real “physical” instrument interact, and what materials they are made from. In effect, you are building a physical instrument from scratch!
Because Sculpture is so innovative, many people have difficulty approaching it, not knowing how to begin designing sounds and editing settings. In the next exercise, you will walk through the key components of Sculpture and create a sound from scratch.
- Choose File > Open.
- In the file selector box, navigate to Music > Logic 8_BTB_Files > Lessons, and open the 04_Sculpture_Start.logic project.
You will use this project for the exercise.
Understanding the String
In Sculpture, the central synthesis element is called the string. This is a bit of a misnomer because the basic physical material can also be similar to a bar (a solid mass). The principle is the same, however: sound is generated only by performing a physical action on, or stimulating, the raw material—striking, picking, blowing, and so on.
- If you have not done so already, select the Inst 1 track.
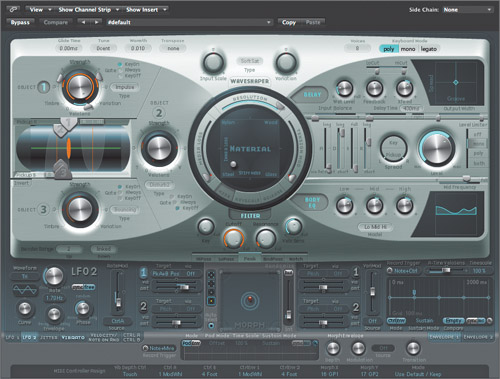
- In the Arrange channel strip, click the Instrument slot to open the Instrument Plug-in menu and choose Sculpture (Modeling Synth) > Stereo.
The Sculpture window opens.
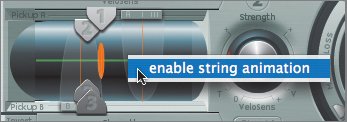
- Control-click the string (the green horizontal line at the far left) to turn on string animation.
- Play your MIDI controller.
The string animates, depicting its vibration. This is an effective tool when you’re programming sounds with Sculpture, as it provides visual feedback reflecting how your choices are affecting the string.
Tip
When you are using Sculpture for playback (and not editing or programming sounds), it is a good idea to disable string animation because it uses some CPU time to generate the animation. Turn the animation on and off by Control-clicking the string (it is off by default).
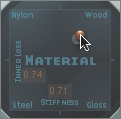
Using the Material Pad in the center of the interface, you can construct the string by blending the properties of four basic materials: steel, nylon, wood, and glass.
- Drag the ball in the Material Pad around the square while playing your MIDI controller. Note how the string animation changes.
The sound also changes as you move the ball, modifying the Inner Loss (damping) and Stiffness (rigidity) of the material.
- Position the ball about halfway between nylon and steel at the far left edge of the Material Pad.
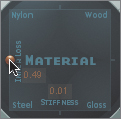
The outside ring of the Material Pad contains additional parameters that determine the sound-making properties of the selected material.
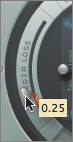
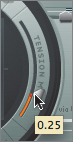
- Try dragging the Media Loss slider, listening to the sound by playing your MIDI controller, eventually settling on a value of about 0.25.
Media Loss controls the damping of the string caused by its environment. Imagine a string vibrating in air, water, or pea soup to visualize what this parameter does.
- Drag the Resolution slider, listening to the sound by playing your MIDI controller, eventually settling on a value of about 55.
The material’s resolution has to do with the number of harmonics generated. The higher the value, the richer and more complex the sound as more overtones are produced. Be aware that higher resolution values carry a higher CPU load.
- Drag the Tension Mod(ulation) slider, listening to the sound by playing your MIDI controller, eventually settling on a value of about 0.25.
The Tension Mod control adds pitch displacement of the string to higher note velocities. This is similar to the slight initial pitch change that occurs when you strongly pluck a stringed instrument.

Using Objects in Sculpture
Sculpture has three objects that determine how the string is excited or disturbed (how it is played). Remember that physical instruments need an action applied to the sound-producing material to make a sound: a guitar string needs to be plucked or picked, a violin string needs to be bowed, a marimba bar needs to be struck with a mallet, and so on.
- Click the 1 button next to the Object 1 controls (at the far left of the interface).
The button turns from blue to gray, indicating that the object is off.
- Play your MIDI controller.
You shouldn’t hear any sound.
Why is no sound produced? This illustrates the dependent physical interaction between objects and strings. Without an object exciting the string, nothing happens, just as in the real world.
- Turn on Object 1 again by clicking the 1 button.
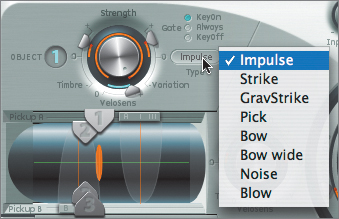
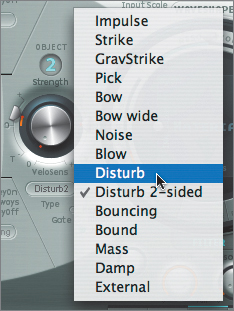
- Click the Type button located to the right of Object 1’s Strength knob.
The menu that appears lists various exciter types for exciting the string.
- Try choosing each exciter type, one at a time, testing each sound by playing your MIDI controller and observing the effect on the string animation.
- Conclude by choosing the Pick exciter type for Object 1.
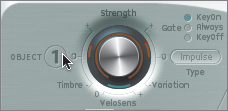
Object 1 is now set to simulate the action and sound of a guitar pick acting on a string. The parameters are controlled by the object’s Strength knob and surrounding sliders: Variation, Timbre, and, for Objects 1 and 2, VeloSens (velocity sensitivity). The parameters are context sensitive, meaning that the exciter type determines what the controls do. For example, the Timbre slider sets hammer mass when the exciter type is Strike, and bow pressure when the type is Bow.
More Info
See page 461 in the Logic Pro 8 Instruments and Effects manual for a chart describing the parameters for each exciter type.
- Drag the Strength knob and try different values, listening to the result while playing your MIDI controller.
In the case of Pick, the Strength parameter determines pick force and speed.
- Option-click the Strength knob to return the value to the default.
- Drag the Variation slider, listening to the sound by playing your MIDI controller, eventually settling on a value of about 0.61.
The Variation control determines plectrum stiffness when the exciter type is set to Pick.
- Click the 2 button next to Object 2 to turn it on.
- Click to open the Type menu and choose Disturb.
Note that this menu is considerably longer than the Object 1 menu. Object 2 offers all of the same exciter types as Object 1 but also contains a variety of others, which are referred to as disturbers. The nature of a disturber type is not to start the string material vibrating (as the exciter types do), but to disturb the vibration in some way through a physical interaction. Therefore, disturbers work in conjunction with exciters to produce a complex result.
- Play your MIDI controller to hear the result of the applied disturber.
With Disturb chosen, you are introducing a physical object at a fixed distance from the string that keeps it from freely vibrating. Think of an object positioned close to the strings of a guitar so that it is nearly touching. When the guitar strings are plucked, the strings hit the object, creating a buzzing sound.
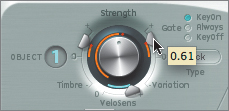
- Adjust the Strength of Object 2 to about 0.43, listening to the results by playing your MIDI controller.
Just as they do with the exciter types, so do the Strength, Variation, and Timbre controls modify aspects of the chosen disturber. In the case of Disturb, Strength sets the hardness of the object positioned near the String.
More Info
See page 462 in the Logic Pro 8 Instruments and Effects manual for a chart describing the parameters for each disturber type.
- Click to select the Always button in the Gate settings for Object 2, playing your MIDI controller to hear the result.
The Gate settings determine when the object interacts with the string in relation to the MIDI controller keystroke: on depressing the key (and not when the key is let go), on letting go of the key (and not when the key is depressed), or always.
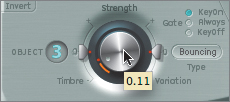
- Click the 3 button, and choose Bouncing from the Type menu if necessary.
Notice that Object 3’s Type choices are limited to disturbers (no exciters). Bouncing simulates a loose object lying on the vibrating string. Imagine a piece of paper or small wood block lying directly on a guitar’s strings to get an idea of what this produces.
- Set Strength to about 0.11, playing your MIDI controller to hear the results as you adjust the value.
Strength controls the effect of gravity on the bouncing object.
- Adjust the Timbre slider to approximately −0.22, listening to the results as you do so.
In the case of a bouncing object, the Timbre parameter controls the stiffness of the object.
Now that you have determined the basic sound generation by choosing object types, you can further work with the sound by determining where each object interacts on the length of the string. This is similar to picking a guitar string at the bridge, at the neck, or in the middle.
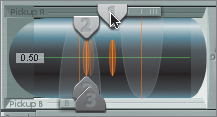
You can position objects by moving sliders representing each object in the Pickup display.
- Drag the Object 1 slider in the Pickup display to the right, positioning it in the middle of the string.
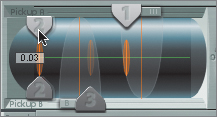
- Drag the Object 2 slider in the Pickup display to the left, positioning it slightly to the right of the left end (a value of 0.03).
- Drag the Object 3 slider in the Pickup display to the left, positioning it between the Object 1 and Object 2 sliders.
- Listen to the sound by playing your MIDI controller.

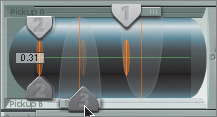
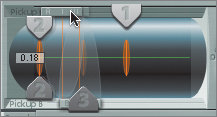
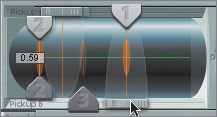
Adjusting the Pickups
Sculpture uses pickups to sense vibrations from the string, functioning identically to an electric guitar’s electromagnetic pickups. As it is on an electric guitar, the pickup’s location is of importance; different positions along the length of the string create different timbres.
Tip
To hear these subtle differences, play your MIDI controller while you do the following adjustments.
- Drag the Pickup A slider to the left, roughly between Objects 2 and 3.
- Drag the Pickup B slider over Object 1.
The resulting sound emphasizes the Pick exciter, similar to the way the neck pickup works on an electric guitar.
Processing the Sound
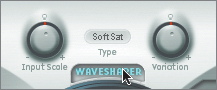
Sculpture’s extensive processing options allow you to further shape the sound using a variety of means (multimode filter, Waveshaper, stereo delay, and Body EQ). Examine some of the choices, working with the sound you have constructed so far.
- Turn on the Waveshaper by clicking the Waveshaper button above the Material Pad.
The Waveshaper provides interesting distortion effects, including tube simulation, for harmonically rich results.
- Drag the Input Scale knob to a value around 0.39.
- Drag the Variation knob to a value of −0.69.
- Play your MIDI controller to audition the sound.
You have just applied soft, tubelike saturation to the sound.
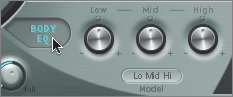
Sculpture’s Body EQ section utilizes a unique approach to equalization, providing some great sound-shaping possibilities. A standard EQ changes individual frequency bands, but Body EQ also offers spectral models that emulate the resonating properties of specific instruments. These models can be shaped by adjusting formant-related parameters.
- If Body EQ is not already turned on, click the Body EQ button to the right of the Material Pad.
By default, Body EQ is set to the Lo Mid Hi model, emulating a standard three-band EQ.
- Click the Model button to open the Model pop-up-menu.
As you can see, the choices range from models of string instruments (guitars, violin, cello, double bass, and so on) to kalimba and various flutes (alto and bass).
- Choose Dobro Guitar.
The controls change to reflect the formant parameters of the resonating body (Dobro Guitar), and the graphic display to the right now depicts a detailed spectrum.
- Try playing your MIDI controller to hear the Dobro Guitar spectral model applied to your sound.
In effect, you are coupling the sound generator that you constructed (through the interaction between string and objects) with the resonating body of a Dobro guitar (a metal-body guitar with an acoustic speaker cone).
- Try changing the three formant controls, which adjust how much the harmonics are emphasized (Intensity), how closely they are spaced (Stretch), and how far their frequency moves up or down (Shift).

Using Modulation in Sculpture
Sculpture’s modulation section is extensive, offering everything from low-frequency oscillators (including two jitter generators that produce random variations) to Note On Random modulators and user-created envelopes.
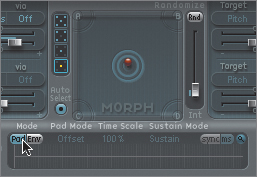
Also of great interest is the Morph Pad, which enables you to morph between parameter settings for the entire instrument. The Morph Pad can be controlled manually, by MIDI controllers, or by its own time-based envelope.
- If the Morph Pad is not already turned on, click the Pad button in the morph envelope display.
The Morph Pad has five morph points, represented by center and corner points (A, B, C, D). Each point can be thought of as a memory location that stores the parameter settings of everything from string material to object and pickup placement.
Instead of setting each state manually, let’s use one of Sculpture’s useful features to randomly generate deviants of the original state in each point.
- Select the 4 Points button located to the left of the Morph Pad.
By selecting this, you are targeting only the four outermost points (A, B, C, D) for randomization, leaving the original (center point) sound alone.
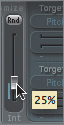
- Drag the Intensity (Int) slider to the right of the Morph Pad to a value of 25%.
- Click the Randomize (Rnd) button above the Intensity slider.
To see what just happened, look at how the controls for the various states (points) were affected.
- Click each point in the Morph Pad (click on the letters), one at a time, looking at how the Material and Object controls change.
- Hold down a note on your MIDI controller, and on the Morph Pad, move the red ball to various points.
The controls (and the sound) change smoothly to reflect the various states.
Saving and Trying Presets
As you can see, Sculpture is a truly exceptional instrument. Let’s end this section on Sculpture’s unique sound-generation properties by saving the sound you just made as a preset.
- Click to open the Settings menu and choose Save Setting As.
- In the Save As field, enter a name that you feel suits the sound you just made.
- Click Save.
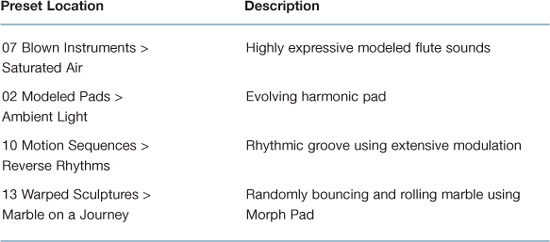
Let’s conclude by taking a brief look at some of Sculpture’s expertly programmed settings, which show off the diverse capabilities of the instrument. With each of these, try playing your MIDI controller while holding chords and single notes to hear the sound evolve over time. Also try playing with the Morph Pad (if active) and modulation wheel of the MIDI controller, as these are frequently deployed to control sound changes.
Some Presets to Try
Treating Your MIDI Hardware as Software
While it is possible to create entire projects using only built-in instruments, Logic Pro also provides ways to integrate external hardware into the computer recording environment.
Logic Pro has a handy little plug-in that enables you to create a direct connection to an external piece of MIDI hardware as if it were an internal software instrument. The plug-in brings the external device’s audio output back into Logic’s Mixer for further processing and bouncing, all in real time.
- Select the Inst 2 track (track 2).
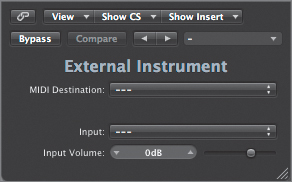
- In the Arrange channel strip, click the Instrument slot to open the Instrument Plug-in menu and choose External Instrument > Stereo.
This plug-in doesn’t do any processing at all, but it functions as a signal router. Basically, it sends MIDI data out to a selected instrument in the Environment representing your external MIDI hardware and receives audio input from a selected input on your audio interface that is receiving the signal from that external MIDI device.
- Physically patch the audio outputs from your selected MIDI hardware to a pair of adjacent audio inputs on your audio interface (1-2, 3-4, 5-6, and so on).
- In the External Instrument plug-in, click to open the MIDI Destination pop-up menu and choose GM Device > 1 (Grand Piano).
This menu mirrors the available choices for assigning a MIDI track within the Arrange area. Each enabled channel of the device is represented and may be chosen.
Note
For this exercise, you set the MIDI destination to a generic MIDI instrument within the project’s Environment. This multi instrument is set to output on all MIDI ports of your interface, so it should trigger all connected MIDI devices. Since only one MIDI device has its audio outputs connected to the audio interface and chosen within the External Instrument plug-in, this will work well for the purposes of this exercise. Within your own project (containing your own MIDI setup in the Environment), however, you would select an instrument representing your individual MIDI hardware.
- Click to open the Input slot pop-up menu and choose the inputs of your audio interface into which you plugged the MIDI hardware.
- Play your MIDI controller.
You should hear the output of your MIDI device, which is routed into the Inst 2 channel strip or track.
- Listen to the sound level and apply additional gain attenuation, if needed, by adjusting the Input Volume slider.
You are now ready to apply additional plug-ins, make volume and pan adjustments, and mix and bounce the MIDI hardware as if it were a software instrument.
- Choose File > Close Project.
An alert message appears asking if you’d like to save the changes done to the project. It is not necessary to save the project file, as no data was actually written.
- Click Don’t Save.
Lesson Review
1. Which direction does signal flow in most of Logic’s software instruments?
2. What do Ultrabeat kits contain?
3. Which feature in Ultrabeat is used to compose and play back patterns?
4. How can you create strings of patterns with Ultrabeat?
5. What do multi output instruments do?
6. Sound generation for the EXS24 mkII consists of what three components?
7. Besides offering flexible physical modeling of real-world components, the vintage keyboard instruments offer what additional feature to process the sound?
8. How are software instrument and effects combinations stored for future recall?
9. What is used to quickly create arrangements of both software instrument and classic MIDI tracks?
10. What is Sculpture’s basis for sound generation?
11. Besides Sculpture’s sound-generation and modulation sections, what other components are used to further process the sound?
12. Which modulation control enables you to program smooth transitions between various parameter states?
13. How can external MIDI hardware be incorporated into Logic’s Mixer?
Answers
1. Signal flow moves from left to right in most software instruments, which helps with understanding the instrument as well as locating controls.
2. Ultrabeat utilizes kits that contain individually programmed drum sounds, each with its own unique settings and modulations.
3. Ultrabeat’s built-in step sequencer works in conjunction with the Logic project to compose and play back patterns.
4. Ultrabeat’s step sequence patterns can be strung together by triggered MIDI notes, or copied to the Arrange window for region-based editing.
5. Multi output instruments (such as Ultrabeat and EXS24 mkII) can route individual sounds to separate channel strips for isolation or further processing.
6. The EXS24 mkII consists of samples organized into sampler instruments that are further shaped by the interface controls.
7. The vintage keyboard instruments have built-in effects processing associated with each instrument.
8. Instrument and effects combinations can be saved and utilized as channel strip settings.
9. Global tracks affect software instruments in the same manner as classic MIDI hardware and can be used to create quick arrangements.
10. Sculpture utilizes a string acted upon by objects as the basis for sound generation.
11. Components such as the Waveshaper, Body EQ, and Delay allow you to further process the instrument in interesting ways.
12. Sculpture’s Morph Pad enables you to smoothly move from various states of control settings.
13. External MIDI hardware can be incorporated into the Mixer as a software instrument by using the External Instrument plug-in.