Lesson 3. Matching Tempo and Pitch
Working with music in the digital domain lends itself well to collage, the combining of material from multiple sources into a cohesive whole. Modern music productions increasingly incorporate audio material from disparate sources, whether it is material from sample libraries or excerpts from existing recordings. The major production stumbling block has been matching the tempos and keys of the sound sources.
When a tape is slowed down or a digital audio file’s sample rate is increased, the pitch is altered as well. Not too long ago, you couldn’t alter the timing and pitch of a recording independently. Recent trends in audio production technology have attempted to address this, incorporating features that specifically deal with matching the tempo and pitch of audio material.
Modern techniques use algorithms that transpose, extend, or compress audio material, giving you the ability to alter pitch or time (or both) without changing the character of the original file. These operations are quite complex, requiring an analysis of the audio data to determine what to leave or cut out, and where to insert material.
These decisions aren’t always suitable for a specific piece of material, however, and unexpected results (desirable or not) can occur. To achieve a better outcome, you need to manipulate the available parameters and help the computer make more appropriate choices.
In this lesson, you will use Logic Pro’s time-stretching and pitch-transposition features to match disparate elements within a project.
Working with Apple Loops
Apple Loops are essentially audio files with additional information written to the file’s header. In software such as Logic and GarageBand, the information enables the time stretching and pitch shifting of the audio data to be done independently of each other in real time.
This file format is a boon for arranging, as Apple Loops have the distinct advantage of automatically conforming to Logic’s time grid, and they provide a great deal of flexibility. Libraries of Apple Loops can be freely imported into any project file; and, in addition, all audio recorded, bounced within, and exported from Logic Pro will have the ability to follow the project’s tempo. Standard audio files (such as .aif, .wav, and .sd2 files not formatted as Apple Loops) have time and pitch attributes that are not conformed when the files are imported. Even so, those formats are easily converted with specific tools to create Apple Loops that will seamlessly conform to a project’s tempo and key.
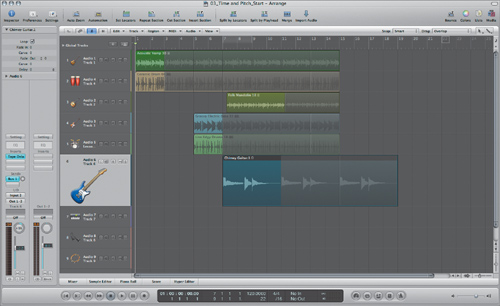
In the upcoming exercises, you will use a project file containing basic elements from previous exercises (similar to the project file you created in Lesson 2), including audio files in the Apple Loops format.
- Choose Music > Logic 8_BTB_Files > Lessons > 03_Time and Pitch_Start.logic.
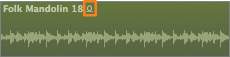
Look at the first five tracks containing audio regions. Note that each region has a small symbol (similar to a loop-the-loop) following its name. This symbol indicates that the audio file is an Apple Loops file.
- Click each track in the track header, taking a look at the Region Parameter box on the far left.
Examine the Region Parameter box on the far left. Note that Follow Tempo is selected for all Apple Loops regions. This parameter ensures that the Apple Loops will conform to any tempo change.
The Follow Tempo parameter is deselected by default for audio that is recorded into Logic. If you want the audio regions to conform to the project’s tempo, this parameter needs to be selected.
In addition to the Apple Loops tracks, track 6 contains a guitar part, Chimey Guitar, that was imported into the project. Note that this region does not have Follow Tempo parameter within the Region Parameter box, nor does it have an Apple Loops symbol because it is a standard mono audio file.
- Play the project to familiarize yourself with the arrangement.
The project moves along at a pretty fast clip and feels a little rushed. Let’s slow the tempo to achieve a better feel for the groove.
- In the Transport bar (at the bottom of the Arrange window), double-click the numerical field of the Tempo display, type 110, and press Enter.
- Play the project.
The groove feels significantly better at this slower tempo, but a major problem has occurred. The Chimey Guitar track, which matched the original tempo of 120 bpm (beats per minute), is now out of tempo.

Using the Apple Loops Utility
One of the easiest ways to make the Chimey Guitar region’s tempo match the other tracks is to convert it into an Apple Loops file. That way you can make tempo adjustments in the arrangement and have all audio regions follow along. Logic Pro ships with an application, the Apple Loops Utility, that enables you to create Apple Loops from any standard audio file.
- If necessary, in track 6 select the Chimey Guitar region.
- In the Arrange area’s local menu bar, choose Audio > Open in Apple Loops Utility.
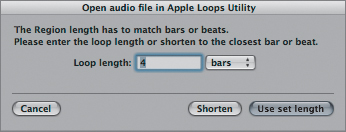
A dialog appears asking you to identify the length of the audio file.
For the Apple Loops Utility to analyze the data, it must discern how the file length relates to music beats and bars. The Apple Loops Utility makes an educated guess based on the region length compared to Logic’s own bar/beat ruler. This region originally lasted four bars (at 120 bpm), so the program “guessed” correctly in this case.
- Click “Use set length.”
The Apple Loops Utility opens, displaying the filename in the Assets drawer (at the far right), with the Tags tab open.
Tagging Files
Tags are pieces of information used by many applications, including those that support the Apple Loops file format. Adding tags will not directly affect the tempo or pitch properties of a file, but tags are essential if you plan on adding a file to the Apple Loops library (accessed by Logic’s Loop Browser). These bits of information constitute a database, enabling you to search for material based on specific criteria. Let’s look at these properties by creating tags for the Chimey Guitar file that you imported.
The upper-left portion of the Tags tab contains property tags related to the file’s musical content.
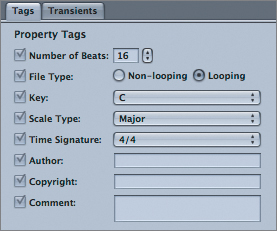
The Apple Loops Utility supplies default values for the time signature, number of beats, key, and tonality. The Chimey Guitar region you are working with will be looped within the arrangement, so it is necessary to indicate this within the property tags.
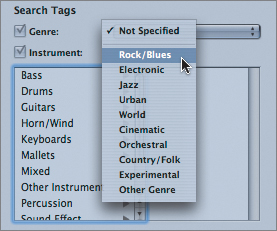
Move down to the Search Tags pane, where you can define the music genre and instrument type for the file.
- If not already selected, click the Looping radial button next to the File Type option
- From the Genre pop-up menu, choose Rock/Blues.
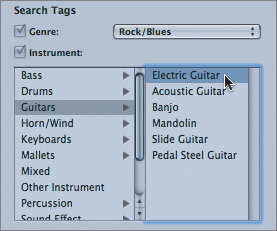
- In the Instrument pane, choose Guitars > Electric Guitar.
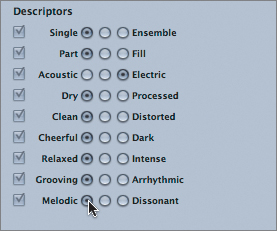
- Move to the right to the Descriptors pane and look at the list that describes the musical content.
- Matching the next figure, click to select the radio buttons for the options that best describe the musical characteristics of the Chimey Guitar part.
Working with Transients
Now that you’ve defined the search tags of the audio file, it is time to work with properties that directly relate to time stretching and pitch transposition.
- At the upper left of the window, click the Transients tab.
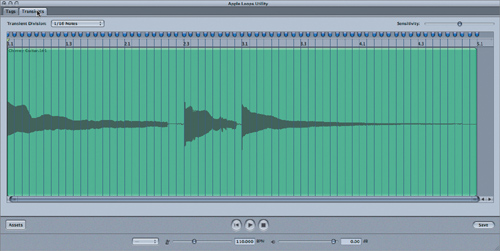
The Transients tab opens, displaying the audio file waveform.
Note
You may need to enlarge the window and zoom in to better view the information within this window.
Transients are good indicators of where beats occur in an audio file, and they typically show up as sharp attacks with the highest amplitude (widest areas of a waveform). The Apple Loops Utility automatically detects transients and applies markers based on their characteristics in conjunction with the bar and beat information that you supplied when opening the utility. These transient markers are used as a map, enabling Logic to make decisions about where best to apply time stretching and pitch transposition.
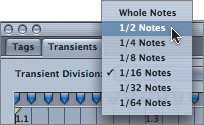
By default, the Apple Loops Utility uses sixteenth-note divisions, but this might not always be appropriate for the given material. It is best to check results by listening to the file played from within the utility, which will immediately apply time stretching and pitch transposition based on the settings.
- If it is not already done, make sure that the Tempo slider (marked with a metronome symbol) is set to the recording’s original tempo (120 bpm, in this case).
- At the bottom of the window, click the Play button.
The file plays, looping over and over. Depending on the settings that were in use the last time the Apple Loops Utility was opened, the file could play back in the wrong key.
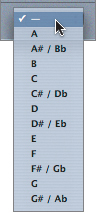
- If necessary, click the Key pop-up menu in the lower part of the window and choose “–” to indicate the original key of the part.
- While playing the file, try selecting different keys from the Key pop-up menu, listening to them one at a time.
The loop transposes up smoothly via semitones and sounds as expected until it reaches the F
 /G
/G setting (the augmented fourth/diminished fifth from C). The pitch immediately drops down 11 semitones (an octave below what is expected). This still reflects the key accurately but achieves better-sounding results.
 - Return to the original key, by choosing “–” in the Key pop-up menu.
- While playing, drag the Tempo slider to a value of 110.000 bpm.
The loop plays at a slower tempo.
Listen to the sound that is produced when you adjust the tempo to your target (110 bpm). The sound has a slight tremor that falls at the sixteenth-note divisions. This was not present in the original file, so you should use the Transient Division menu to home in on a more acceptable sound.
- Click the Stop button.
Look at the numbers displayed above the waveform (1.1, 1.3, 2.1, 2.3, and so on). These correspond to bars and beats, separated by a period. Thus, 1.1 represents the first bar, first beat; 1.3 represents the first bar, third beat. You can use this reference to compare the transients of the audio file with the bar/beat ruler.
The Transient Division setting should reflect the smallest significant note division for the loop. In this exercise, you can look at the waveform and discern that the notes aren’t struck any faster than at half-note intervals (2.3 to 3.1), so setting the Transient Division to match is a good place to start.
- From the Transient Division pop-up menu, choose 1/2 Notes. Click Play to listen to the results.
This sounds significantly better, and considerably less jittery.
- Stop the playback, and at the upper right of the window, drag the Sensitivity slider all the way to the right.
As you do this, notice that more transients are detected, matching up to smaller peaks in the audio waveform and occurring at closer intervals than the half-note value you defined in the Transient Division menu.
Increasing the sensitivity achieves a better result for the glissando between 2.3 and 3.1, but it also brings back the jittery sound, especially for the sustained vibrato between 1.1 and 2.3. Instead of using these results, you can drag the Sensitivity slider back to the middle and add only the transient markers that you need.
- Drag the Sensitivity slider to the halfway point.
- Click the dark gray area above the ruler in the middle of the 2.3–3.1 range.
A transient marker is created at approximately bar 2, beat 4.
- Click in the dark gray area to create another transient marker between the one you just created and the one at 3.1.
A transient marker is created at approximately the upbeat of bar 2, beat 4.
The playback is pretty smooth now, with acceptable results.
- If the playback is still looping, click the Stop button.


Creating Apple Loops
To take advantage of the adjustments and the information that you defined, you have to save the file. When you save the file, the new data is added to the file and made accessible to any application that reads Apple Loops.
- In the lower-right corner of the interface, click the Save button.
The information you provided, both tags and transients, is saved to the file.
- Choose Apple Loops Utility > Quit Apple Loops Utility.
- If necessary, bring forward Logic Pro, which should still be in the background.
Look at the Chimey Guitar audio region in the Arrange area. The Apple Loops symbol is now next to the filename and the region has a length of exactly four measures.
- Play the project.
The Chimey Guitar region now plays in time.
Using the Time and Pitch Machine
Before Apple Loops were integrated within Logic, all tempo and pitch adjustments to audio files were done with the Time and Pitch Machine, which functions differently from Apple Loops. The most obvious difference is that Apple Loops work in real time, dynamically changing pitch and tempo in relation to the project, while using the Time and Pitch Machine is an offline, file-based process that permanently alters a file’s pitch and tempo.
Even so, the Time and Pitch Machine has its advantages, especially with regard to control. Apple Loops offer automatic adaptability, but they are locked to a given project’s tempo or key and are not very useful when you want to shift audio material independently of a project’s tempo or make pitch adjustments of less than a semitone.
Let’s open another piece of material and use the Time and Pitch Machine to conform it to the arrangement.
- On the Toolbar, click the Media button to open the Audio Bin.
- Drag the Synth Layer.aif file to the Audio 7 track at the beginning of measure 2.
The nine-bar Synth Layer region is imported to measure 2.
- Close the Media area.
- Double-click the Synth Layer region, opening the Sample Editor.
- Resize the window to display the file in its entirety, zooming out horizontally if necessary.
- At the top of the sample editor, click the Play button to hear the Synth Layer audio file.
- Adjust the Volume slider to the right of the Play button to change the playback for the Sample Editor.
The audio file consists of a synth pad that slowly grows to a climax, then tapers off.
For this exercise, you will shorten the long synth pad to work better in the project. In this instance, the Apple Loops Utility is not suitable for a variety of reasons. The swelling sound of the synth pad has no beat-related transients on which to base the pitch and time shifting.
In addition, Apple Loops are geared toward repeated, rhythmically based material that always relates to the project’s tempo. For this exercise, you only need to shorten the file’s length, without accounting for tempo. Creating an Apple Loops file from the selection would have no effect unless you later changed the project’s master tempo.
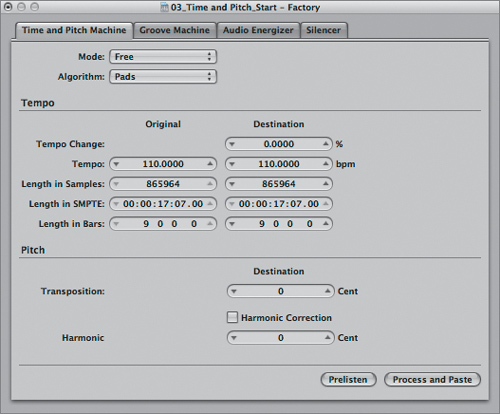
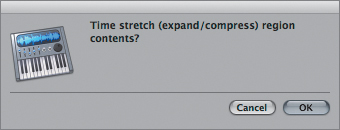
- In the sample editor’s local menu, choose Factory > Time and Pitch Machine.
The Time and Pitch Machine window opens.
- In the Tempo Change parameter, click the Destination field and type 50.
After you enter the value, note that the information displayed in the Destination column now reflects this change.
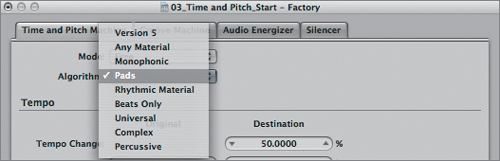
The Time and Pitch Machine offers nine algorithms designed to work with different types of audio material, prioritizing certain musical aspects to better make decisions that affect the time and pitch shifting.
- In the Algorithm menu, choose Pads.
By choosing the Pads setting, you are indicating that the material has a minimum of transients and that it is a sustained sound.
Tip
Although operations in the Sample Editor are usually destructive (and thus permanently change the file), algorithms can be tried on material without destructive results. Logic Pro will cache changes to disk depending on the number of undo steps set within the Sample Editor preferences (Preferences > Audio > Sample Editor). After an operation is completed, you can always undo by choosing Edit > Undo in the Sample Editor or by pressing Command-Z.
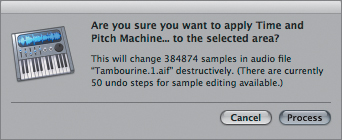
- Click the Process and Paste button.
An alert dialog appears asking if you are sure you want to go ahead with the operation.
- Click Process.
The operation is performed while Logic Pro displays the progress. This may take a few moments, depending on the speed of your computer.
- Close the Time and Pitch Machine window.
- Click the Play button to listen to the results.
The file plays true to its original sound quality, but with a shorter length.
- Click the Sample Editor button to close the Sample Editor.
- Play the project file to hear the Synth Layer region within the context of the project.
This fits much better with the arrangement, building up until the drums and bass enter, then tapering off.
Tip
Better results are usually achieved in contracting audio files than in expanding them. When the operation increases the speed of the audio, the computer must cut out material deemed nonessential, potentially removing important elements such as transients. But things get considerably trickier when you need to decrease the speed, because the computer must invent entirely new material based on the existing waveform and insert it at appropriate places to fill the desired length.


Using Harmonic Correction with Pitch Transposition
Pitch transposition usually involves shifting the complete frequency spectrum up or down by a constant value. In effect, everything within the sound source is shifted, including natural resonances (called formants). This works well for some material, but it can create unnatural results in material (such as instruments or voices) containing a harmonic structure that is integral to the sound.
A good example is the pitch shifting of a cello note. When all the material is shifted upward (including formants), the pitch changes, and the “body,” or timbre, of the instrument changes as well. What results is a higher pitch that sounds as if it were emanating from a smaller instrument (a viola or violin in this case), rather than the original instrument.
If your aim is to change the pitch of a given file while maintaining its resonances, then the formants must be left unaltered. The Time and Pitch Machine can be set to use such a process, called Harmonic Correction, to achieve natural results when pitch shifting.
Try this out by changing the pitch of the Synth Layer region using Harmonic Correction.
- Option-drag the Synth Layer region to measure 13.
The region is copied to the new location.
Since you will be transposing this copy of the region, it must be saved as a unique audio file rather than another reference of the original. This will allow you to make changes to the copied file without altering the regions you worked with previously.
- Select the newly copied region and, from the Arrange area’s local menu bar, choose Audio > Convert Regions to New Audio Files.
A dialog appears, prompting for a location to which to save the converted file.
- Click Save to save the file to the location of the original file.
The region is saved as an independent audio file.
- Double-click the newly saved region to open it in the Sample Editor.
- In the Sample Editor’s local menu, choose Factory > Time and Pitch Machine to open the Time and Pitch Machine.
The Time and Pitch Machine window opens.
- In the Tempo Change parameter, click the Destination field and type 0. Press Enter.
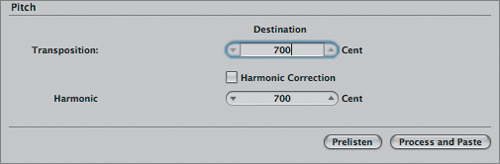
The goal is to transpose the pitch of the file up a fifth from C to G while retaining the inherent resonances of the sound.
- In the Transposition parameter, click the Destination field and type 700. Press Enter.
This will transpose the sound up 700 cents, or seven semitones (there are 100 cents in a semitone). Note that the Harmonic parameter value also changes to 700. With Harmonic Correction deselected, Logic will adjust the pitch and the formants together.
- Just below the Transposition parameter’s Destination field, select the Harmonic Correction checkbox.
- In the Harmonic parameter, click the field and type 0, then press Enter.
This tells the Time and Pitch Machine that you wish to retain the original formants of the file, altering the pitch independently.
- Click the Process and Paste button.
An alert dialog appears asking if you are sure you want to go ahead with the operation.
- Click Process.
The operation is performed while Logic Pro displays the progress. This process takes a bit longer than the tempo shifting that you performed earlier, because the computations for Harmonic Correction are more extensive.
- Close the Time and Pitch Machine window, and play the file from within the Sample Editor.
The synth pad retains all of its original character but sounds a fifth higher.
- Close the Sample Editor by clicking the Sample Editor button.
- Play the project to hear the new region within the context of the composition.
Performing Time Stretching and Compression in the Arrange Area
You can also time stretch and compress audio regions directly within the Arrange area. This can be an extremely convenient way to make adjustments to audio regions while visually referencing the project’s tempo grid.
Accessing the Time and Pitch Machine in the Arrange Area
Sometimes a small adjustment is needed to conform slightly slower or faster regions to the project’s tempo. Fortunately, you can simply stretch the region to the next bar using the power of the Time and Pitch Machine, entirely within the Arrange area.
- Click the Media button, opening the Audio Bin tab.
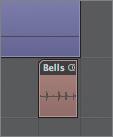
- Drag the Bells.aif file to the Audio 8 track at the beginning of measure 7.
The Bells region is imported to measure 7.
- Play the project to listen to the newly imported region.
Notice that the Bells region sounds out of sync and doesn’t quite reach all the way to the next bar.
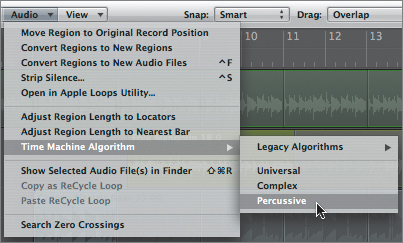
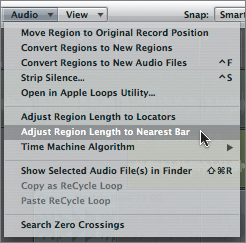
- In the Arrange area’s local menu bar, choose Audio > Time Machine Algorithm > Percussive.
As you probably noticed, the available choices reflect the algorithms presented within the Time and Pitch Machine when accessed in the Sample Editor.
- From the Arrange area’s Audio menu, choose “Adjust Region Length to Nearest Bar.”
An alert dialog appears asking if you are sure you want to go ahead with the operation.
- Click Process.
The region conforms to exactly one bar. You can now loop the region and have it play back in perfect time with the other material.
Time Stretching and Compression by Dragging
The time of an audio region can also be manipulated by graphically dragging out its border to line up with a given bar or beat. This can be especially handy for creating a half-time or double-time feel for a given region.
- Drag the Tambourine.aif file to the Audio 9 track at the beginning of measure 7.
The Tambourine region is imported to measure 7.
- Play the project to listen to the newly imported region.
The Tambourine part sounds a little jerky and would sound considerably better at double the speed.
- Option-drag the lower-right corner of the Tambourine region to the left, making the region one measure long, half of its original length.
- Click OK.
Note
If Cancel is clicked, only the audio region’s borders will be adjusted, without affecting the audio file.
Another dialog appears, asking if you want to proceed and indicating the number of undo steps remaining.
- Click Process.
The region is time compressed to half its previous value.
- Play the project to hear the tambourine play twice as fast.
You can now loop the region and have it play back in perfect time with the other material.
- Choose File > Save As to save the project, naming it 03_Time and Pitch_End.
- Close the project by choosing File > Close.

Working with Rubato Passages
In Logic, you will generally be working with music based on a constant tempo or recorded to a metronome click. In this common situation, Logic’s tempo and time-signature settings create a time grid in which you plot events. This enables data to be displayed musically, in relation to bars and beats.
However, sometimes you will want to record without a click, gaining the freedom to vary the tempo and play with rhythmic flexibility (to play with rubato, in music parlance). In this situation, the trick is not only to maintain a performer’s interpretation, with its deviations in tempo, but also to display the musical data in correct time (bars and beats). You can use beat mapping to align Logic’s time grid with these tempo variations.
Once the time grid matches the performance, you can use Logic’s compositional and arranging features (quantization, time-based effects, notation, Apple Loops, and so on) to work with data as if it had been recorded to a metronome click.
For this exercise, you will use Logic’s Beat Mapping track to create tempo changes for each event that deviates from a constant tempo.
Using the Beat Mapping Track
The Beat Mapping track, one of Logic’s global tracks, works hand in hand with related tracks such as the Signature and Tempo tracks. Think of it as working like an adaptive ruler, letting you graphically tie events to particular bars and beats (all derived from the Signature track). When events are defined according to their bar positions in the Beat Mapping track, tempo changes are created in the Tempo track to align the grid.
Both MIDI and audio tracks can form a basis on which to generate a beat map. Let’s start by opening the project file used in this exercise, which contains both MIDI and audio versions of a rubato piano piece.
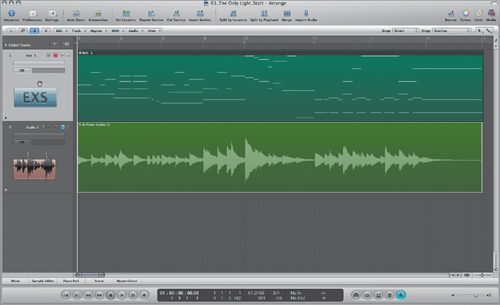
- Choose Music > Logic 8_BTB_Files > Lessons > 03_The Only Light_Start.logic.
The project contains a single MIDI track being output through the EXS24 mkII instrument (a piano sample), along with a muted audio track of the same material.
- Play the project to familiarize yourself with the material.
- In the Transport bar, click the Metronome button to turn on Logic’s click.
- Play the project again, this time listening to the tempo deviations of the piece against the click.
Things start off without too much deviation, but the click is really out of sync by measure 4.
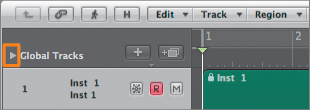
- At the upper-left corner of the Arrange area, click the Global Tracks disclosure triangle.
The global tracks appear, displaying only the tracks used for this exercise: Signature, Tempo, and Beat Mapping.
Tip
You can display any or all of the global tracks by choosing View > Configure Global Tracks and choosing whatever you wish to view. This setting will be saved with the screenset and can be hidden or exposed at any time using a key command or menu selection.
As you can see in the Signature track, the piece starts in 3/4 but also contains bars of 5/4 and 4/4. The time signatures are reflected in the Beat Mapping track, with bars and beats displayed graphically by lines representing the time grid (not unlike the Bar ruler).
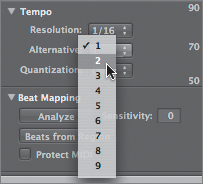
If this grid is to be used as a reference, Logic’s division value (a freely definable part of a beat) must reflect the smallest rhythmic value within the piece of music. The music you are using is based on a triplet feel, so it is necessary to select a division of 12 instead of 16 (the default).
- In the Transport bar, double-click the Division field in the Time Signature display and type 12.
The ruler and grid now display triplet divisions instead of sixteenth notes.
Beat Mapping a MIDI Region
To start aligning the grid to the music, you need to select the material you want to work with.
- If it is not already selected, select the MIDI region on the Inst 1 track.
Colored lines appear in the Beat Mapping track, indicating each MIDI event (with velocities) in the selected region. You will use both these lines and the bar/beat lines above, “tying” them together to realign the grid.
- Zoom in horizontally until about four bars are visible in the Arrange area.
This enables you to see greater detail when working in the Beat Mapping track.
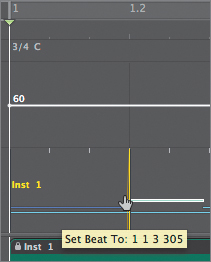
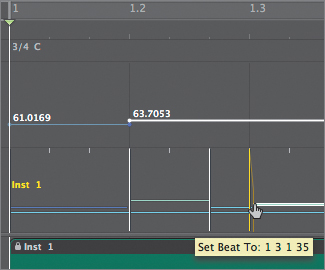
- In the top portion of the Beat Mapping track, drag the line representing measure 1, beat 2 (1 2 1 1) downward, connecting it to the light green event (1 1 3 305) in the bottom portion of the track.
The line turns yellow as you are connecting it and a help tag (Set Beat To) displays the event’s position before alignment.
When you release the mouse button, the points are aligned, and a new tempo event is created (61.0169) in the Tempo track.
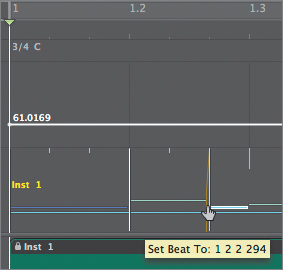
- Using the same technique, connect the line representing measure 1, beat 2, division 3 (1 2 3 1) to the light green line located below and slightly to the left (1 2 2 294).
Another tempo event is created in the Tempo track (63.7053).
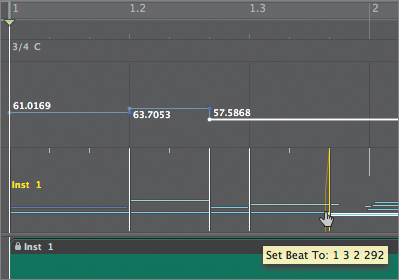
- Connect the line representing measure 1, beat 3 (1 3 1 1) to the light blue line located below and slightly to the right (1 3 1 34).
Another tempo event is created in the Tempo track (57.5868).
- Connect the line representing measure 1, beat 3, division 3 (1 3 3 1) to the light blue line located below and slightly to the left (1 3 2 294).
For every note event connected, a new tempo is indicated, creating an accurate depiction of the region’s timing. Therefore, the more events that are beat mapped, the closer Logic’s time grid will conform to the music.
For the rest of this exercise, you will finish beat mapping the entire piano part, creating an accurate time map of the piece.
Here are two areas to watch out for:
- Continue connecting related lines in the Beat Mapping track, moving from left to right for the entire region.
- When you are finished, check your work by listening to the EXS24 mkII piano part along with the metronome click.
For comparison, a beat-mapped Tempo track has been created for you as a reference. You can access this in the Tempo Alternative menu in the Tempo track.
- From the Tempo Alternative pop-up menu, choose 2.
The Tempo track now displays the premade tempo events created from beat mapping.
- Play the project with the click to compare the premade Tempo track with your results, toggling back and forth between Tempo tracks using the Tempo Alternative menu choices (1 and 2).
Checking Your Results in the Piano Roll Editor
You can check how well you performed beat mapping by viewing the events graphically within the Piano Roll Editor. Here you can clearly see the individual events lined up on the time grid and compare the results achieved with beat mapping to the original, non-beat-mapped track.
- With the MIDI region selected, click the Piano Roll button to display the MIDI events in detail.
- In the Tempo Alternative menu, switch among 1 (your beat map), 2 (the premade beat map), and 5 (not beat-mapped) options, comparing how the note events align to the grid.
You can see major discrepancies between the beat-mapped (1 and 2) and non-beat-mapped (5) versions, especially from measure 4 onward.

Beat Mapping an Audio Region
Using an audio region as the source for beat mapping involves a technique similar to using a MIDI region. Instead of using MIDI note events, however, the Beat Mapping track uses audio transients for alignment points. To do this, Logic needs to analyze the source to detect the transients (somewhat like the Apple Loops Utility).
Let’s mute the MIDI track and unmute the audio track before we start working with the audio track version.
- Close the Piano Roll Editor to display the regions in the Arrange area.
- Mute the Inst 1 track by clicking the Mute button on the track.
The EXS24 mkII piano track is muted.
- Unmute the Audio 1 track by clicking the Mute button on the track.
- From the Tempo Alternative pop-up menu, choose 3.
- Click in the track header of the Beat Mapping track (but do not click the buttons or menus) to select everything in the track, and press Delete.
All beat events are erased, allowing you to continue with a fresh slate.
- Select the Piano Audio region in the Audio 1 track.
The audio waveform is displayed in the Beat Mapping track.
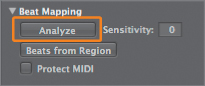
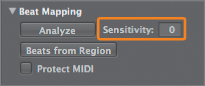
- Click the Analyze button in the Beat Mapping track.
A progress bar appears for the transient-detection process. After the analysis of the selected audio is performed, the detected transients are displayed in the Beat Mapping track as vertical white lines.
- Zoom out horizontally so that you can see the entire track.
Take a close look at the results displayed in the Beat Mapping track. Most of the softer notes were not detected as transients. Fortunately, the detection sensitivity can be adjusted to pick up these softer transients.
- Drag in the Sensitivity field, scrolling upward, increasing the value.
New transients are detected, providing a better picture of the relevant timing events in the audio file.
Tip
It is advisable to start with a lower Sensitivity setting and switch to a higher setting only if important rhythmic events are not detected.
Now that you have timing events in the Beat Mapping track, you are ready to begin the process of aligning the time grid.
- Connect related lines in the Beat Mapping track as you did in the previous exercise, moving from left to right for the entire region.
- When you’re finished, play the track with the metronome click to check your results.
Lesson Review
1. True or false: The timing, pitch, and formants of an audio file can be manipulated independently of the others.
2. Which important aspect of an audio file determines how the Apple Loops Utility manipulates timing?
3. Which two attributes of a Logic project determine how Apple Loops are conformed?
4. Which Logic feature is used to exercise detailed control over an audio file’s timing and pitch, irrespective of the project’s tempo and key?
5. Which feature of the Time and Pitch Machine lets you adjust the natural resonances (formants) of a given sound?
6. Which global track lets you graphically align Logic’s time grid to a rubato part?
7. True or false: Both audio and MIDI regions can be beat mapped.
8. Which menu allows you to toggle between multiple tempo “maps”?
Answers
1. True. The timing, pitch, and formants of an audio file can be changed independently or in combination.
2. Transients. They must be defined accurately through automatic and manual means to achieve the best results when creating Apple Loops.
3. The project’s key and tempo determine how Apple Loops are conformed.
4. The Time and Pitch Machine provides detailed control and functions independent of the project’s tempo or key.
5. Harmonic Correction is used during pitch shifting to preserve the natural resonances of a given sound.
6. The Beat Mapping track allows the accurate rescaling of the time grid to a rubato part.
7. True. Both audio and MIDI regions can be used as the basis for beat mapping.
8. The Tempo Alternatives menu enables you to toggle among multiple tempo tracks per project.