
Lesson 9. Controlling Signal Flow
In the software world of Logic, a signal is routed from one channel to another via the send and input/output fields in each channel. Signals are often sent to multiple destinations simultaneously and can even interface with external devices by leaving the audio interface and coming into it again.
In this lesson, you will use the Mixer to route an audio signal to Logic’s audio channels and accomplish specific mixing tasks. You will also integrate external effects processors into your signal flow, interfacing the physical world with the virtual one.
Using Aux Channels as Submixes
In addition to acting as effects returns (as in the previous lesson), aux channels can act as submix channels, enabling you to feed the output of multiple audio channels to a single fader. Using an aux channel for a submix allows you to work with multiple routed channels as a single set while retaining the relative differences of individual channels.
A common use for a submix is to apply a single effects-processing chain to multiple tracks (such as those for backing vocals or drums). This eliminates the need to assign the same effects chains to several tracks separately and also saves valuable CPU power.
In this exercise, you will assign backing vocals (tracks 2–10) to a shared aux channel, creating a submix that applies the same signal processing to all the tracks at once.
- Choose File > Open.
- In the Open window’s file selector box, go to Music > Logic 8_BTB_Files > Lessons and open 09_I Was Raised_Start.logic.
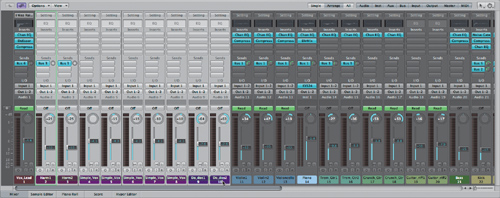
The project opens to the Mixer/Arrange area screenset you used in the previous lesson.
- Drag over the track names of the backing vocal tracks (tracks 2–10) in the Mixer.
The channel strips are selected as you drag over them.
- Click any selected track’s Output slot, and choose Bus > Bus 7.
All the Output slots in the selected channel strips change to Bus 7.
- On any of the selected channels, double-click the Output slot.
The Mixer automatically locates to a newly created aux channel (Aux 7).
Logic automatically creates a new aux channel when you select an unused bus as an output. This is similar to what happened when you created a new send effect in the previous lesson.
To differentiate between the submix channel and the other aux channels, it’s a good idea to give the submix channel a more descriptive name and assign it a new color. Doing so also makes the submix channel easier to locate in the Mixer layout and in the menus that access aux channels (such as the Send and Output menus).
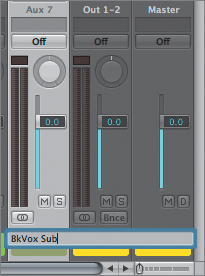
- Double-click the name of the newly created aux channel strip (Aux 7) and enter BkVox Sub. Press Return.
The Aux 7 channel is renamed BkVox Sub.
- Select View > Colors from the Mixer menu bar.
The color palette appears.
- Choose a color by clicking any color square within the palette. When you’ve chosen it, close the Colors window.
By setting the selected tracks to output directly to an aux channel, you can process the full signal of the combined channels using the aux channel’s Insert slots (applying EQ, de-essing, compression, and so on). Let’s try this by instantiating a Channel EQ onto the newly created submix.
- On the BkVox Sub channel, click the top Insert slot and choose EQ > Channel EQ > Stereo from the pop-up menu.
A Channel EQ is instantiated and ready for use.
- In the Settings menu, choose 05 Voice > Backing Vocals.
At this point, you could easily continue to apply additional processing to the backing vocals (such as de-essing and compression), which would affect all the signals at once.
- Close the Channel EQ window.
- On the BkVox Sub channel, click the Solo button.
- Press Control–Command–Right Arrow/Left Arrow (the Go to Next/Previous Marker command) to locate the playhead to the Refrain section.
- In the Transport bar, click the Cycle button.
- Play the project, listening to the backing vocals as sent through the EQ on the aux channel.
- While it’s playing, drag the BkVox Sub channel’s volume fader up and down.
All backing vocal tracks change their volume, adjusted by a single fader.
- Return the volume to 0.0 (dB) by Option-clicking the fader.
- Stop the project playback.
Setting up the aux channel as a submix allows you to control the volume of all participating tracks while maintaining the relative volume levels set by each track’s fader.
Applying Send Effects to Submixes
The submix channel you just created also works well for assigning a group of channels to a common send effect, such as reverb. Conveniently, aux channels also contain sends, which allow you to assign the submix containing the backing vocals to any send effect configured on the other aux channels.
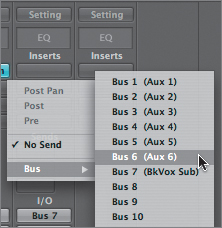
- On the BkVox Sub channel, click the top Send slot and choose Aux 6 from the pop-up menu.
Aux 6 is the vocal reverb that you set up in the previous lesson.
- Play the project.
- On the BkVox Sub channel, drag up the Send knob, listening to the backing vocals as you adjust the amount of signal sent to the vocal reverb to taste.
- Stop the project playback.
- On the BkVox Sub channel, click the Solo button to take it out of Solo mode.
- Play the project, dragging the fader on the BkVox Sub channel to adjust the volume level of the backing vocals.
- Stop the project playback when you are happy with the volume level of the backing vocals in relation to the overall mix.
Using Mixer Groups
A group is used to link similar controls (panning, volume, and so on) in different channels. This creates a direct relationship among all the channels in the group assignment. As a result, when you adjust the parameters on one channel, the same parameters are adjusted in all of the group’s channels.
Assigning channels to groups is similar to using aux channels as submixes. Both techniques enable you to simultaneously adjust the output of multiple channels while maintaining the relative levels of the individual tracks.
However, the two techniques differ profoundly in function, as aux channel submixes directly control the signal flow, while groups affect channels and tracks.
Assigning Channels to Groups
In this exercise, you will assign similar backing vocals to a group, linking together specific properties that you can control in the Mixer.
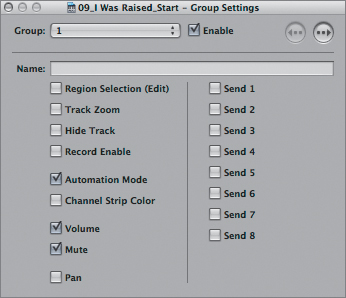
- On the Harm1 channel (track 2), click the Group slot (see below) and choose Group 1 from the pop-up menu.
A yellow 1 appears in the Group slot, and the Group Settings window opens.
In this window, you can set the channel properties to be linked.
- Select the Send 1 checkbox.
This links the topmost Send knob for the group.
- In the Name field, enter HrmVox, and press Return.
- Close the Group Settings window.
1: HrmVox now appears in the Group slot on the track. This signifies that the channel is assigned to Group 1.
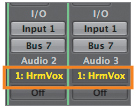
- On the Harm2 channel (track 3), click the Group slot, and choose Group 1 from the pop-up menu.
The Harm1 and Harm2 channels both display 1: HrmVox in the Group slot.
Tip
You can assign the most recently selected group to any channel by Option-clicking its Group slot.
Now that you have assigned the two channels to a group, you can adjust both tracks simultaneously.
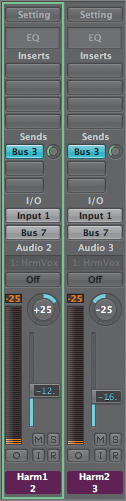
In this mix, the harmony vocals (Harm1 and Harm2) need additional reverb processing to create a more reflective sound. Both tracks are outputting to the BkVox Sub (Aux 7) and then to Aux 6 for processing; but they also have sends set for Aux 3 (a longer, more reflective reverb).
Since the two channels are similar in character and material, it is desirable to have the same send level for both sent to this longer reverb. Because Send 1 was selected in the HrmVox Group Settings window, changing either channel’s Send 1 value will also cause the other to change.
- Use Control–Command–Right and Left Arrow keys to set the locators around the Chorus 2 section.
Due to the unusual signal routing in the current tracks (combined parallel processing and series routing), automatic mute suppression will not work to isolate both reverbs and source signals. However, you can still accomplish this by using the Track Solo buttons in the Arrange area’s track list.
- In the Arrange area, click the Solo buttons for the Harm1 (track 2) and Harm2 (track 3) tracks.
- Play the project.
- While listening to the playback, drag up the Send knob on either of the channels, applying additional reverb to your liking.
Both Send knobs move as you adjust one or the other.
- When you are finished setting the reverb level for the channels, stop the playback.

Temporarily Disabling a Group
It is often necessary to adjust individual channels of an assigned group without affecting the entire group. At these times, you can temporarily disable the group by means of a group clutch. The group clutch works like an automobile’s clutch, temporarily taking the group “out of gear” while letting you perform the necessary adjustments.
In the current project, the Harm2 channel is a little too loud to blend with the part sung on the Harm1 channel. To change the fader without affecting the other channel, you need to engage the group clutch, make an adjustment, and then reengage the group by turning off the group clutch.
The group clutch can be activated via a menu selection in the Mixer’s local menu bar (Options > Group Clutch) or a key command (Command-G). As you will probably be performing this most often during playback, the keyboard shortcut makes for a more ergonomic mix process.
- Play the project, listening closely to the HrmVox group.
- Press Command-G, the group clutch key command.
The Group display turns from yellow (active) to gray (inactive), indicating that the group clutch is engaged.
- Drag the Harm2 fader down to −16 (dB).
- Press Command-G again.
The group display turns from gray (inactive) to yellow (active), indicating that the group clutch is disengaged.
- With the song still playing, turn off soloing on the Harm1 and Harm2 tracks by clicking their Track Solo buttons in the Arrange area.
The entire arrangement can now be heard.
- In one of the HrmVox group channels, drag up the fader to adjust the level of the group in relation to the mix (to about −7.6 dB and −12 dB, respectively).
Both faders move in tandem, maintaining the relative gain between them.
- Stop the project when you are happy with the volume level of the harmony vocals in relation to the overall mix.
Incorporating External Effects Processors
Although software effects processors can offer distinct advantages over external processors, having high-quality hardware processors in the signal chain can uniquely improve the sound. External effects processors are easily incorporated into Logic’s software Mixer with a “helper” plug-in that manages the flow to the processor from the audio interface’s inputs and outputs.
With the I/O plug-in, you can treat the external processor almost as if it were itself a plug-in, inserting it into a channel or applying it as a send effect in Logic’s Mixer. To illustrate this technique, you will insert an imaginary hardware reverb unit as a send effect.
To enable the integration in this exercise, you need to physically send a signal from your audio interface to your hardware processor and back again. This is done by connecting an open pair of outputs from your audio interface into the stereo inputs of the hardware reverb, and connecting the stereo outputs of the hardware reverb back to an open pair of stereo inputs on the audio interface.
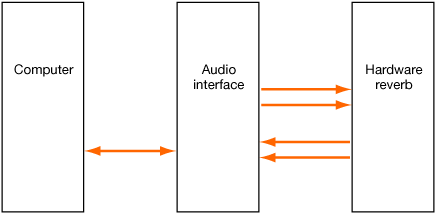
If you have a hardware reverb processor, try this by connecting the equipment according to the above diagram, using inputs 5–6 and outputs 5–6 of your audio interface. If not, follow along with an “imaginary” external processor connected.
Note
If your system configuration does not include as many as six inputs and six outputs, you cannot complete this exercise.
Once this physical cabling has been completed, you need to create a new aux channel to feed the external hardware.
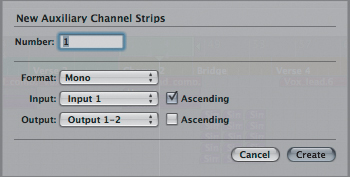
- Select Options > Create New Auxiliary Channel Strips.
The New Auxiliary Channel Strips dialog appears.
In this dialog, you can specify the number, format, and I/O configuration of the aux channels you’ve created.
- From the Format menu, choose Stereo.
- From the Input menu, select Bus > Bus 8.
- Click Create.
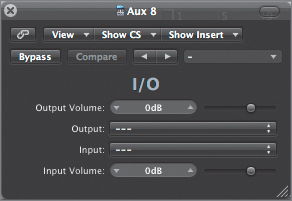
A new aux channel, Aux 8, is created in the Mixer.
- Double-click the track name for Aux 8, and rename it Ext Verb.
Note
Naming aux channels that feed external hardware is useful to differentiate them from Logic’s internal send effects.
If this channel is to function as a send effect, you’ll need to route to the external effects processor. This is done via the I/O plug-in.
- In Aux 8, click the top Insert slot, and choose Utility > I/O > Stereo.
The I/O plug-in window opens.
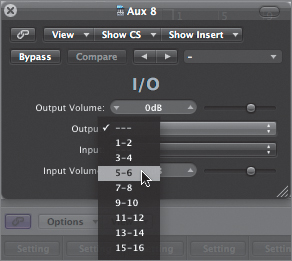
The next step is to assign the appropriate inputs and outputs of the audio interface to access the hardware processor. This is done via the Input and Output menus.
- Click the Output menu and choose 5–6.
- Click the Input menu and choose 5–6.
You can now send signals to the hardware reverb inserted on Aux 8 using the same means you would use for any send effect: the channel Send menu.
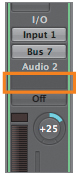
- In the Guitar_riff1 channel (track 19), click the top Send slot, and choose Bus > Bus 8 from the pop-up menu.
- Solo the Guitar_riff1 channel by clicking its Solo button.
- Press Control–Command–Left Arrow to locate to the Intro section.
The cycle area now encompasses the Intro section.
- Play the project.
- While the project is playing, on the Guitar_riff1 channel, drag up the Send knob to adjust the amount of signal sent to the hardware reverb on Bus 8.
- Raise the return level by dragging the Aux 8 channel fader up until you can hear the effect.
Note
All external hardware processors are different. You might need to adjust the send and return levels in Logic to achieve optimum gain staging. You can also apply additional signal gain going to and from the external effects processor by dragging the Output Volume and Input Volume sliders on the I/O plug-in. When using this setup, do not change Logic’s master channel strip fader or master fader in the Transport bar, as this changes the volume level of all output channels and, therefore, your send levels to the external hardware.
- Stop the project playback.

Tip
The I/O plug-in can also be used as an insert effect, sending signals to and from external effects processors such as hardware compressors, EQs, stomp boxes, and so on.
Lesson Review
1. What is the most efficient way to apply effects processing to multiple channels at once?
2. How do you link the controls of multiple channels while mixing?
3. How do you temporarily disengage a group?
4. How do you insert an external effects processor into the signal chain?
Answers
1. Use aux channels as submixes to apply effects processing to multiple channels.
2. Use groups to link the controls of multiple channels while mixing.
3. Engage the group clutch (press Command-G or, in the Mixer’s menu bar, choose Options > Group Clutch).
4. Insert external effects processors into the signal chain using the I/O plug-in.