
Lesson 10. Automating the Mix
A good mix is a performance of sorts. Like an instrument in an ensemble, each element of a mix speaks its part clearly and expressively, complementing the other elements. This is a dynamic process, frequently involving the continuous adjustment of individual signals as a project progresses.
In this lesson, you’ll use automation to craft a mix, manually drawing in automation data as well as entering data in real time with a MIDI controller. You will also learn various methods for editing automation data, including techniques to get the most from the data that is already entered.
Working with Offline Automation
To create a dynamic-sounding mix, you have to be able to control audio signals over time. Adjusting volume, panning, or even plug-in parameters through the course of a project is an important part of breathing life into a mix.
While the mouse is suitable for setting controls, you will quickly discover that it is not the ideal tool for performing common mixing moves (such as dragging sliders and faders). The ability to click only one thing at a time is a major hurdle you must overcome to effectively refine your mix.
Logic’s comprehensive track-based automation system offers help, allowing you to change over time the settings of virtually all channel-related software controls. These movements can be recorded offline with a mouse in non–real time or in real time with a dedicated hardware MIDI control surface or a MIDI controller. Whichever entry method you use, the automation data can easily be edited and manipulated after the initial input, giving you control over all the sonic elements in a composition.
You start by opening the project file used in this lesson.
- Choose File > Open.
- In the Open window’s file selector box, go to Music > Logic 8_BTB_Files > Lessons and open 10_I Was Raised_Start.logic.
- Play the project if you need to familiarize yourself with the material you will be mixing.
Understanding the Automation Interface
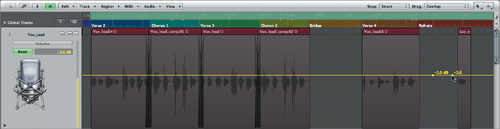
In Lesson 8 you applied some effective dynamic processing to the lead vocal, but it still needs basic level adjustment to sit comfortably in the arrangement. While the vocal’s volume level is adequate for the Verses, the vocal quickly becomes lost in the denser Chorus and Refrain sections and requires a boost in gain.
In this set of exercises, you will use offline automation to manually input automation data that controls the lead vocal’s volume level. In order to work with offline automation, you need to display track automation data in the Arrange area.
- If it is not selected, select the Vox_Lead track (track 1) in the track list.
- In the Arrange area’s local menu bar, choose View > Track Automation.
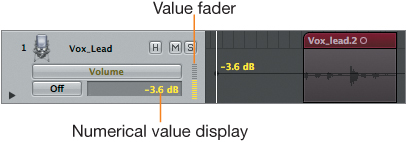
The header of the selected track displays the automation menus.
Note
By default, Volume is displayed as the active automation parameter when you view track automation for the first time.
The track displays a thin black line and a yellow number representing the volume setting for the channel (−3.6 dB). The numerical value of the active automation parameter is also displayed below the Automation Parameter menu and is represented by the fader immediately to the right.
When track automation is active, an automation area highlighted in dark gray is displayed over the track. You will input your offline automation data by clicking in this semitransparent area.
The track automation view can be saved in the screenset. Since you will be working exclusively with automation in the next few exercises, it is a good idea to lock this to Screenset 1.
- Choose Screenset > Unlock, then Screenset > Lock (choose Unlock to disable the lock, and choose Lock to lock it with the new changes).

Creating Automation Nodes
To provide accurate input when working with offline automation, you need to view the area you will be working with at a fairly high level of magnification.
- Create a cycle area from measure 18 to measure 73.
- Press Control-Shift-Z (the “Zoom to fit Locators” key command) to magnify the area designated by the cycle area.
- Press Control–Down Arrow to vertically expand the view as far as it will go.
The Pointer tool has multiple functions for inputting automation data offline. Without a key modifier, the Pointer tool creates points, called nodes, when you click in an automation track. Used with the Shift key, it enables you to select the nodes for adjustment or editing in the automation track.
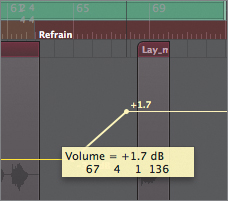
You can start creating offline automation by increasing the lead vocal’s volume level in the Refrain section.
- Using the Pointer tool, click the automation line around measure 65.
The black line turns yellow, showing that automation is now active, and a small node is created with the current volume setting (−3.6 dB).
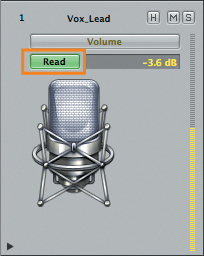
When you graphically make an entry in the automation track, the automation mode automatically changes to Read, enabling the track to follow the volume level adjustments you create.
- Click the automation line between the node you just created and the next region.
Another node is created, displaying the same value.
- Drag up the node you just created to a value of +1.7 dB.
Note
The first node indicates where you want the change in value to start, and the second indicates where you want it to end.
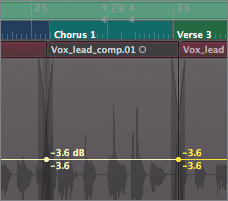
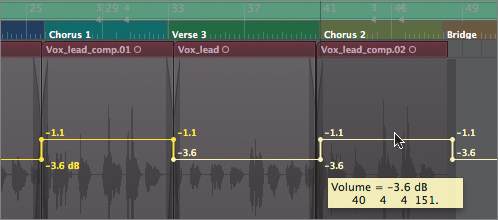
The Chorus 1 section also needs a volume boost that doesn’t affect the level of the Verses. You will ramp up the volume at the beginning of the section, which requires two nodes, and ramp it down at the end, which requires another two nodes. Rather than create the nodes one at a time, you can use a handy feature that lets you automatically create a pair of nodes at each end of a selected region.
- Click the top area of the Vox_lead_comp.01 region to select it.
- Choose Options > Track Automation > Create 4 Nodes at Region Border.
Four nodes are created: two overlapping nodes at each end of the selected area.
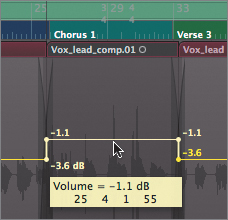
Notice that the automation line and the nodes within the selected region (and before it) are white. This is because the automation area is selected (along with the nodes) and is ready to be edited. To increase the volume level, you simply drag the selected line up, adjusting the automation.
- Drag up the selected automation line between the nodes, increasing the gain to −1.1 dB.

Copying the Automation Data
You need to raise the volume in the Chorus 2 section as well. You can easily do this by copying the previously created automation nodes. To make a selection of multiple nodes within the automation track, you must Shift-drag around the targeted area.
- Holding down the Shift key, draw a selection rectangle around the four nodes used in the Chorus 1 section.
Note
Make sure you draw the selection rectangle within the automation area, as you could inadvertently select a region along with the automation nodes.
The four nodes are selected, along with the area between them.
- Option-drag the selected area, positioning the copied set of nodes to the same relative location around the Chorus 2 section (starting around 40 4 4 151).
The automation nodes you created for Chorus 1 are copied to Chorus 2.
Tip
If you wish to copy automation data while maintaining the relative positions of the nodes in the bars and beats grid, try choosing Snap Automation in the Arrange area’s Snap menu. When Snap Automation is turned on, all created nodes and edits are snapped to the grid. This is especially useful for creative automation (such as automation of a software instrument filter) that repeats on specific beats or at other intervals.
- Play the project, listening to the automated changes in volume level in the Vox_Lead track and observing the fader movement in the Arrange channel strip.
- Stop the playback.
Using Curves
Now turn your attention to the Crunch_Gtr1 and Crunch_Gtr2 tracks in the Bridge section. These two tracks are double-tracked takes of the same part.
- Press the number 1 to open Screenset 1.
The magnification level returns to the original level.
- Press Control–Command–Right Arrow/Left Arrow (the Go to Next/Previous Marker key commands) to locate to the Bridge section.
The cycle area adapts to encompass the Bridge section.
- In the track list, select the Crunch_Gtr1 track.
The region within the Bridge section becomes selected.
- Using the Zoom tool, draw a selection rectangle around the two regions in the Crunch_Gtr1 and Crunch_Gtr2 tracks that occur during the Bridge section.
The window zooms in vertically and horizontally, displaying the two Crunch_Gtr tracks.
- Play the project, listening to the two Crunch_Gtr tracks in the mix.
The levels for both tracks are too hot and would benefit from a slight dynamic build during the last strummed chords. You can fix the problem by creating an automated level increase for the first of the two tracks.
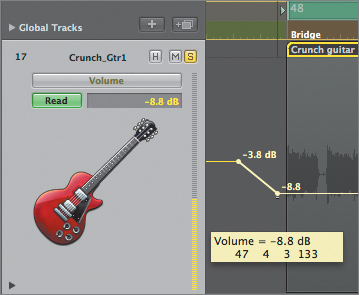
- Click the Solo button for the Crunch_Gtr1 track.
- On the Crunch_Gtr1 track, click the automation line at around 47 3 1 1.
A node is created with a value of −3.8 dB (the current fader position).
- Create another node after the one you created and before the Crunch guitar 1 region.
- Drag the node you just created down to a value of −8.8 dB.
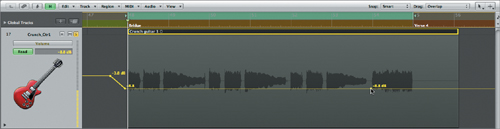
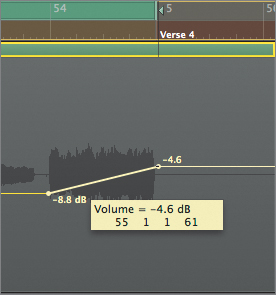
- Create a node right before the last chord (around 54 1 1 1).
- Create another node at the end of the strummed chord (around 55 1 1 1).
- Drag the node you just created up to a value of −4.6 dB.
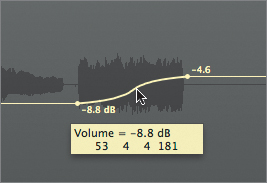
So far, you’ve created a quick 5 dB dip in volume level, followed by a more gradual level increase during the last strummed chord. You can further refine the gradual level increase by applying a curve to the line.
Logic offers four kinds of automation curves: convex, concave, and two types of S curves. You can apply these by holding down the Control and Option keys while dragging the line between two nodes. The direction you move your mouse while pressing the keys determines the kind and amount of curve that will be applied between the nodes.
- Control-Option-drag the line between measures 54 and 55, trying out each of the four curve shapes (drag up, down, left, right) one at a time.
The line changes to a convex shape when dragged up, a concave shape when dragged down, and different S shapes when dragged left and right.
- Control-Option-drag the line to the right, creating a gentle S-shaped curve.
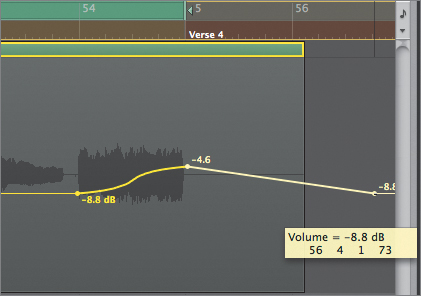
- Create a node by clicking the automation line at 56 3 1 1.
- Drag the node you just created down to a value of −8.8 dB.
This brings the level back down in preparation for the next exercise.
- Play the project, listening to the automated changes in volume level for the Crunch_Gtr1 track and observing the fader movement in the Arrange channel strip.
- Stop the playback.
Note
Using Shift and Control-Option in combination with the Pointer tool provides a speedy way to access the many automation editing functions in Logic. However, if you prefer, Logic has dedicated tools for editing automation and adjusting curves (the Automation Select and Automation Curve tools), which are available in the Arrange area’s Tool menus.

Copying Automation Data Between Tracks
Now that you’ve automated volume levels for the first of the Crunch_Gtr tracks, you can apply the same settings to the other take (Crunch_Gtr2) by copying and pasting the entire automation track.
- Press the 1 key to open Screenset 1, returning to the view of the entire arrangement.
- Hold down Shift and drag to select all the nodes in the Crunch_Gtr1 track.
Note
It is important to include the node located at the beginning of the project for this technique to work.
- Press Command-C to copy the automation.
- Select the Crunch_Gtr2 track.
- Press Command-V to paste the automation.
The automation that you previously created now appears on the Crunch_Gtr2 track. Since you did not enter these nodes manually, Read mode was not automatically enabled for this track. You need to make sure to enable Read mode to ensure that the copied track automation will be performed.
- For the Crunch_Gtr2 track, click the Automation Mode menu, and choose Read.
- On the Crunch_Gtr1 track, click the Solo button to turn soloing off.
- Play the project, listening to the automated volume level changes in the guitar tracks during the Bridge section.
- Stop the playback.
Scaling Automated Values
Often you’ll want to boost or lower levels for an entire track proportionally while maintaining the automation shape and node relationships. In the current project, the Crunch_Gtr tracks have the correct dynamic shape but need to be boosted a few decibels in the mix.
Instead of selecting each automation node and dragging the nodes to adjust the levels (similar to the way you previously adjusted the gain), you can scale the existing values up and down using the value fader with the Command key. In this exercise, you can try your hand at scaling the relative values of the volume automation data.
- Select the Crunch_Gtr1 track by clicking within the track header.
- In the Crunch Gtr1 track header, Command-drag the value fader up and down, observing the changes to the automation.
Notice how the difference in levels between the nodes becomes greater as you scale up, and how the node levels move closer together when scaling down. When you adjust the levels for the entire automation track at once, all the values are changed proportionately by a percentage.
- In the Crunch_Gtr1 track, Command-drag the value fader until the first node of the track reads −2.4 dB.
- Do the same for the Crunch_Gtr2 track, Command-dragging the value fader to set the level to −2.4 dB.
- Play the project, listening to the Crunch_Gtr tracks.
- Stop the playback.
Automating an Effect Bypass
One advantage of offline automation is its precise timing. When placing a node in the automation track, you can determine its exact location along the Bar ruler by dragging it as you would any event.
Listen for specific points in the Crunch_Gtr tracks that could use some precise automation.
- Drag the lower-right corner of the cycle area, extending it to measure 57.
- Play the project, listening carefully to the Crunch_Gtr tracks during the end of the Bridge section and at the beginning of the following verse.
You can distinctly hear the reverb tail continue from the last strummed chord of the Bridge into Verse 4. While this makes perfect sense from an engineering perspective, it does not fit the aesthetic of the project. All instruments stop precisely at the end of the Bridge section, leaving the voice and piano exposed. By using automation, you can bypass the reverb at this point, eliminating the hanging tail that overlaps the verse.
Adding Channels to the Track List for Automation
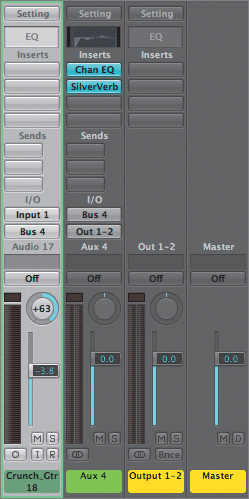
To automate the reverb bypass, you must first determine which reverb effect is being fed by the Crunch_Gtr tracks. This can be done by tracing the signal flow in the Mixer.
- Press the 2 key to open Screenset 2.
- With either of the Crunch_Gtr tracks (tracks 17 and 18) selected, click the Single button in the Mixer’s menu bar.
Both Crunch_Gtr tracks output to Aux 4, a submix channel that has a Channel EQ and a SilverVerb plug-in inserted. The reverb is what needs to be automated.
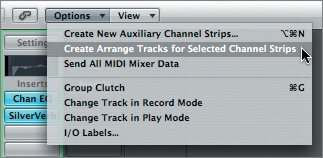
This submix channel exists only in the Mixer as part of the signal flow. It is not represented in the Arrange area, where offline automation is performed. To perform the offline automation of a plug-in on an aux channel, you must add it to the Arrange area’s track list.
- Select the Aux 4 channel.
- In the Mixer’s local menu bar, choose Options > Create Arrange Tracks for Selected Channel Strips.
- Press 1 to open Screenset 1.
A new track, Aux 4, is created in the Arrange area and positioned below the Piano track.
- Within the track header, drag the Aux 4 track down, positioning it below the Crunch_Gtr2 track.
This is where you will automate the reverb bypass that will apply to both Crunch_Gtr tracks.
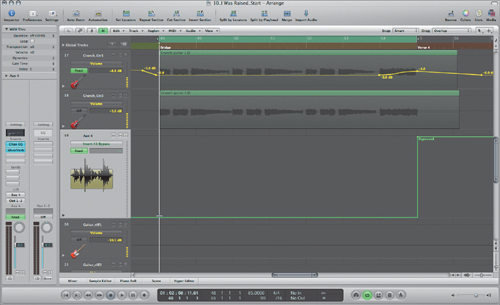
- Using the Zoom tool, draw a selection rectangle around the two Crunch guitar regions in the Bridge section as well as in the track below (Aux 4).
The magnification level expands, allowing you to view the selected area for both the Crunch_Gtr tracks and the Aux 4 track.
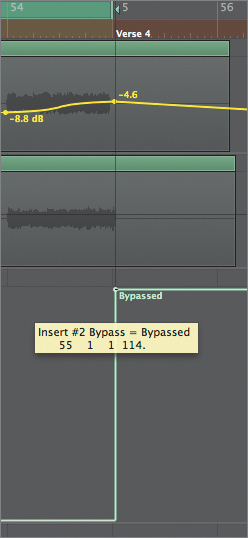
- In the Aux 4 track, click the Automation Parameter menu, and choose Main > Insert #2 Bypass.
Insert #2 Bypass corresponds to the SilverVerb plug-in in the second Insert slot in the Aux 4 channel.
- In the Aux 4 track, click the top of the automation track close to measure 55.
A new node is created, displaying Bypassed.
- If necessary, drag the new node so that it occurs just after the last bit of the waveform in the Crunch_Gtr tracks (around 55 1 1 114).
- Play the project to hear the automated bypass silence the reverb.
- Stop the playback.


Performing Real-Time Automation
In real-time automation, you can replicate your physical gestures, whether they involve dragging a mouse or manipulating a hardware control surface that sends messages to Logic. Logic’s automation is sample accurate, so it captures the precise movements of channel controls—movements that can be recalled during playback.
There are three modes for writing real-time automation: Write, Touch, and Latch. They are available on any channel or Arrange area track. These modes are active whether or not Logic is in Record mode, and they can write automation whenever Logic’s Transport is running.
Write mode is rarely used because it deletes all previously recorded automation data under the playhead position as it moves forward. (There are times when this is useful, however.) Thus, you should most often use Touch or Latch mode when writing automation data, as the existing data, if any, is read until a channel control is “touched.” This allows you to update the existing data as well as overwrite it when needed.
The difference between Touch and Latch modes is best understood by using them. To get a feel for the difference, you will try both modes while writing some real-time automation data in the blank space before the first region in the Piano track.
- Press 1 to open Screenset 1.
The magnification level returns to its original view.
- Press Control–Command–Right Arrow/Left Arrow (the Go to Next/Previous Marker key commands) to locate to the Intro section.
The cycle area adapts to encompass the Intro section.
- Press Control-Shift-Z (the “Zoom to fit Locators” key command) to zoom in to the Intro section.
- Select the Piano track (track 14).
- Click the Solo button to hear the Piano track isolated within the mix.
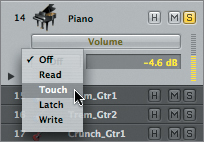
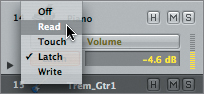
- Click the Automation Mode menu, and choose Touch.
You will be using the mouse for data entry, dragging the Arrange channel strip volume fader to create the automation while Logic is playing. Don’t worry if you aren’t able to do everything in the first seven bars: Cycle mode will be on, repeating the section as many times as you need to complete the steps.
- Play the project.
- While the project is playing, drag the volume fader in the Arrange channel strip all the way up, and release the mouse button.
The fader returns to the state at which you started.
- While still playing the project, change the automation mode to Latch.
- Drag the fader all the way down, and release the mouse button.
The level stays where you left the fader and is “latched” into place.
- Stop the playback.
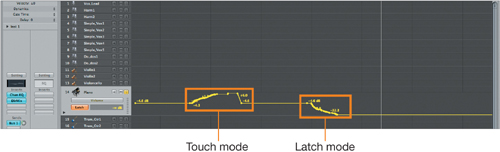
The main difference between these two modes is what happens after the mouse button is released. When you’re in Touch mode, the automation returns to the value at which you started. When you’re in Latch mode, the value remains where you left the control.
Try recording an entire pass for the Piano track using Latch mode. The piano part could use a decrease in volume level of around 2 dB for the Verse 2 through Bridge sections.
- Control-Option-click the background of the Arrange area to return to the original zoom level.
- Click the cycle area to turn Cycle mode off.
- Click Stop to locate to the beginning of the project.
- On the Piano track, click the Solo button to turn off soloing.
- Set the Arrange channel strip fader for the Piano track to around −4.6 (dB).
This will be the level at which you will start recording automation.
Note
Because Touch and Latch modes write only when a control is active, you can overwrite any existing data by holding down the fader as the project plays over the automation data. To overwrite the automation you performed earlier, you will need to hold down the fader for the Piano track, and release the mouse button only after passing over the area.
- Start by click-holding the fader, then play the entire project, riding the Piano track’s volume level by dragging the volume fader in the Arrange channel strip down to −6.7dB for the Verse 2 through Bridge sections.
- Stop the playback when finished.
You should have recorded an entire pass of real-time automation for the Piano track.
If you are happy with this pass, it is a good idea to switch the automation mode to Read so that you won’t inadvertently overwrite your changes.
- Switch the automation mode to Read.
Tip
You can delete the currently displayed automation data by choosing Options > Track Automation > Delete currently visible Automation Data of Current Track (or press Control-Command-Delete). You can also quickly delete all automation written to a track, regardless of what automation parameter is displayed, by choosing Options > Track Automation > Delete All Automation Data of Current Track (Shift-Control-Command-Delete).
Using Automation Quick Access
To truly benefit from using real-time automation, you need to control the channel with something other than the mouse. A hardware control surface that is designed to integrate with Logic’s Mixer would provide the best control for real-time automation, but any MIDI controller will do.
Automation Quick Access allows you to assign any knob, fader, or wheel on your MIDI controller to the currently visible automation parameter on a track. Although this lets you use your MIDI hardware to write real-time automation, it is limited to automating only one parameter at a time.
While a fader control (available on many MIDI keyboards) is more appropriate for controlling volume level, in this exercise you assign the modulation wheel on your MIDI keyboard, as this is more widely available on MIDI hardware.
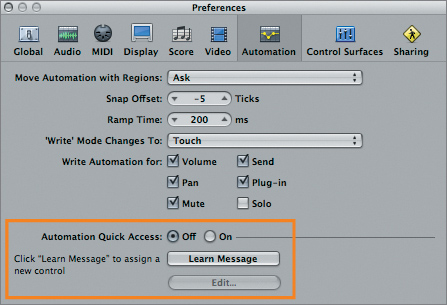
- Choose Logic Pro > Preferences > Automation.
The automation preferences are displayed, with the Automation Quick Access settings located at the bottom of the window.
- Click Learn Message.
- Move the modulation wheel on your MIDI keyboard up and down.
A help tag appears, indicating that the assignment has been learned.
- Click Done, which has taken the place of the Learn Message button.
- Close the Preferences window.
- Select the Kick track (track 23).
- In the Automation Parameter menu, choose Pan.
The Pan setting is displayed in the automation track.
- Move your MIDI keyboard’s modulation wheel.
The Pan setting changes with your movements.
- In the Arrange channel strip, Option-click the Pan knob to reset the value to 0.
- Click the Automation Parameter menu, this time choosing Volume.
The volume level is displayed in the automation track.
- Move your MIDI keyboard’s modulation wheel again.
The volume level changes with your movements.
Notice how the modulation wheel changes function depending on which automation parameter is active. That is the nature of Automation Quick Access. It allows you to access whatever automation parameter is currently displayed on the selected track.
Tip
Logic supports many leading hardware control surfaces with little or no setup, but you can also assign multiple parameter controls to respond to MIDI messages sent from any generic MIDI hardware controller (keyboard, control surfaces, and so on). To do this, use the mouse to jiggle the onscreen knob, slider, or fader that you want to automate to make sure that it is selected as the last active control. Then, choose Logic Pro > Preferences > Control Surfaces > Learn Assignment. Finally, send the chosen MIDI message from the hardware device by jiggling the desired hardware control until a message appears stating that the assignment has been learned. Repeat with additional controls to create comprehensive control maps that link Logic to external MIDI control devices.
Automating Groups
Now that you’ve assigned your controller using Automation Quick Access, you’ll use the modulation wheel to write real-time automation, riding the level of the drums throughout the project. To aid in doing this, the drum channels have been grouped to link the channel parameters. This enables you to record automation data for all the tracks in a group at the same time by controlling a single channel.
- Press 2 to open Screenset 2.
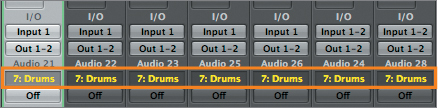
- In the Mixer, scroll to the far right to view the drum tracks.
Note that the drum tracks have been assigned to group 7, named Drums.
- With the Kick track still selected in the Arrange area, move your MIDI keyboard’s modulation wheel.
All the drum channel faders move in relation to the Kick channel.
Note
Although Automation Quick Access is used primarily in the Arrange area, the last selected automation parameter for the selected track (in this case, Volume) is remembered, enabling you to adjust levels in the Mixer.
In addition to linking controls such as those for volume, pan, and sends, you can also link the automation mode for the group. This lets you switch automation modes for all the channels in a group at once.
- On the Kick channel, click the Automation Mode menu, and choose Latch.
All the channels in the Drums group change to Latch mode.
Now you are ready to record an automation pass for the entire Drums group at once. Set the initial levels and locate to the beginning of the project in preparation for recording the real-time automation.
- Using your modulation wheel, set the level of the Kick channel to −15 (dB).
- Click Stop to locate to the beginning of the project.
- Play the project, using the modulation wheel to ride the volume levels for the Drums group during playback, creating a mix to your liking.
- Stop the playback when you’re finished.
- On the Kick channel, click the Automation Mode menu and choose Read.
The automation mode for all the channels in the Drums group changes to Read.
Look in the Arrange area to see the automation data that you just wrote.
- Press 1 to open Screenset 1.
You can see the automation data written to the Kick track, but the other drum tracks are too small for you to see their automation. You need to enlarge the track display.
- Shift-click tracks 24 through 29 (Hat, Snare, Toms_rack, Toms_floor, Drum_overhds, and Loop) in the track list.
The regions on each selected track are highlighted.
- Press Control-Option-Z (the “Zoom to fit Selection” key command) to zoom in to the selected regions (the Drums group tracks).
You should now see the Volume automation data displayed for every track.


Lesson Review
1. How is offline automation created?
2. How is automation edited and copied?
3. How are automation curves used?
4. How is automation data scaled?
Answers
1. You create offline automation by clicking in the automation track.
2. You can edit and copy automation data within the automation track the same way you would work with event data.
3. Automation curves can be used to create more dynamic changes in volume levels.
4. You can scale automation data by Command-dragging the value fader for the automation parameter.
5. While both Touch and Latch automation modes write data when controls are active and read data when no controls are “touched,” they behave differently when the channel controls are released. When you’re in Touch mode, the automation parameter returns to the value at which you started. When you’re in Latch mode, the value remains where you left the control.
6. Automation Quick Access is used to assign automation to a slider or knob on a hardware MIDI controller.