Lesson 7. Advanced MIDI Editing
At its heart, MIDI is a command protocol consisting of status messages that indicate when and how events are performed. While digital and analog audio represent actual sound, MIDI data numerically represents the actions that create or control sound generation. As a result, MIDI editing can be somewhat counterintuitive.
Logic provides similar editing tools and parameters for both MIDI and digital audio input, especially at the region level (for example, for copying and dividing). However, editing the two differs significantly at the finer, note level.
Even considering Logic’s powerful digital audio tools, MIDI still has a distinct advantage when it comes to editing, offering extreme flexibility through real-time and nondestructive processing of all data.
In this lesson, you will use several methods of creating expressive musical parts out of existing material, and you will learn selection and editing techniques that enable you to work efficiently at the note level.
Using Loops, Copies, and Aliases
Logic treats all regions—audio or MIDI—in a similar fashion when it comes to duplication. Let’s apply digital audio copying techniques from previous lessons to make quick copies of MIDI material in an arrangement.
- Choose File > Open.
- In the file selector box, go to Music > Logic 8_BTB_Files > Lessons and open 07_Sintra_Start.logic.
For this lesson, you will use the same project you used in the previous two lessons, including all of the earlier edits.
- If you wish to refamiliarize yourself with the material, play the project.
Using Loops
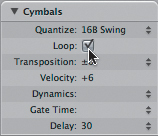
The Cymbals track (track 3) consists of simple parts that have been created for various sections of the project. With Logic’s looping tools, you can fill in some of the parts by extending previously created material.
- Select the first region in the Cymbals track (track 3).
- In the Region Parameter box (located at the top of the Inspector), select the Loop checkbox.
The MIDI region is looped, as represented by the gray boxes following the original region.
Notice that the loops end at the next region (located at measure 5). When you turn on the Loop function in the Region Parameter box, loops are created to repeat the original region until the loop either runs into another region or reaches the end of the project.
While this works well for quick loops (especially when you’re building a backing track), you will frequently need more control over how much of the region is repeated and how often. Loops can be manually drawn to stop at a specific point in time or to play only part of the loop material.
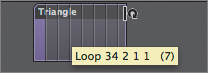
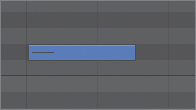
- Position your pointer over the upper-right corner of the Triangle region on track 7.
The pointer turns into a circular arrow, indicating that it will function as the loop-length editing tool. In this case, the arrangement needs the one-bar triangle part to be extended to 34 2 1 1.
- Drag the upper-right corner of the Triangle region to the right approximately 10 bars.
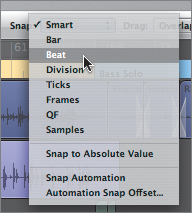
Loops are formed as you drag, duplicating the original region. Notice that the loops snap to the bar line when you’re dragging (as shown in the help tag), making it impossible to stop the loop at the second beat of bar 34 (34 2 1 1). This is because the snap value is set to Smart by default, which dynamically assigns snap values based on the magnification level (the more you zoom in, the finer the snap grid). In the current screenset, the view is zoomed out to such an extent that the Smart snap function assigns the value to the bar.
Smart snap is convenient for zooming in and out of an arrangement, but it can be inhibiting when making adjustments at levels finer than the bar. There is a quick way to override this, however: changing the Snap mode.
- Hold down the cursor over the upper-right corner of the original region until the loops disappear, then release the mouse button.
Only the original region is left.
- In the Arrange area, click to open the Snap menu, and choose Beat.
- Drag loops from the Triangle region as you did previously, using the help tags to end the loop at 34 2 1 1.
The loops snap to the beat, rather than to the bar, allowing you to stop a loop at the desired beat.
- Press Shift-Enter (the “Play from Selection” key command) to play the looped triangle part.
- Stop the playback.
Using Copies
Loops are perfect clones of their source regions. However, they differ from true region copies in their lack of flexibility with regard to placement and content. Loops are always placed adjacent to the original, which makes it impossible to place them at multiple positions in a project. Only copies can be changed independently of the original region; a loop will always reflect the original region’s contents.
Copies are best suited for duplicating material from one part of the timeline to another, especially when material needs to be altered independently of its original source. You can use Logic’s copying functions to create new material from a copied source.
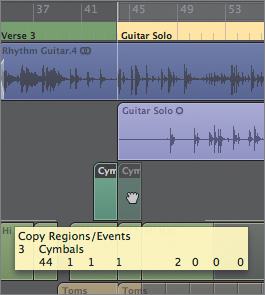
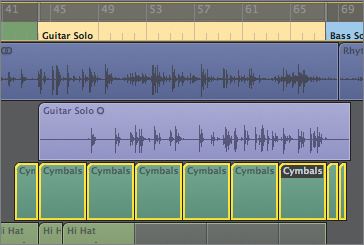
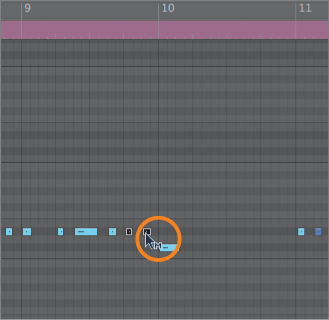
- Option-drag the fourth region on the Cymbals track (located at measure 42) to measure 44.
The region is copied to measure 44.
- On track 3 (Cymbals), click the Solo button to solo the track.
- Press Shift-Enter to play the project from the copied region.
- After the copied region has played, click the Stop button.
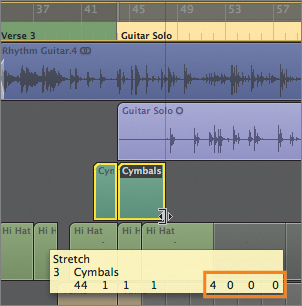
The Cymbals part consists of steady eighth notes. The project calls for that part to change from eighth notes to quarter notes during the Guitar Solo section, effectively doubling the note lengths as well as changing the placement of notes. What would normally require opening a MIDI editor and selectively deleting and moving individual notes can easily be accomplished with stretching, a form of time compression and expression. This technique is identical to one you used earlier on an audio region (in Lesson 3, “Matching Tempo and Pitch”).
- Option-drag the lower-right corner of the new region to the right. Stop when the region length is four bars. The help tag will read 4 0 0 0 for the operation result.
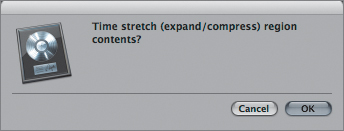
A dialog appears, asking if you want to time stretch the MIDI region.
- Click OK.
- Press Shift-Enter to listen to the time-stretched region.
The ride cymbal plays at quarter-note intervals over four bars instead of eighth-note intervals over two bars. In effect, you stretched the region to double its length and to double each note value and time placement.
Tip
You can accomplish time compression in a similar fashion by making a region shorter and compressing its events.
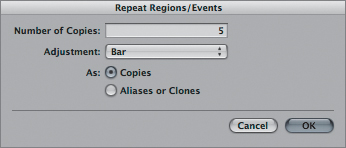
Finish by filling in the Cymbals part for the Guitar Solo section with the new region. You can quickly create multiple copies by using the Repeat Regions command.
- From the Arrange area’s local menu bar, choose Region > Repeat Regions.
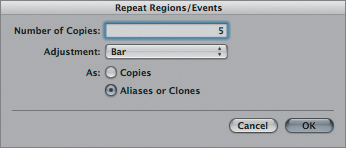
The Repeat Regions/Events dialog opens. Here you can set the number and placement of copies to be produced.
- In the Number of Copies field, enter 5.
- From the Adjustment pop-up menu, choose Bar, if not already selected.
- Select As Copies.
- Click OK.
Five copies of the selected region are created, filling the Cymbals track for the Guitar Solo section.
Using Aliases
In addition to loops and copies of regions, MIDI editing offers another form of replication: aliases.
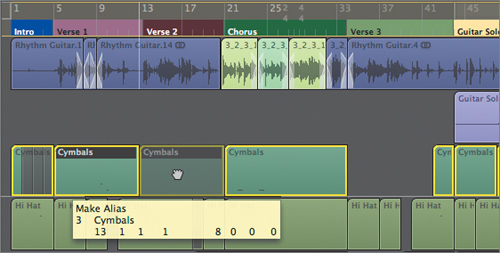
An alias in Logic functions much as it does in the Finder; it is a reference to another region. It does not contain any actual data and refers to the content of the original item from which it was created.
An alias has the unique ability to update itself when changes are made to the original region. This is especially useful for creating parts that are repeated throughout a project; you only need to alter the original region, and the correction will automatically take effect in aliases throughout the composition.
This function will prove useful for duplicating the cymbals material from one verse to another, while still allowing for additional changes.
- In the Cymbals track, Shift-Option-drag the second region (located at Verse 1) to measure 13 (located at Verse 2).
An alias is created at measure 13.
- From the original Verse 1 section, create an additional alias by Shift-Option-dragging the region to measure 34.
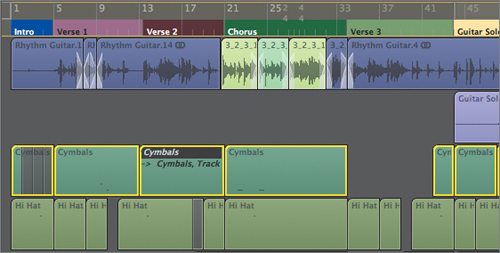
To better understand how aliases function, you can perform a small edit on the original MIDI region.
- Press Control–Command–Right Arrow/Left Arrow to locate the playhead to the Verse 1 marker.
- Select the original Cymbals region from which you produced the aliases.
- Open the Piano Roll Editor by clicking the button at the bottom of the Arrange window.
You might need to scroll down a bit to see all the MIDI events within the regions.
- Press Control-Enter (the “Play from Left Window Edge” command) to play the region contents.
- Stop playback after you’ve heard the contents of the region.
- Using the Mute tool, mute the two notes at the fourth beat of measure 9.
Note
You might need to resize the window or use the zoom commands to view the entire region contents.
The notes are dimmed and will be muted on playback.
- Press Control-Enter to play the part with the muted notes.
- Stop playback.
- Close the Piano Roll Editor by clicking the button at the bottom of the Arrange window.
- Select the alias you created at measure 34 (Verse 3).
- Press Shift-Enter to play the selected alias.
The alias plays with those two notes muted. By creating aliases, you were able to change the original part and keep the corresponding parts updated.
Tip
When you select an alias and open an editor, Logic asks you if you want to open the original region, or turn the alias into a “real copy” to edit independently from the original. If Original is chosen, then the original region is displayed in the editor. This allows you to quickly make alterations that affect the original and all of the related aliases.
- In the Cymbals track, click the Solo button to turn off soloing.

Demixing MIDI Regions
It is not unusual to record MIDI drum parts by triggering multiple sounds in a single pass, creating a single region containing both the kick drum and snare parts. This technique can help create a track that locks into a groove. However, having the kick drum and snare in the same region can make it more difficult to edit those parts, as any modifications done to the region will be applied to both parts.
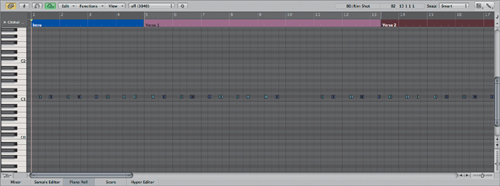
Because a MIDI file transmits a stream of commands with discrete events, it allows for some fancy editing functions. One such function is demixing, which enables you to divide a MIDI region into components based on specific criteria. You can try this on the bass drum–rim shot part, splitting them into separate tracks for independent editing.
- In the Arrange area, select the BD/Rim Shot region in track 6.
- Open the Piano Roll Editor by clicking the button at the bottom of the Arrange window.
The Piano Roll Editor displays the content of the selected region (you might need to scroll down to better view the region contents).
Within the Piano Roll Editor, you can see the bass drum (C1) and rim shot (C
 1) parts represented as notes.
You can separate the two parts using a feature accessed from the Arrange area.
- Make sure the Arrange area has key focus by clicking the top part of the area or by pressing the Tab key.
- Use the Zoom Vertical Out command (Control–Up Arrow) to view all tracks.
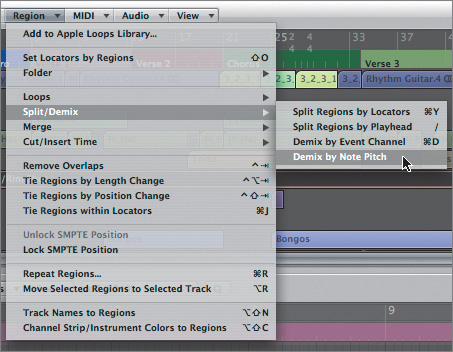
- From the Arrange area’s local menu bar, choose Region > Split/Demix > Demix by Note Pitch.
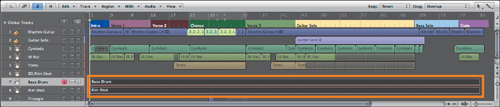
The region on track 6 disappears and is replaced by two new tracks with corresponding regions.
- Click the background of the Arrange area to deselect any regions.
- Click the region in track 7.
The Piano Roll Editor displays the bass drum events (C1).
- Select the region in track 8.
The Piano Roll Editor displays the rim shot events (C
1).When using the Demix by Note Pitch function, a new MIDI track and a new region are created for every note number found. In addition, the newly created tracks are automatically assigned to the same instruments as the ones in the original MIDI region. For easier identification, name the new tracks and regions with their corresponding instruments.
- Press the number 1 to recall Screenset 1.
- Double-click the name on track 7 (BD/Rim Shot), enter Bass Drum, and press Return.
- Double-click the original name on track 8 (BD/Rim Shot), enter Rim Shot, and press Return.
- Drag a selection rectangle around both regions.
- From the Arrange area’s local menu bar, choose Region > Track Names to Regions.
The regions assume the names of their corresponding tracks.
Tip
You can view more than one region’s note data within the same Piano Roll Editor. The Piano Roll Editor (and other editors as well) will automatically display all regions that are selected. This can get a bit confusing when you’re working with lots of events, so it helps to display each region’s events with separate colors. To do this, first make sure that each region is colored differently in the Arrange area, and then, in the Piano Roll Editor’s local menu bar, choose View > Region Colors.

Working with Region Parameters
MIDI regions are data containers that hold various types of MIDI events. The events in a MIDI region can be altered individually using one of Logic’s MIDI editors (Piano Roll Editor, Event List, Hyper Editor, Transform window, and so on), or altered all at once using the Region Parameter box.
The Region Parameter box gives you access to a variety of parameters that affect the data in MIDI regions. These functions invite experimentation, as they are entirely nondestructive, and the MIDI data can be returned to an unaltered state at any time. Think of these parameters as filters that can be applied to single or multiple MIDI regions in varying degrees of intensity, without permanently altering the data.
Earlier, you used the Loop function in this box to create multiple iterations of a selected region. In this exercise, you will use more of the settings in the Region Parameter box to work with the Bass Drum and Rim Shot regions that you split apart in the previous exercise.
- On the Bass Drum track (track 7), click the Solo button.
Note
Mute and solo states can be independent for tracks and channel strips, depending on a setting in your preferences (Preferences > Audio > General > Track Mute/Solo). In order to independently solo the separate drum tracks assigned to the Inst 1 channel (tracks 3–8), you need to have CPU-saving (Slow Response) selected in the Track Mute/Solo menu.
- On track 7, select the Bass Drum region (make sure that no other region is selected).
Look at the Region Parameter box. Notice that the top of the box reads “Bass Drum,” the name of the region you selected. This signifies that any alterations within the box will affect the Bass Drum region only.
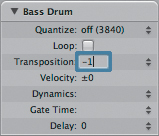
Transposing Regions
Note events in any MIDI region can be transposed all at once by changing the Transpose parameter in the Region Parameter box. This is most effective with pitched material, but it is also handy for changing sample selection in drum parts.
In the EXS24 mkII drum kit used in the current project, the bass drum contains the same audio sample mapped across a range of two adjacent keys (B0 and C1). The EXS24 mkII pitch-shifts these samples accordingly, producing bass drum sounds that vary slightly in pitch. The project currently uses the higher of these two choices (C1) but would benefit from a slightly deeper bass drum. By transposing the Bass Drum region down a semitone, you can change all MIDI notes contained in the region to B0, triggering the lower of the two bass drum samples.
- Play the soloed Bass Drum track.
- Next to the Transpose parameter, double-click the 0, and enter −1 (minus 1) in the text box. Press Return.
- Play the Bass Drum track again, listening to the slightly lower pitch.
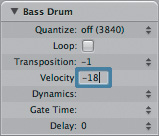
Changing Velocities in a MIDI Region
The Region Parameter box also provides a quick way to alter note velocities within a MIDI region. You can boost or reduce velocities, adding a numerical value to or subtracting a value from each event.
The bass drum part is a little loud in the Chorus section. Rather than dynamically change the volume level in the mixing stage, you can make a velocity adjustment to the MIDI note events in this section. This provides a more musical result, as lower velocities trigger different, softer bass drum samples with less attack. When you reduce the event velocities, the sound not only gets quieter but also changes its timbre, much as a real drum does when struck with less force.
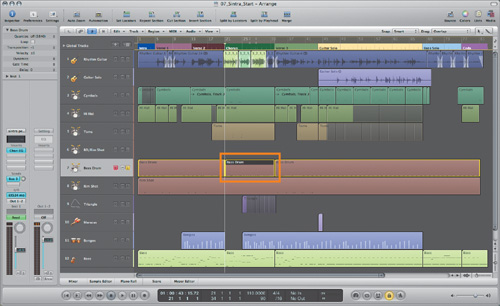
To affect only the events within the Chorus section, it is necessary to divide the Bass Drum region, isolating the events that need to be adjusted.
- Use the Go to Next/Previous Marker key commands (Control–Command–Right Arrow/Left Arrow) to locate to the Chorus section.
- In the Arrange area’s local menu bar, choose Region > Split/Demix > Split Regions by Locators.
The Bass Drum region divides at the borders of the Chorus section.
- Use the Play from Selection key command (Shift-Enter) to listen to the bass drum part. Stop playback when finished.
- In the Region Parameter box, double-click the Velocity parameter, and enter –18 in the text box. Press Return.
- Press Shift-Enter to listen to the results of the velocity adjustment.
Compressing or Expanding the Dynamics of a Region
The Dynamics parameter in the Region Parameter box also acts on MIDI note velocities but—instead of adding or subtracting a fixed value—it scales the difference between the highest and lowest velocity values.
In this way, it functions similarly to the way a compressor or expander acts on the dynamics of an audio signal, increasing or decreasing the dynamic range for the selected MIDI region. When applying a value larger than 100 percent, the differences between “soft” and “loud” notes are increased (as they would be by an expander), and they are decreased with values of less than 100 percent (as they would be by a compressor).
- On the Bass Drum track, click the Solo button to turn off soloing.
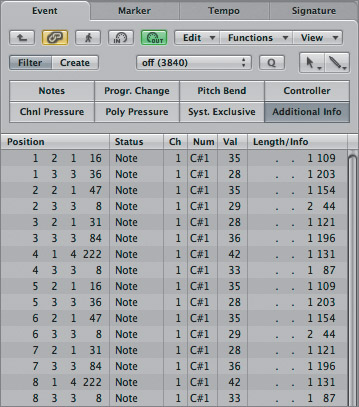
- On the Rim Shot track (track 8), click the Solo button.
- In the Toolbar, click the Lists button.
The Lists area opens with the Event tab selected by default.
- Select the Rim Shot region (track 8).
- Press Shift-Enter to listen to the rim shot part.
The Event List displays the MIDI events in the Rim Shot region, and the Region Parameter box displays “Rim Shot” at the top.
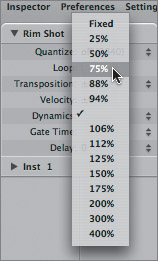
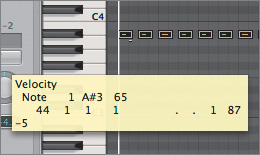
Look at the numbers displayed in the Val(ue) column, which indicate the velocity of each note. Although the range is not wide, the dynamics could use a little velocity compression to achieve a more consistent sound.
- In the Region Parameter box, click to open the Dynamics pop-up menu and choose 75%.
- Play the project, listening to the rim shot part.
The dynamics are evened out, with a reduction in the range between the highest and lowest values.
- Close the Event List by clicking the Lists button in the Toolbar.
- Click the Solo button on the Rim Shot track to turn off soloing.
Using Gate Time to Alter Articulation
The Gate Time parameter directly affects the length of MIDI events, but not in the way that you might expect. Instead of uniformly decreasing or increasing the length of all MIDI events within a region, the Gate Time parameter changes notes by a percentage of their lengths, thereby allowing you to adjust the articulation of a performance from, say, staccato to legato.
The first region on the Bass track needs a little tightening up, as the longer notes sustain a bit too long, bleeding into the shorter ones. By adjusting their lengths with the Gate Time parameter, you can reduce the length of the longer notes and get a more articulate performance from the shorter ones.
- Click the Solo button on the Bass track (track 12).
- Select the first region in the Bass track so it appears in the Region Parameter box.
- Press Shift-Enter to listen to the region.
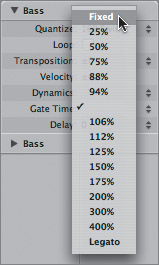
To clearly hear the effect of the Gate Time parameter, you can test an extreme setting and observe the results.
- In the Region Parameter box, click to open the Gate Time pop-up menu and choose Fixed.
- Press Shift-Enter to listen to the region.
The bass part is performed extremely staccato, truncating the ends of each MIDI event. Obviously, this hasn’t improved the piece, so you need to make a more subtle adjustment.
- Click to open the Gate Time pop-up menu, and choose 50%.
- Press Shift-Enter to listen to the region again.
All events are adjusted to 50 percent of their length, creating an articulate performance.
- Stop playback.
- On the Bass track, click the Solo button to turn off soloing.
Using Delay to Adjust the Feel
The Delay parameter is used to move a region forward or backward in time by small increments. By choosing a positive value, you can delay the playback of a region, achieving a laid-back or dragging feel. Negative values push the region earlier, creating a rushing or driving feel in relation to the beat.
The current project’s musical material warrants a laid-back groove, especially in the drum tracks, so you should apply a delay setting to the rim shot to better fit in the pocket created by the other instruments.
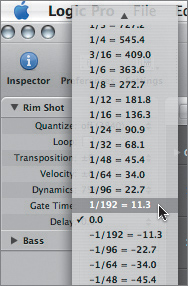
Delay settings can be displayed in ticks (the smallest possible bar subdivision or system quantization), note values, or milliseconds. Most people who have worked with digital delay devices are used to thinking in terms of milliseconds, so switch the default setting of ticks to milliseconds before changing the Delay setting.
- Play the project, listening to how the rim shot works with the rhythm section.
- In the Arrange area’s local menu bar, choose View > Delay in ms.
- With the Rim Shot region selected, click the arrows to the right of the Delay parameter to open the Delay pop-up menu, and choose 1/192 = 11.3.
By selecting this value, you are delaying the playback of the Rim Shot region by a 1/192 note, or 11.3 milliseconds.
- Play the project from the beginning, listening to how the rim shot now Plays in the arrangement.
Note
Settings made in the Region Parameter box, with the exception of Loop and Quantize, aren’t displayed in the editors. The changes take effect during playback. These changes can also be written permanently to the region: In the Arrange area’s local menu bar, choose MIDI > Region Parameters > Normalize Region Parameters.
Quantizing Regions
Just as musical rhythm is expressed in relation to the grid formed by beat and meter, so sequencers map MIDI event timings to a grid determined by a base resolution provided by the software application. To ensure that the placement of an event in time is as accurate as possible, Logic offers a resolution of a 1/3840 note (one tick).
This division allows for a vast range of rhythmical placement, but there will be occasions when you need to adjust the accuracy of events in relation to more musical divisions (eighth notes, sixteenth notes, triplets, and so on). This can be done with quantization, which compares events to a chosen resolution and then corrects their time placement by moving them to the nearest position on a beat/time grid.
Logic offers multiple ways of quantizing events, including adjusting the data in the Region Parameter box. In this exercise, you’ll check out the aural and visual effects on note events when quantizing.
- In the Arrange area, select the Bass Drum track (track 7) in the track list.
All three regions on the track are selected.
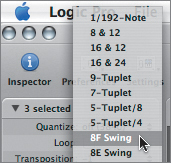
Region parameters can be applied to single regions and also to multiple regions simultaneously. Take a look at the Region Parameter box. Instead of displaying the name of the individual selected region, the box displays “3 selected,” indicating the number of selected regions that will be affected by parameter adjustments. In addition, an asterisk, instead of a value, is placed next to the Velocity parameter, because one of the selected regions already has a value for velocity. If you were to enter another setting here, the region with the preexisting setting would retain it and add the new value.
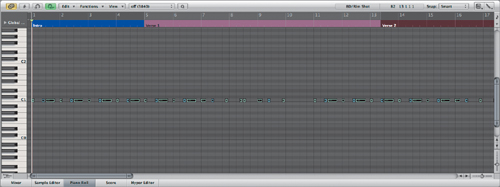
- At the bottom of the Arrange window, click the Piano Roll Editor button.
- While keeping your eye on the bass drum part in the Piano Roll Editor, click to open the Quantize menu and choose 8F Swing.
The events shift in the Piano Roll Editor.
- Click the Metronome Click button in the Transport bar at the bottom of the window.
- Play the project, listening to the quantized bass drum part against the metronome.
The feel is completely transformed from a somewhat straight pattern to a swing feel, in which every other note is delayed.
While applying a swing feel illustrates the power of quantization, it definitely does not work with this project.
- From the Quantize menu, choose 1/16-Note.
- Click the Metronome Click button to turn off the metronome.
- Play the project, listening to the bass drum part with the new quantize setting.
Tip
The settings in the Region Parameter box can also be applied to incoming MIDI signals. This is done by changing settings without selecting a region (the box reads “MIDI Thru” instead of a region name). This feature can be useful for transposing incoming notes up or down an octave, thereby increasing the range of a small MIDI controller. In this case, the events are recorded as played, but the region containing the events inherits the same parameter settings as MIDI Thru.
Using the Extended Region Parameters
So far, you’ve performed straightforward quantization, aligning all notes in a region to a selected value. However, strict quantizing can sometimes make things sound too mechanical. Unless a performance is especially sloppy, you might want to apply quantization only partially, maintaining the original feel but moving notes in closer alignment to the timing grid.
Among the extended region parameters, you will find many ways of applying quantization to a selected region.
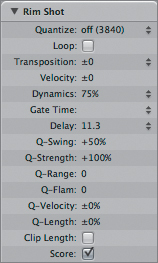
- In the Arrange area, select the Rim Shot region.
- Choose View > Extended Region Parameters.
The Region Parameter box expands to display the extended region parameters.
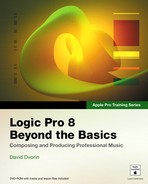
An additional eight parameters are listed in the Region Parameter box, mostly applying to quantization (the Q signifies this). In the box, you can also see the Delay and Dynamics settings that you applied earlier.
Use this box to further refine the Rim Shot region by applying some of its quantization settings. While working with the extended region parameters, keep an eye on the Piano Roll Editor to observe the changes that take place.
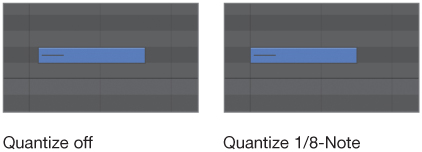
- In the Piano Roll Editor, use the Zoom tool to zoom in to measure 3.
- In the Region Parameters box, choose 1/8-Note from the Quantize pop-up menu.
The notes align to the grid, which can be easily seen in the Piano Roll Editor.
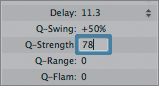
While some slight timing discrepancies are present in the rim shot performance, you will want to retain the original feel and use quantization only to move inaccurate events closer to the grid instead of aligning them perfectly. This can be done by entering a value other than 100% (which is full quantization) for the Q-Strength parameter.
- In the Region Parameters box, double-click next to the Q-Strength parameter, and enter 78 in the text box. Press Return.
The inaccurate note events shift slightly forward, toward the grid line.
By limiting quantization strength, you are moving events toward the grid without perfectly aligning them. Think of this as applying weight to the Quantization parameter, wherein any value above 0 percent pushes the affected notes toward the value specified.
- Play the project, listening to the quantized region in context of the full arrangement.

Working with MIDI Note Events
Let’s continue developing the material by editing at a finer level: individual MIDI events. While you can do this in any of Logic’s MIDI editors, the Piano Roll Editor works particularly well for quickly selecting and viewing region contents.
In this section, you will extend and refine a percussion part, creating a musical performance from a static one.
- Press Control–Command–Right Arrow/Left Arrow to locate to the Guitar Solo section.
- In the Transport bar, click the Cycle button to turn on Cycle mode.
A cycle area appears around the Guitar Solo section.
- In the Arrange area, select the Maracas region on track 10.
- If needed, assign key focus to the Piano Roll Editor by clicking the top part of the area or by pressing the Tab key.
- In the Piano Roll Editor, zoom out to display about five or six measures.

Repeating Note Events
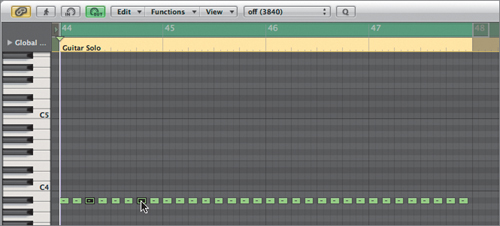
As you can see in the Piano Roll Editor, only two maraca notes were input for the Guitar Solo section. With techniques similar to those you used previously to duplicate regions, you can quickly repeat groups of notes, extending a part.
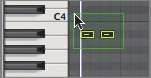
- In the Piano Roll Editor, select the two events by around them with the Pointer tool.
The notes play as they are selected. You can quickly create a part by duplicating these two notes using a command similar to the Repeat Regions command that you learned earlier in the lesson. As you might have noticed, you cannot access this function from a menu in the Piano Roll Editor (or any other MIDI editor, for that matter). This is because the menu command that you used in the Arrange area applies to regions only, not to individual events. Fortunately the key command (Repeat Regions/Events) covers both regions and events selected within a MIDI editor.
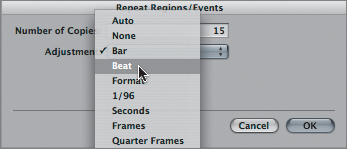
- Press Command-R (the Repeat Objects key command).
- In the Number of Copies field, enter 15.
- Set the Adjustment pop-up menu to Beat.
By choosing Beat in the Adjustment menu, you are specifying that the newly created copies should be placed at the beat, instead of applying the bar justification you used earlier when copying regions.
- Click OK.
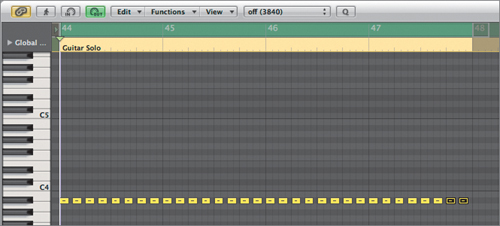
The events are repeated, aligned to the beat, filling up four measures.
- In the Arrange area’s track list, click the Solo button to enable solo for the Maracas track (track 10).
- Play the project, listening to the maracas part.
Selecting Events for Editing
To efficiently work with note events, you need to use a variety of selection techniques to edit only the data you wish to change.
As you most likely heard when playing the repeated notes, the part sounds quite static. This is understandable, since it consists of one repeated note with the same velocity value. To create a more realistic part, it is necessary to modify the velocities, add accents, and alter dynamics to breathe life into it. Let’s explore some of the selection techniques offered in Logic Pro to edit notes independently and in groups.
- In the Piano Roll Editor, choose the Velocity tool.
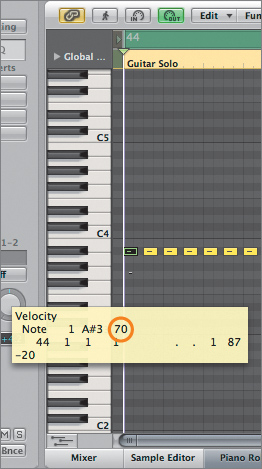
- Click the first note in the passage and drag downward, reducing the velocity to 70 (use the help tag to guide you).
As the note event reduces its velocity (changing from yellow to green), you can hear the sample change to one with a softer attack. This softer sound will work best for the desired maracas part.
Tip
If you don’t want notes to sound when selected in any of Logic’s MIDI editors, click to disable the MIDI Out button at the upper-left side of the editor.
You can make a similar velocity adjustment to the remaining notes in the region without affecting the first note. Instead of drawing a selection rectangle around all of the events except the first, you can use one of Logic’s specialized commands to select all the notes that are not currently selected.
These useful selection commands are available within any MIDI editor by choosing Edit in the local menu bar, and they can be accessed at any time while editing.
- From the Piano Roll Editor’s local menu bar, choose Edit > Toggle Selection.
All the notes that were not selected are now selected, and the original selected event is deselected.
Using the Toggle Selection command, you are able to access the unselected events without having to change tools.
- With the Velocity tool, drag any of the selected notes downward to a value of 70.
You can continue working with the dynamics of the maracas part by adding accents to beats 2 and 4 throughout the passage.
- Click the background of the Piano Roll Editor to deselect the notes.
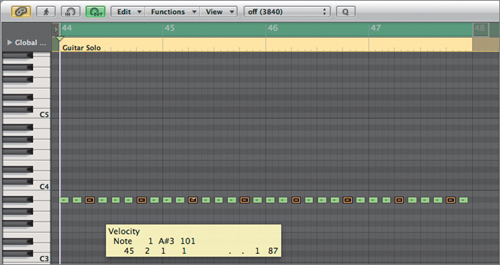
- Hold down the Shift key, and using the Pointer tool, select the notes occurring on 44 2 1 1 and 44 4 1 1.
You’ve selected the beats you want to work with, but only for the first bar. To perform the edit for the entire region, you still have to select the equivalent beats within each measure. This could be accomplished by Shift-clicking each note in succession, but that would get tedious. Instead, you can use one of Logic’s selection functions to select the desired beats all at once.
- From the Piano Roll Editor’s local menu bar, choose Edit > Select Equal Subpositions.
The note events occurring at beats 2 and 4 are selected for each bar of the passage.
- Using the Velocity tool, drag one of the selected notes upward until the velocity reaches a value of 101.
All the selected notes change velocity simultaneously, creating an accent on beats 2 and 4 for the entire region.
- Play the project, listening to the Maracas track with the velocity changes.
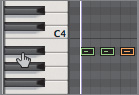
It’s still a little loud overall, so reduce the velocities of all the notes. In this case, all events are triggered by the same pitch (A
3). You can quickly select all events of the same pitch by clicking the equivalent note on the keyboard. - In the onscreen keyboard at the far left of the Piano Roll Editor, click the key that is immediately next to the notes within the editor (A3).
The note sounds, and all A
3 notes are selected within the Piano Roll Editor. This provides a quick way to select all note events of a given pitch without having to change tools. - Using the Velocity tool, drag the first note event downward, reducing the velocity to 65.
This is a relative adjustment; all velocities are reduced by a value of 5, including the accents, which now have a velocity value of 96.

Using Transform Functions
Transform functions are powerful selection and processing tools that allow you to manipulate all types of MIDI information in almost all conceivable ways. Each function employs a set of conditions and operations to specify exactly what data is selected and how it will be manipulated.
The functions can range from the simple to the complex. In this exercise, you will learn how to both use one of the many preset transform functions, as well as create a custom transform set that can be used within your projects.
These functions are accessed in the Transform window, which can be opened from the Window menu or accessed within any editor through the Functions > Transform menu.
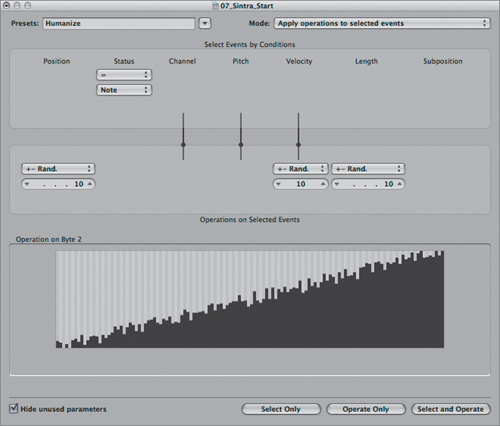
- In the Piano Roll Editor, choose Functions > Transform > Humanize.
The Transform window opens.
The Humanize function applies a slight randomization to events, creating a looser and more natural-sounding performance.
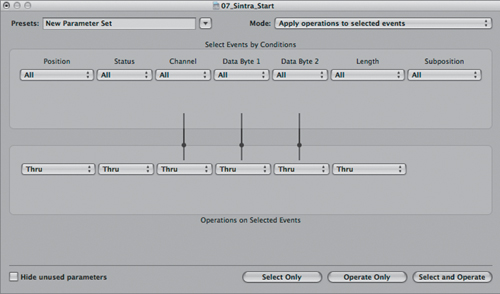
The Transform window is divided into three main sections: Select Events by Conditions, Operations on Selected Events, and Operation on Byte 2. While these headings might sound a little confusing, they can be explained in a straightforward manner.
Basically, to use the Transform functions on MIDI data, you must indicate exactly what you wish to affect within the Select Events by Conditions section. Here, you specify the criteria of the desired target, whether you want a simple selection based on event type (or status) or a complex selection having multiple conditions (for example, events that have a specific length, position, and value).
The Operations sections indicate how you want to modify the selected MIDI events. This can be almost any kind of MIDI transformation you can dream up, even converting one type of event to another for further processing. With the Humanize transformation, for example, selected notes are randomized in position, velocity value, and length. Each transformation has a specific extent assigned to it, which can be anything from a single number or note to a range of operations. Here, the position, velocity and length of the selected note events are randomized within a positive or negative range of 10 ticks.
The Operation on Byte 2 section is a graphical representation of the transformation itself and directly depicts the values for byte 2 of the MIDI event chosen in the Status column. (A MIDI channel voice message consists of a status byte followed by one or two data bytes.) In the case of note events, byte 2 is velocity; for controllers it is the value for the assigned controller.
All of this translates to a function that slightly varies note events, imparting a looser, more human feel.
- At the bottom of the Transform window, click the Select and Operate button.
The note events displayed in the Piano Roll Editor change slightly in position, length, and velocity.
- Close the Transform window.
- Play the project, listening to the “humanized” part.
All that’s left to complete the maracas part is to repeat the region throughout the Guitar Solo section. This can be done quickly by using the Repeat Regions/Events command you used earlier, creating multiple aliases.
- Close the Piano Roll Editor.
- With the Maracas region still selected, bring up the Repeat Regions/Events dialog by using the key command (Command-R).
- In the Number of Copies field, enter 5.
- From the Adjustment pop-up menu, choose Bar.
- Click to select As Aliases or Clones.
- Click OK.
Aliases of the Maracas region are created throughout the Guitar Solo section.
- Click the Solo button to turn off soloing for the Maracas track (track 10).
- Play the project, listening to how the maracas part works with the arrangement.
Creating New Transform Functions
You probably noticed when navigating through the Transform menu that Logic offers numerous preset transform functions. These functions are capable of accomplishing many common MIDI editing tasks in an efficient manner. However, there will most likely be a time that you will need to create your own transform set to address a specific need, whether it be the quick selection of specific MIDI data for editing, or selecting and performing an operation on the MIDI data via a single step.
- In the Arrange area, click the Solo button for the Bongos track (track 11).
- Select the first region in the Bongos track.
- Use the Set Locators by Regions/Events key command (press Control-=, or Control-’ on a laptop) to set the cycle area around the first Bongos region.
- Open the Piano Roll Editor, displaying the contents of the Bongos region.
As you can see in the Piano Roll Editor, a few note velocities are quite low (displaying as purple), resulting in dynamics that are a tad too soft.
- Play the Bongos region, stopping playback after you have had a chance to become familiar with the material.
For this exercise, you will be creating a transform function that will selectively boost only the MIDI velocities of these lightly played notes (that is, the notes with a velocity range of 1 to 20), evening out the dynamics of the performance.
Creating a new transform set is done within any open Transform window, whether opened within a MIDI editor, or from the main Window menu.
- Choose Window > Transform.
The Transform window opens, displaying the last selected preset (in this case, Humanize).
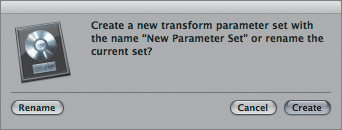
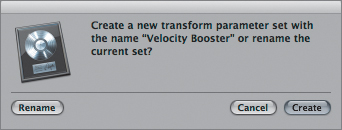
- Click the disclosure triangle next to the Presets menu in the upper-left corner of the Transform window, and choose **Create Initialized User Set**.
A dialog appears asking if you’d like to create a new transform set, or rename the current one.
- Click Create.
A new, blank transform set is created.
Notice that many more parameters are accessible (via pop-up menus) than there were when you opened the Humanize preset. This is because preset transform functions open with unused parameters hidden from view, presenting only the relevant parameters for selection or operation.
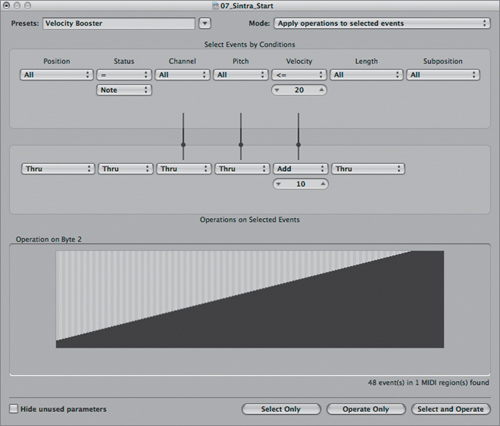
- Select the text in the Preset menu (“New Parameter Set”), and enter Velocity Booster. Press Return.
A dialog appears asking if you’d like to rename the current, empty set or create a new one.
- Click Rename.
When you create a new transform set, it is advisable to start off by defining just what you want to transform. In the Select Events by Conditions area, “All” is displayed by default for every parameter, signifying that no discrimination will be made when selecting MIDI data (all event types, positions, and channels will be selected). In order to narrow the focus of the selection, you need to specify the relevant parameters instead of leaving them in their default state.
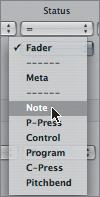
It is best to start defining selection criteria by choosing the MIDI event type, which is done from the Status menu.
- Click the Status pop-up menu and choose = (equal sign).
A new menu is created just below the option you chose, allowing you to specify the event type.
- Click the new pop-up menu, and choose Note.
By specifying Note as the Status parameter, you are excluding all events but MIDI notes in the selection. This is still far too general a selection. The goal of the transform function is to select only the MIDI notes whose velocities range from 1 to 20. In order to do this, you need to define further criteria within the selection parameters.
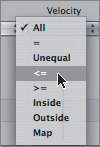
- Click the Velocity pop-up menu and select <= (less than or equal to).
A value field appears below the menu. Entering a number within this value field defines a selection less than or equal to the inputted number.
- Double-click the number in the value field and enter 20. Press Return.
Now that your selection criteria are defined, you can specify what will happen to the selected data when the operation runs. This is done by choosing operations from the parameter menus in the Operations on Selected Events area.
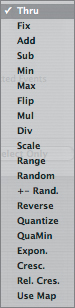
- In the Velocity column in the Operations on Selected Events area, click the pop-up menu to view the list of operations that can be performed (do not choose anything as of yet).
As you can see, there are many possibilities, providing numerous ways to transform MIDI data in simple to complex ways.
- Choose Add from the Velocity pop-up menu.
A value field appears below the Add menu. Any number entered into this value field will be added to the related parameter defined within the Select Events by Conditions area.
- Double-click the Add value field and enter 10. Press Return.
You have now created a new transform set that, when activated, will add 10 to the velocity values of MIDI notes with velocity values of 20 or less.
- Click the Select and Operate button at the lower-right corner of the Transform window.
All MIDI notes with velocity values of 20 or less (the purple ones) are increased in velocity (and are displayed as dark blue).
- Play the project, listening to the newly transformed MIDI data.
- Stop playback.

Applying New Transform Sets
All newly created transform sets are immediately available within any MIDI editor’s Functions > Transform menu. This puts your transform set creations within easy reach whenever you are editing MIDI data.
- Close the Transform window.
- Close the Piano Roll Editor.
- In the Arrange area, select the second region on the Bongos track.
- Open the Event List, this time by using the key command (the E key).
- From the Event List’s local menu bar, choose Functions > Transform > Velocity Booster.
The Transform window opens, displaying the transform set you created earlier.
- Click the Select and Operate button.
All MIDI notes with velocity values of 20 or less are selected within the Event List and increased in velocity by 10.
- Close the Transform window.
- Close the Event List.
- In the track list, click the Solo button on the Bongos track, disabling it.
- Turn Cycle mode off.
- Play the project from the beginning, listening to the newly transformed material within the context of the project.
- Stop playback.
- Save the project as 7_Sintra_Finished to the following location: Music > Logic 8_BTB_Files > Lessons > Completed.
Tip
Newly created transform functions are saved in the project file itself. In order to be able to use your newly created transform functions in other projects, you need to import them first. You can do this by choosing File > Project Settings > Import Settings, and making sure that the Transform Sets checkbox is selected. Then select the project file where the new transform set resides, and click the Open button.
Lesson Review
1. What are the differences between loops, copies, and aliases when you’re duplicating material?
2. What does demixing a MIDI region do?
3. What does the Regions Parameters box do?
4. What does the Toggle Selection command do within a MIDI editor?
5. What does the Select Equal Subpositions command do within a MIDI editor?
Answers
1. Loops are used to quickly duplicate material and can be manually drawn out for exact placement. Copies are used for duplicating material from one part of the project to another and for altering material independently of its original source. Aliases are used for duplicating material that needs to automatically update when the original is edited.
2. Demixing separates combined parts recorded within a single MIDI region into individual regions for further editing.
3. The Region Parameters box allows real-time control over various playback parameters, enabling you to transpose and adjust the feel of events within a MIDI region.
4. The Toggle Selection command selects all regions (within the Arrange area) or events (within a MIDI editor) that are not currently selected and deselects any regions or events that are selected.
5. The Select Equal Subpositions command selects all regions or events with a similar bar or beat relationship to the selection.
6. The Transform functions can be accessed via the main Window menu, or via the Functions > Transform menu within all MIDI editors.
7. The Transform functions contain many helpful operations for processing MIDI data, including boosting selected note velocities and Humanizing.