
Lesson 13. Working with Surround
Surround sound production has rapidly increased in recent years, due mostly to the proliferation of home theater systems. Not only are surround video (DVD-Video) titles proliferating at a rapid pace, but there is also an increase in the production of surround audio (DVD-Audio, Super Audio CD) titles as well.
Logic provides sophisticated tools to produce a professional surround sound mix, whether you are creating content for visual media (video, film, video games, and so on), or producing surround music.
In this lesson, you will explore the entire workflow of a surround music project, from setup to mixing to encoding.
Note
To complete this lesson, you will need an audio interface with at least six outputs wired to a six-channel surround sound playback system. If you do not have such a setup, you can still follow the exercises, but you will hear the results in stereo only.
Configuring Logic for Surround
Working in surround can encompass multiple surround formats, depending on the target playback system (home theater, movie theater, and so on). While Logic can accommodate all popular surround configurations from quadraphonic to 7.1, you will most likely work within the 5.1 (ITU 775) format for your surround productions. This format consists of three speakers across the front (left, center, right) and two speakers in the rear (left surround, right surround). The .1 in the name represents a sixth channel for low-frequency effects (LFE) sent to a subwoofer.
More Info
The Logic Pro 8 User Manual provides excellent explanations and diagrams of the various surround formats. See page 808 for details.
In this lesson, you will mix a jazz quintet session in 5.1 surround format and place the listener in the middle of the performers. Let’s start by opening the project file used in this lesson.
- Choose File > Open.
- In the Open window’s file selector box, go to Music > Logic 8_BTB_Files > Lessons and open 13_A Blues for Trane_Start.logic.
- Play the project to familiarize yourself with the material you will be mixing.
Assigning Audio Interface Outputs
To enable Logic to play a project through each speaker in your surround sound setup, the amplifier for each speaker must be connected to a separate output in your audio interface. When all of your hardware connections have been made, before you can begin mixing, you need to configure Logic to specify which output is connected to which speaker. This is done within Logic’s preferences.
- Choose Logic Pro > Preferences > Audio.
The Audio preferences are displayed.
- Click the Surround tab.
The Surround tab contains options for configuring your surround setup.
- Click the Output tab, if necessary.
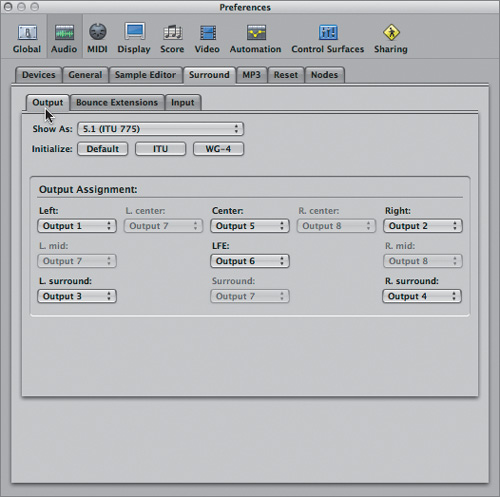
In the Output tab, you can specify which surround channel connects to which output of your audio interface (and, ultimately, to your speakers). While you can match all conceivable setups, the default configuration is highly recommended, and it represents an established standard.
Notice that several channel assignments are dimmed and cannot be set within the Output Assignment area (L. center, R. center, L. mid, R. mid., Surround). These channels are filtered by the Show As menu, which is set to 5.1 (ITU 775) by default. The surround format chosen in the Show As menu makes available only the appropriate output channels.
- Click the Show As pop-up menu to see the available configurations. When you’re done, make sure to leave the setting at its default, 5.1 (ITU 775).
- Look at each of the channel assignments within the Output Assignments area to verify that your system corresponds to this routing.
- Close the Preferences window.
Setting the Project Surround Format
While the Surround preferences are global (and remain the same from project to project), each project can be independently configured to any surround format. The surround format is set in the Audio project settings.
- Choose File > Project Settings > Audio.
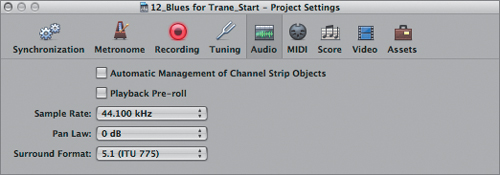
The Audio settings for the project are displayed.
By default, a project’s surround format is set to 5.1 (ITU 775), as seen in the Surround Format menu. Alternative formats can be selected in that menu.
- Click the Surround Format pop-up menu to see the available configurations, making sure to leave the setting at its default, 5.1 (ITU 775).
- Close the Project Settings window.
Mixing in Surround
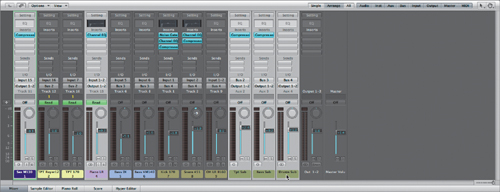
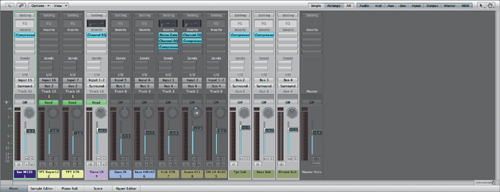
In the Mixer, look at the signal routing of the channels. The mix includes mono and stereo channels set to output through a single stereo output channel (Output 1-2). Some channels are also routed via buses to various submixes (Aux 2, 3, and 4), which, in turn, are also set to output through the single stereo output channel. In short, everything is configured to create a stereo mix.
To create a surround mix, you need to change the channel outputs from stereo to surround. You can do this by changing the assignment from a stereo output to surround in the Output slot.
Note
It is important not to change the output settings for the channels being routed to submixes (trumpet, bass, drums), as that would change the signal flow. Instead, change the output settings for their respective submix channels (Aux 2 through 4) from stereo to surround.
- Shift-click the Sax M130, Piano LR, Tpt Sub, Bass Sub, and Drums Sub channels to select them.
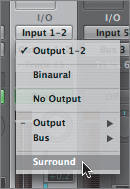
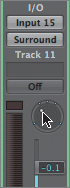
- On any of the selected channel strips, click the Output slot and choose Surround in the pop-up menu.
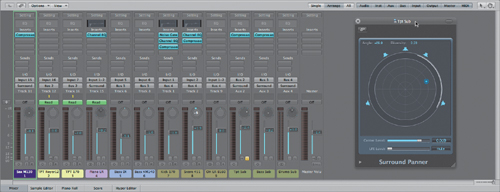
The Pan or Balance control on each selected channel changes to a Surround Panner. To the right of the Mixer, you’ll notice that the Output 1-2 channel has been eliminated and that the Master channel now has a multisegment level meter.
- Click the Mixer background to deselect all channels.
Using the Surround Panner
The Surround Panner is used to position signals within the surround field. Each speaker in the output array is represented by a small blue dot on the circumference of the circle, and the white dot represents the signal position. You can change a channel’s position within the surround field by dragging the white dot within the Surround Panner.
- On the Sax M130 channel, click the Solo button.
- Press Control–Command–Right Arrow/Left Arrow (the Go to Next/Previous Marker key commands) to locate to the Head marker.
- Turn on Cycle mode.
- Start playback, listening to the saxophone.
- In the Surround Panner, drag the white dot to about the 10 o’clock position, slightly in from the edge.
The saxophone emanates from the front left side of the surround field.
As you most definitely discovered, it is difficult to precisely position a sound using the tiny Surround Panner in the channel. Fortunately, you can open the Surround Panner in a magnified window.
- Unsolo the Sax M130 channel and solo the Tpt Sub channel.
- On the Tpt Sub channel, double-click the Surround Panner.
The Surround Panner window opens.
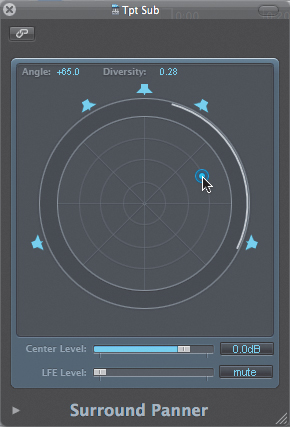
- Drag the blue puck to the 2 o’clock position, just in from the edge.
- Stop playback.
In this enlarged view, it is much easier to accurately position a signal within the surround field. In addition, the Surround Panner window also provides precise visual feedback as to the angle (±180°) and diversity (distance from the surround field’s center) of the positioning. These values are represented both graphically and numerically.
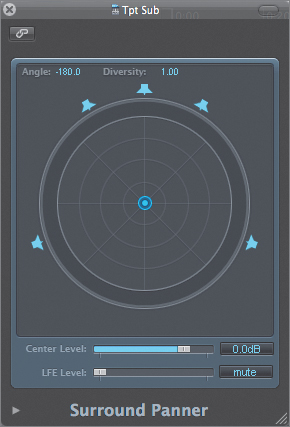
Adjusting Center and LFE Levels
The Surround Panner window includes sliders to independently adjust the amount of signal sent to the center and LFE channels. By default, the Center Level slider is set to unity (feeding signal to the center channel), while the LFE is muted.
In this exercise, you will adjust the center and LFE levels of various channels. To most effectively do this, start off by improving the Mixer’s ergonomics.
- Drag the Surround Panner window to the Mixer, just to the right of the last mixer channel.
- At the top left of the Surround Panner window, click the Link button.
When the Link button is on, you can use a single window to display the Surround Panner of any channel strip, without the clutter of multiple windows.
- Play the project.
- In the Surround Panner window, drag the Center Level slider all the way to the left, muting the output.
As the amount of signal sent to the center channel is eliminated, the placement of the trumpet should become more focused on the front right side of the surround field.
- Unsolo the Tpt Sub channel, and solo the Bass Sub channel.
- On the Bass Sub channel, double-click the Surround Panner.
The Surround Panner window displays the settings for the Bass Sub channel (because linking is turned on).
- While watching the visual readouts, position the blue puck at an Angle of about 150 (degrees) and a Diversity of about 0.40.
- Drag the Center Level slider all the way to the left, muting the output.
- Drag the LFE Level to the right, to a value of −15.5 dB.
As the amount of signal sent to the LFE channel is increased, the bass frequencies should become more pronounced, reinforced by the subwoofer.
- After you’ve had a chance to hear the results of your actions, stop playback.
- Unsolo the Bass Sub channel.


Balancing Stereo to Surround Signals
Depending on the type of input signal (mono, stereo, or surround), Logic uses slightly different types of Surround Panners. So far you’ve been working with mono source signals. In this exercise, you will use the Surround Panner to accurately position stereo signals in the surround field.
Note
A signal’s channel input format is indicated by the number of level meters and by the symbol on the button below them. See page 816 of the Logic Pro 8 User Manual for detailed descriptions and illustrations of each input format.
- Solo the Sax M130, Piano LR, Tpt Sub, and Bass Sub channels.
In this exercise, you will adjust the surround placement of the stereo piano channel within the context of other instruments that are already positioned.
- On the Piano LR channel, double-click the Surround Panner.
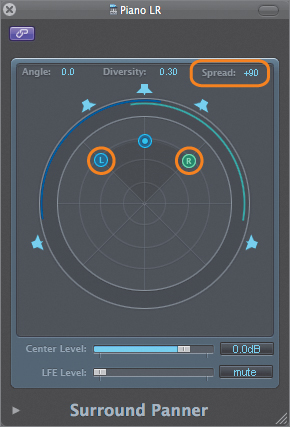
The Surround Panner window displays the Piano LR channel, which is a stereo source.
When using a stereo source, the Surround Panner window contains an additional parameter, Spread, which indicates the width of the stereo signal in the surround field. This is represented graphically by the L and R pucks (representing the left and right side of the stereo image), and numerically at the top of the window.
- Play the project, listening to the piano’s position in the surround field.
As you can hear, the piano sounds a bit wide, crowding the saxophone and trumpet on either side of it.
The spread of the signal can be adjusted by dragging the L and R pucks in the Surround Panner window.
- Try dragging the L puck to the left and right, increasing and decreasing the spread while listening to the results.
You have to be careful when dragging the L or R pucks, as you can inadvertently change the angle and diversity. To avoid doing this, Command-drag the L or R puck. This will lock down the diversity and angle, allowing you to adjust only the spread.
- Position the blue puck to an Angle of 0.0 and Diversity of 0.12.
- Command-drag the L puck toward the center blue puck until the Spread value is +34.
In effect, you narrowed the stereo signal slightly, causing less overlap with the saxophone and trumpet in the surround field.
- Stop playback.
- Option-click an active Solo button on any of the soloed channels.
All the Solo buttons are turned off at once.
Let’s now do the same thing with another stereo source, placing the drums submix within the surround field while listening to the entire mix.
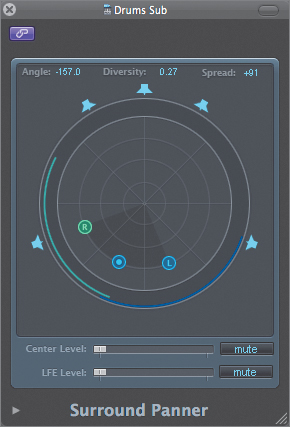
- In the Drums Sub channel, double-click the Surround Panner to display its settings in the Surround Panner window.
- Play the project.
- By moving the pucks or changing the numeric values, position the stereo source within the surround field at an Angle of −157.0, Diversity of 0.27, and Spread of +91.
- Remove any signal fed to the center channel by muting the center level.
This places the drums behind and to the left side in its own space within the surround mix.
- Stop playback.
- Close the Surround Panner window.

Using Surround Effects
To preserve imaging, surround mixing often requires the use of specialized surround processors. These are, in essence, effects that independently process the individual channels of the given surround format. There are two types of surround processors available within Logic: multi-channel and multi-mono. With multi-channel effects, the surround channels are tightly integrated, or coupled, processing the entire surround source at once. Multi-mono effects, on the other hand, are essentially multiple mono plug-ins that are individually applied to each surround channel in the signal path.
In this exercise, you will assign both types of surround format plug-ins to channels, creating surround send and insert effects to aid in producing a professional-sounding mix.
Note
Logic’s surround plug-ins work in all surround formats available to the application (Quadraphonic, LCRS, 5.1, 6.1, 7.1, and so on). The surround format chosen for the project determines the surround format of the plug-ins.
Using Multi-channel Effects
Immersing the listener within an artificially created ambience is the primary goal of surround production. To aid in this task, multi-channel reverb is used to simulate acoustic environments within the surround field. What differentiates the surround reverb processor from its mono and stereo cousins is its ability to simultaneously receive input from and send output to more than two channels.
For this exercise, you will use a multi-channel version of Logic’s convolution reverb, Space Designer, as a send effect. This plug-in not only sends and receives over multiple channels; it also utilizes specialized surround recordings of real acoustic spaces for impulse responses.
- Solo the Sax M130 channel.
- Click the first Send slot on the Sax M130 channel and choose Bus > Bus 1 (Aux 1).
A new aux channel is created, receiving input from Bus 1.
- Below the meters on the Aux 1 channel, click the channel Format button and select Surround from the pop-up menu.
The channel switches from a mono channel to a surround channel. The level meters now display six segments instead of one or two (mono or stereo, respectively). These represent each of the six channels used in a 5.1 configuration.
- On the Aux 1 channel, click the first Insert slot and choose Reverb > Space Designer > 5.1.
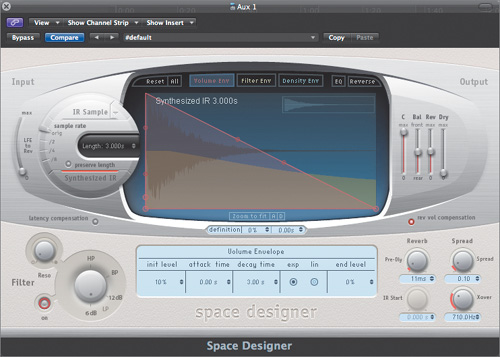
The Space Designer interface opens.
- Click the Settings menu and choose 04 Surround Spaces > 01 Surround Rooms > 02.9 Hansa Studio +.
Space Designer loads the surround impulse response recording and any control configurations saved to the preset.
Note
The new surround impulse responses included with Logic Pro 8 have been recorded with a variety of surround recording techniques, such as circle B-format, omni B-format, and discrete omni. You will even find different format recordings of the same acoustic space.
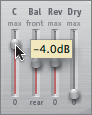
At first glance, the Space Designer interface looks identical to the stereo version that you explored in Lesson 8, “Working with Mixer Channels.” However, closer inspection reveals that the wet-dry controls are replaced by four sliders. Using these you can adjust the amount of wet and dry signal, and you can control the balance between the front and rear speakers. An additional slider is provided to adjust the amount of signal sent to the center channel.
- Drag the center channel output slider (labeled C) down to a value of −4.0 dB.
This reduces the amount of reverb signal sent to the center channel, creating a more or less equal dispersion of reverb across the surround field.
- Close the Space Designer window.
As it is now, the Sax M130 channel is set to send to the surround reverb post fader, but pre Surround Panner. In order to have the surround reverb preserve positional information when generating reflections, you need to assign the send post pan.
- Click-hold the Send slot on the Sax M130 channel and select Post Pan.
- Play the project.
- On the Sax M130 channel, increase the send amount to Bus 1 (Aux 1) to −14.0 dB.
You should not only hear the saxophone localized off to the left front of the surround field but also hear the processed signal in all five speakers. This creates a convincing ambient effect of the saxophone in a three-dimensional space.
- Unsolo the Sax M130 channel.
- Assign the sends on the Piano LR, Tpt Sub, Bass Sub, and Drums Sub channels to Bus 1 (Aux 1), and set each to Post Pan.
- Adjust the send amount of each of the above channels to the surround reverb, listening to how they sit within the ambient surround field.
- Stop playback.

Using Multi-mono Insert Effects
In addition to the surround version of Space Designer, Logic offers multi-mono versions of many types of insert effects, including EQ, compression, and modulation types. These are applied specifically to surround input signals and can be thought of as multiple instantiations of the same effect, one for each surround channel. What makes these multi-mono effects especially powerful is the ability to independently process the LFE channel, which is often called for when you’re creating a surround mix.
The surround professional generally can’t predict how a carefully crafted mix will translate to consumer setups because the subwoofer is often the most inaccurately configured component in a typical home theater system. In addition, the bass-management systems used in consumer receivers vary widely from manufacturer to manufacturer. For this reason, it is recommended that you apply a low-pass filter to the output of the LFE channel while mixing and mastering to catch any stray high frequencies that might otherwise get through. You can accomplish this by inserting a multi-channel version of the Channel EQ on the Master channel, processing only the LFE channel while leaving the others untouched.
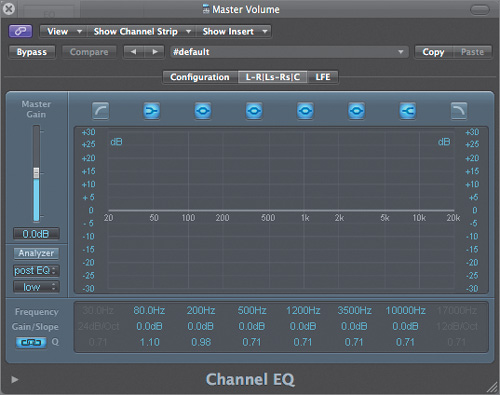
- On the Master channel, click the first Insert slot and choose EQ > Channel EQ > Multi Mono.
The Channel EQ interface appears.
Multi-channel surround versions of plug-ins display an additional set of buttons in the plug-in header compared with their mono or stereo versions. These buttons provide access to surround routing and configuration options.
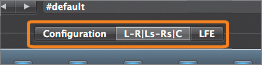
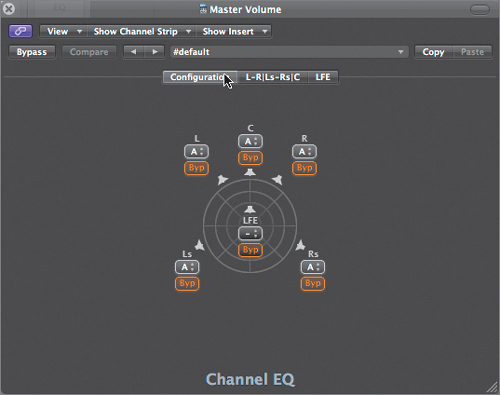
- At the top of the interface, click the Configuration tab.
The plug-in interface changes to display the configuration of the multiple channels.
Within the Configuration tab, you can bypass the effect on a channel-by-channel basis. The small pop-up menu located under each channel represents a form of grouping, not unlike the channel groups you created in an earlier mixing lesson (Lesson 9, “Controlling Signal Flow”). Assigning multiple channels to a group (A, B, C, or none) in this window allows you to simultaneously bypass all the channels in the same group.
- Click the Bypass button on any channel except the LFE channel.
All the channels assigned to group A (L, C, R, Ls, Rs) are bypassed, leaving the LFE channel active.
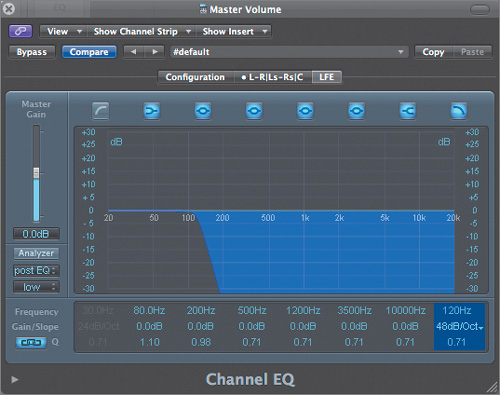
- At the top of the interface, click the LFE tab.
The plug-in interface changes to display the EQ settings for the LFE channel.
Click the Low-Pass Filter button (at the far right), enabling the filter band.
- Double-click the Frequency setting for the Low-Pass Filter band, and enter 120.
- Drag the Gain/Slope setting for the Low-Pass Filter band down to 48 dB/Oct.
By using a low-pass filter on the LFE channel, you will remove all frequencies that might cause undue muddiness in the subwoofer channel.
Note
There is no hard and fast rule for selecting the frequency for the low-pass filter used on the LFE channel. Usually it is set between 80 Hz and 120 Hz, and it can be different for each monitoring system. To make matters more confusing, some consumer surround systems utilize their own low-pass filters for removing unwanted high frequencies sent to the subwoofer.

Checking the Surround Mix
Logic also offers specialized surround plug-ins that enable you to check your mix. These help identify problem spots by isolating individual channels as well as visually displaying the content within the surround field.
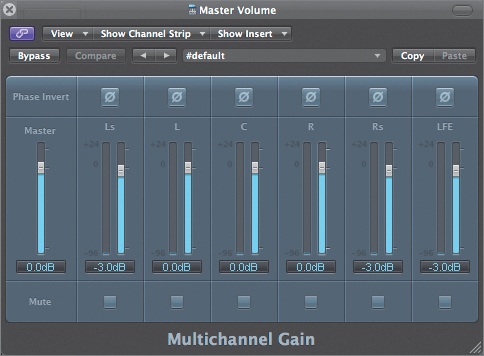
- On the Master channel, click the second Insert slot and choose Utility > Multichannel Gain > 5.1.
The Multichannel Gain plug-in appears.
The Multichannel Gain plug-in allows you control the gain and phase of each channel of a surround track or bus independently. You can also use the plug-in to individually mute each of the surround channels, allowing you to isolate the speaker output.
- Play the project.
- Try muting channels individually or in combination to isolate speaker output.
Note
The order of channels as displayed in the channel level meters is determined by the Channel Order setting in the Display preferences (Logic Pro > Preferences > Display). Logic’s default Internal setting (L, R, Ls, Rs, C, LFE) can be somewhat confusing if you’re using the Multichannel Gain plug-in because the two interfaces display the channels in a different order. However, this can be remedied by choosing the Centered setting (Ls, L, C, R, Rs, LFE) in Logic’s preferences, which reflects the Multichannel Gain order.
- After you have a chance to experiment, stop the playback.
- Make sure that all channels are unmuted within the Multichannel Gain plug-in.
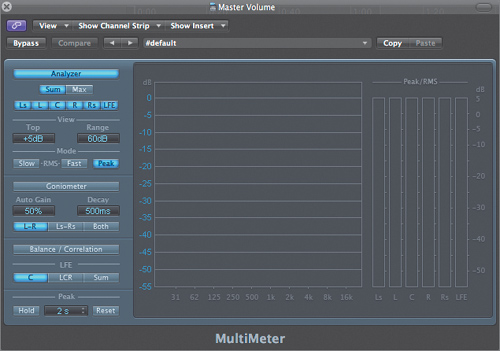
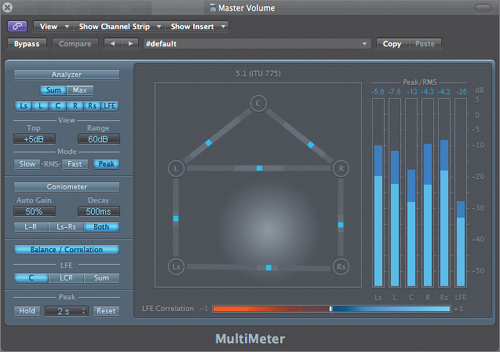
- On the Master channel, click the third Insert slot and choose Metering > MultiMeter > 5.1.
- Play the project, observing the MultiMeter’s frequency analyzer and level meters.
The surround version of the MultiMeter plug-in provides a suite of helpful analysis tools for examining the channels of your surround mix. In addition to a multi-channel frequency spectrum analyzer, level meters, and goniometer, the MultiMeter includes an excellent surround balance analyzer.
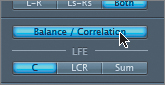
- At the bottom left of the plug-in interface, click the Balance/Correlation button.
The main window displays sound position within the surround field, which responds dynamically to the signal.
- Turn off Cycle mode.
- As the project is playing, listen to your surround mix while watching the balance display.
Now that you’ve checked sound placement for your surround mix, you can check the LFE Correlation meter to see if the LFE is causing any phase cancellation. This meter can be displayed in a variety of ways, comparing the phase of the LFE channel to the center, the front (left, center, and right), or the sum of all channels.
- In the LFE section just below the Balance/Correlation button, click the Sum button.
- If necessary, rewind to the beginning of the project and start playback, watching the LFE Correlation meter at the bottom of the MultiMeter interface.
The correlation meter moves to the left of the middle point toward −1, indicating that the LFE channel is out of phase with the other channels. This can be remedied in the Multichannel Gain plug-in by reversing the phase of the LFE channel.
- In the Master channel, double-click the Multichannel Gain plug-in to display it in the linked window.
- Click the Phase Invert button for the LFE channel.
- In the Master channel, double-click the MultiMeter plug-in to display it in the linked window.
The Correlation meter now moves to the right of the middle, toward +1, indicating that the LFE channel is in phase with the rest of the surround channels.
- Stop the playback after you’ve checked your mix.
Down Mixing
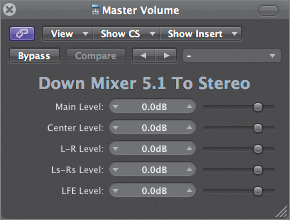
The act of reducing a surround mix to a four-channel (quadraphonic, LCRS) or two-channel (stereo) version is called down mixing. To aid in this, Logic Pro includes a specialized Down Mixer plug-in that can be applied to the Master channel, automatically folding down the surround mix to a specified format. As most consumer DVD-Video players incorporate a built-in down mixing process, this enables you to check your mix’s compatibility with these down mixing systems, as well as quickly create new format mixes for delivery.
- On the Master channel, click the fourth Insert slot and choose Utility > Down Mixer > 5.1→Stereo.
The Master channel changes to display stereo level meters, and the Down Mixer plug-in appears in the linked window.
- Play the project, listening to the stereo down mix, which should now be emanating only from the left and right speakers.
- Stop the playback.
- In the Master channel, click the Down Mixer plug-in and choose No Plug-in from the pop-up menu, thereby removing it from the channel strip.
Encoding Surround Projects
Depending upon the delivery format, different techniques exist for encoding a surround project for distribution. In this exercise, you will create a DVD-Audio disc, as well as encode a surround mix in the Dolby Digital (AC3) format, ready for inclusion in a DVD-Video disc.
Creating DVD-Audio Discs
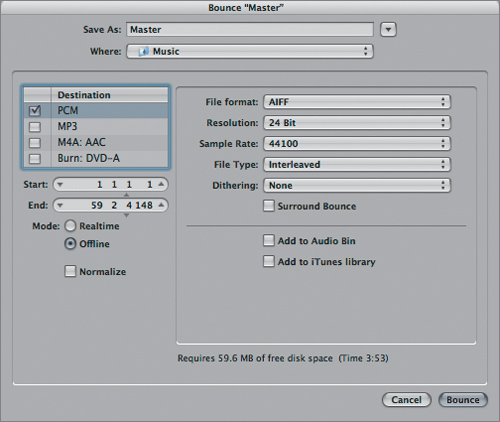
New to Logic Pro 8 is the ability to create DVD-Audio discs without the need for an external encoding application. This is accomplished within the Bounce window.
- At the bottom of the Master channel, click the Bnce (Bounce) button.
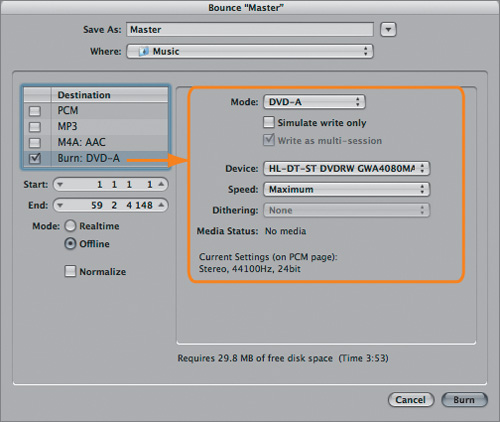
The Bounce window opens.
- In the Destination area on the left, deselect any active checkboxes (PCM, MP3, M4A: AAC).
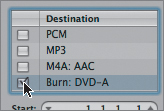
- Select the Burn: DVD-A checkbox.
The DVD-A options appear to the right of the Destination box.
Note
If you’ve never burned a DVD-A before, you might see Burn: CDDA (CD audio) in the menu instead of Burn: DVD-A. If this is the case, select DVD-A from the Mode menu to burn a DVD-A instead of a regular CD.
- In the Save As field, enter Working with Surround.
- Insert a blank DVD into your DVD burner.
- Click the Burn button.
After the burn process is completed, you will have a DVD-Audio disc that can be played in the majority of commercial DVD players (make sure your DVD player supports the DVD-A format before playing your disc).
Encoding Dolby Digital Files (AC3) Using Compressor
Encoding surround sound for DVD-Video entails a two-step process:
• Creating a master multi-channel file
• Encoding a composite surround format file from the master multi-channel file using compression/encoding software or hardware.
A master multi-channel file is also created in the Bounce window.
- At the bottom of the Master channel, click the Bnce button.
The Bounce window opens.
- Deselect the Burn: DVD-A checkbox.
- Select the PCM checkbox.
- In the options to the right of the Destination box, select the Surround Bounce checkbox.
- At the lower right of the window, click the Bounce button.
Note
Logic automatically sets the file path for bounces to a Bounces folder created within the project folder.
A bounce is performed, creating an interleaved multi-channel file named Working with Surround.aif.
Now that the master multi-channel file has been created, you can import it into an application such as Apple’s Compressor (included with Logic Studio) for encoding as a Dolby Digital (AC3) file.
Note
In order to create encoded Dolby Digital (AC3) surround files, some encoder applications need to import multiple “stems,” or submix files, corresponding to each surround output channel instead of a single interleaved multi-channel file. You can create these stems when bouncing by selecting Split from the File Type menu within the Bounce window. The resulting files will have extensions added to their names, corresponding to their derived channels (L, R, C, Ls, Rs, LFE).
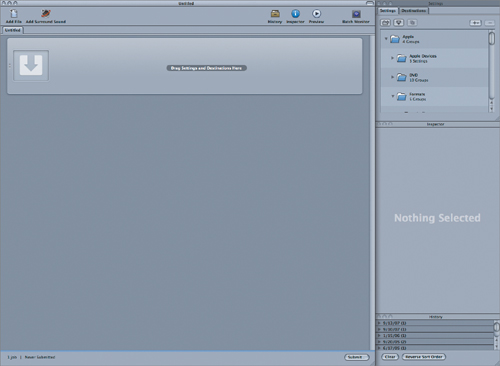
- Open the Compressor application.
- Click the Add File button at the top left.
- Within the file browser, go to Logic 8_BTB_Files > Media > A Blues for Trane > Bounces and select Working with Surround.aif.
- Click the Open button.
The Working with Surround.aif file is added to the Batch.
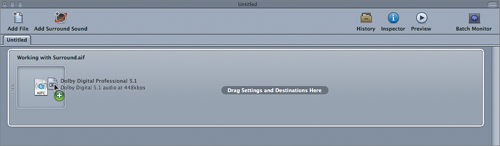
- Within the Settings window, choose Apple > Formats > Audio > Dolby Digital Professional 5.1.
- Drag the Dolby Digital Professional 5.1 setting and drop it on the Working with Surround.aif icon in the Batch window.
- Click the Submit button at the lower-right corner of the Batch window.
The submit dialog appears prompting you to name the submitted batch.
- Click the Submit.
Compressor encodes the interleaved multi-channel Working with Surround.aif file as a Dolby Digital AC3 file, ready for inclusion into a DVD-Video project. The new file will be located within the same folder location as the Working with Surround.aif file (Music > Logic 8_BTB_Files > Media > A Blues for Trane > Bounces).
As surround sound becomes more and more prevalent in the audio world, it becomes increasingly important to acquire at least a working knowledge of surround mixing. The techniques learned in this lesson will help form the foundation for improving your skills in this growing domain.

Lesson Review
1. Where do you assign the outputs of your audio interface to corresponding surround channels?
2. Where do you set the surround format for an individual project?
3. How does the stereo input Surround Panner differ from that of other input formats (mono and surround)?
4. How does the surround version of the Space Designer plug-in differ from the mono and stereo versions when used as a send effect?
5. How do multi-channel insert plug-ins differ from the mono and stereo versions?
6. How can you quickly create a four- or two-channel version of your surround mix?
7. What two steps are involved in creating a Dolby Digital (AC3) file ready for DVD-Video?
Answers
1. Assigning the outputs of your audio interface to corresponding surround channels is done by choosing Preferences > Audio > Surround and clicking the Output tab.
2. The surround format for a project is set in the Audio tab of the Project Settings window.
3. The stereo input to the Surround Panner offers an additional Spread control.
4. The surround version of the Space Designer plug-in loads surround format impulse responses, and it has additional controls to adjust the center level as well as the balance between the front and rear speakers.
5. Multi-channel insert plug-ins have additional configuration settings allowing you to bypass any surround channel. In addition, the LFE channel can be processed independently from the rest of the surround channels.
6. You can quickly create a four- or two-channel version of your surround mix by applying the Down Mixer plug-in to the Master channel.
7. To create a Dolby Digital (AC3) file ready for DVD-Video, you must bounce an interleaved multi-channel surround file from within Logic, then encode the file using a compression/encoder application such as Compressor.