Lesson 14. Scoring to Picture
Composing music for film and video has been greatly facilitated by the advent of computer-based music production. Methods for calculating tempo and ensuring synchronization between music and picture have been made simpler by computers powerful enough to stream digital video and audio in the same application.
Scoring to picture is a collaborative effort integrating a variety of media (including digital video and audio) that are often produced by more than one person or facility. As a result, a key skill is the ability to import and work with many media elements in a variety of formats while maintaining the same timing references, especially when the music needs to synchronize with critical moments in the film or video footage.
In this lesson you will work with a synchronized digital video clip in a Logic project, adjusting its tempo to coordinate with significant events in the movie. You’ll also align musical events with SMPTE time to accentuate visual cues.
Setting Up Synchronization
While it is still entirely appropriate to work with an external video deck synchronized to audio using SMPTE time code (converted to MIDI Time Code), the norm for today’s media composers is to work with digital video clips in a Logic project.
Using digital video clips simplifies video-to-music synchronization. You no longer have to add significant pre-roll time at the beginning of a project to provide time for the hardware deck to lock in to sync, and you can instantly locate to any point within the project and the video. What’s more, the digital video (along with all the synchronization settings) can be saved in the project folder for easy archiving and retrieval.
Logic leverages the Apple QuickTime engine for video playback and, therefore, can open a digital video clip (commonly referred to by the single term movie) in any format supported by the QuickTime standard.
In this exercise, you will open a digital video clip in a new Logic project, adjusting the synchronization settings to allow for time-locked playback and reference of audio and video.
Let’s start by creating a project file around a useful stock project template created for working with video.
- Choose File > New.
The Templates dialog opens.
- In the Collection column, click the Produce folder.
- In the Template column, click the Music For Picture button.
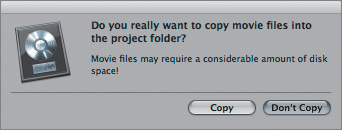
The project template Music For Picture is opened, and a Save As dialog appears.
- Select the Include Assets checkbox, if necessary.
- Select the “Copy external audio files to project folder” and “Copy movie files to project folder” checkboxes.
When “Copy movie files to project folder” is selected, a message appears alerting you that copying a movie file could take up valuable disk space.
- Click Copy.
- Type Score to Picture in the Save As field.
- Set the save location to Music > Logic 8_BTB_Files > Lessons > Completed.
- Click Save.
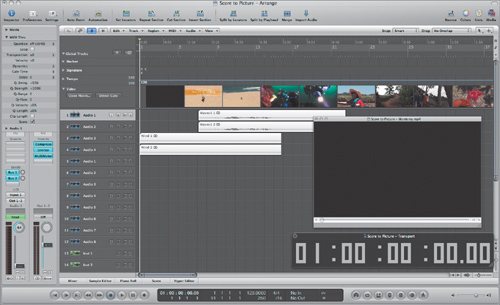
Before you begin the lesson, take a minute to explore what the Music For Picture template offers. The Bar ruler is set to display SMPTE time position as well as bars and beats, and a giant SMPTE display is floating within the Arrange area. Both provide easy visual reference to valuable timing information that you will use when scoring to picture.
Note
You can display SMPTE time in the Bar ruler of any project by clicking the small down arrow located to the right of the Bar ruler and choosing one of the three settings with Time in its name. Displaying the SMPTE ruler also affects what is displayed in the help tags when you’re editing regions and events. You can configure the Transport bar to display a large dedicated floating SMPTE time display, which provides easy readability at long distances (especially useful when you’re working across the room from your display). Do this by Control-clicking the SMPTE time display within the Transport bar and choosing Open Giant SMPTE Display.
- Close the Media area by clicking the button in the Toolbar.
Opening the Movie
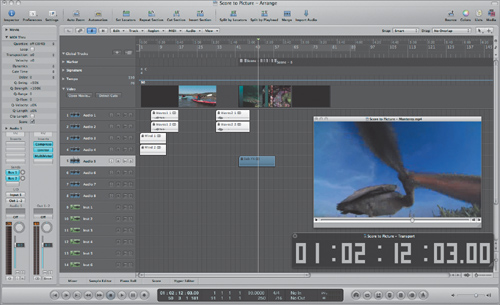
You can see that Screenset 1 has been configured to display the global Marker, Signature, Tempo, and Video tracks, as these tracks are commonly used when working with video. The Video track provides many useful functions for importing and working with video.
- In the Video track, click the Open Movie button.
The Open window appears.
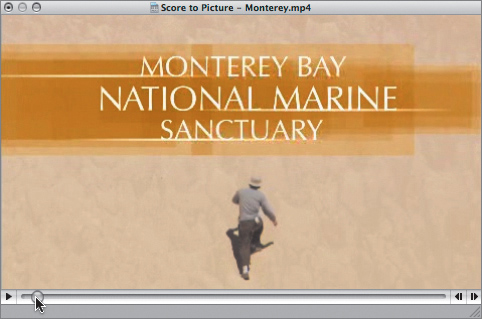
- Go to Music > Logic 8_BTB_Files > Lessons > 14_Movie Files and open Monterey.mp4.
The Monterey.mp4 video opens in a floating window, and a video thumbnail of the movie is created in the Video track.
Note
When working with digital video clips in Logic, it is best to use proxy movies. A proxy movie is a low-resolution, highly compressed version of the full-resolution movie that places less processing and disk access strain on your computer. Usually the video editor will provide the compressed clips, but they can also be created in applications like QuickTime Pro. If you are preparing the clips yourself, it is advisable to use high-compression formats such as MPEG-4 or H.264.
- Play the project to view the video content with which you will be working.
Playback of the movie is controlled by Logic’s Transport bar, and it plays in sync with the project.
- While it’s playing, click anywhere in the Bar ruler to locate to another position.
The movie relocates in sync with the project.
- Drag the playhead in QuickTime Player to the right.
The project relocates in sync with the movie.
- Stop playback.

Note
You can output video via FireWire to an NTSC display (which requires a DV-to-video converter box) as well as to Apple Cinema Display via Digital Cinema Desktop. Choose File > Project Settings > Video and choose a setting from the Video Output pop-up menu. For FireWire video streaming, it is necessary to compensate for the latency in the FireWire setup. This will be a constant amount that you can adjust by choosing Logic Pro > Preferences > Video and dragging the External Video to Project slider until the image and sound synchronize.
Working with SMPTE Time Code
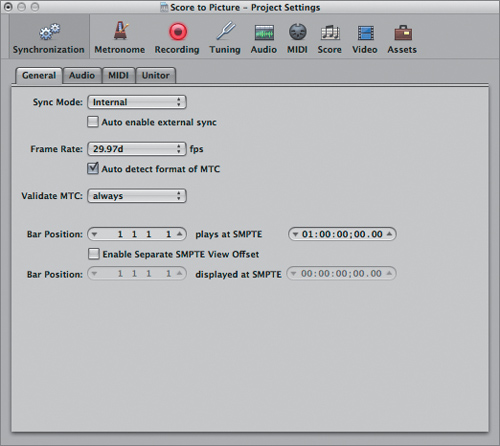
You can establish synchronization between the video and Logic just by opening a QuickTime movie in a project, but a few settings should be set so that the time code will display properly. These settings are found in the Synchronization project settings.
- Choose File > Project Settings > Synchronization.
The Project Settings window opens, displaying the Synchronization tab.
To ensure that the time code display is accurate, the project should reflect the movie’s frame rate. This is set in the Frame Rate pop-up menu.
- Click the Frame Rate menu and choose 24. (This is the frame rate of the digital video clip.)
The SMPTE start time can be set individually for each project to synchronize with the video. You will be using a start time of 1:00:00:00.00 for this project, so it is not necessary to change the project template’s default setting.
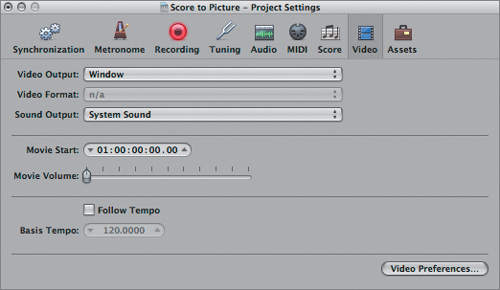
The next thing you need to do is set the Movie Start time. Usually you would set this to match the SMPTE burn-in time code in the video, ensuring that Logic’s time code display will match the time code on the video. However, the clip you are using has no burn-in. The video editor did supply the SMPTE offset information so that the audio can be synchronized with the video, indicating an offset of 1 second and 9 frames. Once the Movie Start time is set, the movie will start just shortly after the project starts. This information is also entered in the Video project settings.
- Click the Video button at the top of the Project Settings window to display the Video settings.
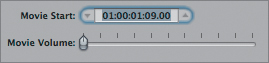
- In the Movie Start field, single-click the number and enter 01:00:01:09.00. Press Return.
The video will now start 1 second, 9 frames into the project.
- Close the Project Settings window.
- Play the project from the beginning, observing the SMPTE display in relation to the video.
- Stop playback after the first 10 or 15 seconds.
- Drag both the movie and the SMPTE Transport display to the lower-right side of the Arrange area to make space for track content.
- Press Control–Left Arrow as needed to zoom out horizontally, displaying about 1 minute and 10 seconds (37 bars) in the Bar ruler.
Now that you’ve taken some time to configure the screen arrangement, let’s lock the screenset.
- Lock the screenset by choosing Screenset1 > Lock.


Importing Media
Integration between the editing suites used by video editors, sound designers, engineers, and composers has traditionally proved to be a hurdle when these groups collaborate on media projects. However, integration has been improved with the development of formats that allow you to exchange media with colleagues while maintaining time code and even automation information.
In the following exercises you will import media in different formats into the project file while retaining the time code information.
Importing XML from Final Cut Pro
Logic supports Extensible Markup Language (XML) files as an interchange format. XML is used by some of Apple’s Pro applications, such as the video production application Final Cut Pro, to store relevant information. This information can be exchanged between the supporting applications. For example, XML exchange allows you to import audio files used in a Final Cut Pro project, including their timing and automation information, into Logic’s Arrange area.
For this exercise, an XML file has been created from a Final Cut Pro project. This file contains information about the file locations, timing, and volume keyframes (automation) for three sound effects that the video editor has placed in a Final Cut Pro sequence.
- In the track list, select the Audio 1 track.
- Choose File > Import.
- Go to Music > Logic 8_BTB_Files > Lessons > 14_XML Exports and open Monterey XML.
A dialog opens, displaying the sequence information from the original Final Cut Pro project file.
- Click OK.
A prompt appears asking you to relink the XML file’s associated audio files by choosing the correct file path.
- Click OK.
- In the file selector, select the desired file from Music > Logic 8_BTB_Files > Lessons > 14_FX from FCP.
Repeat this process for each file requested by Logic, if necessary. All the files are located in the same folder.
Another prompt appears, asking if you’d like to convert the sample rate.
- Click Use 48000.
Note
The Music For Picture template has a default project sample rate setting of 48 kHz, the standard for working in digital video formats. If you wish to change the sample rate when working with this template, choose File > Project Settings > Audio, then choose the desired option in the Sample Rate menu.
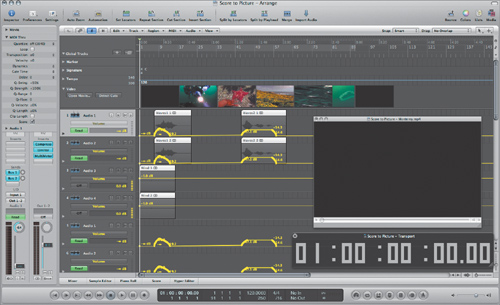
The audio files associated with the XML file are imported into four new tracks in the Arrange area.
- Press Control–Left Arrow a few times, zooming out horizontally to enable you to see all the imported regions around the video window.
- In the Arrange area’s local menu bar, choose View > Track Automation.
The volume automation information associated with the imported audio regions is displayed.
This information was created as volume keyframes in Final Cut Pro and converted to track automation with the Read buttons already turned on for each track.
When importing associated audio from an XML file, Logic will automatically create tracks assigned to the first group of audio channels. The project file you are using in this exercise already has tracks assigned to these channels. As a result, tracks 1 through 4 are duplicated. (You can see the automation duplicated in tracks 5 through 8.) These duplicate tracks aren’t needed.
- Delete tracks 5–8 (the duplicates of audio tracks 1–4 that don’t contain audio regions) by individually selecting them and pressing the Delete key.
The duplicates to audio track 1–4 are deleted.
- Play the project, observing the automation of the channel strip volume fader for track 1.
- Stop playback.

Importing Broadcast WAVE Files
Broadcast WAVE files are similar to files in other PCM audio file formats (such as AIFF), but they also contain time code information in the header of each file. That information allows you to import and export these audio files between applications while retaining their absolute position in time.
You can test this by importing a sound effect in the Broadcast WAVE format.
- In the Arrange area’s local menu bar, choose View > Track Automation to turn off track automation.
- Select the Audio 5 track (now track 5), if it is not already selected.
- Click the Go to Beginning button in the Transport bar to return to 1 1 1 1.
- Choose File > Import Audio File.
The Open File dialog appears.
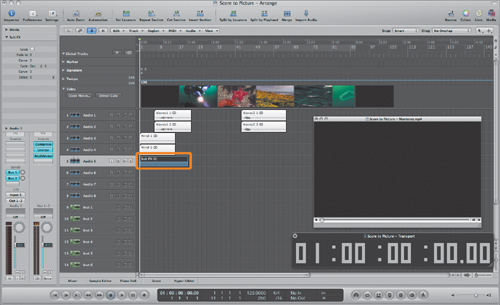
- Go to Music > Logic 8_BTB_Files > Lessons > 14_FX and open Sub FX.wav.
The audio file is added to the Audio 5 track at measure 1 1 1 1.
- With the region highlighted, in the Arrange area’s local menu bar, choose Audio > Move Region to Original Record Position.
The Sub FX Region locates to the time code position contained in the audio file (01:01:50:10.31).
- Play the project, observing how the Sub FX audio works with the movie.
Note
You can save newly recorded audio files in the Broadcast WAVE format by choosing Logic Pro > Preferences > Audio > General and choosing the format in the Recording File Type menu. When this feature is chosen, all saved audio files will include the region’s original record position.
Locking SMPTE Position
Now that you’ve imported the sound effects, it is a good idea to lock their positions to the SMPTE position so that they cannot be moved by mistake. If you time-lock the effects, you can adjust the music tempo freely without changing the effects’ placement in relationship to the movie.
- Choose Edit > Select All.
- In the Arrange area’s local menu bar, choose Region > Lock SMPTE Position.
All regions now display a lock icon in front of their names and cannot be moved.
Now that the regions have been locked, let’s see how tempos can be changed without affecting the locked regions’ SMPTE positions.
- Click the background of the Arrange area to deselect all regions.
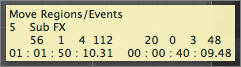
- Click the Sub FX region and hold down the mouse button, observing the SMPTE and bar positions displayed in the help tag.
Note that the SMPTE position is 01:01:50:10.31, which corresponds to the bars and beats position of 56 1 4 112.
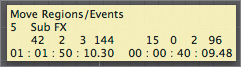
- In the Transport bar, double-click the Tempo display and enter 90. Press Return.
The project tempo changes to 90 bpm.
- Click the Sub FX region and hold down the mouse button, again observing the SMPTE and bar positions displayed in the movie window.
The region’s SMPTE position remains the same as before, but the corresponding bars and beats position is now 42 2 3 144.
When an event is SMPTE locked, it always maintains its time code position, regardless of the tempo.
Spotting the Movie
When you’re choosing the places where music will enhance your project, you can use Logic during or after the “spotting session” with the director to mark those specific time code locations for the musical cues. Creating markers for this task enables you to place text notes at specific SMPTE positions to use as timing references.
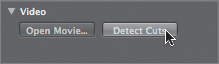
Detecting Cuts
Often a director will want musical cues to begin near scene cuts to accentuate the transition from one scene to the next. You can use Logic to identify relevant visual cues in a video with a unique function called Detect Cuts. When this function is activated, Logic analyzes the video information and creates a special marker, called a scene marker, at locations where the image changes drastically (such as at scene cuts).
- In the global Video track, click the Detect Cuts button.
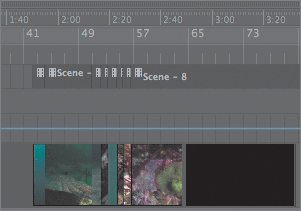
A status bar displays the progress for cut detection.
After the process is completed, scene markers (designated by the movie frame symbol) are created in the Marker track.
- Press Control–Command–Right Arrow/Left Arrow (Go to Next/Previous Marker) to locate along the scene markers.
The movie locates to scene cuts and other points where the video image changes drastically.
- Press Stop to return to the beginning of the project.
Tip
The Marker track can contain multiple alternative tracks, similar to those you looked at earlier in the Tempo track (Lesson 3, “Matching Tempo and Pitch”). By choosing options in the Alternative pop-up menu, you can create separate markers for marking musical sections and for spotting sound effects or musical cues.
Using Markers for Beat Mapping
In addition to locating visual points, you can use markers as the basis for beat mapping, which enables you to create tempo adjustments by tying markers to specific bars and beats.
In this exercise, you will use beat mapping to adjust the project tempo and align the downbeat of a measure to punctuate an exact moment in the movie.
- Click the background of the Arrange area to deselect all currently selected regions.
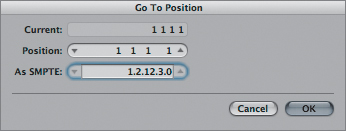
- Press the Go to Position key command (/), and, in the As SMPTE field of the Go To Position dialog, enter 1.2.12.3.0. Press Return.
Note
When entering SMPTE time code, you can use colons, periods, or spaces to delineate hours, minutes, frames, and subframes.
The project locates to 01:02:12:03.00 (as seen in the giant SMPTE display).
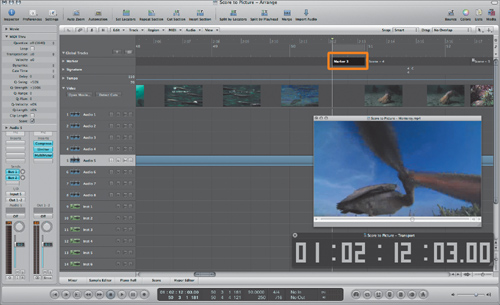
In the movie, a bird snaps at the camera in a sudden, vicious movement. This would make an excellent place for a musical hit point. To place that hit point, you must first create a marker.
- From the main menu bar, choose Options > Marker > Create Without Rounding.
Note
The Create Without Rounding command creates a marker exactly at the playhead’s current position on the SMPTE ruler.
A new marker is created at the current playhead position.
At the current zoom resolution, the marker is difficult to see, but you can zoom in to magnify the current location.
- Press Control–Right Arrow enough times to view the new marker.
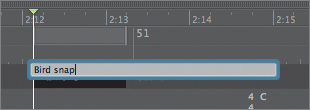
- Control-click the new marker (Marker 3) and choose Quick Edit Marker from the shortcut menu. Enter Bird snap for the marker name, and press Return.
Now that a marker has been created at the visual cue, you can use it as a timing reference for beat mapping. To do this, you must display the Beat Mapping track in the global tracks area.
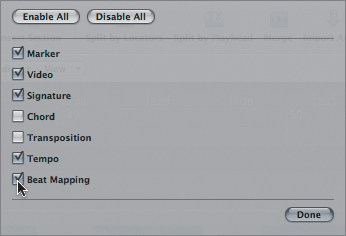
- In the track list, Control-click the global tracks area and choose Configure Global Tracks from the shortcut menu.
- In the Configure Global Tracks window, select the Beat Mapping checkbox.
- Click Done.
The Beat Mapping track is displayed in the global tracks area.
- Click the disclosure triangle on the Beat Mapping track to expand the track.
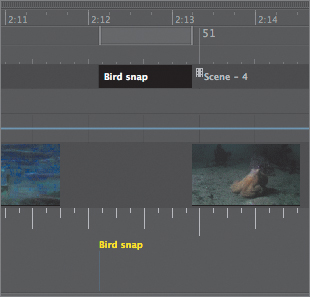
Beat mapping lines for selected markers are automatically created in the Beat Mapping tracks. However, to see the line for the “Bird snap” marker, you need to move the playhead slightly (the marker was created at the playhead position).
- If necessary, scroll the arrange window to the right, so that the video doesn’t cover the playhead.
- Drag in the bottom part of the Bar ruler to move the playhead a little to the left, revealing the beat mapping line.
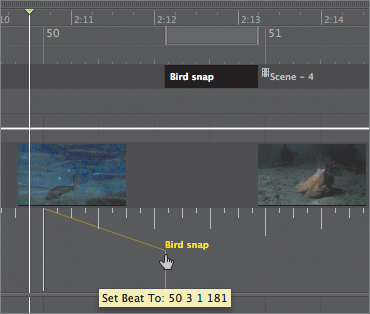
- In the Beat Mapping track, drag the bar line at measure 50 to the “Bird snap” beat mapping line, connecting the two.
The tempo changes to 89.0066, aligning the “Bird snap” marker with the downbeat of measure 50.
- Click the Metronome button.
- Play the project starting just before measure 50, listening to the click punctuating the movement of the bird snapping.
The click on the downbeat of measure 50 lines up perfectly with the bird snap.
- Stop playback.
- Save the project.
- Close the project.
Positioning Events on the Timeline
A common task when working with picture is syncing events to specific SMPTE positions. These events could be sound effects referenced from an Edit Decision List (EDL), or musical hits in the arrangement that punctuate visual cues. Being able to quickly and accurately place events on the timeline is a necessity when you’re arranging material in a session that has been locked to an SMPTE position.
For this exercise, you will be using a nearly finished version of the musical cue for the video with which you have been working.
- Choose File > Open.
- Go to Music > Logic 8_BTB_Files > Lessons and open 14_Monterey_Start.logic.
The project is displayed.
- Play the project to familiarize yourself with the score.
- Press Stop twice to return to 1 1 1 1.
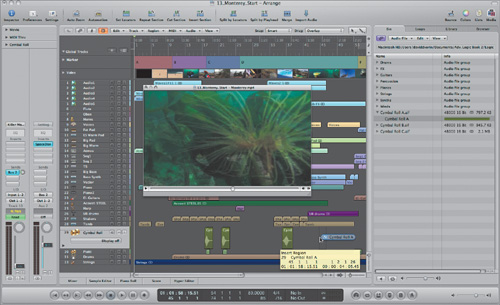
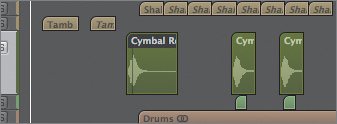
- Select the Cymbal Roll track (track 29), if it is not already selected.
As you probably noticed, the movie is viewable in its own area at the top of the Inspector. This provides a space-saving alternative to a floating window, which could obscure track material. However, the display might prove too tiny to work with in some cases, and it can be displayed in the larger, floating window by double-clicking the movie within the Inspector.
- Double-click the Movie area within the Inspector.
The movie opens in a floating window.
Positioning an Event by Spotting the Video
Let’s examine some of the techniques available for positioning events on SMPTE time by using several audio files of cymbal rolls to accentuate visual cues.
- In the Toolbar, click the Media button to open the Media area.
- If needed, reposition the floating movie window so it doesn’t block the Media area.
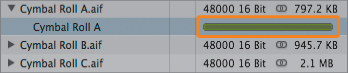
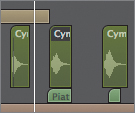
- In the Audio Bin, select the Cymbal Roll A.aif audio file.
- At the bottom of the Audio Bin, click the Play button to listen to the Cymbal Roll A.aif audio file.
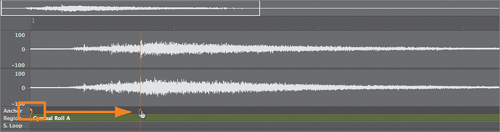
Notice that the cymbal roll builds to a climax about one-third of the way into the file. The climax should be used when syncing to SMPTE time. You can do this directly in the Sample Editor by setting the anchor point.
- Double-click the green bar to the right of the Cymbal Roll A region name.
The Sample Editor opens, displaying the Cymbal Roll A region.
- Drag the anchor (the small orange triangle underneath the Cymbal Roll A region) to the right, positioning it at the transient about one-third of the way into the file.
Note
Depending on your screen resolution, you may need to resize the Sample Editor in order to view the anchor.
- Close the Sample Editor by clicking the button at the bottom of the Arrange window.
Let’s bring this region into the arrangement, manually spotting the point in the timeline.
- Drag the Cymbal Roll A region from the Audio Bin tab to the Cymbal Roll track at around measure 45, holding down the mouse button and moving the file back and forth along the timeline while watching the movie. (Continue to hold down the mouse button for step 8.)
Notice how the movie syncs with the position of the dragged audio file. You can use this visual reference to place cues at specific locations.
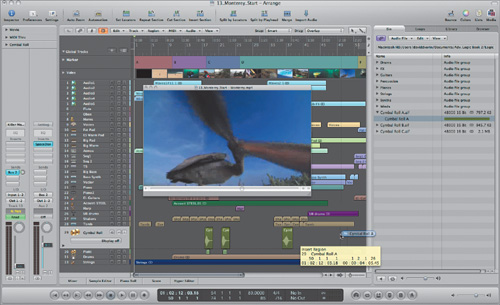
- Still holding down the mouse button, position the Cymbal Roll A region to sync with the bird snapping at measure 50. (You aligned this earlier using beat mapping.) Release the mouse button.
- Use the Play from Selection key command (Shift-Enter) to play the project starting at the selected Cymbal Roll A region.
The cymbal roll effectively punctuates the bird snap in the video.
- Click the Stop button in the Transport bar to stop the project.
Using Pickup Clock
Let’s continue importing audio files into the arrangement, this time aligning the event precisely to the playhead’s SMPTE position by using the Pickup Clock command.
- Use the Go to Position key command, the / (slash) key (in the main keyboard, not the numeric keypad), to locate the playhead to SMPTE position 01:02:16:21.00.
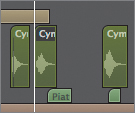
- In the Audio Bin tab, click the disclosure triangle for Cymbal Roll B.aif and drag the Cymbal Roll B region to the Cymbal Roll track at 53 1 1 1.
- Press the Pickup Clock key command (semicolon).
The selected region snaps to the playhead position.
- Use the Play from Selection key command (Shift-Enter) to play the project from the newly positioned region, viewing its placement in relation to the movie image.
The cymbal roll accentuates the opening of the sea anemone.
- Stop the project.
Using the Event Float to Position an Event
The third technique for positioning events involves using the Event Float window to precisely place an event at a SMPTE position.
- In the Transport bar, click the Go to Beginning button.
- In the Audio Bin tab, click the disclosure triangle for Cymbal Roll C.aif and drag the Cymbal Roll C region to the Cymbal Roll track at 3 1 1 1.
- Choose Options > Event Float.
The Event Float window appears.
This window functions like a mini Event List, displaying the position and length of the selected event. By default, it displays position and length as bars and beats, but it can be switched to SMPTE time by clicking the music note button at the far right side of the window.
The position display switches to SMPTE time.
- Double-click the SMPTE display at the left side of the window, and enter 01:00:22:19.09. Press Return.
The region locates to the new position in the track.
- Press Shift-Enter to play the project starting at the newly positioned region, viewing its placement in relation to the movie image.
The cymbal roll accentuates the transition from the man walking on the beach to the undersea divers.
- Click the Stop button in the Transport bar to stop the project.
- Close the Media area by clicking the Media button in the Toolbar.

Wrapping the Project
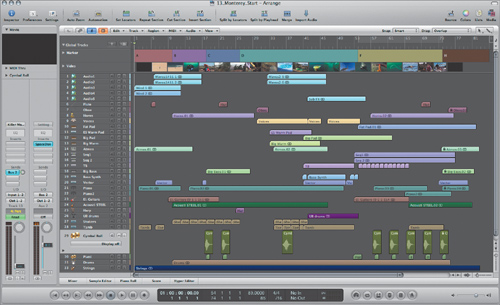
The project used in the last part of this lesson exemplifies the breadth and power of Logic, as well as most of the techniques and concepts you’ve explored throughout this book. The project file has a large number of tracks (consisting of both audio and software instruments), markers (using alternative marker tracks 1 and 2), and groups; extensive automation; synchronized video; and notation.
As this book draws to a close, take this opportunity to explore the project file, viewing the movie in relation to the project, changing screensets (Screensets 3 and 4 show some of the notated score), playing the software instruments, exploring the mixer routings, and listening to the composition in its entirety.
- In the Transport bar, click the Go to Beginning button to return to the beginning of the project.
- Play the project in its entirety to observe how the sound and musical events work in the context of the movie.
- Stop the project.
- Save the project as 14_Monterey_Finished. (Choose Music > Logic 8_BTB_Files > Lessons > Completed or any other location you wish.)
Lesson Review
1. What settings govern how a digital video clip is synchronized within Logic?
2. Where can SMPTE time code be displayed in Logic?
3. What type of Final Cut Pro exported file format can be imported into Logic?
4. What audio file format contains timing information and can be imported into Logic?
5. How can you change the project tempo without changing a region’s position?
6. What kinds of markers are created with the Detect Cuts function?
7. Besides MIDI events and audio files, what else can be beat mapped as references for tempo changes?
Answers
1. Digital video clips in a Logic project can be synchronized by setting the SMPTE start times, frame rates, and Movie Start times.
2. Logic can display SMPTE time code in the SMPTE ruler, Event Float window, and giant SMPTE display.
3. Final Cut Pro XML files, including automation information, can be imported directly into a Logic timeline.
4. Broadcast WAVE files can be imported directly to a Logic timeline and retain their original recorded positions.
5. SMPTE positions of regions and events can be locked, enabling you to change tempos without changing the SMPTE timing.
6. Detect Cuts creates scene markers that can flag scene cuts and other major visual changes.
7. Markers can be used as beat mapping references for tempo changes.
8. Regions can be positioned on the timeline by placing them manually, by using the Pickup Clock command to align them with the current playhead position, and by entering new SMPTE positions in the Event Float window.