Lesson 5. Working with the Arrangement
A computer-based system offers distinct advantages over other methods of developing and arranging musical material. First and foremost is the ability to work with visual representations of sound, whether as audio waveforms or as graphical data (such as MIDI or notation). You can create detailed edits and work with arrangements by moving sections around as you would text in a word processor. A nonlinear approach to editing lets you jump around in a composition, manipulating multiple aspects of a piece of music and playing back sections for instant feedback.
Many of Logic’s features are geared toward manipulating and developing musical material. Lesson 5 focuses on techniques that enable you to efficiently view, organize, and move data within a project.
Creating and Using Markers
Markers serve multiple purposes in a project. They visually identify the sections of a composition, and they also provide navigation points along the Bar ruler. In this way, markers serve as a map that allows you to quickly locate a project’s sections for playback, editing, and arranging.
Markers are displayed in the Bar ruler and global tracks area and are created in a variety of ways. In this exercise, you will use several techniques to efficiently create, edit, and view markers; place them within your composition; and add text and color to them for easy viewing.
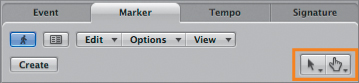
Adding Markers in the Marker Track
For any given project file, you can easily place and edit markers in the Marker track, one of Logic Pro’s global tracks.
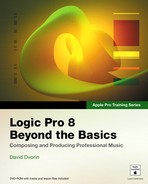
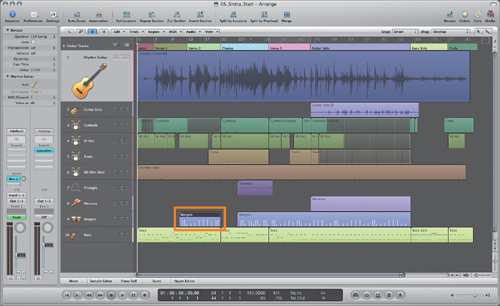
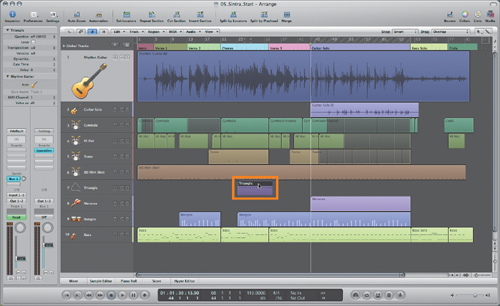
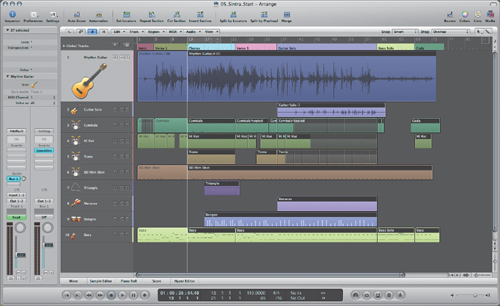
Let’s start by opening the project file that you will use for this lesson.
- Go to Logic 8_BTB_Files > Lessons, and open 05_Sintra_Start.logic.
- Play the project to familiarize yourself with the material.
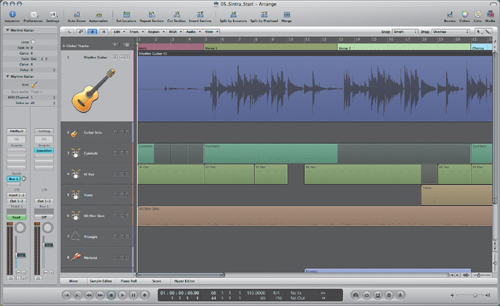
- At the top of the track list, click the Global Tracks disclosure triangle.
The Marker track appears at the top of the window.
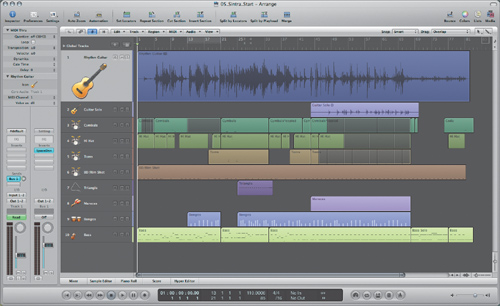
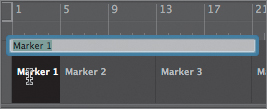
- Select the Pencil tool, and click the Marker track at measure 1.
A new marker, Marker 1, is created at measure 1.
When a marker is created, Logic automatically assigns a name consisting of the word Marker followed by a sequential number. Logic’s allocation of marker names is dynamic, always depending on the order of all the markers in a project.
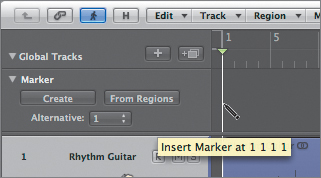
- Using the Pencil tool, click the Marker track to create another marker at measure 13.
Tip
It is easier to achieve exact placement by dragging in the Marker track until the help tag lists the correct position. Then release the mouse button.
A new marker is created, labeled Marker 2.
- Using the Pencil tool, insert a marker at measure 5, between the two markers you created.
The new marker is labeled Marker 2, and the following marker is relabeled Marker 3.
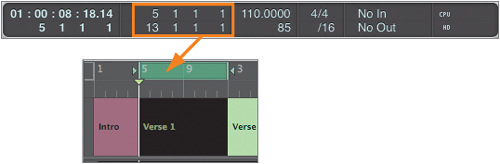
You can also use the playhead to determine the point on the Bar ruler where you want a marker to be inserted. In this case, you first have to position the playhead and then create the marker.
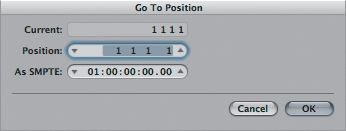
- Press the / (slash) key to open the Go To Position dialog.
The Go To Position dialog appears, with the Position field highlighted for input.
- In the Position field, enter 21 and press Return.
The playhead jumps to measure 21.
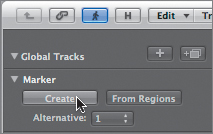
- In the Marker track header, click the Create button.
Marker 4 is created at the current playhead position.
Tip
You don’t have to stop a project to add markers at a current playhead position. You can use the techniques in this exercise to create markers on the fly, placing them on the Bar ruler during playback. However, accessing this function using the mouse can be awkward when the project is playing. By using the key command Control-K, you can drop in markers quickly as the project progresses.
- Play the project starting around measure 20, holding down the Control key and pressing the K key when you reach the section change at the downbeat of measure 34.
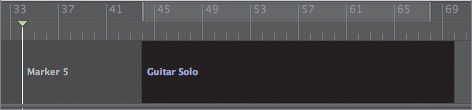
A new marker (Marker 5) is created at measure 34.
Note
Pressing Control-K creates a marker at the nearest bar to the playhead, rounding its placement. If you need to place a marker within a measure or are using absolute time (working with SMPTE), use the key command for Create Marker Without Rounding (Shift-Control-K), or choose Options > Marker > Create Without Rounding. A marker will be placed at the exact spot, rather than being rounded to the nearest bar.

Creating Markers from Regions
Another way to create a marker quickly is by using a region. In this case, the region’s start point, end point, and name designate the marker’s position, length, and name.
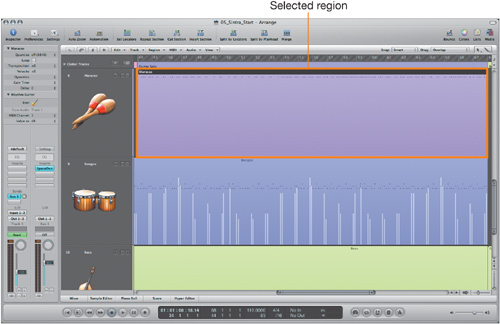
- Using the Pointer tool, select the Guitar Solo region on track 2.
- In the Marker track header, click the From Regions button.
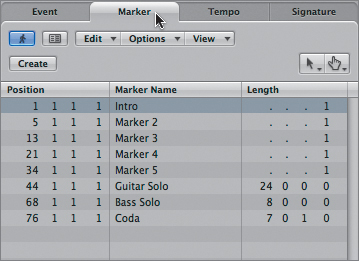
A new marker named Guitar Solo is created at measure 44, with the same color as the region.
You can also create a marker by clicking the region and choosing a menu command.
- On track 10, click the Bass Solo region, and choose Options > Marker > Create by Regions.
A new marker named Bass Solo is created at measure 68.
- Using any of the above techniques, create a marker from the Coda region (the last region on track 3).
A marker named Coda is created at measure 76.
Adding Marker Text
Markers can display all types of text, such as the name of an associated region or section, and can even serve as a placeholder for musical ideas and production notes. You can enter a name directly on the marker or open a separate window for more detailed text entry.
- From the Tool menu, choose the Text tool.
- In the Marker track, click Marker 1.
A text field appears.
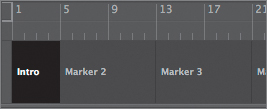
- Enter Intro, and press Return.
The marker name changes to Intro.
Tip
Try using the key command for Quick Edit Marker to quickly name markers. You can also choose Options > Marker > Quick Edit Marker, or press Command-Return to quickly name markers.
Let’s try a different approach for naming markers, involving the Marker List, a technique that has its own advantages, although it is not as quick as the previous technique.
- In the Toolbar, click the Lists button to open the Lists area.
- Click the Marker tab.
The Marker List window uses an Event List format to sequentially display all the markers used in a project. It shows marker position, name, and length and provides a single environment in which to access and edit markers.
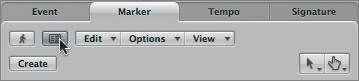
- In the Marker Name column, select Marker 2, and click the Marker Text Area button at the upper left of the Marker List window.
The Marker Text area opens at the bottom of the Marker List, ready for input.
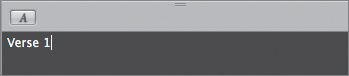
- Highlight the default text (Marker ##) and enter Verse 1.
Marker 2 now appears as Verse 1 in the Marker List and the Marker track.
- In the Marker List, select Marker 3, and in the Marker Text area, enter Verse 2.
By using the Marker List window, you can quickly switch from one marker to another, entering text as needed.
- Using this technique, name the next two markers (Marker 4 and Marker 5) Chorus and Verse 3, respectively.
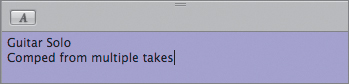
Other information can be entered and displayed in the Marker Text area as well. You can display multiple lines of text in any font that resides in your system, making the Marker Text area a visual notepad. However, sometimes it is more useful to have comments displayed on the marker itself, providing information pertaining to the production.
- In the Marker List, select the Guitar Solo marker.
- In the Marker Text area, make sure that the insertion point is placed after the text Guitar Solo, then press Return to go to the next line.
- In the line after Guitar Solo, enter Comped from multiple takes.
- In the Toolbar, click the Lists button to close the Lists area.
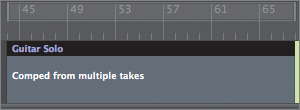
- In the Marker track, look at the marker.
The marker inserts a dividing line between the name of the marker, Guitar Solo, and the production notes beneath.
Editing Markers
In addition to editing information in the Marker List, you can adjust markers in the Marker track the way you would work with regions in the Arrange area. Common tasks include changing the marker lengths, dragging markers to new locations, and coloring their labels.
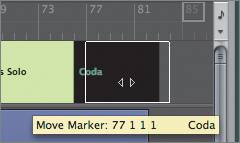
The Coda marker you created earlier is a bar too early. Let’s move it to correct this.
- Using the Pointer tool, position the cursor over the middle of the Coda marker.
The cursor turns into a two-headed arrow.
- Drag the Coda marker one bar to the right (to measure 77).
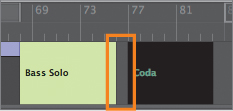
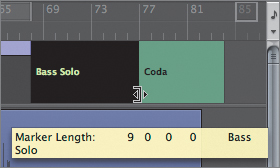
Notice that a small gap appears between the Bass Solo and Coda markers.
You can adjust this by lengthening the Bass Solo marker to fit against the Coda marker.
- Position the cursor over the right edge of the Bass Solo marker.
The cursor changes to a Resize pointer.
- Drag the right edge of the Bass Solo marker to extend it to the beginning of the Coda marker (the length should be a total of nine bars).
The seemingly simple act of coloring an item can make a big difference when navigating within a project. By coloring a marker, you can quickly discern one section from another.
- From the Arrange area’s local menu bar, choose View > Colors.
The Color palette appears.
- Select the Intro marker, and select a color in the Color palette.
The marker changes from its gray default to the chosen color.
- Select each subsequent marker and apply a color by clicking in the Color palette.
- Close the Color palette.
Viewing Markers in the Bar Ruler
The Marker track does not have to be visible for you to see the markers you have created. Whenever the Marker track is not visible, the markers are displayed directly under the Bar ruler.
- Click the Global Tracks disclosure triangle to hide the global tracks.
The Marker track disappears (it is the only global track whose visibility is turned on). All the markers you created in the last few exercises are displayed in the Bar ruler, along with their assigned names and colors.
The markers here are displayed the same way they’re displayed in the Marker track, with the exception of the text that you entered for the Guitar Solo marker. When displayed in the Bar ruler, markers are allocated a limited amount of space, which does not allow for extended text.
Navigating the Arrangement
In a nonlinear editor you have the unique advantage of being able to jump around within a project, concentrating on various aspects, regardless of their position in the Bar ruler. To truly benefit from this random access, it is essential to navigate the project in an efficient manner. Quickly getting to where you want to work is paramount, especially when time is limited.
While the basic transport controls work for navigation, they still follow a linear approach modeled on tape-based media. Forward and rewind controls move the playhead from a fixed point in one direction or the other, and you must scroll through intermediary material to reach the edit point.
In this exercise, you take advantage of the nonlinear aspects of Logic, using techniques to navigate the project rapidly while setting yourself up for the edit.
Using Specialized Playback Commands
The basic method of moving nonlinearly within a project is by using the playhead. Jumping to another section is as easy as clicking once in the bottom half of the Bar ruler (below the dotted line). Playback from any point in the project works in a nearly identical fashion—all you do is double-click instead. The two techniques used together enable both quick location and playback.
- Double-click anywhere in the bottom of the Bar ruler.
The project starts to play at that location.
- While the project is playing, click anywhere in the bottom of the Bar ruler.
The playhead position jumps to that location without stopping playback.
- While the project is playing, double-click anywhere in the bottom of the Bar ruler.
The project jumps to that location and stops playback.
This technique is not very precise for locating starting and stopping points, but it works well for quick navigation when accuracy is not a priority.
However, starting from an exact location is often important, especially when you’re isolating specific areas or material in the composition. Let’s look at a few of the key commands that help to accomplish this.
- Choose Logic Pro > Preferences > Key Commands to open the Key Commands window.
- In the search field, enter play.
All commands that have play in the name are listed in the Command column (including words that contain this combination of letters, such as display).
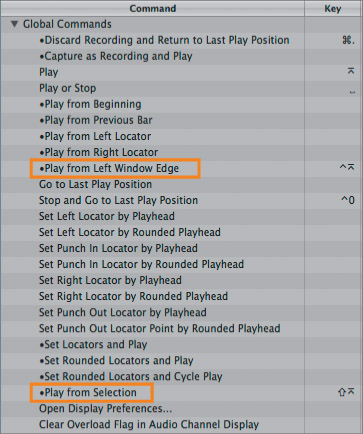
Several useful playback commands are listed here, many of which are accessible only via a key command. (The “•” preceding a command identifies it as a key-command-only function.)
- In the Global Commands list, make note of the key commands for “Play from Left Window Edge” (Control-Enter) and “Play from Selection” (Shift-Enter).
You will be using these for playback from specific points in the project.
- Close the Key Command window.
Before you’re ready to try out these playback commands, it is necessary to understand what they do. The Play from Selectio function allows you to select a region or event using its leftmost point as the location to initiate playback.
- On track 2, select the Guitar Solo region.
- Press Shift-Enter, the key command for Play from Selection.
The project immediately starts playing from the beginning of the region.
- Stop playback.
Rather than base the playback location on the start of a region or event, as Play from Selection does, thePlay from Left Window Edge command uses the visible area of the active window to determine its playback start point. Essentially, it uses a “what you see is what you get” approach, starting playback from the leftmost visible point in the window. This is especially helpful when you’re zoomed in while editing, as it doesn’t require selecting a region or event first and it’s independent of zoom level.
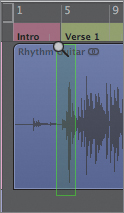
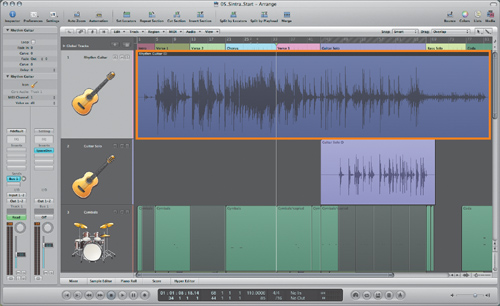
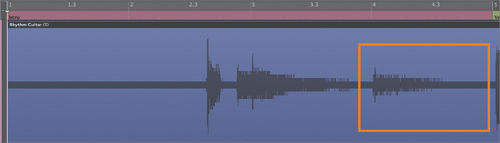
- Using the Zoom tool, draw a selection around the first big transient in the Rhythm Guitar track (track 1), located at the beginning of Verse 1.
The view zooms in horizontally and vertically, displaying a few measures.
- Press Control-Enter, the key command for Play from Left Window Edge.
The project immediately starts playing from the leftmost point of the visible window area.
- Stop playback.
Navigating with Markers
As mentioned earlier in this lesson, markers are extremely useful in helping you locate places in a project. In this way, they can be viewed as navigation points, allowing you to skip to sections where you want to work. In this exercise, you will learn methods of using markers for navigation and for initiating playback.
- Press 1 to open Screenset 1, returning the project to its original zoom settings.
- While pressing the Option key, click the bottom half of the Bar ruler in the Verse 1 marker.
The playhead locates to the beginning of the marker (measure 5). This is a quick way to move to the beginning of a section.
By double-clicking while pressing the Option key, you can start playback from the beginning of a marker.
- Press the Option key and double-click in the Verse 2 marker.
The playhead moves to the beginning of the marker (measure 13) and starts playback.
- Stop playback.
Using the Marker List to Navigate
Another way to navigate using markers is with the Marker List.
- In the Toolbar, click the Lists button.
The Lists area opens. Note that the Lists area has its own set of primary and secondary (with Command key) tools. By default, they are Pointer and Finger tools.
- Select the Marker tab, if not already showing in the Lists area.
- Using the Finger tool (by holding down the Command key), click-hold the Intro marker. (Specifically, you should click the word Intro.)
The project starts playing from the beginning of the Intro marker and continues playing until you release the mouse button.
- Release the mouse button to stop playback.
- Try click-holding other markers with the Finger tool to initiate playback from their positions, releasing the mouse button when you want to stop playback.
This provides a simple way to audition sections in the project, especially when you have many markers that are not in the visible area of the window.
- In the Toolbar, click the Lists button to close the Lists area.
Using Key and Menu Commands to Locate to Markers
Menu commands (and their respective key commands) also provide an efficient way of jumping from one marker to the next.
- Click the Global Tracks disclosure triangle to view the Marker track.
The Marker track appears at the top of the window.
- Choose Options > Marker > Go to Previous, then Options > Marker > Go to Next, observing the results.
The playhead moves from marker to marker sequentially, aligning itself at the beginning. As each marker is selected, it becomes highlighted in the Marker track.
Although the menu commands are readily accessible, the key command equivalents provide the most efficient access to these functions.
- Try pressing the key commands associated with going to the previous marker (Control–Command–Left Arrow) and going to the next marker (Control–Command–Right Arrow).
With these key commands, you are able to quickly scroll forward and backward by markers along the Bar ruler.
Isolating Material with Cycle Mode
Cycle is an extremely useful mode that enables you to play a section repeatedly. This works well for isolating material in a project, permitting you to focus on the repeated section, editing as you listen.
Cycle works by setting locators (used as start and end points), which can be done manually or automatically. Let’s take a look at methods to set locators and to create cycle areas that allow you to isolate material.
- In the top portion of the Bar ruler, click a position of your choice and drag to the right a few bars.
- Press Play.
The project starts immediately at the start point of the cycle area, continuing to play until it reaches the end, at which point it loops around again, playing from the start of the cycle.
- Stop playback.
This technique works for locating to a given point and for playing an isolated passage that has been defined manually. However, precisely positioning the start and end points is difficult and becomes tedious when done around predefined sections (such as markers and regions). To address this, let’s look at additional techniques that can automatically set the locators defining a cycle area.
Using Markers to Create Cycle Areas
An interesting thing happens when navigating using the Go to Next/Previous marker key commands: the locators are automatically set around the marker, corresponding exactly to the marker length. You can use this to your advantage, dynamically changing cycle areas that correspond to the sections in the project.
- With Cycle mode still active, use the key commands for going to the next marker (Control–Command–Right Arrow) and the previous marker (Control–Command–Left Arrow) to move the playhead to the Verse 1 marker.
The locators adapt to the selected marker length, and the cycle area moves in the Bar ruler, matching the Verse 1 marker length exactly.
- Press Control–Command–Right Arrow and Control–Command–Left Arrow as needed to move from marker to marker along the Bar ruler.
The cycle areas adapt to each marker accessed.
As long as Cycle mode is on, the cycle area will relocate to any selected markers, allowing you to effectively concentrate on individual sections in the project.
- In the Transport bar, click the Cycle button to turn off Cycle mode.
You can also create a quick cycle area with a marker without having to locate to it first. This can be done via a simple drag-and-drop technique.
- Drag the Guitar Solo marker upward, and release the mouse button when the marker is over the top half of the Bar ruler (where cycle areas are displayed).
A cycle area is created, matching the Guitar Solo marker length and location.
- In the Bar ruler, click the cycle area to turn off Cycle mode.
This is another way to quickly turn off Cycle mode.
- Click the Global Tracks disclosure triangle to hide the Marker track.
Setting Locators by Regions or Events
While markers work great for sectional material, you will often want to concentrate on smaller areas in the project. You can accomplish this by setting locators around individual regions or events in the project, and then activating Cycle mode.
- Select the first region in the Bongos track (track 9).
- From the Arrange area’s local menu bar, choose Region > Set Locators by Regions.
- In the Transport bar, click the Cycle button.
A cycle area is created, matching the Bongos region.
This technique isn’t limited to regions: it generally applies to all selected objects (notes, events, and so on) in any editor. Thankfully, a single key command encapsulates all object types, allowing you to execute this command regardless of the editor.
- Choose Logic Pro > Preferences > Key Commands, or press Option-K, to open the Key Commands window.
- In the search field, enter locator.
All commands that have locator in the name are listed in the Command column. Make note of the key command for “Set Locators by Regions/Events,” Control-= (equal sign).
- Close the Key Commands window.
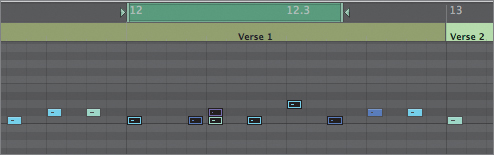
- Double-click the first Bongos region (the one you selected earlier) to open the Piano Roll Editor.
- Use the Pointer tools to draw a selection rectangle around multiple notes in the Piano Roll Editor.
- Press Control-= (equal sign), the key command for Set Locators by Regions/Events.
The cycle area within the Piano Roll Editor adapts to your selection.
As long as Cycle mode is active, it will adapt to whatever you select when using this command.
Using Skip Cycle Areas
Sometimes it is helpful to skip a section to hear how a project sounds without it. You can do this by creating a skip cycle, which lets you omit a passage. Locators are used to determine the position of the skip cycle area, but here they work in reverse, swapping the left and right locators. This technique is especially helpful when trying out transitions between sections.
- Click the Piano Roll button to close the Piano Roll Editor.
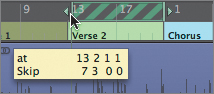
- In the top half of the Bar ruler at measure 21, drag to the left until you reach measure 13.
A skip cycle area is created, represented by the striped bar at the top of the Bar ruler.
- Press the Option key while you double-click the Verse 1 marker.
The project plays from the beginning of Verse 1 until it reaches the skip cycle area, then jumps past it, continuing to play from the end point of the skip cycle area.
This is effective for quick designations but suffers from the same problems as manually drawing a cycle area: it’s inexact and it doesn’t adapt. You can address this with a key command that enables you to create a skip cycle area out of any cycle area (or vice versa).
- Choose Logic Pro > Preferences > Key Commands, or press Option-K, to open the Key Commands window.
The search field should still have locator typed in it, with the Command list displaying all commands with locator in the name. Make a mental note of the key command for “Swap Left and Right Locators” (J).
- Close the Key Commands window.
- Use the Go to Next/Previous marker key commands to navigate to the Guitar Solo marker.
The skip cycle area changes to a regular cycle area around the Guitar Solo marker.
- Press J, the key command assigned to Swap Left and Right Locators.
The cycle area now becomes a skip cycle area.
- Press the Option key as you double-click the Verse 3 marker to play the project without the Guitar Solo.
The project plays from the beginning of Verse 3 until it reaches the skip cycle area, then jumps past the Guitar Solo, continuing from the Bass Solo until the end of the project.
- Stop playback, if necessary.
- Turn off Cycle mode.
Using Zooming
When editing, it is often necessary to work with material at a highly detailed level. Zooming is the act of moving in and out of your arrangement, magnifying your working area to focus on individual aspects of a project.
In this exercise you will use various zoom techniques that improve your ability to view and edit material.
Understanding Zoom Positioning
Before you begin, it is important to understand how Logic uses positioning to determine which visual material is magnified. The goal is to keep the area you are concentrating on visible in the window. This is dictated by either the playhead position or the selected material.
You can see this when executing basic zoom commands such as those controlled by the zoom sliders.
- Click the background of the Arrange area (where no region is located) to make sure that nothing is selected.
- Position the playhead at the beginning of the Chorus marker by Option-clicking the marker.
The playhead locates to the beginning of the Chorus section.
- At the lower right of the Arrange area, slowly drag the horizontal zoom slider to the right.
The project zooms in lengthwise, spreading out in both directions but keeping the playhead in roughly the same place within the window.
- Press 1 to open Screenset 1, returning to the original zoom level.
- In track 7, select the Triangle region.
- Slowly drag the horizontal zoom slider to the right.
The project zooms in, spreading out in both directions, but this time it keeps the left edge of the region in roughly the same place within the window.
What does this mean, and why is this important? In effect, while zooming, the displayed area of the window is justified either to the current playhead position or to a selected region. When you want to zoom in to a given playhead position, you must make sure that nothing is selected before you zoom. If you want to zoom in to an individual region, you need to select it first. This is important to keep in mind while zooming because you may find yourself losing the area that you intend to work with unless you actively choose one of these methods.
Saving and Recalling Zoom Settings
Zooming can be thought of as navigating up and down levels of magnification. Each magnification level can be accessed via the zoom sliders or a key command, and it can also be saved for later use. These zoom steps can also be saved and recalled dynamically while you’re working (like saving and restoring screensets), allowing you to return to desired levels of magnification.
Let’s explore this technique by assigning a few key commands.
- Choose Logic Pro > Preferences > Key Commands, or press Option-K, to open the Key Commands window.
- In the search field, enter zoom.
All the commands that have zoom in the name are listed in the Command column.
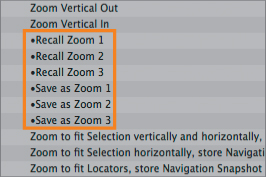
Note the functions relating to saving and recalling zoom settings: Save as Zoom 1, 2, and 3, and Recall Zoom 1, 2, and 3.
Once they’re assigned, you will use these key-command-only functions to save and recall zoom “snapshots” of various levels of magnification.
- In the Command column, choose “Save as Zoom 1.”
- Click the Learn by Key Label button.
- Press Command-F1 to assign this key command to Save as Zoom 1.
- In the Command column, choose “Save as Zoom 2.”
- Press Command-F2 to assign this key command to that function.
- In the Command column, choose “Save as Zoom 3.”
- Press Command-F3 to assign this key command to that function.
Now that you have assigned keys to save three zoom snapshots, let’s assign related keys to recall them.
- Assign Recall Zoom 1, 2, and 3 to F1, F2, and F3, respectively.
- Close the Key Commands window.
With this arrangement, the Command key works as a memory toggle, storing settings when it’s used in conjunction with the function keys. When the keys are depressed without the Command modifier key, they recall the last zoom level that was saved.
- Move the playhead to the beginning of the project, and select the Rhythm Guitar track (track 1).
- Press Command-F1 to save this starting zoom level to the first memory location (Save as Zoom 1).
- Use the basic zoom key commands (Control–Right Arrow and Control–Down Arrow) to zoom in four steps horizontally and four steps vertically (press each key combination four times).
The project zooms in a modest amount, showing the audio region in track 1 in greater detail.
- Press Command-F2 to save this zoom setting to the second memory location (Save as Zoom 2).
- Use the basic zoom key commands again to zoom in four more steps vertically and four more steps horizontally (press each key combination four times).
- Press Command-F3 to save the zoom setting to the third memory location (Save as Zoom 3).
You have saved three zoom settings with varying degrees of magnification.
- Try pressing F1 through F3 to view the zoom snapshots.
These settings work effectively in conjunction with the zoom positioning techniques discussed earlier, allowing you to quickly view elements of the project at multiple magnification levels.
- Press F1 to return to the first zoom snapshot.
- Option-click the Verse 3 marker to go to the beginning of the section.
- Press F1 through F3, recalling the zoom levels you set earlier.
The selected region (Rhythm Guitar) zooms in, keeping the playhead position within the window.
Zooming In on Regions or Events
Zooming in on specific regions is useful when you need to focus on a particular element in a project. It provides a quick way to resize the visible work area to encompass the entire region or regions.
There are several useful key commands for zooming in on regions, including “Zoom to fit Selection vertically & horizontally, store Navigation Snapshot.” This function automatically employs the zoom settings that best fit your selection within the window. The command is also dynamic, using low zoom levels for large regions and high zoom levels for small ones.
Since this has already been assigned to a key combination by default (Control-Option-Z), let’s give it a try within the project.
- Press 1 to open Screenset 1, returning to your original view.
- On track 8, select the Maracas region.
- Press Control-Option-Z to activate the “Zoom to fit Selection vertically & horizontally, store Navigation Snapshot” command.
The screen changes size to fit the entire selected region, justifying the selection to the upper-left corner of the work area.
- Control-Option-click anywhere within the Arrange area to return to the original zoom level.
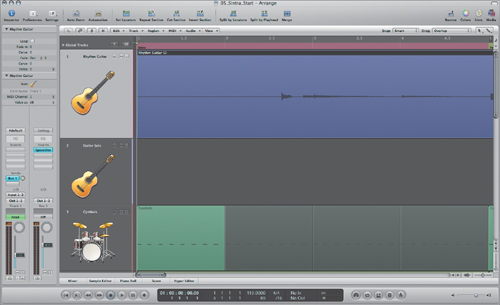
- In track 1, select the Rhythm Guitar region.
- Press Control-Option-Z to activate the “Zoom to fit Selection vertically & horizontally, store Navigation Snapshot” command.
The work area changes size to fit the entire region, shrinking the horizontal view while zooming in vertically.
Tip
This technique also works for zooming in on individual events in other editors such as the Piano Roll.
A similar zooming effect can be achieved based on locators rather than regions or events. You need to assign a key command to this function.
- Choose Logic Pro > Preferences > Key Commands, or press Option-K, to open the Key Commands window.
The search field should still have zoom typed in it, with the Command list displaying all commands with zoom in the name.
- In the Command list, choose “Zoom to fit Locators, store Navigation Snapshot.”
- Click the Learn by Key Label button.
- Press Shift-Control-Z to assign this key command to the function.
- Close the Key Commands window.
Remember how the locators automatically changed to fit the marker when you used the commands for going to the next and previous markers? You can use this feature in conjunction with the key command you just set, adapting the view to display only the selected section.
- Use the Go to Next/Previous marker commands to jump to the Intro marker.
- Press Shift-Control-Z.
The work area is resized horizontally to fit the entire Intro section in the window.
Magnifying the Waveform Without Zooming the Region
Audio is displayed in the Arrange area as waveforms that are constantly redrawn for every zoom level, all the way to single-sample resolution. When the signal level is low, the displayed waveform is quite small and can be difficult to edit.
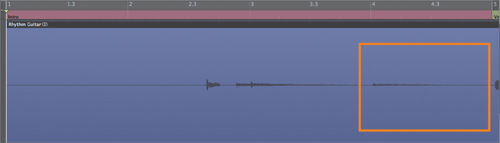
A good example of this is the Rhythm Guitar region at measure 4. A small waveform is barely visible.
To enable more precise edits, the waveform can be zoomed vertically, independent of the region. Logic has a dedicated Waveform Zoom tool to do just this.
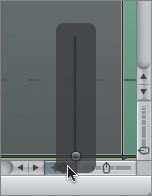
- At the lower-right corner of the Arrange area, hold down the Waveform Zoom button until a slider appears, then release the mouse button.
- Once the Waveform Zoom slider is active, drag it up until the small waveform in the Rhythm Guitar region is clearly visible.
The waveform is magnified while the region size stays the same.
This makes the waveform much easier to edit without changing the visible area.
- Click the Waveform Zoom button to turn off the waveform zoom.
The Waveform Zoom button acts as a toggle between the zoomed view and the original magnification.
The waveform zoom is independent of the screenset and zoom level. It is especially helpful for working with low-signal passages, where you might want the waveform continuously displayed in a magnified state.
Editing the Arrangement
The ability to rearrange the structure of a composition is an essential part of composing and arranging. However, the seemingly simple task of cutting and repeating sections can become overly complicated, and achieving the desired results often entails multiple steps (dividing regions, selecting areas, cutting, pasting, and so on). Fortunately, Logic offers several features that help with editing multiple regions over numerous tracks by combining multiple steps into single commands.
- Press 1 to open Screenset 1, returning the project to its original zoom settings.
- Press Control–Command–Right Arrow and Control–Command–Left Arrow (the Go to Next/Previous Marker key commands) as needed to navigate to the Verse 2 Marker.
The cycle area (and locators) adapts to the Verse 2 marker.
- In the Arrange area’s local menu bar, choose Edit > Cut/Insert Time > Snip: Cut Section Between Locators.
Note
Depending on your individual setup, a dialog may appear asking if you want to erase the automation data within the selected area along with the edit (this preference can be found in Preferences > Automation). For the purpose of this exercise, it won’t matter which option you choose (Don’t Erase or Erase). However, it is important to keep in mind that large-scale edits will also affect underlying (and oftentimes unseen) automation information written to the tracks.
Multiple things happen when the command is executed:
• All regions that overlap the cycle area are divided to form separate regions within the points specified by the locators.
• All material within the cycle area is selected.
• The selected regions are deleted and saved to the Clipboard.
• The regions immediately after the right locator are moved earlier along the Bar ruler to the location of the left locator.
By performing this edit, you effectively eliminated Verse 2 from the project without forming a gap in the project.
- Play the project from Verse 1 to the Chorus, listening to the edit you just made.
Now that you’ve tried your hand at cutting an entire section, you will perform another common large-scale edit, repeating a section.
- Use the Go to Next/Previous Marker commands to navigate to the Verse 1 marker and set locators around it.
- In the Arrange area’s local menu bar, choose Edit > Cut/Insert Time > Repeat Section Between Locators.
Similar to Cut Section Between Locators, this command groups multiple functions under one roof, selecting only the region information that lies between the locators and inserting it immediately. The result is that the entire Verse 1 section is repeated, followed by the Chorus section.
- Play the project, listening to the edit you just made.
- Stop playback.
Lesson Review
1. How do markers aid in a production?
2. How is changing the text and color of markers useful in a production?
3. Where are markers accessed?
4. How do specialized playback commands function in a production?
6. Zooming justification depends on what factors?
7. How are zoom settings stored?
8. Identify the difference between the Zoom to Fit Selection and the Zoom to Fit Locator commands.
9. How can you magnify the audio waveform independently of the region?
Answers
1. Markers can designate section material or serve as navigation points.
2. Changing the appearance of markers (including production notes) helps you easily identify and navigate to sections within the arrangement.
3. Markers can be accessed in the Bar ruler, Marker track, or Marker List.
4. Specialized play commands can effectively aid in quick, nonlinear navigation.
5. Locators can quickly be set by dragging within the Bar ruler or by creating cycle areas for any region, event, or marker.
6. Zooming justification is dependent on playhead position and region selection.
7. Although Logic keeps track of previous magnification levels when zooming, zoom snapshots can be saved and recalled using key commands.
8. Zoom to Fit Selection adapts the viewable area to display selected regions or events. Zoom to Fit Locators allows you quickly display marker areas within the arrangement.
9. Use the Waveform Zoom slider to magnify an audio waveform independently of the region.
10. Locators can be used to edit large areas of the project at once by enabling you to cut or repeat entire sections.