
Changing and Enhancing Your Project
Now that you know your way around your Android project’s structure, it is time to get your hands dirty, change things, and see what breaks! OK, perhaps you won’t break things immediately, but in this chapter, I show you more of the capabilities of your project and how to quickly leverage more of the developer tools. You also start to add more user interface elements and program logic to your application. Let’s get to it.
Extending Your Application with the Android Manifest
Whether you use the New Project wizard in Eclipse, Android Studio, or another IDE that supports Android Developer Tools (ADT), the job of creating your initial AndroidManifest.xml file is done for you. The file itself is a little spartan, with just enough to get the job done. You can control many of a project’s key additional features and optional settings by just adding elements and attributes to AndroidManifest.xml.
Right now, you probably find this to be useful information in an abstract way, but it will become increasing practical as your Android knowledge grows—in fact, many of you should eventually feel happy to flick back to this chapter when you need to.
The AndroidManifest.xml file comprises XML, and therefore is only text, as you saw in Listing 3-1 in the preceding chapter. Editing XML/text is certainly doable, and many of the early examples in this book ask you to do just that. But as the file becomes larger and more complex, it can become cumbersome to perform clean edits and not inadvertently upset opening and closing tags, disturb nesting levels, and make other mistakes. To help overcome this annoyance, ADT includes a graphically-enhanced editor that displays the elements and their attributes as selectable items with text fields in which to make edits. This XML editor is shown in Figure 4-1.
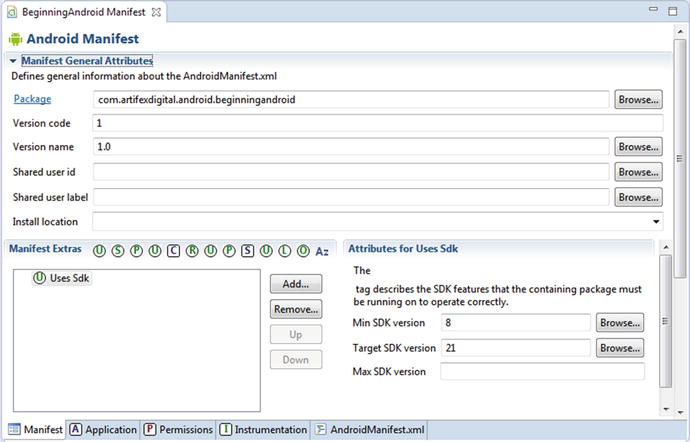
Figure 4-1. The graphical XML editor provided by the Android Developer Tools
Note the tabs at the bottom of the figure. You can switch between graphical and text modes by simply selecting the desired tab.
Specifying Target Screen Sizes
The range of screen sizes for Android devices is now truly mind-blowing. From the miniature wearable watches with 1-inch (2.54cm) screens, to Android-driven 50-inch and larger TVs, you may find your applications running on a vast array of screen sizes and densities. To make them easier to manage and customize, Android divides these devices into multiple categories based on diagonal screen size and the distance at which users normally view them:
- Small—Under 7.5cm/3in, at least 426dp×320dp resolution
- Normal—7.5cm to around 11.5cm/3in to around 4.5in, at least 470dp×320dp resolution
- Large—11.5cm to around 25cm/4.5in to around 10in, at least 640dp×480dp resolution
- Extra-large—Over 25cm/10in, at least 960dp×720dp resolution
If you, as a developer, do nothing to change the default screen support in your manifest file, your application will support normal screens and will attempt (and usually succeed) to support large and extra-large screens via some automated conversion by scaling and resizing code built into Android. It will also attempt to support small screens, but on older devices and SDK levels it will encounter historic issues and may not work.
As a developer, you might immediately ask the question, “Which screens sizes should I explicitly support, and how many of these different sizes are in use throughout the world?” The Android developer site at https://developer.android.com/about/dashboards/index.html attempts to provide some guidance, giving you a partial breakdown of which screen sizes are active in the wild. Figure 4-2 shows a snapshot of the screen sizes listed during the early writing of this book. If you take a look at the Android developer site dashboard as you read this book after publication, you should get an interesting idea of how screen sizes and densities are evolving with Android over time.
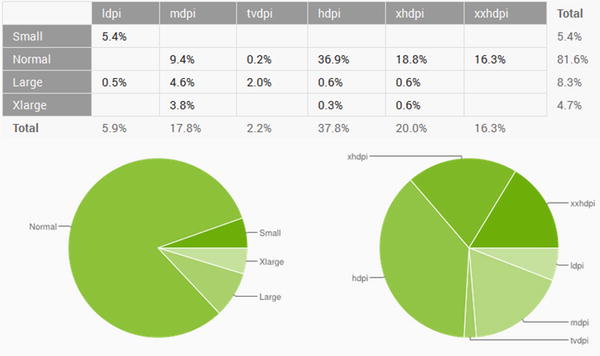
Figure 4-2. Partial data provided by Google on screen sizes being used throughout the world
Note that this is not an entirely accurate picture, since it only deals with devices that report data back to Google. However, it’s useful as a rough estimate.
MYSTERIOUS GOOGLE TV SIZE
As part of the original release of Google TV—and later, the Nexus 7 tablet—Google targeted some specific screen sizes and densities “in between” the standard sizes shown in Figure 4-2. You don’t need to worry about these now or even really consider them at all. For those of you who are curious, however, I’ll talk more about screen sizes in Chapter 11.
To add support for all the screen sizes you want to target, you add a <supports-screens> element in your manifest file. This lists the screen sizes for which you have explicit support. For example, if you want to support large screens, you need to include the <supports-screens android:largeScreens="true" > element and attribute. The pattern for small and extra-large screens is similar; you can simply specify both by including additional attributes, for example, <supports-screens android:smallScreens="true" android:xlargeScreens="true" >. It is fine to use the default setting of AndroidManifest.xml to “just work,” however, if you plan on tailoring your user interface and artwork for larger screens, be sure to add the relevant support for these screen sizes.
From Android 3.2 on, you can employ an alternative method to more accurately specify the space requirements of your screen layouts. These attributes specify the smallest width, sw<N>dp, available width, w<N>dp, and available height, h<N>dp (where N is the pixel count). At first, using these prescriptive options may seem more complicated, but for many designers, it is more natural to design a layout and a set of features, and then determine the minimum and optimum sizes to the nearest pixel for presentation requirements.
Go ahead and edit your existing AndroidManifest.xml file to include broad screen support using this addition:
<supports-screens android:smallScreens="true" android:normalScreens="true"
        android:largeScreens="true" android:xlargeScreens="true" >
Save your changes, and you should see a warning reported immediately. Because support for extra-large screens was not introduced until a later version of Android and its SDK, you will see a message similar to the following:
Attribute "xlargeScreens" is only used in API level 9 and higher (current min is 8)
Is this a problem? Not at all. You could take the easy way out and remove support for extra-large screens. But where’s the fun in that? Instead, you can learn how to adjust and control API-level support and the SDK versions with which you build Android applications. Let’s do that instead!
Controlling Support for Different Android Versions
Android provides you with some control over the behavior of your application when it comes to writing and running it across different devices with different versions of Android. The principal method for controlling this is via the <uses-sdk> element in the Android Manifest, as I briefly mentioned in Chapter 3. If you examine your manifest for the Beginning Android example, you’ll see that it already specifies a minimum supported Android version and a target version using the minSdkVersion and targetSdkVersion attributes I described earlier. This covers enough to get you app working in the device emulator and even on a range of real devices. However, thanks to the variety and age range of the more than 1 billion Android devices active throughout the world, you probably want to add specific details about what versions of Android your application can support. Table 4-1 lists API levels for the Android SDK and the equivalent Android version release.
Table 4-1. Android SDK Official API Levels and Equivalent Android Version
|
API Level |
Android Version |
|---|---|
|
1 |
Android 1.0 |
|
2 |
Android 1.1 |
|
3 |
Android 1.5 |
|
4 |
Android 1.6 |
|
5 |
Android 2.0 |
|
6 |
Android 2.0.1 |
|
7 |
Android 2.1 |
|
8 |
Android 2.2 |
|
9 |
Android 2.3 |
|
10 |
Android 2.3.3 |
|
11 |
Android 3.0 |
|
12 |
Android 3.1 |
|
13 |
Android 3.2 |
|
14 |
Android 4.0 |
|
15 |
Android 4.0.3 |
|
16 |
Android 4.1 |
|
17 |
Android 4.2 |
|
18 |
Android 4.3 |
|
19 |
Android 4.4 |
|
(unnumbered) |
Google Glass extensions for Android 4.4 |
|
20 |
Android 4.4 for Wearables |
|
21 |
Android 5.0 |
|
22 |
Android 5.1 |
|
23 |
Android 6.0 |
Why list all of those versions and API levels here? The gotcha with all of the attributes for <uses-sdk> is that they expect the integer matching the API level to be specified, not the SDK version or Android version. Keep that in mind when you’re setting any of these values.
Keep the following considerations in mind when you are choosing a minSdkVersion attribute. First and foremost, on what APIs will your application rely and are any of them specific to newer versions of Android? A very simple example of this is the switch user interface element (it looks just like a light switch). This was only introduced in API level 14 with the release of Android 4.0. The action bar is another excellent example, although you don’t need to worry about what this is for the moment. Google has gone to some significant effort to provide you with the ability to use or mimic features released in later versions of the API with devices that predate them. The most notable of these are the appcompat project you already saw in Chapter 2 and the Android Support Library.
Another consideration for minSdkVersion is how broadly you want to support older devices. Because of the control telecom carriers exert over the availability and timeliness of updates to Android devices, the vast majority of phones, tablets, and other devices in the wild are running something other than the latest Lollipop 5.0 release with API 21. The Android website tracks a breakdown of devices activated and their current Android release at https://developer.android.com/about/dashboards/index.html (the same URL that tracks screens, discussed earlier), and Figure 4-3 shows the state of device activations at the time of writing.
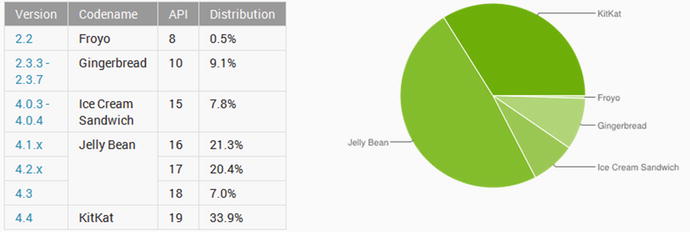
Figure 4-3. Partial data on Android releases in use and related API level for SDK settings
From this figure, you can see that you can target the vast majority of devices using a minSdkVersion of 8 (from Android release 2.2, the first truly widespread release). In practice, you also might think about the geographic spread of devices—what markets you might want to sell or release into, and how that changes the distribution of Android versions. The demographics and economic situations of those users will also come in to play—investment bankers in New York will have very different ideas about purchasing apps compared to backpackers in Vietnam.
The second and more subtle manifest value controlling Android versions is the targetSdkVersion setting. With developers in mind, Android offers this value so you can indicate which version you are writing your code against. The main benefit from this setting comes behind the scenes, on devices running newer versions of Android. Knowing that your code was written for version X, successive versions of Android implement a range of optimizations and enhancements that can actually improve the behavior and responsiveness of your code long after you’ve written it. One example of this is where Android allows your application to adopt new system-default themes if the targetSdkVersion is high enough.
The targetSdkVersion setting is entirely optional, but if you do decide to use it, you must have that release of the SDK installed on the system on which you are developing your application. If you don’t have that particular version present, the ADT detects this and displays errors in the logging area for your IDE. For instance, Figure 4-4 shows the error you see in the Eclipse console output when it loads a project referencing a targetSdkVersion with no matching SDK installed.
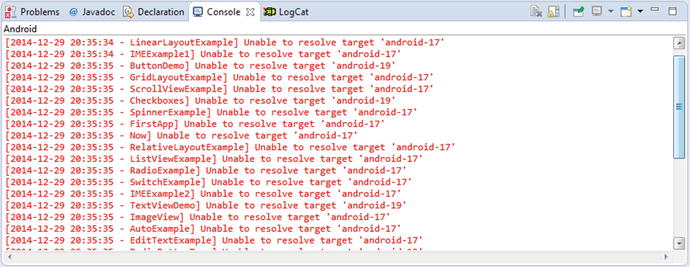
Figure 4-4. Example errors from missing targetSdkVersion versions
Note You can have as many different versions of the SDK installed as you like. The only practical limitation is disk space.
The last of the three version-related manifest settings is maxSdkVersion. Ordinarily you should never need to set this value; in fact, Google strongly recommends that you not do so. However, it exists for very old versions prior to 2.0.2, where Android would perform a running version instead of a declared maxSdkVersion check and refuse to install an application if the device was running a higher (later) version.
When I examined screen sizes earlier in this chapter, I left you with an unresolved warning about extra-large screen sizes needing at least API level 9 for support. Go ahead and edit your AndroidManifest.xml to change the android:minSdkVersion to 9. The <uses-sdk> element in your manifest should look like this:
<uses-sdk
    android:minSdkVersion="9"
    android:targetSdkVersion="21" />
Up to this point, I have been taking things slowly to familiarize you with your new environment and the framework Android and its build tools provide. But editing XML isn’t exactly ground breaking. If you are itching to get at the heart of coding for Android, then the wait is over.
Using the Beginning Android example I introduced in Chapters 2 and 3 as the basis, you will step through the code for you project and modify it to perform some application logic and present the user (that’s you, for now) with some real interaction. Along the way, you can start to build your knowledge of the basic Java building blocks of all Android applications, starting with an Android activity.
Note This chapter assumes you are following the naming conventions of the project and files I used in the original instructions in Chapter 2. If you are using different names, just adjust the instructions provided here so that the names match yours.
Introducing the Activity
I covered the overall project structure and file layout in Chapter 3, and if you look within your project’s src/ directory, you can see that the tree of folders I discussed all derive from the Java package name I used when I created the project. For example, com.artifexdigital.android.beginningandroid results in the directory structure src/com/artifexdigital/android/beginningandroid. At the lowest directory, the ADT generates the file named MainActivity.java, which is where you create your first activity.
If the MainActivity.java file isn’t already open in your IDE—Android Studio, Eclipse, or whatever you’ve chosen to use—open it now and paste in the following code, overwriting the existing content. You can find the example code for the book on the Apress website—look for Ch04/BeginningAndroid for this example, shown in Listing 4-1.
Looking Inside Your First Activity
Let’s examine the Java code in Listing 4-1 piece by piece. We’ll start with the package declaration and imported classes; they are as follows:
package com.artifexdigital.android.beginningandroid;

import android.app.Activity;
import android.os.Bundle;
import android.view.View;
import android.widget.Button;
import android.widget.Button;
Your package declaration has to match the one you used at project creation time. From there, as with any sort of Java project, you need to import any classes you reference. Most of the Android-specific classes are in the android package. You also have a wide range of Java SE and Java ME classes from which to choose for incorporating into any Android program, such as java.util.Date and others. Not every Java SE or ME class is available—Google doesn’t provide an exhaustive list of differences, instead it just documents what is supported, which is largely derived from the Apache Harmony Java implementation.
Activities are the fundamental building blocks of user interaction in Android. You can think of an activity as roughly analogous to a screen or device interface that the user sees and the (initial) logic to control interaction with the user. An application is typically made up of multiple activities that work together to present your application’s overall experience, even though each activity is an independent object in its own right. An activity is a public class in the Java sense, and it inherits from the android.app.Activity base class. In this case, the activity holds a button (myButton):
public class MainActivity extends Activity implements View.OnClickListener {
  Button myButton;
Anyone familiar with any other UI toolkit, like Swing, immediately recognizes a button as a typical UI widget. (I cover all available UI widgets and elements in Part II of the book.) In this example, for the sake of simplicity, I have made the button the only UI widget of the activity, and therefore, because I want all button clicks trapped just within the activity itself, I also have the activity class implement OnClickListener.
The onCreate() method is invoked when the activity is started. This is one of the four fundamental methods that control the lifecycle of an Android application. I cover more on the lifecycle in the next chapter, but for now, you can rely on the fact that onCreate() is invoked once and only once in the life of your activity.
From here, we first chain up to the superclass, calling its onCreate() method. This ensures that our activity invokes the base Android activity initialization on instantiation:
@Override
public void onCreate(Bundle savedInstanceState) {
    super.onCreate(savedInstanceState);
    myButton = new Button(this);
    myButton.setOnClickListener(this);
    myInt = 0;
    updateClickCounter();
    setContentView(myButton);
}
In our implementation, we then perform the following set up work:
- Create the button instance myButton (via new Button(this)).
- Instruct the button to send all button clicks to the activity instance itself (via setOnClickListener()).
- Initialize the myInt counter that we’ll use to track the number of button clicks.
- Call the private updateClickCounter() method as a shorthand way to populate the text of the button so it can be drawn successfully.
- And finally, set the activity’s content view to be the button itself (via setContentView()).
In later chapters, I examine more closely the purpose of the curious Bundle savedInstanceState. For the moment, consider it a handle to a blob of useful state information that all activities receive upon creation.
As an activity that implements the OnClickListener interface, this activity is responsible for providing the necessary plumbing for the onClick() method, shown next.
public void onClick(View view) {
  updateClickCounter();
}
In Android, clicking a button invokes onClick() in the OnClickListener instance configured for that button. The View object that triggered the click (in this case, the button) is then passed to the listener. All we do here is call that private updateClickCounter() method:
private void updateClickCounter() {
    myInt++;
    myButton.setText(myInt.toString());
}
When we initially start the activity (onCreate()) or whenever the button is clicked (onClick()), the text label of the button refreshes to be the current count of the number of clicks on myButton via the setText() method.
Building and Running Your Enhanced Application
You can (re)build your application at any time using your IDE’s built-in Android packaging tool. For example, Project->Build All in Eclipse. Then run the application. Android Studio or Eclipse should launch your device emulator automatically if it is not already running, install the apk file for your application, and launch the activity. If, for any reason, the activity doesn’t appear to launch, try finding the activity in the home screen of your emulated device, and click on it to start it. You should see an activity very much like the one in Figure 4-5, which shows what our app looks like after we click on the button several times.
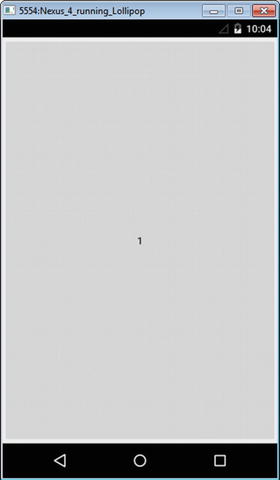
Figure 4-5. Your enhanced application displaying the click counter feature
Because the button consumes pretty much the entire device screen, you can press just about anywhere to update the click counter shown in the button’s label.
You will note some UI effects, such as the pale border that surrounds the button and the centering of the label text. These result from defaults in your layout and other styling defaults, which I’ll explore in the coming chapters.
Congratulations, you have enhanced your Beginning Android application, turning it into a piece of push-button wizardry. When you are done playing with your new creation, press the Back triangle on the emulator, and return to the home screen.