
Making Noise with Audio for Android
In the previous chapter, you began to explore Android beyond the simple programming environment, branching out and using device features such as the ability to make phone calls. We are going to continue expanding you Android reach, and your knowledge of how to leverage the devices on which Android runs, by turning to the topic of audio and sound.
Android provides a rich set of classes supporting the playback and recording of media of all sorts, both audio and video. At the core of Android support is the Media package, which provides everything from basic MP3 audio playback, MPEG video playback, and similar support for a variety of other audio and video formats, through to recording audio and video, and even specialized support for audio routing (choosing headphones over speakers) and image recognition in image formats.
At the heart of the Media package are the MediaPlayer and MediaRecorder objects. These two objects manage all the heavy lifting of playing back and recording. Let’s take a look at managing audio with the Media package, before we move on to video in the next chapter.
Building Your First Audio Application
To start your musical journey, let’s consider one of the very basic uses your users might have for audio playback and your application. If you think of devices like iPods, and even older MP3 players, they effectively provided a mechanism to play back an audio file from the device to the listener – the user of the application or device. We will build our own application to do exactly that. Later in the chapter we will extend the functionality to mimic contemporary streaming services like Spotify, and play back audio directly from a web location.
Using Resources or Assets
We are about to use an audio file to demonstrate playback in an Android application, and you as the developer have the option of using an “assets” folder in which to store your audio files , or the “raw” folder as discussed in Chapter 3. If you are using Eclipse and the ADT, you will find your projects are already created with a raw folder, and this is the most straight-forward option to use. If you are using Android Studio, particularly after the v1.0 release, your projects will be lacking both the raw and assets folders. While this simplifies your project folder structure, it is probably taking things too far into the realm of absurdly simplified.
To create a raw folder for holding audio files in Android Studio, navigate to the res folder in the hierarchy, and choose the menu option File ![]() New
New ![]() Directory. Name the directory “raw”, and your raw folder will now be in place.
Directory. Name the directory “raw”, and your raw folder will now be in place.
If you prefer to use an asset folder and are using Android Studio, you should navigate to the File ![]() New
New ![]() Folder
Folder ![]() Assets Folder option in Android Studio, which will then prompt for the creation of an assests folder for your project, as shown in Figure 14-1.
Assets Folder option in Android Studio, which will then prompt for the creation of an assests folder for your project, as shown in Figure 14-1.
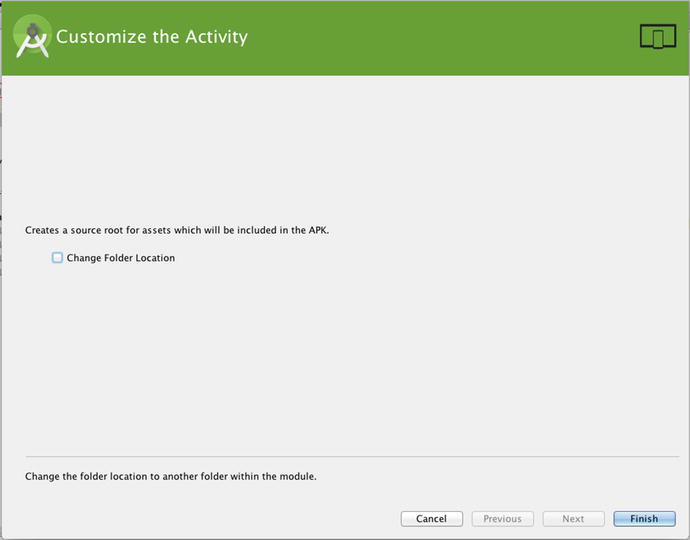
Figure 14-1. Creating a new asset folder for you audio file in Android Studio 1.0 or later
Allow Android Studio to keep the default location. You should see a new folder pop into existing in your project tree named assets, as shown in Figure 14-2.
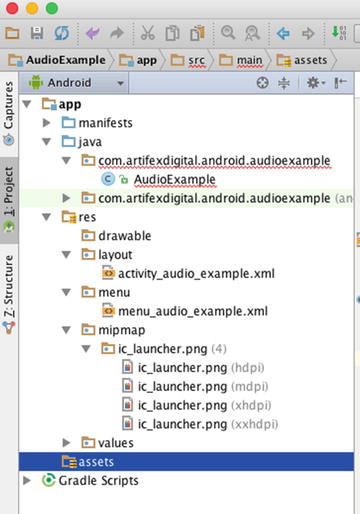
Figure 14-2. Assets folder created in an Android Studio 1.0 or later project
The corresponding filesystem location for you Android Studio assets folder within your project is ./app/src/main/assets (or .appsourcemainassets under Windows).
If you want to continue using the traditional raw folder, you can find (or create) it under the ./app/src/main/res folder of your project.
Coding for Audio Playback Using the Media Framework
Delve into the special-case UI widgets and parts of the Media framework and you will find a very slick, all-in-one audio player widget that is complete with stubs for implementing the common playback functions people use when listening to music. Using that widget would get you an application very quickly, but using it would completely rob you of understanding how the parts of the media framework do their thing. You would miss learning the fundamentals that you need to master as a budding Android developer.
So instead of presenting the fully polished application with no scope for learning these things, we will build our own widget. We’ll explore the Media framework properly as we go.
Starting With A Simple Audio Player Layout
In order to start exploring the use of the Media player framework for audio playback, we will need a simple interface of our own construction. Figure 14-3 presents what is probably the world’s most straight-forward audio player application.
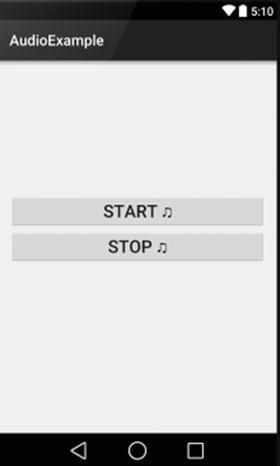
Figure 14-3. A simple audio player application
The layout provides just enough to begin the exploration of the Media framework: a “Start” button, and a “Stop” button. The layout for the interface from Figure 14-3 is shown in Listing 14-1.
The layout is a straight forward RelativeLayout with two Button views placed within it. These buttons have android:id values of startButton for Start, and stopButton for Stop. You can also see a range of additional attributes used to style the look and feel, such as the android:layout_above attribute to place the Start button above the Stop button, and font sizing to make the text large and obvious.
Note You will also see in the android:text attribute values of each button the text ♫ This isn’t some mysterious Android code, but rather is simple Unicode for the little musical symbol you see on the buttons in Figure 14-3. Remember, layouts are XML, and XML is Unicode based, so you have the freedom to include “text” like this. (See http://unicode-table.com for a list of such codes).
Each of the buttons also has the same value for the method to invoke when clicked. This method is named in the android:onClick="onClick" attribute.
Coding the AudioExample Behavior
Let’s look at the application now. You can see the code in Listing 14-2, and in the ch14/AudioExample folder.
Let’s walk through what each method does to build the features of our simple audio file player application. First, our package imports some familiar dependencies such as view.View and os.Bundle. You will also see three key Media framework packages installed, which were alluded to in the chapter introduction. These are:
- Android.media.AudioManager: The AudioManager provides a range of support functions to make audio handling of all sorts of audio easier. You use AudioManager to flag that an audio source is a stream, voice, machine-generated tone, and so on.
- Android.media.MediaPlayer: The work-horse of the Media package, MediaPlayer gives you total control over preparing and playing back audio from local and remote sources.
- Android.media.MediaPlayer.OnPreparedListener: The key to asynchronous playback, OnPreparedListener is the interface that enables callbacks to playback music after off-thread preparation has been done.
Our class implements the OnPreparedListener interface, which obliges us to to eventually provide the logic for the the onPrepared callback. We will come to that shortly.
The onCreate() callback implementation does the by-now familiar inflation of our layout into a fully-fledged UI for the application. All of the interesting logic is in the other methods.
The onClick() method uses a very common design pattern to channel to the appropriate application logic on the basis of the View passed to it. When the user of the application actually clicks either of the startButton or stopButton buttons, Android passes the respective View representing the clicked button to the onClick() method. We simply perform switch logic to detect which View was passed to the method, and by implication which button was pressed. For the startButton we then call the doPlayAudio() method. Similarly, for the stopButton, we call the doStopAudio() method.
When a user of the application clicks the startButton, and doPlayAudio() is called, some obvious things happen. For example, we get the file to play. But some not-so-obvious things also happen. First we create a new MediaPlayer object, and bind our audio file resource to it. The R.raw.audio_file notation is conceptually similar to the layout inflation notation you’ve already seen, such as R.layout.activity_audio_example. Android will examine the raw folder packaged with the application in the .apk file and try to find an asset named audio_file.<some extension>.
Having found and bound our audio_file.m4a example file, we then introduce the use of the AudioManager class through the mp.setAudioStreamType() method. AudioManager has a range of tasks it performs for you, one of the most common being to set the stream type for the given audio resource. Android supports a range of audio stream types, with the goal of ensuring a given stream gets the fidelity and other audio characteristics needed for a given purpose. For instance, the STREAM_DTMF audio stream is used for DTMF tones, and Android filters any streams marked this way to conform to the DTMF standard. Similarly, the STREAM_VOICE_CALL stream type triggers Android to invoke or suppress various echo-cancelling techniques on voice audio.
The AudioExample application sets the stream type to STREAM_MUSIC, meaning our source file is some kind of music recording. Because we are playing our audio file from an asset packaged with the .apk, we can then move straight ahead and start actually playing back the audio. The final call in doPlayAudio() is the mp.start() call. That call has the MediaPlayer object start actually playing the file, sending audio to the speaker or headphones.
The doStopAudio() method is pretty self explanatory. It calls the stop() method on the MediaPlayer object if it is instantiated. The reason for the if{} block testing for instantiation is to ensure we don’t try to stop anything if the user has never pressed Start (i.e. they open the application and press Stop, just for kicks).
Next in the code is the onPrepared() callback method. This is linked to the package definition where AudioExample implements the OnPreparedListener interface. Strictly we aren’t using the onPrepared() callback in this first pass of the AudioExample application, but I wanted to include this deliberately to highlight that there are times where you cannot immediately begin playback after the MediaPlayer object is instantiated and the AudioManager has been invoked to set the stream type. Fear not, we will expand this example in the next section to illustrate how and why to use the onPrepared() callback.
Lastly, we include logic in the onDestroy() callback to release the MediaPlayer object if it has been previously created.
Obviously there’s no way to “show” what the running application is doing with audio playback in a printed book, so you should go ahead and run the example to satisfy yourself that the final working product actually makes some noise!
Building Your Own Android Music Streaming Application
It would be a little strange if Android audio playback was limited to just what was on a device. As you would expect from a smartphone platform born in the internet age, off-device assets and resources are fair game for audio (and video), and the Media framework has you covered.
Altering the existing AudioExample application is easy, and if you peruse the ch14/AudioExample2 project you can see some straight forward changes to the UI, and some not-so-straight-forward adaptations of the Java logic. Figure 14-4 shows the new layout as it appears to the user running the application.
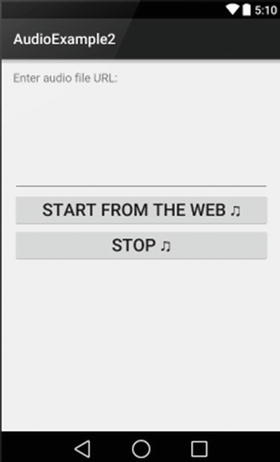
Figure 14-4. A simple layout that accepts a URL for playback
I will omit the layout XML in full for the sake of saving space, but the key changes you should note in AudioExample2 are the TextView for the field label, and the EditText view with an android:id of "@+id/sourceFile".
The changes to the Java logic are somewhat more extensive, and the code can be seen in Listing 14-3.
The main changes you should notice between AudioExample and AudioExample2 are the differences in the doClick() and doStartAudio() methods. There are a few other minor changes that support the major changes in those two methods. We include the android.widget.EditText import so that we can access and manipulate the text the user enters into the UI, and we finally make use of the onPrepared() callback introduced in the AudioExample application.
The doClick() method has two main changes. First, we create an EditText object, named mySourceFile to work with the UI EditText field into which the application user types the URL of their chosen audio file. We use the String value of the EditText to pass to the modified doPlayAudio() method in the subsequent call. The try-catch block is in place to cover the exceptions that doPlayAudio() can now throw.
As for doPlayAudio(), its ability to throw exceptions is just one of the many changes. Instead of creating a MediaPlayer object pointing directly to a file in the .apk, we simply create the new mp MediaPlayer object. We invoke the AudioManager package as before to declare that the eventual data source will be STREAM_MUSIC.
The code then calls setDataSource() on the URL passed to doPlayAudio() from onClick(). The setDataSource() method is a very powerful tool, having quite a few overloaded forms to handle source data presented as strings. Also present are FileDescriptor objects, AssetFileDescriptor objects, and many other resource forms.
Using setDataSource() by implication gives us more power and flexibility with the MediaPlayer object. We can interrogate the object with getDataSource() to see what is currently allocated. We can also change the source data, which cannot be done if the MediaPlayer object is passed a raw resource or asset directly at instantiation-time as in the original AudioExample case.
There are more playback options that stem from using a data source, such as the ability to define playback windows for only part of the source file. No matter how the MediaPlayer object was created, the .seekTo() method can find an exact point in the data, and .getCurrentPosition() can be used to determine the current playback point. Both .getCurrentPosition() and .seekTo() work with millisecond precision.
In order for the setDataSource() call to successfully resolve and fetch the resource (music file) at the URL given, we need to grant our application the android.permission.INTERNET permission in the manifest file. I will cover permissions in much more detail in Chapter 19, but for now all you need to do is add the following to your project’s AndroidManifest.xml file.
<uses-permission android:name="android.permission.INTERNET" />
Note that this line should be the first child element after the <manifest> root element. Put it before the <application> child element that Eclipse or Android Studio created for you.
The next two changes to doStartAudio() work in tandem to ensure that we can play back our audio file from the internet while accommodating all the vagaries of problematic networks, slow connections, and an Android device busy with many parallel tasks. The first of the calls is to .setOnPreparedListener(), indicating that it is our activity itself that will deal with the registered callback. We’re finally working in anger with the implementation of OnPreparedListener that the package definition has carried around since the first example.
Lastly, a call is made to .prepareAsync() on the MediaPlayer object. This brings us to the concept of immediate versus asynchronous playback, so we should deal with that now.
Synchronous versus Asynchronous Playback
As a developer, you have one important choice to make when working with a data source of a MediaPlayer object. The choice is all about what behaviour the user will experience from the point in time the intent to playback is triggered, up to when the actual source data has successfully been accessed and any related playback UI has been prepared. Fundamentally, the choice is this: Should the application (and UI) block and wait until the data source has been reached and playback is ready, or should this happen asynchronously allowing your application to do other things in the time the preparation takes?
Android provides for both approaches through the .prepare() and .prepareAsync() methods. The .prepare() method does all of its work synchronously, forcing the user to wait until such time as it is ready to invoke the onPrepared() callback. This is usually fine for resources or assets you know to be on the device, either packaged with .apk or available on the filesystem. The .prepareAsync() method, as the name suggests, is an asynchronous, non-blocking version for data source preparation. Control is returned immediately, and at some later point the onPrepared() callback will eventually be invoked.
Using .prepareAsync() is principally designed to cope with off-device resources (though you can use it for local items as well). As a developer, you never know when the end-point for a URL is going to be available, how responsive it will be, and how all of that changes from any one day to another. Adopting the asynchronous approach is desirable in the circumstances, and it is a design pattern you will see recur throughout your Android development.
Playing at Last
With all of the changes so far described for AudioExample2, your application will eventually receive the callback to onPrepared(), and the logic here is unchanged from the previous unused example. For AudioExample2, onPrepared() is actually called once .prepareAsync() from onStartAudio() completes, and a simple call to the MediaPlayer’s .start() method gets the music rolling.
There are more details and nuances to the various states in which your MediaPlayer objects and related data source can exist. Rather than repeat the fine documentation here in the Beginning Android book, feel free to take a look a the state diagram and flow of callbacks and transitions on the Android Developer website at:
http://developer.android.com/reference/android/media/MediaPlayer.html
As before, there is nothing to show in the interface here on the printed page that lets you experience the audio, so you should go ahead and run the example to hear for yourself. I have included a link to a public domain mp3 file in the comment at the top of the AudioExample2 package. It is to Gershwin’s Rhapsody in Blue, which is such a great track that everyone should hear it… possibly through their own Android app!
Alternative Audio Playback Approaches
The Media package and MediaPlayer object are great for playing back audio, and even video as we will discover in the next chapter. As good as they are, there are some limitation to MediaPlayer in particular. As a developer you should be aware of the alternatives at your disposal.
The principal limitation of MediaPlayer is that it can only deal with one audio/video track at a time. This is fine in many circumstances, but I’m sure you can think of a range of applications where this will be a moderate to severe limitation.
For example, creating a game application that uses many sounds and music tracks, and a desire to have these play simultaneously isn’t possible with MediaPlayer. The good news is that Android provides other options for a variety of special-case playback needs.
Using SoundPool for Simultaneous Playback
While the MediaPlayer class has enormous power and capabilities, sometimes you are after just the basics. In particular, you might want to only worry about playing back audio tracks local to the device – whether packaged as a resource or asset, or from the file system accessed directly or via FileDescriptor.
Enter the SoundPool class, which is a cut-down wrapper class that encapsulates a subset of the MediaPlayer functionality. SoundPool has the following very useful features:
- Simple playback from on-device: Because SoundPool doesn’t need to handle off-device complications, the more complex methods and capabilities of MediaPlayer are removed.
- Straight-forward File/Resource Access: Resources or assets packaged with the .apk are accessed through SoundPool’s simple .load() method for resources, or the activity context’s .getAssets().openFd() method for gaining a FileDescriptor for the local asset. For the filesystem-inclined developer, .load() has an overloaded version to take a full filesystem filepath to access audio files directly.
- Simultaneous Playback: As a developer, you can load as many sounds as you like, with one limitation we will come to shortly. If you want drums and guitar, you can have both!
There are other benefits of SoundPool you can read about from the documentation, but there is also one major limitation to be aware of. This limitation is the overall limit on the memory footprint of all the audio souces loaded into a SoundPool instance. The total internal buffer for all audio is capped at 1MB. This sounds like a reasonable amount, but there’s more to the SoundPool storage limits than meets the eye.
SoundPool tries to do everything it can to make playback fast and efficient. One of the approaches it takes is to expand audio from whatever compression format it was compressed with into an uncompressed in-memory representation. This means the amount of buffer used by your audio tracks depends on things like number of channels, bit rates, and duration. You might be surprised how quickly you can fill the 1MB buffer.
If you can work within the buffer size limitation, then SoundPool is an excellent alternative for simple local-to-device playback.
Going Fully-Asynchronous with AsyncPlayer
While MediaPlayer has support for asynchronous preparation of an audio source, much of the other setup and management is synchronous or uses the main application thread to manage click handling and related stop, start, and pause behaviour. Sometimes, audio is really not the focus of your application. Maybe you just want some “background music” as a flourish or minor addition.
When you want audio handled entirely in the background, with little need for direct control, then the AsyncPlayer class is the perfect option. The AsyncPlayer is capable of dealing with the same data sources as MediaPlayer, meaning it can use on-device or remotely-accessed items.
In practice, AsyncPlayer makes your work simple by limiting your options and your control. All you do is to first create the AsyncPlayer, and then ask it to play a selection. That’s it. For example:
ap = new AsyncPlayer("AsyncPlayerExample");
ap.play(this, Uri.parse( <some filepath or URL location > ), false,
     AudioManager.STREAM_MUSIC);
This snippet declares a new AsyncPlayer. Then it invokes the .play() method to set an audio resource to be played. The resource wil be accessed asynchronously, and played when it can be played, which is typically shortly after the call completes, but you have no control over the precise timing of playback. You basically have no other control than to specify what is to be played. AsyncPlayer doesn’t give you callbacks, lacks seekTo() and other useful methods, and frees itself of other baggage. It just plays the audio track, eventually.
AsyncPlayer does provide a .stop() method. You can guess what it does. It stops the playback, and kills the background thread. It is the only management method provided.
Recording Audio with Android
The flipside of playing back audio is making your own, and recording it to share with others, or to replay at a later time. Android supports a range of approaches to recording audio, to suit various levels of complexity and fidelity.
Making Recordings with MediaRecorder
The MediaRecorder class is the complement to MediaPlayer introduced earlier in this chapter. MediaRecorder gives you a set of useful features to capture sound and record it. To show its capabilities, you will find one more variant of our on-going example application in ch14/AudioExample3. Figure 14-5 shows the user interface, which incorporates buttons for recording and playback.
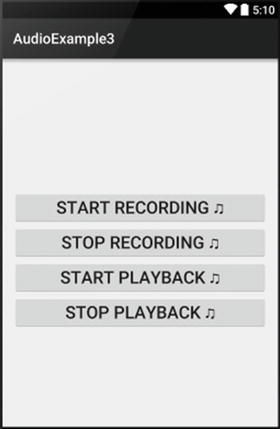
Figure 14-5. The AudioExample3 UI for recording and playback
Listing 14-4 gives the layout.xml for the UI. You should note that I have extended the pattern from the earlier examples, with all of the buttons triggering the onClick() method.
The layout is more closely related to the original AudioExample project, as we don’t need an EditText widget to take a URL. We have two new permissions that will be required in order for our application to be able to first record the audio from a microphone, and then store the recording on the device. Your AndroidManifest.xml will need the two following privileges:
<uses-permission android:name="android.permission.RECORD_AUDIO" />
<uses-permission android:name="android.permission.WRITE_EXTERNAL_STORAGE" />
With these permissions in place, our Java logic can do the work required. Listing 14-5 shows the Java code for AudioExample3.
By now you are familiar with many of the logic constructs shown here. The onClick() method switches on the button clicked by the user, our playback and stop methods are almost identical to before. Interestingly, if you examine the doStopRecording() and doStopAudio() methods, you see exactly the same logic applied to the MediaRecorder and MediaPlayer objects respectively. One of the neat parallels of the two classes is that common goals are served by logically matching methods.
The main expansion of the Java code is through the doStartRecording() method. This method starts by ensuring the File object, myRecording, is created afresh, deleting any previously existing object in the process. Notably, we are relying on the java.io.File package to provide basic file handling capabilities. This is one example of stepping outside the bounds of Android to include other useful libraries. We will cover more of the capabilities of using standard Java libraries in Chapter 20.
The code goes to create the MediaRecorder object named mr. Then the code invokes the .setAudioSource() method to indicate that the application wants to access the MIC in order to record sound. It is this call that necessitates the RECORD_AUDIO permission.
With the microphone accessed, a pair of calls are then made to select the desired output container format for the audio, and the desired codec to use to encode the audio that will be placed in the container. These are the .setOutputFormat() and .setAudioEncoder() calls. The example shown takes the DEFAULT option in each case, which typically varies depending in particular on the audio codecs supported by the hardware device and version of Android in use.
Some commonly-used output formats include:
- AAC_ADTS: The container popularlized by Apple and AAC audio format.
- AMR_NB: The AMR Narrow Band container type is recommended when you would like maximum portability across Android devices.
- MPEG_4: MPEG4 container format is one of the most venerable, but also the most likely to be misinterpreted on older platforms and devices. Use with caution.
- THREE_GPP: Another recommended container format for broad Android support.
- WEBM: The container synonymous for both Google’s much-advertised but little-used WEBM format, and also the default used with Ogg encoded files
The topic of container formats and audio and video codecs could, and does, literally fill entire books by themselves. I will wrap up this area by highlighting the popular codecs used for audio (and video) encoding in Android. They are:
- AAC: (And also AAC_ELD and HE_AAC) audio codecs for the Advanced Audio Codec standard. Widely supported by Apple and other devices and platforms.
- AMR_NB: The actual audio encoder for AMR narrow band. While not widely used outside Android, this codec provides broad support across Android versions and devices.
- VORBIS: The Ogg Vorbis audio codec format
Returning to our examination of the .doStartRecording() method, the .setOutputFile() call configures the Java File object previously created as the repository for the audio stream the user will record.
Lastly we come to the familiar pattern of calling .prepare() and .start() for our MediaRecorder object. Just as the MediaPlayer object has to deal with a variety of obstacles and delays, so too does the MediaRecorder. Whether it’s a slow local filesystem, or remote end point that is not responding, the .prepare() method takes care of the work to allow your recording to be stored, and returns control once all is in place. The call to .start() actually begins capturing the audio input.
As with our earlier playback examples, a printed book cannot demonstrate audio capture. So try the example for yourself to see how each of the pieces described works in action.