
Working with Files
Android offers quite a wide range of approaches to the topic of dealing with storing, and retrieving, data for you applications. In the next three chapters, I cover the major features that allow you to store data away, to process it, to use it for logic and other functions in your application. Android offers a built-in preference system for maintaining state about a user’s settings, options, and preferences. Bundled with all Android installations is a fully working SQLite library, which provides embedded relational database capability. The last main data storage technology Android supports is the traditional file, stored on a file system.
In this chapter I cover the basics of working with files in Android; to do this, I work with the two broad approaches to thinking about file-based data when you build Android applications. The first of these two approaches is what I call the “application embedded” model, which uses raw resources and assets packaged with your application; and the second is what I term the “Java I/O” approach, which enlists the venerable java.io package to manipulate files, data streams, and so on using all the traditional methods you might be used to from Java and working with Linux file systems.
There is no “better” or “best” approach. Each technique has its pros and cons, which I cover as we discuss the relative file handling capabilities and build a few example applications along the way. Let’s get started.
Using Raw and Asset-based Files
In Chapters 14 and 15, you saw examples of how to use raw resources in the res/raw project directory and asset resources from the assets project directory when you are working with audio and video. However, your use of the raw and asset locations is not limited to just media files like audio, images, and video.
You can place any file you like in these locations, but the burden is then on you as a developer to ensure you know how to access their content. For instance, you can store a text file or an XML representation of some data. Android makes accessing such a file easy through the Resources class and its getResources() method. Once you have your raw resource file, you can present its content through an InputStream by calling the openRawResources() method. Interpreting that InputStream is then your job as a developer. We’ll look at an example that drawings on the ListView and Adapter example from Chapter 7 shortly. First, let me cover some important advantages and disadvantages to working with data sources from raw or asset files.
The advantages to the raw-based approach include the following:
- Easy packaging with your application and its .apk file, thanks to the Android Asset Packaging Tool ( AAPT).
- Ability to place resources in a library project so they are accessible from a range of applications.
- Simple static data is easily represented in human-readable and machine-manageable formats like XML.
There are also some important disadvantages to be aware of if you take this approach:
- By default, read-only. Editing existing resources packaged with the application is not trivial, and creating dynamic assets at runtime is complex.
- Not designed for wide sharing with other on-device applications
- Static nature raises questions about keeping information up to date.
You might decide that for your application and functionality, the benefits of a raw-based approach outweigh the disadvantages. As I highlighted in this chapter’sintroduction, the choice of a file-like data management technique is subjective, and you are free to adopt this approach when you think it suits your application.
Populating Lists from Resource Files
Let’s look at a practical example of using an XML file packaged as a resource to populate a list dynamically at runtime. Recall the ListViewExample application from Chapter 7. In its first incarnation, it used a string array defined in the Java code, which is populated with the opening words of a soliloquy from Shakespeare’s Hamlet. The output appears in Figure 7-1. Later versions showed lists of colors. That was all fine for demonstrating ListViews and Adapter logic, but in reality, you will almost certainly want to manage your data separate from your code, so let’s place those words into an XML resource instead.
Listing 17-1 shows a simple layout that provides a ListView to ultimately display the content of our XML resource file.
Let’s focus on the color list example, for which the application uses the data in the colors.xml file in the ch17/RawFileExample project. The content of colors.xml is in Listing 17-2.
The colors.xml file is deliberately simple because I want us to focus on the logic we need to actually open this file, read and parse its content, and place it in an appropriate data structure so we can use it in the application. Listing 17-3 shows the logic for a very simple ListActivity-based application that shows the colors from the file in a list and allows the user to click to choose a particular color.
The first thing you should notice about this code is the number of external libraries I am importing to handle file I/O and XML parsing. I return to the topic of employing the power of external libraries in Chapter 20, but you should make the most of opportunities like this to pull in existing well-built libraries rather than reinvent XML parsing.
The onCreate() method has changed significantly from the examples back in Chapter 7, so let’s examine what is going on. The first line of the method is the actual file-handling in action. I created an InputStream object, and the getResources().openRawResource() call carries out the heavy lifting of finding the file within the .apk, allocating file descriptors, associating them with the InputStream, and readying the system for subsequent use of the data stream from the file. Everything that follows is the logic you need to interpret what is in the file.
Next I use a DocumentBuilder object to parse the content of the file and store the resulting DOM representation in a Document object, myDoc. I invoke the getElementsByTagName() method to collect all of the <color> elements into the NodeList object. This might seem excessively pedantic, but imagine a more complicated XML schema with other elements, child elements, and so on, and you can see how this does the sifting work quite efficiently.
Lastly, I use a for loop to iterate through the NodeList <color> entries, extracting the value attribute’s text—which happens to be the color names I want to present in the ListView. With this in place, I can now inflate the ListView with the ArrayAdapter configured to use my list of color names, asking it to render things using the default simple_list_item_1 built-in XML layout.
The logic for handling the user clicking a color is unchanged from Chapter 7, apart from the variable names. I could make XML handling even easier by using specialist XML resource calls, but I’ll save that topic for later.
If we run our application, it shows the content of the colors.xml file rendered in our ListView, as shown in Figure 17-1.
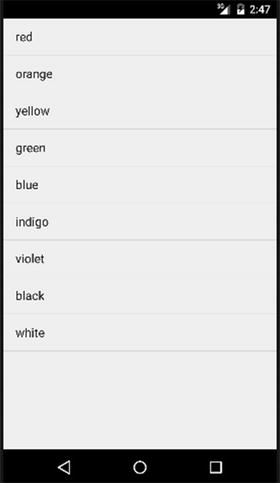
Figure 17-1. The RawFileExample application showing the contents of an XML file
Working with Files from the File System
If you are used to reading and writing files on file systems from traditional Java applications, then performing the same work in Android will be very familiar to you. For those of you not familiar with Java-based file I/O, here is a quick crash course, in one paragraph.
From the Java perspective, files are treated as streams of data, and the key pair of objects you will use are InputStream and OutputStream, for reading and writing data to/from files, respectively. These streams are provided by calling the openFileInput() or openFileOutput() methods from your context or activity. When a stream is available, your program logic is then responsible for actions such as reading in from the InputStream or writing out to the OutputStream and tidying up all of the resources when you are done.
Android’s File System Model
In the very early days of Android, a representation of the built-in file system was presented to developers, together with some rudimentary controls for reserving part of the file system for Android’s internal use; this left developers using the remainder of the file system for storing other files.
This roughly mapped to the notion of on-board storage being “internal,” and plugged-in storage, such as an SD card, being “external.” Then a funny thing happened as the 2.x and 3.x releases of Android came to market. Google decided to discourage the use of add-on SD cards, though manufacturers could push to include them and many still do. This meant that Android had to deal with both possible scenarios—devices with dedicated external storage, and devices without. Google’s solution was to abstract the presence or absence of physical removable storage and present the system with internal and external partitions. Now, “external” actually maps to part of the on-board storage, and any removable SD card or similar hardware is silently mounted to a subdirectory under the “external” partition.
In addition to the “internal” area being used for system-related purposes, other differences also represent advantages and disadvantages to both internal and external storage.
Here is a description of the pros and cons of internal storage:
- Internal storage is found on every Android device and is always in place.
- The default security boundary for internally-saved files is private to your application. You need to take explicit steps to share files.
- Files that form the part of your application designated to be placed on internal storage are considered a hermetic part of your application. The files are installed when the application is installed and are removed when the application is removed.
- Internal storage might be significantly smaller than the available external storage, and often it is the area that fills first, causing users issues with space management, even when they have ample external storage available.
External storage differs in these ways:
- Android provides a USB abstraction layer and interface for external storage. When an Android device is in use as a USB device, applications on the device cannot access external storage.
- The default security boundary is to make all files on external storage world-readable. Other applications can read your externally-stored files without developer or user knowledge or permission.
- Depending on the save method invoked, externally-stored files might not be removed when your application is uninstalled.
With these benefits and costs in mind, whether you choose to use internal or external files for your project, read on.
Permissions for Reading and Writing Files
If you choose to use internal storage, your application always has permissions to write to, and read from, the portion of internal storage reserved for it. You can request details of your application’s internal storage by calling getFilesDir(). More usefully, you can use getDir() to create a named (sub)directory for you to use.
When you call openFileOutput(), a file itself is opened for output streaming, otherwise known as writing (and one is created if it doesn’t already exist). The openFileInput() method performs file opening—but not creating—for an InputStream to satisfy your reading requirements.
Both openFileOutput() and openFileInput() accept a number of MODE_* options to fine tune the file and stream behavior. The mostly commonly used include these:
- MODE_APPEND: With this option, none of the existing data in the file is changed; the data from the string is appended to the existing content in the file.
- MODE_PRIVATE: Permissions on the file are set so only the application that creates it (and any other that runs as the same user) is allowed to access the file. This is the default.
- MODE_WORLD_READABLE: This option opens permissions for reading to all applications and users on the device. This is considered poor security practice but often crops up when a user considers using content providers or services overkill.
- MODE_WORLD_WRITABLE: Even more dangerous than world-readable is world-writable. Any application or user can write to the file. Just because other developers use this, doesn’t mean you should!
It is important to remember that, you as a developer, and you application user, do not need any specific permissions to create, open, or write to an internal file within the application’s allocated internal file system space. The simplest example of creating a file stored within the internal device storage looks like this:
FILE myFile = new FILE(context.getFilesDir(), "myFileName");
When working with external storage, a different set of methods are at your disposal, and the permission model is somewhat more strict; it is even undergoing a steady shift as this book is written.
In order to write to external storage, your Android manifest needs to include the privilege android.permission.WRITE_EXTERNAL_STORAGE. You should already be familiar with this permission from the audio and video examples in Chapters 14 and 15.
All Android versions up to and including Android M allow your application to read freely from external storage without specifying or requiring any particular permission. But do not be complacent about this. Google has flagged that it intends to introduce and enforce read permissions in a future Android release. To that end, it already supports the inclusion of the permission name it plans to use to allow reading from external storage—android.permission.READ_EXTERNAL_STORAGE. You should definitely start including this privilege now in your manifest, even though it is effectively a no-op. Doing so future-proofs your applications so that when Google finally flicks the switch to start enforcing permission-based reading from external storage, you are ready.
The methods used to access external storage closely mirror the methods I previously introduced for internal storage, but the words “external” or “public” are added as part of the method name.
The getExternalStoragePublicDirectory() method is designed to allocate well-structured directories and files into which you can store documents, audio, pictures, video, and more. The method takes an enum signifying one of the predefined application directories and a filename of your choosing. Android provides nearly a dozen application directories, including the following:
- DIRECTORY_DOCUMENTS: For storing traditional text or other editable documents created by the user
- DIRECTORY_MUSIC: A place to keep all kinds of music and audio files
- DIRECTORY_PICTURES: For storing still-image files such as photos, drawings, and so on
Although these predefined locations are helpful and provide some predictability, at times, you will have distinctly different types of files you want to store on the device. You’ll use the general-purpose getExternalStorageDirectory() method in these circumstances; it provides similar functionality to the getFilesDir() I noted earlier in the chapter for internal storage.
Examining External Files in Action
You now have enough exposure to the theory of external files to examine a working example. The ExternalFilesExample app, which you’ll find in ch17/ExternalFilesExample, is a very simple walk through of the mechanics of saving a file and reading back its content.
Figure 17-2 shows the layout for providing a text entry field, buttons for file writing and reading, and a text reading field. The corresponding layout XML flle is in the ch17/ExternalFilesExample project, but I omit it here for brevity.
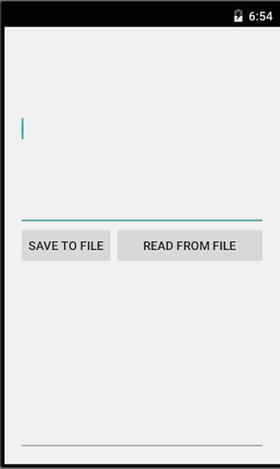
Figure 17-2. An activity with fields and buttons for testing external file management
The Java logic that supports our little application follows the pattern I have used several times. A common onClick() method handles the button clicks and switches to the appropriate method based on which button the user chooses at runtime. The code is shown in Listing 17-4.
What Goes in to Saving and Reading Files
Let’s focus on the key methods in the ExternalFilesExample project, starting with the doSaveToFile() method. We need to perform some preparation and housekeeping prior to defining the method; we do this by first calling doHideKeyboard() (which I explain shortly), followed by creating our local saveField variable and binding it to the EditTextView in our layout. We do this so we can eventually reference the text we want to save in the UI.
The try/catch block that follows defines the output stream we will use to stream the text to the file nominated by the variable FILENAME, which is set globally to whatever meaning we need. We then invoke the .write() method to attempt to actually write out the text through the stream to the file.
You should also notice the multiple layers of exception handling. There are many, many reasons writing to files can run into issues, whether they involve full partitions or users spontaneously removing the volume to which you were writing—sometimes halfway through the writing process! In short, you can never have too much exception handling around file access.
Reading from the file is handled by the doReadFromFile() method. As with the doSaveToFile() method, the initial work you perform is some necessary setup and housekeeping. First you need to call the doHideKeyboard() method. When you do, the local variable readField is created and bound to the editTextRead widget in the UI. We use this to display the contents of the file once they have been read.
What follows in the try/catch block is almost entirely classic Java file handling, in all its cumbersome glory. A stream reader is used to access the file, which is then passed to a buffer. We use the buffer to access the stream one line at a time in the while block, and slowly we build up the file content in the string builder. Once we have read all of the lines from the stream (and therefore, the file), we close the stream and transfer everything that has been buffered in the strBldr object to the readField EditText widget in our Android UI.
I have deliberately taken the old-fashioned Java approach to be sure you appreciate everything that is happening when you access a file. I will return to this example in Chapter 20 to demonstrate a third-party Java library that does all of the messy work in one simple method call. If Java was being designed today, I hope file handling would be one of the things that was radically simplified.
When your user is busy typing text in the EditText field, the IME is triggered to present the soft keyboard for text entry. We could go to some effort to code for an accessory button (as covered in Chapter 8) to provide a “done” option that then hides the IME, but that’s an additional key-press to ask of your users.
Instead, I have been a little subtle in ensuring the layout still includes the Save (and Read) button even when the IME is presented. This means the user can type to her heart’s content and then immediately hit the Save button. The call to doSaveToFile() invokes doHideKeyboard, which determines first, what view the user interacted with, and second, whether or not the Input Method Framework is active and presenting an IME (keyboard) to the user. Any keyboard currently being shown will be closed automatically, representing a convenience to the user.
Seeing File Save and Read Behavior in Action
Now that I’ve described the logic and layout, it is time for you to see the finished product in action. Figure 17-3 shows the initial display of the ExternalFilesExample application when the user first starts to enter text into the top field.
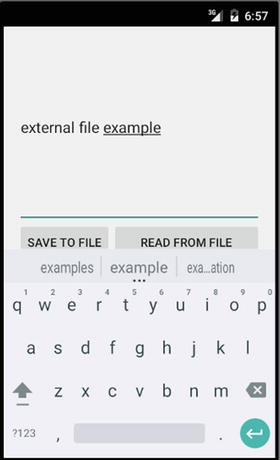
Figure 17-3. Entering text to be saved to an external file
The IME displays over the lower half of the screen, but our buttons are still visible. This really only works in this example as a hack—it is not the polished UI a fully-fledged application would use, but it is sufficient to show the file I/O in which we are interested.
At any point, the user can hit the “Save to File” button, and the doSaveToFile() method kicks in. As I discussed earlier in the chapter, this invokes the doHideKeyboard() method, and our UI then appears as shown in Figure 17-4.

Figure 17-4. The IME is hidden when the user saves the file
The text the user typed into the EditText field is saved in the external file ExternalFilesExample.txt. The user can recall its content at any time by hitting the Read from File button. If they do, the contents of the file are read and displayed by the doReadFromFile() method, and they show in the lower EditText field, as in Figure 17-5.
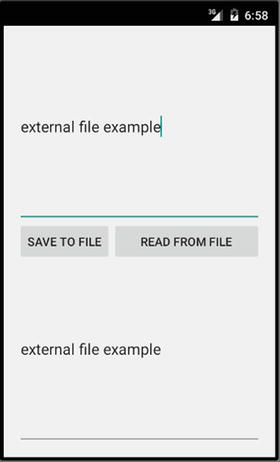
Figure 17-5. Recalling the contents of the external file
That covers all of the behavior within the ExternalFilesExample application.
Ensuring External Storage Is Available When Needed
Earlier in the chapter I mentioned that one of the potential drawbacks of using external storage is the uncertain nature of whether you can rely on it being there when you need it. Remember that your users can physically remove SD cards from their devices, and even for those devices that mimic external storage as a separate partition on internal memory, Android still allows that external storage to be mounted as a USB device elsewhere, which makes that part of the storage unavailable to applications while it is so mounted.
To develop well-behaved applications, you should perform some sanity checks on the presences and availability of your external storage before your application attempts to use it.
Android provides some useful environment methods to help with this. The principal method you want to use is Environment.getExternalStorageState(), which returns a string from a predefined enum that describes the current state of the external storage. This external storage state can have many states, including one of the following commonly seen values:
- MEDIA_BAD_REMOVAL: This state indicates the physical SD card was removed before it was unmounted, possibly leaving files in an inconsistent state due to cached pages not being flushed (see the file system discussion later in this chapter).
- MEDIA_CHECKING: When an SD card is inserted, checks are performed to determine if the card has been formatted, and if so with which file system. This is the value returned while these processed take place.
- MEDIA_MOUNTED: The normal state for external storage that can be used.
- MEDIA_MOUNTED_READ_ONLY: Typically seen when the SD card’s physical switch is set to the read only position, which means that no writing to that part of external storage can be performed.
- MEDIA_REMOVED: This value is returned when no external storage is mapped from the on-board device and no SD card is present.
- MEDIA_SHARED: When the device has its external storage mounted as a USB device to some other external platform, this is the value returned to indicate that external storage is not available to be used at this time, even though it is present in the device.
You can check the Android documentation for a full list of all the possible external storage state values.
Other Considerations with Android File Systems
Now that you are familiar with a variety of approaches to working with files in Android, I need to make you aware of a few subtle and not-so-subtle management considerations that you should think about to ensure the long-term viability of using files on the file system.
Android Filesystems Throughout History
When the original Android systems were launched, their NAND-based on-board storage was presented to the devices through a file system designed to better support flash-based storage. At the time, the file system chosen was YAFFS, or Yet Another Flash File System. This file system offered a number of useful benefits, including wear-leveling support so that the decay over time of flash storage from multiple writes was managed, and to some extent, hidden from the operating system and applications, as well as file system–level garbage collection tools to help move bad regions of storage to a “dead pool” so they would not be used for meaningful storage.
YAFFS has evolved over time to become YAFFS2, with some tweaks and enhancements along the way. There is one significant drawback to the YAFFS file system, which is tied up in its locking behavior and impact on application responsiveness. YAFFS has no file-locking semantics; instead it relies on locking the entire files system to ensure consistent access to a file being modified. That means, in practice, that only one file can be written to by any application at a time, and any other application, or threads of applications, is blocked and has to wait its turn to write. This has negative consequences for any device capable of issuing parallel I/O calls, such as multiprocessor devices capable of running processes or threads simultaneously. As most Android devices in the last few years have sported dual-core or quad-core processors, this is becoming a more prevalent issue.
Newer Android devices have had a choice of underlying solid-state storage technology, and device manufacturers have added ext4 as a file system in a range of cases. This file system comes with traditional file-level locking semantics, which means concurrency issues are greatly reduced. Unfortunately, there is no easy way for you to determine from your application which file system is being used by a user’s device. If you run into concurrency or I/O delay issues with the underlying storage when you are performing read or write operations from your application’s main UI thread, all your user will notice is a slow or unresponsive application. As a developer, you are likely to get the blame, even when it might be Android itself that is causing the issue.
Controlling UI Delays with File I/O
As a developer, you can take several approaches to mitigate locking and contention issues with the YAFFS file system. These techniques can also assist in general with other types of I/O to network end points.
Using StrictMode to Profile an Application
We will explore a range of developer-focused tools and utilities in the coming chapters, but the most relevant for any I/O delay issues is the StrictMode policy system that profiles the operation of all of your code looking for issues defined in its policies.
StrictMode currently has only two sets of policies on which you can call. The first are the virtual machine policies that cover generally poor behavior or practices across an entire application, such as leaking database connection objects. The second set of policies are the thread policies, and these look specifically for poorly behaved code happening on the main UI thread. The policies I’ve just mentioned can help spot code—both yours, and Android’s—that is going to slow or interrupt a user’s smooth experience with the UI.
Activating a StrictMode policy can be as simple as calling the static StrictMode.enableDefaults() method from your onCreate() callback. Doing so reports all kinds of useful information in your LogCat output regarding UI thread issues including file I/O concerns. You can also define your own policies if you desire; the Android documentation has many more details on this.
Caution Never leave StrictMode policies defined in your final, publicly-available, application. Either use application logic such as if/then/else to skip setting policies in released applications, or simply comment the code out of any final version. Leaving StrictMode in place creates significant amounts of log data on user devices that can cause issues with full devices.
Moving Logic to Asynchronous Threads
StrictMode is an excellent tool for finding candidate logic that you can move away from the main UI thread and interface. You might also know of other logic in your application that doesn’t need to happen on the critical path, such as the background lookup of data from a web service, or messaging and polling-style work for maintaining lists, cached items, and so forth.
Android provides a method for spawning asynchronous threads called AsyncTask(). This is well worth mastering as part of your Android learning, since most developers use it as the workhorse for managing threading across their applications.
The AsyncTask() class is provided in a form that means you, as the developer, must subclass it to create specific implementations for the work you want to do. In its most basic form, it provides a doInBackground() method to encapsulate the actual logic your want performed on another thread. You can implement optional additional methods to provide pre- and post-execution logic, interact with the UI in a controlled way, and so on.
Listing 17-5 outlines a subclassing of AsyncTast() to illustrate how you can use it to perform file-saving operations. This is only one of countless ways you can implement this, and I’ll return to the subject of threading and task management in more depth later in the book.
Using the SmartFileSaver.execute() method invokes your various onPreExecute(), doInBackground(), and onPostExecute() methods with Android managing the related thread lifetime and UI interaction.