
Ready, Set, Code!
There is no time like the present to get started with your very first Android application. That’s right, you are going to start coding right now! This chapter takes you right through setting up the tools to create Android applications, and you’ll have your first working Android application before this chapter is done. Ready? Let’s code!
Getting the Prerequisites for Android
There are two main prerequisites to quickly consider for your forthcoming Android development journey: will you need to separately install Java, and do you know what I call “minimum viable Java” for the development you might like to do?
Determining the Right Java for You
In a moment, I discuss the two most popular ways to set up a development environment for Android applications: preconfigured Eclipse and Android Developer Tools (ADT), and Android Studio. Both of these options give you everything you need bundled together, including Java, so you can start coding straight away. But if you are like me, you want more than two options; you might also like to learn about how the tools are set up and how to use them to create Android apps.
If you want to take full control of setting up the Android developer components and not use one of the all-in-one bundles, or if you have an existing development environment in mind and don’t want to use one of the options provided by Google, then you need to ensure you have Java set up and available on your machine.
Getting the JDK
The Java Development Kit (JDK) has always been readily accessible, first through Sun and now through Oracle. If you point your browser to java.oracle.com, Oracle redirects you to the latest-and-greatest landing page for getting the JDK. But be warned! When it comes to getting Java for Android development, you need to make sure you choose a supported version of Java. For now, this means avoiding any Java 8 release. Regardless of platform—Windows, Linux, Mac—you want to choose either Java 6 or Java 7 (also known as Java 1.6 and Java 1.7—confusing, eh?).
Before you dive straight in to picking a JDK version, it is worth noting that, over the years, Java has been a very large source of security vulnerabilities and has been notoriously difficult to keep patched. This is thanks to repeated changes of ownership, changes in approach to managing Java on operating systems of all kinds, and the tendency of various software companies to bundle versions of Java with products that they then never update. You can’t escape the need to install the JDK because the Java language is the chosen development language for Android, but you should at least be aware of the added security implications of having it on your development machine.
Android has supported Java 6 since its relatively early versions and has officially supported Java 7since the KitKat version 4.2 release (with a few very minor no-go areas, such as try-with-resources). If you are setting up an entirely new environment, I recommend that you choose Java 7 for your platform because doing so will future-proof your Android development environment to the greatest degree possible.
Note When Android was first released, Java 5 was supported, but that version is best left to the history books.
Because a few of the tools bundled with the Android development environments from Google still only come in 32-bit form, you should choose the 32-bit distribution of Java 7 for your system if you want to get maximum benefit. For Mac users, however, only a 64-bit JDK is available, which means a handful of tools are not available to you, though none of those feature in this book. For the purposes of this book, you only need the standard edition (SE) version of the JDK. At the time of writing, the latest security patch release for Java 7 was Java SE 7u71/72.
To download your version of the JDK, follow the links on the Oracle download page, and choose the correct JDK distribution for your platform. For Linux users, this is the file jdk-7u71-linux-i586.rpm; for Windows, it is jdk-7u71-windows-i586.exe; and for Mac, it is jdk-7u71-macosx-x64.dmg. Make very sure it is the JDK you are downloading, and not myriad other pieces of software that are mixed in to the Oracle download pages. You do not want just the Java Runtime Environment (JRE), nor are you after OpenOffice, Oracle database software, or the other pieces you see on the quite-confusing download page.
ALTERNATIVES TO THE OFFICIAL JAVA RELEASE
Astute Linux fans will note that Oracle only provides an RPM distribution for Java. If you are a user of Debian, Ubuntu, Mint, or some other flavor of Linux that doesn’t use RPM for package management, you do have options. Although it is not officially supported by Oracle, the OpenJDK distribution of Java works well on Debian and its derivates. Using this distribution helps you avoid any complications you’ll encounter if you try to convert the official RPM using a tool like alien.
Once you have downloaded the relevant JDK bundle, you are ready to install.
Installing the JDK
Follow the instructions included in your Java bundle to install the JDK appropriately. On some systems, you might need administrative privileges to make your Java installation available system wide.
Knowing (Enough) Java for Android
This book assumes you have a passing knowledge of coding in Java, as do most other books and resources on Android development. If you are new to Android and new to Java, then I recommend a crash course in the basics of Java—such as that offered by the book Learn Java for Android Development by my fellow Apress author, Jeff Friesen (Apress, 2010). Alternatively, countless online Java tutorials can get you up to speed quickly. The secret is knowing on which topics you need to focus to be productive with Android development and which you can ignore for now.
To help focus your learning, or refresh your memory if it has been a while since you last wrote Java code, the following are the key topics that will get you (re)started with Java.
General coding knowledge:
- Structure and layout of code
- Object-orientation, classes, and objects
- Methods, data members
Java-specific coding knowledge:
- Interfaces and implementations
- Threading and concurrency
- Garbage collection
- Exception handling
- File handling
- Generics
- Collections
There is plenty more to Java than these topics alone, but they provide the foundation you need to get started quickly with Android development.
Choosing a Development Environment
In the years since Android’s initial release, the tools and technology available to help build applications have exploded in variety and capability. Google provides several options, which I explore shortly, and many other companies and groups also offer development tools. I cover a few of those more exotic options much later in this book. For now, I stick to the most common environments you are likely to use: Android Studio and Eclipse.
The following sections cover installing Android Studio, as well as installing and configuring Eclipse with Android Developer Tools (ADT); this coverage includes putting the ADT pieces together yourself, since this gives you an appreciation for what you are actually getting when you opt for one of the prebuilt developer bundles. Most importantly, remember you only need one development environment. Don’t feel that you need to follow both the Android Studio and Eclipse approaches, although you are welcome to if you have enough disk space and curiosity.
Option 1: Choosing Android Studio
Google announced Android Developer Studio (now just Android Studio; the word Developer has slowly been dropped from the name over the last year) a few years back as an alternative new way to create Android applications. It is built on a foundation of the IntelliJ IDEA environment, with ADT and other tools bolted on.
Despite the years that have since passed, Android Studio is still in beta! As of this writing, the current version is 0.8.4, and although it is packed full of fantastic tools and features, it is also prone to the odd quirk, bug, and crash. That said, Android Studio is rapidly approaching maturity, and it is well worth your effort to learn to use it to develop Android applications.
Downloading Android Studio
Head to the Android developer site at developer.android.com/sdk/installing/studio.html and download Android Studio. At the time of writing, zip files for Windows, Mac OS X, and Linux are available for release number 135.1538390, in addition to an “all-in-one” installer .exe file for Windows. Choose the download appropriate for your platform, and remember where you save it.
Installing Android Studio
This process is as simple as unpacking the zip file and doing the following, depending on your platform:
- Linux: Simply run studio.sh from the bin subdirectory, and Android Studio completes the setup for you. It may prompt you to import settings from a previous version of Android Studio, as shown in Figure 2-1.

Figure 2-1. Android Studio prompts you to import settings from earlier versions
- Windows: If you are using the all-in-one installer, you now have a shiny new program group in the start menu for Android Studio and a launch icon within of the same name. If you download and extract the zip file, you can run the studio.bat batch file from the bin subdirectory, which deals with locating your JDK and determining the address width of your version of Windows in order to run the right version of Android Studio—32-bit or 64-bit.
- Mac OS X: When you drag the android studio.app file from the archive into your Applications directory, Android Studio installs itself and makes itself available as a normal application on your system.
No matter which platform you are on, you are likely to see the import settings option the first time you run Android Studio, as shown in Figure 2-1. You can import any previous Android Studio settings you may have.
Downloading the Android SDK
Unless you are using the all-in-one installer for Windows, you need to download the base Android SDK for your platform from developer.android.com. On Linux and Windows, remember to ensure you select the “bit-edness” that matches your existing installations of Eclipse and Java: either 32-bit or 64-bit.
Unzip the Android SDK into a directory, and note where this is because you’ll need that information shortly. For instance, this might be /home/myname/android-sdk on a Linux machine.
Configuring the Android SDK for Android Studio
If you aren’t using the all-in-one installer, you need to tell Android Studio where to find the Android SDK. To do this, use the menu option Configure ![]() Project Defaults
Project Defaults ![]() Project Structure; this opens the SDK Location setting shown in Figure 2-2.
Project Structure; this opens the SDK Location setting shown in Figure 2-2.

Figure 2-2. Setting the Android SDK location in Android Studio
Set the directory to the location in which you unzipped the SDK earlier, and click OK. Now you’re ready to add the additional SDK components you need to make the most of Android Studio. You can now jump ahead to the “Completing Your Development Environment Setup” section of this chapter, or read on for instructions on how to set up Eclipse as your IDE.
Option 2: Choosing Eclipse the Quick Way
By far the easiest way to get the Android Developer Tools (ADT) and the Android SDK installed and configured with Eclipse is to use the preconfigured bundle available from the developer.android.com site. This bundle takes care of all the base components, leaving you with the simple task of fetching additional SDK components—just as you’d need to with Android Studio.
Options 3: Choosing Eclipse the Do-It-Yourself Way
Although the prepackaged methods of setting up an IDE are great, some people already have Eclipse installed (and set up just the way they like it), and others are curious about how all the developer tools fit together. If you are in this second camp, you want to put the pieces together yourself. Next, I step you through downloading the Android SDK and adding the ADT to your existing Eclipse installation.
Note You need to use Eclipse 3.7 or later in order to use the most recent versions of the Android SDK and ADT. On a Mac OSX machine, you are also warned that Eclipse is not signed by a valid Apple Developer ID’s certificate and that it might be unsafe software. Although Apple is trying to practice good security in this regard, as long as you acquire Eclipse from the official website, it is perfectly safe to allow it to run on your Mac.
Downloading the Android SDK
First, start by downloading the base Android SDK for your platform from developer.android.com. On Linux and Windows, remember to ensure you select the bit-edness that matches your existing installations of Eclipse and Java: either 32-bit or 64-bit.
Unzip the Android SDK into a directory, and note where this is because you’ll need this information shortly—for instance, c:program filesandroid-sdk-windows on a Windows machine.
Adding ADT to Your Existing Eclipse IDE
Next, you need to add the ADT to Eclipse. To do this, start Eclipse, and from the Help menu, choose Install New Software. You should see the Install dialog or something very similar to it, as shown in Figure 2-3.

Figure 2-3. Eclipse Install Available Software dialog
When you click the Add button in the top right of the Install dialog the Add Repository dialog appears. Choose a memorable name for the Android repository, such as Android Repository, and for the location, enter https://dl-ssl.google.com/android/eclipse/, as shown in Figure 2-4.

Figure 2-4. Configuring the Android repository in Eclipse
You might find that the Android Eclipse repository is already listed in the drop-down, in which case you do not need to repeat the setup process. But assuming it isn’t already present, once you click the OK button, the main Install dialog shows the status “Pending” in the main area of the dialog briefly, until it contacts the URL shown and fetches the available packages. You should then see this change to the main entry, Developer Tools, which represents the ADT. When you click the triangular arrow to the left, the detailed components of Developer Tools appear, as shown in Figure 2-5.
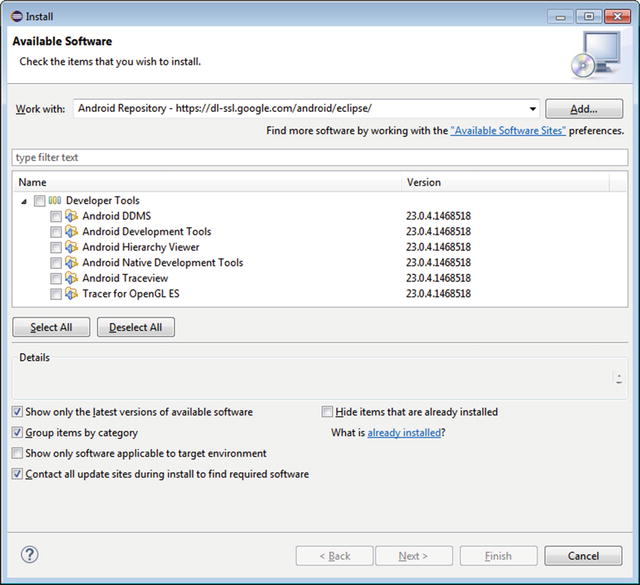
Figure 2-5. Available components for Android Developer Tools
At this stage, if disk space permits, choose all the options. If you are looking to economize, you can safely omit Native Development Tools and Tracer For OpenGL ES because I do not cover those in this book. With your selection chosen, click the Next button, at which point Eclipse presents an installation review dialog, as shown in Figure 2-6.
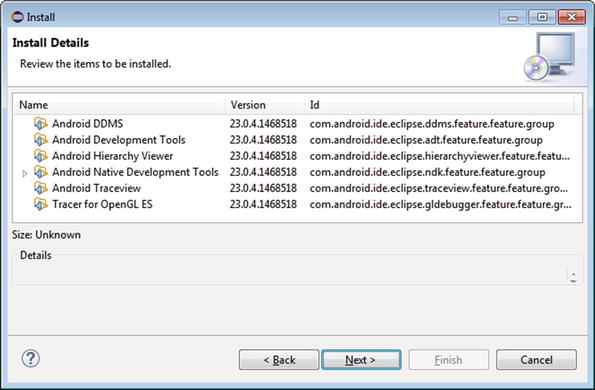
Figure 2-6. Installation review of developer tools in Eclipse
Choose the Next button, and you are presented with a license confirmation screen that contains several different open source licenses. You need to accept all of the licenses that correspond to the ADT components you have selected before you can click Finish to continue. Figure 2-7 illustrates the common licenses you see at this point.
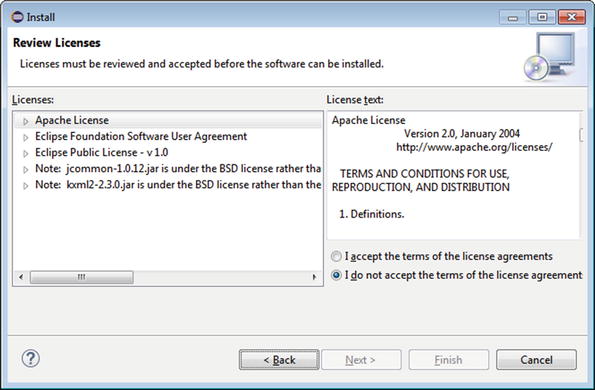
Figure 2-7. ADT installation license confirmation
Once you’ve digested the various license texts, you can click Finish and Eclipse commences downloading and installing the ADT components. You see the normal Eclipse progress dialog while this installation work is happening.
Note If you see any warnings about installing unsigned content, it is safe to continue.
When the ADT installation is complete, Eclipse prompts you that it requires a restart to continue. Save any other work you might have open, and allow the confirmation dialog to restart Eclipse for you.
At this point, you have the ADT installed as part of Eclipse, but it has no idea where to find the Android SDK with which to do its work. So let’s fix that now.
Configuring the Android SDK for ADT in Eclipse
When Eclipse restarts, you need to inform ADT where to find the SDK. To do this, open Preferences in Eclipse; observe the new category, Android. Click Android to see a configuration section, as shown in Figure 2-8.
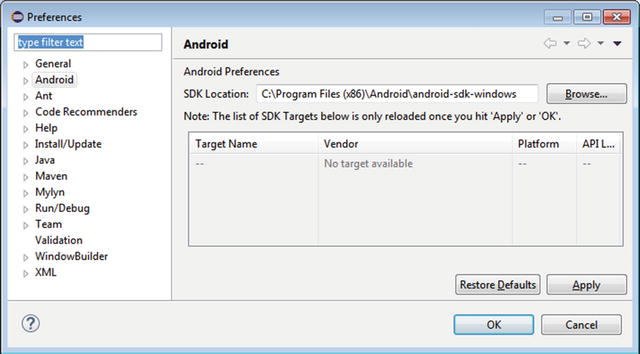
Figure 2-8. Configuring ADT with the Android SDK location
In the SDK Location field, enter the path to the location where you have extracted the Android SDK archive. Click OK. You have completed the basic ADT configuration. ADT quickly tells you if it can’t find the SDK components, as it performs a check to determine whether it can see the tools directory within the Android SDK. If you see an error complaining that it can’t find the tools directory, you know you need to double-check the directory setting in Preferences for Android or confirm where you extracted your Android SDK.
At this point, you are in a common position to all other IDE setup approaches, whether that’s Android Studio, the bundled Eclipse-plus-ADT installs, or some other esoteric or manual approach. You now have the basic IDE set up and you’ve made Android SDK available, but you still need to add specific SDK packages for Android versions and extensions, as well as device images, in order to do anything useful. We handle that final part of set up next and get you coding in a few short pages.
Completing Your Development Environment Setup
Welcome back, readers who have taken the Android Studio or bundled Eclipse-plus-ADT approach! Regardless of your chosen IDE, you are now at the stage in which you have the basics of the development environment in place, together with the core of the Android SDK. The only things missing are the many version-specific additional packages, support libraries, and device images that let you work with all manner of APIs and Android devices. Let’s get those now and get you coding!
To complete the Android SDK setup, you need to launch the Android SDK Manager and choose the additional packages you want for developing with Android. To launch the SDK Manager, choose it from the Window menu in Eclipse or from the Configure menu in Android Studio, or choose the SDK Manager binary from the directory to which you extracted the Android SDK archive (for instance, SKD Manager.exe on Windows). The SDK Manager appears as shown in Figure 2-9.
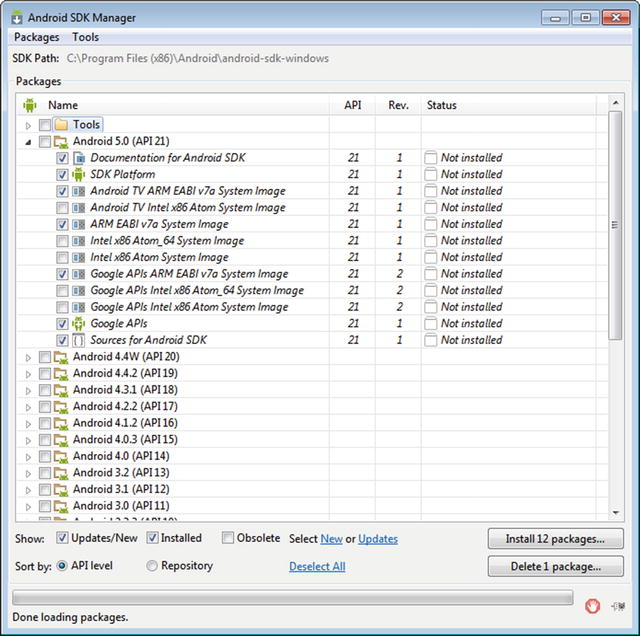
Figure 2-9. The Android SDK Manager
If you scroll up and down the packages list, you see a lot of packages from which to choose. This extensive list is a combination of the diversity and depth of Android, and its longevity. In addition to ARM and x86 system images, various support libraries, documentation, and so forth, you also see every Android SDK release library, from the early Donut and Éclair releases, through to the very latest Jelly Bean and Lollipop versions.
Although you might want to work with an older set of APIs for Android in some situations, to learn development, it’s best to start with the latest and greatest. That means we are going to start with the Android Lollipop libraries, system images, and documentation, and the essential extras you need to learn Android development quickly. To that end, choose the following options to install.
From the Android 5.0 (API 21) section:
- Documentation for Android SDK
- SDK Platform
- Both the regular and TV ARM EABI system images
- Google APIs for ARM
- Base Google APIs
- Sources for Android SDK
From the Extras section:
- Android Support Library
- Google Play Services
- Google USB Driver
Click the Install 12 Packages button (or however many packages you’ve chosen), and another familiar license acceptance screen displays. Accept the licenses shown, and choose Install. The Android SDK Manager Log window opens to show you the progress of the download and installation of your select SDK packages. Now is the time to fetch a coffee or other refreshing beverage, because this install takes a few minutes. The Android SDK Manager Log shows a completion message when it is done in addition to advising you to restart any components that were updated during the process.
All of the components you need to start writing Android programs are now in place. The one extra piece that is very handy for your development work is somewhere to run your Android programs.
Creating Your First Android Virtual Device
Your Android development environment—whether it is Eclipse with ADT, or Android Studio—provides you with the ability to emulate a real Android device so that you can test and debug your Android code without needing to load it onto a real device. This is done by creating Android Virtual Devices (AVDs).
To create and manage AVDs, open the Android Virtual Device Manager. You can access this from the Window menu in Eclipse, the Tools ![]() Android menu in Android Studio, or by launching the AVD Manager binary from your SDK installation directory—this is AVD Manager.exe on Windows.
Android menu in Android Studio, or by launching the AVD Manager binary from your SDK installation directory—this is AVD Manager.exe on Windows.
When the Android Virtual Device Manager starts for the first time, it presents an empty list of devices, as shown in Figure 2-10.
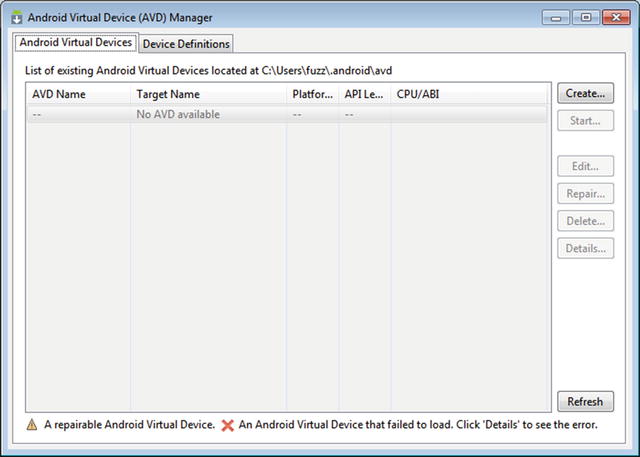
Figure 2-10. The AVD Manager
To create your first virtual device, click the Create button. A dialog of configuration options appears, as shown in Figure 2-11. I have supplied some good starting values for your first virtual device, so go ahead and copy the settings you see, and click the OK button when you’re done.

Figure 2-11. Defining an AVD
Now that your device is created, it is listed in the AVD Manager. To launch your virtual device, highlight it and click the Start button. You are prompted with launch options, as shown in Figure 2-12.

Figure 2-12. Launch options for you AVD
For the moment, the main setting to choose is Scale Display To Real Size. This attempts to draw the virtual device window to the size of the device you specified in the device configuration, which in this instance, is 4.7 inches (about 11.9cm).
Click Launch and the virtual device starts. This can take some time, even on a powerful machine. (Later in the book, you explore installing on a real device, which is normally faster.) You should now see a Starting Android Emulator status window, and then the splash screen for Android in the simulated device screen, as shown in Figure 2-13.

Figure 2-13. The AVD splash screen that shows when you start a virtual device
Once the virtual device has finished starting, it displays the Android home screen and unlock prompt, as shown in Figure 2-14. Feel free to unlock the screen and follow the help screens that guide you through the various screens and menus.
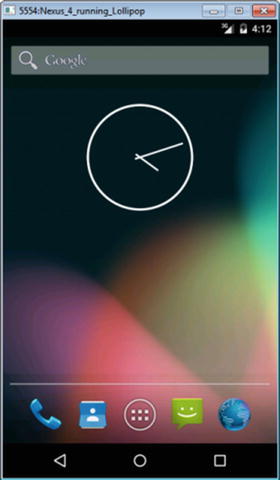
Figure 2-14. The running AVD
When you are done exploring your new virtual device, feel free to close it or leave it running in the background. It is time to code!
Creating Your First Android Application
Without further ado, it is time to create your first Android application and write your first Android code!
One of the huge benefits of setting up your IDE, whether it is Eclipse or Android Studio, is that the Android Developer Tools exist to do all kinds of heavy lifting for you, including putting all the structure and plumbing in place for a new application. You get to focus on just writing the functional code to make you application do as you wish.
To have the developer tools do their magic, simply select File ![]() New
New ![]() Project in Eclipse, or New
Project in Eclipse, or New ![]() Project in Android Studio, and then choose Android Application Project as your project type. Figure 2-15 shows this step in Eclipse.
Project in Android Studio, and then choose Android Application Project as your project type. Figure 2-15 shows this step in Eclipse.
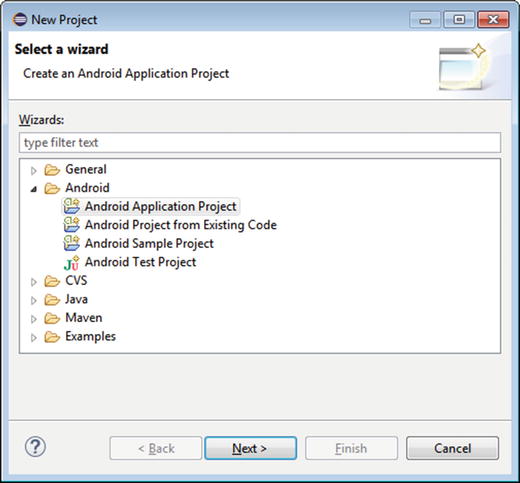
Figure 2-15. Choosing the Android Application Project type
Click next, and you are prompted to enter a range of details about your new Android project, as shown in Figure 2-16.
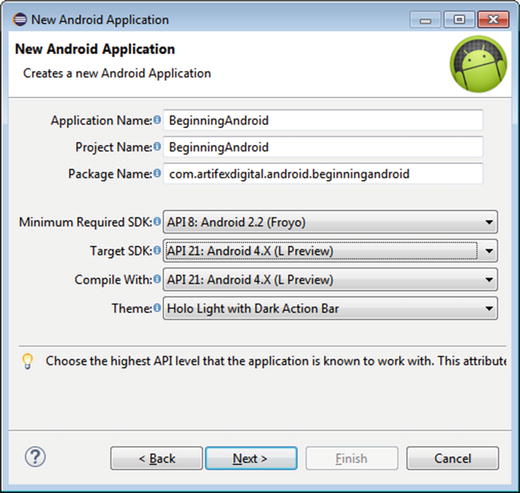
Figure 2-16. Android project properties
Here, you want to specify the following settings, leaving anything else you see at the default provided in the wizard.
- Application Name: This is the name you see for your application when it is installed on an Android device, and also when it appears in the Play Store.
- Project Name: A unique name to identify your project within your IDE. No other project in your IDE’s repository or workspace can have the same name.
- Package Name: The Java package name that is used for packaging this project. This follows the normal globally unique requirements of Java packages. In this example, I’ve anchored the package name to one of my registered domains.
- Target SDK: For the purposes of this chapter, check to ensure this has picked up the most recent SDK version you chose to install earlier in this chapter. Later in the book, I talk more about targeting well-adopted SDK versions and how to deal with older versions you haven’t catered for specifically in your project.
You can leave all the other settings at their defaults. When you’re done, click Next, and you are presented with the next configuration screen, as shown in Figure 2-17. This screen deals with launchers, activities, and other Android topics I cover shortly.
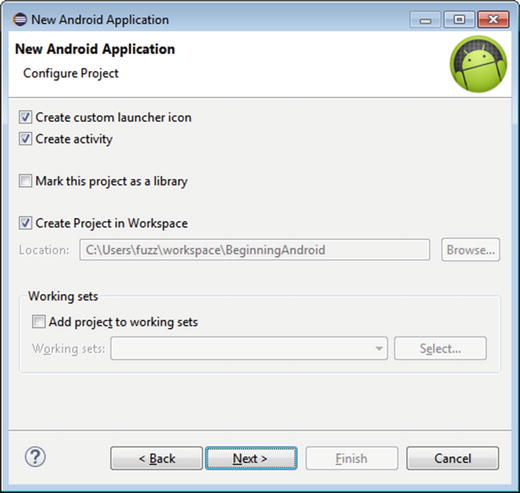
Figure 2-17. Setting Android project launcher and activity details
You should leave all of these settings at the default. We return to them in later chapters to discuss other options. Click Next to continue, and you see the Launcher Icon configuration screen, as shown in Figure 2-18.

Figure 2-18. Configuring a launcher icon for your Android project
Icons are very much items of personal preference and artistic taste. Feel free to play around with the scaling and shape options and the trimming and color settings here. When you finish choosing your creative flourishes, click Next to move to the screen shown in Figure 2-19, in which you choose the initial activity configuration for your new project.

Figure 2-19. Choosing the initial activity behavior for an Android project
For the purposes of this very first application, choose the Blank Activity option, and then choose the Next button. At last, you are at the end of the project configuration, as shown in Figure 2-20.
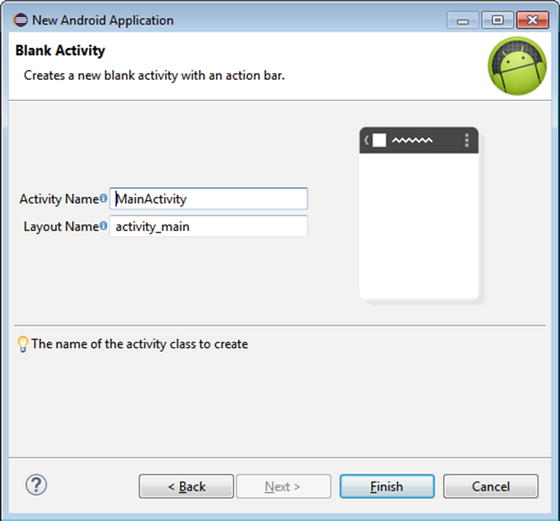
Figure 2-20. Naming the first Android activity in the project wizard
The principal thing to remember on this screen is that the Activity Name is used for the associated Java class, and so it must conform to Java class naming conventions and rules. You can leave this at the default, MainActivity, and then click the Finish button. We discuss exactly what an activity is in the next few chapters.
Writing Your First Android Code
When the Android project wizard finishes creating your project, you see a project structure that includes many directories such as src, libs, res, and so on, as shown in Eclipse in Figure 2-21. Do not worry about what all of these directories represent just yet. I cover that in Chapter 3.
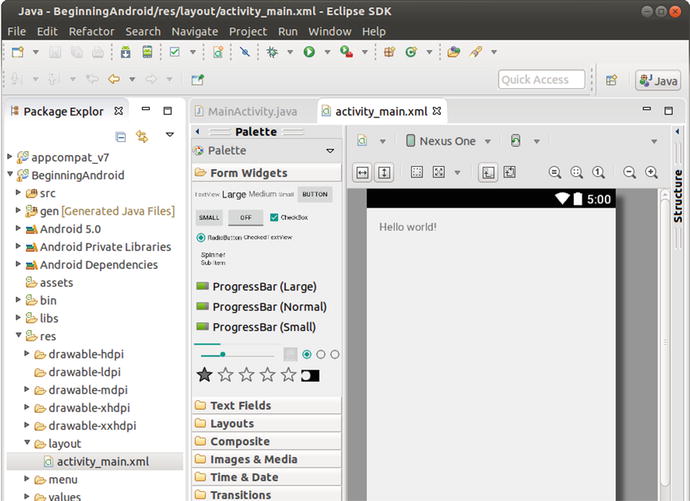
Figure 2-21. Your first project
For now, drill down into the values folder until you find the strings.xml file. Open this in your IDE or editor; you should see half a dozen lines of XML.
<?xml version="1.0" encoding="utf-8"?>
<resources>

  <string name="app_name">BeginningAndroid</string>
  <string name="hello_world">Hello world!</string>
  <string name="action_settings">Settings</string>

</resources>
Your first act of actual Android development should be to change the line, shown in bold, here:
<?xml version="1.0" encoding="utf-8"?>
<resources>

  <string name="app_name">BeginningAndroid</string>
  <string name="hello_world">Beginning Android!</string>
  <string name="action_settings">Settings</string>

</resources>
That’s it! You have written your first Android application and are ready to run it. Save the strings.xml file, change the focus in your IDE back to the MainActivity.java file, and choose the Run option from the toolbar or menu.
Note When first running a new project in Eclipse, you may be prompted to configure a Run Configuration. If this happens, you can set the Target of your Run Configuration so it either prompts you every time about which AVD to use to run your application, or sets a preference to automatically run for you every time.
You should see some log messages scroll past in your IDE; these let you know that your application is being deployed to the AVD, and shortly after, if you unlock the screen on your AVD, you should see the pleasing results of all your setup work in this chapter, as shown in Figure 2-22.
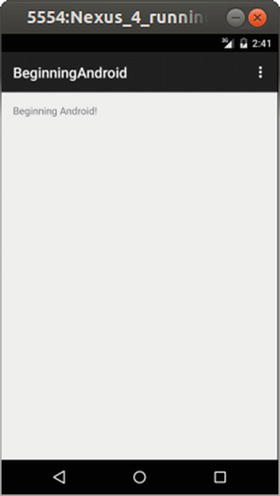
Figure 2-22. Your first Android application running in the Virtual Device emulator
Congratulations! You are on your way to mastering the world of Android development.