
Inside Your First Android Project
In the previous chapter, I helped you get your development environment set up and then quickly created the classic default application so you could rapidly get a feel for a real Android project working in your environment. Regardless of whether you chose Android Studio or Eclipse, you now have a real Android project at your disposal, and you can use this to dissect what goes into such a project and learn the many options present. So let’s get started!
Looking at Android Project Structure
The best way to understand all of what goes into a standard Android project is to start with a visual overview. Because the developer tools and SDK are doing a great deal for you, this turns out to be a pretty big picture. So big, in fact, that I have to split it into two figures to show it to you. Figures 3-1 and 3-2 show you the full project structure of your Beginning Android project; many of the key folders are open so I can refer to their contents throughout this chapter.
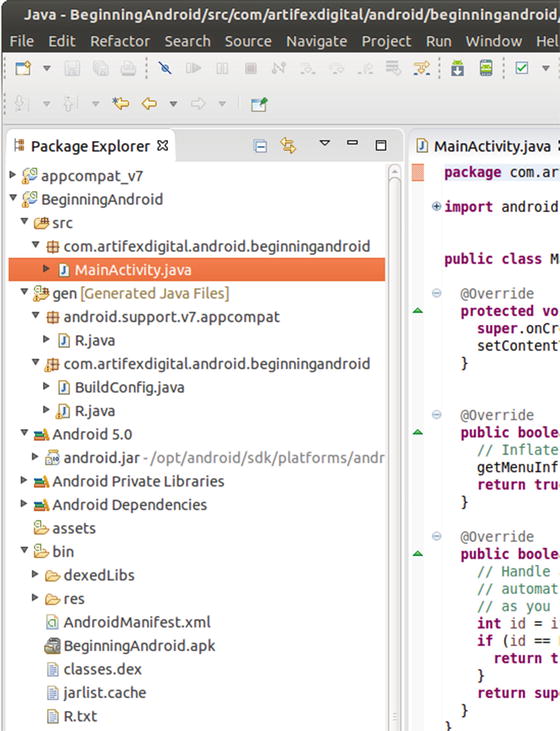
Figure 3-1. The structure of your Beginning Android project
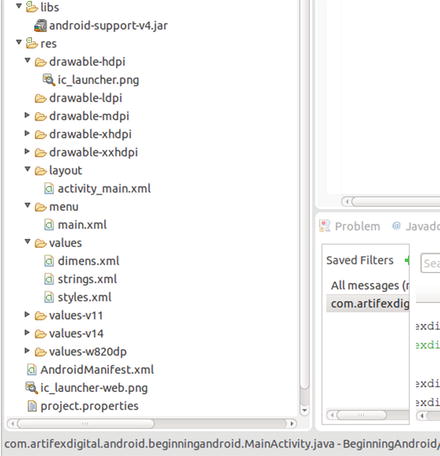
Figure 3-2. The structure of your Beginning Android project (cont.)
Note If your project structure looks a little (or even a lot) different, don’t panic. Some of the major parts of the Android project structure have gradually changed over the many releases of Android, ADT, and SDK. The structure shown here is from the v21 SDK for Lollipop, but yours may differ.
Starting at the Source
Take a look at the first items in the project’s root directory; they are dedicated to source code. The src folder is generated for you automatically (along with the other folders I mention throughout this chapter). Within it, you see a directory tree based on the Java class name you specified when you used the wizard to create your new project. In my case, this part of the tree under src is com.artifexdigital.android.beginningandroid. If you chose to use a different fully qualified class name, you see this change reflected here. Note that although it is conventional in the Java community to use reversed domain names to provide uniqueness, you do not strictly need to adhere to this convention. For instance, you can pick a fully-qualified name that is unique based on other options, such as the reverse of your email address.
The one file you see at the leaf of the src tree is the initial Java source code file that ADT created for you. In my case, this is the file MainActivity.java, which came from the default name suggested by the new project wizard, but you can actually call this file anything you like. This might prompt you to ask, “How does Android know where to find the main() method if I mess with the name of this file?” I talk a little more about what is in MainActivity.java (or its equivalent) in a moment, and I also cover the mystery of main() in the context of Android.
Benefitting from Generated Components
Moving on from the src folder, you next see a gen folder. The contents in this folder vary depending on what version of ADT you are using in your environment and whether or not you have successfully built your project at any point. Assuming you are using an ADT release of a similar vintage to Android Lollipop and that you have successfully built your project at least once, you find at least two fully-qualified Java package references within.
The first package reference is to the mysterious android.support.v7.appcompat package, though the mystery is partly solved through the truth-in-naming of the package itself. I’ll come back to this package a little later in the chapter. You also see the fully-qualified Java package reference based on your chosen name during project creation.
Within both of these package references is a file named R.java. This is an automatically compiled representation of the layout of your application, and it is created (or re-created, depending on the circumstances) during project build events. I’ll talk more about how this is used later in this chapter, as well as in Chapter 5, when we discuss layouts.
Using Libraries and JARs
I’ve already talked about Android’s use of Java as the foundational programming language for Android development. As you would expect with any Java development, much of the heavy lifting is done by other libraries and classes that are already built for you, typically packaged as Java Archive (JAR) files.
Our Beginning Android application currently has these notable libraries:
- android.jar—Listed in Figure 3-1 under Android 5.0, this is the JAR file for the Android SDK. Note that it is specific to the version of Android you told the new application wizard to use for your application.
- Android Private Libraries—android-support-v7-appcompat.jar and android-support-v4.jar are recent and more historic examples of Android’s support and compatibility libraries. These exist to back-port new platform features to old devices and the applications that target them. I’ll talk more about this when we discuss relevant parts of UI design and application behavior in Parts II and III.
As you build more and more complex applications, other libraries you import also show up here and are also referenced further down in the libs directory.
Counting Your Assets
Next up, you should see an assets folder. Within it, you will likely find…nothing! Well, at least initially—there is no default content in the assets folder. As you build more and more complex projects, this is the location in which a variety of custom components and datasources reside. Examples include video and audio files, SQLite databases, and any other file-based resource that doesn’t fit within the predefined project structure provided by the ADT.
Putting Things in the Bin
The bin directory continues the fine UNIX tradition of abbreviating binary to bin. Here you find your compiled Android application. Look for the .apk file—this is the actual package file that is installed on a phone or emulator for your application. It uses the ZIP format to hold the application’s executable, resources, and the AndroidManifest.xml file (which we discuss shortly).
Within the bin directory, you’ll also find a range of other compilation artifacts, such as the dex file, which is the compiled Java application file itself, in addition to optimized code objects, compressed images, and other compilation objects with which you ordinarily don’t need to interact.
You can ignore anything else within the bin directory for now.
Using Resources
A great deal of the tooling and support with which Android, the ADT, and the SDK provide you deals with using resources in extensive and clever ways to cut the amount of coding you actually need to do. The files in res and its subdirectories are all static files that are typically packaged with your application in the .apk file for deployment. The main types of resources are covered next.
Picturing What Drawables Can Do For You
The first set of subdirectories in the res folder are the drawable-* folders. Projects created with Android Jelly Bean, KitKat, Lollipop, or later start with five drawable-* folders:
- drawable-ldpi: The location for low-density artwork, typically 120dpi or worse. This was more important historically; because of the continuous improvement in screen quality, storage size, bandwidth, and so on over the years, you may never need to concern yourself with low-density drawables.
- drawable-mdpi: Meant for medium-density drawables, for resolutions up to 160dpi.
- drawable-hdpi: High-density images are those with resolution approaching 240dpi.
- drawable-xhdpi: The first of the “extra” high-density targets, xhdpi is considered anything up to 320dpi.
- drawable-xxhdpi: Believe it or not, this isn’t the highest possible resolution for which Android caters. xxhdpi is considered resolutions up to 480dpi. Want more? xxxhdpi has been defined for resolutions reaching 640dpi, but you won’t see a default folder for it in your project structure.
Android is smart enough to deal with missing drawables for a given size by scaling images from another size. The results aren’t always pixel-perfect, but for the user of your application, it means they get an application that works rather than a mysterious missing image in the middle of their activity.
SELECTIVE RESOURCE USE AND SUFFIXES
You will notice many more examples of resource directories like the drawables folders that have names and somewhat-cryptic suffixes. In the drawables case, the suffix relates to the apparent resolution or pixel-density of the image being used.
Other forms of selective resource control through directory name suffixes for other resources include version-based suffixes like v8, v11, and v14 relating to SDK versions, and w820dp, w1280dp, and similar suffixes that target exact device-independent pixel dimensions.
In later chapters, I explore layouts and the many options and techniques for designing Android user interfaces (UIs). For now, you can focus on the one file you see in the layout folder, which is used for the default layout for the initial activity: activity_main.xml. If you think of an activity as a screen or dialog in your Android application with which your user interacts, then the XML in the layout provides a consistent language for describing those user interfaces. There’s a lot more to know on this topic, but for now, you know where layout XML files reside.
What’s on the Menu?
The design and use of menus within Android applications has evolved over the many versions of Android. From a developer perspective, menus are treated as first-class UI citizens, enjoying similar descriptive support through XML files as seen about with layouts in general. As of yet, I don’t have any menus separately defined for the Beginning Android application, so for now, the menu folder is empty.
Valuable Values
Using values in a separate XML file should already be familiar to you, since you edited the onscreen text in the strings.xml file for the working example in Chapter 2. More broadly, the contents of the values directory are strings, dimensions, styles, and other reference data that is best handled through abstraction away from the code. Rather than embed my “Beginning Android” string in my Java code, I can easily reference it, and other values.
You can already see how the abstraction supported by the XML approach to values makes tasks such as internationalization and localization much easier. We’ll explore other uses for this approach in later chapters too.
Working with Other Key Files in Your Project
Within the root folder of your project reside a few more critical files that either glue all the disparate parts together or enable various project-level smarts within an IDE or other environment to help manage the project.
Controlling Applications with Android Manifests
At the heart of every Android application is the manifest, represented in the file AndroidManifest.xml within your project’s root folder. The manifest acts as the central point of declaration for the project, enumerating everything from activities and services, to permissions and SDK compatibility, and more.
The manifest is also used as the blueprint for bolting together the constituent parts of your application, for instance, by specifying what activity will act as the launcher activity the user first sees when the application starts.
The ADT aids your work here (and with any new project) by automatically creating a skeleton manifest file for any new project. Listing 3-1 shows the manifest from the Beginning Android example in Chapter 2.
As with any XML schema, element names are arbitrary, and so the Android designers chose the not-unreasonable manifest element as the root element name. The namespace provided here is a little quirky if you are used to vanilla namespace conventions in other uses of XML. In Android, the convention is to assume the namespace only for attributes, not for elements as well. This is strange, but workable, once you become familiar with it.
The first and most important following attribute is the package attribute. The package refers to the name of the Java package that you wish to use as the core package for your application. In the example, this is com.artifexdigital.android.beginningandroid. In addition to acting as the base for your application, this sets up a nice short hand for other references to this package throughout the manifest. Instead of having to type the full package name (and they can be much longer than the one I’ve used here), you can refer to the package with a leading dot, ".", notation instead. You can see this in action if you look further down in the activity element, where the first attribute android:name refers to ".MainActivity" instead of com.artifexdigital.android.beginningandroid.MainActivity. I don’t know about you, but I’m all in favor of not have to type all that. Your package name acts as the unique identifier for your application, both on devices such as phones and tablets, and also on Google Play and other application market places. This means your should choose wisely, since there is no way to change the package name, but have the application appear as the same unchanged application in those locations!
The other key attributes of the manifest element are your android:versionName and android:versionCode. The versionName value is designed to be a human-friendly representation of what version of your application is in use. This can be any string value you like, such as 1.0 shown in the example, or anything else you care to use. This is the value that people see on their devices, on Google Play, and so on, so you might like to help them out by sticking to something understandable.
android:versionCode has a different purpose. This is strictly an integer value, and successive generations of your application must use higher values than previous generations. This is, in effect, the true (internal) version number. By convention, developers usually start versionCode at 1 and go from there, but you can start with any positive number you like.
Caution Only one version of your application (typically, the one with the highest known versionCode value) appears in Google Play at any one time. There are ways to make older versions available, such as by using .apk side-loading, but the vast bulk of your audience probably won’t do this.
The first child element of the manifest is the uses-sdk element. In the example manifest file, you see two attributes: one for minSdkVersion and one for targetSdkVersion. The minSdkversion controls the age/vintage of devices, emulators, and the like that you will support with your application. In practice, this also governs which SDK features you should use. If you stick to developing with Eclipse and the ADT, or Android Studio, then you get helpful warnings if you try to use features introduced after your minSdkVersion level. The targetSdkVersion is a short-hand way of indicating which SDK was used to develop and test the application. It has some compatibility implications that we will discuss in later chapters. If you are interested in real-time data on what SDK versions Google knows are in use, and in what proportion, some data is made available in the Android Developer dashboards at https://developer.android.com/about/dashboards/index.html.
The remaining elements within the manifest govern the initial behavior of your application. You see one application element, and within that, one activity element. Even with the very short coverage of drawables and strings earlier in this chapter, you can probably guess at what the attributes android:icon, android:label, and android:theme are doing. They’re referencing resources and values to provide an onscreen icon and name for your application, and so on.
The activity element is given a label and defines which Java class is implementing the activity’s logic. It usually also includes an intent-filter child attribute that specifies under which conditions this activity can be invoked. I talk more about intents in Part II of the book, but for now, simply note that in this example, I have an action and a category, and my category flags that my application should appear in the device’s launcher so a user can run it by choosing its icon.
You can (and will) place a great deal more in a manifest file; we’ll discover more about these options throughout the rest of the book.
Permutating Projects with Properties
From a developer perspective, you build and maintain your Android application as a project. Depending on which IDE you have chosen, you may see one or more of project.properties, gradle.properties, ant.properties, or local.properties files. Each of these controls project-specific configuration settings, such as cross-project references, key material location for project signing, and so forth. Some are particular to a given build environment or IDE, so for instance, you typically only see ant.properties if you’re using ant to build your projects from the command line.
“R” You Forgetting Something?
I promised earlier in the chapter to explain more about the R.java files you see within your project. The R.java file acts as an index to all of the resources identified in your project. Any time you change, add, or remove a resource, ADT takes responsibility for regenerating the R class and its contents. This happens automatically, so you should never manually edit the R.java source files.
You can see how I already used this automatic referencing support in the Beginning Android application in Chapter 2. If you open the MainActivity.java file in your IDE or editor, you see a call to the setContentView() method within the onCreate() method. I return to this in much more detail in the coming chapters, but in this example, I pass R.layout.activity_main as the parameter to the method. This is my way of telling Android I want to use the layout specified in the activity_main.xml file in my layout resource directory. The R class takes care of all the plumbing to make the necessary link back to my layout definition. You will see this approach again and again with layouts, drawables, and other UI components.
Solving the Appcompat Mystery
If you pay attention to everything that is created for you when you use Android Studio or Eclipse to create your new Android project, you will notice a second project that is created automatically. The project is named appcompat_v7, and it is one of the elements of the Android Support Library for older versions of Android and the devices that run them. You can safely ignore this project for now; rest assured it’s doing some heavy lifting for you in order to make your Android applications support a huge range of legacy devices.