
The Life of an Activity
Up to this point in the book, I have a approached activities in a very practical and tactical way. The examples explored in the earlier chapters introduced activities as the basic UI building blocks, and you’ve seen how the Java code for an activity implements the Android framework and brings to life, through code, selected points in an activity’s lifecycle and the logic to drive your application.
Now that you have a growing understanding of Android, activities, layout. and logic, let’s delve in to the full background on activities, their lifecycle, and all of the common and not-so-common behaviors you should appreciate when building applications. This tour of the deeper fundamentals of activities will help expand your expertise. It also also lays the groundwork for later discussions on services, notifications, intents, and more.
Understanding the Activity Lifecycle
All of the example Android applications so far explored in the book have consisted of only one activity. But remember way back to the introductory chapter, where I stated that applications consist of one or more activities. So your application can have as many activities as you want, and each is governed by its own lifecycle. We’ll cover an example later in this chapter where we have multiple activities in an application.
If all activities have lifecycle stages, what are these stages? I’m glad you asked. Figure 10-1 shows a graphic representation of the stages of an activity, and the callback methods related to the transitions between these stages, or states as they are sometimes called. Thinking of your activities in terms of both the stage they are in, as well as the callback methods called to get it there, is very common once you are familiar with Android.
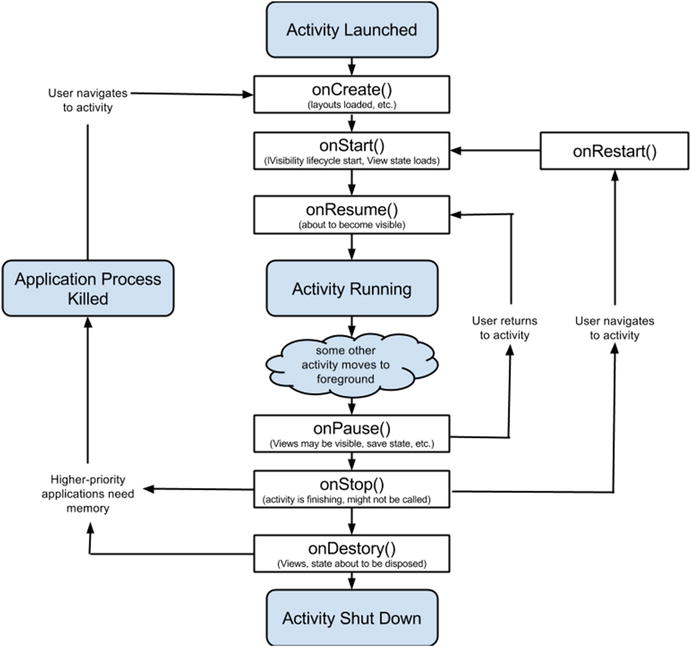
Figure 10-1. The Android Activity Lifecycle diagram
You can see that there are broadly four major states in which an activity can find itself:
- Launched: The point at which an activity comes in to existence, usually as the result of your user performing some action in your application (or starting your application)
- Running: The point at which your users actually sees your activity, after all of the various logistics and setup steps are performed (or re-performed)
- Killed: A state in which the Android OS has determined it needs to recoup the resources from your application, either from user-initiated load or some other trigger.
- Shutdown: The point at which all persistent state information, View hierarchy, etc. is gone.
The various activity stages are fairly simple to understand. The main complexity comes from the interplay of the various callback methods that govern transition between the stages and control intermediary points along the way.
Working with Activity Callback Methods
We will work through each of the callback methods from Figure 10-1, and explore their various behaviors and uses. There are some common characteristics of many of the callbacks that you should know. In almost all cases it is common practice to chain up to the parent class’s equivalent method as the first action in implementing the callback. You have already sees examples of this in preceding chapters’ examples that invoked super.onCreate() as the first action in the onCreate() implementation. I will call out those exceptions where that isn’t done, but in general calling the super-method should be your first action within any callback.
onCreate( )
This is where an activity’s lifecycle starts. It may be that a user has invoked the activity for the very first time, or the activity may be restarting due to some environmental change such as a rotation event. The possibility of a restart is why the full method signature void onCreate(Bundle savedInstanceState) includes the Bundle object. There might be previous state information that you have saved in your code prior to a memory-related shutdown, for instance, that you need to recover for your activity. This Bundle object is typically known as the instance state for a given instance of an activity.
The key actions you should take within your method logic for onCreate() are:
- Load all of the layouts you plan to use in the activity into the content view so that the UI can be constructed in readiness for the onStart() call.
- Initialize any global activity-level variables listed in the activity’s class definition
There are some other nuances to the use of onCreate() as part of recreating an activity. These have to do with managing existing global resources from the possible earlier incarnation of the activity, and dealing with remembering changes to views that happen in your logic after onCreate(). For instance, if you programmatically change your View layout dependent on user interaction, you might need to persist the user’s choices so you can walk through such changes again in the case of an activity recreation scenario. We’ll cover the global resource topic shortly under the onRetainNonConfigurationInstance(), and talk about the use of the instance state and preferences later in this chapter.
onStart( )
Once onCreate() has built the necessary objects from your layout definitions, associated these with context views, and done other initialization work, it is then the job of onStart() to actually present the resulting UI to the user. I like to think of this method as the “OK, Show Me The UI” method, though that doesn’t fit with the typical naming pattern for Android callback methods. If you examine Figure 10-1 closely, you’ll see that onStart() can be called on the path from onRestart().
There is rarely a need to override this method and provide your own implementation. If you are tempted to fiddle with some of your logic and get things “done” before the UI shows up, be aware that if your activity is following the onRestart() path, then the instance state is still not fully restored and won’t be until the subsequent call to onRestoreInstanceState() is made. If that leaves you struggling to think what you might actually add to an override at this point, good! Like I said, it is rare to need to override the onStart() method.
One of the few cases that does warrant implementing your own onStart() override is when you have some manner of custom resource that is long-lived, and that you have decided to pause or freeze when the activity is not in view so as to minimize memory or other resource consumption. If you decide to control such a resource through the onStop() or onPause() callbacks, then the onStart() method would be where you would wake or thaw such a custom resource. Be sure to call the super.onStart() method to invoke the parent’s equivalent, even if you know there is no override code in the parent. Android itself still needs to do its own internal chores in this case.
onRestoreInstanceState( )
When a user dismisses an activity, whether by hitting the back button or some other logic you have coded into your application, then they have indicated they are done with the activity itself, and any instance state associated with it. You as a developer have nothing to worry about, and certainly nothing to retain and restore. But when the Android system itself closes an activity, for instance because it is going to re-render it due to an orientation change, then the act of recreating that activity for the users needs to do just that! Re-create, including instance state.
It is important to note that the instance state is not long-term storage, nor is it designed to persist in any permanent fashion. Where you need to store user data or preferences, the Android Preference system is a perfect choice for small settings-like or option/choice values.
onResume( )
Just as a magician has that moment of revealing the culmination of her or his trick, so too Android has onResume() as the magic-wand moment that occurs just before your UI becomes visible. Why have onResume() and onStart() both trigger in the lead up to UI visibility? Referring to Figure 10-1 again, you will notice onResume() in the boundary of the shaded region labeled Foreground. Along with onResume and onPause(), these transitions can be expected to happen many times in the life of your activity as others pre-empt it, are themselves pre-empted and dismissed, and so on.
The only actions typically coded into an override for onResume() are those that affect real-time visible activity, including:
- Animation
- Video
- Custom view transition effects
There is no state to manipulate or tinker with here, so resist the urge to meddle any further during onResume().
onPause( )
A key building block of the multi-process architecture of Android is the ability to pause applications and their activities to help maintain responsiveness and preserve battery life. An activity’s onPause() callback occurs just before it enters background state (see onStop() later in this chapter). There is also the possibility of immediately resuming through onResume(), which I have already covered.
Importantly, the onPause() call also marks the point beyond which Android can unilaterally terminate your activity and reclaim its resources. Key steps you should be taking during the onPause() call include saving state, deliberately deciding what to do with any running animation, video, audio, etc. Once the onPause() call exits, there is no guarantee your process and activity will ever receive an event again. So be prepared!
Careful observers will note that there is no parameter passed to onPause(). This is a deliberate attempt to guide you to be as light-weight as you can at the time the method is invoked.
onStop( )
The onStop() method has the task of actually pushing your activity to the background. You can think of this method as the complement to the onStart() method introduced earlier. Once the onStop() call completes, your activity is no longer visible to the user, though its view hierarchy and properties still exist - and are fed in to onResume() and onStart() if called.
Remember that onStop() might never be called at all for your activity, for instance if the Android system is under severe memory pressure and Android decides to reclaim your paused activity for its memory resources. It is for this reason you should rarely attempt to override the onStop() method, and you should think carefully before relying on any custom logic in this method. One of the few types of logic added to onStop() includes service interaction with stock Android services or your own custom service, where lack of foreground activity is no impediment.
onSaveInstanceState( )
From the picture painted in Figure 10-1, and the “paired” nature of many of the callback methods discussed so far, it should come as no surprise that onSaveInstanceState() exists. It is also reasonably self-explanatory as methods go. The primary purpose of of onSaveInstanceState() is to preserve state information when an activity is about to be destroyed through onDestroy() without the user realizing state information might be about to be lost.
You might think that would be a rare situation. However, there’s a common behavior that users perform that unknowingly (to most) induces activity destruction and recreation. That behavior is an orientation change, most typically through the user rotating the device while your activity is running.
The good news is that the default implementation of onSaveInstanceState() already deals with handling view preservation. Any other custom state data you would want to save should be handled explicitly. Because of the potential I/O involved in saving state, be warned that calls to onSaveInstanceState() can take a variable, and sometimes long, duration.
onRestart( )
The onRestart() callback method is triggered in the transition from stopped to started states. This gives you some options to deal with how you choose to start your activity. For instance, you can split your logic between a fresh start and a restart from stopped state. In the latter case, you will have access to preserved view and other state data, giving you some options to speed up or make things more efficient.
onRetainNonConfigurationInstance( )
Not only does this method have a ridiculously long name, but if you refer to the state information in Figure 10-1, you’ll see that onRetainNonConfigurationInstance() isn’t mentioned. That is not an accident, as it falls somewhat outside the normal flow of activity state changes.
To understand why this method exists, you need to know a little more about what happens when an activity undergoes a configuration change. The most obvious form of configuration change is when we need to “redraw” an activity due to a rotation of the interface. Other triggers for configuration change include docking the device in some form of cradle, or adding or removing an SD card from the device. The term redraw is a misnomer, because Android actually casts aside your existing activity, recreates it, and then expects you to pick up from there as if (almost) nothing had happened. It doesn’t stretch or tweak your layouts; it expects you to re-inflate them if you want to make use of additional or changed UI space. The need to pick up and carry on doesn’t stop there.
There are potentially a range of resources you might have acquired for your activity that you still want to use should a configuration change occur. Think things like open files, database connections, objects supporting service interactions, and so forth. The onRetainNonConfigurationInstance() method is the traditional way to retain those types of resources. The method returns an object that includes references to all of the old activity’s various resources, so you can carry them forward to use when the activity is recreated. If you look at many of the examples already introduced in the book, you’ll see the onCreate() method almost always calls getLastNonConfiguationInstance(), which is the step required to gain access to the old activity’s reference object, and all the resources it contains.
Note The approach described with onRetainNonConfigurationInstance() is slowly being replaced by the use of headless fragments. However, the traditional approach will be supported for some time to come.
onDestroy( )
Whether through an explicit user action, like clicking a “close” button you might have provided, or unexpectedly due to low resources or similar circumstances, there comes a time when your activity will be destroyed. Destruction is not a catastrophic as you might think. Remember, activities are cheap and easy to create, so just because your user is destroying the activity doesn’t mean your whole application is being shut down. Your user could just as easily interact with and invoke this activity again in short order, and your application’s resources will still persist.
The main logic you can consider adding to your override of onDestory() is any activity-centric cleanup. Don’t try to interact with outside services or other resources that don’t belong to your activity. Remember, there’s no guarantee that onDestroy() will be called, so you should not rely on it.
Understanding the Goals of Android Activity Behavior
From a development perspective, having a grasp of the callback methods that control and guide state is useful. But if you only think in terms of which call takes you between various states, you might miss the bigger picture.
The number one goal of the activity state callback methods is to help you create and maintain the impression of one seamless application when a user is working with your code. It is great to have the power and flexibility to create and discard activities left, right, and center for your app. But remember your is almost certainly thinking in terms of an application and its “screens”, rather than in terms of a loosely coupled group of activities that live and die multiple times.
Keep these guiding principles in mind as you create applications from more and more activities:
- Keep activities focused. That doesn’t necessarily mean simple, but rather ensure an activity doesn’t become the application version of the kitchen sink. This will help you manage other facets like resource use, state, and performance.
- Save state often. You will be surprised how often users do things like switch apps, jump back to the launcher, or take some other step outside your activity. Don’t think of saving state as something onerous, nor like saving a long document that’s being written. Save early; save often.
- Ensure all UI Views have android:id attributes. This helps Android automatically save instance state, including for mutable objects like an EditText field into which a user might already have entered some text.
- Remember paused activities can vanish! Even your best-designed application can run on a device in which the user has dozens of other poorly designed applications running. And the moment your application is paused, Android could decide it needs your application’s memory to use somewhere else.
Working with Activity Configuration Changes
In the descriptions of activity lifecycle callback methods earlier in this chapter, I mentioned several times that one change that happens outside the normal activity lifecycle is activity configuration change. In a nutshell, a configuration change is something that affects the fundamental baseline of your application and the Android device itself. The most obvious example is a user rotating the device to give it a different orientation such as landscape instead of portrait.
But orientation is not the limit of possible configuration change. The Android developer documentation includes exhaustive notes on what constitutes a configuration change. Other key changes include the user changing the language setting, plugging in a power source such as a USB cable, docking the device, and more.
Understanding the Default Configuration Change Approach
One of the many things that Android does for your application is to track any configuration changes that happen to the device on which your code is running. Rotation, device pairing, charging, and more are all monitored. Should a configuration change occur, all running applications are notified by callback that a change is in progress.
Ordinarily, you might think that notification then forces you to do a great deal of work to deal with a configuration change. Nothing could be further from the truth. Along with monitoring and managing configuration changes, Android provides other useful default and/or automatic capabilities that make life easier for you, the developer.
Remember back to our discussion of the various resource folders within your project, including those that cover layouts. Android does all of the work required to get you the layout for a given configuration. You get portrait-orientated layouts when the device is rotated to a portrait orientation, and landscape-orientated layouts for landscape. You don’t need to personally do the coding to detect the orientation and change the UI to cope. You simply ask for your resource by name, and Android sorts things out.
The one thing you as a developer do need to concern yourself with is the question of which other resources you have acquired for your existing activity. This is because any configuration change triggers Android to destroy the current activity and recreate it. You are given the chance to gracefully save state and resources so they can be reloaded.
Following is the callback sequence for configuration change:
- onSaveInstanceState() This will be called when the configuration change is triggered, immediately before Android destroys the current activity. This is the appropriate time to save any resources or other transient user input or data you wish to keep. Use a Bundle object to collect all of the various items you wish to preserve. You have seen examples in this book where the Bundle is used, and older Android examples you might find on line often refer to this Bundle by the name icicle, which is meant to evoke the idea that you are “freezing” state before thawing it again when the activity is recreated. The superclass ancestor for onSaveInstanceState() does many convenient things for you automatically, including saving View state for any object with an ID (as mentioned previously), so it can be recreated intact.
- onCreate() This method invocation is passed the Bundle object created in onSaveInstanceState(). As you’ve seen in each example in the book so far, you needn’t do any more with this call other than ensure it calls up to the parent class via super.oncreate(). If you have any custom state saved, you can elect to implement your restore logic here, or you can wait for the onRestoreInstanceState() callback which occurs immediately following the onCreate() call.
- onRestoreInstanceState() This method is also passed the Bundle object created by onSaveInstanceState(), and you are free to retrieve your various resources in this call if you prefer. One advantage to waiting for the onRestoreInstanceState() call is that you can be sure the content view has been set, and any layout inflation has occurred prior to this call.
Saving Custom State
What data or objects can be saved as part of your instance state Bundle object? A quick inspection of the Bundle class shows a plethora of put- and get-style methods for storing integers, strings, complex objects and more. The pattern used is traditional key-value storage, where each resource you wish to place is the Bundle is keyed by a String name you provide. Example methods (not exhaustive) include:
- putInt() Store an integer value in the Bundle
- putFloat() Store a float value in the Bundle
- putString() Store a string value in the Bundle (beware a common pitfall here, of accidentally confusing which string is you value, and which is your key).
- putParcelable() Store a complex or custom object as a Parcelable in the Bundle.
There are many more options for putting values into your Bundle object, and the complementary get methods are self-explanatory.
Listing 10-1 shows a simple override of onSaveInstanceState() implementing the preservation of some custom data during configuration change (e.g. inserting an SD card).
Here we have simply saved an integer for later restoration once the configuration change has completed. Think back to the very first example you explored in Chapter 2, tracking button presses. We could use this approach to keep track of button presses in horizontal and vertical orientation, for instance by keeping the two integer values and passing them through successive configuration changes (though naturally we could use application-level variables to do the same job). Listing 10-2 shows a simple override for onRestoreInstanceState() that does the logic for this sort of button press tracking.
This is a deliberately simple example. Remember to keep your custom logic to a minimum when handling configuration changes for your application’s activities.