
Managing Databases with Android
Files are not the only way to store information from your application onto an Android device. Every Android device ships with an embedded and embeddable database known as SQLite. Those of you familiar with SQLite know that it represents a rock-solid database engine that ships as a single library, and that it can be included in all manner of applications. SQLite has been around for almost 20 years and has proven itself one of the winners in the “small but mighty” database category.
For those of you not familiar with SQLite, or its Android capabilities, let me quickly walk you through the database fundamentals of using SQLite, and how to use it with Android to build up a simple database-driven application.
Note If you would like to delve deeper into the world of SQLite, beyond what I cover in this chapter, I recommend The Definitive Guide to SQLite, Second Edition. In the interests of full disclosure, I should admit that the authors of that book are Michael Owens and Grant Allen. That second name should look familiar to you, as that is none other than the author of the book you are now reading.
SQLite: A Seriously Popular Database
If you are questioning whether you should invest your time learning about SQLite as part of your Android education, let me provide some reassurance. SQLite is, without a doubt, the most popular database platform shipped with, or used by, software today. Some of its adherents include the following:
- Google (well, obviously, we’re talking Android here). Not only does SQLite ship built in to Android, but it is also the database the Chrome Web browser uses for storing all kinds of profile information, from bookmarks to cookies. It is also used for supporting the “local storage” option of HTML5.
- Apple. Android’s great competitor, the iPhone, ships with SQLite as a standard library as well. As do iPads, all recent Macintosh machines, and even devices like Apple TV.
- Mozilla. The Firefox browser uses SQLite for many tasks similar to what Chrome uses it for, including options for HTML5 local storage support.
- Symbian. If you remember Nokia phones before the Microsoft era, then you will certainly know of and have used Symbian. It, too, shipped with SQLite.
- Oracle. Yes, the database behemoth best known for being one of the giants (in both reputation and resource consumption) of the database world. Many of Oracle’s products ship with SQLite embedded, particularly the range of products it acquired from the Sun acquisition.
And this is just a sample of the incredibly broad use and support for SQLite across the technology industry. Even if all of these names don’t sway you to learn about SQLite for Android use, the millions of Android applications that already use it and that are available from the Google Play store should convince you it’s a solid technology foundation for data storage needs in your Android applications.
A Crash Course in SQLite
SQLite is designed to be a very familiar database library that provides the relational database query and transaction capabilities to whatever application loads the library. It uses a fairly standards-compliant implementation of SQL as the query language, as you probably guessed from the name.
As a language, SQL has steadily evolved in various date-stamped versions, such as SQL-92 and SQL-99, and SQLite supports all the usual SELECT, INSERT, UPDATE, and DELETE commands, but there are some key features of later SQL standards it doesn’t support. Here are some of the support restrictions:
- Only a subset of ANSI outer join syntax is supported.
- There is minimal alter table support—basically just what you need to rename and add columns—so you won’t be able to drop columns or perform data type morphing (more on this later).
- Row-centric triggers are OK, but you won’t be able to use statement-centric triggers.
- Views are strictly read-only.
- There isn’t any support for any windowing or OLAP capabilities (LAG, LEAD, etc.).
To be honest, these few missing features are all at the higher end of typical database usage, and for a very small embeddable database library, you still get the huge range of the power that SQL offers.
In this list, note that in the second item on altering tables flags, you cannot play with existing data types for a table. This isn’t because of any ideological reason; rather, it has to do with the one fundamentally different—and some would say strange—area of the design of SQLite.
When you are specifying data types for a column, such as integer or char, SQLite happily accepts such syntax, but under the hood, it implements a data typing system it calls manifest typing. In layperson’s terms, what this really means is that the notion of prescribed data types really isn’t present;instead, SQLite simply uses them as guides and allows you to create data of any “type” in a given column.
This is very close in concept to the data type flexibility you might have experienced in contemporary NoSQL-style databases. The data type isn’t enforced across the whole column; instead, it is simply another attribute of each individual value in that column for the rows in a table.
Creating SQLite Databases for Your Application
There are two main approaches to bootstrapping a SQLite database for your application: you can either create a SQLite database file from somewhere else, such as your development machine, and copy it as a resource in your Android project, or you can have your application create and populate a database for you.
The drawback of the packaging approach is that as a developer, you find it becomes more difficult to keep the database schema and code development in sync—this is a problem not unique to Android. Ordinarily, you might think that having to manage the creation and initial population in you Android code would be a similar burden, but Android comes to the rescue with some excellent setup assistance.
As part of Android’s SQLite support, the SQLiteOpenHelper class is provided for you to subclass in your application. This class takes care of all the initial setup of a SQLite database, and it deals with future changes and upgrades. You need to implement at least three of the methods from the parent class, and a fourth method for downgrades is also available as an option.
First, you need to add any logic to the SQLiteOpenHelper constructor (calling that parent constructor as a basis). The parent takes care of checking to see if the nominated database file itself actually exists and creates the file if it needs to. It also performs a version check against the provided version and calls the onUpgrade and onDowngrade methods as determined. It can also do some other fancy tricks, but those are the essentials.
Second, you need to implement the onCreate() method. Here you actually perform the SQL commands to create the tables, indexes, views, and so forth that you want in your database. You should also perform any inserts, updates, and the like that you need to seed your database.
Lastly, you have to provide an implementation for onUpgrade(), and you can optionally also provide one for onDowngrade(). The point of these methods is to handle the schema changes and any related data changes you wish to have occur as you upgrade your application over time (and presumably, change the SQLite database to support the new application logic). You will often see a quick hack that uses the “drop and re-create” approach. This is not something I recommend performing unless the data is really unimportant to your user and you know you can create it again if you need to—for example, if you have backed up the user’s data to a web service or end point.
It is one thing to read a few paragraphs that dryly describe what should be in the code; it’s another to...... So let’s improve the situation by taking a look at the example application I use throughout this chapter to explore Android and SQLite.
Introducing the SQLiteExample Application
The ch18/SQLiteExample application highlights all of the key SQLite capabilities you might want to use when you’re building database-driven Android applications, and it builds on some of the list-based UIs we explored in earlier chapters. Figure 18-1 shows the UI comprised of a ListView for showing known Android device models from a SQLite database, along with buttons for adding new device models and showing information about known devices.
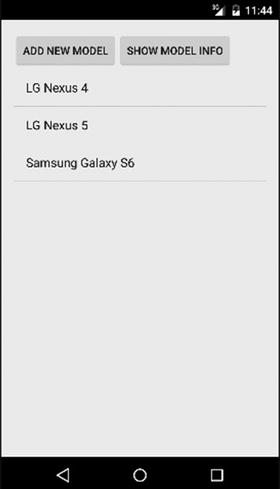
Figure 18-1. The SQLiteExample main activity and appearance
Since you are already familiar with this kind of UI design, I won’t dwell on it in huge detail. Listing 18-1 shows the layout.
When you look at this code you should notice two quick points. First, note that I define two nested LinearLayouts. The outer-most LinearLayout uses orientation=vertical, and contains the inner LinearLayout and the ListView with the stock Android id. The inner LinearLayout houses the two buttons, addNewModel and getModelInfo, with orientation=horizontal. This is a quick layout hack to have the UI widgets flow as I want them, but you can devise a more elegant solution with suitable weightings, gravity, and layout references.
The second point to note is the presence of the by-now normal pattern of both buttons registering the same method to handle clicks. As usual, when we delve into the supporting Java code, our onClick() method determines which button was pressed and directs the logic from there.
Look again at Figure 18-1; you can see several devices already listed, which suggests that there is data in a database somewhere that I am already using to demonstrate the application. This data was placed there when I implemented the SQLiteOpenHelper I used in the SQLiteExample application. The Java for my implementation appears in Listing 18-2.
From the Java listing, you can see the various mandatory helper requirements that I introduced earlier in the chapter. The constructor takes the file name and version information so that it can check to see if the SQLite database file exists and can create it if it needs to. In our case, I have called the database file “devices.db”.
The onCreate() implementation looks deceptively simple. Two calls are made to the execSQL() method; this is your introduction to the first of many of the methods that are used to actually issue SQL commands and work with results. In its most basic and common form, the execSQL() method takes a string SQL statement as a parameter, which is the SQL command executed by the SQLite library. Normally there is nothing returned, assuming the execution is successful.
The SQL statements passed to the execSQL() calls are built up in the constant declarations at the beginning of the class. The constant-based approach is not a new one, but you should take note of the few additional constants the application uses:
- The three COLNO_* constants represent the ordinal position of the columns in the table as defined. These positions are important for some of the access methods that implicitly use the default column order for returning data.
- TABLE_COLUMNS is a String array of the column names in the table. A number of the methods we are about to explore make use of this collection of names.
You should also note the _id column of the table. This uses the autoincrement feature of SQLite to have it generate a unique integer value as the primary key for your table. A number of the built-in Android tools, helper classes, and so on use and expect the name _id convention to be available, so it’s a design choice you should adopt for all of your SQLite tables.
The other SQL statement issued through execSQL() is the INITIAL_DATA_INSERT statement that performs a multirow insert to bootstrap some data into the one table in our schema. This statement is entirely optional and specific to this example. Your own application might have no initial data, or enormous amounts. The syntax used for the insert statement itself is only supported in later versions of SQLite, and, therefore, later versions of Android. I return to the SQLite versions and features versus Android versions toward the end of the chapter.
The last method in the helper class implementation is a skeleton for onUpgrade(). In the example application, we are dealing with the first version of the application (DBVERSION equals 1 and is used in the constructor call). However, you can see the outline of the logic you can use to work with the provided oldVersion and newVersion values in order to decide what schema changes, data updates, or other actions you might need as part of an upgrade to your application. As I mentioned previously, you will see many examples online of people simply dropping and re-creating a database as the onUpgrade() implementation. It’s lazy, but it works to a degree, so long as you don’t care about your user’s data. Beware this approach if you are storing any data of value!
Building a Database-Driven Activity
Now that you understand the structure and purpose of the SQLiteOpenHelper class, you can actually use it to build a database-driven application. The logic that sits behind the SQLiteExample application is shown in Listing 18-3. This is a fairly long listing, even though I have broken out the DialogWrapper class into a separate file and have not copied it here to save space—you can always view this yourself in the ch18/SQLiteExample source code.
The first and most important part of any SQLite-based Android application is creating an object from your helper class, and keeping it for the life of the activities that need it. Typically that’s easily done, as is demonstrated here in our example application from within the launcher activity.
With your helper object available, any time you need to work with the database, all you need do is invoke its getReadableDatabase() or getWritableDatabase() method to return a database object for your underlying SQLite database. As the names suggest, a database object that is readable is used for only SELECT-style queries, whereas the writable version allows DML statements (INSERT, UPDATE, DELETE) and DDL statements like the ones used in our onCreate() helper class method.
When you are done with the immediate needs of using the database object, simply call its .close() method and the helper class tidies up. You typically do this as part of the process of your activity being finalized in onDestroy() or similar.
Our example application creates the helper object and uses getWriteableDatabase(), and then it proceeds to populate the modelEntries list using the getModels() method. With the results in hand, we feed our ArrayAdapter what it needs to inflate the ListView with the data returned from the database. The getModels() method is a deceptively short method, because is introduces and uses two major capabilities having to do with SQLite databases and Android. The first concept is the query helper approach to gathering data from your SQLite database, and the second concept involves the cursor object for managing the results that are returned. Let’s look at the bigger picture of both these concepts in detail.
Choosing Query Approaches for SQLite and Android
When you are using SQLite in your application, you have to choose between two principal ways of actually retrieving the information stored in the database. Although the basis of both is the humble SELECT statement, your choice basically boils down to how much structure and hand-holding you want.
Walking Through the Query Building Process
The first approach, as seen in the getModels() method of the SQLiteExample application, is the query() method. The query() approach provides a very structured path to build up the necessary and desired column choices, tables, predicates, and so on for the query that will actually be issued against your SQLite database.
When using query(), you don’t actually write the SQL SELECT statement itself. Instead, you step through the following constituent phases, and the query() method builds the equivalent SQL under the hood.
- Provide the name of the table to be used in the query.
- Provide the column names to select (or “project” if you are into official relational database nomenclature).
- Provide predicates for the where clause, including any optional positional parameters.
- If positional parameters are used, provide the values for the parameters.
- Provide any GROUP BY, HAVING, or ORDER BY clauses.
Where one of the parts is not needed, you simply provide null. Thus, from SQLiteExample, you saw our call take this form:
myDB.query(MySQLiteHelper.TABLE_NAME, MySQLiteHelper.TABLE_COLUMNS,
    null, null, null, null, null)
This means we didn’t use any predicates in a where clause, had no parameters, and didn’t use any GROUP BY, HAVING, or ORDER BY options.
If this all seems very straightforward, I want you to go back and carefully read the first item in the preceding list of the steps for using query(). Note that you provide the name of the table—singular! That’s right. The number one drawback of the query() approach is that it can only work with one table in a given call. This means you cannot use joins to other tables. More subtly, the predicates to the where clause must not implicitly invoke the use of other tables, meaning you cannot sneak in a subselect, an EXISTS predicate, or other approach that references another table or tables.
Using the Raw Power of SQL
If the query() method seems limiting, and you ache to use the full power of SQL, then rawQuery() is the alternative. As suggested by its name, rawQuery() takes a “raw” string representing a SQL statement. The second parameter is an optional array of positional parameters, if you choose to use them in your SQL statement. Where you don’t need parameterization, simply pass null as the second parameter.
You can see the working example of rawQuery() in the getModelInfo() method of SQLiteExample:
myDB.rawQuery("select _id, model_name, release_year " + "from devices", null)
You are free to go wild with all the SQL complexity your heart desires. Everything SQLite supports can be included in rawQuery(), including nested subselects, joins, and more. Be aware, however, that the power of rawQuery() comes at a price. If you have a well-known set of static queries, then managing them with rawQuery() is fine. But as your query strings become more complex, and especially if you find yourself dynamically building SQL SELECT statements through string concatenation, then life becomes both more complex and more risky. The main danger to watch out for with string concatenation and dynamic SQL you run via rawQuery() is the risk of SQL injection.
SQL injection refers to the practice of malicious users inserting SQL database commands into text fields and application URLs in order to trigger (to deceive!) the application into executing those commands. Such exploits are among the most common, and SQL injection is at the root of many embarrassing breaches of security. This isn’t an Android issue, nor really a SQLite issue—it affects every database where unsanitized dynamic SQL is used. Practice safe SQL!
Managing Data Results with Cursors
Regardless of which approach you use to query the database, your return object is a cursor, which I now cover. This concept is pretty much identical to the concept of cursors in other database programming libraries, so if you have used cursors in other databases, you already have a pretty good idea of how the SQLite cursor behaves with Android. For those of you who have not yet worked with cursors, the best way of thinking of them is as complete sets of data that result from a query, and a pointer (or cursor position) to the current row of interest within the result set.
The data-plus-positional-pointer metaphor is key to understanding the many capabilities a Cursor object gives you. Among the common tasks you can perform are the following:
- Move the cursor position and iterate over the result set with methods like moveToFirst() and moveToNext(); test the position with isAfterLast().
- Interrogate the result set to learn the names of columns, ordinal column positions, and so on with getColumnNames() and getColumnIndex().
- Extract individual column values from the current row with getString(), getInt(), and other similar methods for other data types.
- Get statistics about the result set with getCount(), but be aware that this forces the entire result set for the cursor to be read, which can consume considerable memory and take quite a bit of time for large results.
- Free all of the cursor resources using the close() method.
You typically process your cursor results in a loop, performing whatever application logic you need on each row. The SQLiteExample app does this in a few places, including in this snippet from getModels():
Cursor cursor = myDB.query(MySQLiteHelper.TABLE_NAME,
    MySQLiteHelper.TABLE_COLUMNS, null, null, null, null, null);

cursor.moveToFirst();
while (!cursor.isAfterLast()) {
    String model = cursor.getString(MySQLiteHelper.COLNO_MODEL_NAME);
    models.add(model);
    cursor.moveToNext();
}

cursor.close();
Here I use the query() method for a SQLite database object and pass it the name of the table and the String array with the column names that interest us. This means I get back a cursor with a result set that looks like Listing 18-4.
I invoke the .moveToFirst() method before entering the loop, which means the current row for the cursor is the _id=1 row. Stepping through the loop, I test that we have not moved to the end of the result set for the cursor with isAfterLast(), and I call getString(), passing it the column position for the model_name column, which is represented by the COLNO_MODEL_NAME constant declared in the helper class. I add this string to our ArrayList, and use moveToNext() to continue processing the next row.
Tip This kind of iterative row processing is a very common programming practice, but it contains the most common performance peril in all database-related programming. Do not be seduced by the iterative logic of while loops or for loops if you can express the same logic declaratively in SQL. SQL is pretty much always the best choice for computation and crunching the data. Use the iterative approach in your Java code for non–data-processing logic, such as where data is bound to UI widgets or non–SQL-like processing is performed. Your performance will be preserved and your users will thank you for it.
You can also feed a Cursor object to a SimpleCursorAdapter so you can use it in binding with a ListView or other selection UI widget. In order to use any of the CursorAdapter options, or their subclasses, you must use the table structure pattern I introduced earlier in the chapter. You must create your table with a column named _id as the primary key, and you must set this key with the autoincrement property. This is the value that all of the adapter’s methods expect, such as onListItemClick().
Inventing Cursors of Your Own
When the built-in Cursor class is not enough for your needs, you can branch out with the SQLiteDatabase.CursorFactory object and the queryWithFactory() and rawQueryWithFactory() methods that work with it. The factory object is responsible for generating new cursor objects with the newCursor() method. In all my years of working with Android, I have not yet found a real need to implement CursorFactory, so if you wish to know more, head over to the Android documentation.
Modifying Data with Your Android Application
A world in which you can only read existing data is usually not what you are after when you are building database-driven applications. At some stage, you will want your users to add, modify, and remove information from your SQLite database. This means you want to be able to run INSERT, UPDATE, and DELETE SQL DML statements against your database.
Android’s SQLite support offers you two ways in which to carry out your DML desires. The first is to use the execSQL() method and pass a fully-formed SQL statement. This is what the SQLiteExample application does using the helper class when the database is first created. As discussed earlier, execSQL() is suitable for any kind of statement that doesn’t expect to return a result. This means INSERT, UPDATE, and DELETE are just fine. If SQLite ever supports MERGE, and Android updates the SQLite library accordingly, that would also be a good candidate statement. I cover more about the nuances of Android versions and SQLite versions shortly.
The second option to using DML on your database is to use your SQLiteDatabase object’s .insert(), .update(), and .delete() methods, taking the “guided-path” approach to DML in much the same way that .query() guides you to easier SELECT statements. All of these methods use a ContentValues object, which provides a SQLite-tailored map of values and columns.
Inserting Data
If you look at the insertModelRow() method from SQLiteExample, you can see the .insert() method in operation:
private void insertModelRow(DialogWrapper wrapper) {
    ContentValues myValues=new ContentValues(2);

    myValues.put(MySQLiteHelper.COLNAME_MODEL, wrapper.getModel());
    myValues.put(MySQLiteHelper.COLNAME_YEAR,
        Calendar.getInstance().get(Calendar.YEAR));

    myDB.insert(MySQLiteHelper.TABLE_NAME,
        MySQLiteHelper.COLNAME_MODEL, myValues);
    //uncomment if you want inserts to be displayed immediately
    //displayModels();
}
The .insert() method here is pretty readable thanks to the use of the helper class constants, but why those constants are there bears scrutiny. The first parameter is the name of the table into which you want your data inserted. The second parameter is an Android-required column from the table that can accept nulls, and it is known as the null column hack. This requirement is a workaround for some slightly strange insert behavior in SQLite itself. This hack is only used if the third parameter, the ContentValues object, is empty.
Ordinarily, the ContentValues object has some data added to it before it gets used. In our SQLiteExample application, you can see it is pulling string data from the DialogWrapper object using its .getModel() method. You can open up the class definition for yourself, but .getModel() is returning the text a user enters in the dialog box, which displays if they press the Add New Model button, as shown in Figure 18-2.
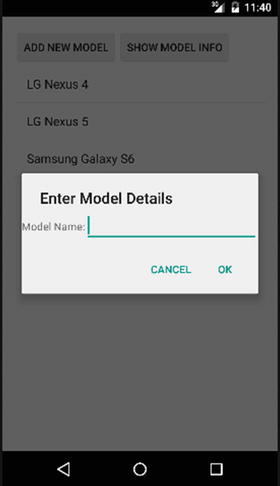
Figure 18-2. Prompting for new data to insert in the SQLiteExample application
The text the user enters becomes the value for the .put() call on the ContentValues object, and the COLNAME_MODEL column name String is used as the key. For the year of release value, we use a common Java technique to simply calculate the current year, though you can expand the complexity of the dialog to have the user input that as well.
Updating Data
Updating data with the .update() method is very similar in approach to how you do it with.insert(), with one additional consideration. Just as with .insert(), you call .update() with the String that represents the name of the table you wish to update, and you call a ContentValues object that represents the new values the column or columns you want to update should have. You can also provide an optional where clause to provide the criteria with which you can refine which rows to update. This where clause can include the question mark, ?, as a value placeholder, and you can pass a final parameter that is a list of values you can use to replace the ? parameter placeholders. This is a very common technique for parameter substitution in other database libraries, so it is likely to be familiar to many of you.
The main drawback of the .update() approach is the simplicity of the ContentValues object. It must contain actual values, and cannot use formulas or dynamically calculate the updated value as part of the executed update statement. If you need that level of sophistication, you should use a SQL update statement as part of the execSQL() method instead.
Deleting Data
Deleting data with .delete() is very similar to the process of updating with .update(); the only exception is that you do not need to provide any “new” values. Simply provide the name of the table you want to target for the delete, and optionally, provide the where clause and any parameter values it might need. This can be as simple as the following example:
myDB.delete(MySQLiteHelper.TABLE_NAME, "_id=?", args);
Assuming you provide something for args—for example, a list with one value in it, such as “2”—the delete() call will substitute that value for the ? marker, note the table name (in our case, “devices” is the MySQLiteHelper.TABLE_NAME value), and execute the resulting SQL. In our case, the SQL statement would be as follows:
delete from devices where _id=2
Again, for complex cases that requiring calculations, joins, subselects, and so on, to determine what rows to delete, you should use the execSQL() option instead.
Tracking SQLite Versions and Android Versions
Just as Android has released many versions over the years, so too has SQLite. Although SQLite is considered to be very mature and not in need of constant overhauling, at least three different library versions have shipped with various releases of Android.
All releases of Android since the initial release, up to and including versions 2.1.x, shipped with SQLite support that used the version 3.5.9 library. When Android 2.2 (Froyo) was released, the SQLite library changed to version 3.6.22. This version had very little impact; it mostly dealt with minor bug fixes and subtle improvements.
Things were static for some time again until the advent of Android 3.0 (Honeycomb). But from Honeycomb on, upgrades to the SQLite library have come thick and fast with new Android releases. Table 18-1 breaks down of all the Android versions at which SQLite versions changed.
Table 18-1. Android Versions That Introduced New SQLite Versions
|
Android Version |
SQLite Version |
|---|---|
|
1.0 |
3.5.9 |
|
2.2 |
3.6.22 |
|
3.0 |
3.7.4 |
|
4.1 |
3.7.11 |
|
5.0 |
3.8.4.3 |
|
5.1 |
3.8.6 |
|
6.0 |
3.8.11 |
From SQLite 3.7 on, significant enhancements and improvements have been made to features like locking, concurrency, and logging. You can decide not to worry about all the more powerful new features and just treat things as if you are using a common ancestor version of SQLite. However, there are two key things to note, even if you do want to ignore such library updates.
The database files SQLite creates include an internal version number. Historically, prior to version 3.7, this was always 1, but with the release of SQLite 3.7, it began to be incremented because at this point a newer format was required to support some of the new features. Ordinarily you can totally ignore this within an Android application. However, if you decide to package and ship a prebuilt SQLite database file with your application, you need to think about what older versions of Android you plan to support. If versions earlier than Android 3.0 Honeycomb interest you, ensure that you use the older SQLite database file format. Although all versions of the SQLite library happily work with the old format without requiring any kind of update or rebuild, shipping a newer format database to an old device with a pre-3.7 SQLite library version will cause unpredictable results, likely including program crashes and data corruption issues.
The second point you need to think about is any situations in which you want to use rawQuery() or execSQL() and newer SQL syntax that is supported by later versions of SQLite. A concrete example of this is the insert statement I constructed in the MySQLiteHelper class. This example uses the newer multirow insert syntax that was only introduced in SQLite 3.8:
insert into devices (model_name, release_year) values
  ('LG Nexus 4', 2012),
  ('LG Nexus 5', 2013),
  ('Samsung Galaxy S6', 2015)
Usually, you will find ways of working around this if you want to provide the broadest possible support. For example, I can perform our multirow insert using a hack with unions and subselects, as follows:
insert into devices (model_name, release_year)
  select 'LG Nexus 4', 2012
  union
  select 'LG Nexus 5', 2013
  union
  select 'Samsung Galaxy S6', 2015
This is far less elegant, but it is supported in all versions of SQLite. The main point here is that you need to check whether you plan to use any recently added SQL features in your statements, and you need to decide whether to set an appropriate minSdkVersion value in your application manifest to ensure you target versions of Android with the SQLite library capabilities you need, or code your SQL to the lowest common denominator.
Packaging and Managing SQLite Databases for Android
You are now well on your way to mastering the use of SQLite for your Android applications. But in addition to learning simple coding, make sure to acquaint yourself with design considerations and the topic of the “care and feeding” of databases, so that your users enjoy using your database-driven applications over time. Whether it’s ensuring that I/O performance doesn’t hinder your UI thread, or preparing the perfect database to include in your application, a little attention to detail here goes a long way.
Managing Performance and Android Storage
In Chapter 17, I covered various aspects of using and managing files and file systems on Android in detail, including SQLite database files. I won’t repeat everything from that chapter here, but I do want to point out one thing that you will hear again. Most Android devices ship with onboard storage based on flash (using NAND hardware).
As you build Android applications using SQLite databases, and as you merrily have your users inserting, updating, and deleting data, remember that they will be reliant on the flash storage to manage the writes to “disk.” Unfortunately, flash storage is notoriously fickle and consistent fast writes. Often you might get great write performance, and then suddenly see a speed decrease because the flash storage is managing some internal properties such as wear leveling and the like. This means a write could suddenly take hundreds of milliseconds or even whole seconds.
Don’t be fooled by the behavior of your application when you are running it in the emulator. It might look fast, but it is almost certainly using an AVD completely cached in your computer’s very fast memory, including the simulated storage and file system. Writes in the emulator are not really writes to disk, and they will seem much faster than any write your application performs when it is actually deployed to a device.
To mitigate the performance risk, use the AsnycTask() approach described in Chapter 17 so that database changes happen on an asynchronous thread, away from the main UI thread.
You should also think about what happens to flash, and to your application’s data, in low-power situations. If a device loses power, SQLite’s abilities to recover from crashes and preserve the “durability” property of ACID should protect your actual data. But you may need to know this is happening, and you may also want to check to see if any transactions were rolled back because they failed to commit during a power-down or power-up situation.
You can add some smarts to your application to track and take action in low-power situations. You can register a receiver in your application to watch for broadcasts like ACTION_BATTERY_CHANGED. You can also examine the intent payload, determine what is going on with the power and battery, and take action such as warning the user or deferring write-heavy tasks.
Packaging Your Own SQLite Database with Your Application
In the SQLiteExample application, the helper class adds three rows of data to the devices table to seed the database. But what if I want to add a few hundred devices? Indeed, currently thousands of known Android devices have been released. Trying to insert all of these at database creation time when the application first runs will be cumbersome, will possibly provide a terrible performance experience, and could run into a variety of runtime errors.
In situations in which you want a nontrival database to be used from the beginning with your application, you can ship a SQLite database in place, packaging it with your other assets within the .apk file.
You are already familiar with the assets/ folder in your project. You can place an already-created-and-populated SQLite database file into the assets/ folder and then pass the path and filename to the overloaded openDatabase() method that accepts a full file location as its first parameter.
To create the full path and filename for your SQLite database file, you need to know that database assets get placed into the file system folder /data/data/your.package.name/databases/. Append the string representing your file name (e.g., devices.db from our example application) and you have the value to pass as a parameter to openDatabase(). In our example application, this would be the following:
/data/data/com.artifexdigital.android.sqliteexample/devices.db
Preparing SQLite Databases for Packaging
Handcrafting databases of any type is a tedious affair, so you will almost certainly want some tools to help design your database and populate it if you want to package a database file with your Android application.
SQLite has a wealth of options to choose from, including the sqlite3 shell program that ships with almost all operating systems (Windows is the exception here). Even the Android emulator provides access to the sqlite3 utility. You can invoke it from the adb shell utility once you are connected to your emulated device. For example,
sqlite3 /data/data/com.artifexdigital.android.sqliteexample/devices.db
A lot of options are available within the sqlite3 utility. Check out the documentation at sqlite.org for more details. The adb tool also provides some other useful general file management commands that you can harness for your SQLite database files, such as adb push to move a file to a device, and adb pull to copy a file from a device.
Of course, you may want to use a fancier GUI tool, and there are many to choose from. One of the most popular is a plug-in for Firefox known as the SQLite Manager. Figure 18-3 shows the SQLite Manager in action.

Figure 18-3. The GUI for SQLite Manager in Firefox
One nice aspect of using browser extensions like this is that they work on all the platforms the browser itself supports.
For a wider list of GUI tools for SQLite database management, check out sqlite.org.