
Incorporating External Libraries with Android
Way back in time, long before Google bought Android, the founders of Android made the choice to use Java as the development language. This was for a host of reasons, including Java’s widespread use, which meant many talented developers could write applications for the platform, but those developers could also write libraries and other tools that could be used by Java programs in general. Whether it’s on a server, a desktop, or a mobile device, Java supports a wealth of libraries that rival any other development language.
Before you race off thinking that absolutely all of Java is at your disposal, there are a few limits and omissions of which you should be aware.
The ART of Android
When Android was originally released, one of the choices its designers made was to embed an Android-specific runtime to execute the Java-coded applications written to run on Android. Instead of a stock JVM, Android introduced Dalvik. Conceptually, the Android runtime does much the same job as the JVM, handling things like memory allocation, stack management, compilation functions, and garbage collection.
Dalvik was good for the job at hand, but as Android evolved, so too did the need to improve and update the runtime. With the release of Android 4.4, Google started testing the brand-new Android runtime, or ART, as the next incarnation of VM for code execution in Android.
There are some great improvements in ART and some key differences between ART and Dalvik, which makes for better application behavior and more efficient system resource use. Before I detail these key changes, the one thing about which you can relax is that as a developer, you basically do not need to worry about which runtime is present on a device. Dalvik is used by default on almost all contemporary devices, and newer devices running late KitKat 4.4 Android versions, 5.0 Lollipop, or 6.0 Marshmallow still all use 100-percent Dalvik-compatible byte code as the input for the VM—whether it’s Dalvik or ART.
Here are the key improvements and new features you should know about in ART:
- Ahead-of-time (AOT) compilation. Dalvik used a snippet-based just-in-time compilation approach to small sections of code that resulted in compiled “traces.” This sped up parts of applications that were frequently used, but it also left large tracts of applications unoptimized. ART performs AOT compilation at install time, which means the user is by and large oblivious to the one-time overhead.
- Strict Java Native Interface (JNI) health and hygiene, in which ART provides stricter enforcement of JNI precautions and also leverages compacting features in garbage collection. JNI is beyond the scope of this book, but some excellent articles online discuss the precautions you should take if you are writing C or C++ for use through JNI with Android applications in an ART-based environment.
- Unified stack model with thread-configurable stack sizes. Dalvik used separate stacks for Java and native code and also had some inflexible stack size defaults. ART provides a cleaner model that also has more configuration options.
- Better diagnostic and debugging options through better runtime exception logging, and better instrumentation of issues such as locks, live objects, and method testing using method-exit modeling.
By the time you need to know more about ART’s inner workings, you will well and truly be in the realm of professional Android developer. More information is available at developer.android.com.
Choosing Library Sources or JARs
Broadly speaking, you can choose to use the raw source code of an external library or other piece of code, or you can use the packaged JAR (Java archive) file. You can mix and match when working with multiple libraries or external sources as you see fit.
Direct Source Inclusion
To incorporate Java source code in your application, you need to place the code in the source tree along with the rest of your Android Java code. Depending on your build tools and environment, the location might differ.
Android Studio
The Java source files for the library should be placed in the main source tree along with your Android Studio Java source files. Within you project’s root folder, you should be able to follow the path ./app/src/main/java. Within that Java folder, you will see further subfolders that represent your package namespace. In the example application ExternalLibraryExample, I used the fully-qualified package name com.artifexdigital.android.externallibraryexample. So the full path from the project root is ./app/src/main/java/com/artifexdigital/android/externallibraryexample. This is where you’ll see existing Java source for your project, and where you should place source files for external library source that you want included in the package context of your application (i.e., you want to just copy over portions of code rather than use the library as a separate package). You can opt to follow a fully-qualified package name from the java directory if you prefer to keep the packages separate.
Of course, you can also drag and drop the files through your GUI file manager and Android Studio, but knowing the plumbing that makes this work is crucial if you need to debug missing or misplaced source files.
Eclipse
Eclipse follows a similar conceptual approach to Android Studio, but the path structure is a little simpler. From the project root folder, the src folder contains all of the fully-qualified packages in folder hierarchy form. So for the example ExternalLibraryExample project, the full path to the source Java files is ./src/com/artifexdigital/android/externallibraryexample.
Just as with Android Studio, you can take the easy approach and use a GUI file manager (Explorer for Windows, Finder for Mac OS X, Nautilus for Linux, and so on) and drag and drop your source files into the source folder in Eclipse. But where is the fun in that?
Other Development Environments
Ant or other build tools are usually structured as per the original Eclipse-style project layout, so use your application’s equivalent to a src directory.
Incorporating JARs
The alternative to copying source directly into your code is to use prepackaged JAR files. The approach for JAR files is deceptively simple:
- Acquire the JAR file for the external library you wish to use.
- Copy it to the library location for your project (dependent on IDE or environment).
- Configure your build tools to find and use the JAR.
- Import the library into your code and start coding!
This is a deceptively simple approach, since the configuration step has not always been the most intuitive of tasks. Both Eclipse and Android Studio offer much better automated support for this in recent releases, but historically it has been a manual task with the pitfalls and chances for mistakes that entails.
In the interests of making the process well-understood, I will step you through explicit examples later in the chapter, adding a well-known external library to the ExternalLibraryExample project.
When Is Java not Java?
After the discussion on the ART environment earlier in the chapter, you should, by now, realize that ART is not a 100-percent like-for-like implementation of the official Oracle/Sun JVM, nor was Dalvik. There are some important differences and omissions of which you need to be aware, particularly when you start relying on external libraries and packages.
In essence, if those external sources expect an aspect of Java that ART does not provide or does not implement, you will end up with your application exhibiting uncertain behavior at best, and code that just does not work at worst. Consider these broad areas when you are thinking of the difference between ART and JVM.
Each release of Android was built broadly targeting features from a JVM of a similar vintage. Obviously this has changed over time as both Android with ART/Dalvik and the JVM incorporate new features, and as Google decides whether or not to take up features of the JVM it wants to include.
The main features you will notice that are missing from ART (and Dalvik) are the Swing UI toolkit and a range of location and mobile-optimization packages. Notionally all of these have equivalents in Android.
Considering Java Performance for Android
There are three key performance considerations that you need to think through with an Android mindset so you avoid building a hog of an application that nobody likes.
If you are incorporating code from non-Android origins, you might find that packages written for a traditional desktop or server environment are larger than anything you are writing yourself. The sheer size of the libraries can cause your application size to blow out—where anything larger than 50MB to 100MB when finally packaged on Google Play looks bloated. This also impacts memory footprint, discussed momentarily.
CPU Use
Lots of Java libraries have been written on ever-more-powerful x86 processors over the years, and often they liberally use threading in the expectation that multicore processors are commonplace. Although it is true that Android devices have moved to multicore in recent years, almost all Android devices are using ARM-based processor designs, and in general, they have much less power than a traditional desktop or server.
Memory Use
When you are dealing with Java on a desktop or server, memory is typically measured in gigabytes or tens of gigabytes, and it’s not unusual for a Java application and its libraries to drive JVM memory to the limit. A typical Android handset has much less memory, and you also will not have tools at hand like jstat or gcutil to closely monitor memory use and garbage collection. Although there are some other tools that do help, watch out for especially memory-hungry libraries when you are thinking of external imports for your code.
Operating System or Native Dependencies
It is rare to find Java libraries that leverage the various forks seen on some operating systems (Windows, for example), but it is worth double-checking on any library just in case. Likewise, libraries that use the Native Development Kit (NDK) to leverage some native resource need careful scrutiny. NDK is available for use in Android, but the native resources being referenced might not be, so you need to do some digging through NDK layers to the underlying native code.
Unusual I/O or Interfaces
Some libraries expect to have control over logging locations and paths, which can have implications on Android and cause subtle quirks or failures. For instance, a library that assumes a /tmp-like shared scratch space is available could be in for a surprise. Some libraries also expect the existence of the console, which you certainly will not have under Android.
Versioning and Cascading Dependencies
Like your very own application, a Java library is created at a point in time and is likely itself relying on other libraries, all the way down to the oldest base classes and foundations. Whether it’s a JAR compiled with an older JVM or a daisy-chain of library dependencies that lead to mysterious destinations, some investigation of the heritage of a library can save you pain in the future.
Overcoming Java Library Issues
In addition to the checks and vigilance described in the previous section, there are more things you can do to make life easier for yourself when you are using external libraries.
- Look at open source alternatives; they offer source transparency that makes spotting dependencies and issues easier.
- Extract only the source you need, if you have access to it.
- Repackage or strip down the JAR to remove unneeded dependencies.
- Use continuous integration and build tools to constantly test your application against changing library dependencies.
- Use a device library testing service to see what quirks might exist with libraries you think are packaged normally, but in fact might differ from one device manufacturer to another.
Adapting an Application to Use an External Library
In Chapter 17, I introduced some simple example applications that dealt with files and file systems. The examples from that chapter demonstrated a lot about the things you need to know when working with files. The ExternalFilesExample application also demonstrated one of the “high-fidelity” parts of Android’s Java implantation: Android wholly adopted Java’s original, traditionally cumbersome file I/O language.
Fortunately, many fine external Java libraries exist that provide a far more elegant and approachable way of dealing with file I/O, and these libraries work well in the Android context. One in particular, the Apache Commons IOUtils library, is a perfect example to use to demonstrate the power of using external libraries and the straightforward way in which you can incorporate them into your applications.
We will use IOUtils to retrofit the ExternalFilesExample application with nicer source code for the file I/O aspects, turning it into the ExternalLibraryExample application you will find in ch21/ExternalLibraryExample. Let’s get stuck in to the retrofit!
Sourcing Apache Commons IOUtils
Apache publishes all of the Commons project source code and JAR files at http://commons.apache.org. The IOUtils main page is at http://commons.apache.org/proper/commons-io/. You will notice references to the current version of the package, Commons IO 2.4, and older versions. For our example, download the current version in binary form (either the .zip or .tar.gz file).
Unpack your chosen download when it completes; you should see contents including the following:
- commons-io.2.4.jar, which is the actual JAR file compiled from the source; it is ready for use in a Java project such as your Android application.
- commons-io-sources.jar, which is a JAR that provides the source code.
- commons-io-2.4-tests.jar and commons-io-2.4-test-sources.jar, which provide the junit and other tests used by the developers.
- commons-io-2.4-javadoc.jar, which provides the JavaDoc-style documentation for use in IDEs such as Eclipse and Android Studio.
- docs folder with API documentation, samples, and so on.
- LICENCE.txt and other text files, which contain the Apache license information, readme, and other notices.
We are really only interested in the commons-io-2.4.jar file to add to our project, although you can use the test-focused JARs if you are creating unit tests in your project and the JavaDoc JAR for contextual assistance and package documentation.
Adding the JAR to Your Project’s Libraries
From your unpacked binary download, it is the commons-io-2.4.jar file you need to add to your project. The approach for doing this varies depending on the IDE or tools you are using, and obviously covering every esoteric development environment would exhaust the pages in the book quickly. However, I can demonstrate how it’s done in Android Studio and Eclipse, and from this information, you can infer how to do it if you are using a different environment.
Adding JARs in Android Studio
To incorporate the commons-io-2.4.jar into your Android Studio project, or indeed to add JARs in general to any Android Studio project, follow these four steps.
- Create a libs folder in the project hierarchy directly under the root, and copy the commons-io-2.4.jar file to the matching location on disk. Android Studio should update the project hierarchy automatically, but to see the library in your project, you need to switch to Project view.
- From within the Project view of your project in Android Studio, right-click on the JAR and choose the Add As Library option, which is buried toward the bottom of the menu, as shown in Figure 21-1.
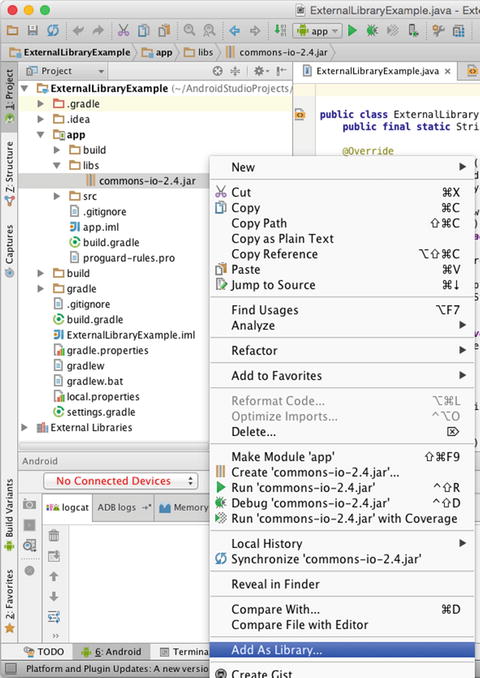
Figure 21-1. The crucial Add Library step to incorporate an external JAR into your project
- At this point, you should see a confirmation to add the library to the app portion of your project. When you click OK, you see a Project Sync In Progress overlay message as Android Studio invokes the gradle build process to add the necessary build rules for the library to the future compilation of your project.
- Strictly speaking, normally you should be able to trust your IDE to perform this build dependency configuration without a hitch. The reality, however, is that Android Studio has had a rapid rise, and its fair share of bugs and problems, and this is one of those areas where older versions of Android Studio have had problems. When the gradle build success message appears, it is worth opening your build.gradle file to ensure the commons-io-2.4.jar library has been added as a dependency. You should see the entry in bold shown in Listing 21-1.
- Lastly, it’s prudent to ensure your project can build regardless of any prevail state. Invoke the Build
 Clean Project option to perform a clean build of your application.
At this point, you are ready to reference your included library, so in our example, we can now go ahead and import and use IOUtils for file I/O operations.
Adding JARs in Eclipse
The process for adding JARs to an Android project in Eclipse is similar to the way you would do it in an ordinary Java project.
- To begin, download the commons-io-2.4.zip or .tar.gz file as in the Android Studio description in the previous section.
- With the archive downloaded, extract the contents and copy the commons-io-2.4.jar file to the /libs folder of your project. In recent versions of ADT working with Eclipse, this should automatically trigger a build rule change to incorporate the JAR in the build path. In reality, this doesn’t always work, or you may find yourself with an older environment and may want to set the build path explicitly.
- To explicitly set the build path to include the commons-io-2.4.jar file in your /libs folder, choose the Project Properties menu option. In the Properties dialog, choose the Libraries tab. If you are using a newer version of Eclipse and the ADT, you should already see the library shown under Android Private Libraries, as shown in Figure 21-2. If your library isn’t shown, click the Add JARs button and browse to find your .jar file, which in our example is commons-io-2.4.jar.
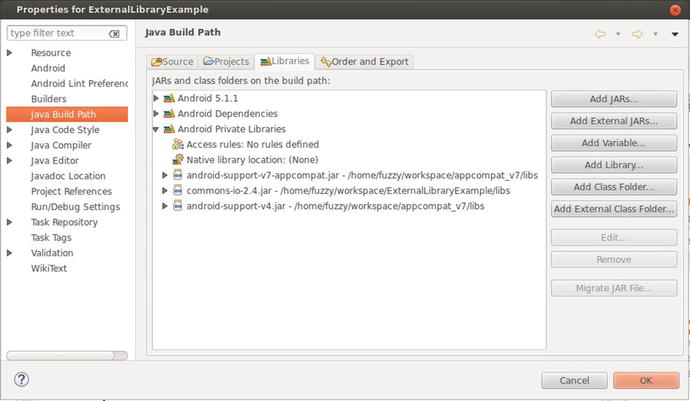
Figure 21-2. Confirming that the build path is set correctly for external libraries in Eclipse with the ADT
- Whether you have added the commons-io-2.4.jar file manually, or it was automatically picked up and included, it is a good safety measure to perform a clean build of the project. Choose the Project Clean menu option. You are now ready to import and use the library in your code.
Referencing (or Refactoring for) Your External Libraries
The process of importing and using the packages and classes provided by an external library is basically the same in Android as with normal Java programming. A quick walk through the refactoring for our ExternalLibraryExample project should provide a refresher for anyone rusty on the details.
The layout for the application is the same for the ExternalFilesExample project from Chapter 17. When rendered, the layout in Figure 21-3 should look familiar to you.

Figure 21-3. The unchanged UI design for ExternalLibraryExample application
The code required to use the IOUtils library features is fairly straightforward—remember, that was the entire reason for opting for this library, since it cleans up the mess that is vanilla Java I/O. Listing 21-2 shows the changes in the externallibraryexample.java code; the import of IOUtils and its use is in bold.
The proof of the external library use is, as you would expect, in building and running the application. You should definitely go ahead and run things; watch the LogCat output in particular to see if there are any issues packaging the JAR with your .apk and deploying it to the emulator. Assuming all of the configuration steps went smoothly, and you haven’t made any errors in your code, you should end up with a running application that incorporates your desired JARs. Figure 21-4 shows the ExternalLibraryExample running, showing off our use of IOUtils.

Figure 21-4. ExternalLibraryExample running successfully and using IOUtils for file I/O
It is true that the actual application here is not the most demanding in the world. But that is precisely so that you can appreciate the steps you must take to set up and use the external JAR without getting swamped with fancy application logic or UI.
Using Languages Beyond Java
One interesting and powerful result of building your own runtime environment and VM is your ability to take full control over what source languages can be supported. With Android’s use or ART (and Dalvik before it), Google provided a great deal of openness in allowing you to use many different source languages, providing you with plumbing to help convert to Dalvik-compliant Java byte code and even providing you with interpreted language support through a few interesting approaches.
The most well-known Android technique for interpreted languages is the Scripting Language For Android module, or SL4A.
Scripting Layer for Android Overview
The SL4A was written and maintained by Damon Kohler and is now available from a repository on GitHub at https://github.com/damonkohler/sl4a. Active development has “paused” on SL4A, so what follows may begin to atrophy over time, though several forks of the work are still seeing activity.
SL4A provides support for quite a few interpreted scripting languages, including these:
- BeanShell
- JRuby
- Lua
- Perl
- Python
- Rhino (the Java-based JavaScript layer from Mozilla)
- Tcl
Historically SL4A also supported PHP, but for a variety of reasons later versions have deprecated support for it.
Choosing Your Approach to SL4A
If you are interested in using one of the languages supported by SL4A, you have two approaches from which to choose. You can embed support for SL4A in your own application by including the source or JAR forms as described earlier in this chapter. This allows you to then perform all kinds of tricks in the interpreted language of your choice, and you can even provide your own layout and UI for an IDE. Yes, you can write an application development environment in your chosen Android application development environment—nested IDEs.
The alternative approach is to install the full SL4A application onto your emulator or device, and then write your scripts within the application. Obviously, this approach doesn’t result in separate fully-functional applications, but it does open up a range of control and management capabilities that are lacking in stock Android.
Testing SL4A on Your Emulator
To install the full SL4A environment and a supported language on an emulator, first download the source from GitHub and build the projects included. This will create a range of .apk files.
Assume for a moment you wanted to try Python in SL4A; you would need the following packaged .apk files from your SL4A project: sl4a_r4.apk and python_for_android_r4.apk.
Next, ensure your emulator AVD is running, and from the command shell in your host operating system, use the adb tool to install the .apk files as follows:
adb install <path_to_files>/sl4a_r4.apk
adb install <path_to_files>/python_for_android_r4.apk
Note The “r4” values refer to release number, and this may differ depending on which repository you take the source code from to build your .apk files.
Installing SL4A and any of its language modules will present a typical permissions overview acceptance dialog, which you should accept. Interestingly, the applications or script fragments you might write with SL4A inherit the permissions of the container application. This means if you build SL4A support into your own application and have permissions such as WRITE_EXTERNAL_FILE granted to the application, then the scripts you run inside the application using the SL4A library will enjoy that same write permission.
When SL4A is installed, you should see it available in the list of applications from the launcher in your emulator. When you start SL4A, you should see a home activity similar to the one shown in Figure 21-5.
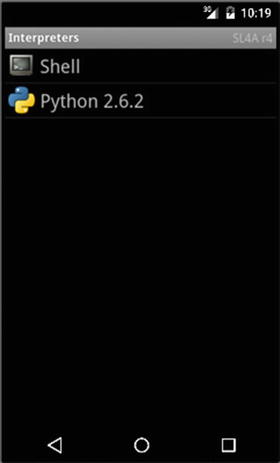
Figure 21-5. The SL4A interpreter system started on an emulator
The interpreters for the languages installed are shown, so in our case, Python is listed along with the default basic shell. Start the Python interpreter, and you should see Python’s familiar triple-greater-than prompt, >>>.
From here, you can play around with Python to your heart’s content. To get you started, you should be aware that the Python SL4A library includes a dedicated “android” module that you can import and use to control Android features and classes from within your Python script.
Almost every attempt at coding in a new environment starts with the Hello World-style program, so here’s the absolute based SL4A Python code to get you running.
>>> import android
>>> mySL4APyObj = android.Android()
>>> result = mySL4APyObj.makeToast('Hello World')
For more information, and to explore the possibilities of SL4A, I recommend the excellent book Pro Android Python with SL4A, by Paul Ferrill (Apress, 2011).