
Android Fragments
Your journey through Android fundamentals so far has explored all of the main aspects of an Android application’s user interface, from layout to choice of widgets, and including the creation and flow of activities through sample applications and your own testing. For quite a few of the early years of Android the UI development only became complex when more advanced widgets and screen elements were added to the tiny phone screens we were all using.
Then along came tablets. Big tablets, medium-sized tablets, things that would one day be called “phablets” and “jumbophones”. 2011 saw the introduction of devices with screens up to – and in a few rare cases beyond – a foot in diagonal screen size. Google hurriedly pushed out a major change to Android that would solve some of the issues being seen. This was the dawn of the Fragments system.
The problems with tablets and large devices are easily visualized. Activities designed to show header information like a person’s photo and name in a contacts activity, and then more detailed address information in another activity, looked like a huge waste of space on these giant screens. Even worse, initial adaptations to “fill” the big screens were done through scaling layouts, which meant poor image fidelity with lots of janky edges and pixelation, and users were left wondering why Android was making such poor use of all that space.
Why wasn’t all that contact information on one well-designed screen? Fragments answers that question by helping Android make smart choices about how to render groups of objects on screen depending on the screen size, and whether to do that all in one activity, or through many. Read on to learn how.
Introducing the Fragment Class
A little more background is in order to help you appreciate how Fragments not only helps with the endless array of screen sizes Android now supports, but also how Fragments promotes tremendous reuse of existing layouts and designs to save you hour upon hour of additional design effort.
Up to this point in the book, if I asked you to deal with a new, much larger screen size, you might think that one way of tackling this would be to define another layout dimension, such as xxhdpi, and choose a layout container like RelativeLayout, meticulously laying out your widgets on this larger canvas for users of larger tablets of an appropriate size. Of course, tablets come in 7-inch, 10-inch, 13-inch and other sizes, so maybe you’d need a few of these extra layouts. Next you’ll suddenly realise tablets can be rotated just like phones, and big-and-tall layouts should really have a short-and-wide equivalent. All of sudden, you are managing a dozen or more layouts for every activity within your application. Our example applications have had just one or two activities up to this point. Imagine an application with a dozen, or twenty, or one hundred activities. Do you want to maintain a thousand different layouts just to deal with tablets? I didn’t think so.
Fragments solve the runaway layout issue by introducing an intermediary layer between activities and the layout containers, and widgets that are rendered within those containers. Fragments go a long way to reducing the complexity of dealing with multiple screen sizes and the desire to compose layout differently for those different sizes.
Backwards Compatibility with Fragments
Fragments were introduced with Android v3.0 “Honeycomb” and have steadily been improved since that rather hurried release. If you do find yourself targetting very old versions of Android on devices with tablet-sized screens, Google makes available the Android Compatibility library with SDKs for supporting older devices with newer features. While these kinds of devices are rare in the tablet realm, they can be found in some strange embedded-device use cases that make any kind of Android upgrade impossible. Examples I have seen include a home telephone address book device, and very basic resistive-touch tablets from manufacturers such as ZTE.
Designing with Fragments in Mind
The first thing to note about designing with Fragments is that they are entirely optional. If you really love designing lots of layouts, you can stick with that approach. However, if you want to save your creative energy for other parts of you application, then adopt Fragments wherever you have identifiable chunks of your interface that you would like to appear in multiple screen-size-dependent activities. Those activities can work with Fragment objects to work out what fragments to show and not show.
An illustration will make much of the preceding discussion clearer, and let you grasp how designing with fragments might be done. Figure 11-1 shows multiple possible renderings of widgets, within fragments, attached to activities for devices in different sizes and orientation.

Figure 11-1. The logical nesting of Activities, Fragments, and UI Widgets
The larger displays capable of incorporating more on the screen can show fragments side-by-side, or one above the other, depending on the landscape or portrait orientation of the device. But only one of the fragments would be visible at a time on a traditional smaller phone screen, with the other triggered by some application logic. In the first instance, this is achieved by generating the XML for your layouts in <fragment> elements, as we will see in the examples later in the chapter, and then letting Android, in conjuction with your activity and its fragment manager, take on the work of what to show when. This means you still get to code your layouts much as before; they just sit in a different place. The views inside can have all the same simplicity or complexity, hierarchy, and so forth. The view hierarchy in the layout is still used to create the UI that the user sees.
Along with the layouts and view hierarchy, a Bundle object is used with a Fragment to provide initialization. This is in a very similar way to Activity in all of the examples we have seen so far. Fragments have a range of other qualities that will seem very similar to activities, with some subtle differences. For example:
- The need for a default constructor for any Fragment-derived class you choose to create
- The strong recommondation of an additional Bundle of arguments and properties that can be used to set up your Fragment, different to the Bundle that is used to recreate it successfully after events such as rotation
- Knowledge of the Fragment Manager that belongs to the Activity hosting the Fragment, enabling bidirectional interplay as required.
Now that we are talking about Fragment creation, instantiation and initialization, destruction and recreation, we should look at how Fragments have their own lifecycle and related callback methods. We’ll also consider what to look out for in comparison to the Activity lifecycle discussed in Chapter 10.
Introducing the Fragment Lifecycle
There are areas of commonality between the Fragment lifecycle and that of an Activity, but it is useful to visualize where things are more complicated. This will help you appreciate the extra possibilities available when working with Fragments, and also the extra limitations you will run in to that dictate when and where you can do things you would assume are possible from your Activity experience. Figure 11-2 shows the full Fragment lifecycle.
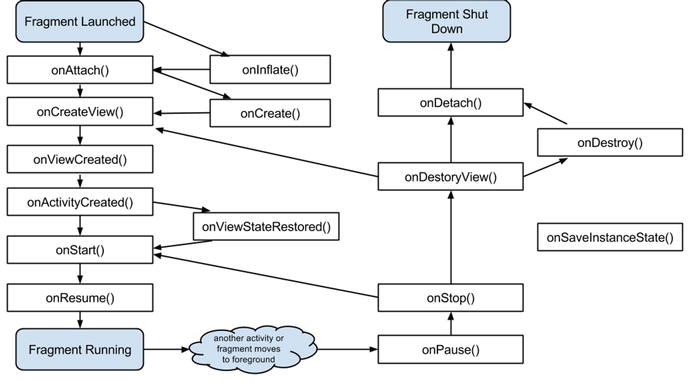
Figure 11-2. The Full Fragment Lifecycle
Most of the differences you see when compared to the Activity lifecycle in the previous chapter are to do with the interaction between a host Activity and its Fragments. There is not necessarily a 1-to-1 relationship between lifecycle events at both levels. An Activity experiencing one event might contain Fragments that have to transition multiple events and stages for the same trigger.
Understanding Fragment Lifecycle Callback Methods
Even though many of the lifecycle callbacks share identical names to the ones we saw for activities in Chapter 10, be careful not to be trapped into assuming those callbacks are exactly the same. The following subsections describe the key differences, as well as the Fragment-specific callbacks.
onInflate( )
The onInflate() method is called in order to inflate the layout of fragments defined in your layout XML files using the <fragment> element. onInflate() is also called if you explicitly create new fragments programmatically in your code via the newInstance() call. Parameters passed include the reference activity in which the fragment will live, and an AttributeSet with any additional XML attributes from the <fragment> tag. You can think of onInflate()’s execution as a render-but-don’t-display step in which Android works out what the fragment will look like, but actual UI creation and association with the activity does not happen until onAttach().
onCreate( )
The fragment variant of onCreate() is similar to its activity cousin, but there are a few subtleties. The main difference is that you cannot rely on any activity view hierarchy being in place to reference in the onCreate() call. That’s mostly because the activity with which the fragment is associated is transiting through its own lifecycle. And just when you think you can start relying on the activity, it may well cease to exist – or at least, it might transition or undergo configuration change, causing the activity view hierarchy to be destroyed or recreated.
onAttach( )
The onAttach() callback happens immediately following Android’s determination of which activity a fragment is attached to. At this point you can safely do things with the activity relationship, such as get and use context for other operations. Any fragment has an inherited method getActivity() that will return the activity to which it is attached. Your fragment can also use the getArguments() method to fetch and work with any initialization paramters.
onCreateView( )
The onCreateView() callback allows you to return some sort of view hierarchy for your fragment. It takes a LayoutInfater object, and ViewGroup and the Bundle of instance state, and then relies on Android to choose a suitable layout based on all the usual screen size and density attributes. Android inflates that layout with the .inflate() method of the LayoutInflater, then modifies the layout in whatever way you think necessary, and then hands back the resultant View object for rendering.
onViewCreated( )
Immediately after onCreateView() returns, onViewCreated() can perform further post-processing work before any saved state is used to modify the View.
onViewStateRestored( )
This method is called in the cases when your fragment’s view hierarchy has all of its state restored. This is handy for differentiating cases of new creation versus resumption, etc.
onStart( )
The fragment’s onStart() callback is linked to the activity’s equivalent onStart(), and is called immediately after the fragment is displayed in the user’s UI. Any logic you think of placing in an activity-level onStart() callback should in most cases be pushed down into the fragment onStart() methods.
onResume( )
Another closely coupled callback between fragment and activity, onResume() is the last call made before the user takes full control of the activity and its fragments.
onPause( )
The onPause() callback is also closely coupled with the overall Activity’s equivalent. If you move logic to your fragments, then the rules from the Activity variant about pausing audio or video, halting or releasing other actions, and the like all apply here.
onSaveInstanceState( )
Conceptually identical to the Activity equivalent, in the onSaveInstanceState() callback you should be persisting any resources or data you want to keep between Fragment incarnations to the Bundle object for the Fragment. Do not go crazy saving enormous amounts of information. Remember that you can use identifier references for long-lived objects outside the Fragment itself. You can just refer to, and save, those.
onStop( )
Identical to the equivalent for an Activity.
onDestroyView( )
This method is called in the pathway to end-of-life for the fragment. When Android has detached the view hierarchy associated with the fragment, onDestroyView() is then triggered.
onDestroy( )
When a fragment is no longer being used, the onDestroy() method is called. Technically the fragment is still attached to and associated with its Activity at this point.
onDetach( )
Breaking the bonds with the Activity is the last part of ending the life of a Fragment. This signals the point at which all other resources, references, and other lingering identifiers should be detroyed, removed, or released.
Keeping Sane with Fragment Lifecycles
While there are many more lifecycle stages to consider with fragments, you do not necessarily need to deal with every single state transition and lifecycle callback in your code. Just as with the Activity discussion in Chapter 10, you are free to override only the mandatory callbacks and select the others that you think are important to your application and its functionality. At a minimum, you can stick to just overriding onCreateView() and be done.
You can see for yourself with the FragmentsExample application that we can pare down the coding requirements to a much more manageable volume.
Implementing Your Own Fragment-Based Application
An example can help illustrate many of the concepts around fragments, and also give you a starting point from which to expand to explore the many options for working with fragments. I will use the simple set of colors from previous examples and rework their display into a familiar master-detail UI design pattern.
Creating Layouts for the Fragments Examples
Our example ColorFragmentExample application will aim to show a list of colors, and when clicked will present details on a given color. In order to make best use of screen space available, we will use fragments to do the “heavy lifting”. This will ensure that users on smaller screens see the color list initially. Then when they select a color, another activity will host the fragment showing that color’s detail. Tablet users will have one activity that hosts the fragment displaying the list of colors as well as the detail fragment, much like the depiction in Figure 11-1.
The Color List Layout
Listing 11-1 shows the fragment layout that will be used in different ways to show the list of colors.
This is a simple <fragment> definition that in turn calls on the stock Android layout list_content, which will show TextView entries in a list. This fragment layout will be used by both the “single-pane” view layout on small devices where an activity will have this fragment attached as the only UI, and by the “two-pane” view layout on large tablets for listing the colors side-by-side with details.
The Color Detail Layout
Showing details of a color will be handled by a TextView, wrapped in a fragment and placed in an Activity. The layout for the TextView is very straight-forward, and you can find this in the fragment_color_detail.xml file, the contents of which are shown in Listing 11-2.
A Host Activity For Color Details
In the circumstances where color details (laid out with the TextView from the previous section) need to be shown in an Activity in its own right on a small screen, we need to provide the layout for that Activity. The only job this Activity will have is to create the fragment that then displays the TextView. You can see the relevant code in activity_color_detail.xml, shown next in listing 11-3.
As you can see, this is a simple <FrameLayout> with some simple styling. The TextView will be injected into this via a fragment.
The Large-screen Multi-fragment Layout
For those situations when our example application is running on a large screen, we need a layout capable of hosting all the fragments and UI widgets we want on one screen. The activity_color_twopane.xml layout file might look like yet another complication in the fragment story. But if you look closely at Listing 11-4, you will see that the layout file really is just a composition that includes the <fragment> and <FrameLayout> that we pulled into separate layouts for smaller screens.
The only differences compared to the (combined) separate layouts from earlier in this chapter are the android:layout_weight values which will be used to control the comparative screen real estate used by the two fragments when presented together in a single Activity. A 1:3 ratio means the master list fragment will take a quarter of the space, and the detail fragment will take three-quarters (the remainder).
Controlling Which Layout Is Chosen
At this point you are probably wondering how our application will decide which layout to use, and therefore what arrangement of fragments, for different sized devices. The secret is in the refs.xml files (plural), under each of the res/values-large and res/values-sw600dp folders respectively. When our code runs on any device or emulator, Android will check at run-time for any size-specific XML resources across all of the different size-specific resource directories, including all of those mentioned in Chapter 3. There is only one child element in refs.xml for large and sw600dp sized-screens, and it reads:
<item type="layout" name="activity_color_list">@layout/activity_color_twopane</item>
Any screen that is categorized as large, or meeting sw600dp resolution standard, will implicitly pick up the instruction in the attributes to use the activity_color_twopane layout from the XML file of the same name.
Coding Differences for Fragments
The good news regarding the Java you write for a fragment-based design is that by and large there are few differences compared to working with Activities alone. The main differences were already discussed earlier: Any UI-centric logic, data manipulation, use of content providers, services, and so forth, moves to the fragments in your application. The activities are then still important for application lifecycle handling and functionality that spans fragments.
Regardless of whether our application ends up displaying one or two fragments simultaneously, it will run the ColorListActivity shown in Listing 11-5.
Listing 11-5 is more straight-forward than it looks. Our onCreate() logic is very simple. First the activity_color_list layout is inflated into the UI. Then we run a quick test to see if the color_detail_container view object has been instantiated (even if it is not displayed), and use the result as a proxy to determine whether we are running within the activity_color_twopane layout triggered from our refs.xml rules. If we are, then we set the mTwoPane Boolean to true and the the getSupportFragmentManager() to set up click handling via the .setActivateOnItemClick() method.
The onItemSelected() override then does the subtle work of deciding what to do when a user clicks a color. Should we create an additional fragment using the color_detail_fragment layout and associated code in ColorDetailFragment.java, or should we fire off startActivity() with the intent explicitly calling for the color_detail_activity layout and associated ColorDetailActivity.java code?
You can look at those source files as well to see the basics for showing color details, and also of the supporting ColorContent class which is just a fancy packaging of an item set for colors and some management functions. I will spare you the endless pages of code for what is some fairly straight-forward Java. Take a look at the source files in ch11/ColorFragmentsExample, and do run them in different-sized emulators with some breakpoints set so you can see the size-determining logic and fragment creation steps being taken.
Seeing Differing Fragment Behavior in Action
There’s nothing like seeing the results on different sized devices or emulators to get an appreciation of the fragment behavior in action. Figures 11-3 and 11-4 show the Color list and Color detail fragments within separate activities on a small device (in this case, a Nexus-5 AVD).
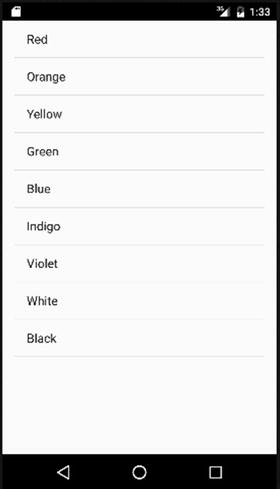
Figure 11-3. The color list fragment showing on a Nexus 5 emulator
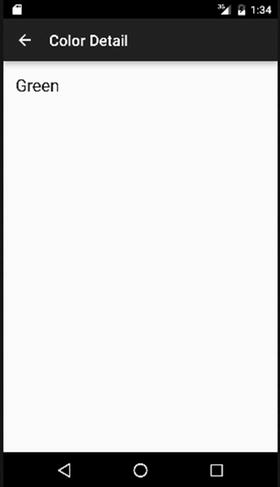
Figure 11-4. The new activity triggered to show the color detail fragment
By comparison, when running the ColorFragmentsExample application on a large 10-inch screen emulator, we see the behavior in Figures 11-5 and 11-6, where the fragments are created and used within just the ColorListActivity activity.
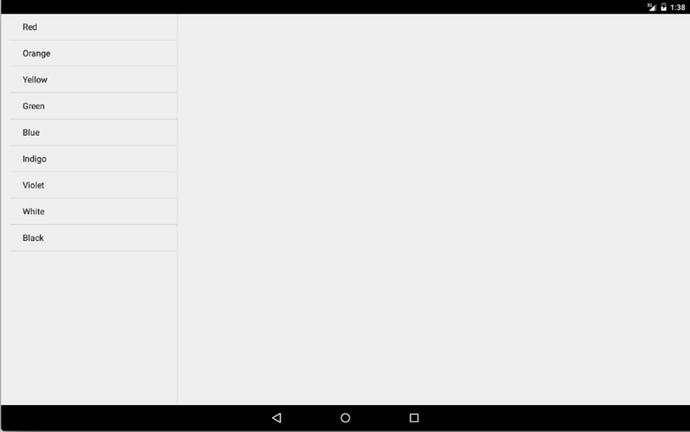
Figure 11-5. The starting display for ColorListActivity with one fragment on a large screen
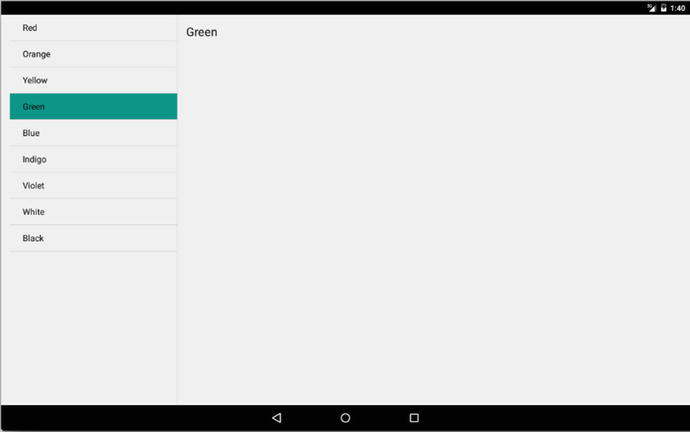
Figure 11-6. Having detected the large screen, the second fragment is added to the activity
Summary
Learning to use fragments is best done by working through more and more examples. You have the solid foundation of the fundamentals for fragments thanks to this chapter, as well as your first working example. Further examples throughout this book use Fragments in different ways, and I encourage you to explore those examples too to expand your Fragments skills. In particular, take a look at the maps example applications in Chapter 15, and the preferences example application in Chapter 19.