
Locations and Mapping with Android
If I asked you what the most common task anyone performs on a mobile device is, I’m guessing that using maps would be high on your list of responses. Of course there are other popular tasks—like watching videos, messaging friends, searching in general, and making calls—but searching for locations and seeking directions to them are some of the most common activities people perform.
From their inception in 2008, Android devices have supported and promoted a range of options for working with locations and maps. The most obvious and most used service is Google Maps, which not only exists as a standalone application on most (but not all) Android devices, but which you can also use to power a range of Android components for your own location-powered application. The main components available to you as a developer are MapView and MapActivity, but you can also use other approaches to include alternative mapping and location services and functionality into your applications.
Choosing Map Providers for Your Application
Over the course of the history of Android, mapping and location has grown from defaulting to and being synonymous with Google Maps, to offering a rich category of technology with several strong contenders from which you, as the developer, can choose. Each option has benefits and drawbacks, so it is worth spending a moment to consider in which technology you want to invest your time and effort.
Although it is easy to think of Google Maps on Android as part of Android itself, this is not the case. From early on in Android’s history, Google Maps was split from the platform and now it exists as part of the separately-packaged Google APIs. The principal reason for this split was the competing desire to “strongly encourage” handset manufacturers to license Google’s bundle of higher-order applications and APIs with any Android device, and the desire to promote and ship as many Android devices as possible, regardless of whether they included separately-licensed Google applications.
Google Maps bundled within the Google APIs is very simple to install, since Google provides it in the same repository as the normal Android SDK components and the other additional APIs it offers. Fire up your SDK Manager from Android Studio, Eclipse, or straight from the command line, and you will see the Google APIs as an install candidate, as shown in Figure 15-1.
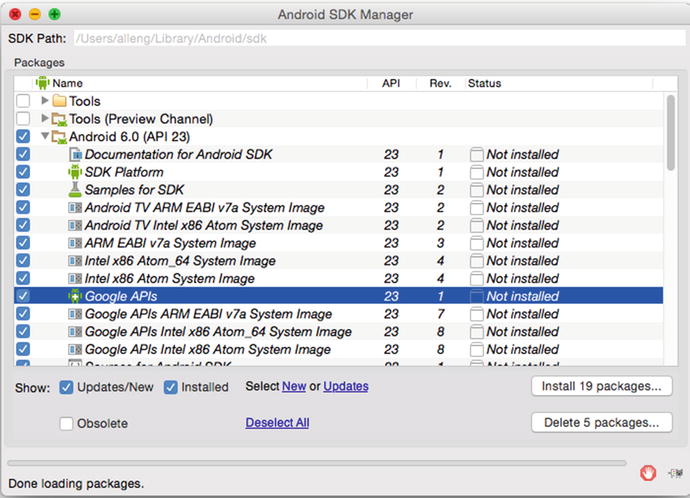
Figure 15-1. Google APIs as an install option in SDK Manager
The main drawback to using the Google Maps APIs then immediately becomes apparent. Because Google Maps is not part of the Android open source package, it is not licensed in an open source fashion. Instead, the Google APIs (including Google Maps) carry a range of much more commercial-style licensing, and I would strongly encourage you to actually read the fine print and ensure that you are happy with its meaning and implications.
If Google Maps will form part of the applications you plan to sell in the Google Play store or elsewhere, be aware that there are cost implications that you need to factor in to your calculations.
Steve Coast started the OpenStreetMap project as a small volunteer effort in 2004 as an way to crowd-source map and location data. OpenStreetMap began in response to the comparatively high cost of licensing map and location data at the time, but it has since exploded to become one of the biggest examples of high-quality crowd-sourced data on the Internet today. Thousands upon thousands of volunteers collect data as they travel to work, home, school, and beyond, using every conceivable GPS-capable device you can imagine, including Android phones.
Using OpenStreetMap in your projects is a little more convoluted, because the OpenStreetMap project has not made any neatly-packaged library or Android API available itself. However, because the data for OpenStreetMap is licensed using the Open Data Commons Open Database License, anyone is free to take it and use it as long as they provide the necessary attribution to the source. A number of people have packaged the OpenStreetMap data into useful Android libraries that they maintain and share themselves.
The most popular third-party libraries that provide OpenStreetMap data and APIs for Android are OpenTouchMap and TouchMapLight. You can find out more about these packages on the OpenStreetMap developer wiki at http://wiki.openstreetmap.org/wiki/Android#Developer_tools.
Now owned by a consortium of German car manufacturers, HERE Maps (formerly Ovi Maps) was, for a long time, the mapping and location technology owned by Nokia. HERE Maps provides rich map data and APIs for multiple platforms, including Android. You can source the APIs and documentation from the HERE developer website at https://developer.here.com/native-apis.
Like Google Maps, HERE comes with a commercial license with a range of legal implications and obligations. If you plan to include HERE Maps in your applications, read and understand the license. If you are in any doubt, seek professional legal advice.
Which Technology to Choose?
Although the ultimate choice of mapping and location technology is up to you, I only have finite space in this book to cover the mapping and location topic. For now, I will delve into the Google Maps APIs since they are the most commonly used by beginner Android developers. But you now know you have options, and you can even include multiple mapping APIs in your application. I know of at least one fitness tracking application that does exactly that.
Preparing for Google Maps Development
In order to use Google Maps from any form of application (not just Android ones), you as the developer need to source and use a Google API key and configure your Google account for the Maps API. You also need to extract the necessary cryptographic signature for you map widgets to use so they can reference your account and map data can flow. Let’s cover these steps briefly now; much more information on this setup is available from the general Google developer site at https://developer.google.com.
Head to https://console.developers.google.com and create a new project under your Google account. You can call the project anything you like, although you might want to think about how this will relate to your maps application and any other applications you plan to write that make use of Google’s web-based APIs.
Enabling a Maps API on Your Google API Project
From your new API Project’s dashboard, follow the link named “Enable APIs and get credentials like keys.” Doing so displays a very large list of the ever-changing set of APIs Google builds for all of its services. In fact, this list and its layout changes so frequently that I’m going to save some paper and not include a screen shot that will be out of date within days. Look for the “Google Maps Android API” entry, and enable that API for your project. You will see a confirmation that looks like the response shown in Figure 15-2.
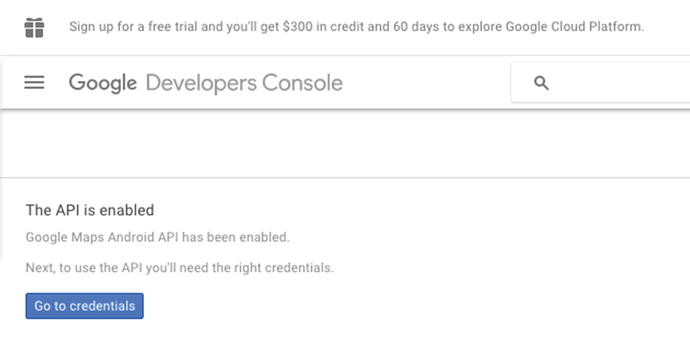
Figure 15-2. Confirmation of Google Maps Android API enabled
Once you have the Maps API enabled, you need some further cryptographic keys to ensure that only your approved applications can use your API Project (and incur any costs that might be triggered).
Getting the API Key
Press the Go To Credentials button to see the details for your proposed API key. Make sure to enter a meaningful key name and nominate the Android package that you will be using for this key. You can have many, many keys for different applications, so do not feel like this is a once-in-a-lifetime naming event. For the example that follows later in the chapter, I have used com.artifexdigital.android.mapsexample, as you can see if Figure 15-3.
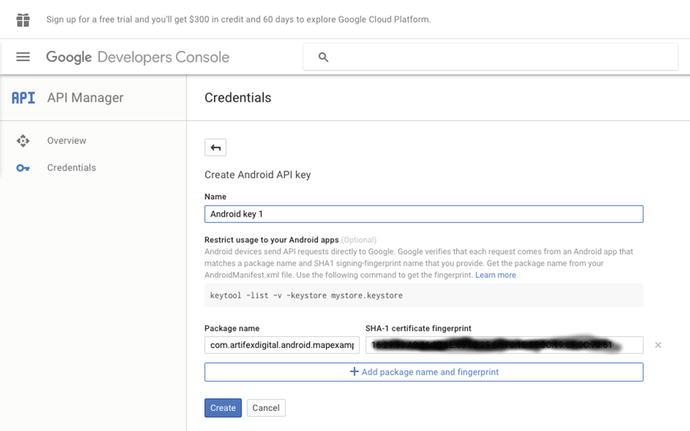
Figure 15-3. Confirming API key details
Once you are happy with the details, click the Create button.
Retrieving Your API Key
The developer console then presents the API key it is has generated for you as I have partially shown in Figure 15-4.
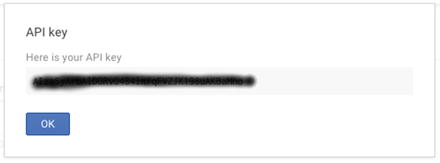
Figure 15-4. API key presented by the Google Developer Console
Caution Never share your API key with anyone. Even though it is nominally tied to your Android package, and you notionally have a unique package namespace that prevents others from abusing your API Project (and your credit card), sophisticated attacks can use this information to your detriment. Keep your API key secret, and use it only where needed in manifest files, layouts, or resource files.
All current Google Maps API keys begin with the substring ‘AIza’, though I have obscured my API key for the reasons I mentioned in the caution statement.
Building Your First Maps Application
After you’ve completed the tasks of setting up your Google developer account and API key, you might be wondering how much different a maps-based application is from the regular Android development you have learned so far. The good news is that conceptually you are now on very familiar ground, with all the earlier topics in this book are perfectly applicable to building maps-based applications.
However, there are a few nuances to be aware of when it comes to composing layouts and choosing permissions and device sensor options. Let’s delve into all of these choices as we build our first maps-based application.
Using MapActivity or FragmentActivity with MapView
Historically, in order for a MapView widget to display a map in your application, it needed to be placed within the purpose-built MapActivity subclass that you’d have needed to define from the base class provided with the Android framework. A MapActivity subclass acts to do a bunch of the stitching behind the scenes, and thus it handles much of the logistics surrounding the “tiles” that make up a Google map and their display within your layout.
With the advent of fragments, which I covered in Chapter 11, much more flexible ways of working with maps were introduced that allowed a MapView to inhabit a fragment and retain much of the behind-the-scenes magic that makes using maps so easy. Let’s explore this approach so that you are armed with the latest and greatest way of building and working with map-based applications.
We’ll now explore the contemporary approach in some example applications so you become familiar with the current preferred development style and adapt it to your needs.
Permissions and Manifest Settings for Maps
Regardless of whether you use an old-style or new-style approach to creating location-aware applications with Google Maps, you need to include several permissions in your manifest file. We cover permissions in more detail in Chapter 20, but for now, you need to adhere to these recommendations.
At a minimum, your application needs android.permission.INTERNET and android.permission.ACCESS_COURSE_LOCATION. The latter allows you to use the APIs that let Android talk to on-device sensors and radios that can approximate location at a course level. This includes cellular (tower) data and wi-fi signals, but not GPS. IF you wish to have GPS location data included “under the hood” when Android satisfies various location-style API calls, you need to include android.permission.ACCESS_FINE_LOCATION.
Strictly speaking, some maps-based functionality will work without these permissions, but I’d strongly advise you to include them so that features that maps expose (directions, journey time calculations) can work seamlessly for your users.
Using the external Google APIs library also requires a custom permission that it enforces (more on this in Chapter 20 as well). You need to include the com.google.android.providers.gsf.permission.READ_GSERVICES permission in order to be able to include and use the Google APIs.
Your <application> element also needs to include a <meta-data> custom child element that specifies version information for the Google API library that you will set as a minimum for using your application. For example, when building applications to target the Google APIs released as part of Google Play services for Android version 6.0 Marshmallow, the <meta-data> element would look as follows:
<meta-data
    android:name="com.google.android.gms.version"
    android:value="8298000"
 />
The android:name value has not changed since Android KitKat 4.2, but the android:value changes with Google API (and implicitly Google Play services) versions. The current value for Android version 6.0 Marshmallow is 8298000,but you should check for updates periodically and decide if you wish to increase your target API level, just as you do for the Android API level, or whether you want to set a more flexible API level tolerance as I describe a little later in the chapter.
The final entry that you should add to your manifest is the API key you generated for your application from the Google Developers Console. This is another <meta-data> element, and it takes the following form:
<meta-data
    android:name="com.google.android.maps.v2.API_KEY"
    android:value="PUT_YOUR_API_KEY_VALUE_HERE"
/>
You can also reference a key value stored as a string in the strings.xml resource file (e.g., android:value="@string/my_secret_maps_api_key").
Building the Layout for Your Map Application
Creating a map-based application with FragmentActivity is very similar to some of the other activity helper subclasses you have used throughout the book, such as ActionBarActivity for building an ActionBar-centric application, and ListActivity for building activities that are dominated by a ListView widget and the data populating it.
Listing 15-1 shows the layout for a straightforward map application named MapsExample, which you can find in the ch15/MapsExample folder. Note in particular the way in which the SupportMapFragment (that implicitly houses a MapView for you) is referenced. Because our desired map classes are provided by a separate library (the Google APIs) outside of the Android API and its widget namespace, we need to use the fully-qualified package name reference in the layout XML.
The com.google.android.gms.maps.SupportMapFragment takes care rendering the map canvas for us and placing a MapView. You can add other normal attributes to this <fragment>, although some of them may be overridden implicitly when the fragment enters various parts of its lifecycle.
Adding Code for a Basic Map
The code for rendering a map is unbelievably simple, although there are a few traps that you as a developer should watch out for; we will cover those shortly. Listing 15-2 shows the bare-minimum code to draw a map and puts one embellishment upon it.
That is all it takes to render a basic map. You can run this code (from the ch15/MapsExample folder) on an emulator that includes the Google APIs. If you haven’t already done so, you should create at least one AVD based on the Google-API-enhanced device images.
In our onCreate() override, we perform the normal steps to restore any state and inflate our layout. We then call the createMap() method to do the work of putting together the map itself. We do this from onResume() as well to ensure our map is re-created if any configurations change, especially those triggered from rotation.
The createMap() method uses the SupportMapFragment library and the regular findFragmentById() method to find the ID of the com.google.android.gms.maps.SupportMapFragment from our layout. The .getMap() call does the work of actually getting the map tiles, rendering them, and so forth.
I have added one extra to this map, by using the .addMarker() method for a map to create a Marker object and position it over London, in the UK. I did this by passing a latitude and longitude pair as either integers or floats.
GOOGLE APIS, GOOGLE PLAY, ANDROID APIS, AND VERSIONING CHAOS
If you attempt to use an AVD based on the Level 22 APIs and Google APIs, you will encounter an issue that the combination of those APIs throws at developers; in these cases, the maps library expects a later version of the Google APIs than the device images provide. This is a convoluted problem but you can fix it. If you have this problem while you are attempting to run the example application (or any application that includes the Google APIs), you can spot it by looking for the following LogCat entry when the application fails to show a map:
Google Play services out of date. Requires 7095000 but found 6774470
Instead of showing a map, your activity will probably show a warning about Play Services needing to be updated and offer an update button. So save yourself some pain and use a Level 21- or Level 23-based AVD instead. Even then, you will have instances when this problem can strike, mainly due to the frequent updates Google pushes for Google Play services and the hoops a developer needs to go through to update those services on an AVD. In those circumstances, the easiest solution is to change the Google Play services dependency to be far more forgiving of different versions. If you encounter this problem with your AVD, open your build.gradle file for the app module, and change the dependency for “play services” to the following:
compile 'com.google.android.gms:play-services:6+'
You’ll likely see a far more specific version to start with, such as 8.3.0. By using the value 6+, you are telling gradle to tolerate any build of Google Play services from the last few years.
When run, the MapsExample application shows a simple map, as you can see in Figure 15-5.
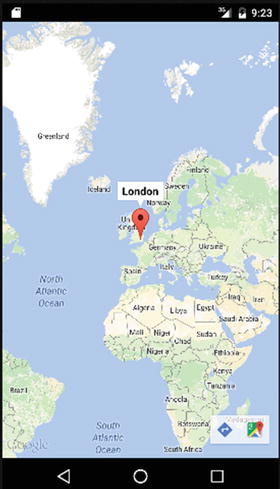
Figure 15-5. The Basic MapsExample application running
After all the effort of setting up your API keys, and adding a little code, you have maps at your disposal.
This looks deceptive. Problems can and do crop up due to the lack of the Google APIs on a device, and that means it is prudent to add some checks to your code to handle cases in which the map object is null because the original instantiation failed as a result of missing APIs. Listing 15-3 shows a slightly modified version of the stock Google example that is created for you if you use the Google Maps template when you create a new project in Android Studio or Eclipse.
Here I split the initial myMap object setup from the other code that adds the marker. In setUpMapIfNeeded(), Google’s example code shows the typical way to test if the GoogleMap object is still null after attempting the .getMap() call; it then shows how to skip any additional map method calls if the object is null (because they would fail). In general, you should add this kind of protection to your code so the rest of your application logic can continue to function on devices that lack the Google APIs.
Obviously you can add a lot more to the map to suit your every need, so let’s cover a range of the most popular options.
Adding Flair and Features to Your Maps
The market pin added to the map in the MapsExample application is one of the familiar flourishes that you have no doubt experienced in your own use of maps. There are many more tricks and treats that you can include when devising functionality for your maps. You can configure many of these options in the layout file and/or in your Java code. I will mix and match to get you comfortable with both approaches for some of the most common additions to maps.
The initial map depicted in Figure 15-5 shows London from the aerial perspective of half of planet Earth. This is probably not so useful if, for instance, you are looking for the nearest supermarket. You can add zoom controls to your map through the getUiSettings().setZoomControlsEnabled() method. This takes a simple Boolean, which you set to true to enable zoom controls.
True North
Before the advent of spoken turn-by-turn directions in your favorite mapping applications, a good percentage of users used the compass on a map to help orientate themselves. You can add the compass to your map using another of the getUiSettings() submethods—the .setCompassEnabled() option, which also takes a Boolean.
Toolbars and theMy Location Button
You can enable other normal features, like the maps toolbar and the My Location button, by using additional getUiSettings() calls. The setMapToolbarEnabled() and setMyLocationButtonEnabled() methods do exactly what their names describe.
Shakin’ It!
There is more than one way to interact with a map on an Android device. One of the more interesting ways is to use gestures and device movement to control maps and related information. Additional getUiSettings() calls can handle shakes, rattles, and rolls to let your user play with your maps. Some of the major options are as follows:
- setRotateGesturesEnabled(): This method allows users to use a two-finger spin gesture to have the compass orientation rotate for your map.
- setScrollGesturesEnabled(): With this method, swiping up and down on the map allows scrolling through (virtual) space.
- setTiltGesturesEnabled(): This is particularly useful with building map types and satellite/street-view maps. This alters the viewer’s perspective from the default bird’s eye view to one of their own choosing based on the titling gesture they use.
- setZoomGesturesEnabled(): The infamous “pinch to zoom” feature. This is very handy for the user, and was once a minefield of patent litigation between Google and one other notable mobile technology company.
Changing Map Type
The default map type for MapView objects in fragments or standalone is very useful for many situations. But there are times when seeing building outlines, real satellite imagery, or some hybrid combination of map type is more suited for the use you have in mind.
Your map object includes the .setMapType() method to indicate which of the supported map types you wish to display. This takes an integer value, with these constants provided as part of the GoogleMap package:
- MAP_TYPE_NORMAL: The default cartoon-style map with roads, parks, street names, and so on.
- MAP_TYPE_SATELLITE: Uses the satellite imagery from Google Earth to show real images of the map area. This includes the place names, street names, and so on from a normal map.
- MAP_TYPE_TERRAIN: The terrain view shows all of the geographic features of your map area, but it omits label overlays like street names by default.
- MAP_TYPE_HYBRID: The mix of everything—satellite imagery, street outlines and names, terrain features, the works!
Your maps are of type MAP_TYPE_NORMAL by default. You can change types at any time.
Listeners for Every Conceivable Type of Map Interaction
There are no fewer than 10 different listeners you can configure to interact with maps and user actions. These range from the straightforward—such as the map equivalent of an onClickListener, named, as you might suspect, the onMapClickListener—to esoteric options like the onIndoorStateChangeListener for dealing with transitions to and from indoor maps.
As with other listeners, you can configure a range of responses to deal with the events the listener captures. In a straightforward example, we can register an onMapClickListener with the .setOnMapClickListener() method like this:
myMap.setOnMapClickListener(this);
This sets the fragment to be its own handler and requires us to extend the class definition to implement OnMapClickListener and to implement an onMapClick() method to deal with the associated callback. We could structure a very simple example as follows:
public void onMapClick(LatLng point) {
    myMap.animateCamera(CameraUpdateFactory.newLatLng(point));
    Toast.makeText(getApplicationContext(), point.toString(),
        Toast.LENGTH_LONG).show();
}
The calls of note here include using the animateCamera() method to move the map to the point the user clicked, and using the LatLng object passed to the call back to populate a Toast message that tells the user what latitude and longitude they clicked.
There are so many more options for maps that they could fill a book. In fact, several books have been written just on Google Maps APIs and using them with Android. I would suggest Beginning Google Maps API 3, by Gabriel Svennerberg (Apress, 2010). Rather than turn this book into a clone of Gabriel’s book, let us finish by looking at an updated MapsExample2 application that includes all of the preceding options and a few more (see Listing 15-4).
You can run this example yourself from the ch15/MapsExample2 folder (do not forget to substitute your own API key); you should see the results that appear in Figure 15-6.
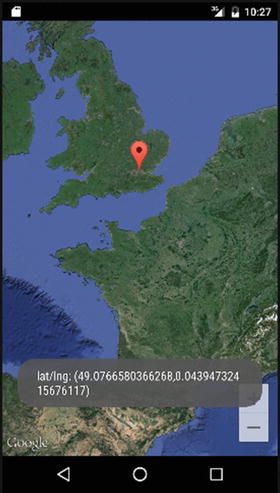
Figure 15-6. The MapsExample2 application showing our maps enhancements
Summary
This chapter provided you with a very fast crash course on mapping and location for Android, as well as much of the background and history on how today’s state-of-affairs came to be. If you want to learn more, the developer.google.com and developer.android.com sites have copious information on incorporating maps, and the OpenStreetMap and HERE Maps sites include even more. Happy mapping!