
Of all the capabilities, applications and features available to users of Android, and to you as a developer, the one “original” feature that is still pervasive is the ability to make telephone calls. Even now when Android is appearing in cars, planes, home appliances, and more, the very large majority of devices running Android are phones, and will be for some time.
Checking for Phones and “Phonies”
I claimed in the opening to the chapter that the vast majority of devices for Android are phones. That is true, but the growth of tablets and other non-cellular devices means you should think in advance about what telephony support your application must have, what is nice to have, and what it can live without. In short, checking if the device is really a phone will help you as a developer, and your users.
Mandating Telephony Support
Requiring phone support for your application is done by specifying the relevant uses-feature option in your application’s manifest. For phone support, the hardware feature is named telephony, and is specified as shown in Listing 13-1
Specifying the telephony requirement ensures your application will run only on devices that have cellular support, and that the Google Play store and other application stores can filter results shown to people looking for applications such that your application isn’t shown as available for install to devices that don’t have telephony support.
Optional Telephony Support
Obviously an all-or-nothing approach to requiring telephony is fine in some circumstances, but you might have in mind an application where telephony is nice to have, but not strictly required. In those circumstances, instead of specifying the hardware requirement in your manifest, you can check for detected telephony support on a given device at run time, and code Java logic to handle both its presence and absence. The key to detecting various device capabilities at run-time is the PackageManager class, and its most-frequently-used method is hasSystemFeature().
Listing 13-2 is an example fragment of code showing PackageManager in action, using a common if block pattern. The example detects the presence or absence of telephony support at run-time.
There are several other useful variants of telephony for which you can check. These include whether a device is running on a GSM, CDMA, or other style of cellular network providing telephony for the device.
With the device capabilities determined, you can now start doing interesting things like making an outbound phone call. This is actually far simpler than you might imagine, as Android is built around telephony as a core feature. You do not have to personally build low-level components like radio firmware, network handshakes, etc. In fact, there is almost no code required at all!
The secret to almost all of the telephony and phone call handling you might want to undertake is the TelephonyManager class. Its methods include the ability to determine a wide variety of details and state information about the phone and calls. Some of the most useful methods are:
- getPhoneType() Returns the phone’s radio type (GSM, etc.)
- getNetworkType() Provides information on the data capabilities of the network, including its categorization as 4G, LTE, 3G, GPRS, EDGE, etc.
- getCallState() Can determine whether the phone is idle (not in a call), in the process of making a call by ringing a number, or connected in a call (known as offhook).
Tip It is very good practice to use getCallState() and examine the result before your application tries to initiate a call, to avoid the embarrassing situation of interrupting an existing call or forgetting that your user might be doing other call-related activities outside of your application. There are ways to deal with multiple incoming or active calls, but they stretch beyond the scope of this book. You can always check out the advanced call handling options at developer.android.com
The actual task of dialing a number and initiating the call is performed by invoking an ACTION_DIAL or ACTION_CALL intent. We will cover the differences in the two approaches shortly. Either intent takes a Uri representing the number your user wishes to call, taking the string format tel:nnnnnnnn, where nnnnnnnn are the digits of the desired phone number. Explaining the setup and behavior is easier with an example.
The folder ch13/PhoneCallExample contains working code, and a simple custom layout that shows the various calling and dialing options in action. From that example code, Listing 13-3 presents a simple layout that allows a user to enter a number and make a call.
The layout has a label and an EditText field, into which the user can enter their desired phone number. It also has two buttons, with each used to call a method invoking the relevant intent. Figure 13-1 shows the layout as rendered in a virtual device.
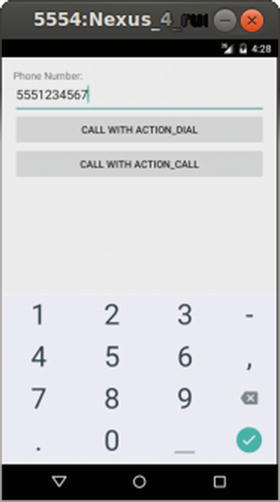
Figure 13-1. A simple layout for entering and dialing or calling a number
There are a few things to note about this example so as not to confuse you. First, the EditText field has the inputType="number" attribute, which means it will restrict its input to digits and some limited punctuation. This inputType is also why the IME shown for input into the EditText field is limited in the same way. It looks like a phone dialer pad, but is just a normal number EditText IME soft keyboard.
The two buttons are labeled to explicitly inform you what each one does when pressed. The first button, labeled CALL WITH ACTION_DIAL, will use the ACTION_DIAL intent, and the other button, labeled CALL WITH ACTION_CALL uses the alternative intent. So what’s the difference? The ACTION_DIAL intent will trigger Android to display the phone dialer interface to the user (see Figure 13-2 later in the chapter). Whereas the ACTION_CALL intent moves immediately to dialing the number and placing the call, with no additional UI step.
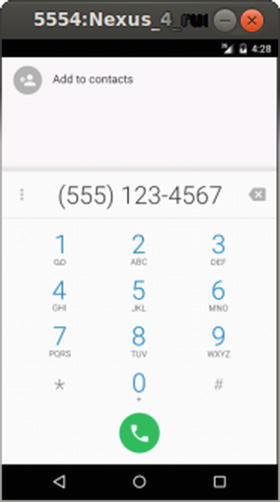
Figure 13-2. The Android dialer invoked through ACTION_DIAL intent
Why have these alternatives? You can probably think of many reasons, but the ACTION_DIAL intent means the user will actually see the number, and have to hit the call button to go ahead and place the call. This means it is the user who actually completes the steps to make the call. The ACTION_DIAL intent needs no special permissions, as it’s the user who has the final say.
In contrast, ACTION_CALL will proceed immediately to calling with no further user interaction. You can probably imagine various ways this can be abused, or accidentally cause issues. As such, Android protects the ACTION_CALL intent with the CALL_PHONE permission. You must have this in your manifest in order for a startActivity() call with ACTION_CALL intent to work.
Listing 13-4 shows the Java code that wires up the logic for the PhoneCallExample app.
Both methods triggered by the two buttons, usedialintent and usecallintent, follow the same pattern of logic: Find the phonenumber view into which the user has typed their number and extract the digits to format in the pattern expected by the Uri format introduced earlier in the chapter. With the Uri properly constructed, then fire the relevant intent through startActivity().
Using ACTION_DIAL
Figure 13-2 shows the result of the user pressing the usedialintent button, and therefore triggering the ACTION_DIAL intent and the presentation of the dialer UI to the user.
At first glance, the dialer in Figure 13-2 is very similar to the numeric IME shown as part of Figure 13-1. However, there are some key differences over and above the color and alignment of the digits. This is the real Android system dialer. It has extra flourishes such as the ability to add the number entered as a contact. The number is also formatted automatically depending on the device’s regional and language settings, the number of digits entered, use of IDD codes, etc. In this example, Android has detected that the number 5551234567 looks like a North American number. Android has added the idiomatic brackets, spacing, and hyphen expected in the USA and Canada.
The other UI element to note is the big green phone symbol centered at the bottom. This is the call button that actually places the call using the number entered.
Using ACTION_CALL
There is no figure to show for pressing the usecallintent button, because we skip the dialer and go straight to the call. I am going to assume you as a developer have probably made at least one phone call from an Android device. You can imagine what the screen then looks like.
Working with Incoming Calls
Intercepting and handling an incoming call is a somewhat advanced endeavor, and beyond the scope of this book. However, there are other actions your application can take when a call is being received.
The main way in which your application can respond to incoming calls is by registering a broadcast receiver for the broadcast intent ACTION_PHONE_STATE_CHANGED in your application manifest file. This intent is fired by the Telephony Manager framework when a call is received. Listing 13-5 demonstrates the receiver declaration in your AndroidManifest.xml file.
When the call is made to the device, the intent is fired, and your receiver is notified by way of callback to the specified method. Along with the intent, two possible extras are included. First is a state value for the call, such as CALL_STATE_OFFHOOK to indicate the call has been answered, or CALL_STATE_RINGING to indicate the phone is still ringing. In the latter case, the second extra will be EXTRA_INCOMING_NUMBER which provides the caller ID if such is passed by the network.
Listing 13-6 shows a simple fragment of Java code for the MyPhoneStateChangedReceiver class to give you an idea of what you can do with the callbacks.
Because working with incoming calls is considered potentially sensitive from a security perspective, your application must also include the permission READ_PHONE_STATE in the manifest file in order to receive the ACTION_PHONE_STATE_CHANGED intent.