
5.2. Utilizing XML Data in InfoPath
5.2.1. Why Use an XML Data Source?
Because you can hook forms up to databases such as Access and SQL Server, you may wonder why you would need to use XML as a data source. Two of the main reasons are portability and collaboration. Because InfoPath gives customers a choice of e-mailing forms, using them on laptops offline, and collaborating with them using Windows SharePoint Services (WSS). WSS is discussed in Chapter 17, "Working with InfoPath and Windows SharePoint Services."
5.2.2. Creating an InfoPath Form Using an Existing XML Document
You created an InfoPath form based on an Access database in Chapter 4, "Creating an InfoPath Form from an Existing Data Source." Creating one based on an XML data source is not much different. However, in contrast to using the database, you have a choice of basing the InfoPath form on just the structure of the database rather than also having to use the data itself. For the purposes of this section you do just that. Use the task New from XML Document or Schema . . . from the Design a Form task pane. Once you have clicked the task, you are taken to the Data Source Wizard, introduced in Chapter 4. The information requested is different because you will specify which XML document you want to use instead of database specifics.
5.2.2.1. Try It Out: Specifying a XML Data Source
Open Microsoft InfoPath.
Click Design a Form in the Design a Form task pane.
Choose New from XML Document or Schema . . . in the Design a New Form task pane. The Data Source Wizard opens, prompting you to enter the location of the XML schema to use. You also can use the Browse button.
Locate the XML schema, as displayed in Figure 5-4. Remember that you only want the schema for this Try It Out and not the data.
Figure 5.4. Figure 5-4

Click the Next button. You are then asked if you would like to add another XML schema or XML document. The default is no.
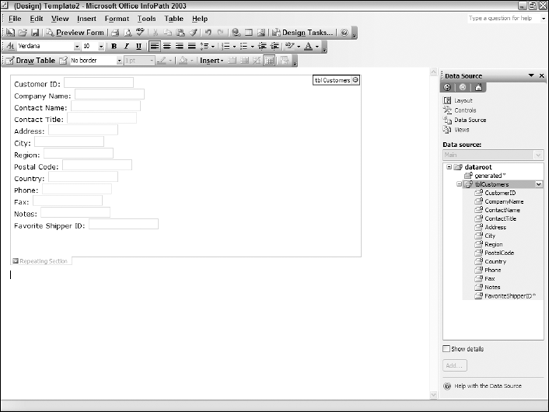
Click Finish. You now see the blank form displayed. In the Data Source Pane, the tblCustomers are listed. Expand the tblCustomers node, and you then see the fields in the table, as shown in Figure 5-5.
Figure 5.5. Figure 5-5

Unlike using the database, when you create the form from the data source, the data goes with the InfoPath form. Now it's time to create the form itself. You will follow the same steps you used when you created a form based on the information in the database.
Notice that when InfoPath creates this form, the form is blank; it does not contain query and data sections, only a single area. This is because the only data going in is for this particular form. There is no reason for a query area.
5.2.2.2. Try It Out: Adding the Fields
Using the form you just created:
Click the tblCustomers node, and drag it onto the form. You are then presented with the options for adding a section to the form, as shown in Figure 5-6.
Figure 5.6. Figure 5-6
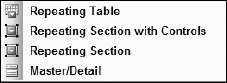
Select Repeating Section with Controls. The form is then created, and can be seen in Figure 5-7.
Figure 5.7. Figure 5-7
5.2.3. Utilizing Data with an XML Data Source
In the last section, you saw how to set a data source to an XML schema file. This helps create the structure of the data to be used with the form, but it includes no data. There are times when you want to include the data with the structure. Here are some of the reasons to include the data with the schema:
To Utilize Data from Another Business System: When using data from another system by using the XML document, the data can be viewed in the InfoPath form. You also can create code to update the data and return it to the system or recreate an XML document from the updated data.
To Supply Prototype Data for a New System: By seeding the InfoPath form, you can suggest the type of data to be entered into the form. When creating an InfoPath form that will be used against a database or Web service (backends), it may take a while for the IT group or whoever is in charge of the backend to have the backend ready for use. Until the backend is ready, you can have the people creating the backend generate an XML document to work with until the backend is complete. You may have to make some modifications to match changes that occur.
To Add Data for Lookup Purposes: Even when entering data into individual forms, there are cases when you want to supply some data to the form, even if the main form's data source is created using just an XML schema.
For the purposes of this section, you will be adding a data source using the last scenario, in the Try It Out.
5.2.3.1. Try It Out: Adding a Data Source Using an XML Document
To show this technique, you will be using the XML document you created when you exported the tblShippers table from Access to tblShippers.xlm and the InfoPath form you created in the last couple of Try It Outs. You can see tblShippers.xml displayed in Figure 5-8.
Figure 5.8. Figure 5-8
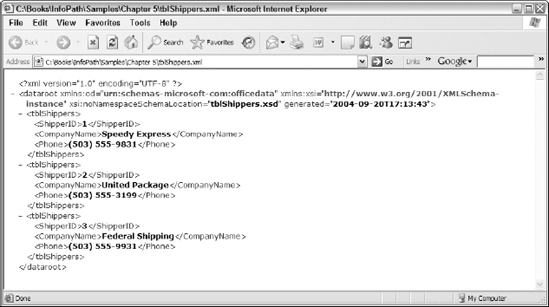
The last field displayed in the new form is FavoriteShipperID. The first task is to convert this field from a text field to a list box. Then you will be specifying the XML document as the data source for the list to display for the list box.
Open the form created in the last couple of Try It Outs in design view.
Right-click the text box bound to the FavoriteShipperID field. The context menu appears.
Choose Change To from the menu, and then highlight List Box from the list of controls available, as shown in Figure 5-9.
Once chosen, the text box bound to the FavoriteShipperID is changed to a list box control.
Right-click the new list box control, and choose List Box Properties . . . from the menu displayed. The List Box Property dialog box is displayed.
In the List Entries options, click the last one, labeled Look up values in a data connection to a database, Web service, file, or SharePoint library or list, as shown in Figure 5-10. You will be selecting a file.
Click Add. The Data Connection Wizard is then displayed. You will be using the default choice, XML document, as displayed in Figure 5-11.
Figure 5.9. Figure 5-9
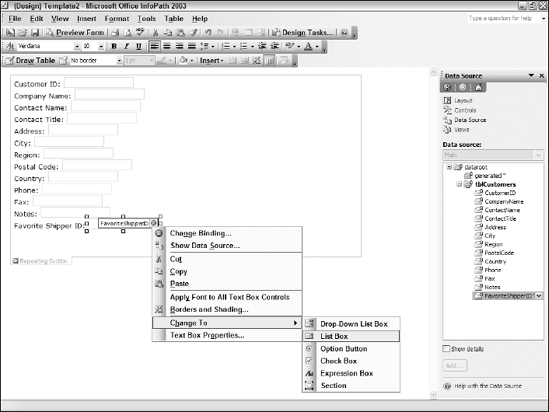
Figure 5.10. Figure 5-10

Figure 5.11. Figure 5-11

Click Next. The next page of the Data Connection Wizard enables you to choose the actual XML document you want to use. You can either type the path and name of the file or use the Browse button, located to the right of the file text box. You can see the file in Figure 5-12.
Figure 5.12. Figure 5-12

Click Next to see the last page of the Data Connection Wizard. This summary page lets you specify what you would like to call the connection and also note whether you would like to have the data loaded when the form is opened. Leave the defaults as you can see them in Figure 5-13.
Figure 5.13. Figure 5-13

Click Finish. You will then see a message box displayed informing you that the data is not part of the form. It gives you the choice of adding the file to the form. You can see this dialog box in Figure 5-14.
Figure 5.14. Figure 5-14

Click Yes. The name of the new data connection is then listed in the Data Connection property of the property sheet.
Select tblShippers, and click OK. The tblShippers XPath is then added to the Entries text box, and the ShipperID is filled in the Value and Display name properties.
Click the Select XPath button next to the Display name text box.
Select the CompanyName from the treeview of nodes, and click OK. All the properties are now filled out as they should be for displaying shippers, and can be seen in Figure 5-15.
Figure 5.15. Figure 5-15

Click Preview Form to view the InfoPath form.
After typing in some values and picking a Shipper, your form should look something like the one in Figure 5-16.
Figure 5.16. Figure 5-16
