
6.4. Setting the Default Value of a Control
When a control is based on a field from a data source, there are some cases when you want to have a value put in the control automatically when new records are added. This value is called the default value. In a perfect world the default value of a field is specified for the field in the table, located in the database. However, there will be times when it is overlooked, or you want to override the default value set at the database level.
Which type of data you will use as a default value will depend on the data type of the field. The following table displays some example of default values that could be used with the form used in this chapter:
| Field | Default Value | Description |
|---|---|---|
| Region | "WA" | Places the abbreviation for the state of WA in the Region field. |
| Order Date | today() | Use the today() formula to assign today's date. |
| Quantity | 1 | Setting a numeric value to 1 or 0; this helps to keep users from leaving values blank. |
When set at the form level, default values are just like other values you enter into forms in that you need to click the Submit button to have them saved in the database.
6.4.1. Using Literal Values
The way to specify default values is to use the property sheet of the control. There are several ways to specify default values. The first way is enter the value you want into the Value entry in the Default Value area on the data tab of the property sheet.
6.4.1.1. Try It Out: Adding a Default Value to Quantity
Using the Chapter 6 Starting.xsn form:
Right-click the Quantity field, located under the label displaying Quantity in bold.
Choose Text Box Properties... The property sheet for the Quantity text box opens.
Type 1 into the Value property. The property sheet will then look as it does in Figure 6-2.
Click Preview Form. Even at this point, when the form is showing a blank form, you can see 1 displayed in the Quantity field, as shown in Figure 6-3.
While Figure 6-3 shows a the use of default value, a few more steps will show the default value even better when a new order detail record is inserted into existing records.
Figure 6.3. Figure 6-3

In the query portion of the form, type in BC for the region, then click Run Query. A record appears displaying entries for the Bottom-Dollar Markets company.
Click the Insert Item choice, under the existing order detail entries. A new record will appear, and once again the number 1 will be displayed in the Quantity field. You can see this in Figure 6-4.

You should now have a good idea what the default value property accomplishes for you when you type a literal value such as 1 in the property. There also is another way to specify default values, and that is by using a formula, also called an expression.
Figure 6.4. Figure 6-4

6.4.2. Using Formulas
You can use formulas for various purposes on your InfoPath form. Just as with formulas used in Excel, they can be expressions such as the values of two fields being added together or an aggregate function such as Sum(). Formulas can consist of:
Fields and other formula controls being added together
Functions
Combination of functions and fields.
When setting default values, where formulas are concerned you will use functions, because when a default value is utilized, other fields are not yet supplied.
Whatever type of information you want to use, there are two methods you can utilize to create the formulas. For the default values, you can type the formulas directly into the Value field of the Default Value area in the Data tab of the Properties dialog box. The other alternative is to click the Formula command button, located beside the Value field.
If you choose to use the Formula command button, the Insert Formula dialog box will open as seen in Figure 6-5.
Figure 6.5. Figure 6-5

The three command buttons accomplish the following:
Insert Field or Group: This button enables you to specify an individual field or a group of fields to use. You also can utilize filters to narrow down the data displayed. In the next chapter, you will read about using fields and groups of fields in formulas to display information.
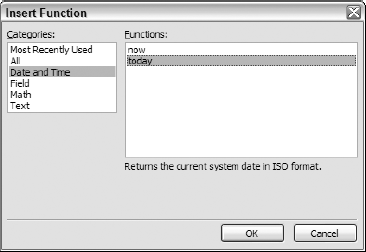
Insert Function: This button displays the Insert Function dialog box, where you can pick functions to use from Date and Time, Field, Math, and Text categories. Functions will return a value when given a parameter or parameters, or just when called by itself, depending on the requirements of the functions.
Verify Formula: As the caption says, this button verifies the syntax of the formula. Note that if your formula has problems other than syntactical ones, the errors won't show up until you preview the form.
Edit XPath (Advanced): XPath, or XML Path Language, is a language used to search information within an XML document. In Microsoft Office InfoPath 2003, these are the same as fields or controls on a form. If you are familiar with Xpath, you can edit the expressions directly by checking this box.
6.4.2.1. Try It Out: Using a Formula for Order Date Default Value
For the purposes of examining the use of a formula for default value, you must use a call function within your formula. In the form you have been using thus far in the chapter:
Right-click the OrderDate field, underneath the label with the caption Order Date, and choose Date Picker Properties... from the menu. The Properties dialog box opens.
Click the Formula button, next to the Value field under Default Value. The Insert Formula dialog box opens.
Select the Date and Time category in the Categories list box. You will then see the two functions: now and today. The function now will rerturn both the current system time and date, and the function today returns the current system date only.
Click OK to accept the function. The Insert Formula dialog box now displays the today() function as shown in Figure 6-7.
Figure 6.7. Figure 6-7

Click OK to accept the formula. The formula is now displayed in the Value field of Default Property area of the Date Picker Properties dialog box.
Click OK to accept the new default value.
Now, when you add a new order for any of the customers, the current date (today) will be set as the Date Ordered default value. You can see this in the form by clicking the Preview Form toolbar button, locating a customer, then clicking the Insert Item button under the Orders section. You also can see it in the default blank record displayed on the form when you first open it, as shown in Figure 6-8.
Figure 6.8. Figure 6-8

As of this writing, a bug occurs with forms bound to a database where the default value is repeated in all records displayed. This makes this feature currently more useful in forms used with XML.