
9.2. Working with View Properties
Another great feature of InfoPath is the ability to set properties at the view level. This means that you can give users visual clues as to which view they are working on by setting the views up with different properties such as background color and size, and even adding a background picture if desired.
9.2.1. Reviewing the Views Task Pane
Before discussing the property sheet itself, take a look at the Views task pane and what the options are for working with views. You can see the views task pane in Figure 9-6.
The first thing you will notice is the list of views. This list displays all the available views, including print views. You will see this list grow as the chapter goes on. Below the list is the View Properties button. This button opens the property sheet for the currently highlighted view. You can also open the property sheet by double-clicking the view.
Figure 9.6. Figure 9-6

In the Actions tasks, you can see the following choices:
Add a New View: Creates a new view in the current form you are in. When clicked, a blank view will be created, based on the main data connection. You can also create views based on secondary data sources.
Add Print View for Word: This task takes the data from the InfoPath form view and allows the user to specify an XML transformation file (XSLT) to create the file for printing use Microsoft Word.
Create Print Version for This View: With this option you can create a view that can be formatted for printing. This view can combine information from multiple tasks and display it in a single view, which may be more convenient when printing.
The best way to open a view is to click the Views task in the Design Tasks task pane. In the Views task pane you can click the View Properties buttons, located below the list of views.
9.2.2. Getting to the View Properties
Properties for views are broken up into four categories, which you can see in the following series of figures:
General properties: This tab, displayed in Figure 9-7, contains three categories of settings. The first is View settings, which is where you will specify the name of the view. When there is more than one view, you can set when you want a particular view to be the default view and whether or not you want to have the view displayed on the View menu. For example, you may not want a view to be displayed on the View menu if you are switching to that view by using a button or after submission instead.
Figure 9.7. Figure 9-7
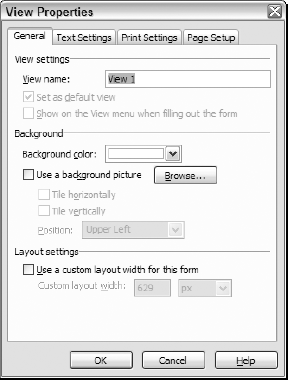
Within the General tab there are also Background properties, including color and a picture if desired. Finally, Layout settings enables you to specify a custom width for the form.
Text Settings: This tab enables you to set the formatting properties for the various types of controls you have on the current view. By setting the properties at this level, you make all the controls of that type consistent, but different from other views if desired. Note that not all control types use all the properties. You can see the Text Settings for the current view in Figure 9-8.
Print Settings: Using this tab, you can set various properties for how you want the view to print. Categories include using a specific view to print with, Orientation as in Portrait or Landscape, Headers and Footers, Number of copies, and number of pages to print. You can see this page in Figure 9-9.
Figure 9.8. Figure 9-8

Figure 9.9. Figure 9-9

Page Setup: The last tab contains settings for which printer to use, the type of paper, and the margins for the page. This tab can be seen in Figure 9-10.
Figure 9.10. Figure 9-10

9.2.2.1. Try It Out: Changing the Default View's Properties
For the purposes of this chapter, you will not be changing too many properties. In fact, using the form you created in the last Try It Out, you will be simply changing the name of the view so that you can distinguish it from the other views you are creating in the next Try It Out.
Click the Views task in the Design Tasks task pane.
Click the View properties button, or double-click the only view in the Views list: View 1. The property sheet for the view will open.
Change the name of the view to Customer Information, as displayed here in Figure 9-11.
Click OK. The property sheet closes, and the new name is reflected in the Views list.
Because the purpose of this chapter is to see how to use multiple views, it's time to get busy.
Figure 9.11. Figure 9-11
