
13.2. Using Visual Studio .NET
While you can create .NET applications using other editors, Microsoft provides Visual Studio .NET, and it rocks. With VS.NET you can create just about any type of .NET application you need to, including:
Various .NET Languages: Visual Basic .NET and C# are both supported by InfoPath forms, as well as other available .NET language such as COBOL .NET, J# .NET, and Microsoft JScript .NET.
Create the Different Types of Projects: Depending on the tasks, you can create Windows Applications, ASP.NET Web applications, Windows services, console applications, and ASP.NET Web services among many other choices. You can see an example of the various choices when you create a new C# application, as shown in Figure 13-3.
Figure 13.3. Figure 13-3

Other Application Templates Can Be Added: For example, when the toolkit is installed, Microsoft Office InfoPath Projects also are added for Visual Basic and C#.
You can have multiple projects within a Visual Studio solution. These projects can be of different types of languages and purposes. When you "build" a solution, you are creating the runtime files necessary to make up the final application.
13.2.1.
13.2.1.1. Try It Out: Creating a C# Windows Application Project
To get into the Visual Studio .NET editor, you will create a simple C# application. To accomplish this you will:
Open Visual Studio .NET 2003. If it is installed, you will find it on the Windows Start menu in the All Programs menu choices. The application shortcut is Microsoft Visual Studio .NET 2003 and can be found in a folder of the same name. When you open VS, the Microsoft Development Environment (MDE) opens with the Start Page displayed.
Which panes are displayed on your screen will vary depending on how you have used Visual Studio. For instance, the Server Explorer and Toolbox are not expanded in the screen shown in Figure 13-4.
Figure 13.4. Figure 13-4

You can see some of the past projects worked on displayed in the page under Open an Existing Project. This makes it easy to go back and work on past projects.
Click New Project. The New Project dialog box will open.
Click Visual C# Projects, displayed in Project Types.
Select Windows Applications.
Locate the folder you want to place the project in, and give it the desired name. For this Try It Out, the project is named MyFirstCSharpApp and is located in the Visual Studio Project folder, which is in the My Documents folder. You can see the New Project dialog box with the specified project in Figure 13-5.
Figure 13.5. Figure 13-5

Click OK. The project is now created and is displayed in Visual Studio .NET 2003, with the starting windows form displayed, as shown in Figure 13-6.
Congratulations. You have created your first C# windows application. Before taking it and adding any code or controls, take a look at some of the different elements of the Microsoft Visual Studio .NET integrated development environment (IDE ).
Figure 13.6. Figure 13-6

13.2.2. Elements of the IDE
There are actually far more elements than can be covered in a single chapter, but these following are the ones you use most.
Editing Window: The main editing window is where your forms are displayed, or in the case of code files, where the code is displayed. You can drag and drop objects onto this window, as well as move and resize objects.
Toolbox: This contains the controls that can be used on your windows forms and applications. Different categories of controls include data, components, and windows form. The controls available vary based on the type of project you are creating.
Solution Explorer: This controls the various files necessary for the solution and project.
Property Sheet: This presents various properties, depending on the object you are working with.
Output Window: This window displays various statuses as the application is being developed, compiled, and executed.
13.2.3. Modifying the Project by Adding a Control and Event Code
Modifying a project consists of adding controls and writing code. When writing code in VS, you will use event programming just as you do in scripting. To accomplish this you double-click a control to add the default event.
For this section, you will use the MessageBox class in the System namespace. This class is used to display information in windows forms. The Show method displays requested information.
13.2.3.1. Try It Out: Adding Controls and Code
Currently the project does not do much good. Right now you have a form that only opens and does nothing. The next step is to add a button and have it display a message box when pressed.
Click the Windows category in the Toolbox.
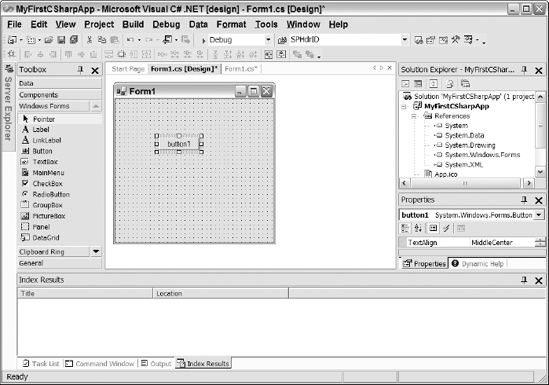
Drag and drop a Button control from the Toolbox on the form. The editor will now be displayed as shown in Figure 13-7.
Figure 13.7. Figure 13-7
Type the following line of code in between the opening and closing brackets.
MessageBox.Show("Hello World");
The code now looks as it does in Figure 13-8.
Figure 13.8. Figure 13-8

The code is now ready to test.
13.2.4. Executing the Application
Once you have created a project and made the desired changes, you will want to build and test the application. There are two modes for executing, or running, your application. Those modes are debug and release. You can specifically build and run applications in one or the other based on what your current purpose is.
13.2.4.1. Executing with Debugging (Debug Mode)
When you execute an application with debugging, you can use a number of options to watch how your application is running. Some of the benefits to debugging are that you can walk line by line through the code if desired or tell the code to stop at different locations in the code, much as was shown in the last chapter for scripting. Specific debugging options and techniques are discussed later in this chapter in a later section. To execute the application using this method from the project in Visual Studio, click the F5 key.
13.2.4.2. Executing without Debugging (Release Mode)
When an application is built and run without debugging, it is said to be in release mode. In this mode, you can't debug the application. You will use this mode when you are ready to distribute the application. To execute the application using this method from the project in Visual Studio, click the Ctrl+F5 keys.
13.2.4.3. Try It Out: Running Your Application
To accomplish this Try It Out, you will use the application you have been working in.
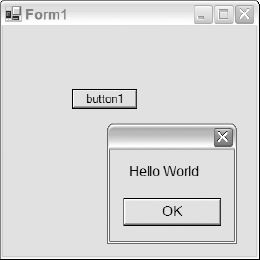
Click F5. The application will run, displaying the traditional Hello World message, as shown in Figure 13-9.
Figure 13.9. Figure 13-9
There you go; you have now created and executed your first C# windows application.