
9.4. Custom Task Panes
Besides switching views, you can create custom task panes for various purposes such as displaying context-sensitive help, as discussed in Chapter 14, "Real-World Tasks and Coding Examples." A custom task pane consists of a Hypertext Markup Language (HTML) Web page using links or code that switches the current view. You also can include button images, as shown in Figure 9-18.
Once you have created the HTML page that contains the necessary code, you can set form options to tell InfoPath which files (resources) make up the Web page, and that you want the InfoPath to include a custom task pane.
The logical place to start in using a custom task pane is to outline what goes into creating the HTML Web page.
Figure 9.18. Figure 9-18
9.4.1. HTML Web Page Used for Custom Task Pane
While the HTML Web page created for the custom task pane is pretty straightforward as far as Web pages go, it does involve some Java Script coding and using the InfoPath object model. Normally, this would be covered in a later chapter such as Chapter 12, "Getting Starting Using Script," which will cover the topics discussed here in greater detail. However, because the code is minimal and the topic so useful, it is logical to include this custom task pane in this chapter.
In the HTML Web page you will have the standard tags for <html>, <head>, and <body>. You will also use the images in the Web page as well. The biggest change is the use of <script> in the code, and a function that is created. The function is called SwitchView() and is used to switch views.
<script>
                function SwitchView(view)
                {
                        gobjXDocument = window.external.Window.XDocument;
                        gobjXDocument.View.SwitchView(view);
                }
         </script>
This code uses the XDocument object, which is the primary InfoPath object for programming the InfoPath object model. Using the syntax:
window.external.Window.XDocument
the code specifies the XDocument object of the window that the Web page is residing in, which will be the InfoPath task pane area. Within the XDocument object is the View object. When the following line of code is called:
gobjXDocument.View.SwitchView(view);
the SwitchView method of that object is called, being passed the name of the view to switch to. An example of assigning the call to the custom function within the HTML is:
<p><img border="0" src="Notes.png" width="123" height="38"
                onclick="SwitchView('Notes')"></p>
You also will have to create the image files, in this case Notes.png, to use as the buttons.
9.4.1.1. Try It Out: Creating the Task Pane in HTML
You can find all the objects created in this and the next Try It Out in the Chapter 9 folder for this book on the Wrox Web site. As mentioned, the image files will have to be created using a image editor. For the purposes of this Try It Out, three image files: Customer.png, Notes.png, and Orders.png, were created.
Open NotePad.exe.
Type in the following text:
<html>
  <head>
         <title>Custom Task Pane</title>
         <script>
                 function SwitchView(view)
                 {
                        gobjXDocument = window.external.Window.XDocument;
                        gobjXDocument.View.SwitchView(view);
                  }
         </script>
  </head>
  <body>
          <p><font color="#ffffff" size="4"><span
          style="BACKGROUND-COLOR: #000000">Custom Task Pane</span></font></p>
          <p><img border="0" src="Customer.png" width="123" height="38"
                 onclick="SwitchView('Customer Information')"></p>
          <p><img border="0" src="Notes.png" width="123" height="38"
                 onclick="SwitchView('Notes')"></p>
          <p><img border="0" src="Orders.png" width="123" height="38"
                 onclick="SwitchView('Orders')"></p>
  </body>
</html>
Save the text as index.htm in the Chapter 9 folder on the Wrox Web site.
Copy the image files into the Chapter 9 folder.
That's all there is to it. Now you are ready to specify the task pane information in InfoPath.
9.4.2. InfoPath Custom Task Pane Properties
InfoPath lets you easily specify which custom task pane files to use on the Form Options dialog box. Using the dialog you will specify the following properties:
Enable custom task pane: When checked the next custom task pane properties and options are enabled.
Task pane name: This is used to specify the name for the task pane.
Task pane location: This property points to the main task pane HTML file you have created. The file will need to added using the Resource File dialog box.
Resource Files button: This opens the Resource File dialog box, which enables developers to specify the files used for the custom task pane, including the HTML and image files.
When you specify the resource files, when you publish the file, then the files are included in the .xsn created. You can export the files from the form using the Resource Files dialog box.
9.4.2.1. Try It Out: Specify Task Pane Files in Your InfoPath Form
Using the InfoPath form you have created throughout the chapter and the HTML file and images mentioned in the last Try It Out.
Open InfoPath.
Open the form in design view.
Choose Tools
 Form Options from the menu. The Form Options dialog box will open.
Click on the Advanced tab.
Type Custom Task Pane in the Task pane name field, as shown in Figure 9-19.
Click the Resource Files... button. The Resource Files dialog box opens.
Locate and select the four files that make up the custom task pane including: index.htm, Customer.png, Notes.png, and Orders.png.
When the last file is selected, the Resource Files dialog box will look as it does in Figure 9-20.
Click OK. The dialog box closes.
Select index.htm for the Task pane location drop-down dialog box, as shown in Figure 9-21.
Figure 9.20. Figure 9-20

Figure 9.21. Figure 9-21

Click OK to accept and close the Form Options dialog box.
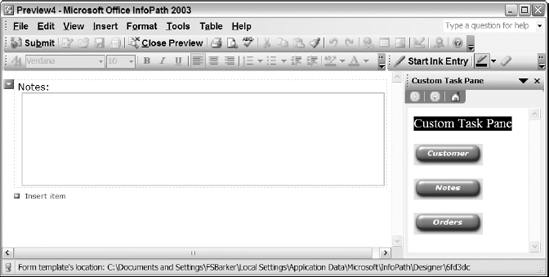
Click the Preview Form button to display the new form. The form is now displayed with the custom task pane on the right side, as shown in Figure 9-22.
Click the various choices in the task pane to test the new form.

Figure 9.22. Figure 9-22
