
6.6. Formatting Fields
InfoPath does a good job of looking at the data that you are basing your form on and supplying the control that matches that data. However, there are times when InfoPath can't know how you want the data to actually look. An example of this occurs with the OrderID and UnitPrice fields used in the form for this chapter. Also, it would be nice to display the Quantity field in red if it is a negative number. Looking at the Chapter 6 Starting.xsn form, you can see how the fields look, as displayed here in Figure 6-17.
Figure 6.17. Figure 6-17
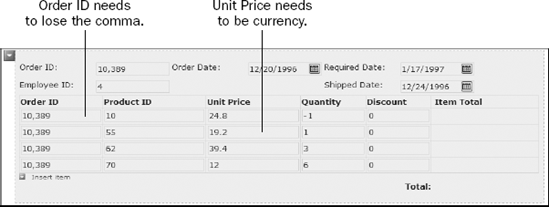
Notice that there are two locations where the OrderID field is displayed, in the order header area, and in the detail records. The OrderID field could also be removed from the detail level. Depending on how you want to format your form.
There are two methods of formatting that are used to accomplish what is needed:
Standard Formatting: Used to set the format of the field regardless of the value stored in the field.
Conditional Formatting: Format the field based on the conditions set in the conditional formatting dialog box. Conditions for formatting are the same as those used for rules.
6.6.1. Using Standard Formatting
To change the formatting of a control, you will once again open the property sheet of the control. Once the property sheet is open, you can choose Format... to open the Format dialog box. InfoPath will provide the formatting choices based on the actual data type of the bound control. For example, if you click the Formatting... button in the property sheet for the OrderID field, then the dialog box displayed is the Integer Format dialog box. The format options are:
None: This option displays the raw value provided by the XML.
Number: This option displays the designated format for the data type and number size.
Currency: This option allows you to specify which currency you want to display the number in, such as U.S. dollars.
Other options are displayed as well, depending on the type of data and size specified. You can see from Figure 6-18 that in order to correct the OrderID, None (display XML value) was selected.
Figure 6.18. Figure 6-18

Again, by selecting None (display XML value), InfoPath will simply display the value supplied in the field that the control is based on.
6.6.1.1. Try It Out: Formatting the UnitPrice for Currency
Using the form you have been working in this chapter:
Open the property sheet for the UnitPrice field.
Click on the Formatting... button. In this case, the Decimal Format dialog box opens. You will see that format is set to Number.
Click on the Currency option. The dialog box will now look like Figure 6-19.
Figure 6.19. Figure 6-19

Click OK to close the property sheet.
Click Preview Form to test the form you just modified.
Take a look at the UnitPrice field and notice the dollar signs, as shown in Figure 6-20.
Figure 6.20. Figure 6-20

Now it's time to take look at the other way of formatting fields.
6.6.2. Conditional Formatting
When you apply conditional formatting, you are basing the formatting of an object on conditions you have specified. You can apply conditional formatting to quite a few controls including buttons.
6.6.2.1. Formatting Attributes
Almost all the controls, including sections, let you use conditional formatting with them. However, not all the attributes of the conditional formatting dialog box can be used with each control. Attributes of the conditional formatting include things such as Fonts, Bolding, Italicizing, and so on. You can even hide or display a control based on the conditions created.
6.6.2.2. Display Properties of a Text Box
To apply conditional formatting, click the Display tab of the control that you are working with. It is worthwhile to discuss the Display tab, because you can accomplish so much with it. The Display tab, like other elements of the property sheet, varies with the type of control. In Figure 6-21, you can see the Display tab for the Quantity text box property sheet.
You can see from Figure 6-21 just how much you can do when setting the display properties of the control using this page of the properties sheets. You should take some time to modify some of the properties displayed in the figure and watch what happens.
Figure 6.21. Figure 6-21

6.6.2.3. Try It Out: Creating Conditional Formatting
It is time to actually create the conditional formatting, by setting up a conditional format for the Quantity field, when values less than 0 are entered. Using the form you have been using for the chapter:
Double-click the Quantity text box control to open the property sheet.
Click the button with the caption Conditional Formatting.... You will be presented with the conditions that have been specified for formatting. At this point, you can modify or delete any existing conditions, add new ones, and rearrange the conditions, much as in the Rules dialog box.
In the three drop-down lists displayed (the condition), type in Quantity, less then, and the value 1. Again, these are just like the entries in the Condition text boxes of the rules you created in the section titled "Working with Rules at the Control Level," earlier in the chapter.
Just as with the conditions for rules, you can create complex criteria using the And button.
Select Red for the font color. Now, the format is set so that when the user enters a quantity less than 0, the Quantity field turns red. You can see this condional format set up in Figure 6-22.
Figure 6.22. Figure 6-22

Test your form by previewing it, querying a record, and entering a value less than 0 for the quantity. The field should turn red.
Again, take a look at some of the other attributes you can set using the Conditional Format dialog box.