
7.3. Utilizing Drop-Down List Boxes on the Form
Drop-down list boxes are extremely useful for both controlling the data that goes into your form and adding convenience for users by supplying the necessary choices for the field currently being updated.
A few good examples of locations where drop-down list boxes can be useful can be seen right on the form you have been modifying. On the form that is being used for this chapter, Employee ID, Product ID, and Ship Via are currently using text boxes that take a number as a value. The problem with selecting a value is you can't be sure what the value represents unless you have looked at data the values are based on. For instance, instead of displaying the field Employee ID, you could display the names of the employees and have the user choose from that list. See Figure 7-9.
Figure 7.9. Figure 7-9
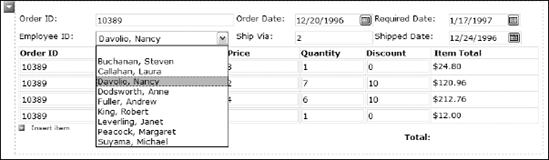
Although the Product ID field is hidden under the drop-down list box, you can see the Ship Via field displaying an integer value instead of the various shipping options such as Speedy Express and United Package.
This whole section can be applied to the list box control as well as the drop-down list box. Which you decide to use depends on one main question: How much room is there to display data? The methods for setting properties such as the data source will be the same.
7.3.1. Adding a Drop-Down List Box to a Form
There are two ways to add a drop-down list box to an InfoPath form:
Add the control from the data source as a text box, and then change it into a drop-down list box.
Add a drop-down list box control from the Controls task pane, setting the binding at that time.
7.3.1.1. Try It Out: Adding the Field from the Data Source as a Text Box, and then Changing It
Using the form that called Chapter 7 Intro.xsf:
Click the right mouse button, and highlight Change To.... You can now see the list of the types of controls you can change the control to, as shown in Figure 7-10.
Click the Drop-Down List Box. A drop-down list box is displayed in the form.
The new control is now ready to have you specify the data source for the list. You can use the steps just presented to create a drop-down list box from an existing control. However, there will also be times when you simply want to add a control to an existing form. The next Try It Out shows you how to do this.
Figure 7.10. Figure 7-10

7.3.1.2. Try It Out: Adding a Drop-Down List Box and Binding it to a Field
To add a drop-down list box control right from the Controls task pane, you must first delete the text box used for Ship Via from the form you have been using in this chapter:
Click the text box bound to the @ShipVia field, next to the label with the same text.
Press the Delete key. The text box is now gone.
Click the Controls task in the Design Tasks task pane. The controls will be listed in the Controls task pane.
Locate and highlight the ShipVia field in the tblOrders table. The dialog box then looks as it does in Figure 7-11.
Figure 7.11. Figure 7-11

Note that the data source you are setting is what the control is bound to, not what is going to be listed in the drop-down list box for the users' choices.
Click OK to close the dialog box. The drop-down list box control is added and is bound to the ShipVia field.
Delete the text for the label, which reads ShipVia, that has been added for the new control.
As with the last Try It Out, the drop-down list box control has now been added to the InfoPath form, but it still needs to have the data source and properties assigned for the data to be listed.
7.3.2. Specifying List Box Data Sources
Once you have added a drop-down list box to your InfoPath form, you need to add data source properties for the list itself using the property sheet of the control. You can see an example of this using the control bound to the EmployeeID field in the InfoPath form you have been using for this chapter. You can see the property sheet in Figure 7-12.
There are threes ways to supply the data that is displayed in a drop-down list box. They are:
Enter the list box entries manually: Here you will be specifying both the value to be stored in the field that the control is bound to and the text you want to be displayed for the individual values. This is useful if you have a static list that is fairly short.
Look up values in the form's data source: When you want to limit the data to the data source specified for the form, you can use this option, including when you want to use the control as a filter for the form.
Look up values in a data connection to a database, Web service, file, or SharePoint library or list: This option enables you to add additional data connections from the various sources. You will get the same dialog box used when specifying the form's main data connection.
Figure 7.12. Figure 7-12

Which of these options you use depends on what you need to accomplish with the list box.
7.3.2.1. Working with an Additional Data Source
In the case of the drop-down list box bound to the EmployeeID field, as shown in Figure 7-6, a new data connection is created. Using the tblEmployees table for the data connection, the EmployeeID field is used for the Value property, and an expression called EmployeeName is used for the Display name.
To look at the data connection called Employee Id and Name, choose Tools![]() Data Connections.... In the Data Connections dialog box, click Modify... with the Employee Id and Name data connection highlighted. Once you are back in the Data Connection Wizard, click Edit SQL...; you will then see the SQL statement used here:
Data Connections.... In the Data Connections dialog box, click Modify... with the Employee Id and Name data connection highlighted. Once you are back in the Data Connection Wizard, click Edit SQL...; you will then see the SQL statement used here:
select [EmployeeID],[LastName] & ', ' & [FirstName] as EmployeeName from
[tblEmployees] as [tblEmployees] order by [LastName]
You have just read about specifying another data connection for a drop-down list; now it's time to do the same task yourself by completing the next Try It Out.
7.3.2.2. Try It Out: Specifying an Additional Data Source
When modifying a data source using Tools![]() Data Connections..., you can add a new connection right in the control's property sheet. To see how to do this and specify the necessary properties, you will work with a drop-down list box bound to the ProductID field on the form you have been working with:
Data Connections..., you can add a new connection right in the control's property sheet. To see how to do this and specify the necessary properties, you will work with a drop-down list box bound to the ProductID field on the form you have been working with:
Open the property sheet for the drop-down list box bound to the ProductID.
Select the third option in the List box entries option group. A Data Connections drop-down list is displayed, as well as an Add... button.
Click the Add... button. The Data Connection Wizard opens.
Select Database for the source, and click Next>. You are taken to the main page of the Data Connection Wizard for databases.
Click on Select Database....
Locate the Chapter 7.mdb database, as shown in Figure 7-13.
Click Open. The Select Table dialog box opens.
Select tblProducts from the Select Table dialog box, and click OK. You are now taken back to the main page of the Data Connection Wizard, with all the fields displayed in tblProducts.
Deselect all the fields except ProductID and ProductName, as shown in Figure 7-14.
Click Next. The last page of the Data Connection Wizard is displayed.
Figure 7.13. Figure 7-13

Figure 7.14. Figure 7-14

The name of the new data connection, tblProducts, is entered into the Data Connection property of the drop-down list box. You're not done yet. Although you have created a new data connection and assigned it to the control as needed, there are some additional properties that need to be assigned.
7.3.2.3. List Box Data Connection Properties
There are three properties that need to be set, which were briefly mentioned earlier in the section:
Entries: The specific table or query within the data connection to be used. The text displayed will be the XML XPath from within the form.
Value: The XPath representation of the field to be stored in the bound field of the control when an item is chosen from the list.
Display name: Again, an XPath representation, but this time specifying the name of the field to be used for displaying the choices in the list.
You can get a good idea of what values to use by working with the following Try It Out.
7.3.2.4. Try It Out: Setting a List Box's Data Connection Properties
While still using the drop-down list box control bound to the ProductID field:
Click the XPath button next to the Entries properties. The dialog box that enables you to specify what field or group to use for the entry is displayed in Figure 7-15.
Figure 7.15. Figure 7-15

Click d:tblProducts table, and then click OK. The XPath for the group is populated in the Entries property.
Choose ProductID, and then click OK. You can see in Figure 7-16 that @ProductID is filled in for both the Value property and Display name.
The reason both the Value and the Display name boxes are filled in with the field specified in the Value property is that many times you can use the same field for both properties, so InfoPath is saving you some work. In this case, however, you will be also specifying a different field for the Display name.
Click the XPath button next to the Display name property. Once again the good old Select a Field or Group dialog box is displayed.
Highlight the ProductName field, as shown in Figure 7-17.
Figure 7.16. Figure 7-16

Figure 7.17. Figure 7-17

Click OK. The Display name field is now populated with the @ProductName XPath name for the desired field. You can see the property sheet one final time in Figure 7-18.
Click OK to save the properties as you have set them.
Click Preview Form.
Supply BC for query entry in the Region field, and click Run Query. You will now see the product names displayed in a drop-down list box, as shown in Figure 7-19, rather than just the product IDs.
There you have it. That is all there is to specifying a new data connection and assigning which fields to use in your list box. Practicing a few more times will have you adding list boxes all over the place in your forms.
Remember that you can modify the data connections as described in Chapter 4, "Creating an InfoPath Form from an Existing Data Source." Using the methods described in that chapter, you can specify sort orders for the lists after they have been created.
7.3.2.5. Entering the List Manually
Sometimes as you are creating your forms you will want to base a drop-down list box on a list that doesn't exist anywhere in a data source or database. This occurs frequently with small static lists. An example of this is that the Ship Via accepts values that represent three different shipping companies: 1 for Speedy Express, 2 for United Package, and 3 for Federal Shipping.
It is recommended that you store this type of information in a table so that more information, such as contact address and phone numbers, could be stored for each shipping company. For the purposes of this example, you type the figures in yourself.
Figure 7.18. Figure 7-18

Figure 7.19. Figure 7-19

Another situation in which it makes sense to type the figures in statically is if you are going to be using the InfoPath form without a database behind it, for example, if you are going to e-mail the form to other users and just have the data stay with form, instead of in an Access or SQL Server database. As far as the users are concerned, the input experience will be the same when filling out the form.
7.3.2.6. Try It Out: Creating the List Manually
Using the drop-down list box control bound to the ShipVia field in the form you have been working with in this chapter:
Open the property sheet.
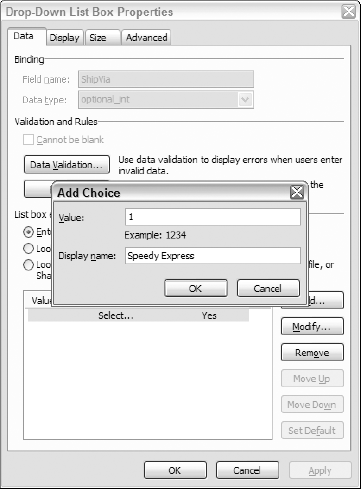
Leaving the default of Enter list box entries manually for the list box entries option and click on the Add... button, located next to the list of current entries. The Add Choice dialog box opens.
Add the first entry: 1 for Value and Speedy Express for the Display name. The dialog box then looks as it does in Figure 7-20.
Figure 7.20. Figure 7-20
Click OK to accept the choice.
Repeat Steps 3 through 4 for the other two choices (United Package and Federal Shipping) displayed in Figure 7-21.
Figure 7.21. Figure 7-21

Click OK to close the property sheet.
Click Preview Form, supply BC for the Region, and click Run Query. The form then displays a record with United Package displayed in the Ship Via field. Remember that prior to this, a 1 was displayed in the Ship Via text box control.
Click the Ship Via drop-down list box. You then see the possible list entries, as shown in Figure 7-22. Picking another item from the list stores the values specified in the Value property in the database once the Submit button is clicked.
Figure 7.22. Figure 7-22
