
17.3. Using InfoPath and SharePoint
By using InfoPath with SharePoint, you can add a great deal of versatility and functionality to your InfoPath forms. You can do a number of tasks such as:
Publish an InfoPath form onto the site for people to fill out with data stored in each table using XML, and publish some of the fields in a list.
Sort the list based on values promoted from the InfoPath form.
Add a Web part to display a graph for each of the values.
You see how to perform these tasks in the following section.
One thing to remember when using an InfoPath form with SharePoint is that if you are using a database for the data source of the InfoPath form, then the user's machine and SharePoint site have to have access to it. For this reason, it is best to use a Web service or simply store the data in XML format when using InfoPath forms with SharePoint.
17.3.1. Publishing an InfoPath Form on a SharePoint Site
You can use any InfoPath form you create on a WSS site, with the data connected, just as you would on your desktop. One of the convenient features of SharePoint is that even if you have your data in separate XML files behind your InfoPath forms, you are able to promote fields to the SharePoint site list, and both sort and query on those fields. The way to put the form up on a WSS site is to publish the form on the site, in a document library. InfoPath creates a new library if you tell it to.
To publish an InfoPath form on a SharePoint site, you need to provide the Publishing Wizard with the HTTP address of the site where you want to publish the form. The Publishing Wizard also provides a means to promote some of the fields into the list and notifies other users about the form being posted.
17.3.1.1. Try It Out: Publish a Sales Report to a SharePoint Site
To get started, you require a form that you have already created. In this case, one of the sample forms called Sales Report.
Open InfoPath, and then click Sample Forms under the Forms Categories.
Highlight the Sales Report InfoPath form. The dialog box is shown in Figure 17-9.
Click Design this Form. The InfoPath form opens in design view.
Choose File
 Publish.... The first page of the Publishing Wizard is displayed, as shown in Figure 17-10.
Click Next to move to the next page of the Publishing Wizard. This page asks where you would like to publish the form: a Shared folder, SharePoint site, or Web Server.
Select the second choice: To a SharePoint form library. The dialog box then looks as it does in Figure 17-11.
Figure 17.9. Figure 17-9

Figure 17.10. Figure 17-10

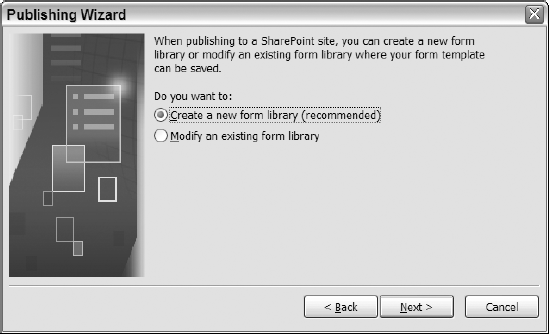
Click Next to move to the next page of the Publishing Wizard. The next page asks where on the SharePoint site you would like to publish the form: by creating a new form library or by modifying an existing library. You can see the page in Figure 17-12.
Figure 17.11. Figure 17-11

Figure 17.12. Figure 17-12
Click Next to move to the next page of the Publishing Wizard. You are then asked to supply the address of the Web site where you want to publish the form.
Type in the address of the Web site. You can see the address used by the author display in Figure 17-13.
Figure 17.13. Figure 17-13

Choose to Create a new form library, and then click Next. You are then asked to enter the name and description for the new form library.
Enter the name and description for the new library You can see an example in Figure 17-14.
Figure 17.14. Figure 17-14

Click Next. The next page lets you specify the fields you want to promote to the SharePoint site.
Choose the field you want to be displayed in the list on the site. You can select multiple fields by holding the Ctrl key and selecting the fields. You also can add additional fields from the data source of the form by clicking the Add button. The form is displayed in Figure 17-15.
Figure 17.15. Figure 17-15

Click Finish. The wizard adds the form to the list on the site. You are shown the summary page, which asks if you want to notify other users about the new form being added to the site, as shown in Figure 17-16.
Figure 17.16. Figure 17-16

Click Close.
The new document library has been created and the form uploaded up to the SharePoint site. Remember that although you upload the InfoPath form up onto the site, users will have to have a copy of Microsoft InfoPath on their local machines.
17.3.2. Filling Out InfoPath Forms on the SharePoint Site
Now that you have added the InfoPath form to the SharePoint site, it is time to see how to fill out the form, and see the results in the form library list. To accomplish this, return to the SharePoint site and look up the new document library. Once in the library you can view the form's data in list view as well as sort and filter the data.
To look at the data, however, you need to fill out some forms so that the data exists. That is the purpose of this next Try It Out.
17.3.2.1. Try It Out: Working with the Form Library
Using the Windows SharePoint Service site specified throughout this chapter:
Click the Documents link, located on the left side of the home page. You see the Sales Reports listed as a new document library, as shown in Figure 17-17.
Figure 17.17. Figure 17-17

Click the link Fill Out This Form in the Sales Report document library. InfoPath then opens on the local machine with the form opened for filling.
Fill out the form.
Choose File
 Save. The Save As dialog box opens, with the Sales Report document library displayed, as shown in Figure 17-18.
Figure 17.18. Figure 17-18

Type in a meaningful name for the file, because this will be displayed in the library. Figure 17-18 displays this dialog box with a couple of forms already filled out.
Click Save. The form is then saved on the WSS site and displayed immediately in the document library list, as shown in Figure 17-19.
The columns displayed in Figure 17-19 have been modified to fit on the screen. You can modify the fields by clicking on Modify Settings and Columns.
You can change the list order in the document library by clicking on the column headings. You can alsocan also set filters by clicking on the Filter button, displayed in the toolbar over the list.
Figure 17.19. Figure 17-19
