
1.1. What Is InfoPath, and How Can It Be Used?
InfoPath is a forms management tool that enables you to create forms and publish them in a number of different ways. InfoPath enables you to use forms that are attached to various types of existing data, and to use data that is self-contained within the form. Before going into more detail, take a look at what the problem was before InfoPath came about.
1.1.1. The Challenge of Forms Management
Over the last decade there have been a number of attempts, both inside and outside of Microsoft, to enable users to create forms quickly, yet responsibly, to work with data. You can see this with database systems such as Access, and the form tools in Word and Excel. However, these tools have either come up short in helping users control and share their data, or they are too confusing to use to create forms that can handle data made up of more single-table solutions.
To be useful for other systems, data needs to be manipulated or combined with other data. IT departments tend to cringe when a system like Microsoft Access is used to create a standalone or medium-sized solution because they have no control over the data.
The IT manager of one large corporation figured that the corporation had at least 40,000 Access databases throughout its enterprise. These are databases that are not controlled by the IT departments until the authors (developers) of these databases transfer from or leave the company. Then the IT department has to assign its own developer to learn and work with the system and control the data.
Users create their own standalone or group databases because IT departments don't have the time and manpower for smaller projects. Traditionally, trying to create an application that the department knows would work for their needs, with a large backend database, has been something of a struggle. So, the question remains: What is a solution to this set of challenges?
Various companies, such as Adobe and Oracle, have created their own form packages that attempt to resolve the issue of forms management. The problem with these packages is that they are either limited to the product they come with, such as Oracle forms, or to other proprietary data storage.
Even Microsoft has a number of possible forms packages, depending on the products you are using. In fact, some of them are pretty robust and powerful. Access has a great forms package built in that gives you the power you need when working with Access, or even SQL Server, data. Word and Excel have more limited forms packages. But again, these packages are somewhat limited in how they are bound to data of different types.
Microsoft InfoPath changes all that—not only by using the quickly becoming universal Extensible Markup Language (XML) standard for its base file structure, but also because of its expanding base of ways to connect to different types of data.
1.1.2. Microsoft's Solution: InfoPath
Microsoft's solution is InfoPath. Although there have been a number of forms packages from Microsoft in various products, InfoPath is the most intuitive, yet full featured, to date. With InfoPath, you can quickly create forms, either by using existing data or by creating the new data structure when you create the form itself. Now IT departments can create the backend database for the users and let the users create their forms based on the data. An example of an InfoPath form can be seen in Figure 1-1, where an Absence Request form has been filled out by an employee.
This form is one of the many sample forms included with InfoPath.
1.1.2.1. Try It Out: Opening the Sample Absence Request InfoPath Form
If you have already played with InfoPath forms, then you can skip this example. Otherwise this is a good way to get the feel for how users fill out an InfoPath form. After you have installed Microsoft InfoPath:
From the Windows Start menu, choose Microsoft Office
 Microsoft Office InfoPath 2003. The Fill Out This Form dialog box appears, as shown in Figure 1-2.
Figure 1.1. Figure 1-1
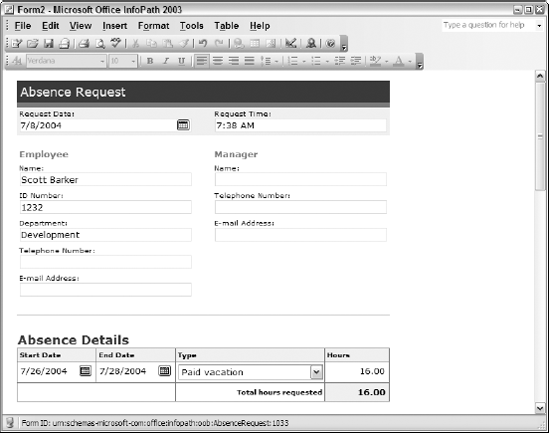
Figure 1.2. Figure 1-2

Click on the Fill Out This Form task in the Forms Tasks task pane. The Absence Request form opens, ready to be filled out.
Take time to move around the form and get used to the way to enter data. You will notice a number of very nice features in the InfoPath form. The next section discusses some of those features.
NOTE
Besides the sample forms included with InfoPath, Microsoft offers some additional forms on the Office Online Web site. To get there, click on the Forms from Office Online task, located on the Open a Form task pane on the Fill Out a Form dialog box displayed in Figure 1-2. Once on the Web site you can search for InfoPath in the search field, and all the available templates (forms) will be displayed.
1.1.2.2. Side Trip: Installing the InfoPath 2003 Service Pack 1.1
If the Fill Out a Form dialog box presented in Step 1 doesn't look the same as the one displayed in Figure 1-2, this means that you probably have not installed Office 2003 Service Pack 1, which you can download from Microsoft. To download and install the service pack, go to http://office.microsoft.com/officeupdate and download and install the service pack.
1.1.2.3. InfoPath Features
You can see just how powerful InfoPath is as you continue through the book. Here are just a few of the many things InfoPath enables you to do:
1.1.2.3.1. Create Attractive Forms Quickly
The designer provided in Microsoft InfoPath enables you to create forms that are pleasing to the eye, while being functional and very powerful, with very little extra work. Controls are provided automatically for specific tasks and types of data. For example, when you have a date type field, and place it on your form, InfoPath places an icon beside it in the shape of a small calendar. When you click the calendar icon, a small calendar appears, allowing you to pick a date to enter into the field.
Forms are laid out using a table and section format, with various types of tables available to choose from. You can create your own custom tables as well.
1.1.2.3.2. Prevent Data-Entry Errors
Through the use of field properties for the various controls, you can easily help users prevent data entry errors. Some of the ways to prevent data entry errors are by using:
Default Values: Default values ensure that fields are not unintentionally left blank.
Data Validation Conditions: Data validation conditions allow you to specify values that are okay to enter, including ranges. Based on the data, you can either have InfoPath give an error message or run code to handle issues that arise.
Rules: Rules can be applied that cause InfoPath to perform a set of actions based on the data entered.
1.1.2.3.3. Consistent and Conditional Formatting
You can apply formatting to fields and color schemes throughout a form and throughout multiple forms. This makes for a more consistent and comfortable experience when inputting data into forms.
Conditional formatting also can be specified to let users know when field values are negative (making them red) or when a field is invalid for some reason.
1.1.2.3.4. Combine Data from Multiple Forms
When you create a standalone form, you can e-mail that form and have the form e-mailed back to you. Once you have received one or more forms with the data filled in, you can merge the data with other forms that use the same form template. This is very useful, for example, if you are compiling data, such as evaluations from a presentation, and want to provide a report with all the data in one form.
1.1.2.3.5. Generate Different Views of Data
You can have multiple views with one form, switching between those views by using a task pane on the form. Task panes are a section of the form that include hyperlinks you can use to pick other tasks to perform. Besides the task pane in the InfoPath designer, Access and Excel both include task panes.
While the information displayed and edited could be different views of the same data, it makes more sense to create forms that contain different types of related data. An example of a form that includes multiple views is a form created for an auto repair shop. Here is way the views could be laid out:
Customer Information: This information would be entered once for a customer and could be pulled up into future forms that are filled out for the customer.
Mechanics Bid: Pulling forward the information from the description of issues view, hours and dollars can be assigned and the bid presented to the customer.
Final Invoice: The final invoice can be displayed here and printed for the customer.
While it is not mandatory to break your forms into separate views, it can help with organizing the data for the user.
1.1.2.4. Features Introduced in Service Pack 1.1
The service pack has enough interesting features that it is well worth mentioning. With the additions listed in the next sections, the service pack has enough new features, rather than just bug fixes, to make it a 2.0 release. The following sections outline some new features and enhancements.
1.1.2.4.1. Ink Enabled for Tablet PC
With the release of Service Pack 1.1 of InfoPath, Microsoft has made InfoPath ink-enabled for use on tablet PCs. Microsoft has added additional support for the tablet environment, including special input boxes that appear in which users can write their entries for their InfoPath forms and then convert the information into text. Additional ink controls also are included for displaying images such as pictures and enabling the user to annotate the images. All of these features are included without the need for any additional programming.
1.1.2.4.2. Additional Controls
There are a number of new types of controls that were added with the Service Pack 1.1. They fall into a number of different areas, and you will see their value as you use them throughout the rest of the book.
ActiveX Control: This enables you to utilize standard ActiveX controls that can be used in a number of different applications and languages. This control enables you to use Window's standard controls such as file open dialog boxes, TreeView controls, and more. There are literally hundreds of ActiveX controls available on the market.
Choice Group: This allows you to replace an option at the time you are filling out a form—for example, if you wanted to replace a person's cell phone with his or her office phone as the contact phone.
File Attachment Control: Enables you to attach files to a form being filled out.
Master/Detail Control: Allows you to use data from two different tables, such as a Customer table and Orders, displaying and editing the data easily without any additional programming.
Repeating Recursive Section: This can be inserted within itself, bound to nested reference fields, and repeats. This is extremely useful when you need to create hierarchical content.
Scrolling Region: This allows you to scroll through text inside fields.
Vertical Label: This specifies that text should appear at a 90-degree angle in the form.
1.1.2.4.3. Control Enhancements
There are a number of control enhancements that we take for granted in other applications that have been around for a while, such as Microsoft Access. For example, you can now highlight and edit multiple controls and modify their properties all at once.
1.1.2.4.4. Data Enhancements
The biggest improvements in the area of data enhancements is probably in the way that InfoPath handles data used as the source for forms. Besides being able to populate list boxes with choices by using secondary data sources, you can now bind controls to those secondary data sources. You can then use these controls to submit data to and query the secondary data source. In InfoPath 1.0, you could not submit data to the secondary data source. Data sources and secondary data sources are discussed in Chapter 4, "Creating an InfoPath Form from an Existing Data Source."
In addition to the data enhancement just mentioned, Windows SharePoint Services support has been greatly increased, and you can now submit forms using an e-mail program by attaching the form.
These are just a few of the enhancements with the Service Pack 1.1. You will be experiencing the features just mentioned and others as you progress through this book. For now, the next section walks you through a condensed set of steps you will take when working with InfoPath forms.
1.1.2.5. The InfoPath Form Process
When working with InfoPath you can accomplish creating and entering the data in a 2 to 4 step process in some cases. The steps are:
Design the Form, Using the InfoPath Designer: This designer is a powerful, yet simple tool that uses a table layout.
Publish the Form: If you are using the form for your own purposes, you can skip this step altogether.
Fill Out the Form with Data.
Microsoft has created InfoPath so that it both stores and manipulates data using XML, as specified by the World Wide Consortium (WC3). XML is to data what HTML (Hypertext Markup Language) is to displaying information. This opens up the structure of InfoPath forms, allowing developers to work with the data and forms, and use the data with other business systems when necessary, in a nonproprietary way.
The beauty of working with InfoPath is that you don't have to have a computer science degree in XML to create some very powerful and useful forms. In Figure 1-3, you can see a simplified overview of how InfoPath uses XML to let you enter data. InfoPath puts that that data into your database, in this case Access, where you can then generate reports.
Figure 1.3. Figure 1-3

The InfoPath forms editor does most of the work for you. This doesn't mean that you are limited to what the editor gives you for controlling your form. Like database systems, there are underlying languages that can be used to extend the power of what Microsoft gives you in InfoPath. In InfoPath, you can use script languages, such as Java or VBScript, or if you are using Visual Studio, you can even use C# .NET, Microsoft's newest language.
1.1.3. Ways to Use InfoPath
The various ways to use InfoPath forms is limited only by your imagination, as shown by the number of sample forms included in InfoPath (refer again to Figure 1-2). The following sections outline some of the major uses for InfoPath.
1.1.3.1. Single User
You can create an InfoPath form that is just used for your own use. This form will be stored on your own computer, be it a desktop, notebook, or tablet PC. You may want to use this to create an expense report for yourself and print it or export the information to Excel.
1.1.3.2. Published for Others' Use
You can create forms to share with other users. You can place the form on a server, and others can use it as a template for their own data. An example of this is a form that inspectors pull off a network and use for their reports. Using this method of development provides each report with a common look and feel, but allows them to contain autonomous data.
1.1.3.3. Collaborative Efforts
There are several ways to collaborate in InfoPath forms. The first method is to e-mail a form around the company, which still requires you to have a common share where the users of the form can find the template for the form.
Another method of collaboration is to use a SharePoint Team Service Web site to store common forms, where the user can fill out forms, leaving the filled out forms on the Web site, with lists being generated from the completed forms. There's more detail about using InfoPath forms with SharePoint in Chapter 4.
You can use InfoPath forms with various methods of data storage, depending on your needs. One of those methods is to store them locally, using XML.
1.1.4. Ways to Connect Data to InfoPath
Designing a form with InfoPath is a lot easier than with databases such as Access, because you drag and drop the fields onto the form, and InfoPath creates the underlying form definitions and defaults to whatever type of data the field is. There are three ways that you can connect data to InfoPath.
Standalone XML: This has been mentioned before; the data is stored in a separate XML file by itself. The XML file (and schema) can already exist, or be created on the fly at the time the form is being designed. Creating an XML schema is discussed in Chapter 5, "Utilizing XML and Web Service Data Sources."
Connecting to an Existing Database: This could be as complicated as SQL Server or Oracle, which are called client/server databases and are used for large-scale data storage. Or, it could be as easy as an Access database, which can even travel with the document. Connecting to an existing database is discussed in Chapter 4.
Using XML Web Services: This sounds scarier than it is. An IT department, or you, can create routines that provide access to data over the Internet. When you connect to an XML Web service, the fields will look the same as when you are connecting an existing database or XML file. Creating and connecting to XML Web Services is discussed in detail in Chapter 15, "Creating and and Working with Web Services."
1.1.5. Deployment Requirements for Designing and Filling Out InfoPath Forms
To design or deploy InfoPath forms, each user needs to have InfoPath on their computer. You can post a read-only version of a form on the Web and users can read it without owning a copy of InfoPath.
InfoPath is considered a Microsoft Office application, but it can only be purchased by itself or as part of the Office Professional Enterprise Edition 2003.
When deploying forms for common use, you need to have the templates available on a network share or on a Windows SharePoint Services Web site. Deploying InfoPath forms in the various ways other than SharePoint is discussed in Chapter 10, "Publishing Your Forms." SharePoint and deploying InfoPath forms on a SharePoint site is discussed in great detail in Chapter 17, "Working with InfoPath and SharePoint."
1.1.6. Taking a Look at a Typical InfoPath Form
There are many aspects to an InfoPath form that make it powerful, yet convenient to use. Returning to the first example, in Figure 1-4 you can see the Absence Request form, which is a typical InfoPath form, with some of the features highlighted.
Figure 1.4. Figure 1-4

In Figure 1-4 you can see a few of the common features of an InfoPath form. These include:
Common colors can be assigned at the view or control level. Note that the summary column is a different shade than the other fields.
Data is laid out using tables. Those tables can range in size from one column to as many as you want. You can also embed tables within tables using drag and drop.
Controls such as the Date picker are automatically placed on a form, based on the type of data you are using.
You can create multiple sections, and those sections can be hidden. When a section is hidden, InfoPath displays a message telling users to click a spot to redisplay the section. Groups can be repeating, based on the type of data you are using. You can see this in Figure 1-5.
Figure 1.5. Figure 1-5

Drop-down list boxes enable you to control the data that is going into a field. In Figure 1-5 you are limited to a list of types of absences.
Fields can use formulas to display the summation of data.
Sections can be redisplayed, as shown in Figure 1-6.
1.1.6.1. Try It Out: Testing the Features of the Absence Request Form
After looking over the bullet points mentioned over the last couple of pages, open the Absence Request form once again, and test the features for yourself:
From the Windows Start menu, choose Microsoft Office | Microsoft Office InfoPath 2003. The Fill Out This Form dialog box will appear.
Select the Absence Request form.
Click on the date picker control, next to the request date field.
Pick a date, and click OK.
Fill in some entries for the absence details. As you place the cursor over an entry, a gray down arrow icon appears to the left of the section. Clicking on this arrow gives you the choice of inserting items above or below the current item, or removing the item. You can also choose to cut, copy, or paste data. You can see the menu in Figure 1-7.
Figure 1.7. Figure 1-7

