
Chapter 17
Registering SIP Endpoints to the Cisco Unified Communications Manager
This chapter covers the following topics:
Manual Registration Process: This topic will explain how users and devices can be added to the Cisco Unified Communications Manager manually by an administrator.
Self-Provisioning: This topic will examine an alternative option to the manual process within the Cisco Unified Communications Manager for adding devices. This process involves setting up auto-registration prior to configuring Self-Provisioning.
Bulk Administration Tool (BAT): This topic will examine yet another option for provisioning multiple devices within the Cisco Unified Communications Manager. This method will also allow an administrator to modify existing settings on phones and within user profiles.
Provisioning can loosely be defined as mass configuration and mass deployment. The idea behind provisioning is to configure a baseline that can be pushed out to multiple devices, thus making the job of deployment much easier. One of the key functions within the Cisco Unified Communications Manager is to enable the provisioning of devices. This chapter will explain how to manually configure a single device and how to provision multiple devices using the Self-Provisioning and BAT options built into the Cisco Unified Communications Manager. Topics discussed in this chapter include the following:
Manual Registration Process
Self-Provisioning
Bulk Administration Tool (BAT)
This chapter covers the following objectives from the Cisco Collaboration Core Technologies v1.0 (CLCOR 350-801) exam:
2.4 Deploy SIP endpoints
2.4.a Manual
2.4.b Self provisioning
2.4.c Bulk Administration Tool (BAT)
“Do I Know This Already?” Quiz
The “Do I Know This Already?” quiz allows you to assess whether you should read this entire chapter thoroughly or jump to the “Exam Preparation Tasks” section. If you are in doubt about your answers to these questions or your own assessment of your knowledge of the topics, read the entire chapter. Table 17-1 lists the major headings in this chapter and their corresponding “Do I Know This Already?” quiz questions. You can find the answers in Appendix A, “Answers to the ‘Do I Know This Already?’ Quizzes.”
Table 17-1 “Do I Know This Already?” Section-to-Question Mapping
Foundation Topics Section |
Questions |
|---|---|
Manual Registration Process |
1–3 |
Self-Provisioning |
4–6 |
Bulk Administration Tool (BAT) |
7–9 |
Caution
The goal of self-assessment is to gauge your mastery of the topics in this chapter. If you do not know the answer to a question or are only partially sure of the answer, you should mark that question as wrong for purposes of the self-assessment. Giving yourself credit for an answer you correctly guess skews your self-assessment results and might provide you with a false sense of security.
1. Which of the following settings should be configured in the CUCM before an end user is created?
Phone profile
User profile
Device profile
Phone
2. Which of the following settings allows a date/time group, region, and location to be grouped together?
Common phone profile
Common device configuration
Phone button template
Device pool
3. How does the CUCM identify a phone for registration?
IP address
MAC address
Serial number
tftp.cnf file
4. Which two of the following services must be enabled to use Self-Provisioning? (Choose two.)
Cisco Unified Mobile Voice Access Service
Cisco IP Voice Media Streaming App
Cisco CTI Manager
Cisco Extended Functions
Cisco Directory Number Alias Sync
Cisco UP Manager Assistant
Cisco WebDialer Web Service
Self Provisioning IVR
5. When you are configuring Self-Provisioning in the CUCM, which of the following steps should be configured first?
Create an application user.
Create a CTI route point.
Configure a dial-in extension.
Configure auto-registration.
6. When you are creating an application user for Self-Provisioning, which of the following permission groups is required to add before Self-Provisioning can be set up?
Standard CTI Enabled
Standard CCM Admin User
Standard CTI Allow Control of All Devices
Standard CCM Super Users
7. When a bulk transaction is performed using BAT, what is the maximum number of records that can be included?
1200
12,000
120,000
There is no limit
8. Which of the following statements is true regarding CSV files for BAT administration?
Data in a CSV will overwrite conflicting data in a BAT template.
Data in a BAT template will overwrite conflicting data in a CSV template.
Data in CSV template and data in a BAT template are universally unique from one another and so will never be conflicting.
Data in a CSV template and data in a BAT template must be reconciled before it can be used, or else all attempts to use them will fail.
9. When you are creating CSV files, what behavior will result in leaving a row blank?
That field will be removed if anything is configured there.
Nothing will change in that field.
The system treats blank rows in the spreadsheet as end-of-file markers and discards subsequent records.
The BAT.xlt file encloses that field entry in double quotation marks when you export to BAT format.
Foundation Topics
Before a phone or endpoint can register to the Cisco Unified Communications Manager, an administrator must create the phone’s configuration within the Cisco Unified Communications Manager Administration settings first. The phone’s configuration contains all the TFTP configuration file information that is provisioned to the phone prior to registration. When it comes to creating a phone’s configuration in the Cisco Unified Communications Manager, there are two types of phones the administrator can create. A user phone is a device configuration that is associated with a specific end user. A Cisco Unified IP phone, a personal Telepresence endpoint, or the Jabber soft client can be used for a user phone. The second type of phone an administrator can create is a room phone. These types of phones are not associated with any particular end user, and they can be any model of Cisco Unified IP phone or Telepresence endpoint, but they cannot be the Jabber soft client.
A user phone is the most common type of phone created in the Cisco Unified Communications Manager. These phone types must be associated with an end user; therefore, it is essential that the end users are created or imported into the Cisco Unified Communications Manager before the phones are created. The preceding chapter discussed at great length the process of using LDAP synchronization and authentication to import and authenticate end users with their passwords. Therefore, the following steps outline how to manually add a new end user into the Cisco Unified Communications Manager and configure that end user with an access control group and a primary line extension.
Before beginning, you should verify that a user profile has been configured and includes a universal line template. If a new extension needs to be configured, the Cisco Unified Communications Manager uses settings from the universal line template to configure the primary extension.
Step 1. In the Cisco Unified Communications Manager Administration, navigate to User Management > User/Phone Add > Quick User/Phone Add.
Step 2. Click Add New, and then enter the User ID and Last Name.
Step 3. From the Feature Group Template drop-down list, select a feature group template.
Step 4. Click Save.
Step 5. From the User Profile drop-down list, verify that the selected user profile includes a universal line template.
Step 6. From the Access Control Group Membership section, click the + icon.
Step 7. From the User Is a Member Of drop-down list, select an access control group. Most end users will be part of the Standard CCM End Users group.
Step 8. Under Primary Extension, click the + icon.
Step 9. From the Extension drop-down list, select a directory number (DN) that displays as (available).
Step 10. If all line extensions display as (used), perform the following steps:
Click the New button. The Add New Extension popup displays.
In the Directory Number field, enter a new line extension.
From the Line Template drop-down list box, select a universal line template.
Click Add.
The Cisco Unified Communications Manager configures the directory number with the settings from the universal line template.
Step 11. (Optional) Complete any additional fields in the Quick User/Phone Add configuration window.
Step 12. Click Save.
There are other ways to add end users to the Cisco Unified Communications Manager, but this method will create the end user and associate the DN to this user prior to creating the phone in the Cisco Unified Communications Manager. Figure 17-1 illustrates the different fields from the Quick User/Phone Add dialog.

Figure 17-1 Quick User/Phone Add Fields
After an end user is created in the Cisco Unified Communications Manager, a phone can be created as well. Phones and end users can be provisioned separately, independent of each other, or collectively together. Chapter 15, “Cisco Unified Communications Manager Setup,” delved into a lot of different settings that are required not only for basic Cisco Unified Communications Manager operations but also for endpoint registration. Because so many different settings need to be configured on Cisco Unified Communications Manager registered phones and endpoints, many tools within the Cisco Unified Communications Manager Administration menus allow administrations to group common settings together. The device pool is a perfect example, where the Cisco Unified Communications Manager Group, Date/Time Group, Regions, Location, and many other settings can all be grouped together for phones and endpoints that share a common geographical region. Other grouped settings include the phone button template, common phone profile, and common device configuration. Review Chapter 15 for more detailed information on most of these settings.
When it comes to adding phones to the Cisco Unified Communications Manager, several options are available to the administrator. Phones can be added manually, one at a time. This is a great option if a room phone is being added, or a single or few new employees need a phone set up for use. There is even a Copy option when adding a new phone, if the new phone being added will share settings with another phone of the same model. However, when an administrator needs to add a lot of phones, such as a hundred or a thousand or even ten thousand phones, the manual approach is not the way to add these phones, even with the Copy button. Several other methods are available to add a mass number of phones to the Cisco Unified Communications Manager. Auto-registration is the foundation for the other methods that will be discussed in this chapter, and this approach can be used independent of any other method if all phones within the enterprise are being configured the exact same way. However, since that is not usually the case, the administrator also can use the Self-Provisioning method and the Bulk Administration Tool (BAT) method. These two mass provisioning methods will be examined later in this chapter. First, it is important to understand the manual method of adding phones to the Cisco Unified Communications Manager.
You can perform the following procedure to manually add a new phone for a new or existing end user. First, make sure that the user profile for the end user includes a universal device template. Cisco Unified Communications Manager uses the universal device template settings to configure the phone. Before you begin, make sure an end user has already been created, as outlined earlier in this chapter. Also, the Cisco Unified Communications Manager identifies phones trying to register through the MAC address, so be sure to identify the MAC address of the phone prior to setting up registration.
Step 1. In the Cisco Unified Communications Manager Administration, navigate to User Management > User/Phone Add > Quick/User Phone Add.
Step 2. Click Find and select the end user for whom you want to add a new phone.
Step 3. Click the Manage Devices button. The Manage Devices window appears.
Step 4. Click Add New Phone. The Add Phone to User popup displays.
Step 5. From the Product Type drop-down list, select the phone model.
Step 6. From the Device Protocol drop-down, select SIP or SCCP as the protocol. Note that some Cisco phones and endpoints support only SIP, so SCCP will not be an option.
Step 7. In the Device Name text box, enter the device MAC address.
Step 8. From the Universal Device Template drop-down list, select a universal device template.
Step 9. (Optional) If the phone supports expansion modules, enter the number of expansion modules that you want to deploy.
Step 10. If you want to use Extension Mobility to access the phone, check the Is Extension Mobility Template check box.
Step 11. Click Add Phone. The Add New Phone popup closes. The Cisco Unified Communications Manager adds the phone to the user and uses the universal device template to configure the phone.
Step 12. If you want to make additional edits to the phone configuration, click the corresponding Pencil icon to open the phone in the Phone Configuration window.
An alternative way to add a phone manually to the Cisco Unified Communications Manager is to navigate to Device > Phone, click Add New, and enter all the appropriate phone settings. This method is used more often for phones and endpoints in rooms rather than for end users. Figure 17-2 illustrates the dialogs covered in the preceding steps for adding a phone to an existing end user.

Figure 17-2 Adding a Phone to an End User Through the Quick User/Phone Add Dialogs
The Self-Provisioning feature allows phones to be provisioned across the network by enabling end users to provision their own phones without contacting an administrator. If the system is configured for Self-Provisioning, and an individual end user is enabled for Self-Provisioning, then the end user can provision a new phone by plugging the phone into the network and following a few specified prompts. The Cisco Unified Communications Manager configures the phone and the phone line by applying preconfigured templates.
Self-Provisioning is supported whether the cluster security setting is in nonsecure or mixed mode. In secure mode, users or administrators must be authenticated in order to access Self-Provisioning. End users can be authenticated against their password or PIN. Administrators can enter a preconfigured authentication code. In nonsecure mode, users or administrators can enter their user ID, or a Self-Provisioning ID, to associate the phone to a user account. Nonsecure mode is not recommended for day-to-day use.
Self-Provisioning uses the universal line template and universal device template configurations to configure provisioned phones and phone lines for an end user. When a user provisions his or her own phone, the system references the user profile for that user and applies the associated universal line template to the provisioned phone line and the universal device template to the provisioned phone. Once the Self-Provisioning feature is configured, you can provision a phone by doing the following:
Step 1. Plug the phone into the network and allow the phone to register to the Cisco Unified Communications Manager using auto-registration.
Step 2. Once the phone is registered, dial the Self Provisioning IVR extension.
Step 3. Follow the prompts to configure the phone and associate the phone with an end user. Depending on how Self-Provisioning has been configured, the end user may need to enter the user password, PIN, or an administrative authentication code.
Before end users can use Self-Provisioning, they must be configured with a primary extension. They must also be associated with a user profile or feature group template that includes a universal line template and a universal device template, and the user profile must be enabled for Self-Provisioning. If an administrator is provisioning a large number of phones on behalf of the end users, Cisco suggests also configuring a speed dial on the universal device template that will forward a call to the Self Provisioning IVR extension.
The task of setting up Self-Provisioning is not easy for the administrator. Several settings under many different menus must be configured before Self-Provisioning can be used. However, all of the required settings need to be configured only once, and after Self-Provisioning is set up, the process of provisioning phones through this service is quite simple. Use the following steps to configure the various aspects of Self-Provisioning. Figures 17-3 through 17-8 follow each of the steps in order to provide a visual example of the settings the steps describe.
Step 1. Before Self-Provisioning can be configured, you must activate some services first. Use the following steps to activate the services that support the Self-Provisioning feature, as shown in Figure 17-3. Both the Self Provisioning IVR and Cisco CTI Manager services must be running.
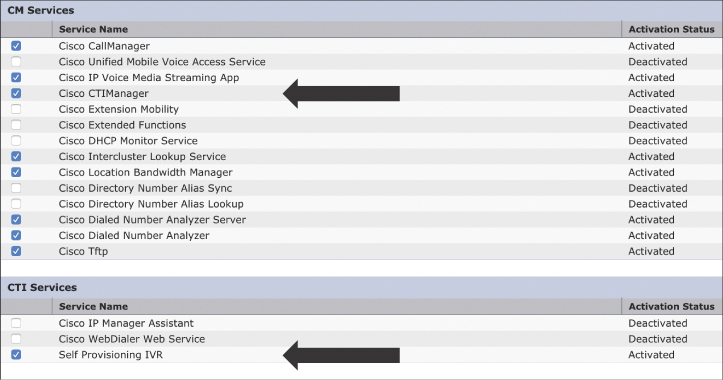
Figure 17-3 Self Provisioning IVR and Cisco CTI Manager Services
From Cisco Unified Serviceability, navigate to Tools > Service Activation.
From the Server drop-down list, select the publisher node and click Go.
Under CM Services, check Cisco CTI Manager.
Under CTI Services, check Self Provisioning IVR.
Click Save and then ensure the services are activated and running.
Step 2. After services have been activated, the next step is to configure the auto-registration parameters on the publisher, as shown in Figure 17-4.
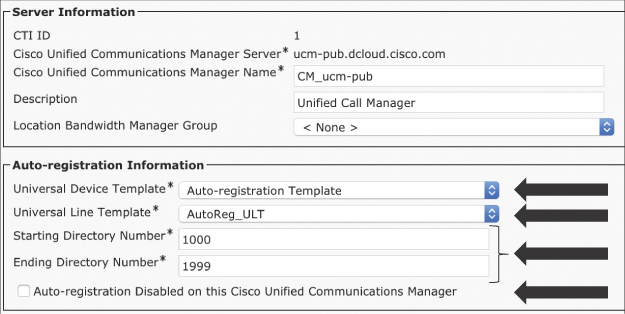
Figure 17-4 Auto-registration Settings on the Cisco Unified Communications Manager
From Cisco Unified Communications Manager Administration, navigate to System > Cisco Unified CM. Click Find, and then click on the publisher node.
Select the Universal Device Template that you want to be applied to provisioned phones.
Select the Universal Line Template that you want to be applied to the phone lines for provisioned phones.
Use the Starting Directory Number and Ending Directory Number fields to enter a range of directory numbers to apply to provisioned phones. Make sure the range is broad enough to encompass all the phones within the enterprise network. If this pool runs out of DNs, then phones trying to auto-register will fail.
Uncheck the Auto-registration Disabled check box on the Cisco Unified Communications Manager.
Click Save.
Step 3. Now that auto-registration is set up, the next step is to configure a CTI route point for the Self Provisioning IVR (see Figure 17-5).
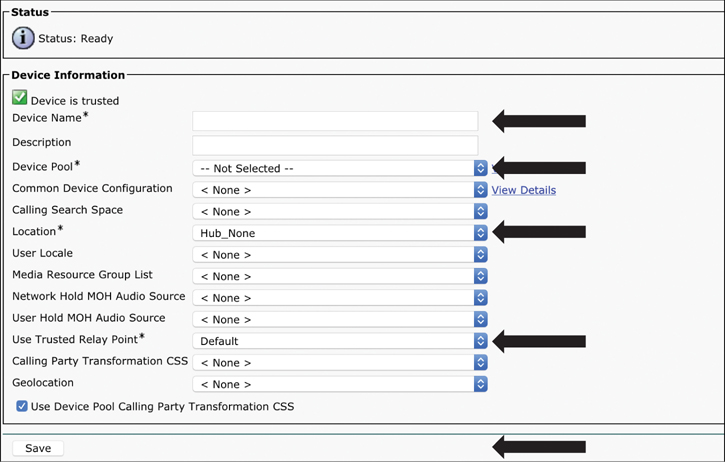
Figure 17-5 Create CTI Route Point for Self Provisioning IVR
From Cisco Unified Communications Manager Administration, navigate to Device > CTI Route Points.
Complete either of the following steps: Click Find and select an existing CTI route point, or click Add New to create a new CTI route point.
In the Device Name field, enter a unique name to identify the route point.
From the Device Pool drop-down list box, select the device pool that specifies the properties for this device.
From the Location drop-down list box, select the appropriate location for this CTI route point.
From the Use Trusted Relay Point drop-down list box, enable or disable whether Cisco Unified Communications Manager inserts a trusted relay point (TRP) device with this media endpoint. The Default setting is to use the Common Device Configuration setting that is associated with this device.
Complete the remaining fields in the CTI Route Point Configuration window. For help with the fields and their settings, refer to the online help.
Click Save.
Step 4. The administrator needs to set up the extension that users will dial to access the Self Provisioning IVR. You must associate this extension to the CTI route point that you want to use for Self-Provisioning, which is why the CTI route point needs to be configured first (see Figure 17-6).
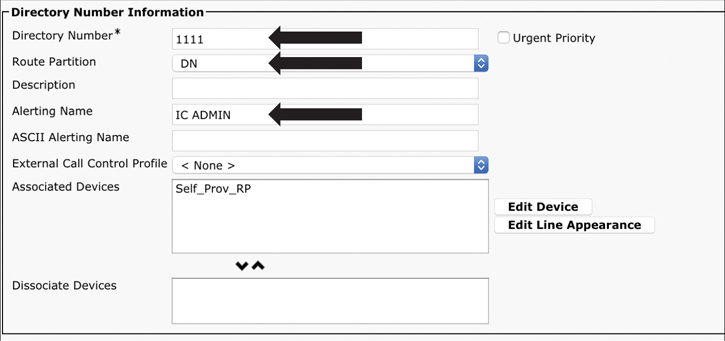
Figure 17-6 Dial-In Extensions for Self Provisioning IVR
From the same CTI route point that was created in the previous step, scroll to the bottom of the page under the Association section. Click Line [1] - Add a new DN. The Directory Number Information window displays.
In the Directory Number field, enter the extension that you want users to dial to access the Self Provisioning IVR service.
Click outside the box or press the Tab key.
Once the page refreshes, complete the remaining fields in the Directory Number Configuration window. For help with the fields and their settings, refer to the online help.
Click Save when finished.
Step 5. Next, the administrator needs to set up an application user for the Self Provisioning IVR and associate the CTI route point that was created with the application user (see Figure 17-7).
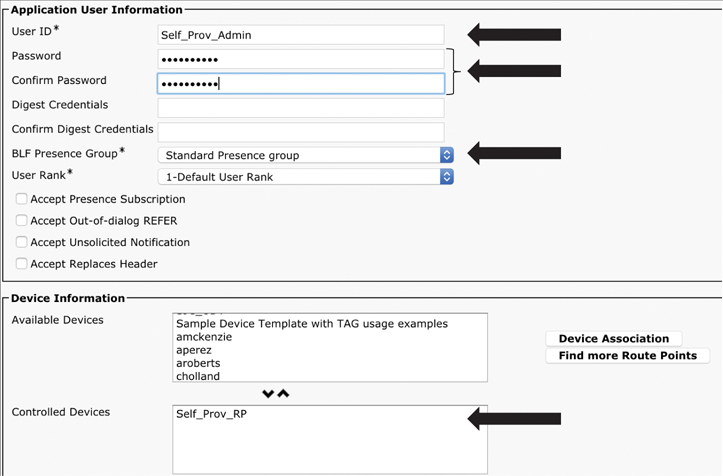
Figure 17-7 Application User Settings for Self Provisioning IVR
From Cisco Unified Communications Manager Administration, navigate to User Management > Application User.
Perform either of the following steps: To select an existing application user, click Find and select the application user, or to create a new application user, click Add New.
In the User ID text box, enter a unique ID for the application user.
Select a BLF Presence Group for the application user.
Associate the CTI route point that you created to the application user by performing the following steps:
If the CTI route point that you created does not appear in the Available Devices list box, then click Find More Route Points.
If the CTI route point that you created does display as an available device, then in the Available Devices list box, select the CTI route point that you created for Self-Provisioning and click the down arrow.
The CTI route point displays in the Controlled Devices list box.
Under the Permissions Information section, click the Add to Access Control Group button.
Check the box beside Standard CTI Enabled and then click the Add Selected button at the top of the page.
Complete the remaining fields in the Application User Configuration window. For help with the fields and their settings, refer to the online help.
Click Save.
Step 6. Self-provisioning enables users in your network to add their own desk phone or soft client through an IVR system, without contacting an administrator. Use this procedure to configure your system for Self-Provisioning, but remember that in order to use the Self-Provisioning feature, end users must also have the feature enabled in their user profiles (see Figure 17-8).

Figure 17-8 Configure the System for Self-Provisioning
From Cisco Unified Communications Manager Administration, navigate to User Management > Self-Provisioning.
Configure whether you want the Self Provisioning IVR to authenticate end users by clicking one of the following radio buttons:
Require Authentication: To use the Self Provisioning IVR, end users must enter their password, PIN, or a system authentication code.
No Authentication Required: End users can access the Self Provisioning IVR without authenticating.
If the Self Provisioning IVR is configured to require authentication, then click one of the following radio buttons to configure the method whereby the IVR authenticates end users:
Allow Authentication for Users Only: End users must enter their password or PIN.
Allow Authentication for Users (via Password/PIN) and Administrators (via Authentication Code): End users must enter an authentication code. If you choose this option, configure the authentication code by entering an integer between 0 and 20 digits in the Authentication Code text box.
In the IVR Settings list boxes, use the arrows to select the language that you prefer to use for IVR prompts. The list of available languages depends on the language packs that you have installed on your system. Refer to the Downloads section of https://cisco.com if you want to download additional language packs.
From the CTI Route Point drop-down list, choose the CTI route point that you have configured for your Self Provisioning IVR.
From the Application User drop-down list box, choose the application user that you have configured for Self-Provisioning.
Click Save.
Bulk Administration Tool (BAT)
The Cisco Unified Communications Manager Bulk Administration Tool (BAT) is a web-based application that can be used to perform bulk transactions to the Cisco Unified Communications Manager database. BAT is installed as part of the Cisco Unified Communications Manager Administration and can be used to automate the manual process of creating phones and users to more quickly add, update, or delete a larger number of similar phones, users, or ports at the same time.
The Bulk Administration menu is visible only on the first node of a Cisco Unified Communications Manager cluster. Bulk Provision Service (BPS) administers and maintains all jobs that are submitted through the Bulk Administration menu of the Cisco Unified Communications Manager Administration. You can start this service from Cisco Unified Serviceability. The BPS Server service parameter determines whether the service is activated on a particular server. You need to activate BPS only on the first node of a Cisco Unified Communications Manager cluster. BAT can be used to work with the following types of devices and records:
Add, update, and delete Cisco Unified IP phones including voice gateway (VG) phones, computer telephony interface (CTI) ports, and H.323 clients, and migrate phones from Skinny Client Control Protocol (SCCP) to Session Initiation Protocol (SIP)
Add, update, and delete users
Add, update, and delete user device profiles
Add, update, and delete Cisco Unified Communications Manager Assistant and Manager associations
Add, update, and delete ports on a Cisco Catalyst 6000 FXS Analog Interface Module
Add or delete Cisco VG200 and Cisco VG224 analog gateways and ports
Add or delete forced authorization codes
Add or delete client matter codes
Add or delete call pickup groups
Update or export CUP/CUPC users
Populate or depopulate the region matrix
Insert, delete, or export the access list
Export or import configuration
Insert, delete, or export remote destination and remote destination profiles
Add infrastructure devices
As you can see from this list, BAT works not only with physical devices but also in combination with the user information. For example, when an administrator adds CTI ports and users, he or she can use BAT to choose the Enable CTI Application Use option. This setting saves time when users are added who have applications that require a CTI port, such as a Cisco IP soft phone. When a bulk transaction is performed, the number should be limited to a maximum of 12,000 records. This number applies whether BAT is used to insert, update, delete, or query any records. BAT can also be used to modify batch changes for users, phones, and device profiles.
The Auto-Registration Phone Tool and Self-Provisioning are optional components of BAT that can further reduce the time and effort involved in administering a large system. To add a large block of new phones, an administrator can use BAT to add the devices with dummy MAC addresses instead of entering each MAC address in the data input file. After the phones are registered using the Auto-Registration Phone Tool, the phone users or the administrator can call the Self Provisioning IVR extension, follow the voice prompts, and download the correct user device profiles for their phones.
Every device includes a multitude of individual attributes, settings, and information fields that enable the device to function in the network and provide its telephony features. Many devices have the same attributes and settings in common, while other values, such as the directory number, are unique to a user or to a device. To condense the BAT data input file contents, BAT uses templates for settings that devices usually have in common.
For bulk configuration transactions on the Cisco Unified Communications Manager database, the BAT process uses two components: a template for the device type and a data file in comma-separated value (CSV) format that contains the unique values for configuring a new device or updating an existing record in the database. The CSV data file works in conjunction with the device template. For instance, when you create a bulk transaction for a group of Cisco IP phones, you set up the CSV data file that contains the unique information for each phone, such as the directory number and MAC address. In addition, you set up or choose the BAT template that contains the common settings for all phones in the transaction, such as a Cisco IP Phone 7841 template. Along these same lines, if BAT is being used to omit data from a field, you can type NULL into the field, but do not leave the field blank. BAT uses a multistep process to prepare the bulk configuration transaction, and it uses the Bulk Administration menu options to guide you through the configuration tasks. The BAT process includes these tasks:
Set up the template for data input.
Define a format for the CSV data file.
Collect the data for each device in the bulk transaction.
Upload the data files choosing the relevant target and function for the transaction.
Validate the data input files with the Cisco Unified Communications Manager database.
Submit jobs for execution.
Schedule jobs.
Execute jobs to insert the devices into the Cisco Unified Communications Manager database.
BAT Configuration Templates
For the first task in the BAT configuration process, an administrator needs to set up a template for the devices that are being configured. The administrator should specify the type of phone or device to add or modify, and then create a BAT template that has features that are common to all the phones or devices in that bulk transaction. BAT templates can be created for the following types of device options:
Phones: All Cisco Unified IP phones and Cisco ATA 186, Cisco VGC phones, CTI ports, and H.323 clients
Gateways: Cisco VG200 and Cisco Catalyst 6000 FXS Analog Interface Module
User Device Profiles: Cisco Unified IP Phone 7900 series and Cisco Softphone
Prior to creating the BAT template, you should make sure settings such as device pools, locations, calling search spaces, phone button templates, and softkey templates have already been configured in the Cisco Unified Communications Manager Administration. Define a BAT template by specifying values in the template fields that will be common to all the devices in the bulk transaction. The BAT template fields require similar values to those that are entered when adding a device manually in the Cisco Unified Communications Manager Administration. After a BAT template has been created, save it with a name. Later in the configuration process, the template name will be associated with the CSV data file. The system stores the templates, so they are reusable for future bulk transactions. If an administrator configured a Cisco IP Phone 8841 template with a specific button template and calling search space for a small deployment, when that administrator needs to add a large number of phones later with the same basic configuration components, he or she can reuse the existing BAT template.
When adding a group of phones that have multiple lines, you can create a master phone template that provides multiple lines and the most common values for a specific phone model. The master template can then be used to add phones that have differing number of lines, but you should not exceed the number of lines in the master phone template. The Cisco Unified IP Phone 8841 is a good example. Even though the phone looks as though it can support eight lines, it can support only four. Therefore, the creation of a master phone template for a Cisco Unified IP Phone 8841 requires only four possible lines. If phones that had between one and four lines were added to the Cisco Unified Communications Manager, then this master template could accommodate them all.
CSV Data File Formats
The CSV data file contains the unique settings and information for each individual device, such as its directory number, MAC address, and description. Make sure that all phones and devices in a CSV data file are the same phone or device model and match the BAT template. The CSV data file can contain duplicates of some values from the BAT template, but values in the CSV data file will override any values that were set in the BAT template. You can use the override feature for special configuration cases. For example, if an administrator wants most of the phones in the bulk transaction to be redirected to a voice-messaging system, the Call Forward Busy for Both Internal and External (CFB) and Call Forward No Answer for Both Internal and External (CFNA) fields can be set to the voice-messaging number in the BAT phone template. However, if a few phones in the bulk transaction need to be redirected to, say, an office administrator or lobby ambassador instead of to a voice-messaging system, then that person’s directory number could be set in the CFB and CFNA fields in the CSV data file. All of the phones will use the CFB and CFNA values from the BAT phone template, except for those specific phones where the directory number of the office administrator or lobby ambassador was specified in the CSV data file.
The CSV data file for phones can also contain multiple directory numbers. Keep in mind, however, that the number of directory numbers that are entered in the CSV data file must not exceed the number of lines that are configured in the BAT phone template; otherwise, an error will result.
When you are adding new devices to the system, you can use the Microsoft Excel spreadsheet that was designed to use with BAT. The BAT spreadsheet assists you with the following features:
Data file templates with macros for the different devices
Customized file format definition
Support for multiple phone lines
Record error checking
File conversion to CSV format
When you are creating new records, use the BAT spreadsheet, which is named BAT.xlt, because the data gets validated automatically when you export to the CSV format. BAT.xlt validates data only for valid characters, data types, and field length for particular fields. For experienced BAT users who are comfortable working in a CSV-formatted file, you can use a text editor to create a CSV data file by following the sample text file that is provided on the device insert task window. To modify or update existing phones and devices, you need to locate the records for these devices. BAT provides two methods for locating phones, gateways, and device profiles. You can search by using a customized query or by using a custom file. You can also extract a group of phone records from the Cisco Unified Communications Manager database for inclusion in a CSV data file by using the export utility.
Customized Query Searches: BAT provides a window for defining your query criteria. You can choose the specific device model or choose criteria from a list of device details and a list of line details. To locate all devices of a specific device model, you choose the model but add no other criteria for the search. You get the records for all the Cisco Unified IP phones that are configured in the database.
Custom File Searches: When no common attribute for a query exists, BAT provides the custom file option. A custom file includes device names or directory numbers. You can build a custom text file by putting each record on a separate line. The search gives you all the records that match the criteria.
Export Phone Records to CSV Data File: When you need to move a group of phones, you can use the export utility. You use the export utility to extract existing records from the Cisco Unified Communications Manager database to move them into a CSV data file. When you move phones, use the Export Phones with the All Phone Details option. This option generates an export file that contains records with all the information, including the device attributes, line attributes, and services, that is associated with that phone. You can also export phone records with specific details when phones have similar line configurations and you want to use a template. CSV data files comprise a string of device attributes and information in a comma-separated value (CSV) format. To insert data records into the Cisco Unified Communications Manager database, ensure that each data file is in the CSV format.
The first row of every CSV data file shows the file format by displaying the name of each field that the CSV file includes. The file format information makes it easier to locate the entry for a specific field in the CSV data file. Example 17-1 demonstrates sample output of an exported CSV file. In the CSV file, USER ID represents the fourth field in the header, and the fourth field in the CSV file for the phone shows Johns.
Example 17-1 Sample Output of a CSV Export
MAC ADDRESS,DESCRIPTION,LOCATION,USER ID,DIRECTORY NUMBER 1,DISPLAY 1,LINE TEXT
LABEL 1,FORWARD BUSY EXTERNAL 1,FORWARD NO ANSWER EXTERNAL 1,FORWARD NO COVERAGE
EXTERNAL 1,FORWARD BUSY INTERNAL 1,FORWARD NO ANSWER INTERNAL 1,FORWARD NO COVERAGE
INTERNAL 1,CALL PICKUP GROUP 1,SPEED DIAL NUMBER 1,SPEED DIAL LABEL 1, 1231123245AB,
SEP1231123245AB,Dallas,Johns,9728437154,9728437154,Mike,9728437172,9728437196, 9728
437127,9728437154,9728437178,9728437189,9728437121/TollByPass,1230000000,Helpdesk,
9728437127,9728437154,9728437178,9728437189,Marketing,1230000000,Helpdesk
Now, the file format for the CSV data file can be customized by using the Create Phone File Format Configuration window. You can add attributes to your file format that are also in the BAT template. This allows you to override the template entry with a specific attribute for a device. For instance, you can choose the route partition attribute for your file format and enter different partitions for each phone in the CSV data file. From this window, you can choose specific attributes from the Device and Line fields. The MAC Address and Description device attributes always remain in each file format. The File Format Configuration dialog makes it easy to choose the device attribute in the Device Field box and click an arrow to move the attribute into the Selected Device Field box. You can select multiple attributes at the same time by holding down the Ctrl key. Rearrange the order of the device attribute fields and line attribute fields in the file format by using the up and down arrows. Select an attribute and then click the up arrow to move the item closer to the first record, or click the down arrow to move the item further away from the first record. However, line attributes cannot be moved before device attributes, nor can the order of speed dials be changed.
When a text editor is being used to create a CSV data file, create a customized file format and then enter values in the same order as specified by that file format. Before the text-based CSV data file that uses the customized file format is inserted, the file format name must be associated with the CSV data file. Only one file format can be associated with a single CSV data file. Use the following steps to perform this task:
Step 1. In the Add File Format window, choose the name of the CSV data file <CSVfilename>.txt from the File Name drop-down list.
Step 2. Choose a file format from the File Format Name drop-down list. The data in the CSV data file must match the custom file format that is chosen.
BAT Spreadsheet Data Collection for CSV Data File Creation
The BAT spreadsheet simplifies the creation of CSV data files. You can add multiple devices and view the records for each device in a spreadsheet format. The BAT spreadsheet allows you to customize the file format within the spreadsheet and provides validation and error checking automatically to help reduce configuration errors. The BAT spreadsheet also includes tabs along the bottom of the spreadsheet for access to the required data input fields for the various devices and user combinations in BAT. BAT.xlt validates data only for valid characters, data types, and field length for particular fields.
When the Cisco Unified Communications Manager is installed, the Microsoft Excel file for the BAT spreadsheet gets placed on the first node database server. That file must be downloaded from the first node database server to the administrator’s computer where Microsoft Excel is installed. To use the BAT.xlt spreadsheet to create a CSV data file, locate and double-click the BAT.xlt file. You must choose Enable Macros when you open the BAT spreadsheet. If the Enable Macros option is not displayed while you are opening the spreadsheet, macro security on the Excel program may be set too high. Ensure that macro security is medium or low for the macros to run. To set the macro security to medium, do the following:
Step 1. Navigate to Tools > Macro > Security from the Excel menu.
Step 2. Set the security level to medium.
Step 3. Close the Excel program and open it again. This action should give you the Enable Macros option when you open the spreadsheet the next time.
When the spreadsheet opens, it will display a set of columns with attribute headings that specify the BAT field names, whether the field is required or optional, and the maximum number of characters that are allowed in the field. Tabs for every device are displayed along the bottom of the spreadsheet. Click the tab for the type of device to work with, and the columns will adjust to display all relevant fields for the chosen device. For example, to add phones and users all at once, click the tab marked Phones-Users.
Next, define the file format for the CSV data file by clicking the Create File Format button. Use the Field Selection dialog to choose items and their order in your CSV data file. Click Create and the columns in the spreadsheet will adjust to the new file format. In the first row, enter data for a device in all mandatory fields and any relevant optional fields. Enter data in a new row for each device. The system treats blank rows in the spreadsheet as end-of-file markers and discards subsequent records. If you enter a comma in one of the fields, BAT.xlt encloses that field entry in double quotation marks when you export to BAT format.
After all device records are completed, you export the BAT spreadsheet data to the CSV file format that BAT must use to perform the bulk transaction with the Cisco Unified Communications Manager first node database. The system saves the CSV-formatted file as a text file to a folder chosen by the administrator. The filename format should appear as <tabname><timestamp>.txt, where <tabname> represents the type of device input file that was created, such as phones or user device profiles, and <timestamp> represents the precise date and time that the file was created. Next, upload the converted CSV data file back to the Cisco Unified Communications Manager database server by choosing Bulk Administration > Upload/Download Files in Cisco Unified Communications Manager Administration.
Validate the Data Input Files
The system runs a validation routine to check for errors in the CSV data file and the BAT template against the first node database. These checks include the following items:
Fields, such as Description, Display Text, and Speed-Dial Label that do not have a dependency on a database table, use valid characters.
The BAT Validate Transaction validates only data type, length, and relational dependency. Consider the following example:
MAC ADDRESS,DESCRIPTION,PARTITION
AABBCC112233,Lab Phone,Dallas
If the Partition does not exist, Validate displays an error saying “Dallas is not an existing PARTITION.”
The number of lines that are configured on a device matches the device template (only for specific details).
Validation does not check for the existence of a user or for mandatory or optional fields that are BAT defined, such as the dummy MAC address. The following steps define how to run validation on the Cisco Unified Communications Manager.
Step 1. Select the Validate File option and choose the file name of the CSV data input file, the BAT template for the device, and the model, if applicable. The CSV data file should contain all details.
Step 2. Select the validation method.
Choose Specific Details for validating records that follow the Default or Custom file format.
Choose All Details for validating records from a file that was generated from the export utility using the All Details option.
Step 3. Click Submit when ready to validate the file.
After the transaction is complete, click the Log File Name link in the Job Configuration window to see a log file that displays the devices that could not be validated successfully and the error code.
Insert BAT Data Input File Records into Database
When the data input file has passed validation, you are ready to use the Insert window to add the device records into the Cisco Unified Communications Manager first node database. The CSV data input file must be valid. If any line information for a phone record fails, BAT does not insert that phone record. Use the following steps to insert BAT data input file records into the Cisco Unified Communications Manager database.
Step 1. In the Insert window, choose the name of the CSV data input file, the BAT template for the device, and the model, if applicable. The CSV data file should contain all details and be valid.
Step 2. Select the insert method.
Choose Specific Details to insert records that use a customized file format.
Choose All Details to insert records from a file that was generated from the export utility using the All Details option.
Step 3. Enter Job Information details and click Submit. This creates a job that can be accessed using the Job Scheduler option in the Bulk Administration menu.
Step 4. Use the Job Configuration window to view the status and to schedule and activate the job.
If any line information for a phone record fails, BAT does not insert that phone record. After the transaction is complete, click the Log File Name link in the Job Cseonfiguration window to see a log file that displays the number of records that were added and the number of records that failed, including an error code.
Exam Preparation Tasks
As mentioned in the section “How to Use This Book” in the Introduction, you have a couple of choices for exam preparation: the exercises here, Chapter 32, “Final Preparation,” and the exam simulation questions in the Pearson Test Prep Software Online.
Review All Key Topics
Review the most important topics in this chapter, noted with the Key Topics icon in the outer margin of the page. Table 17-2 lists a reference of these key topics and the page numbers on which each is found.
Table 17-2 Key Topics for Chapter 17
Key Topic Element |
Description |
Page Number |
|---|---|---|
Paragraph |
Two Types of Phones in the CUCM |
393 |
Steps |
Manually Creating Users Within CUCM |
393 |
Steps |
Manually Add Phone to End-User Account in CUCM |
395 |
Steps |
Self-Provisioning Basic Steps |
397 |
Steps |
Enable Services for Self Provisioning |
397 |
Steps |
Auto-registration Settings on CUCM |
397 |
Steps |
CTI Route Point for Self Provisioning IVR |
399 |
Steps |
Dial-in Extension for Self Provisioning IVR |
399 |
Steps |
Application User for Self Provisioning IVR |
400 |
Steps |
Configure System for Self-Provisioning |
401 |
List |
Devices and Records Used with BAT |
403 |
Paragraph |
Two Components Used by BAT |
404 |
List |
Tasks to Set Up the BAT Process |
404 |
List |
BAT Spreadsheet Feature Assistance |
406 |
Steps |
Changing Macro Security Levels in Excel |
408 |
List |
Validation Routine Checklist for BAT CSV Files |
408 |
Steps |
Insert BAT Data into Database |
409 |
Define Key Terms
Define the following key terms from this chapter and check your answers in the glossary:
Q&A
The answers to these questions appear in Appendix A. For more practice with exam format questions, use the Pearson Test Prep Software Online.