
Chapter 26
Users and Cisco Jabber Soft Clients
This chapter covers the following topics:
Registration Options for Jabber Client: This topic will introduce the various registration options for the Cisco Jabber client, including softphone mode and deskphone mode for on-premises deployments, Hybrid Message Service for Hybrid message and presence interworking with Webex Teams clients, and Team Messaging mode for Jabber registration to Webex Control Hub for messaging and presence.
Configure Cisco Unified Communications Manager for Jabber Client: This topic will examine all the configuration components required to support Jabber registration to the Cisco Unified Communications Manager. These components include configuring end-user accounts, configuring the Cisco Unified Client Services Framework (CSF) phone for Jabber, associating the Cisco Unified CSF phone with the end-user account, and configuring computer telephony integration (CTI) and other components with the Cisco Jabber account.
This chapter takes the information about the Cisco IM and Presence server from the preceding chapter and explains how to apply this information in a practical solution using the Cisco Jabber client. The playing field is changing in the Collaboration world to a more cloud-centric environment. Therefore, this chapter will introduce two new concepts that Cisco engineers have conceived, but due to the nature of this book, the primary focus throughout the rest of this chapter will remain on the deployment of Jabber on-premises. Topics discussed in this chapter include the following:
Registration Options for Jabber Client
Softphone Mode
Deskphone Mode
Hybrid Message Service
Team Messaging Mode
Configure Cisco Unified Communications Manager for Jabber Client
Configure End-User Accounts
Configure Cisco Unified Client Services Framework (CSF) Phone
Add CSF Phone to End-User Account
Computer Telephony Integration (CTI) and Other Considerations
This chapter covers the following objectives from the Cisco Collaboration Core Technologies v1.0 (CLCOR 350-801) exam:
6.4 Describe Cisco Unified IMP protocols and deployment
6.4.a XMPP
6.4.b High availability
6.5 Deploy Cisco Jabber on-premises
“Do I Know This Already?” Quiz
The “Do I Know This Already?” quiz allows you to assess whether you should read this entire chapter thoroughly or jump to the “Exam Preparation Tasks” section. If you are in doubt about your answers to these questions or your own assessment of your knowledge of the topics, read the entire chapter. Table 26-1 lists the major headings in this chapter and their corresponding “Do I Know This Already?” quiz questions. You can find the answers in Appendix A, “Answers to the ‘Do I Know This Already?’ Quizzes.”
Table 26-1 “Do I Know This Already?” Section-to-Question Mapping
Foundation Topics Section |
Questions |
|---|---|
Registration Options for Jabber Client |
1–5 |
Configure Cisco Unified Communications Manager for Jabber Client |
6–10 |
Caution
The goal of self-assessment is to gauge your mastery of the topics in this chapter. If you do not know the answer to a question or are only partially sure of the answer, you should mark that question as wrong for purposes of the self-assessment. Giving yourself credit for an answer you correctly guess skews your self-assessment results and might provide you with a false sense of security.
1. What is the highest video resolution that can be obtained using the Jabber client for video calls?
480p30
720p30
720p60
1080p30
2. What DNS SRV record should be used so that Jabber can discover the Cisco IM and Presence Service?
_sip._tcp.
_cisco-uds._tcp
_cuplogin._tcp.
_imp._tcp
3. What protocol does the Cisco Jabber client use to take control over a phone?
CCMCIP
XMPP
SOAP
CTIQBE
4. Which of the following message scenarios is possible with the new Cisco Jabber Hybrid Message Service?
Webex Teams send messages to Jabber clients, but neither client is set up with the Hybrid Message Service.
Jabber clients send messages to Webex Teams, but neither client is set up with the Hybrid Message Service.
Webex Teams clients not enabled for the Hybrid Message Service send messages to Jabber clients set up with the Hybrid Message Service.
Jabber clients not enabled for the Hybrid Message Service send messages to Webex Teams clients set up with the Hybrid Message Service.
5. Which of the following statements about Cisco Jabber Team Messaging mode is true?
The Webex Control Hub replaces the IM and Presence Service.
Calls are not possible with Team Messaging mode.
Presence will suffer long delays updating status using Team Messaging mode.
Calls are possible with Team Messaging mode, but voicemail is not available.
6. Which of the following settings are required when creating an end-user account in the CUCM?
Password
PIN
Last Name
Display Name
7. Which of the following settings cannot be configured in the CUCM until after an end-user account is created?
Manager User ID
Controlled Devices
UC Service Profile
Presence Gateway to be configured on CUCM IM and Presence server
8. Which of the following clients must be combined with Cisco Unified Video Advantage so that video capabilities can be extended to that soft client?
Cisco Unified IP Communicator
Cisco Unified Personal Communicator
Cisco Webex Connect
Movi
9. Which of the following statements is true?
If the CSF phone is associated with an end user, that end user does not need to be associated with the phone.
If an end user is associated with a CSF phone, that phone does not need to be associated with the end user.
Both the end user and the CSF phone must be associated with each other.
Only the Cisco Unified CSF phone has to be associated with an end user, which is why the end-user account must be configured first.
10. Which of the following is a required field when configuring CTI as a UC Service on the CUCM for Jabber deskphone control?
Specify a name for the UC service.
Configure the CTI service address.
Specify the port number for the CTI service.
All of these answers are correct.
Foundation Topics
Registration Options for Jabber Client
Cisco Jabber is a Cisco Unified Communications client application for Microsoft or Apple computers, tablets, and smartphones. Cisco Jabber client applications provide IM and presence, voice and video, voice messaging, desktop sharing, and other collaborative workspace capabilities that support 720p30 high-definition video interoperability. Cisco Jabber uses the Cisco Precision Video Engine and ClearPath technology to optimize video media. The Cisco Precision Video Engine uses fast video-rate adaptation to negotiate optimum video quality, based on network conditions. Cisco Jabber clients are available for many devices and can be used with on-premises or cloud-based Cisco Unified Communications services, or with the Cisco Webex solution in the cloud. Cisco Jabber clients provide a consistent experience across devices. These desktop clients include Cisco Jabber for Windows and Cisco Jabber for Mac. Jabber can also be used on smart devices such as Apple or Android tablets or smartphones.
Cisco Jabber takes advantage of Cisco Medianet-based networks and Cisco Unified Communications Manager call control to deliver secure, clear, and reliable communications. It streamlines communications and enhances productivity by securely unifying IM and presence, video, voice, voice messaging, desktop sharing, and conferencing capabilities into one client on your desktop. It also delivers highly secure, clear, and reliable communications. Cisco Jabber offers flexible deployment models, is built on open standards, and integrates with commonly used desktop applications. The Cisco Jabber client allows users to communicate and collaborate effectively from anywhere that has an Internet connection.
Cisco Jabber is based on the Cisco Unified Client Services Framework (CSF) and combines advanced collaborative media features with Cisco Unified Communications. It uses SIP for call control, XMPP for IM, and CTI for deskphone control. Cisco Jabber is a software-based service framework that supports multiple lines and enables the following client service applications:
Audio and video calls with integrated multipoint conferencing control
Deskphone control
Instant messaging (IM)
Presence
Advanced voicemail control
Communication history management
Cisco Jabber operates in one of two modes. In deskphone mode, the Cisco Jabber client controls the Cisco IP phone of the user. In softphone mode, the Cisco Jabber client behaves like an IP phone and originates and terminates all audio and video communication interactions on the software endpoint itself. Cisco Jabber supports video in both softphone and deskphone modes. Video resolution is supported from QCIF and CIF through VGA up to 720p high-definition video with up to 30 fps. Cisco Jabber also supports integrated ad hoc video conferencing control, movable self-view, audio and video mute, and desktop sharing by using standard video conferencing that is based on SIP BFCP content-sharing protocols. It can operate in one of the following video options:
Cisco Jabber operating in softphone mode terminates both audio and video sessions on the host computer as mentioned before.
Cisco Jabber operating in deskphone mode can use one of two options:
The first option uses a Cisco Unified IP phone that is not video capable. In this situation, the audio terminates on the Cisco Unified IP phone, and video terminates on the host computer. Audio and video streams are mutually synchronized with the Cisco Audio Session Tunnel (CAST) protocol between Cisco Jabber and the Cisco Unified IP phone. For CAST to work, the host computer must connect to the PC port on the Cisco Unified IP phone, and IP routing must work between the voice (deskphone) and data (PC with Cisco Jabber) VLANs.
The second option of deskphone mode uses a video-capable Cisco Unified IP phone, which terminates both audio and video sessions. On a Cisco Unified IP Phone 8845 or 8865, or on the Cisco DX70 or DX80 video endpoint, the Cisco Jabber desktop client detects a connected camera on the CTI-controlled IP phone, and both voice and video are serviced through that IP phone or Telepresence endpoint.
Figure 26-1 illustrates the three video options available to Cisco Jabber.
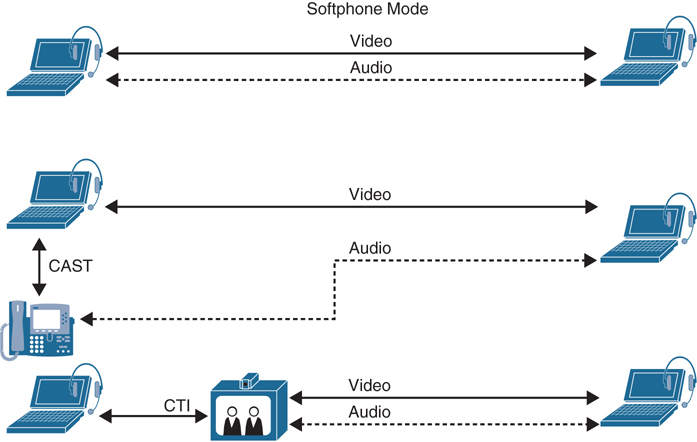
Figure 26-1 Three Video Options Available to Cisco Jabber
Softphone Mode
The first three steps of the registration process of a Cisco Jabber client are the same whether the client is operating in softphone mode or deskphone mode. Cisco Jabber takes all IP network parameters from the host computer. The IP address, network mask, default router, and DNS must be properly set up on the host computer before the client is launched. If DNS was configured on the back end with the SRV record for Cisco Jabber to discover the IM and Presence server (_cuplogin._tcp.), then when the client is launched, it requires only two parameters:
User ID: <username@domain> (The domain is used to look up the SRV record of the Cisco Unified Communications Manager IM and Presence Service.)
Password
If the SRV record cannot be discovered, an Advanced Settings option will allow the user to enter the Cisco Unified Communications Manager IM and Presence Service IP address or name manually. Cisco Jabber sends the user ID and password to the indicated Cisco Unified Communications Manager IM and Presence Service after the address is obtained. The Cisco Unified Communications Manager IM and Presence Service verifies whether the user is licensed to use Cisco Jabber and then sends the user ID and password to Cisco Unified Communications Manager for authentication. Cisco Unified Communications Manager verifies the credentials locally, against its own database, or it uses an external LDAP directory server if integrated. After verification, authentication is acknowledged, and the registration process can continue as follows:
When Cisco Jabber launches and a user logs in, the client makes a secure connection using SOAP over HTTPS to the Cisco Unified Communications Manager IM and Presence Service and downloads the following information:
Contact list
Client profiles, such as CTI, Cisco Unified Communications Manager IP Phone Service, and LDAP
User settings
Portable user preferences
The client registers to receive presence information from the Cisco Unified Communications Manager IM and Presence Service. Via the Extensible Messaging and Presence Protocol (XMPP), the client receives presence information for each contact in the contact list.
Based on the Cisco Unified Communications Manager IP phone profile that Cisco Jabber downloaded initially, the client uses the Cisco Unified Communications Manager IP Phone Service over HTTPS to contact Cisco Unified Communications Manager. The client then receives the list of endpoint devices that are associated with the end user. When Cisco Jabber discovers endpoint devices that are associated with the user, a Cisco Unified Client Services Framework device can define softphone functionality. In general, the Cisco Unified Client Services Framework is defined in Cisco Unified Communications Manager using a name, such as jwhite. The following steps are unique for the Cisco Jabber softphone mode registration process.
Cisco Jabber, now operating in softphone mode, contacts the Cisco Trivial File Transfer Protocol (TFTP) server to download the configuration for the softphone device. The TFTP address was obtained as part of the profiles that were downloaded using the Simple Object Access Protocol (SOAP). The name of the Cisco Unified Client Services Framework device in the Cisco Unified Communications Manager database is used to identify which configuration file to download. If the name was jwhite, this file would be called jwhiteclient.cnf.xml. If security was used, the file ctlsepjwhiteclient.tlv would be retrieved from the TFTP server before the configuration file. Cisco TFTP sends the jwhite.cnf.xml file to the Jabber client.
Cisco Jabber then uses that information to register using SIP to the primary Cisco Unified Communications Manager for call processing. Cisco Jabber registers as the video-capable softphone to Cisco Unified Communications Manager, using a SIP REGISTER message. Cisco Unified Communications Manager sends an acknowledgment, using a “SIP 200 OK” response. Figure 26-2 illustrates how the softphone registration process works for Cisco Jabber.

Figure 26-2 Softphone Registration Process for Cisco Jabber Client
After Jabber has successfully registered, you can click the computer icon at the bottom-right corner of Cisco Jabber to expand the menu. When Cisco Jabber, operating in softphone mode, has registered successfully, the menu shows a check mark next to the Use My Computer for Calls option, and the presence status at the top of the window is Not Unknown (gray color).
Deskphone Mode
The registration process for Cisco Jabber operating in deskphone mode is simplified and does not include the TFTP and SIP registration stages. However, it does initialize CTI communication to Cisco Unified Communications Manager CTI Manager for deskphone control. The deskphone mode process associates Cisco Jabber with a Cisco Unified IP phone that can support only audio or both audio and video. The Cisco Jabber client obtains all the IP network parameters, such as the IP address, network mask, default gateway, and DNS address if used, from the hosting computer or device, which typically obtains this information through a DHCP server. Therefore, obtaining this network information is not part of the Jabber registration process. The Cisco Jabber client will use the following steps to register using deskphone mode:
When Cisco Jabber launches and a user logs in, the client makes a secure connection using SOAP over HTTPS to the Cisco Unified Communications Manager IM and Presence Service and downloads the following information:
Contact list
Client profiles, such as CTI, Cisco Unified Communications Manager IP Phone Service, and LDAP
User settings
Portable user preferences
The client registers to receive presence information from the Cisco Unified Communications Manager IM and Presence Service. Via the XMPP protocol, the client receives presence information for each contact in the contact list.
Based on the Cisco Unified Communications Manager IP phone profile that Cisco Jabber downloaded initially, the client uses the Cisco Unified Communications Manager IP Phone Service over HTTPS to contact Cisco Unified Communications Manager. The client then receives the list of endpoint devices that are associated with the end user.
To control an associated deskphone, Cisco Jabber initializes CTIQBE to the Cisco Unified Communications Manager CTI Manager, which is usually collocated with Cisco Unified Communications Manager but can be a separate server for scalability reasons. If the user did not specify a preferred endpoint device in Cisco Jabber, the endpoint with the line that is configured in Cisco Unified Communications Manager Administration is used as the primary line if the user becomes the preferred CTI endpoint device.
If desktop video is shown on Cisco Jabber with a Cisco Unified IP phone that is audio-capable only, the Cisco Audio Session Tunnel protocol is used to synchronize video and audio media. In this case, Cisco Discovery Protocol is used at Cisco Jabber start-up to discover whether the hosting computer connects to the PC port at the controlled IP phone. Figure 26-3 illustrates how the deskphone registration process works for Cisco Jabber.
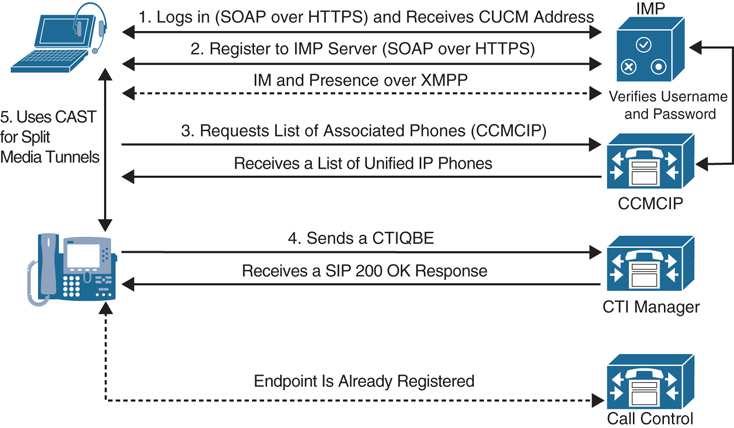
Figure 26-3 Deskphone Registration Process for Cisco Jabber Client
The phone being controlled using CTI does not have to be physically connected to the computer running Jabber with a patch cable as long as CAST isn’t being used. After Jabber has successfully registered, you can click the computer icon at the bottom-right corner of Cisco Jabber to expand the menu. When Cisco Jabber, operating in deskphone mode, has registered successfully, the menu shows a check mark next to the Use My Phone for Calls option, and the presence status at the top of the window is Not Unknown (gray color).
Hybrid Message Service
Several new deployment options are available for businesses using Cisco Jabber. Historically, Cisco Jabber has been available through an on-premises deployment only. There is now a cloud-based deployment for Cisco Jabber, which uses Cisco Webex to host services. This option is referred to as Team Messaging mode. Another option allows Cisco Jabber clients deployed on-premises to integrate with the messaging functionality of Cisco Webex Teams. This service is referred to as the Hybrid Message Service.
The Cisco message to customers today is “Cloud First, not Cloud Only.” Although Jabber continues to be Cisco’s primary on-premises application offering, with Jabber version 12.5, Cisco has introduced a unified user experience aligning the Jabber user interface with that of Webex Teams. This will create easier transitions should companies wish to move their users from Cisco Jabber to a full Webex Teams deployment. Jabber 12.5, which was released in January 2019, offers that same great interface as Webex Teams, plus Team Messaging mode capabilities, meetings tools when used with Cisco Meeting Server, and media optimization for a better user experience during calls. Jabber 12.6 was released in April 2019 and offers all the same great tools as the version 12.5 release, plus JVDI and Intelligent Proximity support. Jabber 12.7 was released in October 2019 and has brought continued enhancements and support, along with additional features.
Cisco Jabber Softphone for VDI extends the Cisco Collaboration experience to virtual deployments. With a supported version of Cisco Jabber for Windows, users can send and receive phone calls on their hosted virtual desktops. The Cisco Jabber Softphone for VDI software detects the virtual environment and routes all audio and video streams directly from one endpoint to another, without going through the hosted virtual desktops. Figure 26-4 illustrates the similarities between the new Cisco Jabber client and the Cisco Webex Teams client.
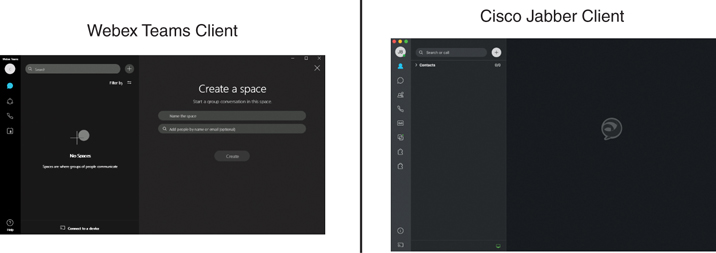
Figure 26-4 Comparison of the Cisco Jabber and Cisco Webex Teams Clients
Hybrid Message Service involves an on-premises deployment of Cisco Jabber integrating with a cloud deployment of Cisco Webex Teams. As with any other hybrid integration, a connector card along with other settings must be configured for the integration to perform correctly. After a Hybrid Message Service integration has been configured, the Jabber client can engage in chat messaging with Webex Teams applications, whether they are 1:1 conversations or group spaces. The following services are available in a hybrid cloud-based deployment that uses Webex Messenger service:
The Cisco Webex Messenger service provides contact resolution.
The Cisco Webex Messenger service allows users to publish their presence availability and subscribe to other users’ presence availability.
The Cisco Webex Messenger service allows users to send and receive instant messages between Jabber and Webex Teams.
Audio calling, video calling, conferencing, and voicemail services are all available and continue to operate through the Cisco Unified Communications Manager just as they always have.
As the Hybrid Message Service is implemented, a company’s user population may progress as follows. At the start, all users are on Cisco Jabber. Then the company places an order for the Webex solution and implements it through the Webex Control Hub. After the Control Hub is set up, users can be integrated into Webex through an Active Directory integration. Assuming the users in the Cisco Unified Communications Manager are also integrated through Active Directory, this will ensure that the same users will have accounts with Jabber and with Webex Teams. The next task that must be performed is to enable Hybrid Message Service for some of the users. After this service has been enabled, there are four ways to send chat messages:
A user without Message Service uses Webex Teams.
A user without Message Service uses Cisco Jabber.
A user with Message Service uses Webex Teams.
A user with Message Service uses Cisco Jabber.
The recipients can also use those four ways to receive chat messages, which means there are 16 possible interactions. You can expect eight of them to work because they are interactions between the same clients, such as Jabber to Jabber or Webex Teams to Webex Teams. Of the remaining eight interop scenarios, you should expect three cases to fail. Figure 26-5 illustrates these 16 possible interactions between Cisco Jabber and Webex Teams using Hybrid Message Service.
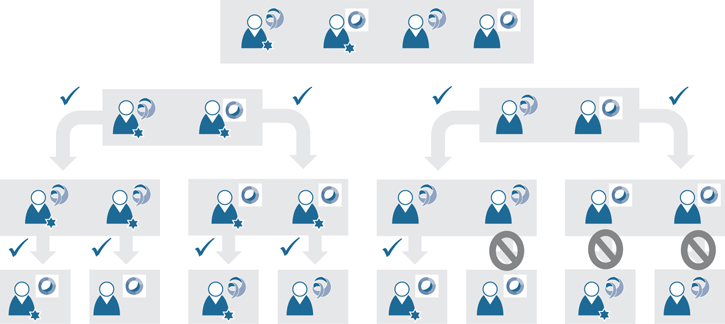
Figure 26-5 Interactions Between Cisco Jabber and Webex Teams Using Hybrid Message Service
In Figure 26-5, the box at the top of the image shows all the different meeting clients available in a Cisco Collaboration solution. From left to right, there are the Jabber client with Hybrid Message Service enabled, Webex Teams with Hybrid Message Service enabled, Jabber client without Hybrid Message Service enabled, and Webex Teams without Hybrid Message Service enabled. Moving down the figure are all of the one-way connections that are possible messaging attempts that could occur between each of these clients. Assuming the initiator of the chat message does have Hybrid Message Service enabled, the recipient will see the conversation regardless of whether Hybrid Message Service is enabled. Without Hybrid Message Service enabled, Webex Teams can send messages to other Webex Teams users, and Jabber clients can send messages to other Jabber clients.
However, if the sender uses Webex Teams to send a message to a Jabber client, and neither client is set up with Hybrid Message Service, the message will not be sent. The same is true if a user tries to send a message using Jabber to a Webex Teams client, and neither client is set up with Hybrid Message Service. If the Webex Teams client not enabled for Hybrid Message Service sends a message to a Jabber client that is set up with Hybrid Message Service, the message would still not be sent. This behavior is expected. Cisco designed the service this way to reduce load because it anticipated that organizations would enable Hybrid Message Service for the early adopters and that they would use Webex Teams as their primary chat client. Conversely, if the Jabber client not enabled for Hybrid Message Service sends a message to a Webex Teams client that is set up with Hybrid Message Service, the message will be sent.
Team Messaging Mode
By contrast, Team Messaging mode enables you to register Cisco Jabber directly to the Webex Control Hub. Five services are available in a cloud-based deployment using Team Messaging mode:
Cisco Team Messaging Mode: Provides contact resolution through the Webex Control Hub.
Cisco Team Messaging Mode: Lets users show their presence availability and see other users’ availability.
Cisco Team Messaging Mode: Lets users send and receive instant messages.
Cisco Webex Meetings Center: Provides hosted meeting capabilities that can be joined through Jabber. This is not a change in service capability; it is available to Jabber users regardless of where the client is registered.
Voice and Video Calling: Can be added by registering Jabber via SIP to the Cisco Unified Communications Manager after Team Messaging mode has been configured. This is the only piece that connects to an on-premises device, and calling cannot occur in Jabber without it.
Cisco Jabber Team Messaging mode offers an alternative path to the traditional Jabber on-premises deployment, which uses the IM and Presence server for XMPP messaging. Instead, Jabber Team Messaging allows the Webex Control Hub to be used as a replacement for the IM and Presence server, and all messaging and presence communication traverses through the same media path as Webex Teams messaging. This allows a seamless integration between Webex Teams clients and the Cisco Jabber client. This also allows for easier migration from Cisco Jabber to Webex Teams. Figure 26-6 illustrates the infrastructure used to support the Jabber Team Messaging mode solution.
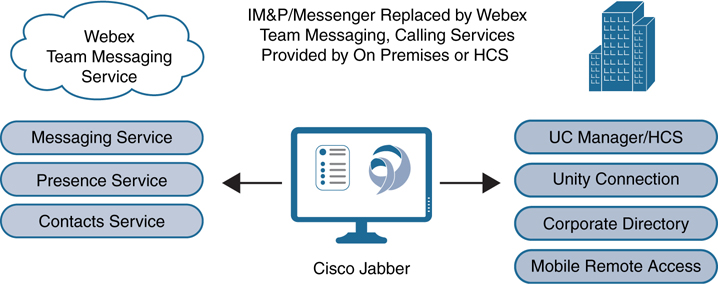
Figure 26-6 Jabber Team Messaging Mode Infrastructure
As mentioned earlier, the services provided to Jabber through Team Messaging mode include instant messaging, presence services, and contact services. If voice and video calling is still required through Jabber, the client can register with the Cisco Unified Communications Manager. With a CUCM registration, the Jabber client can still utilize all the benefits that coincide with a CUCM registration, such as voicemail through Unity Connection, MRA, and the corporate directory.
Because Jabber 12.5 and later releases provide a seamless user interface with the Webex Teams App, usability is easily transferable. There are no limitations in what you can do with Jabber as compared to Webex Teams. Team messaging through Jabber supports 1:1 conversations and group spaces, member lists, moderator controls for meetings, and participant lists. Presence status is a seamless integration as well. When Hybrid Message Service is used, there is a delay in sharing presence information. But when Jabber Messaging mode is used, presence status is updated and shared instantaneously.
Configure Cisco Unified Communications Manager for Jabber Client
Several settings must be configured before the Cisco Jabber client will be able to register and access the services on the Cisco IM and Presence server and the Cisco Unified Communications Manager. Many of these settings were discussed in the preceding chapter. The components discussed in this section, which must be configured on the Cisco Unified Communications Manager to support the Cisco Jabber client, are as follows:
Configure End-User Accounts
Configure Cisco Unified Client Services Framework (CSF) Phone
Add CSF Phone to End-User Account
Computer Telephony Integration (CTI) and Other Considerations
Configure End-User Accounts
Chapter 16, “LDAP Integration with Cisco Unified Communications Manager,” briefly discussed the steps necessary to manually add an end user to the Cisco Unified Communications Manager and then discussed in depth how to import users from an LDAP directory service. This section will not discuss adding users using LDAP; instead, it will examine means of adding end users manually as an alternative to the method described in Chapter 16.
The settings to add an end user described in Chapter 16 required an administrator to navigate in the Cisco Unified Communications Manager web interface to User Management > User/Phone Add > Quick User/Phone Add. Another way to create an end user is to navigate to User Management > End User and click Add New. Some settings must be configured before the new end-user account can be saved, and other settings cannot be configured until the new account is saved. All settings with an asterisk are required settings, which include User ID and Last Name. Before saving the settings, notice that the Controlled Devices buttons do not exist yet, and the Permissions Information section at the bottom of the page is missing. These settings will appear after the end-user account is saved. For best practice, ensure the following settings are configured initially before saving the end-user account:
User Information:
User ID
Password
Confirm Password
Self-Service User ID (only if the user portal will be enabled and used for this end user)
PIN (again, only if the user portal will be enabled and used for this end user)
Confirm PIN
Last Name
First Name
Display Name
Directory Number (Refer to the section titled “Endpoint Addressing” in Chapter 18, “Cisco Unified Communications Manager Call Admission Control (CAC),” for a reminder of the function this field performs.)
Manager User ID (for reporting purposes that will be discussed in later chapters)
Service Settings:
Home Cluster (checked)
Enable User for Unified CM IM and Presence (Configure IM and Presence in the Associated UC Service Profile) (checked)
Include Meeting Information in Presence (Requires Exchange Presence Gateway to Be Configured on CUCM IM and Presence Server) (checked)
UC Service Profile (Select the appropriate service profile for Jabber operations, which is usually the system default.)
No other settings need to be configured on the End User Configuration page at this time. The administrator needs to return to the end-user account to finish configuration for Jabber client support after the phone is configured in a different menu. Figure 26-7 illustrates the end-user settings that should be configured when setting up a user account manually for the first time.
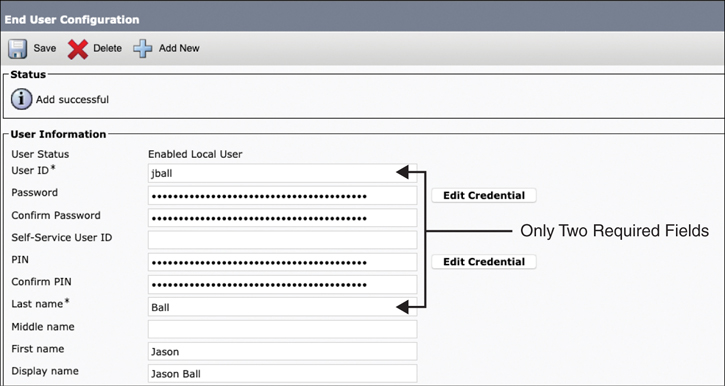
Figure 26-7 Initial End User Settings for Jabber Client
Configure Cisco Unified Client Services Framework (CSF) Phone
The Cisco Unified Client Services Framework (CSF) phone in Cisco Unified Communications Manager is a phone configuration template designed to deliver Cisco UC settings and services to soft clients, but it did not originate with Cisco Jabber. The Cisco Unified IP Communicator was Cisco’s first attempt at a soft client. This Microsoft Windows PC–based softphone application uses Skinny Call Control Protocol (SCCP) as the call control protocol. This application was designed to bring the voice telephony functions of Cisco Unified IP phones to the desktop over a software application. The Cisco Unified Video Advantage application is a layered application over the Cisco Unified IP Communicator Softphone that brought video to the IP Communicator and Cisco Unified IP phones (via CAST) by using a web camera on the hosting computer.
Later, Cisco launched a new client application, which evolved from the Cisco Unified IP Communicator. This new application not only supported voice and video in a single application, but it also supported instant messaging and presence. This new client application was known as the Cisco Unified Personal Communicator, or CUPC, and it too was based on the Cisco Unified Client Service Framework.
CUPC lasted for a few years, but Cisco continuously strives to be number one with the products it offers business communities around the world. Therefore, Cisco made three key acquisitions that aided in providing the best soft client on the market to date. The first company Cisco acquired was called Jabber. The second company, called Tandberg, had a soft client called Movi. Jabber was a much more feature-rich client in terms of the number of services available, but Movi, which was later named Cisco Jabber Video for Telepresence, supports high-definition video and desktop- and application-sharing options. The third company was called Webex, and it had a soft client called Webex Connect. This client connected to the Webex Cloud and supported voice, video, IM, and presence.
Cisco took the best features of all these new soft clients, combined with the rich features of the Cisco Unified IP Communicator and CUPC, and built a soft client application that has endured the test of time and proven to be the best soft client available today. Based on its popularity, Cisco decided to dub this soft client Cisco Jabber, but it has evolved far from the original Jabber client that Cisco bought so many years ago.
The biggest competitor product to Cisco Jabber is the Microsoft soft client, which has gone by many names over the years. It began as Microsoft OCS, then later became Microsoft Lync, then Skype for Business, and now it goes by the name Microsoft Teams. The greatest downside to the Microsoft solution is that it still uses proprietary protocols, rendering them incompatible cross-vendor. Cisco Unified Communications Integration for Microsoft, which is available with the Cisco Unified Client Service Framework, integrates Cisco Unified Communications and Cisco Collaboration with Microsoft. This is just one more way Cisco is setting the standard for collaboration today.
As mentioned previously, Cisco Jabber is built on the Cisco Unified Client Services Framework, which is a software application that combines several services into a single integrated client. An underlying framework is provided for integration of Cisco Unified Communications services, including audio, video, web collaboration, visual voicemail, and so on, into a single IM and presence application.
The following steps outline how to configure a Cisco Unified CSF phone on the Cisco Unified Communications Manager for the Cisco Jabber client registration. To differentiate the phone that will be created for Jabber and the user associated with the phone, the administrator may want to use different names for the end-user account and the CSF phone.
Step 1. From the Cisco Unified Communications Manager Administration page, navigate to Devices > Phones and click Add New.
Step 2. From the Phone Type drop-down menu, choose Cisco Unified Client Services Framework and click Next.
Step 3. In the Device Name field, enter the Cisco Jabber client username, and configure the following fields:
Description: (Optional field)
Device Pool: (Required field; choose from the drop-down list)
Phone Button Template: Standard Client Services Framework
Phone Common Profile: Standard Common Phone Profile
Calling Search Space: (Optional field; choose from a drop-down list)
Owner: USER
Owner User ID: (Required field for Jabber; choose the associated user from the drop-down list)
Device Security Profile: Cisco Unified Client Services Framework-Standard SIP Non-Secure
SIP Profile: Standard SIP Profile
Step 4. When you are finished, click Save.
Step 5. After the page refreshes, click the Line [1] – Add a new DN link in the left column.
Step 6. On the new page that appears, enter the Directory Number that should be assigned to Cisco Jabber for calling, and choose a Route Partition if required. Click Save.
When you are entering the Directory Number, the page needs to refresh before it can be saved. The refresh will happen automatically when you perform one of two actions. You can either press the Tab key to move to the next field or use the mouse to click anywhere else on the screen. This is also true when configuring the Route Partition setting. Figure 26-8 illustrates how these settings might look for a Cisco Unified CSF phone.
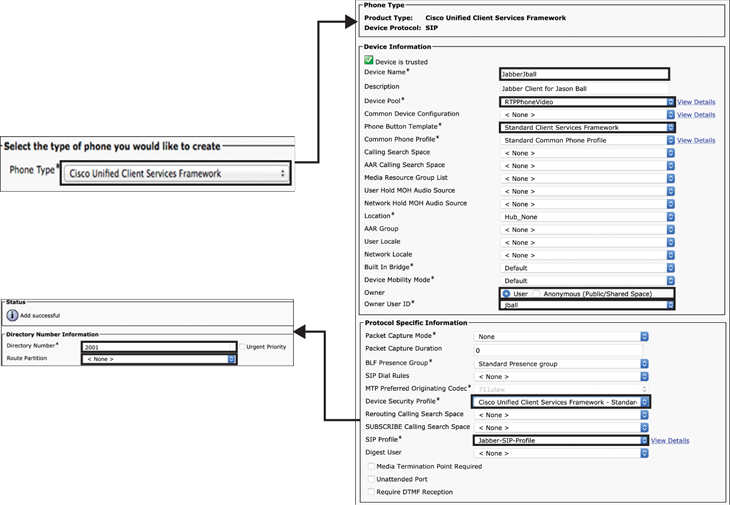
Figure 26-8 Cisco Unified CSF Phone Settings on CUCM
Add CSF Phone to End-User Account
After the end-user account has been created and the Cisco Unified CSF phone has been created and associated with the end user, the end-user account needs to be associated with the Cisco Unified CSF phone. You can use the following steps to associate the end-user account with the Cisco Unified CSF phone:
Step 1. From the Cisco Unified Communications Manager Administration page, navigate to User Management > End Users.
Step 2. Use the Find button to locate your username. When you find your username, click it.
Step 3. In the middle of the end-user page, locate the Device Information area and click Device Association.
Step 4. On the new page that appears, click Find and locate the Cisco Unified Client Services Framework device that you configured previously.
Step 5. Check the box beside it, and then click Save Selected/Changes.
Step 6. In the top-right section of the page, click Go next to the Related Links: Back to User drop-down menu to get back to the end-user page.
For your end user, set the primary extension to the earlier configured directory number. Locate the Directory Number Associations section. From the Directory Number* drop-down list, choose the entry with your directory number.
Step 7. Click Save to save the end-user configuration.
Your Jabber client should now be able to sign in and register to the Cisco Unified IM and Presence server and the Cisco Unified Communications Manager. Figure 26-9 illustrates the preceding outlined settings used to associate the Cisco Unified CSF phone with the end-user account.
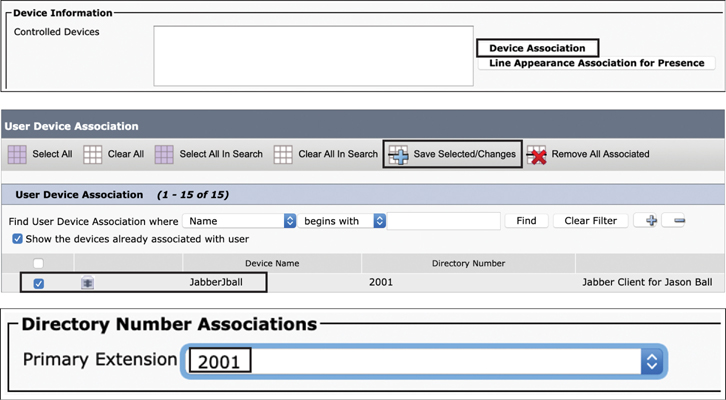
Figure 26-9 Associating the Cisco Unified CSF Phone with an End-User Account
Computer Telephony Integration (CTI) and Other Considerations
Computer telephony integration (CTI) is a service in the Cisco Unified Communications Manager that enables computer and telephone systems to interact together. CTI is most commonly used by call centers handling a large number of incoming calls. Call centers implementing CTI can use computers to manage all telephone calls, which in turn leads to increased efficiency and better results. A CTI port is a virtual port. It is analogous to a trunk line in a traditional ACD or PBX setting. One such use of a CTI port is to allow access to the post routing capabilities of the IP-IVR. A CTI route point is a virtual device that can receive multiple simultaneous calls for the purpose of application-controlled redirection. A CTI route point is another useful virtual device; this one can receive multiple calls at once and efficiently distribute them to the various CTI ports. The manner in which the calls are distributed is based on application-controlled redirection. A program called CTIManager includes the CTI components that interface with the applications that are separated out of Cisco Unified Communications Manager. Cisco IM and Presence Service CTI configuration (CTI Server and Profile) for use with Cisco Jabber is automatically created during the database synchronization with Cisco Unified Communications Manager. All Cisco Jabber CTI communication occurs directly with the Cisco Unified Communications Manager and not through the Cisco IM and Presence Service.
Adding the CTI service capabilities on the Cisco Unified Communications Manager for Cisco Jabber is not always a straightforward process. Different Cisco Unified IP phones may have slightly different requirements when it comes to configuring Jabber deskphone control. However, some common settings should be configured for every instance of Jabber deskphone control using CTI. You can use the following steps to configure these settings:
Step 1. Add a CTI UC service, and then add the CTI UC service to your service profile. The CTI UC service provides Jabber with the address of the User Data Services (UDS) device service. The UDS device service provides a list of devices associated with the user. After you add a CTI service on Cisco Unified Communications Manager, you must apply it to a service profile so that the client can retrieve the settings.
From the Cisco Unified Communications Manager Administration page, navigate to User Management > User Settings > UC Service.
Select Add New, and then in the Add a UC Service section, select CTI from the UC Service Type drop-down list.
Click Next.
Provide details for the instant messaging and presence service as follows:
Specify a name for the service in the Name field. The name you specify will be displayed when you add services to profiles. Ensure the name you specify is unique, meaningful, and easy to identify.
Specify the CTI service address in the Host Name/IP Address field.
Specify the port number for the CTI service in the Port field.
Click Save.
Navigate to User Management > User Settings > Service Profile.
Find and select your service profile to access the Service Profile Configuration window.
Scroll down to the CTI Profile section, and select up to three services from the following drop-down lists:
Primary
Secondary
Tertiary
Click Save.
Step 2. Enable the device for CTI. If you want Cisco Jabber desktop clients to be able to control the user’s deskphone, you must select the Allow Control of Device from CTI option when you create the device for the user.
From the Cisco Unified Communications Manager Administration page, navigate to Device > Phone and click Find to search for the phone that is to be controlled by Cisco Jabber.
In the Device Information section, check the box beside the Allow Control of Device from CTI setting.
Click Save.
Step 3. Deskphone video capabilities let users receive video on their computers through the Jabber client for transmissions targeted toward their deskphone devices. To set up deskphone video, you must complete the following steps:
Physically connect the computer to the computer port on the deskphone device. You must physically connect the computer to the deskphone device through the computer port so that the client can establish a connection to the device. You cannot use deskphone video capabilities with wireless connections to deskphone devices.
Enable the deskphone device for video in Cisco Unified Communications Manager.
Install Cisco Media Services Interface on the computer. Cisco Media Services Interface provides the Cisco Discover Protocol (CDP) driver that enables the client to do the following:
Discover the deskphone device
Establish and maintain a connection to the deskphone device using the CAST protocol
You can download the Cisco Media Services Interface installation program from the download site at cisco.com. There are some considerations and limitations that should be taken into account before provisioning deskphone video capabilities for a user. You cannot use deskphone video capabilities on devices if video cameras are attached to the devices, such as a Cisco Unified IP Phone 8865. However, you can use deskphone video capabilities if you remove video cameras from devices that have a removable camera. Video desktop sharing, using the BFCP protocol, is not supported with deskphone video.
Legacy phones have some unique restrictions that should be considered as well. You cannot use deskphone video capabilities with devices that do not support CTI, so do your homework when using legacy phones. It is not possible for endpoints that use SCCP to receive video only. SCCP endpoints must send and receive video. Instances where SCCP endpoints do not send video result in audio-only calls. The 7900 series phones must use SCCP for deskphone video capabilities, but these 7900 series phones cannot use SIP for deskphone video capabilities. If a user initiates a call from the keypad on a deskphone device, the call starts as an audio call on the deskphone device. The client then escalates the call to video. For this reason, you cannot make video calls to devices that do not support escalation, such as H.323 endpoints. To use deskphone video capabilities with devices that do not support escalation, users should initiate calls from the Jabber client. A compatibility issue exists with Cisco Unified IP phones that use firmware version SCCP45.9-2-1S. You must upgrade your firmware to version SCCP45.9-3-1 to use deskphone video capabilities. Some antivirus or firewall applications, such as Symantec Endpoint Protection, block inbound CDP packets, which disables deskphone video capabilities. You should configure your antivirus or firewall application to allow inbound CDP packets. You must not select the Media Termination Point Required check box on the SIP trunk configuration for Cisco Unified Communications Manager. Deskphone video capabilities are not available if you select this check box.
Step 1. The client uses video rate adaptation to negotiate optimum video quality. Video rate adaptation dynamically increases or decreases video quality based on network conditions. To use video rate adaptation, you must enable Real-time Transport Control Protocol (RTCP) on Cisco Unified Communications Manager. RTCP is enabled on software phone devices by default. However, you must enable RTCP on deskphone devices. You can enable RTCP on a common phone profile to enable video rate adaptation on all devices that use the profile.
From the Cisco Unified Communications Manager Administration page, navigate to Device > Device Settings > Common Phone Profile.
Specify the appropriate filters in the Find Common Phone Profile Where field and then select Find to retrieve a list of profiles.
Select the appropriate profile from the list.
Locate the Product Specific Configuration Layout section.
Select Enabled from the RTCP drop-down list.
Click Save.
Alternatively, you can enable RTCP on specific device configurations instead of a common phone profile. The specific device configuration overrides any settings you specify on the common phone profile.
Navigate to Device > Phone, click Find, and select the appropriate phone from the list.
Locate the Product Specific Configuration Layout section, and select Enabled from the RTCP drop-down list.
Click Save.
Step 2. When you associate a user with a device, you provision that device to that user. You then need to create and configure the Cisco Jabber devices as follows:
From the Cisco Unified Communications Manager Administration page, navigate to User Management > End User.
Click Find and select the appropriate end user from the list.
Scroll down to the Service Settings section and select Home Cluster.
Select the appropriate service profile for the user from the UC Service Profile drop-down list. This should be the service profile previously configured that contains the CTI UC Service.
Scroll down to the Device Information section and click on the Device Association button. The Device Association window will appear.
Select the devices to which you want to associate the user. Jabber supports only a single softphone association per device type. For example, only one CSF device can be associated with a user. However, a CSF soft phone and a Cisco Unified IP phone can be associated with the same user.
Click the Save Selected/Changes button.
In the top-right section of the page, click Go next to the Related Links: Back to User drop-down menu to get back to the end-user page.
Scroll down to the Permissions Information section and select the Add to Access Control Group section. The Find and List Access Control Groups dialog box opens.
Select the access control groups to which you want to assign the user. At a minimum, you should assign the user to the following access control groups:
Standard CCM End Users
Standard CTI Enabled
Remember, if you are provisioning users with secure phone capabilities, do not assign the users to the Standard CTI Secure Connection group. Certain phone models require additional control groups, as follows:
For Cisco Unified IP Phone 9900, 8900, or 8800 series or DX series, select Standard CTI Allow Control of Phones Supporting Connected Xfer and conf.
For Cisco Unified IP Phone 6900 series, select Standard CTI Allow Control of Phones Supporting Rollover Mode.
Click Add Selected and then click Save on the End User Configuration page.
Step 3. After you create and associate users with devices, you should reset those devices:
From the Cisco Unified Communications Manager Administration page, navigate to Device > Phone.
Click Find and select the appropriate device from the list.
Scroll down to the Association Information section and select the appropriate directory number configuration.
Click Reset, and the Device Reset dialog box opens. Click Reset again and then click Close.
When the Cisco Jabber client is registered, there are options available to tune the client to the environment. There are two options to tune video: one is at the operating system level, and the other is at the application level. An internal camera on a laptop can be used with Jabber. A USB camera must be connected, configured, and operational at the operating system level before it can be used with Cisco Jabber. Cisco Jabber can use multiple video peripherals, if available at the computer. From the Jabber client, navigate to File > Options > Video > Advanced and choose a camera to use from the Camera drop-down menu. Click the Advanced button to order the video peripherals in the priority sequence that is required for Cisco Jabber to use them. For example, a USB camera can be set up as a primary camera, and the built-in camera can be set up as a secondary camera. When Jabber is booted, if the USB camera is unavailable, the internal camera will be used instead. As soon as the USB camera is connected and detected, the camera being used by Jabber will switch to the preferred camera.
As in the case for video, Cisco Jabber can use multiple audio peripherals, if available at the computer. Navigate to File > Options > Audio > Advanced and choose the peripherals for audio output, audio input, and audio alerts to use from the drop-down menus. Click the Advanced button to order the audio peripherals in the required priority sequence for audio output, input, and alerts. Figure 26-10 illustrates the camera and audio configuration options from the Cisco Jabber client.

Figure 26-10 Camera and Audio Configuration Options from Cisco Jabber Client
Exam Preparation Tasks
As mentioned in the section “How to Use This Book” in the Introduction, you have a couple of choices for exam preparation: the exercises here, Chapter 32, “Final Preparation,” and the exam simulation questions in the Pearson Test Prep Software Online.
Review All Key Topics
Review the most important topics in this chapter, noted with the Key Topics icon in the outer margin of the page. Table 26-2 lists a reference of these key topics and the page numbers on which each is found.
Table 26-2 Key Topics for Chapter 26
Key Topic Element |
Description |
Page Number |
|---|---|---|
List |
Client Service Applications Supported by Cisco Jabber |
611 |
List |
Three Video Options for Cisco Jabber |
612 |
List |
Four Ways to Send Messages Using Hybrid Message Service |
617 |
List |
Five Services Available in Team Messaging Mode |
619 |
Paragraph |
End-User Settings Not Configurable Until After Saved |
620 |
Steps |
Configure CSF Phone in CUCM |
623 |
Paragraph |
Define CTI, CTI Port, and CTI Route Point |
625 |
Define Key Terms
Define the following key terms from this chapter and check your answers in the glossary:
Q&A
The answers to these questions appear in Appendix A. For more practice with exam format questions, use the Pearson Test Prep Software Online.