
The physicalized attachments in CRYENGINE provide a simple, easy-to-setup, and stable way to create secondary motion to characters. You can use the physicalized attachments to dynamically simulate characters' accessories, such as necklaces, earrings, and cloth, or body parts, such as tails, tentacles, and fat jiggle. Physicalized attachments work on both bones and static meshes. Depending on your pipeline, you can decide how to use them, but we advise to use bones as much as possible to save draw calls.
In our example, we will simulate our character's belly. Sounds fun, right? Go back to the Boris folder in Objects and open the boris_export_groups Maya file. In the view port, go to Shading and make sure that X-Ray Joints option is checked. You should see our belly_JNT parented under pelvis_JNT. In the Animations menu set, go to Skin | Edit Smooth Skin | Paint Skin Weights Tool. You should see all the skin influences in a list in the Tool Settings Editor. Select the belly_JNT bone in the Influences list and have a look at its smooth influence on our body mesh. It should look like the following screenshot:
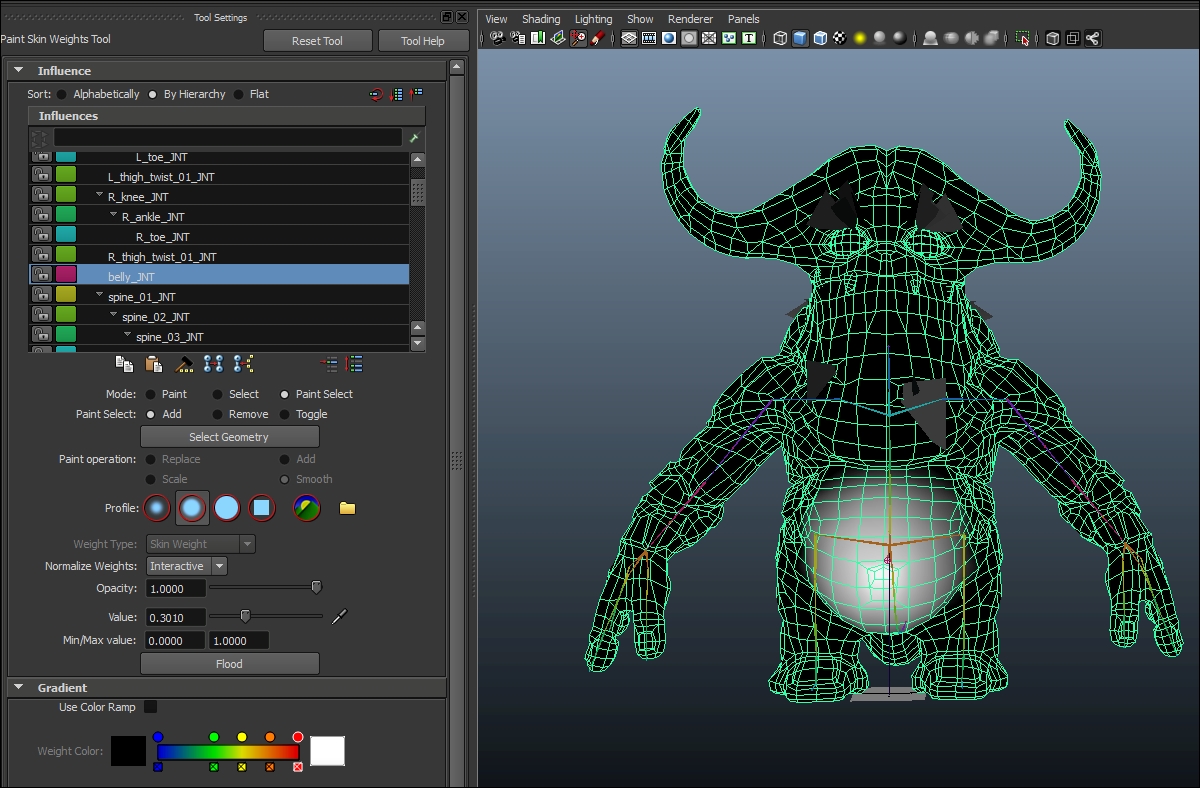
Feel free to move and rotate the joint to have a better feeling of how it affects the skin, but make sure to set it back to its default position and orientation. Please keep in mind that the skinning is a very important step in our setup. Skinning along with the physicalized attachments setup in the engine can define how strong your simulation can be. So it is a back and forth process between modifying the skinning in Maya and the attachment settings in the engine until you get the results you want. The last thing we need to do is to update the boris_body skin attachment by exporting it from Maya again.
In Sandbox, open the Character Editor and load the boris.CDF file. Now, we will go through the steps to create a bone attachment, which we will use later to physicalize the belly_JNT bone using either the springs or pendula properties in the engine:
- In the Attachment properties tab, check the Bone Attachment button.
- Select belly_JNT from the joints list.
- In the Attachments section, create a new attachment and rename it
belly_phys. - Click on Apply.
- Click on Align with Bone, so our attachment has the same position and orientation as the belly_JNT bone.
In the Simulate Socket drop-down list, you will see five options: No physics, Cone, HalfCone, Hinge, and Ellipsoid. The No physics option renders the attachment as a normal bone attachment. The Cone, HalfCone, and Hinge options use the pendulum physics properties, while the Ellipsoid uses the spring physics properties. Because the Pendulum simulation creates a simple harmonic motion, it is better in general for physicalized chain setups, such as ropes, tentacles, and tails. The swinging of the object attached to the pendulum can be controlled by the physical parameters and constrained by the geometrical shape of the Cone, HalfCone, and Hinge primitives. The spring physical properties are similar to the pendulum properties. The difference between these two is that the spring can stretch and the spring system implemented in CRYENGINE allows stretching in any direction, unlike the helical spring. The object motion attached to a spring can be constrained by the limits of the geometrical shape of an ellipsoid. The great thing about the ellipsoid is that it is scalable. So, using a few parameters we can transform the shape of the ellipsoid to a line, a plane, and half a sphere.
We will use the spring simulation in our example, so select the Ellipsoid from the Simulate Socket list. Make sure to check the Re-direct, Run Simulation, and Draw Setup checkboxes. The Re-direct option activates the simulation on the attachment. The Run Simulation option allows you to see the run time simulation in the Character Editor. The Draw Setup option will draw the geometrical shape of the ellipsoid, as shown in the following:
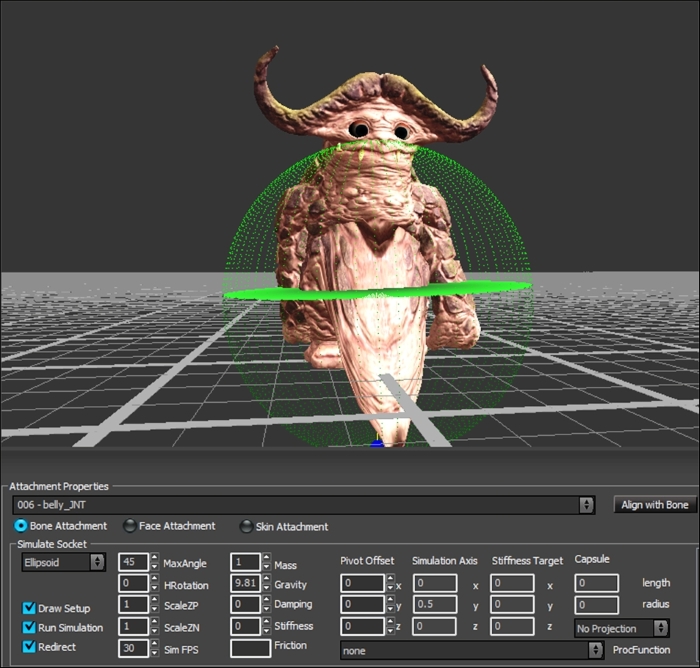
This is of course not what we want the belly to look like. The first thing you probably thought of is decreasing the size of the ellipsoid, you are right! However, you need to keep in mind when you reduce the size of the ellipsoid to get the desired results, it will end up probably (based on the size of your character of course) inside the mesh and it will become more difficult to tweak its shape. So let's try first to think about the final shape we would like to have for our ellipsoid and then reduce its size. First of all, let's rotate the ellipsoid so that its y axis faces towards our character. Set the HRotation value to 90. We don't want our joint to rotate 360 degrees at any time. So it makes sense we use only half of the ellipsoid by setting the ScaleZP value to 0. Now we can reduce the size of our ellipsoid (or half ellipsoid now). Set the MaxAngle attribute to 10. Now we are starting to see better results just by adjusting the shape and size of our ellipsoid, but we still have some more parameters to adjust.
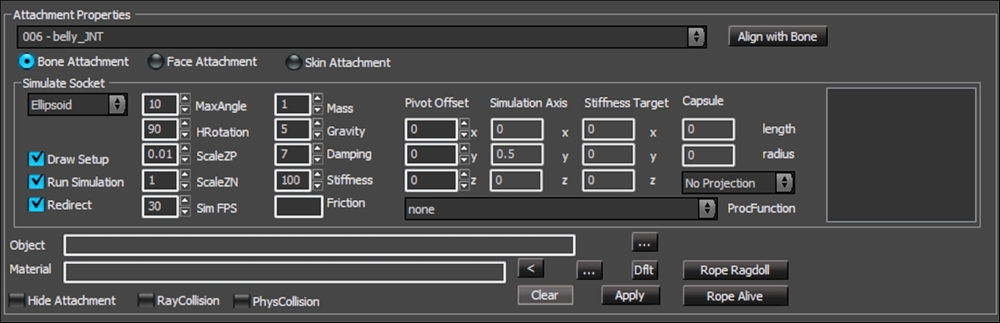
Leave the Mass value at 1 so that the gravity doesn't pull the pendulum more downward in the way that you see it now. Increasing the Mass value will increase that affect but increasing the Stiffness value will reduce it. So set the Stiffness parameter to 100. You probably will see now the pendulum moving pretty fast inside the ellipsoid. To get much smoother results set the Damping value to 7. If you still want less gravity, you can set the Gravity value to 5 instead of 9.8, just make sure to have a higher value than one. Otherwise, you will end up getting a very damped and floating effect, which we don't want. The following screenshot represents all the values we set to our spring attachment for your reference:
Feel free to play more with these parameters or the shape of the ellipsoid, so you have a better idea of their effect on the simulation and where else you can use them in your character setup.