
Given the scale and complexity of many modern games, or simply the desire to directly guide the player through an experience, mission objectives is a common way to inform the player of what they need to do in order to progress with the events of the level. The SDK’s implementation of objectives gives us a bare bones implementation of mission objectives to work with; let’s dive into them and add an objective to our fishing village assault.
The first step to implement our objectives is to define their names and descriptions outside Sandbox. These are then loaded by the game when we activate our mission objectives. To do this, simply navigate to the LevelData folder in your level folder, where you’ll find Objectives.xml. This is a simple XML file that contains a name, description, and MissionID for each objective. The following snippet is an example of a setup that I’ve created for the fishing village level; only one objective is listed for simplicity, but more can be made by simply duplicating the MissionID line and changing the attributes to suit our needs:
<Root>
  <FishingVillage>
    <Clear_Encampment Name=”Clear The Shore Encampment” Description=”Terrorists have taken a small fishing village - reclaim it.” />
  </FishingVillage>
</Root>
Here are a few customizable parameters:
- The level name (shown in the example as
<FishingVillage>) does not need to be the actual name of your level. This is just the folder name that the objective will appear under when we browse it in the Editor. - The MissionID (shown in the example as
Clear_Encampment) won’t be exposed to the player and is just used to identify the objective for you when you browse the Editor. - The
Nameattribute is what appears to the player as the primary name of the objective when the notification is displayed. - The
Descriptionattribute is what appears to the player under the name, which offers more information about the task.
Note
As well as the file within the LevelData folder, we are also able to define objectives with one file global to all levels. This file is called Objectives_new.xml, and this can be found in GameData.pak under the Libs/UI directory. Remember that you’ll need to extract the file to that path external to the .pak file, if you want to use it. This is an older way of defining objectives, but it is still relevant if you want to keep all the objectives contained in one file instead of across levels.
With our objectives now filled out, we can return to the Editor and get our new mission setup implemented.
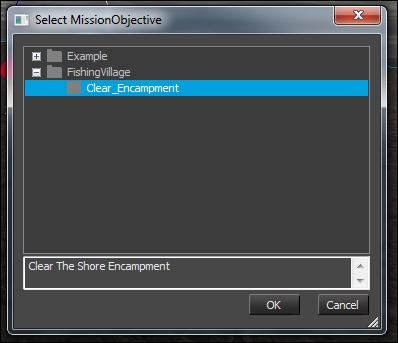
Now, we have a name and description defined for our objective. Let’s place it and activate it as part of our level flow. To start off, we first need to give it a physical manifestation somewhere in the world—this requires placing a MissionObjective entity in our level. These can be found by navigating to Rollup Bar | Objects Tab | Entity | Others | MissionObjective, and they should be placed where you want the objective marker to appear on the minimap. Once you’ve placed the entity, here’s where our MissionID from the XML setup comes into play. In the MissionID parameter, click on the browse icon, and you’ll be presented with a hierarchy, displaying all the available objectives.
The Clear_Encampment objective created in the previous section is shown in the following screenshot, with its accompanying name loaded in the description box:
Tip
An additional parameter on the MissionObjective entity is the TrackedEntityName option. If the name of an object is entered as this parameter, the game will track the root of that object instead of using the marker position when displaying the marker on the radar. This can be useful if your objective is a moving object, such as an AI entity or a vehicle.
With our objective placed and ready for action, all that remains to start in order to test our setup is to trigger the objective in Flow Graph. This is done by simply right-clicking on your Flow Graph of choice and hitting Add Selected Entity, while the MissionObjective entity is selected. We are then given a suite of objective inputs that represent the various ways in which we can present the player with updates to their current objectives. To activate the objective, we can simply trigger Activate, and to complete the objective, the Completed input needs to be triggered.
An example of this is shown in the following screenshot:
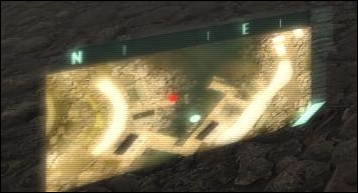
In the SDK build, at the time of writing, the feedback that the objective has been activated includes the text summary that was provided in the Objectives.xml, as well as a red dot on the minimap, as shown in the following screenshot. Use these features to verify that your setup has worked as expected.
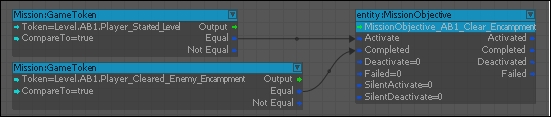
We now know how to activate objectives—let’s think of a suitable Flow Graph workflow for our objective triggering. If you’ve seen the screenshot of a Flow Graph container structure in the previous chapter, then this scripting would live in the Objectives_Logic container under the Mission category. This in itself isn’t vitally important, but it is important to maintain a separation of the objectives from the rest of the scripting. With the setup shown here, although functional, it starts to fall apart if we want to change the conditions that trigger the objective. What if we want to activate the objective once the level starts and the player has seen the encampment? Or if we want to complete it after the player has killed all the enemies and explored the interior spaces? We can complicate the objective triggering logic, but it would be cleaner just to have one token per event.
By creating an objective library of Game Tokens and keeping the objectives all in one place, you can easily alter the objective flow and track down what’s triggering certain events, without scouring the Flow Graph for all the events contributing toward an objective state. So far, I’ve created the Objective_Player_Clear_Encampment_Active and Objective_Player_Clear_Encampment_Completed Game Tokens and added these to the setup, as shown in the following screenshot. These tokens are then triggered by the relevant combination of events elsewhere in the level flow, keeping the objective scripting simple and clean.

Tip
Try not to trigger the level events from the objective outputs. If you end up changing your objective ordering or removing objectives from the level, you’ll end up with a totally broken flow that needs reordering to preserve the functionality you had before. Keeping the objectives separate from the level flow and modular as described here will help you proof your setup from any iteration that takes place in future. Use the regular event tokens, as discussed in the next chapter.
Now we have the objective set up in place, let’s make sure that the player is able to play with our absurdly challenging setup, without throwing his monitor out of the window in frustration.
A simple extra feature that we can add to our mission flow is a checkpoint (or save game). This will save the state of all the entities and Flow Graph scripts, allowing the game to restore its state if the player dies or chooses to manually load a previous save. The setup required to achieve this is simple; the Game:SaveGame flownode handles all the level-side controls of checkpointing in CRYENGINE.
This flownode is shown in the following screenshot. Let’s take a look at the functionality it offers:
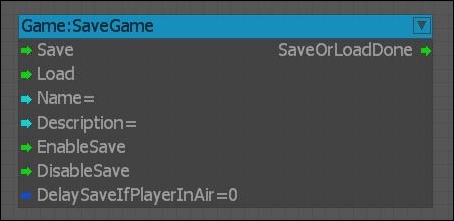
The following are the functions that are available:
- Save and Load: These are self-explanatory and will save/load SaveGame of a specified name when triggered.
- Name and Description: If your menu UI supports it, this will be what is displayed in the load checkpoint menu. The name is also printed on the
game.logfile on saving, which means that you’re able to track the checkpoints in the log when testing in a pure game mode. - EnableSave and DisableSave: This allows us to control whether the player is able to use any quicksave functionality present in the game.
- DelaySaveIfPlayerInAir: This is a useful parameter if your level has lots of verticality, and you’re unsure about the player’s position when saving. This will stop save/death loops caused by a bad checkpoint when the player is about to take a critical damage.
Tip
A useful functionality hidden in the Name port tooltip is that, as well as loading explicit save games by names, we’re also able to load the previous saved game’s state. This can be useful in cases where the player has manually saved its own checkpoint, or if we have multiple checkpoints that could have been saved after each other. To do this, we can simply enter $LAST in the Name port when triggering Load.
We now have a scripted sequence that not only responds to player actions, but is able to adapt its behavior based on player position. We also used this example to discuss more on how the various logic functionalities in CRYENGINE can be used to create a flexible and interesting game world that offers believable responses. Equipped with this toolbox of scripting techniques, we should be able to create almost any level system that tickles our fancy.