
CHAPTER 22
Troubleshooting and Repairing AV Solutions
In this chapter, you will learn about
• The troubleshooting process
• Troubleshooting strategies
• Repairing common audiovisual (AV) system problems and restoring systems to full functionality
• Tools for diagnosing network issues
• Recording maintenance and repair
• Billing for repair services
The process of troubleshooting and repairing an AV system requires a systematic, logical approach to identifying the problem source. Understanding and practicing this logical approach helps make you more confident when faced with actual system failure, especially in emergency situations.
When an AV system breaks down, an AV professional must be able to restore the system to full operation quickly and efficiently. AV professionals are expected to calmly and quickly diagnose the problem and either fix it or apply a temporary work-around until permanent repairs can be made.
Inexperienced technicians (or more inexperienced end users) may randomly push buttons, make unrelated adjustments, or swap cables without any true insight into the actual cause of the problem. In most cases, this approach to troubleshooting wastes time, may cause additional problems, and fails to achieve the desired result. As you will learn in this chapter, using a logical troubleshooting approach allows you to systematically identify and isolate the problem, even in a complex system.
Repairing AV systems requires an AV professional to understand how AV components operate and interconnect, how to address common AV system problems, and how to document repair activities.
Duty Check
Questions addressing the knowledge and skills related to troubleshooting and repairing AV solutions account for about 10 percent of your final score on the Certified Technology Specialist (CTS) exam (about 10 questions).
Preparing to Troubleshoot
There’s a problem with the AV system you installed, or perhaps it’s a system that someone else installed but you’re helping support. Now what?
Prior to attempting to troubleshoot a system problem, you need to do the following:
• Take steps to familiarize (or refamiliarize) yourself with the AV systems and equipment, either as part of a preventive maintenance schedule or prior to a live event. In many cases, the AV technician is under pressure to return a system to operation as quickly as possible, especially during a live event. The troubleshooting and repair process will be more successful if you have already reviewed the system design and operation and know how individual devices should work, rather than learning about the system after you arrive on the scene.
• Have the project and/or system documentation available. System documentation will prove valuable if you need to examine drawings and trace component interconnections or determine appropriate system and component settings. And you may need equipment manuals to look up specific troubleshooting and repair procedures.
• Bring the proper tools and supplies. In many cases, you will need to test the output of devices, open the cases of individual components, and so on. This will require tools, such as the following:
• A multimeter
• A signal generator and analyzer
• An oscilloscope for video
• A laptop/notebook computer and signal adapters
• Mechanical tools such as screwdrivers and spanners to open equipment cases or remove components from racks
• Tools to install new terminations and connections
• A supply of standard connectors
• A selection of signal cables
• A pair of headphones
• Understand the warranty and maintenance agreements. The service and warranty agreements covering the AV system and its components may dictate how repairs or replacements should be addressed. In cases where warranties cover the components and/or the overall system—whether they are manufacturers’ warranties or the AV company’s warranty—you should repair or replace components according to the terms of those agreements. In cases where the client is paying the AV company directly for service and repairs, you may need to explain the issues to the client and obtain approval prior to addressing more costly system faults.
An Overview of the Troubleshooting Process
One way to figure out what’s wrong with an AV system is to guess at the source of the problem and then test each related component until you figure it out. Of course, this approach can take a long time and still not lead to a solution.
Proper troubleshooting follows a systematic, logical process to define the nature of the problem and narrow down the potential issues until you can identify the actual cause of the problem. The correct troubleshooting process offers the most efficient path to identifying and isolating failure points in a system while minimizing guessing.
The first step in the troubleshooting process is to clearly identify and understand the symptoms of the system’s failure and determine how the system is malfunctioning. The next step is to select a troubleshooting strategy and use it to identify the cause of the problem.

NOTE Remember that many of today’s AV systems integrate with IT networks. When familiarizing yourself with a system that is having problems, make sure you understand which part of it—if any—traverses the client’s network. That way, you can include possible network issues in your analysis and coordinate with IT staff as necessary. See the “Basic Network Troubleshooting Tools” section later in this chapter.
Recognizing Symptoms and Elaborating on Them
To clearly identify the problem, you must be able to differentiate “normal” system performance from “abnormal” performance. Understanding what the system should do when it’s operating properly requires knowledge of the system’s characteristics and design. To decide whether the system is malfunctioning, you need to be able to recognize whether abnormal performance truly is a system problem or whether it is the result of user error.
You should also characterize the problem. For example, an intermittent problem—one that happens every now and then but is not persistent or permanent—may be more difficult to troubleshoot because you can’t reproduce it. Either you can observe the system, hoping it fails in your presence, or you can have the client contact you immediately when it happens. Either way, you will need to ask pertinent questions, especially in cases of intermittent system failures.
Asking questions helps define points of demarcation—before and after the abnormal performance began—to better develop a picture of what the system did or didn’t do prior to the problem or failure. Here are some common questions for helping define a problem:
• When did it last work?
• When did it fail?
• Did any other equipment or anything related to this system change between when it last worked and when it failed?
• Who was using it when it failed?
• What were they doing when it failed?
• What happened when it failed?
• Was it a sudden or “catastrophic” failure, or did it gradually fail over time?
• What does it look or sound like when everything is “normal”?
• Can you reproduce the problem?
• Is there system documentation?
The next step is to elaborate on the symptoms by asking the following questions:
• Is it a system failure or a device failure?
• Is it turned on?
• Is it plugged in?
• Does it have a fuse or reset button?
• Does system have electrical power?
• Can you reset the system or cycle the power?
Selecting a Strategy
The next step in troubleshooting the problem is to apply the appropriate troubleshooting strategy. The following strategies are used to identify faulty functions:
• Swapping While this may not seem like a formal, step-by-step process, swapping the suspected faulty component with a known-good component can help identify problems. Prior experience with similar systems and their problems may quickly lead the experienced technician to a faulty component. For example, swapping out a small loudspeaker that isn’t working with another small loudspeaker that you know is working divides the problem into smaller parts and indicates whether the original loudspeaker is the cause.
• Divide and conquer This strategy involves dividing a problem or system in half to define the half that is not working. Then divide the faulty half again and test for the failure point, repeating the process until you identify the source of the failure. In just a few steps, you can quickly identify a faulty component.
• Divide the problem into subsystems Audio, video, or control? Divide the subsystem in half to identify the portion that’s not functioning. Continue to divide the subsystems in half until you locate the fault.
• Signal flow Start at one end of the signal path and continue to follow the signal path until you find the fault. With audio, you could begin at the source (such as the microphone or replay device) and continue all the way to the destination (such as the loudspeaker) until you find the faulty component (such as a cable, device, connection, or termination). Troubleshooting a video problem may begin at the output (the projector or display) and follow the signal path all the way back to the source. You could also do it the other way around.
A Troubleshooting Scenario
To demonstrate the troubleshooting process, let’s walk through an example. Suppose that your client tells you a microphone is not working. Assuming you know that the audio mixer, as well as the rest of the signal path, is connected properly and powered on (and you already verified this), begin by asking the following questions:
• Is the channel muted?
• Is the channel fader up?
• Is the microphone a dynamic or condenser model? If it’s a condenser, is the phantom power switched on?
• Is it plugged into the correct input on the wall panel or snake/multicore?
• Is it plugged into the correct channel on the mixer?
• Is there a mic/line switch on the mixer channel? If so, it is set for mic or line?
You can also swap the microphone for a microphone you’ve verified is working. If there is still no audio, you can assume it’s probably not the microphone. However, while you have divided the system to try to identify the problem, only the microphone has been ruled out. Most of the rest of the system is still unknown.
Next, divide the system in half by determining whether you have sound out of the loudspeaker. You check this by connecting a known good input to the audio mixer, using something like a personal media device or a laptop computer. If you have sound from the loudspeakers, then you know the problem is somewhere between the microphone and the input of the audio mixer.
The next division is to take a known working microphone channel and plug the nonfunctioning microphone’s line into it. If you have sound, then the problem is neither the microphone nor the cabling leading to the mixer.
Then take a known working microphone line and plug it into the nonfunctioning microphone channel’s input. If you don’t have sound, you know the problem is somewhere between the input and output of the mixer. You can then quickly follow the signal path through the mixer, checking adjustments and routings until you find the problem.
Best Practices for Troubleshooting AV Systems
The following are some basic troubleshooting best practices:
• Change only one thing at a time.
• Test after each change.
• Use signal generators to provide a known reference to measure against.
• Use signal analyzers to obtain quantifiable information.
• Document your procedures and findings.
An Overview of the Repair and Restoration Process
As described earlier, a successful troubleshooting approach should identify the cause of a system failure. The next step is to use that information to correct the problem. How you repair and restore an AV system depends on the nature of the problem.
In many cases, troubleshooting and repair are part of the same restoration process. For example, if, through troubleshooting, you’ve determined that a failed cable caused the problem, the repair process is simply to replace the cable. However, repairing the individual AV components of a larger system can be a complex task, depending on the nature of the component and the nature of the failure. Some companies have the capability to make corrective adjustments to a system and/or repair equipment in-house; others may contract with specialists to handle repairs. And in many cases, such as equipment under warranty, sending the device to the manufacturer for repair is the best option.
You can remedy some system failures at the client site, such as problems related to faulty cable terminations or system configurations. Problems related to mounting or other physical issues are also best addressed on-site.
The key objective of any repair is to get the system working at full capability as soon as possible, with minimal disruption to the client’s business. To minimize system downtime, it is often necessary to replace a failed piece of equipment with a working device of similar functionality. This ensures that the overall system continues to operate while the failed equipment is out for repair.
After the faulty equipment has been repaired, system repair and restoration are similar to the original installation process. The AV technician replaces or installs the new component, properly terminates connections, tests to ensure proper operation, adjusts the configuration settings, and verifies that the repair has corrected the identified symptoms and the underlying problem. The technician must therefore understand procedures associated with installation and testing to ensure the repair addresses the fault or problem.

Addressing Common AV System Problems
To illustrate issues in repairing AV systems, we will review how to troubleshoot and repair some common audio, video, and control system problems. What follows is not a comprehensive list of AV problems. It is provided to help demonstrate a general approach to isolating and addressing typical problems with AV components.

TIP When working with specific components, it’s always a good idea to review the equipment manual or the manufacturer’s website for suggested repair procedures.
AV Problems and Solutions
According to seasoned technology managers and live-event professionals, the following are examples of ten problems users describe having with AV equipment:
• “I can’t see an image.”
• “There is no sound.”
• “I hear feedback.”
• “My control panel is locked up.”
• “My video disc won’t play.”
• “My optical disc won’t run on my computer.”
• “I’m not getting an Internet connection.”
• “The projector keeps turning off.”
• “My microphone isn’t working.”
• “The audio is distorted.”
Here, we will briefly review how to address each of these issues.
NOTE The solutions described in this chapter work in many common situations. If they don’t work in your specific situation, seek the guidance of an experienced technician to help you fix the problem. In general, you may need to engage the services of specialized technicians to address certain problems, such as a damaged cooling fan in a projector.
“I Can’t See an Image”
If the user reports not being able to see an image, follow a troubleshooting process and pay particular attention to the following:
• Check the projector lens for a lens cap.
• Check the power connections, switches, and buttons, as follows:
• Check the status lights on the source and the projector—do they indicate power?
• Are any power strips plugged in?
• If the power strips have a switch, is it on?
• Do all the wall outlets you’re using work? When in doubt, try different outlets or turning on light switches.
• Check the video, HDMI, DVI, HD15, HDBaseT, or other connections, as follows:
• Are they pushed in all the way?
• Wiggle the video, HDMI, DVI, HD15, HDBaseT, or other cable—is the image affected?
• Look at the pins in the connector—are they bent or broken?
• If you suspect a cable is bad, replace it.
• Some laptop/notebook computers will not allow the projection device and the local monitor to be displayed when the computer is running on its battery. If a laptop computer is the image source, plug the computer into a power outlet to check whether this is the cause of the problem.
• If a laptop/notebook computer is the image source, check the following:
• Did the screensaver come on?
• Are the display settings correct?
• Did it time out and go into a standby or power-save mode?
• Did you try toggling the display output?
• Check the status lights on the projector:
• Is the temperature light on?
• Is the lamp light on?
• Is the douser or shutter open?
• Do you see any light coming out of the projector? If so, is the projector in standby mode? If not, does the lamp in the projector need to be replaced? If it gets dim and then bright, it may indicate lamp or image problems.
• Turn off the source device and projector, and then turn the projector back on. Now turn the source device back on.
• Find the sync or auto-image button on the projector and select it.
• Replace the video input cable with a cable that is known to work.
• Replace the projector with a projector that is known to work.
• Replace the source device with one that works with your projector.
“There Is No Sound”
Microphones and loudspeakers may seem to be the most obvious suspects when audio fails; however, cables and connectors fail substantially more often than microphones and loudspeakers. When you are going to help someone who is having audio problems, it is always a good idea to bring a few spare microphone and speaker cables. Simply replacing a cable may be a quick fix, but not if your client must wait for you to run back to the office for a spare.
Troubleshooting audio is significantly easier when you use test equipment. However, if you’re put in a position to solve an audio problem without a multimeter and a test signal generator, here are some strategies:
• Make sure everything in the system is plugged in completely and powered on, including system phantom power. Bring up the audio level slowly.
• After confirming that the microphone is switched on, speak into it to produce sound. While you are speaking, move the XLR connector, which attaches to the microphone, keeping the microphone and cable still.
• If you don’t hear a change, move the microphone cable around and listen.
• Move the connector on the other end of the cable and listen. If you hear any snaps or pops or the signal coming and going, then the connector or cable may have a problem.
• If you still don’t hear a change, follow the troubleshooting process and begin replacing one component at a time, starting with the microphone.
• A simple way to determine whether a microphone is failing is to exchange it for a known-working microphone. If the new microphone works, send the old microphone for repair.
When people use 3.5mm (1/8-inch) or 2.5mm (subminiature) connectors on a regular basis and don’t handle them carefully, they produce a variety of symptoms, including audio-popping sounds, static, loudspeakers not producing audio, or no audio at all. Users often report these problems as intermittent.
To check for a problem with this connector, try moving the cable and the connector around while sending an audio signal to the loudspeakers. Listen for a change in the audio, such as popping, cracks, and audio cutting out on all or some speakers. If the problem is with the connector, you should hear a change in the audio while you manipulate the connector.
The same is true if you manipulate the cable and hear a change in the audio. If you do hear a change when you move the cable around, replace the cable with one that is known to be functioning.
If there is still a problem, the audio socket inside the device may be damaged and require service.
“I Hear Feedback”
Feedback is the squealing or howling noise that drowns out the audio signal and annoys the listener. Acoustic feedback is generated between a microphone and a loudspeaker when the same tone is caught in a loop and amplified again and again. Feedback may stem from the audio system being too loud or the source (the presenter or talent) being too far away from the microphone.
The best strategy is to select microphones with the narrowest pattern possible for the application and place them as close as practicable to the origin of the sound to be reinforced. Microphones should be physically behind and as far from the loudspeaker’s main output axis as possible. The presenter/talent should maintain an appropriate distance from the microphone. If the presenter/talent is too far away, an operator may be tempted to increase the gain on of the microphone, which can lead to feedback.
Feedback is best reduced through a combination of good loudspeaker placement and processing equipment. If you can’t correct equipment placement, then reduce the microphone gain or the level of signal to the loudspeaker. Once the problem is corrected, the result isn’t instantaneous; it might take a second for the feedback to complete a cycle and die out.
Feedback also occurs during audioconferencing and videoconferencing. It manifests itself in the form of an echo or other audio problems. The solution is often simple: move the speaker closer to the microphone, move the microphone away from the loudspeaker, or turn down the incoming or outgoing audio. The most successful approach is to include echo cancellation and clean-feed capabilities into the design of the conferencing system.
Best Practices for Controlling Feedback
Best practices for controlling feedback include the following:
• Select a microphone with the narrowest pattern possible for the application.
• Keep the microphone as close to the sound source as possible.
• Keep the loudspeakers in front of the microphones and as far from the microphones as possible.
• Use the lowest possible microphone gains.
• If your mixer has a mute button, mute the unused or temporarily unused microphone channels. The mute function will allow you to stop the microphones from picking up sound without disturbing the gain settings on the mixer.
“My Control Panel Is Locked Up”
Control panels may be wireless or hardwired. If your panel is hardwired, make sure all connectors are secure and undamaged. If you discover that a connector is damaged, seek the assistance of an experienced technician.
Touchscreens can be damaged by misuse. Control screens may be mounted in tabletops, which exposes them to potential damage. Clients may set heavy objects on the screens, not realizing what they are. Also, food or beverages may spill onto the equipment.
If a touchscreen stops working, inspect it for damage. Cleaning a touchscreen should be done only according to the manufacturer’s instructions.
NOTE A cracked or damaged screen can pose a safety hazard; do not touch a broken screen with your bare hands. Call an experienced technician to repair the panel.
Some touchscreen devices have a screensaver function, whereby the screen goes into a power-saving mode and won’t display the control interface until someone touches it again. Users may incorrectly perceive a blank screensaver as a problem. Simply touching the screen may bring it out of power-saving mode.
Button panels don’t have a sleep function. They often have lights that indicate whether they are receiving power and which button was last pushed. Buttons on these panels can become damaged through misuse. Pushing buttons too hard or spilling food or liquids into the panels can damage them. Follow the manufacturer’s instructions to clean the interface.
“My Video Disc Won’t Play”
The following are some steps to take when a user says, “My DVD (or Blu-ray disc) won’t play in my player.” After completing each step, try to play the disc. If it still won’t play, move on to the next step.
• Make sure the power is on and the player is plugged in.
• Check the DVD/Blu-ray player. The disc should be inserted in the player.
• Insert the disc with the label side up and the playback surface down.
• Seat the disc in the circular depression in the tray.
• Visually inspect the DVD/Blu-ray disc for scratches. Avoid touching the surface.
• If using a noncommercial DVD/Blu-ray disc, check whether the presenter is certain that the files were burned correctly and that the disc has been tested.
• If the presenter is using a noncommercial DVD/Blu-ray disc, make sure it is not, in fact, a CD.
• Many discs made in one country are not compatible with players from other countries. Ask the presenter where the disc was obtained.
• Clean the disc. Use a cleaning cloth to wipe the disc from the center straight out to the edge. Do not use abrasive cleaners or cleaners designed for other media.
• Check the cables. The video cable should be plugged into a video output connector on the player and then into a system input panel, monitor, or projector.
• If you’re using an antenna connection to a television, channel 3 or 4 may need to be selected.
• Projectors, televisions, and many types of monitors have several video inputs. What input is the DVD/Blu-ray player connected to? Use the input button or input menu to select this input.
• Has the DVD/Blu-ray player been in the cold air? Moisture may condense on the lens of the laser, making it unable to read the disc. Let the player adapt to the humidity and temperature of your current environment.
“My Optical Disc Won’t Run on My Computer”
If you are a technology manager or live-event professional, you may be called upon to troubleshoot problems with any video or audio source, including a presenter’s laptop. When troubleshooting problems with a computer’s optical drive, check the following:
• The disc should be seated in the depression in the tray with the data side down.
• Confirm that there is only one disc in the tray.
• The CD/DVD/Blu-ray disc should be clean and free of scratches.
• Check the format of the disc, as some will not play in certain optical drives.
• If using a noncommercial disc, check whether the presenter is certain the files were burned correctly and that the disc has been tested.
• Not all laptops create CDs/DVDs that are compatible with all types of computers, optical drives, and operating systems. Ask the client where the disc came from, as it may not have been finalized properly. Try to use the disc on a computer that most closely matches the computer on which the disc was created. Match the manufacturer, software, and operating system.
• If the optical drive is removable, turn off the computer, eject the drive, and put it back in. Follow the procedures in the operator’s or hardware manual for the specific computer.
Figure 22-1 shows a troubleshooting and repair flowchart that illustrates the process for troubleshooting an optical disc-related problem.
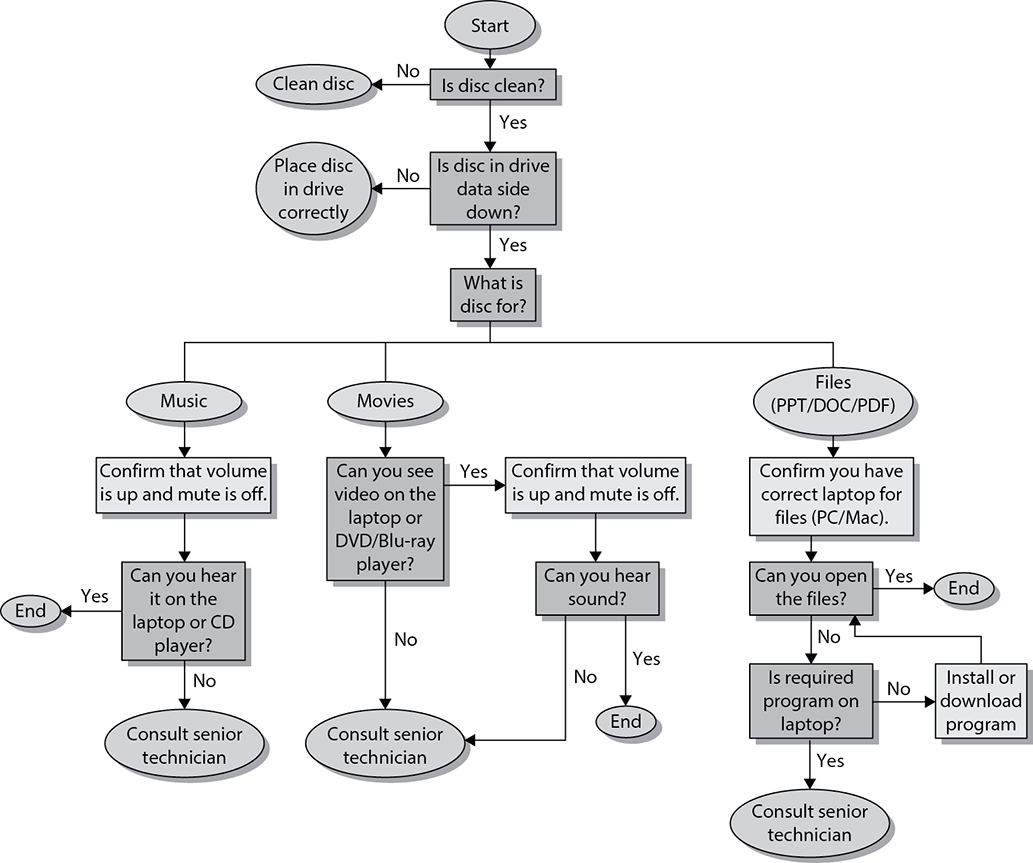
Figure 22-1 A troubleshooting process for an optical disc reader
“I’m Not Getting an Internet Connection”
If you are a technology manager or live-event professional, you may be called upon to troubleshoot network connections for presenters and facility guests. Start by checking the network to which you are connecting the computer. Making this connection isn’t always as simple as connecting a computer cable. Networks are often secured and do not allow access, or Internet connectivity, to everyone. Do not attempt to connect to a network that you are not familiar with. Check with the person in charge of the network to learn how to set the computer to work with the network. You may need login information, an IP address, or some other configuration details.
Beyond that, if you’re connecting to a wired network, the network cable should be plugged into a network wall jack. Do not plug in the cable unless you are sure it is a network jack.
If the computer has a network interface card, it will often include small indicator lights near the network jack, on the network card RJ-45 (modular plug) adapter, or on the network card. When these lights are illuminated, they indicate an active network connection. The operating system user interface usually has indicators of network connectivity and often also the presence of an operational Internet connection.
There are two main types of wireless networks: one uses routers and access points to create a network, and the other uses computers to broadcast to one another. Access points send and receive signals from the network via wireless network cards installed in computers.
One common problem with wireless networks is losing a signal. This occurs when the user’s computer is located too far away from an access point. Another obstacle for people wanting to connect to a wireless network is the network security system. Many wireless networks cannot be accessed without a password. Some users have wireless cards that are capable of using cellular technologies to access the Internet, thus avoiding the network security problems, but they still require a strong cell signal to obtain a connection.
In situations such as conferences, conventions, trade shows, and public events, where a substantial number of users may be attempting to connect to the same wireless data network, the network may not be able to provide connections for all users and may not have sufficient data bandwidth to meet the needs of all connected users.
“The Projector Keeps Turning Off”
Projectors will unexpectedly power off for many reasons. Digital projectors have safety mechanisms that may be triggered if conditions exist that could damage the projector. If these conditions persist, the projector will continue to power off.
Begin by looking at the projector’s indicator lights. Typically, there will be a light for temperature, lamp status, and power. Read the operator’s manual to determine what the lights on your projector tell you about the status of the projector.
Many projectors contain thermostats, which measure the air temperature inside the projector. If the internal temperature of the projector gets too hot, it will automatically go into a cooldown cycle. An indicator light will illuminate, indicating that the projector has overheated. Some possible remedies are as follows:
• Clean the filters according to the operator’s manual. This usually involves using a vacuum cleaner.
• Check the projector’s air vents. Are they covered by something? In some temporary situations a projector may be placed on a padded chair, not realizing that the padding impedes the air flow, causing the projector to overheat.
• Listen for the projector’s cooling fan. If you don’t hear the fan start as the projector warms up, this might indicate that it has failed.
• Look for environmental factors, such as nearby heaters or heating, ventilation, and air conditioning (HVAC) outlets that may contribute to the projector’s overheating problems.
• Check that all safety switches, covers, filters, and cables are properly connected and closed before you power on the projector. If the projector appears to turn on and then abruptly turns off, check the following:
• Are the air filter and cover properly clipped into place?
• Is the lamp properly installed in the projector?
• Is the lamp cover properly installed?
• Is the case of the projector cracked or damaged?
• How many hours does the lamp have left? Some projectors will warn you when the lamp life is about to expire.
• Has the lamp burned out? If so, read the operator’s manual and follow the instructions to replace the lamp.
“My Microphone Isn’t Working”
As stated earlier, a simple way to determine whether the microphone is failing is to replace it with a different microphone. If that option is not available, here are some possible solutions:
• Replace the batteries, if the microphone uses them. In most professional audio systems, wired condenser microphones are phantom powered from the mixer.
• Turn on phantom power at the mixer.
• In wireless microphone systems, the most common source of failure is dead batteries, so replace the batteries anyway.
• Check for a power switch on the microphone and turn it on.
• Check for mute switches on the microphone or transmitter and position them properly.
• Many types of microphones have diaphragms. If they become damaged, the microphone may buzz or not work at all. This usually entails replacement of the entire microphone capsule, which isn’t a field repair.
Wireless microphones present additional issues, as follows:
• Wireless microphones transmit to wireless receivers. Transmitters and receivers must be set to the same frequency.
• If two microphones are transmitting on the same frequency, the signals will interfere with each other.
• If two wireless microphone systems in proximity are running on similar frequencies, they will interfere with each other.
• The range of wireless microphones is limited by both transmitter power and characteristics of the local environment such as structures. If the transmitter and receiver are too far apart, they will not work reliably.
• Note that most wireless microphone transmitters and receivers have gain level adjustments that must be properly set to allow the system to work and not interfere with other systems.
• Wireless microphone transmitters have power, and often mute, buttons that must be set correctly for a signal to be sent.
• Receivers should be set up so that their antennas are separated, aligned in the vertical, and clear of large metallic objects. Try repositioning the antennas if you are not getting a signal. If antennas are located remotely, ensure that the coaxial cable is matched to the receivers’ input impedance.
• Some receivers are capable of either microphone-level or line-level audio output. Check that the appropriate output level is selected.
• All of the issues associated with the effective operation of wireless microphones apply to wireless in-ear monitor systems (IEMs); the difference is that with IEMs the transmitter is stationary and the receivers move around the production/performance space.
“The Audio Is Distorted”
Audio distortion is any unwanted change in the quality of a sound resulting from the operation of the audio system. Distorted audio has many possible causes.
• Overloading somewhere in the signal path causes distortion. One likely culprit is a mismatched signal level, like driving a –10dBV input with a +4dBu output without a pad. It may also be caused by an impedance mismatch.
• Frequency distortion happens when frequencies at the input are not present or equally produced at the output.
• Loudness distortion may result when the audio signal is prerecorded at higher than normal levels or reproduced at a level greater than the system can handle.
Check the output of each device in the system to see where the distortion becomes audible in the system. If the signal is distorted when coming out of the mixer, double-check the input gain of the distorted channel(s). Lower the input trim until the distortion goes away. If the problem is within prerecorded material, there is nothing that can be done to eliminate the distortion.
A major cause of distortion in live audio systems is poor gain structure. This is characterized by a constant high-frequency hiss in the system or a waterfall sound. This is usually because of the inputs on the mixer being set too low and subsequent processing stages having their gain increased in an attempt to compensate. Double-check all microphone input gains and program-source input gains (optical discs, media players, video streams, and so on), and increase gain to the highest possible level without getting distortion or clipping.
Basic Network Troubleshooting Tools
Under some circumstances, if a networked AV system isn’t working and the network is the cause, the client’s IT staff or IT contractor will be responsible for identifying and rectifying the problem. However, it is increasingly important for AV professionals to acquire network troubleshooting skills and/or tools.
For example, you should consider adding a network cable tester to your toolbox. Network cable testers are electronic tools used to verify Ethernet cable installation. Depending on the quality of the tester, it can test for simple continuity, crossed wires, and mismatched pairs. The more capable testers can also measure crosstalk and signal attenuation. You should also equip yourself with a portable computer with a network interface and loaded with diagnostic applications such as packet sniffers and protocol analyzers.
Here are some other networking tools:
• Network interface card (NIC) loopback test
• Wireless network tester/analyzer
• Tone generator and tracker
Many network devices themselves can hint at problems, as most have indicator lights that can provide immediate feedback or have a web-based interface for configuration, diagnostics, and control. Indicator lights and web access interfaces differ widely between devices, so access to the appropriate manuals is important.
In addition to hardware tools, you’ll want to familiarize yourself with software utilities for troubleshooting IP networks, such as the following:
• Ping can test the connectivity of networked AV devices by sending packets to their IP addresses.
• Traceroute and Windows tracert are diagnostic tools for checking the network path between two devices.
• Ifconfig and Windows ipconfig are tools for diagnosing IP configuration issues.
• Arp is a tool for listing and configuring the mapping between IP addresses and network hardware addresses (MAC addresses).
As you learn more about networked AV systems, you will encounter many other tools for diagnosing and repairing network problems. But keep in mind that sometimes the best way to fix an issue with a network device is to turn it off, wait a minute, and then turn it back on.
Maintenance and Repair Records
In all cases, AV technicians should maintain detailed records of their actions to repair a system and the impact those actions have on the system. The repair records should be recorded in client system logs and sent back to the company for billing purposes, if appropriate.
The maintenance records should typically include the following:
• The nature of the problem and repair actions
• Parts and materials necessary to complete the repair
• Labor required to complete the repair
• Any follow-up actions required
• Warranty-related information (for example, if replacing a failed component, the warranty period for the new component should be recorded)
You should also identify repair-related issues that might impact long-term system maintenance and operation. For example, identify any reductions in system capabilities while components are out for repair or replacement.
Billing for Repair Activities
Depending on the nature of your contract with the client, you may need to invoice the client for repair activities. The information required for the accounting staff to bill a client for repair work typically includes the following:
• Labor time and level of staff expertise engaged
• Travel time
• Component replacement
• Materials and supplies
• Costs for in-house repairs
• Cost for repairs completed by another supplier
• Other expenses
Chapter Review
In this chapter, you examined the troubleshooting approach typically used to identify the source of problems in an AV system. By following this systematic, logical troubleshooting approach, you can narrow down potential causes until you identify the actual source of the problem. This step-by-step approach helps you find solutions more quickly, efficiently, and professionally.
We also reviewed examples of general repair steps AV professionals can take when a client identifies a problem with an AV system. The technician must understand how to restore the AV system to full operation in a rapid and efficient manner. This may require repairing equipment on-site, removing components for warranty repair, or replacing failed components with new components. We also introduced some basic tools for diagnosing network issues.
As you help clients with AV system problems, you will become more confident, and you will be able to resolve problems more efficiently. Just don’t get overconfident: if the symptoms look familiar, resist the temptation to jump to conclusions. The AV industry is constantly changing, and technicians must be prepared to learn how to use new equipment and train others to do the same.
Review Questions
The following review questions are not CTS exam questions, nor are they CTS practice exam questions. These questions may resemble questions that could appear on the CTS exam but may also cover material the exam does not. They are included here to help reinforce what you’ve learned in this chapter. See Appendix D for more information on how to access the online sample test questions.
1. What should be the first step in troubleshooting a failure in an AV system?
A. Determine the possible failure points
B. Determine which components are fully operational
C. Review a system diagram depicting interconnections and signal flow
D. Clearly identify the failure symptoms
2. What is an intermittent problem?
A. A system failure that affects multiple components
B. A system failure that is difficult to reproduce
C. A disruption in signal flow affecting the system
D. A failure of an interface component
3. Once the characteristics of the system failure are clearly identified, what is the recommended next step required to return the system to normal operation?
A. Examine the system to determine whether the problem is simple to address and gather more information
B. Logically divide the system in half, and determine which half has the failure
C. Replace the component that has appeared to fail
D. Ask the user to further describe the nature of the problem
4. What is typically the most efficient process for localizing the faulty function within a malfunctioning AV system?
A. Test each of the components in the order of signal flow
B. Test each of the components beginning at the final output, working backward
C. Begin with testing the major functions, and then move to the minor functions
D. Logically divide the system in half, determine which portion has the failure, and then repeat for the failed half
5. When troubleshooting an AV system, should the AV technician consider user error as a source of the problem?
A. No, because the users usually understand system operation
B. No, because the users are not considered part of the system that has failed
C. Yes, because users often do not understand how to properly operate the system and may have changed settings or performed other actions that caused the failure
D. Yes, because user error is typically considered the main cause of AV system failure
6. What is the best method to determine whether a microphone is the source of a problem?
A. Change the cable to the microphone
B. Test the microphone with a multimeter
C. Plug the microphone into a preamp and test
D. Swap out the suspect microphone with a new microphone that you know is working and see whether the system works properly
7. Which of the following is not an example of an issue that can cause a video projector to overheat?
A. Brightness set too high
B. Fan has failed
C. Projector not properly positioned
D. Air filters clogged with dust
8. Which of the following is the most likely source of an AV system failure or problem?
A. Amplifier failure
B. Projector failure
C. Computer source failure
D. Cable/connector failure
9. Which of the following is not a method of addressing feedback within an audio system?
A. Adding compression to the microphone signal chain
B. Keeping the microphone as close to the sound source as possible
C. Keeping the loudspeakers in front of and as far from the microphones as possible
D. Turning down or muting all unused microphones
10. An excessive amount of high-frequency hiss within an audio system is likely due to which of the following situations?
A. Poor gain structure
B. Insufficient compression
C. Noise gate thresholds set too low
D. Source output gain set too high
Answers
1. D. The first step in the troubleshooting process is to clearly identify the failure symptoms.
2. B. An intermittent failure is difficult to reproduce because it is not present all the time. This makes it hard for the technician to identify and isolate the problem.
3. A. Once the characteristics of the system failure are clearly identified, the next step is to examine the system to determine whether the problem is simple to address and, if not, gather more information that will aid in identifying possible faulty functions.
4. D. Often, the most efficient process for localizing the faulty function within a malfunctioning AV system is to logically divide the system in half, determine which portion has the failure, and then repeat for the failed half. Continue the process until the failure source is narrowed down to the faulty component.
5. C. The technician should consider user error when troubleshooting an AV system failure because some users do not understand how to properly operate the system. It’s possible that a user has changed a setting or performed another action that caused the failure.
6. D. The easiest method to test whether a failed microphone is the source of a system problem is to swap out the suspect microphone with a new microphone that you know is working and see whether the system works properly.
7. A. The brightness setting is not a typical reason for a video projector to overheat.
8. D. Cables and connectors fail more frequently than components. When cables and connectors are used on a regular basis and not handled carefully, they can be damaged and may present a variety of symptoms.
9. A. Adding compression to the microphone signal chain will not address feedback. The best practices for controlling feedback include keeping the microphone as close to the sound source as possible, keeping the loudspeakers in front of and as far from the microphones as possible, appropriately positioning the volume (gain), and turning down or muting all unused microphones.
10. A. Poor gain structure is a typical source of a constant high-frequency hiss in the system. This is because of the inputs on the mixer being set too low and subsequent stages having their gain increased in an attempt to compensate.