
Chapter 9. Implementing Next-Generation Firewall Services with ASA CX
This chapter covers the following topics:
![]() Preparing ASA for CX for configuration
Preparing ASA for CX for configuration
![]() Enabling user identity services
Enabling user identity services
![]() Defining context-aware access policies
Defining context-aware access policies
![]() Configuring ASA for CX traffic redirection
Configuring ASA for CX traffic redirection
Modern network security devices have moved beyond traditional access policies that depend only on IP addresses and transport protocol ports. Stateful firewalls continue to block attacks at TCP, UDP, ICMP, and IP levels, but these devices must also become aware of the full context behind the transit application flows. Such context information includes the identity and location of the users, the specific types of services and applications that the users access, and the reputation of the network endpoints with which these users communicate. The ability to identify and classify the applications and resources should no longer depend only on static data, such as TCP and UDP port numbers. A next-generation firewall provides full visibility into the transit connections based on the specific content.
The Cisco ASA Next-Generation Firewall Services solution provides end-to-end protection for your network across all protocol layers. ASA CX modules add easy-to-implement application visibility and control capabilities to the award-winning ASA stateful inspection features. This allows you to simplify the firewall policy set significantly and control access based on the following:
![]() User identity
User identity
![]() Application name and type
Application name and type
![]() URLs
URLs
![]() Reputation scores
Reputation scores
![]() Additional context-specific connection properties
Additional context-specific connection properties
CX Integration Overview
Cisco ASA implements next-generation firewall services for context-aware inspection with the help of hardware and software ConteXt Security (CX) modules. This defense-in-depth approach enables you to block traditional network attacks with regular ASA policies and offload complex application visibility and content filtering tasks to the CX module. Because an ASA and the CX modules use separate hardware resources, this distributed processing method allows you to achieve the optimal performance for the overall next-generation firewall system.
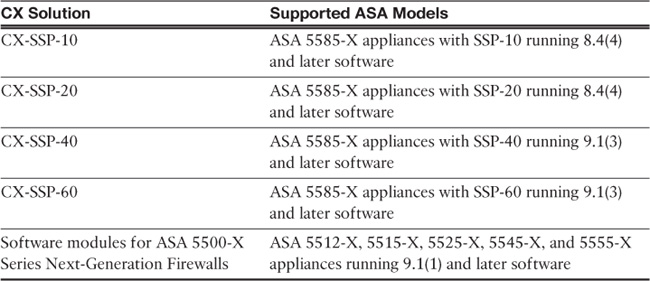
There are multiple available CX solutions for different ASA models, as shown in Table 9-1.
ASA CX runs its own operating system and maintains an independent set of policies.
You must configure the CX module with Cisco Prime Security Manager (PRSM). You can also use PRSM to manage a limited set of ASA features in certain configurations, as discussed later in the “Managing ASA CX with PRSM” section of this chapter. Otherwise, you can continue to manage the host ASA with Cisco Adaptive Security Device Manager (ASDM) or Cisco Security Manager (CSM) products.
ASA applies context-aware security policies to desired traffic by redirecting applicable connections to the CX module for external inspection. This redirection occurs as a step in the normal packet processing path, similarly to ASA application inspection engines or the Intrusion Prevention System (IPS) module. In the normal production mode, ASA CX inspects all packets locally before taking a preventive action or sending them back to the ASA for further processing.
Selectively redirect traffic to CX from the ASA by using the cxsc action within the Modular Policy Framework (MPF) and either defining specific traffic classes at Layer 3 and 4 or matching all transit flows. Just as with the most advanced security settings, CX redirection matches on a per-connection basis. ASA still applies basic stateful inspection to the redirected packets, but TCP packet reordering happens on the CX module itself. This approach removes the additional processing load from the ASA and allows ASA CX to implement advanced inspection techniques and selectively modify or inject packets in the transit connections. This behavior is different from that of most TCP-based application inspection engines and IPS traffic redirection policies where the ASA itself performs the TCP packet reordering tasks.
Logical Architecture
Figure 9-1 illustrates a basic block diagram of ASA CX module connections.

An ASA CX module relies on several physical and virtual interfaces to communicate with the host ASA and external network:
![]() Internal-Control: ASA uses this interface for control communication with the CX module. Module initialization, health monitoring keepalives, basic configuration, and other control messages use this link.
Internal-Control: ASA uses this interface for control communication with the CX module. Module initialization, health monitoring keepalives, basic configuration, and other control messages use this link.
![]() Internal-Data: The CX module receives redirected network traffic on this interface. ASA tags each redirected packet with a special header to provide additional metadata, such as VPN client information. Proxy messages for active user authentication use this link as well. After processing, the CX module forwards permitted packets back to the ASA using this interface. ASA CX also has the ability to modify transit redirected packets and even inject messages into the connection flows.
Internal-Data: The CX module receives redirected network traffic on this interface. ASA tags each redirected packet with a special header to provide additional metadata, such as VPN client information. Proxy messages for active user authentication use this link as well. After processing, the CX module forwards permitted packets back to the ASA using this interface. ASA CX also has the ability to modify transit redirected packets and even inject messages into the connection flows.
![]() Management: You must connect and configure this interface to manage the CX module from the network. The ASA backplane connection does not provide external management access. ASA CX also uses this interface to download critical software and database updates. For instance, you must allow the CX module to update URL categorization and reputation information from Cisco either directly or through an HTTP proxy.
Management: You must connect and configure this interface to manage the CX module from the network. The ASA backplane connection does not provide external management access. ASA CX also uses this interface to download critical software and database updates. For instance, you must allow the CX module to update URL categorization and reputation information from Cisco either directly or through an HTTP proxy.
Hardware Modules
Cisco ASA 5585-X appliances rely on external CX hardware modules with their own disk storage, memory, and processing complexes. Such modules plug into the top expansion slot on the host chassis. The backplane connection with the chassis provides physical Internal-Data and Internal-Control interfaces. The throughput capability of the Internal-Data interface significantly exceeds the maximum forwarding capacity of all ASA CX modules, so this interface never becomes the performance bottleneck.
Even though CX-SSP modules come with multiple Gigabit Ethernet and 10-Gigabit Ethernet interfaces, ASA CX software does not use these ports directly. You must configure these connections from the ASA side as you would any other onboard interfaces. ASA CX software only has access to the dedicated management interfaces on the module. You must physically connect one of these CX management interface to the network as you would any other endpoint. You will not be able to configure ASA CX policies without this connection. As indicated in the previous section, the CX module software also uses this interface for downloading engine updates, signature packages, and real-time categorization and reputation databases.
Keep in mind that regular ASA security policies apply to CX management traffic when it traverses the firewall. You must permit the appropriate management connections to and from the module as with any other transit network traffic. ASA CX requires Internet connectivity to continuously receive critical categorization and reputation information from Cisco, so you may need to configure appropriate NAT policies as well. You can also use an HTTP proxy server if you cannot provide a CX module with direct access to the Internet.
Software Modules
Cisco ASA 5500-X appliances do not require an external module to implement the Next-Generation Firewall Services. The necessary dedicated hardware for ASA CX is already built into the appliance. However, you may need to install one or two solid-state drives (SSD) if you want to add the ASA CX package to an existing device. Only use Cisco-provided SSD parts with 120-GB capacity. ASA 5512-X, ASA 5515-X, and ASA 5525-X models require a single SSD. ASA 5545-X and ASA 5555-X appliances use two redundant SSDs in a RAID1 array. Use the show raid command on the ASA to check the status of disk array members.
When you need to implement context-aware policies, you must install the appropriate ASA CX software package on the ASA. A software CX module is no different in functionality or logical operation from the hardware module. Virtual Internal-Data and Internal-Control interfaces provide the link between IPS and CX containers. CX software runs in a separate container with dedicated memory and CPU cores, so it never competes for resources with the ASA software image.
A software CX module still requires a physical management network connection. The Management0/0 interface on ASA 5500-X appliances internally extends to both the ASA and ASA CX containers. This interface must always operate in the management-only mode, and you cannot manually remove this command and use Management 0/0 for any other purpose. You cannot route management traffic to and from the ASA CX within the appliance, so an external switch or router is required. You have two options of provisioning management connectivity to a software CX module:
![]() Connect Management0/0 to the dedicated management network: Both ASA and CX can use this interface for external management connectivity. You will need to connect this network to a router in order to provide ASA CX with Internet connectivity.
Connect Management0/0 to the dedicated management network: Both ASA and CX can use this interface for external management connectivity. You will need to connect this network to a router in order to provide ASA CX with Internet connectivity.
![]() Connect Management0/0 to a production network: With this approach, you can use another logical interface on the ASA to provide CX with Internet connectivity. For instance, you can connect the software module to your protected inside network. In this case, you will only set an IP address on the ASA CX and leave Management0/0 unconfigured on the ASA side. Keep in mind that ASA does not support overlapping subnets between different logical interfaces.
Connect Management0/0 to a production network: With this approach, you can use another logical interface on the ASA to provide CX with Internet connectivity. For instance, you can connect the software module to your protected inside network. In this case, you will only set an IP address on the ASA CX and leave Management0/0 unconfigured on the ASA side. Keep in mind that ASA does not support overlapping subnets between different logical interfaces.
Figure 9-2 illustrates the first connectivity option. ASA CX has the management IP of 192.168.100.10 on the dedicated management subnet. The Management0/0 interface is enabled on the ASA as well; it has the IP address of 192.168.100.11. Both ASA and CX use an external router at 192.168.100.1 as their default gateway to reach other internal networks as well as the Internet. This is very similar to how you would connect the management interface on a hardware CX module.

High Availability
ASA supports the CX module with failover but not clustering. However, an ASA CX module in each failover peer does not exchange configuration or connection state information with the module in the other unit. You must either configure both ASA CX modules in a failover pair independently or leverage PRSM Multiple Device mode. On a switchover event, the newly active ASA will not redirect packets for any existing connections to the local ASA CX module. Only new connections after the switchover go through CX services.
Each ASA monitors the health of its CX module at multiple levels:
![]() Data Plane Status: ASA ensures that it can successfully exchange data with the CX module over the Internal-Data interface. If this interface goes down unexpectedly, the ASA considers the CX as failed.
Data Plane Status: ASA ensures that it can successfully exchange data with the CX module over the Internal-Data interface. If this interface goes down unexpectedly, the ASA considers the CX as failed.
![]() Control Plane Status: ASA and the CX module exchange periodic keepalives to ensure that both devices are operational. If the ASA stops receiving keepalives from the ASA CX, the health monitoring process considers the module as failed.
Control Plane Status: ASA and the CX module exchange periodic keepalives to ensure that both devices are operational. If the ASA stops receiving keepalives from the ASA CX, the health monitoring process considers the module as failed.
![]() Application Status: ASA CX software monitors the status of its processes and restarts them in case of a failure. If the module detects an unrecoverable failure, it signals the ASA that it failed. If the module is unable to communicate with the ASA, the other health monitoring methods still detect the failure.
Application Status: ASA CX software monitors the status of its processes and restarts them in case of a failure. If the module detects an unrecoverable failure, it signals the ASA that it failed. If the module is unable to communicate with the ASA, the other health monitoring methods still detect the failure.
You can determine how the ASA handles connections that fall under the CX redirection policies when the ASA CX fails. You can use different modes for different classes of traffic under the MPF:
![]() Fail-open: In this mode, ASA permits new and existing transit connections even if CX cannot inspect them. Only use this option if network reachability for the given traffic is more important than context-aware policy enforcement.
Fail-open: In this mode, ASA permits new and existing transit connections even if CX cannot inspect them. Only use this option if network reachability for the given traffic is more important than context-aware policy enforcement.
![]() Fail-close: In this mode, ASA blocks matching transit connections until the CX module becomes available again. This option ensures that the associated traffic always undergoes the complete set of inspection policies. Example 9-1 shows the syslog message that the ASA generates in this mode.
Fail-close: In this mode, ASA blocks matching transit connections until the CX module becomes available again. This option ensures that the associated traffic always undergoes the complete set of inspection policies. Example 9-1 shows the syslog message that the ASA generates in this mode.
Example 9-1 Syslog Message with a Fail-Close Policy and ASA CX Down
%ASA-3-429001: CXSC card not up and fail-close mode used. Dropping TCP packet
from inside:192.168.3.112/34129 to DMZ:172.16.171.125/80
When an ASA operates in failover with any CX redirection policies configured, an ASA CX failure immediately triggers a switchover event. Keep in mind that the ASA does not monitor the state of the CX module for failover purposes if no CX redirection policies exist. You must always disable CX traffic redirection before performing any maintenance operations or reloading the ASA CX module, to avoid a failover event. The fail-open and fail-close actions are always secondary to failover, so they only trigger when the host ASA is the last operational failover pair member.
ASA CX Architecture
By design, ASA CX software performs the minimum necessary processing on every transit packet. If a definitive policy decision can be made based on the IP addresses or endpoint reputation data, there is no need to spend additional processing resources on identifying the specific application or decrypting the flow. This is another example of the defense-in-depth approach that the ASA utilizes very effectively in its operation.
When the policy decision involves multiple actions, the ASA CX distributes the work to several modules that process a packet in parallel. This approach delivers much higher performance than the traditional serialized packet processing techniques with many overlapping actions. As soon as one or more modules report an outcome that is sufficient for a policy decision, the ASA CX permits the packet or takes a preventive action. Each packet consumes just enough resources to make the definitive decision based on the configured policy.
ASA CX software has the following main components:
Figure 9-3 depicts these main components of the ASA CX software architecture and their relationships with each other.
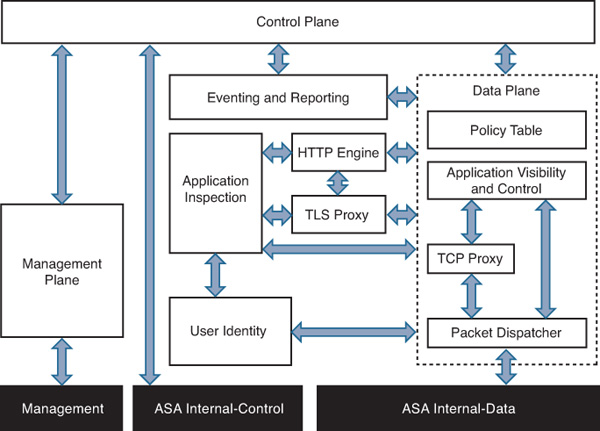
Data Plane
All traffic redirected to ASA CX from the ASA must pass through the data plane. Other components provide this module with information that is sufficient to process the majority of transit traffic. The Data Plane module accelerates its forwarding functions to provide the highest possible performance for CX inspection. This module has several critical components:
![]() Policy Table: This table represents all of the security policies that you configure on ASA CX. The Data Plane module uses this table to make local policy decisions or redirect incoming traffic to other modules.
Policy Table: This table represents all of the security policies that you configure on ASA CX. The Data Plane module uses this table to make local policy decisions or redirect incoming traffic to other modules.
![]() Packet Dispatcher: This component receives packets from the backplane interface of the ASA and prepares them for CX processing. It detaches the appropriate headers and fills out the connection data structures based on the ASA meta information. Packet Dispatcher forwards TCP packets to the TCP Proxy module for reordering and other advanced security checks. It sends other packets to the Application Visibility and Control module for processing. This component forwards self-generated and successfully inspected packets back into the network through the ASA.
Packet Dispatcher: This component receives packets from the backplane interface of the ASA and prepares them for CX processing. It detaches the appropriate headers and fills out the connection data structures based on the ASA meta information. Packet Dispatcher forwards TCP packets to the TCP Proxy module for reordering and other advanced security checks. It sends other packets to the Application Visibility and Control module for processing. This component forwards self-generated and successfully inspected packets back into the network through the ASA.
![]() TCP Proxy: This component reorders packets that belong to transit TCP connections before the Application Visibility and Control module can inspect them. Depending on the necessary level of inspection, TCP Proxy can completely reassemble application level messages and inject new packets into the transit stream. In other words, TCP Proxy allows the ASA CX to seamlessly insert itself in the middle of a TCP connection and communicate independently with both of the original endpoints without breaking the application flow.
TCP Proxy: This component reorders packets that belong to transit TCP connections before the Application Visibility and Control module can inspect them. Depending on the necessary level of inspection, TCP Proxy can completely reassemble application level messages and inject new packets into the transit stream. In other words, TCP Proxy allows the ASA CX to seamlessly insert itself in the middle of a TCP connection and communicate independently with both of the original endpoints without breaking the application flow.
![]() Application Visibility and Control: This component inspects the incoming packets and reassembled messages to identify the particular application for the flow. It inspects multiple different parameters of the payload to accurately identify the specific application across any TCP or UDP ports. After a match is made, the data plane can make an immediate policy decision or pass the packet to another module for additional processing.
Application Visibility and Control: This component inspects the incoming packets and reassembled messages to identify the particular application for the flow. It inspects multiple different parameters of the payload to accurately identify the specific application across any TCP or UDP ports. After a match is made, the data plane can make an immediate policy decision or pass the packet to another module for additional processing.
Eventing and Reporting
This module performs two tasks:
![]() Event collection: Receives and stores the events from all the other components in the local database. Events may involve policy decisions made on transit traffic, system activities, and debugs.
Event collection: Receives and stores the events from all the other components in the local database. Events may involve policy decisions made on transit traffic, system activities, and debugs.
![]() Report generation: When you generate a report, this module retrieves the matching events from its database according to the supplied filters and passes this data through the management plane to PRSM. The purpose of this independent module is to offload the report processing tasks from the data inspection components.
Report generation: When you generate a report, this module retrieves the matching events from its database according to the supplied filters and passes this data through the management plane to PRSM. The purpose of this independent module is to offload the report processing tasks from the data inspection components.
User Identity
This module communicates to different network entities to establish user identity information. With passive authentication for transit connections, ASA CX retrieves the username-to–IP address mappings from the Cisco Context Directory Agent (CDA) or the Cisco Active Directory Agent (AD Agent). This component also connects to generic Lightweight Directory Access Protocol (LDAP) servers and Active Directory (AD) domain controllers to retrieve group memberships for identified users.
The user identity module also implements active authentication for transit and to-the-box management connections against LDAP and AD servers. For transit HTTP connections, the module redirects the client to the authentication proxy and instructs the ASA to intercept that connection. The user then logs in through the ASA CX authentication web page before being authorized to proceed to their destination. When authenticated over HTTP, the client can open any other connections through CX according to the user-based policies.
TLS Decryption Proxy
The Transport Layer Security (TLS) Decryption Proxy module allows CX to apply context-aware policies even to encrypted connections. Similarly to the TCP Proxy, this component transparently inserts the ASA CX in the middle of an encrypted flow to inspect the application traffic in clear text. TLS Decryption Proxy maintains separate encrypted connection legs with the original client and server. The HTTP Inspection Engine is the primary user of this functionality, which allows ASA CX to control HTTPS connections. To accelerate the processing of transit traffic, ASA CX runs multiple independent instances of this module that process transit connections in parallel.
HTTP Inspection Engine
As the name implies, this module exclusively inspects HTTP connections. It uses endpoint reputation and URL categorization information to make policy decisions. It also examines cleartext HTTP context received from the TLS Decryption Proxy module. Because HTTP supports tunneling of many other protocols, the HTTP Inspection Engine may pass certain packets to the application inspection engine. As with the TLS decryption proxy module, ASA CX instantiates multiple HTTP Inspection Engine threads in parallel.
Application Inspection Engine
This component performs inspection of all other advanced application flows, including protocols tunneled through HTTP. It also tracks secondary connections for such protocols as FTP and supports file blocking. This module is also capable of inspecting cleartext data from TLS Decryption Proxy. As with the other packet processing engines, CX runs multiple parallel instances of the Application Inspection Engine.
Management Plane
This major component is in charge of all to- and from-the-box management connections with ASA CX. It accepts all CLI and PRSM commands and translates them into universal and specific actions for other modules. It runs an HTTP server to service PRSM sessions; it is also capable of establishing outgoing HTTP connections to download software/signature/database updates. The management plane maintains user information for role-based access control (RBAC).
Control Plane
In addition to handling basic network infrastructure functions, such as Address Resolution Protocol (ARP) requests and responses, the control plane manages the overall operation of all other modules and processes. If another process fails, this component attempts to restart it. Additionally, it handles all of the interaction with the ASA backplane interfaces, including health monitoring with the keepalive packets.
The Control plane heavily interfaces with the management plane to receive and send to- and from-the-box packets as well as apply feature licenses. When you enable CX for network participation, this module also collects the telemetry data and periodically uploads it to Cisco.
Preparing ASA CX for Configuration
All hardware ASA CX modules come with preinstalled system software. You can re-image the module if you need to completely clear the current configuration or load a different software version. Keep in mind that you can perform CX software upgrades without performing a complete re-image and losing the configuration and events databases.
You may have to install the software CX module on ASA 5500-X appliances when adding context-aware services to an existing ASA deployment. Recall that you must install one or two compatible SSDs first. If the ASA already has the ASA IPS package installed, you must remove it first with the sw-module module ips uninstall command. Example 9-2 shows output of the show module command where the IPS module is already installed.
Example 9-2 Checking ASA IPS Module Installation Status
asa# show module
Mod Card Type Model Serial No.
---- -------------------------------------------- ------------------ -----------
0 ASA 5545-X with SW, 8 GE Data, 1 GE Mgmt ASA5545 FCH11SOTAOT
ips ASA 5545-X IPS Security Services Processor ASA5545-IPS FCH11SOTAOT
cxsc Unknown N/A FCH11SOTAOT
Mod MAC Address Range Hw Version Fw Version Sw Version
---- --------------------------------- ------------ ------------ ---------------
0 0001.111f.5585 to 0001.111f.558e 1.0 2.1(9)8 9.1(2)
ips 0001.1111.5583 to 0001.1111.5583 N/A N/A 7.1(7)E4
cxsc 0001.1111.5583 to 0001.1111.5583 N/A N/A
Mod SSM Application Name Status SSM Application Version
---- ------------------------------ ---------------- --------------------------
ips IPS Up 7.1(4)E4
cxsc Unknown No Image Present Not Applicable
Mod Status Data Plane Status Compatibility
---- ------------------ --------------------- -------------
0 Up Sys Not Applicable
ips Up Up
cxsc Unresponsive Not Applicable
Mod License Name License Status Time Remaining
---- -------------- --------------- ---------------
ips IPS Module Enabled perpetual
You need to perform the following steps to install or reinstall ASA CX software on a CX-SSP or an ASA 5500-X:
1. Load the CX bootstrap image to prepare the installation. The bootstrap image is fairly small, so you would typically transfer it over TFTP. You must download the correct image type for your ASA CX module from Cisco.com; this bootstrap image is typically called ASA CX Boot Software. The image installation procedure is different for hardware and software CX modules:
A1. When using CX-SSP on an ASA 5585-X appliance, you must connect to the module console and reload it. When you see the following prompt, press the Escape key to enter ROMMON mode:
Cisco Systems ROMMON Version (2.0(7)0) #0: Wed Sep 22 12:42:00 PDT 2010
A2. Connect the Management0 interface of the CX-SSP to the network and place the bootstrap image file on a TFTP server that is accessible from the CX management interface. Then set the IP address of the CX interface, TFTP server, and default gateway, and specify the bootstrap image filename. If the TFTP server and ASA CX are on the same network, use the TFTP server IP address as the default gateway. The following configuration sets the CX management IP address to 172.16.162.241 with the default gateway of 172.16.162.225; ASA CX will download the bootstrap image called asacx-boot-9.1.2-42.img from the TFTP server at 172.16.171.125.
rommon #1> ADDRESS= 172.16.162.241
rommon #2> SERVER=172.16.171.125
rommon #3> GATEWAY= 172.16.162.225
rommon #4> IMAGE= asacx-boot-9.1.2-42.img
A3. Start the TFTP download process to load the bootstrap image:
rommon #5> tftp
ROMMON Variable Settings:
ADDRESS=172.16.162.241
SERVER=172.16.171.125
GATEWAY=172.16.162.225
PORT=Management0/0
VLAN=untagged
IMAGE=asacx-boot-9.1.2-42.img
CONFIG=
LINKTIMEOUT=20
PKTTIMEOUT=4
RETRY=20
tftp [email protected] via 172.16.162.225
!!!!!!!!!!!!!!!!!!!!!!!!!!!!!!!!!!!!!!!!!!!!!!!!!!!!!!!!!!!!!!!!!!!!!!!!!!!!!!!!!
!!!!!!!!
[...]
!!!!!!!!!!!!!!!!!!!!!!!!!!!!!!!!!!!!!!!!!!!!!!!!
Received 69011672 bytes
Launching TFTP Image...
Execute image at 0x14000
[STUB]
Boot protocol version 0x209
[...]
starting Busybox inetd: inetd... done.
Starting ntpd: done
Starting syslogd/klogd: done
Cisco ASA CX Boot Image 9.1.2
asacx login:
B1. On an ASA 5500-X appliance, simply transfer the CX bootstrap image into the local flash and execute the following commands; make sure to reference the correct bootstrap image filename:
asa# sw-module module cxsc recover configure image disk0:/asacx-5500x-
boot-9.1.2-42.img
asa# sw-module module cxsc recover boot
B2. After about 15 minutes, use the session cxsc console command to access the module. If the bootstrap image is ready, you should see the login prompt.
asa# session cxsc console
Establishing console session with slot 1
Opening console session with module cxsc.
Connected to module cxsc. Escape character sequence is 'CTRL-SHIFT-6 then x'.
cxsc login:
The remaining steps are the same between the hardware and software ASA CX modules.
2. Log in as admin with the default password of Admin123:
asacx login: admin
Password:
Cisco ASA CX Boot 9.1.2 (42)
Type ? for list of commands
asacx-boot>
3. Issue the partition command to prepare the disk drives for system image installation. You must complete this critical step before proceeding.
asacx-boot> partition
[...]
Partition Successfully Completed
4. Issue the setup command to configure the basic CX settings through an interactive dialog. The values in the square brackets show the defaults, which you can accept by pressing Enter. This example uses Edge-CX as the CX hostname. You can use the same IP address settings for the CX management interface as for the TFTP bootstrap image transfer in ROMMON.
asacx-boot> setup
Welcome to Cisco Prime Security Manager Setup
[hit Ctrl-C to abort]
Default values are inside []
Enter a hostname [asacx]: Edge-CX
Do you want to configure IPv4 address on management interface?(y/n) [Y]: Y
Do you want to enable DHCP for Ipv4 address assignment on management interface?(y/n) [N]: N
Enter an Ipv4 address [192.168.8.8]: 172.16.162.241
Enter the netmask [255.255.255.0]: 255.255.255.224
Enter the gateway [192.168.8.1]: 172.16.162.225
5. You can also configure a static IPv6 IP address on the CX management interface or default to stateless auto configuration:
Do you want to configure static IPv6 address on management interface?(y/n) [N]: N
Stateless autoconfiguration will be enabled for IPv6 addresses.
6. Configure a DNS server for outbound connectivity and set the local domain name. If you plan to integrate the CX with Active Directory for user identity discovery (covered later in this chapter), be sure to use a DNS server that can resolve queries for your Active Directory domain. You can also configure a list of default search domains for certain auto-completion functions. In this example, CX uses a DNS server at 172.16.162.228 for connections to Cisco.com and other destinations and uses example.com as the local domain:
Enter the primary DNS server IP address: 172.16.162.228
Do you want to configure Secondary DNS Server?(y/n) [N]: N
Do you want to configure Local Domain Name?(y/n) [N]: Y
Enter the local domain name: example.com
Do you want to configure Search domains(y/n) [N]: N
7. Configure ASA CX to synchronize the clock with an NTP server to make the reports more accurate. This example uses 172.16.162.228 for both DNS and NTP:
Do you want to enable the NTP service? [Y]: Y
Enter the NTP servers separated by commas: 172.16.162.228
8. The CX displays the complete configuration and requests your confirmation. You can always cancel the setup dialog and start over. If everything looks good, apply the changes and exit the dialog:
Please review the final configuration:
Hostname: Edge-CX
Management Interface Configuration
[...]
Apply the changes?(y,n) [Y]: Y
Configuration saved successfully!
Applying...
Done.
Press ENTER to continue...
asacx-boot>
9. Install the ASA CX system image. This image is relatively large, so you can only transfer it using HTTP, HTTPS, or FTP. Download the appropriate ASA CX system software image from Cisco.com and place it on a server that is accessible from the CX management interface. Then, use the system install command to load the system software onto CX:
asacx-boot> system install http://172.16.171.125/asacx-sys-9.1.2-42.pkg
Verifying
Downloading
Extracting
Package Detail
Description: Cisco ASA CX System Upgrade
Requires reboot: Yes
Do you want to continue with upgrade? [y]: Y
Warning: Please do not interrupt the process or turn off the system.
Doing so might leave system in unusable state.
Upgrading
Stopping all the services ...
Starting upgrade process ...
10. After the image loads, press Enter to reload the system:
Reboot is required to complete the upgrade. Press Enter to reboot the system.
11. If prompted during the reload, choose the default boot option of Cisco ASA CX Image. After the ASA CX boots, proceed with configuring it through PRSM.
Managing ASA CX with PRSM
You can use the ASA CX CLI only for basic configuration and troubleshooting tasks. You must use PRSM to configure all advanced settings and define the context-aware policies on an ASA CX module. There are two modes of device management in PRSM:
![]() Single Device mode: In this mode, you manage the CX by connecting directly to its management IP address over HTTPS. An instance of PRSM is always running on the CX module to allow remote administration. You can use the interactive management interface directly through a supported web browser without any additional software. This management mode is appropriate only if you have only a few ASA CX modules and intend to configure each of these modules separately. You cannot manage the host ASA chassis with this local PRSM instance, but the complete CX feature set is available.
Single Device mode: In this mode, you manage the CX by connecting directly to its management IP address over HTTPS. An instance of PRSM is always running on the CX module to allow remote administration. You can use the interactive management interface directly through a supported web browser without any additional software. This management mode is appropriate only if you have only a few ASA CX modules and intend to configure each of these modules separately. You cannot manage the host ASA chassis with this local PRSM instance, but the complete CX feature set is available.
![]() Multiple Device mode: You can also install a separately licensed PRSM instance as a virtual machine on an external server. This external PRSM server maintains its own upgradeable software, management interface, event store, and a CLI for basic configuration and troubleshooting purposes. Multiple Device mode allows the PRSM to fully manage multiple CX modules and even configure certain features on ASA appliances. You still use the same interactive web-based management interface as in Single Device mode, but all management connections use the external PRSM server instead. After you add an ASA CX to an external PRSM server, you can no longer manage the module directly or add to another PRSM instance.
Multiple Device mode: You can also install a separately licensed PRSM instance as a virtual machine on an external server. This external PRSM server maintains its own upgradeable software, management interface, event store, and a CLI for basic configuration and troubleshooting purposes. Multiple Device mode allows the PRSM to fully manage multiple CX modules and even configure certain features on ASA appliances. You still use the same interactive web-based management interface as in Single Device mode, but all management connections use the external PRSM server instead. After you add an ASA CX to an external PRSM server, you can no longer manage the module directly or add to another PRSM instance.
The following features are available only with a multiple-device PRSM instance:
![]() Unified monitoring: PRSM retrieves event and status information from all managed ASA CX devices. It also acts as a syslog server for the managed ASA devices in PRSM 9.2(1) and later software. You can see the consolidated health and event data on the PRSM dashboards and generate unified reports for an end-to-end view of your secure network.
Unified monitoring: PRSM retrieves event and status information from all managed ASA CX devices. It also acts as a syslog server for the managed ASA devices in PRSM 9.2(1) and later software. You can see the consolidated health and event data on the PRSM dashboards and generate unified reports for an end-to-end view of your secure network.
![]() Shared objects and policies: You can share context-aware objects and policies between multiple managed ASA CX modules. In PRSM 9.2(1) and later, you can also share traditional policy sets between managed ASA devices.
Shared objects and policies: You can share context-aware objects and policies between multiple managed ASA CX modules. In PRSM 9.2(1) and later, you can also share traditional policy sets between managed ASA devices.
![]() Universal policies: Available in PRSM 9.2(1) and later, these mandatory policies apply to all managed devices. A top-level universal policy set defines the rules to enforce before the managed device applies its local or shared policies. Similarly, a bottom-level universal policy set always applies after the local policies. You can leverage this feature to enforce common organizational security policies on all of your ASA appliances and CX modules.
Universal policies: Available in PRSM 9.2(1) and later, these mandatory policies apply to all managed devices. A top-level universal policy set defines the rules to enforce before the managed device applies its local or shared policies. Similarly, a bottom-level universal policy set always applies after the local policies. You can leverage this feature to enforce common organizational security policies on all of your ASA appliances and CX modules.
![]() Deployment Manager: You can use PRSM to build and schedule configuration deployment jobs across multiple devices. You can also selectively approve or discard change requests from different administrative users and review the history of past changes.
Deployment Manager: You can use PRSM to build and schedule configuration deployment jobs across multiple devices. You can also selectively approve or discard change requests from different administrative users and review the history of past changes.
![]() Centralized license management: You can maintain a single pool of ASA CX feature licenses in PRSM and move them between different managed modules based on current needs.
Centralized license management: You can maintain a single pool of ASA CX feature licenses in PRSM and move them between different managed modules based on current needs.
![]() CX failover support: Even though ASA CX modules in a failover ASA pair do not share the connection state, you can use PRSM to maintain configuration parity.
CX failover support: Even though ASA CX modules in a failover ASA pair do not share the connection state, you can use PRSM to maintain configuration parity.
![]() ASA management: Prior to PRSM 9.2(1) software, a multiple-device management instance could only configure a limited set of CX traffic redirection commands on the host ASA. PRSM 9.2(1) and later instances can manage a broader range of ASA features and policies, including unified objects, interfaces, ACLs, NAT, logging, and failover.
ASA management: Prior to PRSM 9.2(1) software, a multiple-device management instance could only configure a limited set of CX traffic redirection commands on the host ASA. PRSM 9.2(1) and later instances can manage a broader range of ASA features and policies, including unified objects, interfaces, ACLs, NAT, logging, and failover.
All examples in this chapter assume that PRSM is operating in Single Device mode. In this mode, any configured policies and settings automatically apply just to the local device. When using Multiple Device mode, you would manage individual ASA CX modules very similarly after selecting the specific device in PRSM and linking the appropriate configuration elements to it.
Using PRSM
To access the on-module PRSM interface, you need to point your web browser to the ASA CX management IP address over HTTPS. After accepting the certificate warning, you should see the login screen, as shown in Figure 9-4.

Use the default administrative user admin and password Admin123 to log in for the first time. You should immediately change this user’s password, as discussed in the next section, “Configuring User Accounts.”
When you log in to an ASA CX module running 9.2(1) software for the first time, PRSM displays a screen requesting you to enable the network participation feature on this module, as shown in Figure 9-5.
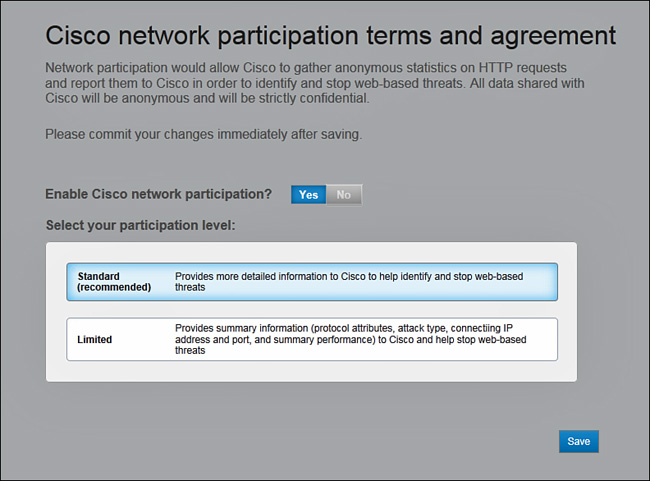
When enabled, network participation securely uploads consolidated contextual data on transit HTTP requests and the associated performance information to Cisco every 5 minutes. This feature requires the ASA CX module to have direct access to the Internet from its management interface. You can choose between Standard and Limited participation modes, depending on how much information you want to share. All shared data remains anonymous and strictly confidential. You can also choose to disable all participation on this screen by clicking No. After you make your selection, click Save to continue. You can always change your selection by navigating to Administration > Network Participation in PRSM.
Any changes that you make in PRSM do not automatically apply to the managed ASA CX module. This is very similar to the functionality of ASDM, where you have to click Apply to push the configuration changes to the ASA. However, this approach is different from that of using the ASA CLI, where all configuration changes go into effect immediately. PRSM puts all changes into a deployment queue, enabling you to commit or discard them later. Unlike ASDM, these pending changes remain in the queue even if you log out of PRSM and log back in later.
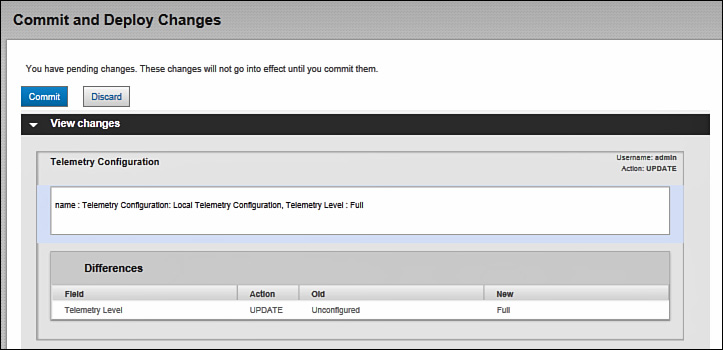
You can always see if there are uncommitted changes by looking at the upper right corner of the PRSM management interface. If you see a green circle with the No Pending Changes status, then your ASA CX configuration is up to date. If you see an orange circle with the Changes Pending message, then you have some changes to commit or discard. After you enable network participation during the first login, PRSM places the necessary configuration changes into the queue. You can review them by clicking the status message in the upper right corner of any PRSM screen. Figure 9-6 shows a sample screen with the uncommitted changes for network participation. Click Commit to apply these changes to the ASA CX running configuration, or click Discard to clear them. You can also go to Administration > Change History to review all past configuration changes.
PRSM provides a simple interface with a lot of interactivity, automation, and cross-references. The following top-level sections are available:
![]() Dashboard: You can start by reviewing the various tabs that provide you full visibility into the module health, network security status, application patterns, and user behavior. You can also generate various security and user behavior reports from this section and save them to the local management station in PDF format.
Dashboard: You can start by reviewing the various tabs that provide you full visibility into the module health, network security status, application patterns, and user behavior. You can also generate various security and user behavior reports from this section and save them to the local management station in PDF format.
![]() Events: Here you can filter and review CX system and policy messages based on many flexible criteria, including date and time ranges, IP addresses, user identities, and other contextual flow information. You can also use this section to troubleshoot certain CX system and network connectivity issues.
Events: Here you can filter and review CX system and policy messages based on many flexible criteria, including date and time ranges, IP addresses, user identities, and other contextual flow information. You can also use this section to troubleshoot certain CX system and network connectivity issues.
![]() Configurations: This is where you configure all of the context-aware policies, advanced protection features, user identity and authentication parameters, TLS decryption policies, certificates, application database update settings, and logging.
Configurations: This is where you configure all of the context-aware policies, advanced protection features, user identity and authentication parameters, TLS decryption policies, certificates, application database update settings, and logging.
![]() Components: This is where you can view known applications, micro-applications, known threat signature definitions, and predefined policy objects. You can also define custom objects for referencing in the context-aware policies.
Components: This is where you can view known applications, micro-applications, known threat signature definitions, and predefined policy objects. You can also define custom objects for referencing in the context-aware policies.
![]() Administration: Here you can configure ASA CX management users, apply licenses, import custom PRSM SSL certificates, perform configuration database backups, upgrade PRSM and CX software packages, review configuration change history, edit end-user notification templates for blocked connections or warnings in CX 9.2(1) or later software, and configure network participation. You can also check the About tab to determine the current CX and PRSM software versions, ASA CX model identifier and serial number, and PRSM management mode.
Administration: Here you can configure ASA CX management users, apply licenses, import custom PRSM SSL certificates, perform configuration database backups, upgrade PRSM and CX software packages, review configuration change history, edit end-user notification templates for blocked connections or warnings in CX 9.2(1) or later software, and configure network participation. You can also check the About tab to determine the current CX and PRSM software versions, ASA CX model identifier and serial number, and PRSM management mode.
On most tabs, you can click the I Want To button to open the drop-down menu with available configuration actions. Feel free to navigate the interface, make some changes, and get comfortable with the configuration flow. You can always choose to discard the unwanted changes instead of deploying them to the operational ASA CX module.
Configuring User Accounts
Navigate to Administration > Users to add new PRSM users or change settings for the existing users. Figure 9-7 shows this screen with all the configured users grouped by role. You have the option of authenticating each user locally or relying on LDAP or AD servers.
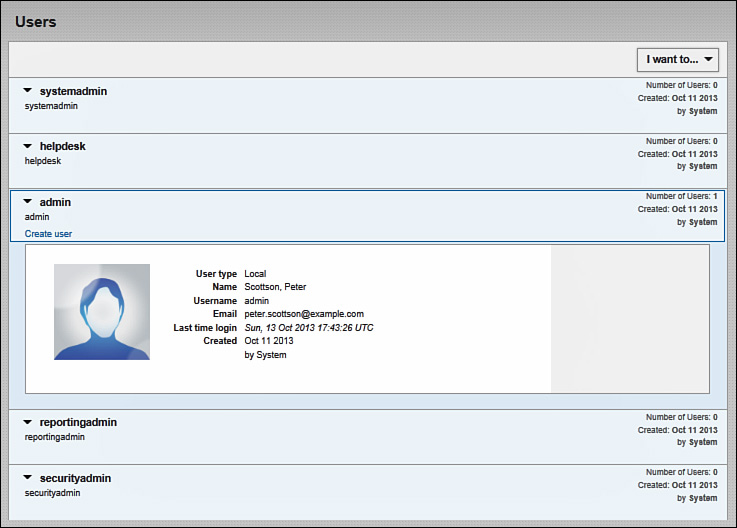
PRSM and CX support the following user roles:
![]() Systemadmin: System administrators can configure global device properties, such as user accounts or logging. They can also upgrade CX and PRSM software. However, these users cannot view or change CX security policies.
Systemadmin: System administrators can configure global device properties, such as user accounts or logging. They can also upgrade CX and PRSM software. However, these users cannot view or change CX security policies.
![]() Helpdesk: Help Desk users typically troubleshoot network connectivity problems. They can view the dashboards, events, and all configurations. However, they cannot change any settings except their own account information.
Helpdesk: Help Desk users typically troubleshoot network connectivity problems. They can view the dashboards, events, and all configurations. However, they cannot change any settings except their own account information.
![]() Admin: Super administrators have full control over the system and all the other user accounts.
Admin: Super administrators have full control over the system and all the other user accounts.
![]() Reportingadmin: Reporting administrators can only view dashboards and events and generate reports. They cannot view any configurations or change any settings except their account information.
Reportingadmin: Reporting administrators can only view dashboards and events and generate reports. They cannot view any configurations or change any settings except their account information.
![]() Securityadmin: Security administrators have full control over the context-aware policy sets and associated objects. They can also configure most other ASA CX settings.
Securityadmin: Security administrators have full control over the context-aware policy sets and associated objects. They can also configure most other ASA CX settings.
Select a user category role from the list and click Create User to add a new account. After logging into the ASA CX for the first time, you should change the password for the default administrative user and fill out the rest of the account details. Click Edit User under the admin user account to display the dialog box shown in Figure 9-8. You would see a very similar screen when adding a new user.

You must complete the following fields when adding or changing a user:
![]() User Type: You can choose from local, remote, or sso only when creating a new user. PRSM uses password-based authentication for local users. Remote user information comes from an LDAP or an AD server. Single sign-on (SSO) users enable easier CSM integration. In this example, the default administrative account is already local.
User Type: You can choose from local, remote, or sso only when creating a new user. PRSM uses password-based authentication for local users. Remote user information comes from an LDAP or an AD server. Single sign-on (SSO) users enable easier CSM integration. In this example, the default administrative account is already local.
![]() Username: Choose a desired name for local and SSO users. For remote accounts, this has to match the LDAP or AD account information. Figure 9-8 shows use of the default administrative account, which must always remain admin.
Username: Choose a desired name for local and SSO users. For remote accounts, this has to match the LDAP or AD account information. Figure 9-8 shows use of the default administrative account, which must always remain admin.
![]() First Name: For local or SSO users, type in the mandatory first name. PRSM retrieves this information from LDAP or AD servers for remote users.
First Name: For local or SSO users, type in the mandatory first name. PRSM retrieves this information from LDAP or AD servers for remote users.
![]() Last Name: For local or SSO users, type in the mandatory last name. PRSM retrieves this information from LDAP or AD servers for remote users.
Last Name: For local or SSO users, type in the mandatory last name. PRSM retrieves this information from LDAP or AD servers for remote users.
![]() Email: For local or SSO users, type in the mandatory email address for various notifications. PRSM retrieves this information from LDAP or AD servers for remote users.
Email: For local or SSO users, type in the mandatory email address for various notifications. PRSM retrieves this information from LDAP or AD servers for remote users.
![]() Active: Select On to keep the user account active or select Off to deactivate it.
Active: Select On to keep the user account active or select Off to deactivate it.
![]() Role: Select the desired user role for this account. The default administrative user must remain a super administrator.
Role: Select the desired user role for this account. The default administrative user must remain a super administrator.
![]() Password: For local or SSO users, choose a password that is at least eight characters long with at least one uppercase letter, one lowercase letter, and one digit. PRSM authenticates the remote users against LDAP or AD. Click Change to modify the default admin password.
Password: For local or SSO users, choose a password that is at least eight characters long with at least one uppercase letter, one lowercase letter, and one digit. PRSM authenticates the remote users against LDAP or AD. Click Change to modify the default admin password.
Click Save, and the new user account settings take effect immediately. Because this configuration belongs to PRSM, you do not need to deploy changes to ASA CX.
CX Licensing
ASA CX has the following optional feature licenses:
![]() K9 3DES/AES: This license enables strong encryption algorithms for management connections as well as TLS decryption services. You can obtain it from Cisco at no charge as long as you meet the export compliance requirements. This permanent license has to match the serial number of the specific ASA CX module. You cannot move it to another module.
K9 3DES/AES: This license enables strong encryption algorithms for management connections as well as TLS decryption services. You can obtain it from Cisco at no charge as long as you meet the export compliance requirements. This permanent license has to match the serial number of the specific ASA CX module. You cannot move it to another module.
![]() Application Visibility and Control: This license allows you to include application and micro-application identity when configuring context-aware policies. It is subscription based, so you must renew it periodically. This license has to match the specific ASA CX module type, but you can move it between different modules. For instance, you can remove this license on a CX-SSP-10 module and apply it to another CX-SSP-10 module; you cannot move this license from a CX-SSP-10 module to a CX-SSP-20 module.
Application Visibility and Control: This license allows you to include application and micro-application identity when configuring context-aware policies. It is subscription based, so you must renew it periodically. This license has to match the specific ASA CX module type, but you can move it between different modules. For instance, you can remove this license on a CX-SSP-10 module and apply it to another CX-SSP-10 module; you cannot move this license from a CX-SSP-10 module to a CX-SSP-20 module.
![]() Web Security Essentials: This license allows you to define context-aware policies using URL objects and categories as well as web reputation scores. This is also a subscription-based license that you can move between different CX modules of the same type.
Web Security Essentials: This license allows you to define context-aware policies using URL objects and categories as well as web reputation scores. This is also a subscription-based license that you can move between different CX modules of the same type.
![]() Next Generation (NG) IPS: This license is available only in 9.2(1) and later CX software. It allows ASA CX to analyze and drop packets based on known threat signatures. This is also a subscription-based license that you can move between different CX modules of the same type.
Next Generation (NG) IPS: This license is available only in 9.2(1) and later CX software. It allows ASA CX to analyze and drop packets based on known threat signatures. This is also a subscription-based license that you can move between different CX modules of the same type.
Each ASA CX module comes with 60-day evaluation licenses for all of the subscription-based features. You must renew these licenses to continue using the features. ASA CX handles subscription-based license expiration in the following manner:
![]() 30 days before license expiration, all policies that involve the associated items show a warning icon in PRSM. All policy configuration, enforcement, and monitoring tasks continue to perform normally.
30 days before license expiration, all policies that involve the associated items show a warning icon in PRSM. All policy configuration, enforcement, and monitoring tasks continue to perform normally.
![]() After license expiration, you have a 60-day grace period to renew it. During this period, ASA CX continues to enforce policies that involve the associated subscription-based features. However, you cannot edit the existing policies or add new entries that use the unlicensed features. All dynamic database updates from Cisco cease as well. You can still use the associated Dashboard reports.
After license expiration, you have a 60-day grace period to renew it. During this period, ASA CX continues to enforce policies that involve the associated subscription-based features. However, you cannot edit the existing policies or add new entries that use the unlicensed features. All dynamic database updates from Cisco cease as well. You can still use the associated Dashboard reports.
![]() After the grace period, ASA CX continues to enforce policies that involve the expired features. You can only delete the policies that use the unlicensed features. All the associated Dashboard reports stop working as well.
After the grace period, ASA CX continues to enforce policies that involve the expired features. You can only delete the policies that use the unlicensed features. All the associated Dashboard reports stop working as well.
View, add, or remove ASA CX licenses by navigating to Administration > Licenses in PRSM. Figure 9-9 shows an ASA CX with the permanent K9 license and all the subscription-based licenses in the evaluation mode.

Notice that PRSM shows the expiration date for each subscription-based license. Choose I Want To > Upload License File to apply a permanent or subscription-based license from your local management station. You can also choose I Want To > Renew Evaluation Licenses to get a free one-time renewal for 60 days, as long as you are still within the original evaluation period with no uploaded subscription-based licenses. You can also click Revoke License under an installed subscription-based license in the list to move it to another ASA CX module; you cannot move an evaluation license or the permanent K9 license. You must commit any license changes to ASA CX before they take effect.
Component and Software Updates
ASA CX uses two types of updates:
Signatures and Engines
These frequent periodic updates occur automatically to keep the ASA CX current on traffic categorization, application identification, and network reputation scores. You can configure these updates by navigating to Configurations > Updates in PRSM. The Updates screen shows the current version and the latest update timestamp for the following CX applications and their components:
![]() Application Visibility and Control (AVC): Application identification database
Application Visibility and Control (AVC): Application identification database
![]() Web Reputation Scanners (WBRS): URL categories as well as web reputation scores and rules based on IP addresses, hostnames, and domain names
Web Reputation Scanners (WBRS): URL categories as well as web reputation scores and rules based on IP addresses, hostnames, and domain names
![]() Security Application Scanners (SAS): HTTP Inspection Engine and Application Inspection Engine
Security Application Scanners (SAS): HTTP Inspection Engine and Application Inspection Engine
![]() Threat Protection (TP): In ASA CX 9.2(1) and later software, signature and engine packages for the Next Generation IPS feature
Threat Protection (TP): In ASA CX 9.2(1) and later software, signature and engine packages for the Next Generation IPS feature
![]() CX Telemetry: Network participation engine and data set
CX Telemetry: Network participation engine and data set
![]() IPS Base Reputation System (IBRS): In ASA CX 9.2(1) and later software, a blacklist of known malicious Internet endpoints
IPS Base Reputation System (IBRS): In ASA CX 9.2(1) and later software, a blacklist of known malicious Internet endpoints
You can choose I Want To > Edit Settings to change some of the update settings. Figure 9-10 shows the Update Settings dialog box that opens.
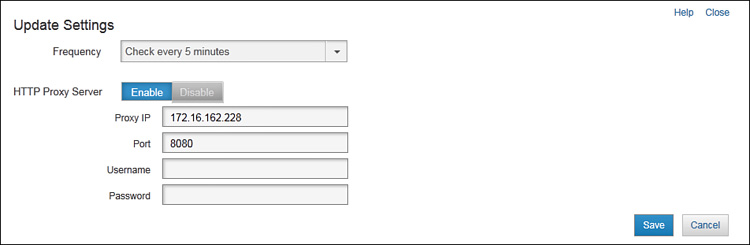
In the Update Settings dialog box, you have the following options:
![]() Frequency: By default, CX downloads signature and engine updates from Cisco every 5 minutes. You can specify an optional time window when these updates occur; the CX still downloads updates within this window every 5 minutes of every day. You can also choose Never Check from the drop-down list to disable updates; you should choose this option only if you are troubleshooting a problem, because it negatively impacts the ability of the CX to effectively protect your network.
Frequency: By default, CX downloads signature and engine updates from Cisco every 5 minutes. You can specify an optional time window when these updates occur; the CX still downloads updates within this window every 5 minutes of every day. You can also choose Never Check from the drop-down list to disable updates; you should choose this option only if you are troubleshooting a problem, because it negatively impacts the ability of the CX to effectively protect your network.
![]() HTTP Proxy Server: If the ASA CX has no direct connection to the Internet, you can click Enable and provide the following additional details:
HTTP Proxy Server: If the ASA CX has no direct connection to the Internet, you can click Enable and provide the following additional details:
![]() Proxy IP: Specify the IP address for this proxy server. It must be reachable from the management IP address of the ASA CX.
Proxy IP: Specify the IP address for this proxy server. It must be reachable from the management IP address of the ASA CX.
![]() Port: Specify the TCP port for the HTTP proxy server.
Port: Specify the TCP port for the HTTP proxy server.
![]() Username: If the proxy server requires authentication, specify the username.
Username: If the proxy server requires authentication, specify the username.
![]() Password: If the proxy server requires authentication, specify the corresponding password.
Password: If the proxy server requires authentication, specify the corresponding password.
Make sure to supply the ASA CX with a valid DNS server to use when connecting to the update servers. You can change the DNS server configuration by repeating the basic configuration dialog over the CLI, as previously discussed in the “Preparing ASA CX for Configuration” section.
System Software
To manually upgrade CX and PRSM system images, navigate to Administration > Upgrade in PRSM. You must follow these steps on the Upgrade Packages tab to perform an upgrade:
1. Choose I Want To > Upload an Upgrade Package to load the upgrade file from the local management station.
2. After you upload the upgrade package and it shows up in the list, click Upgrade to determine if this image is compatible with the ASA CX module.
3. After the evaluation process completes successfully, select the local ASA CX module from the available targets for the upgrade and click Upgrade again.
4. When prompted for a confirmation, click Start Upgrade to apply the package to the ASA CX device.
Always perform system upgrades during a maintenance window to avoid impact on the transit traffic. Some upgrades may require the ASA CX to reload; if you deploy the CX modules in an ASA failover pair, unconfigure CX redirection policies on the ASA before the CX upgrade to avoid undesired switchover events. Use the Upgrade Status tab to monitor the progress and review the past upgrade history.
Configuration Database Backup
Back up the ASA CX configuration database frequently. You can do it manually with the config backup command from the CX CLI, or you can set up an automatic scheduled backup job in PRSM. In both cases, you can only back up the database to an FTP server that is reachable from the ASA CX management interface.
Navigate to Administration > Database Backup in PRSM to configure periodic backups, as shown in Figure 9-11.

You must complete the following steps on this screen:
1. Click On for Periodic Backup to enable scheduled backups.
2. In the Backup Periodicity (In Hours) field, enter the desired value. By default, the backup job runs every 24 hours.
3. Under FTP Server Settings, configure the following parameters:
![]() Server Host Name / IP Address: Specify the hostname or IP address of the FTP server. If you specify a hostname, the CX resolves it through the configured DNS server; it assumes the default domain unless you supply the fully qualified domain name (FQDN). In Figure 9-11, 172.16.171.125 is identified as the FTP server IP address.
Server Host Name / IP Address: Specify the hostname or IP address of the FTP server. If you specify a hostname, the CX resolves it through the configured DNS server; it assumes the default domain unless you supply the fully qualified domain name (FQDN). In Figure 9-11, 172.16.171.125 is identified as the FTP server IP address.
![]() Server Port: Set the TCP port on which the FTP server is listening. You would typically leave the default value of 21.
Server Port: Set the TCP port on which the FTP server is listening. You would typically leave the default value of 21.
![]() User Name: Set the username with which to log in to the FTP server.
User Name: Set the username with which to log in to the FTP server.
![]() Password: Set the associated password for the FTP server.
Password: Set the associated password for the FTP server.
![]() Backup File Location on Server: Specify the directory on the FTP server where the backup job should store the database backup.
Backup File Location on Server: Specify the directory on the FTP server where the backup job should store the database backup.
4. Click Save to immediately apply the changes. Because PRSM performs the configuration database backup job, you do not need to apply these changes to the CX.
Refer to the Backup Status area of this screen to determine when the last successful configuration database backup occurred.
Defining CX Policy Elements
ASA CX supports context-aware policies that may include multiple different criteria for matching traffic to a certain action. For instance, you can permit or deny traffic from certain users when they employ a particular application from a specific network location. You can configure such policies by directly referencing the usernames, application names, IP addresses, and other attributes. You can also combine multiple attributes together to create your own reusable policy building blocks. There are three main types of such policy elements in CX:
![]() Objects: These are individual blocks of a particular type that you can reference in object groups or policies. You use objects to describe which connections match a particular policy entry. For instance, you can create a URL object to describe a group of websites and then configure a policy to block all connections to any website in this group by referencing this object.
Objects: These are individual blocks of a particular type that you can reference in object groups or policies. You use objects to describe which connections match a particular policy entry. For instance, you can create a URL object to describe a group of websites and then configure a policy to block all connections to any website in this group by referencing this object.
![]() Object groups: You can tie multiple different objects together in an object group. Just as with objects, you can use object groups to match connections to policy actions. For instance, you can create a network object to describe a set of IP subnets, create a URL object to match a list of websites, and then create a destination object group to match both of these different objects. This way, you can block all connections to these URLs only when the user tries to retrieve them from the particular subnet.
Object groups: You can tie multiple different objects together in an object group. Just as with objects, you can use object groups to match connections to policy actions. For instance, you can create a network object to describe a set of IP subnets, create a URL object to match a list of websites, and then create a destination object group to match both of these different objects. This way, you can block all connections to these URLs only when the user tries to retrieve them from the particular subnet.
![]() Profiles: These elements describe how advanced CX security features operate in addition to the configured policy actions. For instance, a web reputation profile defines a threshold for denying HTTP connections to malicious sites. You can reference these profiles in individual policy entries to tell CX how to process matching traffic. For example, the default web reputation profile will always block malicious traffic even if you reference it under a policy entry with the permit action.
Profiles: These elements describe how advanced CX security features operate in addition to the configured policy actions. For instance, a web reputation profile defines a threshold for denying HTTP connections to malicious sites. You can reference these profiles in individual policy entries to tell CX how to process matching traffic. For example, the default web reputation profile will always block malicious traffic even if you reference it under a policy entry with the permit action.
ASA CX comes with many predefined objects that allow you to match connections based on the most common attributes. For instance, it has a set of User Agent objects to permit or block traffic coming from a Linux workstation or an Apple iPhone. View these system objects and profiles by navigating to Components > Objects in PRSM. Although you cannot change the predefined objects, you can add your own objects, object groups, and profiles by clicking the I Want To drop-down arrow and choosing one of the following options that are available in the drop-down list:
When you create or edit any of these policy elements, you must fill out a header with a common set of fields, as shown in Figure 9-12.

Each object, object group, profile, policy, or other similar CX element has the following common properties:
![]() Name: Each element must have a unique name. Make sure that you use something descriptive. You can use spaces as well.
Name: Each element must have a unique name. Make sure that you use something descriptive. You can use spaces as well.
![]() Description: You can optionally provide an additional textual description.
Description: You can optionally provide an additional textual description.
![]() Tags: Type in any optional text-based tag values to associate with the element. These can be useful for searching. You can use spaces and create multiple tags. In Figure 9-12, the object is tagged with Database and East-West labels.
Tags: Type in any optional text-based tag values to associate with the element. These can be useful for searching. You can use spaces and create multiple tags. In Figure 9-12, the object is tagged with Database and East-West labels.
![]() Ticket ID: Use this field to reference ticket information from your change management or support case tracking system. You can specify multiple values. In Figure 9-12, 6300611012 is identified as the related external change management record.
Ticket ID: Use this field to reference ticket information from your change management or support case tracking system. You can specify multiple values. In Figure 9-12, 6300611012 is identified as the related external change management record.
The rest of the fields under each policy element depend on its type. As you start typing, notice that PRSM attempts to auto-fill the Tags and Ticket ID fields based on the previously used values. To remove a previously assigned value, click the × icon next to it. PRSM implements this level of interactivity when working with other elements, policies, and reports as well.
Network Groups
When you choose I Want To > Add CX Network Group, the dialog box shown in Figure 9-13 opens. Use this policy element to create host and network groups based on IP addresses.
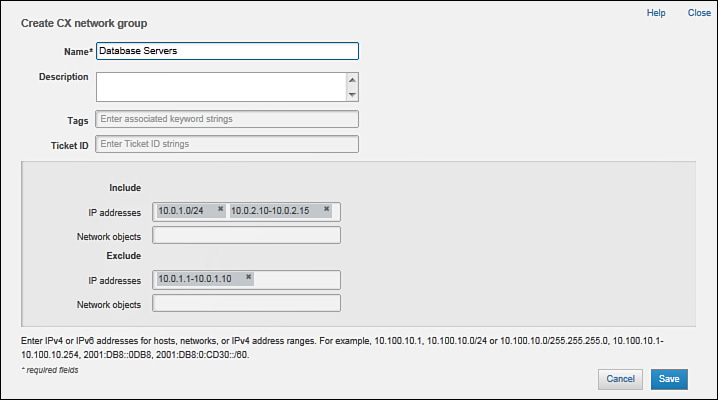
You must populate the Name field in the element header first (specified as Database Servers in Figure 9-13). You also have to complete at least one field in the object attributes section at the bottom. Each object always has the following two sets of identical attributes:
![]() Include: If a connection attribute matches any of these values and does not match any values in the Exclude set, then it matches this object.
Include: If a connection attribute matches any of these values and does not match any values in the Exclude set, then it matches this object.
![]() Exclude: If a connection attribute matches any of these values, then it does not match this object. This directive has a higher precedence over the Include set.
Exclude: If a connection attribute matches any of these values, then it does not match this object. This directive has a higher precedence over the Include set.
When defining a network group, use the following attributes in the Include and Exclude sets:
![]() IP Addresses: List IPv4 and IPv6 addresses, address ranges, or subnets.
IP Addresses: List IPv4 and IPv6 addresses, address ranges, or subnets.
![]() Network Objects: List any other previously configured network objects to create a hierarchical set. Notice that PRSM auto-completes your entries as you start typing.
Network Objects: List any other previously configured network objects to create a hierarchical set. Notice that PRSM auto-completes your entries as you start typing.
In Figure 9-13, this network object matches the following endpoints:
![]() All hosts on the 10.0.1.0/24 subnet except 10.0.1.1 through 10.0.1.10
All hosts on the 10.0.1.0/24 subnet except 10.0.1.1 through 10.0.1.10
![]() Hosts 10.0.2.10 through 10.0.2.15
Hosts 10.0.2.10 through 10.0.2.15
You must click Save and commit the changes to push this new object to ASA CX.
Identity Objects
Choose I Want To > Add CX Identity Object to create a policy element based on AD and LDAP users and groups. Such objects provide a much better abstraction than IP addresses when matching the connection source in context-aware policies. You must complete the tasks in the “Enabling User Identity Services” section, which appears later in this chapter, to enable this functionality.
You still need to configure the mandatory object name when creating this policy element. The configuration shown in Figure 9-14 is for a CX identity object named Special Project Users. You can also fill out the optional Description, Tags, and Ticket ID fields as discussed earlier in this section. All of these steps are common to each policy element and policy that you create. Figure 9-14 shows the attribute fields that are specific to the CX identity objects.
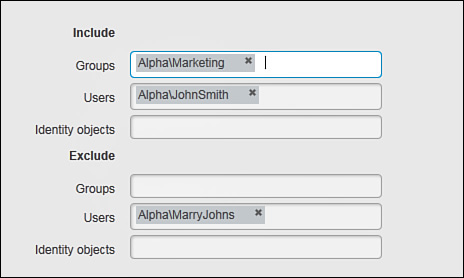
You can use the following fields under the Include and Exclude sets:
![]() Groups: List domain groups retrieved from AD or LDAP directories. After you have configured ASA CX for user identity integration, PRSM attempts to auto-complete the input with the actual domain groups as you type.
Groups: List domain groups retrieved from AD or LDAP directories. After you have configured ASA CX for user identity integration, PRSM attempts to auto-complete the input with the actual domain groups as you type.
![]() Users: Domain usernames which you define similarly to the groups, including the auto-completion capabilities.
Users: Domain usernames which you define similarly to the groups, including the auto-completion capabilities.
![]() Identity Objects: List other previously configured CX identity objects or default system objects. The default system objects include the following:
Identity Objects: List other previously configured CX identity objects or default system objects. The default system objects include the following:
![]() Known users: IP addresses with valid user mappings through passive or active authentication
Known users: IP addresses with valid user mappings through passive or active authentication
![]() Unknown users: IP addresses with no valid user mappings
Unknown users: IP addresses with no valid user mappings
In Figure 9-14, the CX identity object matches the following entities:
![]() All users in the AlphaMarketing group except AlphaMarryJohns
All users in the AlphaMarketing group except AlphaMarryJohns
![]() AlphaJohnSmith user
AlphaJohnSmith user
You must click Save and commit the changes to push this new object to ASA CX.
URL Objects
Choose I Want To > Add URL Object if you want to match the connection destination based on a combination of web domains, URLs, or URL categories. This feature requires a valid Web Security Essentials license.
Figure 9-15 shows the available attribute fields for a URL object called Blocked Auction Sites.

You can define the following parameters under the Include and Exclude sets:
![]() URL: Enter a full or partial hostname, domain name, or URL. Use a caret (^) to match the beginning of the string, a dollar sign ($) to match the end of the string, or an asterisk (*) to match any characters within the string. If you specify the domain name, the object matches all hosts within that domain.
URL: Enter a full or partial hostname, domain name, or URL. Use a caret (^) to match the beginning of the string, a dollar sign ($) to match the end of the string, or an asterisk (*) to match any characters within the string. If you specify the domain name, the object matches all hosts within that domain.
![]() Web Category: List one of the predefined URL categories, such as Arts or Advertisements. ASA CX continuously updates the URL categorization database from Cisco.
Web Category: List one of the predefined URL categories, such as Arts or Advertisements. ASA CX continuously updates the URL categorization database from Cisco.
![]() URL Objects: List any other previously configured URL objects.
URL Objects: List any other previously configured URL objects.
In this case, the URL object matches the following destinations:
![]() All websites in the Auction category except ebay.com
All websites in the Auction category except ebay.com
![]() All hosts and URLs under the exampleauctionsite.com domain
All hosts and URLs under the exampleauctionsite.com domain
You must click Save and commit the changes to push this new object to ASA CX.
User Agent Objects
Choose I Want To > Add UserAgent Object to match a custom client web browser for an HTTP connection. Keep in mind that ASA CX comes with many predefined user agent objects that cover most of the known programs and platforms, such as the Google Chrome browser and the Linux operating system. Only create a user agent object for a custom client.
Figure 9-16 shows the specific attributes for a sample user agent object called Custom Browsers.

You can leverage the following attributes under the Include and Exclude sets:
![]() UserAgent: Enter a string that matches the User Agent field in the HTTP request from the client. Use an asterisk (*) to match any characters.
UserAgent: Enter a string that matches the User Agent field in the HTTP request from the client. Use an asterisk (*) to match any characters.
![]() UserAgent Objects: List other system predefined or previously configured user agent objects.
UserAgent Objects: List other system predefined or previously configured user agent objects.
The configuration shown in Figure 9-16 matches any HTTP connections where the client uses a Beta or Gamma browser of any version.
You must click Save and commit the changes to push this new object to ASA CX.
Application Objects
Choose I Want To > Add Application Object if you want to define a group of applications for your context-aware policies. This feature requires a valid Application Visibility and Control license. ASA CX recognizes many different applications (such as Active Directory) and micro-applications (such as individual Facebook games), so you can configure very flexible and comprehensive policies without depending on static TCP or UDP ports. See the complete list of supported applications by navigating to Components > Applications in PRSM. This feature requires a valid Application Visibility and Control license.
Figure 9-17 shows the associated attributes for an application object called Business Apps.
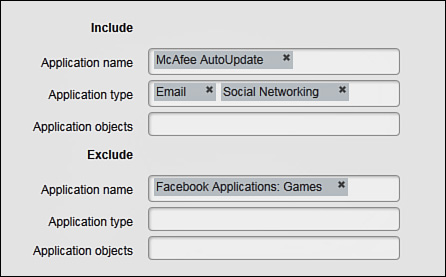
The following fields are available under the Include and Exclude sets:
![]() Application Name: Enter a list of recognized applications to match. You can leverage the auto-completion functionality here as well.
Application Name: Enter a list of recognized applications to match. You can leverage the auto-completion functionality here as well.
![]() Application Type: Enter a category of applications, such as Social Networking.
Application Type: Enter a category of applications, such as Social Networking.
![]() Application Objects: List other previously configured application objects.
Application Objects: List other previously configured application objects.
In Figure 9-17, this object matches connections that involve the following applications:
![]() McAfee AutoUpdate
McAfee AutoUpdate
![]() All email applications, such as Google Mail
All email applications, such as Google Mail
![]() All social networking applications except Facebook games
All social networking applications except Facebook games
You must click Save and commit the changes to push this new object to ASA CX.
Secure Mobility Objects
Choose I Want To > Add Secure Mobility Object when you want to match a group of specific AnyConnect mobile client devices in your context-aware policies. The mobile clients must establish the VPN connection to the host ASA so that the ASA CX can receive the device information as a part of the metadata for the redirected connection.
Figure 9-18 illustrates the object-specific attributes for a Secure Mobility object called Corporate Mobile Phones.

You can use the following fields under the Include and Exclude sets:
![]() Device Type: Select from the list of predefined device types, such as Android or MacOS.
Device Type: Select from the list of predefined device types, such as Android or MacOS.
![]() Secure Mobility Objects: Specify any other previously configured secure mobility objects or All Remote Devices.
Secure Mobility Objects: Specify any other previously configured secure mobility objects or All Remote Devices.
In Figure 9-18, the secure mobility object matches the following mobile AnyConnect clients:
![]() All Android and Windows Mobile devices
All Android and Windows Mobile devices
![]() All iPhone devices except the first-generation model
All iPhone devices except the first-generation model
You must click Save and commit the changes to push this new object to ASA CX.
Interface Roles
Choose I Want To > Add Interface Role if you want some context-aware policies to apply only to traffic between specific ASA interfaces. When you configure any interfaces on the ASA, ASA CX automatically receives the update as well. ASA marks every packet redirected to the CX module with the local ingress and egress interface information. This feature is only operational in ASA 9.1(3) and CX 9.2(1) and later software.
Figure 9-19 shows the object-specific attribute for a new interface role object called Inside Zone.
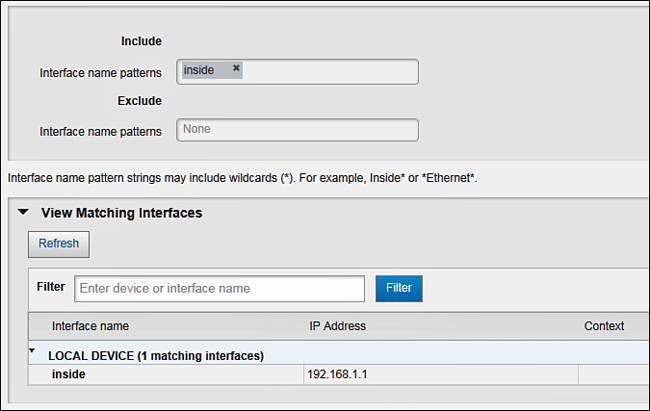
The only parameter available here is the interface name. This value should correspond to the nameif command on the ASA. Specify multiple interface names or use an asterisk (*) to match based on name patterns. Click View Matching Interfaces and expand the local device to see the list of configured ASA interfaces that match the specified pattern.
The configuration shown in Figure 9-19 uses inside to match the corresponding ASA interface.
You must click Save and commit the changes to push this new object to ASA CX.
Service Objects
Choose I Want To > Add Service Object Group if you want to create a custom combination of IP, ICMP, TCP, and UDP protocol and port numbers or ranges. ASA CX comes with many predefined service objects, such as icmp-echo for ICMP Echo Reply packets. You would typically create your own service object groups for custom network applications or to group different services, such as FTP and HTTP, in a single policy entity.
When naming a service object group, you must use only letters, digits, underscores, dashes, and periods; unlike with other objects and object groups, you cannot use spaces. This is one of the few exceptions in the ASA CX naming convention for policies and policy elements. Figure 9-20 shows the service object group attributes specific to a service object group called database-tcp-9990-9999.
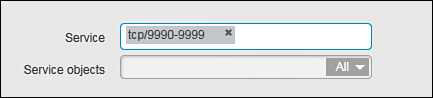
Unlike objects, object groups do not provide the ability to exclude elements. Use the exclusion option when building objects and then employ object groups to tie multiple objects together. You can include the following elements in a service object group:
![]() Service: List IP protocol numbers as IP/protocol, ICMP messages as ICMP/type, and TCP and UDP ports as TCP/port and UDP/port respectively. You can also use protocol and port ranges, as well as other operators, as shown at the bottom of the attributes area.
Service: List IP protocol numbers as IP/protocol, ICMP messages as ICMP/type, and TCP and UDP ports as TCP/port and UDP/port respectively. You can also use protocol and port ranges, as well as other operators, as shown at the bottom of the attributes area.
![]() Service Objects: Include predefined system objects or other previously configured service object groups.
Service Objects: Include predefined system objects or other previously configured service object groups.
The service object group in Figure 9-20 matches TCP ports from 9990 through 9999. Such an object group can apply to a source or destination of a connection, depending on your policy.
You must click Save and commit the changes to push this new object group to ASA CX.
Application-Service Objects
Choose I Want To > Add Application-Service Object to create a set of service and application pairs. This is essentially an object group that can match a particular application only when it uses the corresponding IP protocol, ICMP message, TCP or UDP port, or a service object group of these elements. This feature requires a valid Application Visibility and Control license.
Figure 9-21 shows the attributes for an application-service object called Backup Tier.
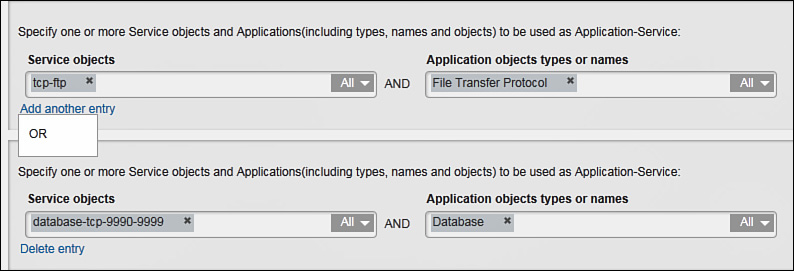
The following fields are available for each entry:
![]() Service Objects: List predefined system objects or other previously configured service object groups.
Service Objects: List predefined system objects or other previously configured service object groups.
![]() Application Object Types or Names: List the corresponding previously configured application objects or predefined system applications. You can also use the predefined application categories, such as Social Networking.
Application Object Types or Names: List the corresponding previously configured application objects or predefined system applications. You can also use the predefined application categories, such as Social Networking.
Each entry matches a connection only if the specified application or application category uses the protocols and ports from the corresponding service objects and groups. Click Add Another Entry to create multiple matching pairs. A connection must match any of these entries to match the application-service object.
The configuration shown in Figure 9-21 matches the following connections:
![]() Any FTP connection over the standard TCP port of 21
Any FTP connection over the standard TCP port of 21
![]() Any database connection over TCP ports 9990 through 9999
Any database connection over TCP ports 9990 through 9999
You must click Save and commit the changes to push this new object group to ASA CX.
Source Object Groups
Choose I Want To > Add Source Object Group when you need to create a combination of elements to match a particular connection source within your context-aware policy. These elements come from the system predefined or manually preconfigured objects and object groups. Keep in mind that the supported set of elements is different for matching the source and destination of a connection.
Figure 9-22 shows the available attributes for a source object group called Database Clients.
Each entry can match on the following elements:
![]() Network Objects: List the previously configured network groups for this source.
Network Objects: List the previously configured network groups for this source.
![]() CX Identity Objects: List the previously configured user identity elements for this source.
CX Identity Objects: List the previously configured user identity elements for this source.
![]() UserAgent Objects: List the system-defined or previously configured user agents that this source could use.
UserAgent Objects: List the system-defined or previously configured user agents that this source could use.
![]() Secure Mobility Objects: List the previously configured secure mobility objects that this source could use.
Secure Mobility Objects: List the previously configured secure mobility objects that this source could use.
For the source of a connection to match an object group entry, all of the underlying elements have to match. You can leave any in the fields that you do not want to use for matching. Click Add Another Entry if you want to match the connection source against multiple group entries; if the source matches at least one entry in the list, it matches the entire service object group.
The configuration shown in Figure 9-22 matches connections from the previously created Special Project Users identity group only when these users connect from Windows 7 and XP workstations.
You must click Save and commit the changes to push this new object group to ASA CX.
Destination Object Groups
Choose I Want To > Add Destination Object Group to create a set of criteria for a particular destination in your context-aware policy. You would typically use this object group type with HTTP connections, so this feature may require a valid Web Security Essentials license.
Figure 9-23 shows the available attributes for a new destination object group named Cloud Web.

You can match the destination to the following element pair:
![]() Network Objects: List previously configured IP-based network objects.
Network Objects: List previously configured IP-based network objects.
![]() URL Objects: List previously configured URL objects.
URL Objects: List previously configured URL objects.
The destination of a connection matches the entry when both the IP address and URL portions match. In other words, the client must be attempting to retrieve a specified URL from the particular list of web servers. Click Add Another Entry to match the destination based on other attribute pairs.
In Figure 9-23, a connection matches this object group when the client attempts to access a URL or domain from the Example.com object on a server in the Cloud Servers group.
You must click Save and commit the changes to push this new object group to ASA CX.
File Filtering Profiles
Choose I Want To > Add File Filtering Profile to define file types that you want the ASA CX to block in transit connections, such as HTTP. You can apply these profiles to specific categories of connections when creating context-aware policies.
Just like all other policy elements, each profile requires a mandatory unique name. In this example, you can use Bad Files as the file filtering profile name. Description, Tags, and Ticket ID remain as optional fields for all profile types. Figure 9-24 shows the attributes that are specific to file filtering profiles.

A file filtering profile allows the following parameters:
![]() Block File Downloads: Specify the Multipurpose Internet Mail Extensions (MIME) file types that you do not want the users to download. You can choose from a list of system predefined MIME types.
Block File Downloads: Specify the Multipurpose Internet Mail Extensions (MIME) file types that you do not want the users to download. You can choose from a list of system predefined MIME types.
![]() Block File Uploads: Similarly, specify the MIME file types that you do not want users to upload.
Block File Uploads: Similarly, specify the MIME file types that you do not want users to upload.
Figure 9-24 shows a file filtering profile that blocks all executable file downloads and all video uploads in transit HTTP connections.
You must click Save and commit the changes to push this new profile to ASA CX.
Web Reputation Profiles
Choose I Want To > Add Web Reputation Profile to match all HTTP connections against a certain reputation score threshold. There are two reasons to create a web reputation profile:
![]() Block connections to known malicious websites
Block connections to known malicious websites
![]() Decrypt HTTPS traffic to known malicious websites for additional inspection
Decrypt HTTPS traffic to known malicious websites for additional inspection
Reputation profiles do not block or decrypt traffic on their own, so you must reference them for specific classes of connections when creating decryption and context-aware policies. This feature requires a valid Web Security Essentials license.
Figure 9-25 shows what the profile-specific attribute looks like for a web reputation profile called HTTP Decryption.

Use the slider to define what reputation score places a website into the low reputation category. The possible range of the reputation score is from –10 to 10, where –10 represents the worst possible reputation and 10 represents the best possible reputation. Use the following guidelines to determine the correct threshold:
![]() –10 to –6 scores represent known malicious websites.
–10 to –6 scores represent known malicious websites.
![]() –6 to –3 scores represent user tracking and suspicious websites.
–6 to –3 scores represent user tracking and suspicious websites.
![]() –3 to 0 scores represent websites with user-generated content.
–3 to 0 scores represent websites with user-generated content.
![]() 0 to 5 scores represent responsible websites with third-party validation.
0 to 5 scores represent responsible websites with third-party validation.
![]() 5 to 10 scores represent commonly used and very safe websites.
5 to 10 scores represent commonly used and very safe websites.
Check the reputation score of a specific website by accessing SenderBase at http://www.senderbase.org/. By default, the threshold between the low- and high-reputation websites is set at –6, as in Figure 9-25.
You must click Save and commit the changes to push this new profile to ASA CX.
NG IPS Profiles
Choose I Want To > Add NG IPS Profile to define how ASA CX treats connections that involve known security threats. The CX module inspects transit traffic using a predefined signature database; the module constantly retrieves signature updates from Cisco. You can either use the default NG IPS profile or create custom profiles for specific classes of traffic in your context-aware policies. This feature is available only in CX 9.2(1) and later software with a valid NG IPS license.
Figure 9-26 illustrates the attributes that are specific to a custom NG IPS profile called Threat Protection.
You can define the following NG IPS parameters:
![]() Action thresholds: Based on threat severity from 0 (lowest) to 100 (highest), use the slider to set which connections fall into the following processing categories:
Action thresholds: Based on threat severity from 0 (lowest) to 100 (highest), use the slider to set which connections fall into the following processing categories:
![]() Allow & Don’t Monitor: Permit the connection through NG IPS and do not generate any alerts. Keep in mind that other context-aware policies apply as well, so the module may still deny the connection for other reasons. By default, threat scores from 0 to 40 fall under this category.
Allow & Don’t Monitor: Permit the connection through NG IPS and do not generate any alerts. Keep in mind that other context-aware policies apply as well, so the module may still deny the connection for other reasons. By default, threat scores from 0 to 40 fall under this category.
![]() Allow & Monitor: Permit the connection through NG IPS after generating an appropriate event. As before, other context-aware policies apply as well. By default, threat scores from 41 to 70 fall under this category.
Allow & Monitor: Permit the connection through NG IPS after generating an appropriate event. As before, other context-aware policies apply as well. By default, threat scores from 41 to 70 fall under this category.
![]() Block and Monitor: Block the connection in NG IPS and generate an appropriate event. This happens even if other context-aware policies may permit this traffic. By default, threat scores from 71 to 100 fall into this category.
Block and Monitor: Block the connection in NG IPS and generate an appropriate event. This happens even if other context-aware policies may permit this traffic. By default, threat scores from 71 to 100 fall into this category.
![]() Advanced Threat Settings: Override the default action for individual signatures. Type the signature name into the Exceptions field, choose the desired action from the Action drop-down list, and click Apply. Review the complete set of NG IPS signatures and their definitions by navigating to Components > Threats. You can create multiple exceptions.
Advanced Threat Settings: Override the default action for individual signatures. Type the signature name into the Exceptions field, choose the desired action from the Action drop-down list, and click Apply. Review the complete set of NG IPS signatures and their definitions by navigating to Components > Threats. You can create multiple exceptions.
The configuration in Figure 9-26 uses the default action threshold settings, but the CX always blocks all SQL injection attacks regardless of the associated threat score.
You must click Save and commit the changes to push this new profile to ASA CX.
![]() To authenticate management users in PRSM and SSH
To authenticate management users in PRSM and SSH
![]() To incorporate the user information into context-aware policies for transit connections
To incorporate the user information into context-aware policies for transit connections
Creating security policies based on user identify information instead of or in addition to traditional IP addresses has many benefits:
![]() Such policies transparently support dynamic IP address assignment schemes, such as Dynamic Host Configuration Protocol (DHCP).
Such policies transparently support dynamic IP address assignment schemes, such as Dynamic Host Configuration Protocol (DHCP).
![]() Users can access the protected resources from any location within or outside the network, using any available device.
Users can access the protected resources from any location within or outside the network, using any available device.
![]() User credentials for all access verification purposes remain in a centralized secure database.
User credentials for all access verification purposes remain in a centralized secure database.
ASA CX supports two methods of determining user identity:
![]() Passive authentication: External Cisco AD Agent or Cisco CDA subscribes to the domain login events and records username-to–IP address mappings. ASA CX connects to the AD Agent or CDA and retrieves these mappings to associate transit connections with specific user identities.
Passive authentication: External Cisco AD Agent or Cisco CDA subscribes to the domain login events and records username-to–IP address mappings. ASA CX connects to the AD Agent or CDA and retrieves these mappings to associate transit connections with specific user identities.
![]() Active authentication: ASA CX authenticates transit HTTP and HTTPS sessions by prompting the user for their domain credentials. After the CX module verifies user identity against the configured AD or LDAP servers, it can enforce the appropriate context-aware policies.
Active authentication: ASA CX authenticates transit HTTP and HTTPS sessions by prompting the user for their domain credentials. After the CX module verifies user identity against the configured AD or LDAP servers, it can enforce the appropriate context-aware policies.
You can configure the ASA CX to use only one of these methods or combine them together. If the module was not able to determine user identity with passive authentication, it can do it by actively authenticating the associated HTTP or decrypted HTTPS connection.
You need to perform the following steps to prepare the ASA CX for configuring identity-based policies:
1. Configure a realm with at least one directory server.
2. For passive authentication, configure an AD Agent or CDA.
3. Configure optional authentication settings.
4. Create an identity discovery policy.
Configuring Directory Servers
You can use the same set of directory servers for the following purposes:
![]() Remotely authenticate PRSM management users
Remotely authenticate PRSM management users
![]() Actively authenticate transit connections to retrieve user identity
Actively authenticate transit connections to retrieve user identity
![]() Retrieve the list of domain groups and member users for identity-based policy configuration and enforcement
Retrieve the list of domain groups and member users for identity-based policy configuration and enforcement
To create a directory realm and the associated directory servers, navigate to Components > Directory Realm in PRSM and follow these steps:
1. Choose I Want To > Add Realm. Figure 9-27 shows the dialog box that opens.
Populate the following fields:
![]() Name: Even though it is only locally significant, the realm name typically matches your AD domain. PRSM displays this name when configuring identity-based policies as well as on the various dashboards and reports.
Name: Even though it is only locally significant, the realm name typically matches your AD domain. PRSM displays this name when configuring identity-based policies as well as on the various dashboards and reports.
![]() Description: Enter any textual description for this realm.
Description: Enter any textual description for this realm.
![]() Directory Type: Choose between Active Directory and Standard LDAP for user identity purposes. You would typically use AD when implementing passive authentication for transit connections.
Directory Type: Choose between Active Directory and Standard LDAP for user identity purposes. You would typically use AD when implementing passive authentication for transit connections.
![]() Primary Domain: This option is available only for AD realms. Configure the fully qualified AD domain name. If you choose to use AD for your directory realm, make sure that the DNS server that the CX is using for name resolution is able to resolve queries for your domain.
Primary Domain: This option is available only for AD realms. Configure the fully qualified AD domain name. If you choose to use AD for your directory realm, make sure that the DNS server that the CX is using for name resolution is able to resolve queries for your domain.
![]() Join Username: This option is available only for AD realms. Specify the name of an AD user who has the authority to join or remove devices in the given domain.
Join Username: This option is available only for AD realms. Specify the name of an AD user who has the authority to join or remove devices in the given domain.
![]() Join Password: This option is available only for AD realms. Specify the password of the AD user for this domain. For AD realms only, click Test Domain Join to verify the supplied connectivity information and user credentials. After a successful test, click Save to create the directory realm and the associated default user identity discovery policy. You can create only one AD directory realm but multiple LDAP realms.
Join Password: This option is available only for AD realms. Specify the password of the AD user for this domain. For AD realms only, click Test Domain Join to verify the supplied connectivity information and user credentials. After a successful test, click Save to create the directory realm and the associated default user identity discovery policy. You can create only one AD directory realm but multiple LDAP realms.
2. Under the newly created directory realm, click Add New Directory to associate the realm with a directory server as shown in Figure 9-28.

Complete the following fields to add a new AD server:
![]() Directory Hostname: Enter the IP address or FQDN for the AD server. In Figure 9-28, dc.example.com is entered as the FQDN. If you choose to use an FQDN, make sure that the DNS server that you configured on the CX during the initial setup process can resolve this name.
Directory Hostname: Enter the IP address or FQDN for the AD server. In Figure 9-28, dc.example.com is entered as the FQDN. If you choose to use an FQDN, make sure that the DNS server that you configured on the CX during the initial setup process can resolve this name.
![]() Port: Specify the TCP port for connecting to the directory server. ASA CX only supports cleartext connections over port 389, so you should typically not change the default setting.
Port: Specify the TCP port for connecting to the directory server. ASA CX only supports cleartext connections over port 389, so you should typically not change the default setting.
![]() AD Login Name: You can typically specify any valid domain user for the directory connection.
AD Login Name: You can typically specify any valid domain user for the directory connection.
![]() AD Password: Enter the domain user’s password.
AD Password: Enter the domain user’s password.
![]() User Search Base: Enter the path in the LDAP or AD hierarchy where domain user information resides. All values are case sensitive. If you leave this field blank, the CX attempts to construct it based on the domain name in the Directory Hostname field. You must fill it out if you reference the directory server by its IP address. In Figure 9-28, cn=Users,dc=example,dc=com is specified as the user search path.
User Search Base: Enter the path in the LDAP or AD hierarchy where domain user information resides. All values are case sensitive. If you leave this field blank, the CX attempts to construct it based on the domain name in the Directory Hostname field. You must fill it out if you reference the directory server by its IP address. In Figure 9-28, cn=Users,dc=example,dc=com is specified as the user search path.
![]() Group Search Base: This field identifies the domain group location in the LDAP and AD hierarchy similarly to the User Search Base field. In Figure 9-28, ou=Groups,dc=cisco,dc=com is specified as the group search path.
Group Search Base: This field identifies the domain group location in the LDAP and AD hierarchy similarly to the User Search Base field. In Figure 9-28, ou=Groups,dc=cisco,dc=com is specified as the group search path.
![]() Group Attribute: This value would typically be member for AD.
Group Attribute: This value would typically be member for AD.
Click Test Connection to verify that this user can successfully access the AD server. After confirming connectivity, click Save to close this window.
3. (Optional) Repeat the previous step to add more directory servers to the realm. The displayed order determines which server the CX module uses first. If the first server is unavailable, the module attempts to use the next one in the list for retrieving the identity information.
4. When finished, commit pending changes in PRSM to push the configuration to the CX module.
Connecting to AD Agent or CDA
To rely on passive authentication for determining user identity information, ASA CX must connect to one of the following entities:
![]() AD Agent: This software package runs on a Microsoft Windows–based host within the AD domain.
AD Agent: This software package runs on a Microsoft Windows–based host within the AD domain.
![]() CDA: This standalone product runs as a virtual machine anywhere within the network. This is the preferred option.
CDA: This standalone product runs as a virtual machine anywhere within the network. This is the preferred option.
Each of these agents connects to the AD domain controller and subscribes to the user login events. When a user logs in to the domain, the domain controller records the associated IP address in the security logs. The AD Agent or CDA receives these events through the Windows Management Instrumentation (WMI) framework and records the mapping between the AD username and the client computer’s IP address in the local database. Security devices connect to the AD Agent or CDA to retrieve these mappings and use them to implement identity-based policies.
You configure both of these products very similarly, and you can reuse the AD domain connection information from when you added directory realms and servers to ASA CX. ASA and ASA CX can connect to the same AD Agent or CDA instance to implement identity-based firewalling. You must ensure that the ASA CX has network connectivity to the AD Agent or CDA from its management interface. You must also configure the management IP address of the CX module on the AD Agent or CDA as a client device; you also need to pick a shared key for this connection.
After you complete the AD Agent or CDA configuration, navigate to Configurations > Policies/Settings in PRSM. Click the drop-down arrow for the tab menu (to the right of the Overview tab) and choose AD Agent under the Authentication and Identity settings. The dialog box shown in Figure 9-29 opens.

Complete the following fields in this dialog box:
![]() Hostname: Enter the IP address or FQDN of the AD Agent or CDA host.
Hostname: Enter the IP address or FQDN of the AD Agent or CDA host.
![]() Password: Enter the shared key that you configured on the AD Agent or CDA when you added the ASA CX as a client.
Password: Enter the shared key that you configured on the AD Agent or CDA when you added the ASA CX as a client.
Click Test to verify the connection from ASA CX to the AD Agent or CDA. After a successful verification, click Save, close this tab, and commit the changes to CX.
Tuning Authentication Settings
You can optionally change the default ASA CX authentication settings by navigating to Configurations > Policies/Settings in PRSM, clicking the drop-down arrow for the tab menu, and choosing Auth Settings under the Authentication and Identity section. Figure 9-30 shows the associated dialog box that opens.

This dialog box allows you to change the following settings:
![]() Authenticated Session Duration (Hours): Specify how long ASA CX should keep an IP address–to-username mapping before performing another authentication. This value mostly applies to active authentication, because the AD Agent or CDA may remove or update the mapping sooner. You must specify the value in hours, and the default authenticated session duration is 24 hours.
Authenticated Session Duration (Hours): Specify how long ASA CX should keep an IP address–to-username mapping before performing another authentication. This value mostly applies to active authentication, because the AD Agent or CDA may remove or update the mapping sooner. You must specify the value in hours, and the default authenticated session duration is 24 hours.
![]() Failed Authentication Timeout (Minutes): If the user exceeds the maximum number of active authentication attempts, the ASA CX will not attempt another authentication until this timeout elapses. During this interval, the CX module classifies all connections from this user as unknown. Unless you configure traditional access rules with IP addresses, this user would not be able to establish transit connections through the ASA CX. You must specify this value in minutes, and the default timeout is 1 minute.
Failed Authentication Timeout (Minutes): If the user exceeds the maximum number of active authentication attempts, the ASA CX will not attempt another authentication until this timeout elapses. During this interval, the CX module classifies all connections from this user as unknown. Unless you configure traditional access rules with IP addresses, this user would not be able to establish transit connections through the ASA CX. You must specify this value in minutes, and the default timeout is 1 minute.
![]() Maximum Authentication Attempts: Set the maximum number of unsuccessful active authentication attempts from the user before the failed authentication timeout triggers. The default value is 3 attempts.
Maximum Authentication Attempts: Set the maximum number of unsuccessful active authentication attempts from the user before the failed authentication timeout triggers. The default value is 3 attempts.
![]() Group Refresh Interval (hours): Define how often the CX retrieves the group and user membership lists from AD or LDAP directory servers. ASA CX only retrieves the groups that you reference in the identity-based policies. If you make any changes to groups or their members on the AD or LDAP side, the CX will not find out about the changes until the next refresh time. You must configure this interval in hours, and the default group refresh interval is 24 hours. The CX immediately refreshes a group’s member list if you commit a change to a policy that references this group.
Group Refresh Interval (hours): Define how often the CX retrieves the group and user membership lists from AD or LDAP directory servers. ASA CX only retrieves the groups that you reference in the identity-based policies. If you make any changes to groups or their members on the AD or LDAP side, the CX will not find out about the changes until the next refresh time. You must configure this interval in hours, and the default group refresh interval is 24 hours. The CX immediately refreshes a group’s member list if you commit a change to a policy that references this group.
When finished, click Save, close the tab, and commit the changes to ASA CX.
Defining User Identity Discovery Policy
An identity discovery policy enables you to configure the following parameters:
![]() Which specific traffic should trigger the ASA CX to discover user identity
Which specific traffic should trigger the ASA CX to discover user identity
![]() Which method or methods the ASA should use to identity users for each class of traffic
Which method or methods the ASA should use to identity users for each class of traffic
![]() Which clients should be excluded from user identity discovery
Which clients should be excluded from user identity discovery
Keep in mind that the user identity discovery policy itself does not permit or deny any traffic. It simply allows the CX to identify users based on IP addresses and then employ that mapping information when applying the actual context-aware policies to transit connections.
Perform the following steps to configure the identity discovery policy in PRSM:
1. Navigate to Configurations > Policies/Settings, click the drop-down arrow for the tab menu, and choose Identity Policies under the Authentication and Identity section.
2. ASA CX should already have the default identity policy set configured. If you see No Items Found in the identity policy set list, click the top icon on the left side and choose Add Policy Set. In the new window, fill out the mandatory Policy Set Name field and specify the optional description, tags, and ticket identifiers. All these fields are similar to the fields covered earlier for other policy elements and policies. Click Save Policy Set to continue.
3. Select the configured identity policy set, click the second icon from the top on the left side, and choose Add Policy at the Top.
4. On the Edit Policy screen, enter a unique name in the Policy Name field. You can also use the Enable Policy switch to activate or deactivate this policy entry. By default, the policy is enabled (On).
5. Complete the traffic selection section, which is shown in Figure 9-31.

The following criteria are available:
![]() Source: Choose a previously configured IP-based network object to match the source of the connection.
Source: Choose a previously configured IP-based network object to match the source of the connection.
![]() Destination: Choose a previously configured IP-based network object to match the destination of the connection.
Destination: Choose a previously configured IP-based network object to match the destination of the connection.
![]() Service: Choose a predefined system object for an IP, ICMP, TCP, or UDP service or use a previously configured service object. You need to match the destination port of the connection when using specific UDP or TCP ports.
Service: Choose a predefined system object for an IP, ICMP, TCP, or UDP service or use a previously configured service object. You need to match the destination port of the connection when using specific UDP or TCP ports.
You can leave the default value of Any in all of these fields to match all connections for identity discovery. A connection must match all of the specified fields to match the policy entry.
6. Configure the identity discovery parameters in the section shown in Figure 9-32.
Fill out the following fields:
![]() Realm: Choose the previously configured realm that the ASA CX will use to authenticate the users passively or actively.
Realm: Choose the previously configured realm that the ASA CX will use to authenticate the users passively or actively.
![]() Action: Choose between Get Identity Using AD Agent for passive authentication and Get Identity via Active Authentication. This action only applies to the selected class of network traffic under this policy. The configuration in Figure 9-32 uses passive authentication.
Action: Choose between Get Identity Using AD Agent for passive authentication and Get Identity via Active Authentication. This action only applies to the selected class of network traffic under this policy. The configuration in Figure 9-32 uses passive authentication.
![]() Do You Want to Use Active Authentication If AD Agent Cannot Identify User?: If you chose passive authentication, you can also enable active authentication when the AD Agent or CDA does not have the user mapping for the source IP address of this connection. The configuration in Figure 9-32 enables secondary active authentication.
Do You Want to Use Active Authentication If AD Agent Cannot Identify User?: If you chose passive authentication, you can also enable active authentication when the AD Agent or CDA does not have the user mapping for the source IP address of this connection. The configuration in Figure 9-32 enables secondary active authentication.
![]() Authentication Type: Choose Basic for interactive HTTP authentication or NTLM, Kerberos, or Advanced for various domain integration options. The latter three choices may require additional complex configuration on the client side, so you would typically use the basic HTTP authentication as in this example.
Authentication Type: Choose Basic for interactive HTTP authentication or NTLM, Kerberos, or Advanced for various domain integration options. The latter three choices may require additional complex configuration on the client side, so you would typically use the basic HTTP authentication as in this example.
![]() Exclude User Agent: You can exempt connections from certain devices from identity discovery. Choose from the predefined or previously configured user agent objects. Keep in mind that this exclusion does not mean that the given devices will bypass your context-aware policies; they will simply be treated as unknown users.
Exclude User Agent: You can exempt connections from certain devices from identity discovery. Choose from the predefined or previously configured user agent objects. Keep in mind that this exclusion does not mean that the given devices will bypass your context-aware policies; they will simply be treated as unknown users.
7. (Optional) Apply this policy entry only to connections between certain ASA interfaces. Figure 9-33 shows the Interface Roles section. This section is common to all policies. This functionality requires ASA 9.1(3) and CX 9.2(1) and later software.

In the Interface Roles section, you can populate the following fields:
![]() Source Interface Role: Choose one or more previously created interface role objects. The policy applies only to connections where the client is behind the matching ASA interface.
Source Interface Role: Choose one or more previously created interface role objects. The policy applies only to connections where the client is behind the matching ASA interface.
![]() Destination Interface Role: Choose one or more previously created interface role objects. The policy applies only to connections where the server is behind the matching ASA interface.
Destination Interface Role: Choose one or more previously created interface role objects. The policy applies only to connections where the server is behind the matching ASA interface.
In both cases, you can keep the default selection of Any as shown in Figure 9-33.
8. Fill out the optional Tags and Ticket ID values and click Save Policy.
9. Repeat this procedure from Step 3 if you want to create multiple different identity discovery rules for different classes of traffic. ASA CX matches connections against the policy entry list from top to bottom. You can use the Add Above Policy and Add Below Policy options to create entries in a desired order. You can also drag the entries within the policy to change the order.
10. When finished, commit the changes to ASA CX.
Enabling TLS Decryption
You must enable TLS Decryption if you want to apply the following ASA CX features to encrypted connections:
![]() Application identification
Application identification
![]() URL matching
URL matching
![]() File blocking
File blocking
![]() NG IPS inspection
NG IPS inspection
With TLS Decryption enabled, the ASA CX inserts itself in the middle of the encrypted connection as shown in Figure 9-34. You can enable the decryption functionality on specific classes of traffic or all connections by configuring an appropriate decryption policy.

The following simplified flow of events occurs when ASA CX processes a transit encrypted connection that matched a decryption policy:
1. A client attempts to establish an encrypted connection toward a server. ASA CX transparently intercepts this connection. Even though the connection initially matched the decryption policy, the ASA CX may revise that decision based on the information received from the server.
2. ASA CX uses the same connection information to attempt an encrypted session with the server. The CX module may change some of the original encryption parameters to optimize the operation. As far as the server is concerned, the connection appears as if it was coming from the original client.
3. The server establishes the encrypted session with the ASA CX. The CX module examines the reply from the server and determines whether it should continue to inspect the session. If the decryption policy indicates that connections to this server should not be decrypted, the ASA CX terminates the client and server connections and allows the client to reestablish a direct encrypted session with the server. In that case, the CX content inspection features are disabled for this connection.
4. If the original decryption decision has not changed, the ASA CX completes the encrypted session with the client. The module reuses the identity elements from the server to make it appear as if the client is talking to the server directly.
5. ASA CX receives encrypted traffic from the client, decrypts it, applies the necessary context-aware policies to the cleartext payload, re-encrypts the permitted packets, and transmits them toward the server. The reverse process occurs for encrypted packets received from the server. All the data between the client and server remains fully encrypted and secure; the CX module inspects the decrypted payload but does not save or export it.
Consider the following points when enabling TLS Decryption on ASA CX:
![]() Most modern applications require strong encryption, so you should apply the K9 3DES/AES license when possible. A connection matching a decryption policy will fail if the CX cannot establish a secure connection with the client or server. If you cannot apply this license because of export regulations, consider either allowing the secure connections to bypass encryption in case of a handshake failure or completely disabling TLS Decryption.
Most modern applications require strong encryption, so you should apply the K9 3DES/AES license when possible. A connection matching a decryption policy will fail if the CX cannot establish a secure connection with the client or server. If you cannot apply this license because of export regulations, consider either allowing the secure connections to bypass encryption in case of a handshake failure or completely disabling TLS Decryption.
![]() The TLS Decryption Engine must emulate a certificate authority (CA) to dynamically issue certificates for accessed HTTPS websites. ASA CX presents these certificates to the clients during the TLS handshake in order to insert itself into the encrypted stream. Because you cannot obtain a subordinate CA certificate from a well-known public CA, you have to either generate a self-signed certificate on the ASA CX itself or use your own private CA. All client web browsers come with a preinstalled list of CAs that they trust; the identity decryption certificate of CX will not be on that list by default. To avoid the certificate warning that each client will see when establishing a secure connection with TLS Decryption enabled, distribute the identity certificate of the TLS Decryption Engine or the private CA issuer to all web browsers in your organization. You can either ask the users to download and install the certificate manually or push it to their computers using another method.
The TLS Decryption Engine must emulate a certificate authority (CA) to dynamically issue certificates for accessed HTTPS websites. ASA CX presents these certificates to the clients during the TLS handshake in order to insert itself into the encrypted stream. Because you cannot obtain a subordinate CA certificate from a well-known public CA, you have to either generate a self-signed certificate on the ASA CX itself or use your own private CA. All client web browsers come with a preinstalled list of CAs that they trust; the identity decryption certificate of CX will not be on that list by default. To avoid the certificate warning that each client will see when establishing a secure connection with TLS Decryption enabled, distribute the identity certificate of the TLS Decryption Engine or the private CA issuer to all web browsers in your organization. You can either ask the users to download and install the certificate manually or push it to their computers using another method.
![]() You may be required by local regulations to disable TLS Decryption for websites in a particular sensitive category, such as health care or financial institutions. You must configure the appropriate exceptions in your decryption policy to comply with such requirements.
You may be required by local regulations to disable TLS Decryption for websites in a particular sensitive category, such as health care or financial institutions. You must configure the appropriate exceptions in your decryption policy to comply with such requirements.
![]() Certain applications that require certificate-based client authentication may not work correctly with TLS Decryption. To enable these applications, configure appropriate exceptions in your decryption policies or allow the secure connections to bypass encryption in case of a handshake failure.
Certain applications that require certificate-based client authentication may not work correctly with TLS Decryption. To enable these applications, configure appropriate exceptions in your decryption policies or allow the secure connections to bypass encryption in case of a handshake failure.
![]() In some cases, the ASA CX must first establish a secure connection with the server to determine whether or not to continue decrypting the session. When the TLS Decryption Engine decides to disengage from the connection and resets it, the client must re-attempt the connection to proceed. Depending on the application, some client programs may not re-attempt the connection automatically. Because the CX caches the information about each client and server pair that is exempt from decryption, it is sufficient to manually retry the connection after the ASA CX resets the original session.
In some cases, the ASA CX must first establish a secure connection with the server to determine whether or not to continue decrypting the session. When the TLS Decryption Engine decides to disengage from the connection and resets it, the client must re-attempt the connection to proceed. Depending on the application, some client programs may not re-attempt the connection automatically. Because the CX caches the information about each client and server pair that is exempt from decryption, it is sufficient to manually retry the connection after the ASA CX resets the original session.
![]() TLS Decryption is a very processing-intensive feature, so it considerably reduces the maximum forwarding performance of ASA CX. Only configure decryption for untrusted classes of traffic. You would typically exempt connections to internal HTTPS servers from decryption.
TLS Decryption is a very processing-intensive feature, so it considerably reduces the maximum forwarding performance of ASA CX. Only configure decryption for untrusted classes of traffic. You would typically exempt connections to internal HTTPS servers from decryption.
There are two steps to preparing ASA CX for performing TLS Decryption:
1. Configure decryption settings.
2. Define a decryption policy.
Configuring Decryption Settings
To configure global TLS Decryption parameters, navigate to Configurations > Policies/Settings in PRSM, click the drop-down arrow for the tab menu, and choose Decryption Settings under the Decryption section. The dialog box shown in Figure 9-35 controls these global options.

You need to complete the following steps in this dialog box:
1. Switch the Enable Decryption Policies selector to On. The other options will then appear.
2. In CX 9.2(1) and later software, you can configure the following advanced options in the Deny Transactions to Servers area:
![]() Using an Untrusted Certificate: This option is enabled (On) by default, so the ASA CX denies the secure connection if the TLS server is using an untrusted certificate. ASA CX comes with a predefined list of well-known CAs, but you can add custom CA certificates to the trust list of the TLS Decryption Engine under Configurations > Certificates. You can also choose Off to disable this check and bypass TLS decryption for these connections.
Using an Untrusted Certificate: This option is enabled (On) by default, so the ASA CX denies the secure connection if the TLS server is using an untrusted certificate. ASA CX comes with a predefined list of well-known CAs, but you can add custom CA certificates to the trust list of the TLS Decryption Engine under Configurations > Certificates. You can also choose Off to disable this check and bypass TLS decryption for these connections.
![]() If the Secure Session Handshake Fails: This option is enabled (On) by default, so the CX module blocks the encrypted connection if it could not establish a secure session with the server. This may happen due to unsupported encryption algorithms, failed client certification authentication, and other protocol errors. You can choose Off to disable this check and bypass TLS decryption for such incompatible websites and applications.
If the Secure Session Handshake Fails: This option is enabled (On) by default, so the CX module blocks the encrypted connection if it could not establish a secure session with the server. This may happen due to unsupported encryption algorithms, failed client certification authentication, and other protocol errors. You can choose Off to disable this check and bypass TLS decryption for such incompatible websites and applications.
Prior to CX 9.2(1) software, both of these checks were permanently enabled. Keep in mind that disabling these safeguards may compromise the effectiveness of your context-aware policies.
3. Choose the Certificate Initialization Method for the CA certificate that the ASA CX uses to dynamically generate server identities. There are two available options:
![]() Generate: ASA CX generates a self-signed CA certificate. This default option is chosen in Figure 9-35. You need to fill out the following additional fields when you choose Generate:
Generate: ASA CX generates a self-signed CA certificate. This default option is chosen in Figure 9-35. You need to fill out the following additional fields when you choose Generate:
![]() Common Name: Mandatory field to describe the device. It could be a hostname or an FQDN.
Common Name: Mandatory field to describe the device. It could be a hostname or an FQDN.
![]() Organization: Optional name for your organization.
Organization: Optional name for your organization.
![]() Organizational Unit: Optional department name.
Organizational Unit: Optional department name.
![]() Country: An optional two-letter country code.
Country: An optional two-letter country code.
![]() Months to Expiration: The validity period of the certificate. Figure 9-35 shows the default value of 12 months. You can use a longer period if you want to avoid updating the CA certificate on all clients as often. Keep in mind that using a longer time period may introduce a security risk if the CA certificate is compromised.
Months to Expiration: The validity period of the certificate. Figure 9-35 shows the default value of 12 months. You can use a longer period if you want to avoid updating the CA certificate on all clients as often. Keep in mind that using a longer time period may introduce a security risk if the CA certificate is compromised.
![]() Set Basic Constraints Extension to Critical: Some older web browsers may not recognize the CA certificate, so setting this option to On ensures that such clients reject it during installation. This should not be a concern with any modern software.
Set Basic Constraints Extension to Critical: Some older web browsers may not recognize the CA certificate, so setting this option to On ensures that such clients reject it during installation. This should not be a concern with any modern software.
![]() Import: You can import a subordinate CA certificate issued by your private CA. Keep in mind that you cannot get such a certificate from a well-known public CA. You need to use separate tools to generate a certificate-signing request on behalf of ASA CX. When you obtain the subordinate CA certificate, you need the following components to successfully import it into the ASA CX:
Import: You can import a subordinate CA certificate issued by your private CA. Keep in mind that you cannot get such a certificate from a well-known public CA. You need to use separate tools to generate a certificate-signing request on behalf of ASA CX. When you obtain the subordinate CA certificate, you need the following components to successfully import it into the ASA CX:
![]() Certificate: The certificate file itself in Privacy-enhanced Electronic Mail (PEM) format.
Certificate: The certificate file itself in Privacy-enhanced Electronic Mail (PEM) format.
![]() Key: The associated private key file in PEM format.
Key: The associated private key file in PEM format.
![]() Private Key Phrase: The optional password used to encrypt the certificate and private key files.
Private Key Phrase: The optional password used to encrypt the certificate and private key files.
You will see the View Current Certificate button only if you are replacing an existing self-signed CA certificate.
4. When done, click Save and commit the changes to ASA CX.
Defining a Decryption Policy
You configure a TLS Decryption policy similarly to how you configure an identity discovery policy. This policy determines which connections the ASA CX will attempt to decrypt. It does not indicate whether the module will permit or deny the decrypted traffic; the context-aware policies inspect such packets along with any other cleartext connections and make the final decision. The TLS decryption module only processes connections that were initially permitted by CX based on IP addresses and user identity information.
You can configure multiple entries in the decryption policy to apply different actions based on the type of traffic. Because ASA CX evaluates all policies from top to bottom, put the more specific entries first. Depending on your organizational security policy, you can take one of two approaches:
![]() Exclude a few trusted connections and applications from TLS decryption and decrypt the rest of the encrypted traffic: This approach provides the most security, but comes with the most significant performance impact. In this case, you need to configure the exemption entries first and use a blanket policy for decrypting all traffic at the bottom of the policy set.
Exclude a few trusted connections and applications from TLS decryption and decrypt the rest of the encrypted traffic: This approach provides the most security, but comes with the most significant performance impact. In this case, you need to configure the exemption entries first and use a blanket policy for decrypting all traffic at the bottom of the policy set.
![]() Decrypt only some flows: This approach lowers the processing impact on ASA CX but may not provide visibility into all of the encrypted traffic. You can use the option to decrypt only traffic to known malicious websites as an effective compromise. In this case, you just need to define the individual decryption entries in the desired order.
Decrypt only some flows: This approach lowers the processing impact on ASA CX but may not provide visibility into all of the encrypted traffic. You can use the option to decrypt only traffic to known malicious websites as an effective compromise. In this case, you just need to define the individual decryption entries in the desired order.
To define a decryption policy, navigate to Configurations > Policies/Settings in PRSM, click the drop-down arrow for the tab menu, choose Decryption Policies under the Decryption section, and follow these steps:
1. Select the default access policy set called Decryption. If you do not see it, click the top icon on the left side, choose Add Policy Set, and create a new one.
2. Click the second icon from the top on the left side and choose Add Policy at the Top under the appropriate decryption policy set to create a new entry.
3. Enter the mandatory Policy Name and ensure that the Enable Policy selector is On. This example creates a policy entry called Decrypt Malicious.
4. Complete the traffic selection section that is shown in Figure 9-36.

You can populate the following fields or use the default Any criteria:
![]() Source: Decrypt connections from a particular source. You can use previously configured network objects, secure mobility objects, and identity objects. To use identity objects, you must perform additional configuration as discussed in the earlier “Enabling User Identity Services” section. The configuration in Figure 9-36 selects traffic from Special Project Users as long as the rest of the decryption criteria are met.
Source: Decrypt connections from a particular source. You can use previously configured network objects, secure mobility objects, and identity objects. To use identity objects, you must perform additional configuration as discussed in the earlier “Enabling User Identity Services” section. The configuration in Figure 9-36 selects traffic from Special Project Users as long as the rest of the decryption criteria are met.
![]() Destination: Only decrypt traffic to certain destination servers. You can use network objects, URL objects, and destination object groups. URL objects must only use hostnames, domain names, and categories. Because the ASA CX cannot see the full URL before it establishes the secure connection with the client, such object entries are ignored. The CX module must start the decryption process in order to match against URL objects or categories. In those cases, the client must re-attempt the connection if the CX module decides against continuing with the decryption after seeing the reply from the server and resets the session. The configuration in Figure 9-36 matches any destinations.
Destination: Only decrypt traffic to certain destination servers. You can use network objects, URL objects, and destination object groups. URL objects must only use hostnames, domain names, and categories. Because the ASA CX cannot see the full URL before it establishes the secure connection with the client, such object entries are ignored. The CX module must start the decryption process in order to match against URL objects or categories. In those cases, the client must re-attempt the connection if the CX module decides against continuing with the decryption after seeing the reply from the server and resets the session. The configuration in Figure 9-36 matches any destinations.
![]() Service: Only decrypt traffic to destination services that match the listed service object groups. The configuration in Figure 9-36 matches any services.
Service: Only decrypt traffic to destination services that match the listed service object groups. The configuration in Figure 9-36 matches any services.
5. Apply a decryption action to the matching connections. Figure 9-37 shows the available fields.

You must provide the following information:
![]() Action: Choose Decrypt Everything or Do Not Decrypt if you want the ASA CX to take the respective action on all matching traffic. You can also choose Decrypt Potentially Malicious Traffic to base the decryption decision on the reputation score of the destination website, as shown in Figure 9-37. Keep in mind that this choice may require the ASA CX to attempt decryption first and disengage later based on the server information.
Action: Choose Decrypt Everything or Do Not Decrypt if you want the ASA CX to take the respective action on all matching traffic. You can also choose Decrypt Potentially Malicious Traffic to base the decryption decision on the reputation score of the destination website, as shown in Figure 9-37. Keep in mind that this choice may require the ASA CX to attempt decryption first and disengage later based on the server information.
![]() Web Reputation: This option is available only when you choose to decrypt potentially malicious traffic. Select the default or a previously configured web reputation profile to specify the threshold for low reputation websites. ASA CX decrypts connections to websites that fall into the low reputation category. The configuration in Figure 9-37 uses a custom profile called HTTP Decryption.
Web Reputation: This option is available only when you choose to decrypt potentially malicious traffic. Select the default or a previously configured web reputation profile to specify the threshold for low reputation websites. ASA CX decrypts connections to websites that fall into the low reputation category. The configuration in Figure 9-37 uses a custom profile called HTTP Decryption.
6. Complete the Interface Roles section if you want to apply this decryption policy entry only to traffic between certain ASA interfaces.
7. List the optional tag and ticket identifiers for this policy entry and click Save Policy.
8. (Optional) Repeat this procedure from Step 2 if you want to add additional decryption policy entries. Keep in mind that the ASA CX evaluates the policy set in the configured order, so you should match the most specific traffic classes on top.
When you are done, commit the changes to ASA CX.
Enabling NG IPS
In CX 9.2(1) and later software, separately licensed NG IPS features can protect your network by scanning transit connections for known threats based on the dynamically updated signature database. You can use global and custom threat profiles to apply this inspection to all connections or to just specific classes of traffic. Keep in mind that this feature impacts the maximum forwarding performance of the ASA CX when enabled. Refer to the “NG IPS Profiles” section earlier in this chapter for additional information on NG IPS operation.
NG IPS is disabled by default. Enable this feature or change its global settings by navigating to Configurations > Policies/Settings, clicking the drop-down arrow for the tab menu, and choosing Intrusion Prevention under the Basic Device Properties section. Figure 9-38 shows the dialog box that opens.
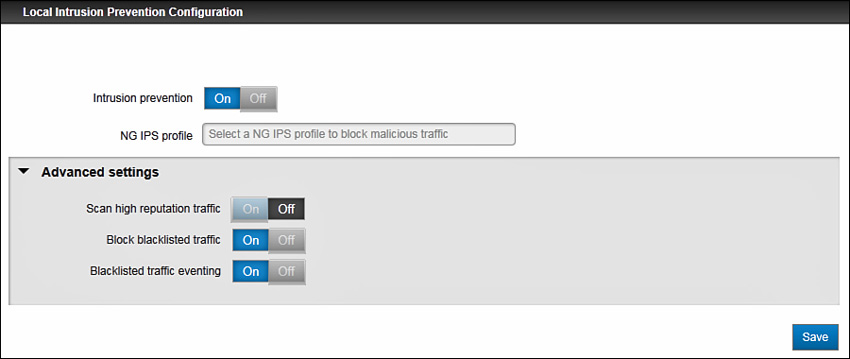
You can change the following options:
![]() Intrusion Prevention: Turn the feature On or Off globally. The other options only appear when NG IPS is enabled.
Intrusion Prevention: Turn the feature On or Off globally. The other options only appear when NG IPS is enabled.
![]() NG IPS Profile: Choose the default NG IPS profile. The system comes with a predefined Default NG IPS profile, but you can choose a different previously configured NG IPS profile here. You can also use different profiles for specific classes of traffic when configuring the context-aware policies.
NG IPS Profile: Choose the default NG IPS profile. The system comes with a predefined Default NG IPS profile, but you can choose a different previously configured NG IPS profile here. You can also use different profiles for specific classes of traffic when configuring the context-aware policies.
![]() Advanced Settings: The following advanced NG IPS parameters are available:
Advanced Settings: The following advanced NG IPS parameters are available:
![]() Scan High Reputation Traffic: Click On if you want NG IPS to scan connections to high reputation websites. This option is disabled by default, because ASA CX considers such connections very safe. This capability requires an active Web Security Essentials license to maintain the reputation database up to date.
Scan High Reputation Traffic: Click On if you want NG IPS to scan connections to high reputation websites. This option is disabled by default, because ASA CX considers such connections very safe. This capability requires an active Web Security Essentials license to maintain the reputation database up to date.
![]() Block Blacklisted Traffic: By default, NG IPS blocks connections to and from endpoints that are present in the dynamically downloaded blacklist. You can disable this option if you do not want to use this blacklist.
Block Blacklisted Traffic: By default, NG IPS blocks connections to and from endpoints that are present in the dynamically downloaded blacklist. You can disable this option if you do not want to use this blacklist.
![]() Blacklisted Traffic Eventing: By default, NG IPS reflects the blacklisted connections in the Dashboard reports and event log. You can click Off to quietly drop such connections if the previous option is enabled.
Blacklisted Traffic Eventing: By default, NG IPS reflects the blacklisted connections in the Dashboard reports and event log. You can click Off to quietly drop such connections if the previous option is enabled.
When you are finished, click Save and commit the changes to ASA CX.
Defining Context-Aware Access Policies
After you finish configuring all of the necessary policy elements and the global user identity discovery, TLS decryption, and NG IPS policies, you can define the actual context-aware policies that the ASA CX will use to permit or deny transit connections.
To create an access policy, navigate to Configurations > Policies/Settings in PRSM, click the drop-down arrow for the tab menu, choose Access Policies under the Basic Policies section, and follow these steps:
1. Select the default decryption policy set called Access. If you do not see it, click the top icon on the left side, choose Add Policy Set, and create a new one.
2. Click the second icon from the top on the left side and choose Add Policy at the Top under the appropriate access policy set to create a new entry.
3. Specify the mandatory policy name and configure the other properties that are shown in Figure 9-39.
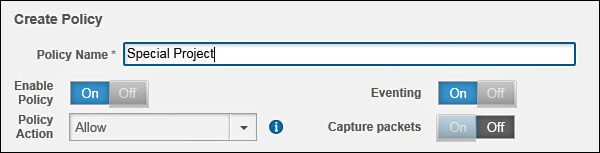
You can choose the following policy parameters:
![]() Enable Policy: Click On to enable this entry.
Enable Policy: Click On to enable this entry.
![]() Policy Action: Choose the action that ASA CX should apply to the matching traffic. You have these options:
Policy Action: Choose the action that ASA CX should apply to the matching traffic. You have these options:
![]() Allow: Permit the connection through as shown in Figure 9-39.
Allow: Permit the connection through as shown in Figure 9-39.
![]() Warn: This option is available in CX 9.2(1) and later software only for HTTP and decrypted HTTPS connections. When this option is selected, the ASA CX can present the user with a warning page before permitting the traffic through. You can customize the warning message by navigating to Administration > End User Notification in PRSM. The user must agree with the displayed policy message before proceeding. ASA CX records the user response in the event log for compliance reasons. When this action matches with connections other than HTTP and HTTPS, the CX module simply permits the traffic.
Warn: This option is available in CX 9.2(1) and later software only for HTTP and decrypted HTTPS connections. When this option is selected, the ASA CX can present the user with a warning page before permitting the traffic through. You can customize the warning message by navigating to Administration > End User Notification in PRSM. The user must agree with the displayed policy message before proceeding. ASA CX records the user response in the event log for compliance reasons. When this action matches with connections other than HTTP and HTTPS, the CX module simply permits the traffic.
![]() Deny: Block the connection.
Deny: Block the connection.
![]() Eventing: Click On to include information about the matching connections in Dashboard reports and event logs. It is enabled by default, as shown in Figure 9-39.
Eventing: Click On to include information about the matching connections in Dashboard reports and event logs. It is enabled by default, as shown in Figure 9-39.
![]() Capture Packets: Click On to record packets corresponding to the matching connections in an internal file. This functionality works only when the policy entry selects connections based on IP, TCP, UDP, and ICMP information. If you use any other objects to select traffic, ASA CX will not capture matching packets even if this feature is enabled. This option is set to Off by default. Enable this option only when troubleshooting specific connectivity, as it will have an impact on the performance of the ASA CX. Refer to the “Packet Captures” section later in this chapter for more information about this functionality.
Capture Packets: Click On to record packets corresponding to the matching connections in an internal file. This functionality works only when the policy entry selects connections based on IP, TCP, UDP, and ICMP information. If you use any other objects to select traffic, ASA CX will not capture matching packets even if this feature is enabled. This option is set to Off by default. Enable this option only when troubleshooting specific connectivity, as it will have an impact on the performance of the ASA CX. Refer to the “Packet Captures” section later in this chapter for more information about this functionality.
4. Complete the traffic selection section shown in Figure 9-40.
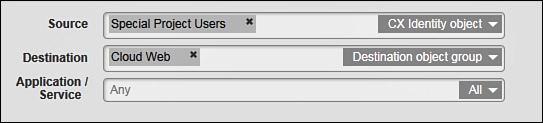
Similarly to other policies, you have the following options for matching the traffic to this entry:
![]() Source: Match the source of a connection to system predefined user agent objects or previously configured network, identity, user agent, and secure mobility objects. You can also use source object groups. When you specify multiple entries of different type, the source of a connection can match any of them.
Source: Match the source of a connection to system predefined user agent objects or previously configured network, identity, user agent, and secure mobility objects. You can also use source object groups. When you specify multiple entries of different type, the source of a connection can match any of them.
![]() Destination: Match the destination of a connection to previously configured network and URL objects or destination object groups. You can also specify multiple different object types for a single match.
Destination: Match the destination of a connection to previously configured network and URL objects or destination object groups. You can also specify multiple different object types for a single match.
![]() Application/Service: Match a specific system predefined service or application by name or type. You can also use previously configured application and application-service objects or service object groups.
Application/Service: Match a specific system predefined service or application by name or type. You can also use previously configured application and application-service objects or service object groups.
The configuration in Figure 9-40 matches any application connections from the Special Project Users identity object to the Cloud Web destination object group.
5. Apply additional inspection profiles to allowed matching connections. Figure 9-41 illustrates the available options.
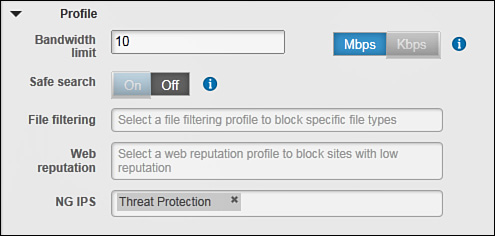
You can define the following advanced settings for the selected traffic:
![]() Bandwidth Limit: This option is available only in CX 9.2(1) and later software. You can rate-limit all connections that match this policy entry to the configured value in Kbps or Mbps. In Figure 9-41, all matching flows are limited to 10 Mbps of throughput.
Bandwidth Limit: This option is available only in CX 9.2(1) and later software. You can rate-limit all connections that match this policy entry to the configured value in Kbps or Mbps. In Figure 9-41, all matching flows are limited to 10 Mbps of throughput.
![]() Safe Search: This option is available only in CX 9.2(1) and later software. For matching HTTP and decrypted HTTPS connections, you can force the compatible search engines to always use the safe search option. This functionality is currently available with Ask, Bing, Dailymotion, Dogpile, DuckDuckGo, Flickr, Google, Yahoo, Yandex, and YouTube engines. The ASA CX transparently rewrites search URLs in transit connections to apply this option. If you enable this feature, the CX module denies connections to all incompatible search sites.
Safe Search: This option is available only in CX 9.2(1) and later software. For matching HTTP and decrypted HTTPS connections, you can force the compatible search engines to always use the safe search option. This functionality is currently available with Ask, Bing, Dailymotion, Dogpile, DuckDuckGo, Flickr, Google, Yahoo, Yandex, and YouTube engines. The ASA CX transparently rewrites search URLs in transit connections to apply this option. If you enable this feature, the CX module denies connections to all incompatible search sites.
![]() File Filtering: Apply a previously configured file blocking profile to the matching connections.
File Filtering: Apply a previously configured file blocking profile to the matching connections.
![]() Web Reputation: Apply the predefined system default or a previously configured web reputation profile to the matching HTTP and decrypted HTTPS connections. This option requires a valid Web Security Essential license.
Web Reputation: Apply the predefined system default or a previously configured web reputation profile to the matching HTTP and decrypted HTTPS connections. This option requires a valid Web Security Essential license.
![]() NG IPS: This option is available only in CX 9.2(1) and later software with a valid NG IPS license. Use the system default or a previously configured NG IPS profile to inspect the matching connections. Keep in mind that you must first enable NG IPS globally, as discussed in the “Enabling NG IPS” section earlier in this chapter. The configuration in Figure 9-41 uses a custom Threat Protection profile.
NG IPS: This option is available only in CX 9.2(1) and later software with a valid NG IPS license. Use the system default or a previously configured NG IPS profile to inspect the matching connections. Keep in mind that you must first enable NG IPS globally, as discussed in the “Enabling NG IPS” section earlier in this chapter. The configuration in Figure 9-41 uses a custom Threat Protection profile.
6. Complete the Interface Roles section if you want to apply this access policy entry only to traffic between certain ASA interfaces.
7. Click Save Policy to return to the policy set configuration screen.
8. Repeat the procedure from Step 2 to create other access policy entries. Keep in mind that the ASA CX matches connections to the policy from top to bottom, so you must place the more specific traffic classes first. You can drag the policy entries up and down to create the desired order.
When you are finished, commit the changes to ASA CX. The module is now ready to accept redirected connections from the ASA.
Configuring ASA for CX Traffic Redirection
After you have finished defining the context-aware policies on ASA CX, you need to configure CX traffic redirection on the ASA. You would do this similarly to application inspection or advanced connection settings through the Modular Policy Framework (MPF). Refer to Chapter 13, “Application Inspection,” for a detailed discussion of how to configure and use MPF traffic classes, policies, and actions.
When configuring CX traffic redirection, keep in mind that ASA CX is not compatible with the following ASA features:
![]() Cisco Cloud Web Security (formerly ScanSafe)
Cisco Cloud Web Security (formerly ScanSafe)
![]() URL filtering
URL filtering
![]() HTTP inspection
HTTP inspection
![]() Web Cache Control Protocol (WCCP)
Web Cache Control Protocol (WCCP)
You should not apply these features to the same connections that you intend to redirect to the CX module. The ASA CX feature set already covers the typical use cases for these features. You still need to enable ASA application inspection engines for connections that require opening secondary channels and embedded IP address rewrites with NAT, such as Session Initiation Protocol (SIP) or FTP. Keep in mind that ASA still applies its regular ACL and stateful checks before redirecting connections to the CX module.
Use ASDM to configure CX traffic redirection by navigating to Configuration > Firewall > Service Policy Rules. You can Edit an existing rule from the list and select ASA CX Inspection under the Rule Actions tab. If you want to redirect an existing class of traffic to the CX module, select an existing class of traffic to the CX module, select an existing rule in the list, click Edit, and choose the ASA CX Inspection on the Rule Actions tab. You apply CX services to a new traffic class with the following steps:
1. Select Add Service Policy Rule to launch the Add Service Policy Rule Wizard.
2. On the Service Policy screen, select which MPF policy to use. You can either create an interface policy or use the global one. Click Global – Applies to All Interfaces to leverage the global policy. This allows you to pick up traffic for CX redirection from all configured data interfaces. Click Next.
3. On the Traffic Classification Criteria screen, define a class of traffic for CX redirection. You can create a new class or use an existing one. Choose the desired Traffic Match Criteria as well by checking the respective check boxes. You could check Source and Destination IP Address (Uses ACL) if you wanted to redirect only certain connections to the CX module. Keep in mind that you diminish the benefits of ASA CX when you redirect traffic based on static TCP and UDP ports. This example will redirect Any traffic under a class called global-class; this selection covers all transit IPv4 and IPv6 connections. Click Next.
4. On the Rule Actions screen, click the ASA CX Inspection tab, illustrated in Figure 9-42.

You can configure the following options:
![]() Enable ASA CX for This Traffic Flow: Check this box to redirect the selected class of traffic to ASA CX for inspection.
Enable ASA CX for This Traffic Flow: Check this box to redirect the selected class of traffic to ASA CX for inspection.
![]() If ASA CX Card Fails: Click Permit Traffic to bypass flow redirection if the ASA CX is not ready (fail-open). Click Close Traffic to deny any transit connections that match the CX redirection policy if the module is not ready (fail-close). Refer to the “High Availability” section earlier in this chapter for additional information.
If ASA CX Card Fails: Click Permit Traffic to bypass flow redirection if the ASA CX is not ready (fail-open). Click Close Traffic to deny any transit connections that match the CX redirection policy if the module is not ready (fail-close). Refer to the “High Availability” section earlier in this chapter for additional information.
![]() Enable Auth Proxy: You must check this box if you want ASA CX to discover user identity through active authentication. The CX module redirects a user authentication session to a predefined TCP port at the IP address of the closest ASA interface. ASA forwards this connection to the ASA CX with an appropriate flag, so the module can complete the user authentication process. By default, ASA uses TCP port 885 for redirected active authentication connections.
Enable Auth Proxy: You must check this box if you want ASA CX to discover user identity through active authentication. The CX module redirects a user authentication session to a predefined TCP port at the IP address of the closest ASA interface. ASA forwards this connection to the ASA CX with an appropriate flag, so the module can complete the user authentication process. By default, ASA uses TCP port 885 for redirected active authentication connections.
![]() Enable Monitor Only: Check this box to deploy the ASA CX in a passive monitoring mode. When this option is checked, the CX module only receives copies of transit packets. It is unable to inject packets into the network or block any transit connections. Most of the advanced features, such as TLS Decryption, cannot operate in this mode. You must also enable this feature on the ASA CX under Configurations > Monitor-Only Mode in PRSM. This mode is only useful to learn some of the ASA CX application visibility and reporting capabilities. You must uncheck the Enable Auth Proxy box on this ASDM screen for this option to become available.
Enable Monitor Only: Check this box to deploy the ASA CX in a passive monitoring mode. When this option is checked, the CX module only receives copies of transit packets. It is unable to inject packets into the network or block any transit connections. Most of the advanced features, such as TLS Decryption, cannot operate in this mode. You must also enable this feature on the ASA CX under Configurations > Monitor-Only Mode in PRSM. This mode is only useful to learn some of the ASA CX application visibility and reporting capabilities. You must uncheck the Enable Auth Proxy box on this ASDM screen for this option to become available.
5. Click Finish to close the wizard and then click Apply to push the configuration to the ASA.
Example 9-3 shows the respective configuration that ASDM sends to the ASA.
Example 9-3 Sample CX Redirection Policy
class-map global-class
match any
!
policy-map global_policy
class global-class
cxsc fail-open auth-proxy
!
service-policy global_policy global
Monitoring ASA CX
ASA CX provides three major monitoring capabilities:
Dashboard Reports
View various security reports by navigating to the Dashboard section in PRSM. This section contains the following dashboards:
![]() Network Overview: A broad view of the CX health and processing load as well as the lists of the most active network users, most frequently accessed destinations, and most commonly hit policies. It also contains a brief summary of blocked threats and malicious connections.
Network Overview: A broad view of the CX health and processing load as well as the lists of the most active network users, most frequently accessed destinations, and most commonly hit policies. It also contains a brief summary of blocked threats and malicious connections.
![]() Malware Traffic: A summary view of all threats and malicious transactions that the ASA CX detected or blocked.
Malware Traffic: A summary view of all threats and malicious transactions that the ASA CX detected or blocked.
![]() NG Intrusion Prevention: The top attackers, targets, and threats as well as the access policies that detected the most threats. Available only in CX 9.2(1) and later software with a valid NG IPS license.
NG Intrusion Prevention: The top attackers, targets, and threats as well as the access policies that detected the most threats. Available only in CX 9.2(1) and later software with a valid NG IPS license.
![]() Users: The network statistics for the most active authenticated users. You must configure user identity services to see this report.
Users: The network statistics for the most active authenticated users. You must configure user identity services to see this report.
![]() Web Destinations: The top destinations based on the domain name along with the relevant traffic usage information.
Web Destinations: The top destinations based on the domain name along with the relevant traffic usage information.
![]() Web Categories: The most commonly accessed web categories along with the associated traffic usage information. This report requires a valid Web Security Essentials license.
Web Categories: The most commonly accessed web categories along with the associated traffic usage information. This report requires a valid Web Security Essentials license.
![]() Policies: The most commonly hit policies along with the hit counts and other traffic usage information.
Policies: The most commonly hit policies along with the hit counts and other traffic usage information.
![]() User Devices: The most frequently used VPN device types along with the associated traffic usage information.
User Devices: The most frequently used VPN device types along with the associated traffic usage information.
![]() Applications: The most commonly used applications along with the traffic usage data. You need a valid Application Visibility and Control license to utilize this report.
Applications: The most commonly used applications along with the traffic usage data. You need a valid Application Visibility and Control license to utilize this report.
![]() Application Types: The most commonly used application types along with the associated traffic usage information. You need a valid Application Visibility and Control license to utilize this report.
Application Types: The most commonly used application types along with the associated traffic usage information. You need a valid Application Visibility and Control license to utilize this report.
All of these dashboards display the information from a specified time period. By default, they show statistics and events from the last 30 minutes. The list views allow you to choose between 10, 100, and 1000 entries to display; top 10 items is the default selection.
Click the Generate Report button in the upper right corner of any of these tabs to create and download an administrative or traffic usage report in PDF format. PRSM allows you to select the desired time interval for the report and insert a custom image as the logo. The following report categories are available in CX 9.2(1) software:
![]() Administrative: Includes reports for the traffic summary, policy changes, and top 25 policies by transactions
Administrative: Includes reports for the traffic summary, policy changes, and top 25 policies by transactions
![]() User and Device: Includes reports for top 25 users and user devices
User and Device: Includes reports for top 25 users and user devices
![]() Threat Analysis: Includes reports for top 25 threats, attackers, targets, and policies with maximum detected threats
Threat Analysis: Includes reports for top 25 threats, attackers, targets, and policies with maximum detected threats
![]() Application and Web Destination: Includes reports for top 25 applications, application types, web destinations, and web categories
Application and Web Destination: Includes reports for top 25 applications, application types, web destinations, and web categories
Connection and System Events
You can retrieve ASA CX system and traffic events over a specified time period by navigating to the Events section in PRSM. The following event tabs are available:
![]() Context Aware Security: Displays events created from the context-aware access policies.
Context Aware Security: Displays events created from the context-aware access policies.
![]() All Events: Shows all system and policy events. This view includes the data from all other tabs.
All Events: Shows all system and policy events. This view includes the data from all other tabs.
![]() Authentication: Lists active and passive user authentication events.
Authentication: Lists active and passive user authentication events.
![]() NG IPS: Shows deny and monitor events recorded by NG IPS policies.
NG IPS: Shows deny and monitor events recorded by NG IPS policies.
![]() Encrypted Traffic View: Lists events recorded by TLS Decryption.
Encrypted Traffic View: Lists events recorded by TLS Decryption.
![]() SystemEventView: Shows all system events. This tab is extremely useful for troubleshooting CX and PRSM platform issues. Figure 9-43 shows an event that indicates a connectivity problem to the configured AD Agent or CDA. This could explain why user connections that rely on an identity-based access policy fail.
SystemEventView: Shows all system events. This tab is extremely useful for troubleshooting CX and PRSM platform issues. Figure 9-43 shows an event that indicates a connectivity problem to the configured AD Agent or CDA. This could explain why user connections that rely on an identity-based access policy fail.

To change the depth of CX platform logging for various subsystems, navigate to Configurations > Policies/Settings, click the drop-down arrow for the tab menu, and choose ASA CX Logging under the Logging section. Figure 9-44 shows the dialog box that opens.

Only modify these settings when troubleshooting a specific issue with Cisco TAC. Permanently increasing system logging levels will cause overall performance degradation for ASA CX.
In Figure 9-44, the TLS Decryption Engine logging level is raised to Debug for troubleshooting a decryption problem. After clicking Save and committing the changes to the CX module, you should attempt the failing transit HTTPS connection to generate the necessary logs. Then click Download Logs to retrieve the support bundle and send it to TAC for analysis. Make sure to return the logging level back to the default value, click Save, and commit the changes to the ASA CX after you are done.
Packet Captures
You can configure ASA CX to capture certain inspected and dropped packets to troubleshoot advanced connectivity issues. To configure global packet capture parameters, navigate to Configurations > Policies/Settings, click the drop-down arrow for the tab menu, and choose Packet Capture under the Basic device Properties section. This opens the dialog box shown in Figure 9-45.
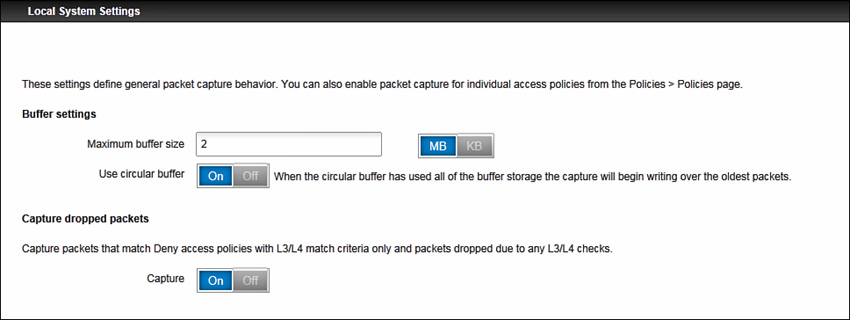
The following parameters apply to the packet capture files that ASA CX creates when you choose On for the Capture Packets action under specific access policy entries; refer to the “Defining Context-Aware Access Policies” section earlier in this chapter for more information on matching traffic classes with policies:
![]() Maximum Buffer Size: Set the maximum capture file size in kilobytes (KB) or megabytes (MB). The default size is 512 KB, and you can increase it up to 32,768 KB. In Figure 9-45, a 2-MB capture file is specified.
Maximum Buffer Size: Set the maximum capture file size in kilobytes (KB) or megabytes (MB). The default size is 512 KB, and you can increase it up to 32,768 KB. In Figure 9-45, a 2-MB capture file is specified.
![]() Use Circular Buffer: By default, ASA CX overwrites the oldest packet data in the capture file when it reaches the maximum configured size. This method does not work when troubleshooting an intermittent network problem if you are unable to disable the capture process quickly and the traffic rate of the matching flows is high. If you set this option to Off, the ASA CX stops capturing additional packets when the file is full.
Use Circular Buffer: By default, ASA CX overwrites the oldest packet data in the capture file when it reaches the maximum configured size. This method does not work when troubleshooting an intermittent network problem if you are unable to disable the capture process quickly and the traffic rate of the matching flows is high. If you set this option to Off, the ASA CX stops capturing additional packets when the file is full.
ASA CX stores capture files on the local disk under the respective policy name and with a .pcap extension. For instance, the capture file will be called Marketing.pcap if you enable the Capture Packets option under the access policy entry called Marketing. The CX module saves the capture file to the disk only when you disable the Capture Packets action under a policy entry. If you re-enable this action under the same policy, ASA CX overwrites the existing file.
You can also switch the Capture selector in the Capture Dropped Packets area to On if you want ASA CX to store packets that fail basic IP, TCP, UDP, and ICMP checks. The CX module drops such packets by default, so this option could be helpful when troubleshooting obscure connectivity problems. ASA CX stores these packets in a separate file called aspdrop.pcap. You must change the Capture selector to Off before the ASA CX writes this file to the disk.
You can download the packet capture files as a part of the ASA CX diagnostic bundle by following these steps:
1. Access the CX module CLI through SSH or by using the session cxsc console command from the ASA CLI.
2. After logging in, issue the support diagnostic command and enter option 3 at the interactive prompt:
asacx> support diagnostic
======= Diagnostic =======
1. Create default diagnostic archive
2. Create diagnostic archive for advanced troubleshooting
3. Manually create diagnostic archive
Please enter your choice (Ctrl+C to exit): 3
3. Enter option 1 to add files to the package:
=== Manual Diagnostic ===
1. Add files and directories to package
2. View package contents
3. Upload package
Please enter your choice (Ctrl+C to exit): 1
4. Enter option 3 to add packet capture files to the package:
=== Add files and directories to package | Manual Diagnostic ===
1. Logs
2. Core dumps
3. Packet captures
4. Reporting data
5. Eventing data
6. Update data
b. Back to main menu
Please enter your choice (Ctrl+C to exit): 3
5. Select the desired capture files from the file list:
============================
Directory: /var/local | 11 KB
-----------files------------
2013-10-19 10:37:28 | 11382 | Marketing.pcap
([b] to go back or [m] for the menu or [s] to select files to add)
Type a sub-dir name to see its contents: s
Type the partial name of the file to add ([*] for all, [<] to cancel)
> Marketing
Marketing.pcap
Are you sure you want to add these files? (y/n) [Y]: Y
=== Package Contents ===
[Added] Marketing.pcap
========================
Repeat this step for all the captures that you want to download. If you do not see the necessary capture files, make sure that you stopped the capture process by disabling the associated action under the access policies.
6. When you are finished selecting files, return to the main diagnostic menu:
============================
Directory: /var/local | 11 KB
-----------files------------
2013-10-19 10:37:28 | 11382 | Marketing.pcap
([b] to go back or [m] for the menu or [s] to select files to add)
Type a sub-dir name to see its contents: m
7. Select option 3 to upload the support diagnostic package with packet captures to an FTP or TFTP server and follow the prompts:
=== Manual Diagnostic ===
1. Add files to package
2. View files in package
3. Upload package
Please enter your choice (Ctrl+C to exit): 3
Creating archive
Enter upload url (FTP or TFTP) or [Ctrl+C] to exit
Example: ftp://192.168.8.1/uploads
> ftp://172.16.171.125/incoming
Uploading file cx_asacx_10_19_2013_11_03_34.zip [size: 11384]
Uploading the file to /incoming on the remote server.
.
Successfully Uploaded ftp://172.16.171.125/incoming/cx_asacx_10_19_2013_11_03_34.zip
Summary
ASA CX effectively complements the core ASA feature set to deliver Next-Generation Firewall Services in a defense-in-depth approach. This chapter presented the CX services that are available in both hardware modules and software packages to fit every network design and performance profile. It explained how an ASA firewall blocks traditional protocol-level threats and redirects the permitted connections to the CX module for context-aware policy enforcement. The examples illustrated how ASA CX policies offer powerful methods of abstraction, including user identity discovery and true application visibility without relying on static TCP or UDP ports. The discussion also showed that the CX module can fully inspect even encrypted flows by leveraging the TLS decryption functionality, and can provide up-to-date next-generation IPS and malware protection services by constantly retrieving the current threat data from Cisco. This chapter demonstrated how you can leverage comprehensive monitoring capabilities of ASA CX to gain contextual visibility into your network security, application, and user behavior profiles.