
Chapter 21. Configuring and Troubleshooting PKI
This chapter covers the following topics:
![]() The local certificate authority
The local certificate authority
![]() Configuring IPsec site-to-site tunnels using certificates
Configuring IPsec site-to-site tunnels using certificates
![]() Configuring the Cisco ASA to accept remote-access VPN clients using certificates
Configuring the Cisco ASA to accept remote-access VPN clients using certificates
Public Key Infrastructure (PKI) is usually defined as a set of standards and systems whose main purpose is to verify and authenticate the validity of each party involved in a network transaction. This chapter starts with an introduction to PKI and then shows you how to configure, enroll, and troubleshoot the Cisco ASA with digital certificates.
Introduction to PKI
PKI is a security architecture that provides a higher level of confidence for exchanging information over insecure networks. PKI is based on public key cryptography, a technology that was first created to encrypt and decrypt data involving two different types of keys: a public key and a private key. A user gives a public key to other users, keeping the private key. Data that is encrypted with the public key can be decrypted only with the corresponding private key, and vice versa. Figure 21-1 illustrates how this works.
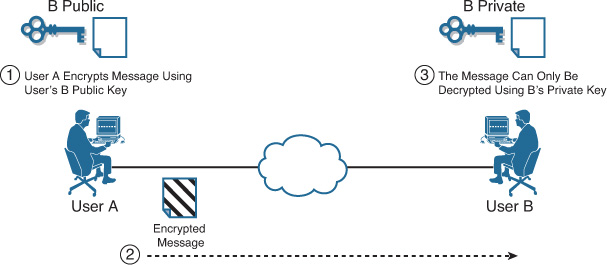
The following is the sequence in Figure 21-1:
1. User A obtains User B’s public key and uses it to encrypt a message destined for User B.
2. User A sends the encrypted message over the unsecured network.
3. User B receives the encrypted message and decrypts it using his own private key.
The following are several key terms and concepts used in PKI:
![]() Certificate revocation list (CRL)
Certificate revocation list (CRL)
![]() Simple Certificate Enrollment Protocol (SCEP)
Simple Certificate Enrollment Protocol (SCEP)
These terms and concepts are defined in the sections that follow.
Certificates
Digital certificates are commonly used to authenticate and validate users and devices while simultaneously securing information exchanged over unsecured networks. Certificates can be issued for a user or a network device. They securely bind the user’s or device’s public key along with other information that describes the user’s or device’s identity.
The certificate syntax and format are defined in the X.509 standard of the International Telecommunication Union-Telecommunication Standardization Sector (ITU-T). An X.509 certificate includes the public key and data about the user or device, information about the certificate itself, and optional issuer material. Generally, certificates contain the following information:
![]() The entity’s public key
The entity’s public key
![]() The entity’s identifier information, such as the name, email address, organization, and locality
The entity’s identifier information, such as the name, email address, organization, and locality
![]() The validity period (the length of time that the certificate is considered valid)
The validity period (the length of time that the certificate is considered valid)
![]() Issuer’s information
Issuer’s information
![]() CRL distribution point
CRL distribution point
Digital certificates can be used in many implementations, such as IPsec and Secure Sockets Layer (SSL), secure email using Secure/Multipurpose Internet Mail Extensions (S/MIME), and many others. The same certificate might have different purposes. For example, a user certificate can be employed for remote-access VPN, accessing application servers, and S/MIME email authentication.
Note
Cisco ASA supports digital certificates for remote-access and site-to-site IPsec VPN session authentication, as well as for WebVPN and SSL administrative sessions.
The CA that issues the certificate determines the implementations for each certificate. The usage of the certificate is configured on the CA (that is, SSL, IPsec, and so on).
Certificate Authority
A CA is a device or entity that can issue a certificate to a user or network device. Before any PKI operations can begin, the CA generates its own public and private key pair and creates a self-signed CA certificate. A fingerprint in the certificate is used by the end entity to authenticate the received CA certificate. The fingerprint is created by the result of a hash (MD5 or SHA-1) calculation on the whole CA certificate. The fingerprint value corresponds to the ultimate root certificate, in cases in which multiple levels of CA exist. Keep in mind that SHA-1 is more secure than MD5.
CAs can be configured in a hierarchy, as illustrated in Figure 21-2. The CA at the top of a certification hierarchy is usually referred as the main root CA.
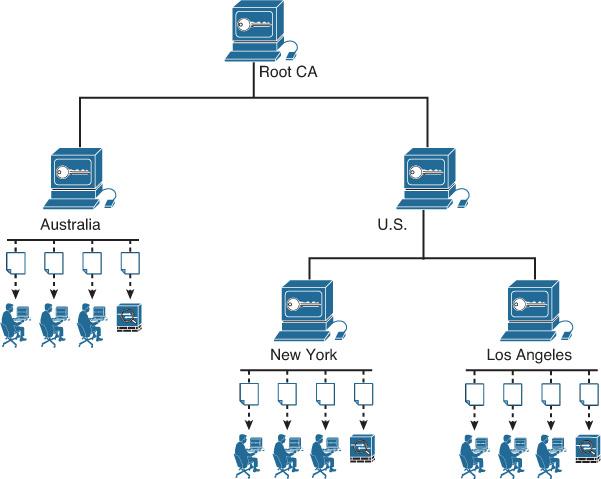
In Figure 21-2, the root CA server has two subordinate CAs: U.S. and Australia. The U.S. CA server also has two subordinates, New York and Los Angeles. Each CA server grants or denies certificate enrollment requests from its corresponding users and network devices (Cisco ASAs in this case).
A user or network device chooses the certificate issuer as a trusted root authority by accepting the issuer CA’s self-signed certificate containing the issuer’s public key. The certificate information from all trusted CAs within the hierarchy is often referred to as the certificate chain of trust.
The Cisco ASA has a local CA that integrates basic certificate deployment, providing revocation checking of issued certificates. The local CA user enrollment is supported by browser web page login.
Note
The local CA functionality is discussed later in this chapter.
There are several CA vendors. The following are some of the CAs supported by Cisco ASA:
![]() Microsoft Windows 2000 and 2003 CA Server(s)
Microsoft Windows 2000 and 2003 CA Server(s)
![]() Microsoft Active Directory Certificate Services (ADCS)
Microsoft Active Directory Certificate Services (ADCS)
![]() DigiCert
DigiCert
![]() Entrust
Entrust
![]() Cisco IOS router configured as a CA server
Cisco IOS router configured as a CA server
Several PKI implementations also include the use of registration authorities (RA). An RA acts as an interface between the client (user or network device) and the CA server. An RA verifies and identifies all certificate requests and asks the CA to issue them. RAs can be configured within the same CA (server) or in a separate system. Microsoft Active Directory Certificate Services (ADCS), and Entrust are examples of PKI servers that utilize an RA.
A certificate is valid only for the period of time specified by the issuing CA. After a certificate expires, a new certificate must be requested. You can also revoke a specific user and device certificate. The inventory of serial numbers of revoked certificates is maintained on a certificate revocation list (CRL).
Certificate Revocation List
When you revoke a certificate, the CA publishes the serial number of the revoked certificate to the CRL. This CRL can be maintained on the same CA or a separate system. The CRL can be accessed by any entity trying to check the validity of any given certificate. LDAP and HTTP are the most commonly used protocols when publishing and obtaining a CRL. Storing CRLs in a separate system other than the CA server is often recommended for large environments, for better scalability and to avoid single points of failure.
Figure 21-3 illustrates how a certificate can be revoked on a CA and subsequently published to a CRL server.
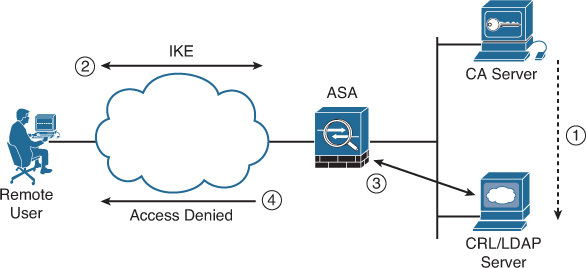
The following is the sequence of events in Figure 21-3:
1. The user certificate is revoked in the CA server. The CA server updates the CRL/LDAP server.
2. The user attempts to establish an IPsec VPN connection to the Cisco ASA.
3. The Cisco ASA is configured to query the CRL server. It downloads the CRL and finds the certificate serial number on the list of revoked certificates.
4. The Cisco ASA denies access to the user and sends an IKE delete message.
You need to use CRLs for several reasons. Revoking a certificate is crucial if it might have been compromised or if the user might not have authority to use such certificate. For instance, you should always revoke certificates when employees leave your organization.
Simple Certificate Enrollment Protocol
Simple Certificate Enrollment Protocol (SCEP) is a protocol developed by Cisco. SCEP provides secure issuance of certificates to users and network devices in a scalable manner. It uses HTTP for the transport mechanism for enrollment and uses LDAP or HTTP for CRL checking. SCEP supports the following operations:
![]() CA and RA public key distribution
CA and RA public key distribution
![]() Certificate enrollment
Certificate enrollment
![]() Certificate revocation
Certificate revocation
![]() Certificate query
Certificate query
![]() CRL query
CRL query
Cisco ASA supports enrollment via SCEP and manually via a cut-and-paste method.
Tip
Using SCEP is recommended for better scalability. The manual cut-and-paste method is normally used when the CA server does not support SCEP or an HTTP connection is not possible.
Installing Certificates
Enrollment is the process of obtaining a certificate from a CA server. This section covers the necessary steps to configure and enroll a Cisco ASA to an external CA server.
Installing Certificates Through ASDM
You can install a certificate on the Cisco ASA through ASDM from an external CA by using the following methods:
![]() By copying and pasting the certificate in PEM format
By copying and pasting the certificate in PEM format
![]() By using SCEP
By using SCEP
The following sections demonstrate how to install CA and identity certificates by each of these supported certificate installation methods.
Installing a CA Certificate from a File
Complete the following steps to install a CA certificate from a file, using ASDM:
1. Log in to ASDM and navigate to Configuration > Device Management > Certificate Management > CA Certificates. You can alternatively navigate to Configuration > Remote Access VPN > Certificate Management > CA; navigating to either of these locations within ASDM enables you to accomplish the same tasks.
2. Click Add.
3. The Install Certificate dialog box illustrated in Figure 21-4 is displayed. By default ASDM names the trustpoint ASDM_TrustPoint0. The 0 at the end of the trustpoint name increments every time a new certificate is imported. You can also edit the name to the name of your preference. In this case, the trustpoint name is left to the default value of ASDM_TrustPoint0.

4. In this instance the CA certificate is installed from a file. Choose Install from a File and click Browse to locate the certificate file in your local system.
5. Click Install Certificate to install the CA certificate.
6. Click Apply to apply the changes in ASDM.
7. Click Save to save the configuration on the Cisco ASA.
Installing an Identity Certificate from a File
Complete the following steps to install an identity certificate from a file, using ASDM:
1. Log in to ASDM and navigate to Configuration > Device Management > Certificate Management > Identity Certificates. You can alternatively navigate to Configuration > Remote Access VPN > Certificate Management > Identity Certificates; navigating to either of these locations within ASDM enables you to accomplish the same tasks.
2. Click Add.
3. The Add Identity Certificate dialog box illustrated in Figure 21-5 is displayed.
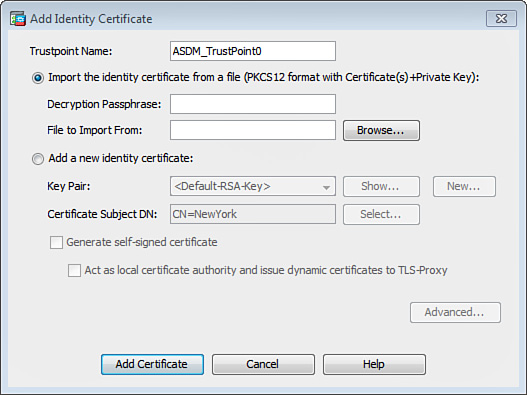
4. Choose Import the Identity Certificate from a File and click Browse to locate the certificate file in your local system.
5. If your certificate has a passphrase used for encryption, enter it in the Decryption Passphrase field.
6. Click Add Certificate to install the CA certificate.
7. Click Apply to apply the changes in ASDM.
8. Click Save to save the configuration on the Cisco ASA.
Installing a CA Certificate by the Copy-and-Paste Method
Install a CA certificate by pasting the PEM-formatted file into ASDM. Complete the following steps to install a CA certificate by the copy-and-paste method, using ASDM:
1. Log in to ASDM and navigate to Configuration > Device Management > Certificate Management > CA Certificates. You can alternatively navigate to Configuration > Remote Access VPN > Certificate Management > CA Certificates; navigating to either of these locations within ASDM enables you to accomplish the same tasks.
2. Click Add.
3. The Install Certificate dialog box illustrated in Figure 21-6 is displayed. Choose Paste Certificate in PEM Format and paste the CA certificate into the form field, as shown in Figure 21-6.

4. Click Install Certificate to install the CA certificate.
5. Click Apply to apply the changes in ASDM.
6. Click Save to save the configuration on the Cisco ASA.
Installing a CA Certificate Using SCEP
Complete the following steps to install a CA certificate using SCEP via ASDM:
1. Log in to ASDM and navigate to Configuration > Device Management > Certificate Management > CA Certificates. You can alternatively navigate to Configuration > Remote Access VPN > Certificate Management > CA Certificates; navigating to either of these locations within ASDM enables you to accomplish the same tasks.
2. Click Add.
3. The Install Certificate dialog box is shown (refer to Figure 21-6). Choose Use SCEP to install the CA certificate using SCEP.
4. Enter the CA server SCEP URL in the SCEP URL field.
5. By default, the retry period for the Cisco ASA to try to connect to the CA server using SCEP is 1 minute. To define a different retry period, enter the value (in minutes) in the Retry Period field. In this case, the default value is used.
6. The number of times the Cisco ASA attempts to connect to the CA server via SCEP is defined in the Retry Count field. The default is 0, which indicates unlimited retries. In this case, the default value is used.
7. You can optionally click the More Options button to enter advanced configuration parameters. After you click More Options, the Configuration Options for CA Certificate dialog box shown in Figure 21-7 is displayed.
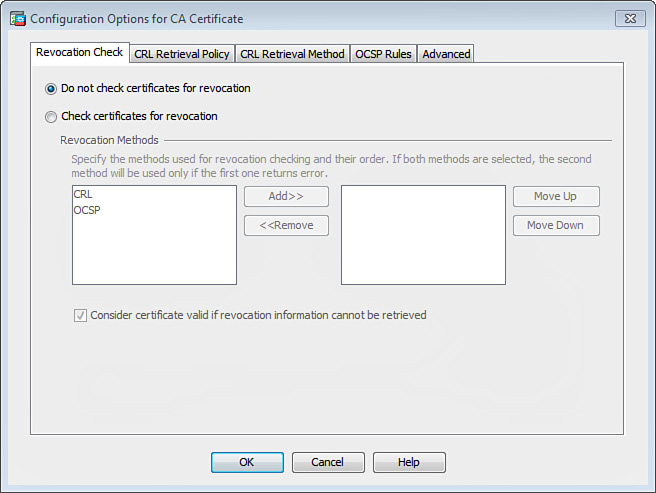
8. On the Revocation Check tab, you can configure the Cisco ASA to confirm whether a certificate has been revoked or not, using CRL checking or the Online Certificate Status Protocol (OCSP). To have the Cisco ASA confirm whether a certificate has been revoked, choose the Check Certificate for Revocation option, as shown in Figure 21-7.
9. Specify the method used for revocation checking and the order in which each check takes place. The available methods are CRL and the Online Certificate Status Protocol (OCSP). Select the method and click Add. If both methods are added, the second method is used only if the first one fails.
10. As a fallback mechanism, you can check Consider Certificate Valid if Revocation Information Cannot Be Retrieved, as shown in Figure 21-7.
11. On the CRL Retrieval Policy tab, shown in Figure 21-8, you can specify whether the CRL distribution point is used from the certificate issued or from a configured static URL. In this case, the default behavior is employed; Use CRL Distribution Point from the Certificate is checked.

12. You can optionally use the CRL Retrieval Method tab to choose the method to be used for CRL inspection. You can configure the Lightweight Directory Access Protocol (LDAP), HTTP CRL retrieval, or SCEP. If you specify LDAP as the CRL retrieval option, TCP port 389 is used by the Cisco ASA by default. Additionally, if LDAP is selected, you must enter the username, password, and LDAP server IP address. The default TCP port 389 can also be changed based on your implementation requirements. In this example, HTTP is selected.
13. On the OCSP Rules tab, you can optionally configure OCSP rules for obtaining certificate revocation status. You must configure a certificate map before you configure OCSP rules. This certificate map matches user rules to specific fields in a certificate. In this example, OCSP is not used.
14. The Advanced tab enables you to configure CRL and OCSP optional advanced parameters, as illustrated in Figure 21-9.

There are a two CRL advanced options you can configure in the CRL Options area. First, you can change the value of the Cache Refresh Time field. This is the number of minutes that the Cisco ASA stores/caches retrieved CRLs locally. The default value of 60 minutes is used in this example; however, the configurable values are from 1 to 1440 minutes.
By default, the Cisco ASA enforces CRL checking immediately after it is configured. To disable this, uncheck the Enforce Next CRL Update option.
In the OCSP Options area, you can specify the URL for the OCSP server to be used for certificate status check. By default, the OCSP request includes the nonce extension used to prevent replay attacks. However, you can check Disable Nonce Extension to disable the nonce extension if the OCSP server is configured to send replies that do not contain this matching nonce extension or if the server does not support it.
The Validation Usage area enables you to specify the type of VPN connections to be validated. You can choose IPsec Client, SSL Client, or SSL Server. The default option is to validate certificates for both IPsec Client and SSL Client connections.
In the Other Options area, you can configure the Cisco ASA to accept certificates granted by the configured CA and/or accept certificates issued by any subordinate CAs of this CA. Both options are enabled by default, as shown in Figure 21-9.
15. Click OK to accept the configured values.
16. Click Install Certificate to install the CA certificate.
17. Click Apply to apply the changes in ASDM.
18. Click Save to save the configuration on the Cisco ASA.
Installing an Identity Certificate Using SCEP
Complete the following steps to install an identity certificate using SCEP via ASDM:
1. Log in to ASDM and navigate to Configuration > Device Management > Certificate Management > Identity Certificates. You can alternatively navigate to Configuration > Remote Access VPN > Certificate Management > Identity Certificates; navigating to either of these locations within ASDM enables you to accomplish the same tasks.
2. Click Add.
3. The Add Identity Certificate dialog box is displayed. Choose Add a New Identify Certificate as shown in Figure 21-10.
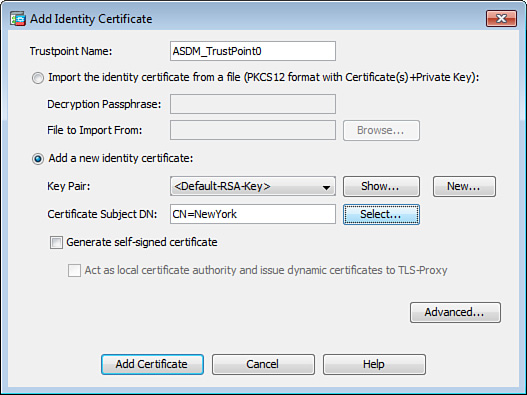
4. Before starting the enrollment process, you must either accept the default RSA key pair (generated by ASDM) or create a new one. In this example, the default RSA key pair is used. To generate a new one, click the New button. To show the current key pair, click the Show button.
5. Define the certificate distinguished name (DN) in the identity certificate by clicking the Select button to right of the Certificate Subject DN field. The Certificate Subject DN dialog box is displayed, in which you can define several attributes; these include the following:
![]() CN = Common Name
CN = Common Name
![]() OU = Department
OU = Department
![]() O = Company Name
O = Company Name
![]() C = Country
C = Country
![]() ST = State/Province
ST = State/Province
![]() L = Location
L = Location
![]() EA = Email Address
EA = Email Address
In this example, NewYork is defined as the CN.
Click OK after defining the DN attributes for the identity certificate.
6. Click the Advanced button to enter advanced enrollment parameters. The Advanced Options dialog box is displayed.
7. Click the Enrollment Mode tab.
8. In this example, enrollment is done via SCEP. Choose the Request from a CA radio button to enroll via SCEP.
9. Enter the URL of the CA server in the Enrollment URL (SCEP) field.
10. The retry period is the number of minutes that the Cisco ASA waits before retrying to install the identity certificate. The default is 1 minute. The retry count is the total number of retries. The default is 0, which indicates unlimited retries. In this example, the retry period and retry count are left to their default values.
Note
You can also configure a challenge phrase that is registered with the CA during SCEP enrollment. The CA typically uses this phrase to authenticate a subsequent revocation request.
11. Click OK to accept the configured values.
12. Click Add Certificate to send the identity certificate request to the CA server. The enrollment request has been sent to the CA server. To check the enrollment status, click the Refresh button.
13. After the identity certificate is issued and installed, it is listed under Configuration > Remote Access VPN > Certificate Management > Identity Certificates and under Configuration > Device Management > Certificate Management > Identity Certificates.
14. Click Save to save the configuration on the Cisco ASA.
ASDM also enables you to enroll the Cisco ASA to an Entrust CA server. To enroll using an Entrust CA, navigate to Configuration > Remote Access VPN > Certificate Management > Identity Certificates and click the Enroll ASA SSL VPN with Entrust button. The Generate Certificate Signing Request dialog box appears, enabling you to configure and generate a certificate-signing request to send to Entrust. You can do the same thing by navigating to Configuration > Device Management > Certificate Management > Identity Certificates.
Installing Certificates Using the CLI
This section demonstrates how to install certificates using the CLI instead of ASDM.
Generating the RSA Key Pair in the CLI
Before starting the enrollment process via the CLI, you must generate the RSA key pair with the crypto key generate rsa command. To generate the keys, you must first configure a hostname and domain name. Example 21-1 demonstrates how to configure the Cisco ASA hostname and domain name and generate the RSA key pair.
Example 21-1 Generating the RSA Key Pair
ASA(config)# hostname NewYork
NewYork(config)# domain-name securemeinc.org
NewYork(config)# crypto key generate rsa modulus 1024
INFO: The name for the keys will be: <Default-RSA-Key>
Keypair generation process begin.
In Example 21-1, the name for the key pair is <Default-RSA-Key>. The <Default-RSA-Key> is replaced with a key pair label if configured, which you accomplish by using the label keyword. If you attempt to create another key pair with the same label, the Cisco ASA displays a warning message.
Use the crypto key zeroize rsa command if an RSA key pair exists and a new pair needs to be regenerated. Example 21-2 demonstrates how to remove existing RSA key pairs.
Example 21-2 Removing Existing RSA Key Pair
NewYork(config)# crypto key zeroize rsa
WARNING: All RSA keys will be removed.
WARNING: All certs issued using these keys will also be removed.
Do you really want to remove these keys? [yes/no]: yes
To verify the generation of the RSA key pair, use the show crypto key mypubkey rsa command. Example 21-3 shows the output of this command.
Example 21-3 Viewing RSA Key Pair Information
NewYork# show crypto key mypubkey rsa
Key pair was generated at: 08:46:31 UTC Jan 22 2014
Key name: <Default-RSA-Key>
Usage: General Purpose Key
Modulus Size (bits): 1024
Key Data:
30819f30 0d06092a 864886f7 0d010101 05000381 8d003081 89028181 00f26be4
08b00ac5 fb06adda 7c7a2ae6 26c136ce 990f5612 41d6fa09 79ef251f d229dcc0
64bc15f8 1b3a4f1e 131f1765 866dfb3a bb8c3a59 f8605625 8e8ff0ca 90d291d0
75c753c3 dd5f55f3 6d49d774 523b9d8b 78ad05b4 efd75793 88ac9646 7e8c8816
017d464d 4a817041 a559dc63 2532c657 cc12373a c7b733f1 a50bdb82 61020301 0001
Note
The same RSA key pair is used for Secure Shell (SSH) connections to the security appliance.
Configuring a Trustpoint
The Cisco ASA certificate configuration commands are similar to Cisco IOS commands. The crypto ca trustpoint command declares the CA that your Cisco ASA should use and enables you to configure all the necessary certificate parameters. Invoking this command puts you in ca-trustpoint configuration mode, as shown in Example 21-4.
Example 21-4 Configuring a Trustpoint
NewYork# configure terminal
NewYork(config)# crypto ca trustpoint CISCO
NewYork(config-ca-trustpoint)#
Table 21-1 lists and describes all the trustpoint subcommands.

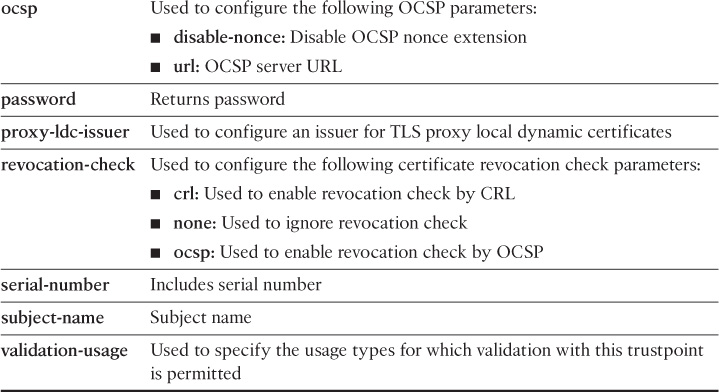
Figure 21-11 illustrates a topology that is used in Example 21-5. A Cisco ASA is configured to enroll via SCEP to the CA server 209.165.202.130.
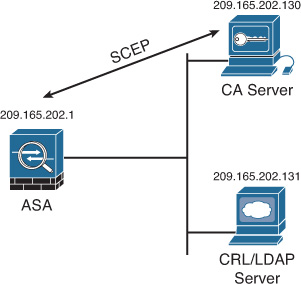
Example 21-5 includes the Cisco ASA trustpoint configuration.
Example 21-5 Configuring the ASA to Enroll via SCEP
NewYork# configure terminal
NewYork(config)# crypto ca trustpoint CISCO
NewYork(configure-ca-trustpoint)# enrollment url http://209.165.202.130/certsrv/mscep/mscep.dll
NewYork(configure-ca-trustpoint)# enrollment retry count 3
NewYork(configure-ca-trustpoint)# enrollment retry period 5
NewYork(configure-ca-trustpoint)# fqdn NewYork.securemeinc.org
NewYork(configure-ca-trustpoint)# exit
NewYork(config)# exit
NewYork#
In Example 21-5, the Cisco ASA is configured with a trustpoint named CISCO. The enrollment url subcommand is used to declare the location of the CA server.
Note
In Example 21-5, the CA server is a Microsoft Windows CA Server with SCEP services. The complete URL is http://209.165.202.130/certsrv/mscep/mscep.dll.
The SCEP plug-in for Microsoft Windows can be downloaded from Microsoft at www.microsoft.com.
The Cisco ASA is configured to retry three times in case the certificate is not successfully obtained from the CA server. It is also configured to wait 5 minutes between each request to the CA. The fully qualified domain name (FQDN) used in the enrollment request is configured to be NewYork.securemeinc.org.
In this example, the Cisco ASA enrolls with the CA to use certificates for IPsec authentication. The Cisco ASA needs to obtain the CA certificate and request an ID certificate from the CA server. To obtain the CA certificate, use the crypto ca authenticate command. Example 21-6 demonstrates how to employ this command to retrieve the CA certificate from the CA server.
Example 21-6 Obtaining the CA Certificate from the CA Server
NewYork# configure terminal
NewYork(config)# crypto ca authenticate CISCO
INFO: Certificate has the following attributes:
Fingerprint: 3736ffc2 243ecf05 0c40f2fa 26820675
Do you accept this certificate? [yes/no]: yes
In Example 21-6, CISCO is the name of the previously configured trustpoint. After executing this command, the Cisco ASA establishes a TCP port 80 connection to the 209.165.202.130 CA server (via SCEP). While this transaction occurs, the Cisco ASA prompts you to accept the certificate. The Cisco ASA also retrieves RA certificates from the server if an RA is used.
After the CA certificate is obtained from the CA server, use the crypto ca enroll command to generate an identity certificate request to the 209.165.202.130 CA server. Example 21-7 demonstrates how to use this command to obtain the ID certificate. The request is a PKCS#7 certificate request.
Example 21-7 Obtaining the ID Certificate from the CA Server
NewYork(config)# crypto ca enroll CISCO
%
% Start certificate enrollment ..
% Create a challenge password. You will need to verbally provide this
password to the CA Administrator in order to revoke your certificate.
For security reasons your password will not be saved in the configuration.
Please make a note of it.
Password: ******
Re-enter password: ******
% The fully-qualified domain name in the certificate will be: NewYork.securemeinc.org
% Include the router serial number in the subject name? [yes/no]: no
Request certificate from CA? [yes/no]: yes
% Certificate request sent to Certificate Authority
NewYork(config)# The certificate has been granted by CA!
Again, CISCO is the name of the previously configured trustpoint. After invoking the crypto ca enroll command, the Cisco ASA asks for a password to be used for this certificate. The Cisco ASA displays the FQDN to be used in the certificate. The Cisco ASA asks whether you would like to include its serial number in the subject name of the certificate. This is not selected in this example. The serial number is not used by IKE, but it may be used by the CA server to authenticate certificates or to associate a certificate with a particular device. If you are in doubt, ask your CA administrator whether you need to include the serial number in your certificate request. In the first shaded line, the Cisco ASA finally asks whether you would like to request the certificate from the CA. If your answer is yes and the subsequent request is successful, the message in the second shaded line is shown, indicating a successful certificate enrollment.
Use the show crypto ca certificates command to verify and display the root/CA and ID certificate information. Example 21-8 shows the output of this command.
Example 21-8 Output of the show crypto ca certificates Command
NewYork# show crypto ca certificates
Certificate
Status: Available
Certificate Serial Number: 1c91af4500000000000d
Certificate Usage: General Purpose
Public Key Type: RSA (1024 bits)
Issuer Name:
cn=SecuremeCAServer
ou=ENGINEERING
o=Secureme
l=NewYork
st=IL
c=US
[email protected]
Subject Name:
Name: NewYork.securemeinc.org
Serial Number:
hostname=NewYork.securemeinc.org
CRL Distribution Point:
http://NewYork-ca.securemeinc.org/CertEnroll/SecuremeCAServer.crl
Validity Date:
start date: 02:58:05 UTC Jan 2 2014
end date: 03:08:05 UTC Jan 2 2016
Associated Trustpoints: CISCO
!
CA Certificate
Status: Available
Certificate Serial Number: 225b38e6471fcca649427934cf289071
Certificate Usage: Signature
Public Key Type: RSA (2048 bits)
Issuer Name:
cn=SecuremeCAServer
ou= ENGINEERING
o=Secureme
l=NewYork
st=IL
c=US
[email protected]
Subject Name:
cn=SecuremeCAServer
ou=ENGINEERING
o=Secureme
l=NewYork
st=IL
c=US
[email protected]
CRL Distribution Point:
http://NewYork-ca.securemeinc.org/CertEnroll/SecuremeCAServer.crl
Validity Date:
start date: 20:15:19 UTC Jan 10 2014
end date: 20:23:42 UTC Jan 10 2017
Associated Trustpoints: CISCO
NewYork#
The certificate information is shown in Example 21-8, which includes the following:
![]() The status of each certificate
The status of each certificate
![]() The certificate usage
The certificate usage
![]() The issuer DN information (i.e., organization, organizational unit, locality, etc.)
The issuer DN information (i.e., organization, organizational unit, locality, etc.)
![]() CRL distribution point (CDP)
CRL distribution point (CDP)
![]() The validity period of each certificate
The validity period of each certificate
![]() The trustpoint associated to the certificate
The trustpoint associated to the certificate
The show crypto ca certificates command is very useful for troubleshooting and verification purposes.
Manual (Cut-and-Paste) Enrollment via the CLI
The manual, or cut-and-paste, enrollment method is mostly used in any of the following circumstances:
![]() The CA server does not support SCEP.
The CA server does not support SCEP.
![]() There is no IP connectivity between the Cisco ASA and the CA server.
There is no IP connectivity between the Cisco ASA and the CA server.
![]() TCP port 80 is blocked between the Cisco ASA and the CA server.
TCP port 80 is blocked between the Cisco ASA and the CA server.
The configuration of the Cisco ASA for manual enrollment is very similar to its configuration for the SCEP enrollment process. However, the enrollment terminal subcommand is used instead of the enrollment url subcommand. Example 21-9 shows the trustpoint configuration for manual enrollment.
Example 21-9 Configuring the Cisco ASA for Manual Enrollment
NewYork# configure terminal
NewYork(config)# crypto ca trustpoint MANUAL
NewYork(configure-ca-trustpoint)# enrollment terminal
NewYork(configure-ca-trustpoint)# exit
NewYork(config)# exit
NewYork#
The name of the trustpoint in Example 21-9 is MANUAL. The enrollment terminal subcommand is used to specify manual enrollment.
The administrator retrieves (copies and pastes) the certificate from the CA server. Use the crypto ca authenticate command to import the CA certificate. Example 21-10 demonstrates how to import the CA certificate to the Cisco ASA manually.
Example 21-10 Importing the CA Certificate Manually
NewYork(config)# crypto ca authenticate MANUAL
Enter the base 64 encoded CA certificate.
End with the word "quit" on a line by itself ——-BEGIN CERTIFICATE——-
MIIC0jCCAnygAwIBAgIQIls45kcfzKZJQnk0zyiQcTANBgkqhkiG9w0BAQUFADCB
hjEeMBwGCSqGSIb3DQEJARYPamF6aWJAY2lzY28uY29tMQswCQYDVQQGEwJVUzEL
MAkGA1UECBMCTkMxDDAKBgNVBAcTA1JUUDEWMBQGA1UEChMNQ2lzY28gU3lzdGVt
czEMMAoGA1UECxMDVEFDMRYwFAYDVQQDEw1KYXppYkNBU2VydmVyMB4XDTA0MDYy
NTIwMTUxOVoXDTA3MDYyNTIwMjM0MlowgYYxHjAcBgkqhkiG9w0BCQEWD2phemli
QGNpc2NvLmNvbTELMAkGA1UEBhMCVVMxCzAJBgNVBAgTAk5DMQwwCgYDVQQHEwNS
VFAxFjAUBgNVBAoTDUNpc2NvIFN5c3RlbXMxDDAKBgNVBAsTA1RBQzEWMBQGA1UE
AxMNSmF6aWJDQVNlcnZlcjBcMA0GCSqGSIb3DQEBAQUAA0sAMEgCQQDnCRVLNn2L
wgair5gaw9bGFoWG2bS9G4LPl2/lTDffk9yD3h7/R3bBLIcSwy3nt1V5/brUtGFR
CoVV2XQ4RZEtAgMBAAGjgcMwgcAwCwYDVR0PBAQDAgHGMA8GA1UdEwEB/wQFMAMB
Af8wHQYDVR0OBBYEFKTqtaUJ6Pm9Pc/0IRc/EklKnT9TMG8GA1UdHwRoMGYwMKAu
oCyGKmh0dHA6Ly90ZWNoaWUvQ2VydEVucm9sbC9KYXppYkNBU2VydmVyLmNybDAy
oDCgLoYsZmlsZTovL1xcdGVjaGllXENlcnRFbnJvbGxcSmF6aWJDQVNlcnZlci5j
cmwwEAYJKwYBBAGCNxUBBAMCAQAwDQYJKoZIhvcNAQEFBQADQQCw4XI7Ocff7MIc
LlAEyrhrTn3c2yqTbWZ6lO/QGaC4LdfyEDMeA0HvpkbB2GGJSj1AZocRCtB33GLi
QkiMpjnK
——-END CERTIFICATE——-
quit
INFO: Certificate has the following attributes:
Fingerprint: 82a0095e 2584ced6 b66ed6a8 e48a5ad1
Do you accept this certificate? [yes/no]: yes
Trustpoint CA certificate accepted.
% Certificate successfully imported
As shown in Example 21-10, the CA certificate is manually imported to the Cisco ASA by the cut-and-paste method. Enter a blank line or the word quit after pasting the Base64-encoded CA certificate to the Cisco ASA to exit the CA configuration screen. If the certificate is recognized, the Cisco ASA asks you whether you would like to accept the certificate; enter yes. The Certificate Successfully Imported message is displayed if the CA certificate import is successful.
To generate the ID certificate request, use the crypto ca enroll command. Example 21-11 demonstrates how to generate the certificate request.
Example 21-11 Generating the ID Certificate Request
NewYork(config)# crypto ca enroll MANUAL
% Start certificate enrollment ..
% The fully-qualified domain name in the certificate will be: NewYork.securemeinc.org
% Include the device serial number in the subject name? [yes/no]: noDisplay
Certificate Request to terminal? [yes/no]: yes
Certificate Request follows:
MIIBpDCCAQ0CAQAwLTErMA4GA1UEBRMHNDZmZjUxODAZBgkqhkiG9w0BCQIWDE5Z
LmNpc2NvLmNvbTCBnzANBgkqhkiG9w0BAQEFAAOBjQAwgYkCgYEA1n+8nczm8ut1
X5PVngaA1470A1Us3YWRvOYcfwj/tosNRoJ/lY2tVQMnZ+aKlai2+PcZfyP2u2Ar
cadRwkwY0KfKrt5f7LAKrhmHyavNT0rRXBxEMPbtvWuacghmaNXAiRGNpNOHpQjB
QCth9fw7s+anAkXZlfd2ZzAu1Y60s6cCAwEAAaA3MDUGCSqGSIb3DQEJDjEoMCYw
CwYDVR0PBAQDAgWgMBcGA1UdEQQQMA6CDE5ZLmNpc2NvLmNvbTANBgkqhkiG9w0B
AQQFAAOBgQDGcYSC8VGy+ekUNkDayW1g+TQL4lYldLmT9xXUADAQqmGhyA8A36d0
VtZlNc2pXHaMPKkqxMEPMcJVdZ+o6JpiIFHPpYNiQGFUQZoHGcZveEbMVor93/KM
IChEgs4x98fCuJoiQ2RQr452bsWNyEmeLcDqczMSUXFucSLMm0XDNg==
—-End - This line not part of the certificate request—-
Redisplay enrollment request? [yes/no]: no
NewYork(config)#
Example 21-11 shows how the certificate request is generated. Copy and paste the certificate request to your CA server and generate the new ID certificate for the Cisco ASA.
Caution
Make sure not to copy and paste the second highlighted line in Example 21-11. The certificate request becomes malformed if this is included.
Note
Obtain a Base64-encoded certificate from your CA server. You cannot copy and paste a Distinguished Encoding Rules (DER) encoded certificate.
The Cisco ASA gives you the option to redisplay the certificate request if needed (as shown in Example 21-11).
After the ID certificate is approved by the CA server, use the crypto ca import command to import the Base64-encoded ID certificate. Example 21-12 demonstrates how to import the ID certificate.
Example 21-12 Manually Importing the ID Certificate
NewYork(config)# crypto ca import MANUAL certificate
% The fully-qualified domain name in the certificate will be: NewYork.securemeinc.org
Enter the base 64 encoded certificate.
End with the word "quit" on a line by itself
——-BEGIN CERTIFICATE——-
MIIECDCCA7KgAwIBAgIKHJGvRQAAAAAADTANBgkqhkiG9w0BAQUFADCBhjEeMBwG
CSqGSIb3DQEJARYPamF6aWJAY2lzY28uY29tMQswCQYDVQQGEwJVUzELMAkGA1UE
CBMCTkMxDDAKBgNVBAcTA1JUUDEWMBQGA1UEChMNQ2lzY28gU3lzdGVtczEMMAoG
A1UECxMDVEFDMRYwFAYDVQQDEw1KYXppYkNBU2VydmVyMB4XDTA0MDkwMjAyNTgw
NVoXDTA1MDkwMjAzMDgwNVowLzEQMA4GA1UEBRMHNDZmZjUxODEbMBkGCSqGSIb3
DQEJAhMMTlkuY2lzY28uY29tMIGfMA0GCSqGSIb3DQEBAQUAA4GNADCBiQKBgQDW
f7ydzOby63Vfk9WeBoDXjvQDVSzdhZG85hx/CP+2iw1Ggn+Vja1VAydn5oqVqLb4
9xl/I/a7YCtxp1HCTBjQp8qu3l/ssAquGYfJq81PStFcHEQw9u29a5pyCGZo1cCJ
EY2k04elCMFAK2H1/Duz5qcCRdmV93ZnMC7VjrSzpwIDAQABo4ICEjCCAg4wCwYD
VR0PBAQDAgWgMBcGA1UdEQQQMA6CDE5ZLmNpc2NvLmNvbTAdBgNVHQ4EFgQUxMvq
7pWbd8bye1PKnXTKYO3A5JQwgcIGA1UdIwSBujCBt4AUpOq1pQno+b09z/QhFz8S
SUqdP1OhgYykgYkwgYYxHjAcBgkqhkiG9w0BCQEWD2phemliQGNpc2NvLmNvbTEL
MAkGA1UEBhMCVVMxCzAJBgNVBAgTAk5DMQwwCgYDVQQHEwNSVFAxFjAUBgNVBAoT
DUNpc2NvIFN5c3RlbXMxDDAKBgNVBAsTA1RBQzEWMBQGA1UEAxMNSmF6aWJDQVNl
cnZlcoIQIls45kcfzKZJQnk0zyiQcTBvBgNVHR8EaDBmMDCgLqAshipodHRwOi8v
dGVjaGllL0NlcnRFbnJvbGwvSmF6aWJDQVNlcnZlci5jcmwwMqAwoC6GLGZpbGU6
Ly9cXHRlY2hpZVxDZXJ0RW5yb2xsXEphemliQ0FTZXJ2ZXIuY3JsMIGQBggrBgEF
BQcBAQSBgzCBgDA9BggrBgEFBQcwAoYxaHR0cDovL3RlY2hpZS9DZXJ0RW5yb2xs
L3RlY2hpZV9KYXppYkNBU2VydmVyLmNydDA/BggrBgEFBQcwAoYzZmlsZTovL1xc
dGVjaGllXENlcnRFbnJvbGxcdGVjaGllX0phemliQ0FTZXJ2ZXIuY3J0MA0GCSqG
SIb3DQEBBQUAA0EAQ1+WBtysPhOAhTKLYemj8X1TpGrqtUl3mCyNH5OXppfYjSGu
SGzFQHtnqURciJBtay9RNnMpZmZYpfOHzmeFmQ==
——-END CERTIFICATE——-
quit
INFO: Certificate successfully imported
NewYork(config)#
The Base64-encoded ID certificate is successfully imported to the Cisco ASA.
Configuring CRL Options via the CLI
This section teaches you how to configure CRL checking on the Cisco ASA. You can configure the Cisco ASA to do any of the following:
![]() Optionally accept the peer’s certificate if the security appliance is not able to retrieve the CRL
Optionally accept the peer’s certificate if the security appliance is not able to retrieve the CRL
![]() Require CRL checking
Require CRL checking
To bypass CRL checking, use the crl nocheck trustpoint subcommand.
Tip
Bypassing CRL checking is insecure and therefore is not recommended.
The crl optional subcommand enables the Cisco ASA to have the opportunity to accept its peer’s certificate if the required CRL is not available.
Use the crl required subcommand to force the Cisco ASA to perform CRL checking. The CRL server must be reachable and available for a peer certificate to be validated. After this command is enabled, you must configure the CRL parameters. To configure the CRL options, use the crl configure trustpoint subcommand. After invoking this command, you are placed in the ca-crl prompt, as shown in Example 21-13.
Example 21-13 crl configure Subcommand
NewYork(config)# crypto ca trustpoint CISCO
NewYork(configure-ca-trustpoint)# crl required
NewYork(configure-ca-trustpoint)# crl configure
NewYork(config-ca-crl)#
Table 21-2 lists all the CRL configuration options.

Example 21-14 demonstrates how to configure CRL checking and the use of several of the options from Table 21-2.
Example 21-14 CRL Checking Example
crypto ca trustpoint CISCO
crl required
enrollment retry count 3
enrollment url http://209.165.202.130:80/certsrv/mscep/mscep.dll
fqdn NewYork.securemeinc.org
crl configure
policy static
url 1 ldap://NewYork-crl1.securemeinc.org/CRL/CRL.crl
url 2 ldap://NewYork-crl2.securemeinc.org/CRL/CRL.crl
url 3 ldap://NewYork-crl3.securemeinc.org/CRL/CRL.crl
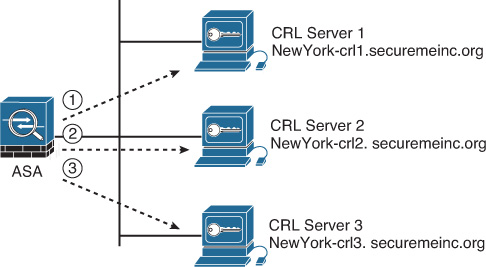
In Example 21-14, a Cisco ASA is configured to require CRL checking with the crl required trustpoint subcommand. The Cisco ASA has three CRL servers statically defined. LDAP is used as the transport protocol.
Note
Make sure to configure a domain name server on the Cisco ASA when using FQDN for CRL distribution points. Use the dns name-server ip-address command to specify the domain name server to be selected.
The Cisco ASA first tries the CRL server named NewYork-crl1.securemeinc.org. Subsequently, it attempts NewYork-crl2.securemeinc.org and NewYork-crl3.securemeinc.org, in that order, as shown in Figure 21-12.
You can manually request the retrieval of the CRL by using the crypto ca crl request command. Example 21-15 demonstrates how to manually retrieve the CRL.
Example 21-15 CRL Manual Retrieval via the CLI
NewYork(config)# crypto ca crl request CISCO
CRL received
The CRL is received successfully. To view the CRL, use the show crypto ca crls command, as demonstrated in Example 21-16.
Example 21-16 Output of the show crypto ca crls Command
NewYork# show crypto ca crls
CRL Issuer Name:
cn=SecuremeCAServer,ou=ENGINEERING,o=Secureme,l=NewYork,st=IL,c=US,[email protected]
LastUpdate: 14:18:11 UTC Sep 10 2013
NextUpdate: 02:38:11 UTC Sep 18 2013
Retrieved from CRL Distribution Point:
http://NewYork-crl1.securemeinc.org/CertEnroll/SecuremeCAServer.crl
Size (bytes): 1095
The first and second shaded lines in Example 21-16 show when the last CRL update took place and when the next one will be. The third shaded line shows the URL of the CRL distribution point.
The Local Certificate Authority
The Cisco ASA offers basic certificate authority functionality to issue digital certificates, as well as perform basic revocation checking of issued certificates. This feature is often referred to as the local certificate authority (local CA). The certificates issued by the Cisco ASA’s local CA are for both browser- and client-based SSL VPN connections. When the local CA is configured and enabled on the Cisco ASA, users can enroll for a certificate by visiting a specified browser-based enrollment web page. This section demonstrates how to configure and enable the Cisco ASA’s local CA, using ASDM and the CLI.
Configuring the Local CA Through ASDM
Complete the following steps to configure the local CA through ASDM:
1. Log in to ASDM and navigate to Configuration > Remote Access VPN > Certificate Management > Local Certificate Authority > CA Server. The screen shown in Figure 21-13 is displayed.

2. Check the Enable Certificate Authority Server check box to configure the local CA.
3. In the Passphrase field, you can enter a passphrase to secure the Local CA server from unauthorized or accidental shutdown.
4. In the Issuer Name field, enter the issuer name used for the CA certificate to be generated by the Cisco ASA’s local CA. In this example, CN=asa1.securemeinc.org is used.
5. Choose the key modulus size used for the CA server certificate from the CA Server Key Size drop-down menu. The configurable values are from 512 to 2048. In this example, the default size of 1024 is used.
6. Choose the key modulus size used for the client certificates from the Client Key Size drop-down menu. The configurable values are from 512 to 2048. The default size of 1024 is used.
7. In the CA Certificate Lifetime field, enter the validity period (lifetime) for the local CA certificate (in days). The default value of 1095 days is used in Figure 21-13.
8. In the Client Certificate Lifetime field, enter the validity period (lifetime) for all client certificates that will be issued by the local CA (in days). The default value of 365 days is used.
9. The Cisco ASA uses the Simple Mail Transfer Protocol (SMTP) to send emails that deliver one-time passwords for an enrollment invitation to users. In the Server Name/IP Address field, enter the IP address or server name of the SMTP server in your network. The IP address of the SMTP server is 172.18.104.139.
10. In the From Address field, enter the email address that will be used when the emails are sent to the users. This is typically an administrator’s address or group, depending on your policies. The email address used is in this example is [email protected].
11. In the Subject field, enter the subject used in the enrollment email to be sent to the users. The default subject (Certificate Enrollment Invitation) is used in the example.
12. Click More Options to enter advanced local CA configuration options.
13. In the CRL Distribution Point URL field, enter the URL for the CRL distribution point within the Cisco ASA to be included within each certificate. The default CRL distribution location is http://hostname.domain/+CSCOCA+/asa_ca.crl. In this example, the http://asa1.securemeinc.org/+CSCOCA+/asa_ca.crl URL is used.
14. Use the Publish-CRL Interface and Port drop-down menu and field to make the CRL available for HTTP download on a specific interface or port. TCP port 80 is the HTTP default port number. In this example, the outside interface is selected with the default port (TCP port 80).
15. Specify the lifetime of the CRL (in hours) in the CRL Lifetime field. The default of 6 hours is configured in Figure 21-13.
16. In the Database Storage Location field, specify the storage area for the Local CA configuration and data files within the Cisco ASA’s flash. The default location (flash:/LOCAL-CA-SERVER) is used in this example. Alternatively, you can click Browse to search for a specific location.
Note
You can also use an external CIFS or FTP server to store certificates. In this example, the local flash is used for simplicity.
17. Optionally, you can use the Default Subject Name field to configure a default subject name to append to a username on issued certificates. In this example, it is left blank.
18. In the Enrollment Period field, enter the number of hours a user has to enroll and retrieve a user certificate. The default enrollment period of 24 hours is used in Figure 21-13.
19. The One Time Password Expiration field enables you to configure the validity period for the one-time password emailed to the user. The default enrollment period of 72 hours is used.
20. In the Certificate Expiration Reminder field, enter the number of days before expiration reminders are sent to the users that have not completed the enrollment. In this example, the default enrollment period of 14 days is used.
21. Click Apply to apply the changes in ASDM.
22. Click Save to save the configuration on the Cisco ASA.
Configuring the Local CA Using the CLI
Use the crypto ca server command to configure the local CA using the CLI, as shown in Example 21-17.
Example 21-17 Configuring the Local CA Using the CLI
NewYork(config)# crypto ca server
NewYork(config-ca-server)# cdp-url http://newyork.securemeinc.org/+CSCOCA+/asa_ca.crl
NewYork(config-ca-server)# issuer-name CN = NewYorkCA
NewYork(config-ca-server)# smtp from-address [email protected]
NewYork(config-ca-server)# publish-crl outside 80
Example 21-17 shows the values used in the previous examples when configuring the local CA via ASDM. The cdp-url subcommand is used to specify the CRL distribution point URL. The issuer-name subcommand is employed to specify the issuer name information to be used in the CA certificate. The smtp from-address subcommand is used to define the From email address used in the emails sent to users during the enrollment process. The publish-crl subcommand is employed to specify the interface and port where the CRL distribution point is accessed.
To specify the SMTP server to be employed by the Cisco ASA, use the smtp-server global configuration command, as shown in Example 21-18.
Example 21-18 Configuring the SMTP Server
NewYork(config)# smtp-server 172.18.104.139
The lifetime ca-certificate command can be used to specify the lifetime for the Local CA certificate. Example 21-19 shows the values used in the previous example when configuring the local CA, using ASDM.
Example 21-19 Configuring Certificate Lifetimes
NewYork(config)# crypto ca server
NewYork(config-ca-server)# lifetime ca-certificate 1095
NewYork(config-ca-server)# lifetime certificate 365
The keysize command specifies the size of the public and private keys generated at user-certificate enrollment. The keysize server command is used to configure the size of the local CA’s own key-pair.
Note
As previously mentioned, the default key size for both the server and user certificates is 1024. When these values are configured, these commands are not shown in the configuration. For both the keysize command and the keysize server command, the options are 512, 768, 1024, and 2048 bits.
To enable the local CA server, issue the no shutdown subcommand, as shown in Example 21-20.
Example 21-20 Enabling the Local CA
NewYork(config)# crypto ca server
NewYork(config-ca-server)# no shutdown
% Some server settings cannot be changed after CA certificate generation.
% Please enter a passphrase to protect the private key
% or press return to exit
After the local CA is enabled, the Cisco ASA generates its CA certificate chain and it is displayed in the configuration, as shown in Example 21-21.
Example 21-21 Local CA Certificate Chain
crypto ca certificate chain LOCAL-CA-SERVER
certificate ca 01
30820203 3082016c a0030201 02020101 300d0609 2a864886 f70d0101 04050030
15311330 11060355 0403130a 204e6577 596f726b 4341301e 170d3039 30363133
30393139 34355a17 0d313230 36313230 39313934 355a3015 31133011 06035504
03130a20 4e657759 6f726b43 4130819f 300d0609 2a864886 f70d0101 01050003
818d0030 81890281 8100db2d 324a8481 e9554044 af1064d3 ce6faa28 2a1bd2b8
9e5348b2 e4ca4003 7e5a5a79 b9b12e3a 0c6578af a94e99fb 2ffa21ba 77da04f8
6194d3bf 83aad420 a0d762a1 67738aa3 a35f3d68 827f9edf fe403e70 2c486d1c
c021ee73 c6d8fafe 1f357861 400ec2b5 0261b083 ed664177 35d62e1e 37edc24d
ed6b91d8 0da04aeb fb750203 010001a3 63306130 0f060355 1d130101 ff040530
030101ff 300e0603 551d0f01 01ff0404 03020186 301f0603 551d2304 18301680
14ef32a1 a35889c2 4cf22c13 32d47619 0c693dac e3301d06 03551d0e 04160414
ef32a1a3 5889c24c f22c1332 d476190c 693dace3 300d0609 2a864886 f70d0101
04050003 818100a0 8e1c6e8d 625385fc 91ca4918 dc531473 00a9c122 d3afc256
afe56fd7 a58d71ab e70ee0a5 c6beaa3c 4f045911 e68696bc 6b6f2857 cadf0ad2
f59f187d 167dca1e 7b03c86f 37ee13b8 b0d074b2 e94dd26b 9f3362a8 d5ff7355
b8183677 c3530edb 1504c1f9 af3c13c5 59faf495 ea7a3bfe c79b3ead ad4175b5
1f54962a 016822
quit
The show crypto ca server command can be used to verify that the local CA server is enabled and to show other statistics, as shown in Example 21-22.
Example 21-22 Output of the show crypto ca server Command
NewYork# show crypto ca server
Certificate Server LOCAL-CA-SERVER:
Status: enabled
State: enabled
Server's configuration is locked (enter "shutdown" to unlock it)
Issuer name: CN = NewYorkCA
CA certificate fingerprint/thumbprint: (MD5)
ab1174ad fe12d6ef e8b7551c e6eb9e06
CA certificate fingerprint/thumbprint: (SHA1)
6752c25c 94aeeedf d57add2e 6f4b1630 2cef182d
Last certificate issued serial number: 0x1
CA certificate expiration timer: 09:19:45 UTC Jun 12 2017
CRL NextUpdate timer: 15:19:45 UTC Jun 13 2014
Current primary storage dir: flash:/LOCAL-CA-SERVER/
Auto-Rollover configured, overlap period 30 days
Autorollover timer: 09:19:45 UTC May 13 2017
The show crypto ca server certificate command can be used to display the Base64-encoded local CA certificate, as shown in Example 21-23.
Example 21-23 Output of the show crypto ca server certificate Command
NewYork# show crypto ca server certificate
Current Local CA Certificate (Base64 encoded):
——-BEGIN CERTIFICATE——-
MIICAzCCAWygAwIBAgIBATANBgkqhkiG9w0BAQQFADAVMRMwEQYDVQQDEwogTmV3
WW9ya0NBMB4XDTA5MDYxMzA5MTk0NVoXDTEyMDYxMjA5MTk0NVowFTETMBEGA1UE
AxMKIE5ld1lvcmtDQTCBnzANBgkqhkiG9w0BAQEFAAOBjQAwgYkCgYEA2y0ySoSB
6VVARK8QZNPOb6ooKhvSuJ5TSLLkykADflpaebmxLjoMZXivqU6Z+y/6Ibp32gT4
YZTTv4Oq1CCg12KhZ3OKo6NfPWiCf57f/kA+cCxIbRzAIe5zxtj6/h81eGFADsK1
AmGwg+1mQXc11i4eN+3CTe1rkdgNoErr+3UCAwEAAaNjMGEwDwYDVR0TAQH/BAUw
AwEB/zAOBgNVHQ8BAf8EBAMCAYYwHwYDVR0jBBgwFoAU7zKho1iJwkzyLBMy1HYZ
DGk9rOMwHQYDVR0OBBYEFO8yoaNYicJM8iwTMtR2GQxpPazjMA0GCSqGSIb3DQEB
BAUAA4GBAKCOHG6NYlOF/JHKSRjcUxRzAKnBItOvwlav5W/XpY1xq+cO4KXGvqo8
TwRZEeaGlrxrbyhXyt8K0vWfGH0WfcoeewPIbzfuE7iw0HSy6U3Sa58zYqjV/3NV
uBg2d8NTDtsVBMH5rzwTxVn69JXqejv+x5s+ra1BdbUfVJYqAWgi
——-END CERTIFICATE——-
Enrolling Local CA Users Through ASDM
All users to be enrolled within the local CA must be added manually to the Cisco ASA’s local CA server user database. Complete the following steps to enroll local CA users through ASDM:
1. Log in to ASDM and navigate to Configuration > Remote Access VPN > Certificate Management > Local Certificate Authority > Manage User Database.
2. Click Add to add a user. The Add User dialog box shown in Figure 21-14 is displayed.

3. In the Username field, enter the username for the new user. The username user1 is employed in this example.
4. In the Email ID field, enter the user’s email address. The certificate enrollment invitation email is sent to [email protected] in this example.
5. In the Subject (DN String) field, enter the certificate DN information. Click the Select button to select and configure the available DN attributes. The Certificate Subject DN dialog box is displayed, as illustrated in Figure 21-15, which shows all available DN attributes that can be configured.

6. Click OK after you configure the appropriate DN attributes.
7. Make sure that the Allow Enrollment check box is checked to allow this user to obtain the certificate from the local CA.
8. Click Add User to add the new user.
9. The user now appears in the Manage User Database screen, as shown in Figure 21-16.

10. Click the Email OTP button to send the certificate enrollment invite email to the user, along with the one-time password.
11. Click on Save to save the configuration on the Cisco ASA.
The user receives an email from the Cisco ASA with instructions on how to obtain the new certificate. The body of the email sent to user1 is shown in Example 21-24.
Example 21-24 Certificate Enrollment Invitation Email
You have been granted access to enroll for a certificate.
The credentials below can be used to obtain your certificate.
Username: user1
One-time Password: 52FCE582EF0F38BF
Enrollment is allowed until: 10:34:54 UTC Tue Jun 16 2009
NOTE: The one-time password is also used as the passphrase to unlock the
certificate file.
Please visit the following site to obtain your certificate:
https://NewYorkCA.securemeinc.org/+CSCOCA+/enroll.html
You may be asked to verify the fingerprint/thumbprint of the CA certificate
during installation of the certificates. The fingerprint/thumbprint
should be:
MD5: AB1174AD FE12D6EF E8B7551C E6EB9E06
SHA1: 6752C25C 94AEEEDF D57ADD2E 6F4B1630 2CEF182D
When the user visits the specified URL, they are asked to enter the credentials included in this email. If authentication is successful, the user is allowed to install the new certificate.
Enrolling Local CA Users Through the CLI
The CLI can also be used to add local CA users. The crypto ca server user-db add and crypto ca server user-db allow commands are employed to add and permit new local CA users. The crypto ca server user-db add command has the following options:
![]() username: The username for the user being added
username: The username for the user being added
![]() dn: The distinguished name information
dn: The distinguished name information
![]() email: The user’s email address, where OTPs and notices are to be sent
email: The user’s email address, where OTPs and notices are to be sent
Example 21-25 shows how user1 is added to the local CA database.
Example 21-25 Adding New Local CA Users Through the CLI
NewYork(config)# crypto ca server user-db add user1 dn
OU=Engineering,O=SecureMeInc email [email protected]
NewYork(config)# crypto ca server user-db allow user1
In Example 21-25, user1 is added to the local CA user database. The Organization Unit (OU) within the DN is set to Engineering and the Organization (O) is SecureMeInc. User1’s email address is [email protected] and is entered with the email keyword. The crypto ca server user-db allow user1 command is employed to allow user1 to enroll with the Cisco ASA.
To send the enrollment invitation email to the new user, enter the crypto ca server user-db email-otp username command, as follows:
NewYork# crypto ca server user-db email-otp user1
The user receives an email from the Cisco ASA with instructions on how to obtain the new certificate.
Use the show crypto ca server user-db username username command to display the information about a specific user, as shown in Example 21-26.
Example 21-26 Output of the show crypto ca server user-db username user1 Command
NewYork# show crypto ca server user-db username user1
username: user1
email: [email protected]
dn: OU=Engineering,O=SecureMeInc
allowed: 10:34:54 UTC Tue Jun 16 2009
notified: 1 times
enrollment status: Allowed to Enroll
Note
The show crypto ca server user-db (without the username keyword) displays all users within the local CA user database.
Note
You can also use the show crypto ca server user-db enrolled command to display all users that have successfully enrolled with the local CA. The show crypto ca server user-db allowed command lists all users in the user enrollment database that are currently allowed to enroll. The show crypto ca server user-db expired command displays all users holding expired certificates. The show crypto ca server user-db on-hold command shows all users that do not hold a certificate and are not currently allowed to enroll.
Configuring IPsec Site-to-Site Tunnels Using Certificates
Chapter 19, “Site-to-Site IPsec VPNs,” illustrated how to configure an IPsec site-to-site tunnel using preshared keys. This section illustrates how to use digital certificates to configure an IPsec site-to-site tunnel between two Cisco ASAs.
In the following examples, a branch office in London needs to create an IPsec site-to-site tunnel to the New York office. Figure 21-17 illustrates a high-level network topology of SecureMeInc.org’s implementation.
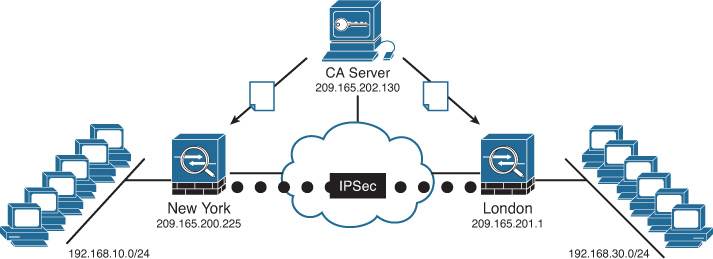
The Cisco ASAs in both locations successfully enroll with the CA server and build the IPsec site-to-site tunnel, using its corresponding certificates for authentication.
Example 21-27 includes New York’s ASA trustpoint configuration.
Example 21-27 New York ASA Trustpoint Configuration
crypto ca trustpoint NewYork
enrollment retry period 5
enrollment retry count 5
enrollment url http://209.165.202.130/certsrv/mscep/mscep.dll
fqdn NewYork.securemeinc.org
subject-name O=secureme, OU=NewYork
Note
To add the identity certificate through ASDM, navigate to Configuration > Site-to-Site VPN > Certificate Management and follow the steps outlined in the previous sections.
The Cisco ASA is configured to enroll and obtain a certificate from the CA server 209.165.202.130. The certificate distinguished name information contains O=secureme and OU=NewYork in this case. The O represents the organization name and OU represents the organizational unit.
Example 21-28 demonstrates how the ISAKMP policy is configured in NewYork’s Cisco ASA. The isakmp identity auto command is configured in this example. Usually, the IP address identity is used for preshared key authentication. The keyword hostname is generally used for certificate-based connections. The auto keyword automatically determines the ISAKMP identity. This is recommended if you have a combination of some IPsec tunnels that use preshared keys and others that use certificates for authentication.
Example 21-28 ISAKMP Policy Configuration
isakmp identity auto
crypto ikev1 enable outside
crypto ikev1 policy 1
authentication rsa-sig
encryption aes-256
hash sha
group 2
lifetime 86400
The shaded line in Example 21-28 shows that the Cisco ASA is configured for RSA signature authentication.
Example 21-29 includes NewYork’s ASA crypto map configuration.
Example 21-29 Crypto Map Configuration
access-list 100 extended permit ip 192.168.10.0 255.255.255.0 192.168.30.0
255.255.255.0
crypto ipsec transform-set myset esp-aes-256 esp-sha-hmac
crypto map NewYork 10 match address 100
crypto map NewYork 10 set peer 209.165.201.1
crypto map NewYork 10 set transform-set myset
crypto map NewYork 10 set trustpoint NewYork
crypto map NewYork interface outside
The crypto map configuration is similar to the configuration examples in Chapter 19. The shaded line in Example 21-29 associates the crypto map with the trustpoint that defines the certificate used while the IPsec connection is negotiated.
Example 21-30 includes the tunnel group configuration for NewYork’s ASA.
Example 21-30 Tunnel Group Configuration
tunnel-group 209.165.201.1 type ipsec-l2l
tunnel-group 209.165.201.1 ipsec-attributes
peer-id-validate cert
!used to validate the identity of the peer using the peer's certificate
chain
! Enables sending certificate chain
trust-point NewYork
! used to configure the name of the trustpoint that identifies the
! certificate to be used for this tunnel
Note the differences in the configuration in Example 21-30 in comparison to the configuration of an IPsec site-to-site tunnel that uses preshared keys. The peer-id-validate cert command is used to validate the identity of the IPsec peer, using its certificate. The chain command enables the Cisco ASA to send the complete certificate chain to its peer. The trust-point command associates the trustpoint that identifies the certificate to be used for this tunnel.
To configure a site-to-site tunnel to use digital certificates through ASDM, complete the following steps.
1. Navigate to Configuration > Site-to-Site VPN > Advanced > Tunnel Groups.
2. In this case, an existing tunnel is edited. Select the site-to-site tunnel group and click Edit.
3. The Edit IPsec Site-to-site Tunnel Group dialog box is displayed. In the IKE Authentication area, choose the respective identity certificate from the Identity Certificate drop-down menu and check Send Certificate Chain.
4. Click OK.
5. Click Apply to apply the configuration changes.
6. Click Save to save the configuration on the Cisco ASA.
Example 21-31 shows London’s Cisco ASA site-to-site IPsec configuration.
Example 21-31 London’s ASA Site-to-Site IPsec Configuration
access-list 100 extended permit ip 192.168.30.0 255.255.255.0 192.168.10.0
255.255.255.0
crypto ipsec transform-set myset esp-aes-256 esp-sha-hmac
! crypto transform-set and crypto map configuration matching the IPSec Policies
! from its peer
crypto map London 10 match address 100
crypto map London 10 set peer 209.165.200.225
crypto map London 10 set transform-set myset
crypto map London 10 set trustpoint London
! The trustpoint configured below is applied to the crypto map.
crypto map London interface outside
crypto ca trustpoint London
enrollment retry period 5
enrollment retry count 3
enrollment url http://209.165.202.130/certsrv/mscep/mscep.dll
fqdn London.securemeinc.org
subject-name O=secureme, OU=London
! The certificate subject name information is defined
crl configure
crypto ca certificate map 1
! The following is the certificate information appended to the configuration
! after enrollment
crypto ca certificate chain London
certificate 02
30820210 308201ba a0030201 02020102 300d0609 2a864886 f70d0101 04050030
3e311430 12060355 040b130b 454e4749 4e454552 494e4731 16301406 0355040a
130d4369 73636f20 53797374 656d7331 0e300c06 03550403 1305696f 73636130
1e170d30 34303931 30313332 3230375a 170d3035 30393130 31333232 30375a30
56311030 0e060355 040b1307 41746c61 6e746131 10300e06 0355040a 13074765
6f726769 61313030 0e060355 04051307 34343436 37303830 1e06092a 864886f7
0d010902 16114174 6c616e74 612e6369 73636f2e 636f6d30 5c300d06 092a8648
86f70d01 01010500 034b0030 48024100 be06c890 637c426c 5c1e431e c6247567
c0b7c279 86f87c1f 5c01a305 cdaf699a 84dd872d 7b45b0ba 4bf7f28c 2097fe6f
5f07926a 9bfcdc03 0a383e9f 4b32d0b3 02030100 01a3818a 30818730 39060355
1d1f0432 3030302e a02ca02a 86286874 74703a2f 2f63726c 73657276 65722e63
6973636f 2e636f6d 2f43524c 2f636973 636f2e63 726c301c 0603551d 11041530
13821141 746c616e 74612e63 6973636f 2e636f6d 300b0603 551d0f04 04030205
a0301f06 03551d23 04183016 80142ff7 332973b2 4d6ddb0d 711bd3fb b033359a
6981300d 06092a86 4886f70d 01010405 00034100 abe66626 4d58e0d6 25fa809d
c30bfaed 4cae7ef3 e4f6a120 206ba892 faa81224 1497ea80 f9e28bf6 4a73037f
570c7e19 f56a05ca a6942805 508e9b37 61dac8c3
quit
certificate ca 01
308201d0 3082017a a0030201 02020101 300d0609 2a864886 f70d0101 04050030
3e311430 12060355 040b130b 454e4749 4e454552 494e4731 16301406 0355040a
130d4369 73636f20 53797374 656d7331 0e300c06 03550403 1305696f 73636130
1e170d30 34303931 30313332 3035365a 170d3037 30393130 31333230 35365a30
3e311430 12060355 040b130b 454e4749 4e454552 494e4731 16301406 0355040a
130d4369 73636f20 53797374 656d7331 0e300c06 03550403 1305696f 73636130
5c300d06 092a8648 86f70d01 01010500 034b0030 48024100 dc7d0b35 1bfa7577
99cbab8b 69c32a44 47ecd0ae 7cb13fc0 808e7520 9d5e6132 1bc4565a 1ede26a4
fc01650e 240aa737 824e07c3 c92f9796 5dd10ac7 4e1a5b75 02030100 01a36330
61300f06 03551d13 0101ff04 05300301 01ff300e 0603551d 0f0101ff 04040302
0186301d 0603551d 0e041604 142ff733 2973b24d 6ddb0d71 1bd3fbb0 33359a69
81301f06 03551d23 04183016 80142ff7 332973b2 4d6ddb0d 711bd3fb b033359a
6981300d 06092a86 4886f70d 01010405 00034100 7982764a c82daaf0 ed3b0a6e
25df09b2 4caa7ce8 b27098f1 982085bc 0fda9bcf 86dedda6 84c30abc 48c43fc8
692386ad 595e2b1e aafd3388 9d711b3c 6314cb5e
quit
! ISAKMP identity is set to auto
isakmp identity auto
isakmp enable outside
! ISAKMP authentication is set to rsa-sig
crypto isakmp policy 1
authentication rsa-sig
encryption aes-256
hash sha
group 2
lifetime 86400! Tunnel group configuration for the site-to-site tunnel
tunnel-group 209.165.200.225 type ipsec-l2l
tunnel-group 209.165.200.225 ipsec-attributes
! The ASA will validate the identity of the peer, using the peer's certificate
peer-id-validate cert
! The chain subcommand enables the ASA to send the complete certificate chain
! the previously configured trust point is applied to the tunnel group
trust-point London
Configuring the Cisco ASA to Accept Remote-Access IPsec VPN Clients Using Certificates
This section demonstrates how to configure the Cisco ASA to terminate Cisco AnyConnect Secure Mobility Client connections using certificates. The steps to configure remote-access VPNs are covered in Chapter 20, “IPsec Remote-Access VPNs.” When creating a remote-access VPN configuration using the AnyConnect VPN Connection Setup Wizard in ASDM, as covered in the “IPsec (IKEv2) Remote-Access Configuration Steps” section of Chapter 20, choose the device certificate in the Device Certificate area in wizard step 3 (VPN Protocols, shown in the background of Figure 21-18). This device certificate identifies the ASA to the remote-access clients and is the certificate you previously installed in the Cisco ASA. Some AnyConnect features (such as Always-On and IPsec IKEv2) require a valid device certificate on the ASA. If you do not have a certificate installed in the Cisco ASA, install a new one by clicking Manage to open the Manage Identity Certificates dialog box and then clicking Add to add an identity certificate and its details, as shown in Figure 21-18.

Note
If you are using Entrust as your certificate authority, click Enroll ASA SSL VPN with Entrust in the Manage Identities Certificates dialog box to enroll the Cisco ASA with the Entrust CA.
Troubleshooting PKI
Several troubleshooting commands and techniques are used to troubleshoot PKI on the Cisco ASA.
Time and Date Mismatch
One of the most common problems experienced when first implementing PKI is time and date mismatch. The certificate validity period is the time during which a certificate is valid. Incorrect time settings in the Cisco ASA, its peers, or the CA can cause the IKE negotiation to fail.
Tip
It is strongly suggested that you configure Network Time Protocol (NTP) on the Cisco ASA and the CA server to avoid this problem.
Example 21-32 includes an excerpt of the output of debug crypto ikev1 127 and debug crypto ca while a Cisco ASA had incorrect clock settings.
Example 21-32 Output of debug crypto ikev1 127 and debug crypto ca with Incorrect Clock Settings
Oct 07 11:33:16 [IKEv1 DEBUG], Group = , IP = 209.165.201.1
processing cert payload
Oct 07 11:33:16 [IKEv1 DEBUG], Group = , IP = 209.165.201.1,
processing cert request payload
Oct 07 11:33:16 [IKEv1 DEBUG], Group = , IP = 209.165.201.1 processing
RSA signature,
Oct 07 11:33:16 [IKEv1 DEBUG], Group = , IP = 209.165.201.1, computing hash
Oct 07 11:33:16 [IKEv1 DECODE]0000: 8D01E129 F25F46B3 C3CA9D4E
55571486 ...)._F....NUW..
0010: BDA26964 FA025484 03C271EB 43A7E69C ..id..T...q.C...
0020: 2A9AD9FA 49E523B1 94AC4874 E352B13B *...I.#...Ht.R.;
0030: 07354EA9 DB81F8E2 62276185 1A5EF2FC .5N.....b'a..^..
0040: 7436999D A6E54E96 AB5A5023 23BD1613 t6....N..ZP##...
0050: A2CB28F6 C817A665 9140C932 21EA5AAC ..([email protected]!.Z.
0060: 33D1A3C9 CC8B1B7F 792D3A63 3C220A25 3.......y-:c<".%
0070: 7B3ACB97 1CC09506 879D40B7 41E28A20 { :[email protected]..
Oct 07 11:33:16 [IKEv1 DEBUG], Group = , IP = 209.165.201.1,
Processing Notify payload
Oct 07 11:33:16 [IKEv1], IP = 209.165.201.1Trying to find group
via cert rules...,
Tunnel Group Match on map sequence # 10.
Group name is SALES
Oct 07 11:33:16 [IKEv1], IP = 209.165.201.1, Connection landed on
tunnel_group SALES
CRYPTO_PKI: looking for cert in handle=375b290, digest=
92 3c f9 ac b2 65 e3 fe 49 5a dc b8 64 d4 cd 9e | .<...e..IZ..d...
CRYPTO_PKI: Cert record not found, returning E_NOT_
CRYPTO_PKI: crypto_pki_get_cert_record_by_subject()
CRYPTO_PKI: Found a subject match
CRYPTO_PKI(make trustedCerts list)Oct 07 11:33:16 [IKEv1], Group = SALES,
IP = 209.165.201.1 Peer Certificate authentication failed,
Oct 07 11:33:16 [IKEv1 DEBUG], Group = SALES, IP = 209.165.201.1 IKE MM
Responder FSM error history (struct &0x49cc114)
<state>, <event>:
MM_BLD_MSG6, EV_UPDATE_CERT
MM_BLD_MSG6, EV_UPDATE_CERT
MM_BLD_MSG6, EV_UPDATE_CERT
MM_BLD_MSG6, EV_UPDATE_CERT,
Oct 07 11:33:16 [IKEv1 DEBUG], Group = SALES, IP = 209.165.201.1 ,
IKE SA MM:ce9697e1 terminating:
flags 0x0105c002, refcnt 0, tuncnt 0
Oct 07 11:33:16 [IKEv1 DEBUG], sending delete/delete with reason message
Oct 07 11:33:16 [IKEv1 DEBUG], Group = SALES, IP = 209.165.201.1 ,
constructing blank hash
Oct 07 11:33:16 [IKEv1 DEBUG], constructing IKE delete payload
Oct 07 11:33:16 [IKEv1 DEBUG], Group = SALES, IP = 209.165.201.1,
constructing qm hash
Oct 07 11:33:16 [IKEv1],
IP:( 209.165.201.1), IKE DECODE
SENDING Message (msgid=7bd21f5e) with payloads :
HDR + HASH (8) + DELETE (12)
total length : 80
To check the validity period of the installed certificates, use the show crypto ca certificates command. Example 21-33 includes output of the show crypto ca certificates and show clock commands, illustrating the date mismatch.
Example 21-33 Output of show crypto ca certificates and show clock Commands
NewYork# show crypto ca certificates
Certificate
Status: Available
Certificate Serial Number: 1c91af4500000000000d
Certificate Usage: General Purpose
Issuer:
cn=SecuremeCAServer
ou=ENGINEERING
o=Secureme
l=NewYork
st=IL
c=US
[email protected]
Subject Name
Name: NewYork.securemeinc.org
Serial Number: 46ff518
hostname=NewYork.securemeinc.org
serialNumber=46ff518
CRL Distribution Point:
http://NewYork-ca.ssecuremeinc.org/CertEnroll/SecuremeCAServer.crl
Validity Date:
start date: 02:58:05 UTC Sep 2 2009
end date: 03:08:05 UTC Sep 2 2011
Associated Trustpoints: NewYork
!
CA Certificate
Status: Available
Certificate Serial Number: 225b38e6471fcca649427934cf289071
Certificate Usage: Signature
Issuer:
cn=SecuremeCAServer
ou= ENGINEERING
o=Secureme
l=NewYork
st=IL
c=US
[email protected]
Subject:
cn=SecuremeCAServer
ou=ENGINEERING
o=Secureme
l=NewYork
st=IL
c=US
ea= [email protected]
CRL Distribution Point:
http://NewYork-ca/CertEnroll/SecuremeCAServer.crl
Validity Date:
start date: 20:15:19 UTC Jun 25 2009
end date: 20:23:42 UTC Jun 25 2011
Associated Trustpoints: NewYork
NewYork# show clock
11:50:27.165 UTC Thu Oct 7 2014
The clock set command is used to correct the time and date settings problem.
SCEP Enrollment Problems
SCEP uses TCP port 80 for its communications. Make sure that TCP port 80 is not blocked anywhere when enrolling the Cisco ASA. The following debug commands are useful when troubleshooting certificate enrollment problems on the Cisco ASA:
![]() debug crypto ca transactions
debug crypto ca transactions
![]() debug crypto ca messages
debug crypto ca messages
Example 21-34 includes the output of these debug commands when the Cisco ASA attempts to enroll but the CA server never responds because of communication problems.
Example 21-34 Output of debug crypto ca transactions and debug crypto ca messages
crypto_ca_get_ca_certificate(48b4884, 1850fa0)
crypto_pki_req(48b4884, 11, ...)
Crypto CA thread wakes up!
CRYPTO_PKI: Sending CA Certificate Request:
GET /cgi-bin/pkiclient.exe?operation=GetCACert&message=NewYork HTTP/1.0
CRYPTO_PKI: status = 65535: failed to send out the pki message
CRYPTO_PKI: transaction GetCACert completed Crypto CA thread sleeps!
The error messages in Example 21-34 are displayed if the Cisco ASA is not able to communicate with the CA server because of any communication problems, such as routing issues, blocked ports, and so on.
Time and date settings are also crucial during enrollment. Example 21-35 shows an unsuccessful enrollment request when the incorrect time and date settings were set in the Cisco ASA. The debug crypto ca transactions and debug crypto ca messages commands are enabled.
Example 21-35 Errors Due to Incorrect Time and Date Settings During Enrollment
NewYork(config)# crypto ca enroll NewYork
%
% Start certificate enrollment ..
% Create a challenge password. You will need to verbally provide this
password to the CA Administrator in order to revoke your certificate.
For security reasons your password will not be saved in the configuration.
Please make a note of it.
Password:
Re-enter password:
% The subject name in the certificate will be: O=secureme, OU=NewYork
% The fully-qualified domain name in the certificate will be: NewYork.securemeinc.org
% Include the router serial number in the subject name? [yes/no]: no
Request certificate from CA? [yes/no]: yes
% Certificate request sent to Certificate Authority
NewYork(config)#
Certificate is not valid yet.
The current certificate enrollment session is cancelled.
The shaded lines in Example 21-35 show that the certificate enrollment request failed because the certificate received is not valid yet. The start date in the certificate validity period was later than the current date in the Cisco ASA.
CRL Retrieval Problems
During IKE Phase 1 negotiation, if CRL checking is required, the ASA verifies the revocation status of the peer certificate. CRLs exist on external servers maintained by CAs. To verify the revocation status, the Cisco ASA retrieves the CRL by using one of the available CRL distribution points and checks the peer certificate serial number against the list of serial numbers in the CRL. The Cisco ASA can use LDAP or HTTP (SCEP) for CRL checking. LDAP uses TCP port 389. Make sure that the necessary ports are not blocked by any device between the Cisco ASA and the CRL distribution point.
Use the show crypto ca crls command to view the CRL information on the Cisco ASA, as previously illustrated in Example 21-16.
If you chose a CRL retrieval policy that uses static distribution points, you must enter at least one (and not more than five) valid URLs. This enables you to configure backup CRL distribution points to maximize availability.
Summary
This chapter provided an introduction to PKI and then progressed into detailed configuration and enrollment topics. To use digital certificates for authentication, you must first enroll with a CA and obtain and install a CA certificate on the Cisco ASA. Next, you must enroll and install an identity certificate from the same CA. This chapter showed how to enroll and install digital certificates on the Cisco ASA via SCEP or manually with the cut-and-paste method.
The Cisco ASA’s local CA integrates a basic certificate authority functionality to deploy certificates and provides secure revocation checking of issued certificates. In this chapter, you learned how to configure the local CA through ASDM and in the CLI.
Additionally, this chapter provided detailed configuration steps you can follow to configure the Cisco ASA to use digital certificates to authenticate site-to-site and remote-access VPN sessions. Several troubleshooting tips and techniques were included at the end of the chapter.