
Chapter 23. Client-Based Remote-Access SSL VPNs
This chapter covers the following topics:
![]() SSL VPN deployment considerations
SSL VPN deployment considerations
![]() Pre-SSL VPN configuration guide
Pre-SSL VPN configuration guide
![]() Cisco AnyConnect Secure Mobility Client configuration guide
Cisco AnyConnect Secure Mobility Client configuration guide
![]() Deployment scenario
Deployment scenario
![]() Monitoring and troubleshooting Cisco AnyConnect Secure Mobility Client SSL VPNs
Monitoring and troubleshooting Cisco AnyConnect Secure Mobility Client SSL VPNs
Chapter 20, “IPsec Remote-Access VPNs,” covered remote-access IPsec VPN concepts, and Chapter 22, “Clientless Remote-Access SSL VPNs,” discussed the implementation of SSL VPN on clientless workstations. The clientless VPN application does not provide full network access to your remote users. If you want your users to have full network connectivity from their remote workstations, similar to what they would have with remote-access IPsec but by using SSL VPN, you can implement the full-tunnel-mode functionality on the Cisco ASA. Using the full tunnel client mode, remote machines can send all IP unicast traffic, including TCP-, UDP-, or even ICMP-based packets. SSL clients can access internal resources via HTTP, HTTPS, SSH, or Telnet, to name a few.
Many enterprises are in the process of migrating from an existing IPsec-based deployment. Their main motivation is that the Cisco AnyConnect Secure Mobility Client is easy to deploy and maintain, has a smaller package size, requires no machine reboots during client installation, and is easy to configure.
In the full tunnel mode, Cisco AnyConnect Secure Mobility Client can be pushed to or installed on the remote workstations after a successful authentication. After it is installed, you can choose to keep the client installed permanently and thus reduce the connection time for the remote user.
SSL VPN Deployment Considerations
As discussed in Chapter 22, you have to analyze your current environment and determine which features and modes might be useful in your operation before you implement the SSL VPN services on a Cisco ASA. You have the option to install Cisco AnyConnect Secure Mobility Client or go with the clientless SSL VPN functionality. Cisco AnyConnect Secure Mobility Client SSL VPN is an obvious choice for someone who wants to give full network access to an enterprise’s network, using SSL-based tunnels.
After you have determined that Cisco AnyConnect Secure Mobility Client SSL VPN is your choice of remote-access VPN solution, you must consider the appropriate SSL VPN design. This section provides some options.
Cisco AnyConnect Secure Mobility Client Licenses
Starting with Cisco ASA Software version 8.2, Cisco has introduced specific licenses to be used in the SSL VPN environment. Chapter 3, “Licensing,” covers all the different license options for the Cisco ASA and its SSL VPN capabilities.
Cisco ASA Design Considerations
Before you deploy Cisco AnyConnect Secure Mobility Client SSL VPN, make sure that you understand the impact it has on your environment. Some of the design considerations are included in the following subsections.
ASA Feature Set
A Cisco security appliance can run various features such as IPsec (IKEv1 and IKEv2) VPN tunnels, routing engines, firewalls, and data inspection engines. Enabling the SSL VPN feature can add further load if your existing appliance is already running a number of features. You must check the CPU, memory, and buffer utilization before enabling SSL VPN.
Infrastructure Planning
Because SSL VPN provides network access to remote users, you have to consider the placement of the VPN termination devices. Before implementing the SSL VPN feature, ask the following questions:
![]() Should the Cisco ASA be placed behind another firewall? If so, what ports should be opened in that firewall?
Should the Cisco ASA be placed behind another firewall? If so, what ports should be opened in that firewall?
![]() Should the decrypted traffic be passed through another set of firewalls? If so, what ports should be allowed in those firewalls?
Should the decrypted traffic be passed through another set of firewalls? If so, what ports should be allowed in those firewalls?
![]() Are there any proxy servers between the client and the security appliances?
Are there any proxy servers between the client and the security appliances?
If you have an HTTP 1.1 proxy server between the Cisco AnyConnect Secure Mobility Client client and the server, your connection should succeed as long as the proxy server uses Basic and NTLM authentication. In the current implementation, Socks proxies are not supported.
Additionally, if the proxy server runs only TCP, you cannot run DTLS. DTLS is discussed in the “Configuring DTLS” section of this chapter.
Implementation Scope
Network security administrators need to determine the size of the SSL VPN deployment, especially the number of concurrent users that will connect to gain network access. If one Cisco ASA is not enough to support the required number of users, ASA clustering or load balancing must be considered to accommodate all the potential remote users.
Table 23-1 lists the various security appliances and the number of supported simultaneous Cisco AnyConnect Secure Mobility Client SSL VPN users for each platform.

You cannot apply quality of service (QoS) policies to the Cisco AnyConnect Secure Mobility Client client connections.
SSL VPN Prerequisites
You must ensure that several prerequisites are met before you begin to implement an SSL VPN in your enterprise. They are discussed in the following sections.
Cisco provides a two-user complementary license on all supported ASA devices. You do not have to purchase licenses if you want to test SSL VPN features in a lab environment where the user count is not going to exceed two.
Note
This chapter focuses strictly on version 8.2 because of the SSL VPN enhancements that were added in this version of code.
Client Operating System and Browser and Software Requirements
The SSL VPN functionality on Cisco security appliances is supported on several client operating systems and several browsers. The supported platforms are discussed next.
Supported Operating Systems
Cisco AnyConnect Secure Mobility Client is supported on the following operating systems:
![]() Windows Vista
Windows Vista
![]() Windows 7
Windows 7
![]() Windows 8
Windows 8
![]() OS X
OS X
![]() Android
Android
![]() Apple iOS (OS of the iPad, iPhone, iPod)
Apple iOS (OS of the iPad, iPhone, iPod)
Cisco AnyConnect Secure Mobility Client support for Windows 8 32- and 64-bit operating systems was added in 3.0.11042 and later versions (for 3.0.x versions) and 3.1.02026 and later (for 3.1.x versions). Cisco AnyConnect Secure Mobility Client support for Windows 8.1 32- and 64-bit was added in Cisco AnyConnect Secure Mobility Client 3.1.04072.
For the latest operating system and system requirement information from Cisco, visit http://www.cisco.com/en/US/products/ps10884/prod_release_notes_list.html.
Compatible Browsers
You must use an SSL-enabled browser such as Google Chrome, Microsoft Internet Explorer, Firefox, Opera, or Safari to download the Cisco AnyConnect Secure Mobility Client client from the security appliance. For Windows-based workstations, use Internet Explorer 6.0+ or Firefox 2.0+, and enable ActiveX or install Java JRE 1.5 or higher, with JRE 7 recommended. The Apple Safari browser requires Java to be enabled.
Infrastructure Requirements
The infrastructure requirements for SSL VPNs include, but are not limited to, the following options:
![]() ASA placement and requirements
ASA placement and requirements
ASA Placement and Requirements
If you are installing a new security appliance, determine the location that best fits your requirements. If you plan to place it behind a firewall, make sure that you allow appropriate SSL VPN ports to pass through the firewall. In most cases, it is placed near the Internet edge.
You must upgrade to ASA 9.0 or later if you want to use the following features with SSL VPN:
![]() IPv6 support
IPv6 support
![]() Cisco Next Generation Encryption “Suite-B” security
Cisco Next Generation Encryption “Suite-B” security
![]() Cisco AnyConnect Secure Mobility Client client deferred upgrades
Cisco AnyConnect Secure Mobility Client client deferred upgrades
![]() Internet Explorer 11 and OS X 10.9
Internet Explorer 11 and OS X 10.9
User Account
Before SSL VPN tunnels are established, users must authenticate themselves to either the local database or to an external authentication server. The supported external servers include RADIUS (including Password Expiry using MSCHAPv2 to NT LAN Manager), RADIUS one-time password (OTP), RSA SecurID, Active Directory/Kerberos, and Generic Lightweight Directory Access Protocol (LDAP). Make sure that SSL VPN users have accounts and appropriate access. LDAP password expiration is available for Microsoft and Oracle LDAP.
Administrative Privileges
Cisco AnyConnect Secure Mobility Client VPN client requires administrative rights for the initial installations.
Note
Smartcard support is not available for Linux-based Cisco AnyConnect Secure Mobility Client clients. Smartcards are, however, fully supported on all Windows operating systems and OS X 10.4 or later.
Pre-SSL VPN Configuration Guide
After analyzing the deployment considerations and selecting the SSL VPN as your choice of remote-access VPN solution, you must configure the security appliance for the tasks listed in the following subsections even before you enable SSL VPN. These tasks include the following:
![]() Enrolling digital certificates (recommended)
Enrolling digital certificates (recommended)
![]() Setting up tunnel and group policies
Setting up tunnel and group policies
![]() Setting up user authentication
Setting up user authentication
Enrolling Digital Certificates (Recommended)
Enrollment is the process of obtaining a certificate from a certificate authority (CA). The certificate enrollment process for Cisco AnyConnect Secure Mobility Client SSL VPN client is identical to the enrollment process discussed in Chapter 22 for clientless SSL VPN tunnels. If you have not gone through the process of enrolling SSL VPN certificates into a Cisco security appliance, please consult the “Enroll Digital Certificates (Recommended)” section in Chapter 22.
Setting Up Tunnel and Group Policies
As discussed in Chapter 22, Cisco ASA uses an inheritance model when it pushes network and security policies to the end-user sessions. Using this model, you can configure policies at the following three locations:
![]() Under the default group policy
Under the default group policy
![]() Under the user’s assigned group policy
Under the user’s assigned group policy
![]() Under the specific user’s policy
Under the specific user’s policy
In the inheritance model, a user receives the attributes and policies from the user policy, which inherits its attributes and policies from the user group policy, which in turn receives its attributes and policies from the default group policy.
After defining these policies, you must bind them to a tunnel group where users terminate their sessions. This way, a user who establishes her VPN session to a tunnel group inherits all the policies mapped to that tunnel. The tunnel group defines a VPN connection profile, of which each user is a member.
Configuring Group Policies
Configure the user group and default group policies by choosing Configuration > Remote Access VPN > Network (Client) Access > Group Policies. Click Add to add a new group policy. As shown in Figure 23-1, a user group policy called Cisco AnyConnect Secure Mobility Client GroupPolicy is being added. This group policy allows only clientless SSL VPN tunnels to be established and rejects all the other tunneling protocols. If you would rather assign attributes to the default group policy, modify DfltGrpPolicy (System Default) by going to Configuration > Remote Access VPN > Network (Client) Access > Group Policies, and select DfltGrpPolicy, then click Edit. Any attribute that is modified in DfltGrpPolicy is propagated to any user group policy that inherits that attribute. A group policy name other than DfltGrpPolicy is treated as a user group policy.
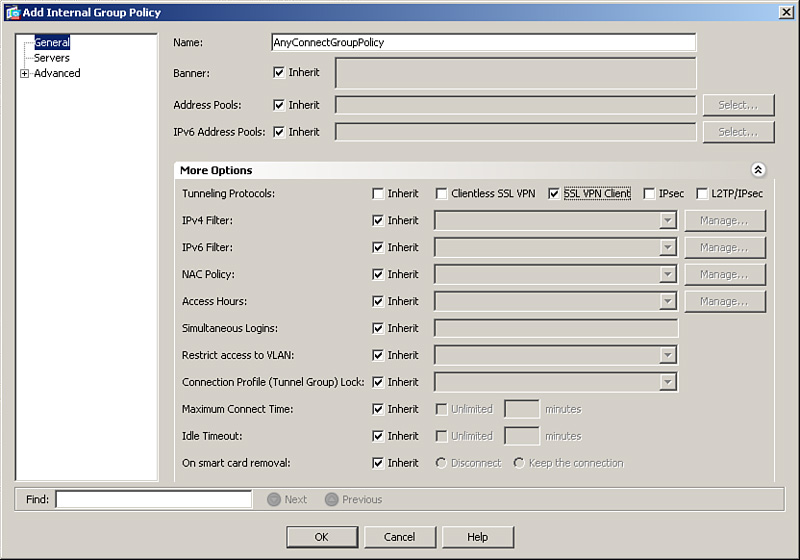
The default and user group policies are set up to allow both Cisco IPsec VPN and SSL VPN tunnels. If you want to restrict a policy to use only SSL VPN, check either Clientless SSL VPN or SSL VPN Client options for Tunneling Protocols, as illustrated in Figure 23-1.
The user, group and default group polices can be applied to clientless, Cisco AnyConnect Secure Mobility Client, and IPsec-based remote-access VPN tunnels. The Cisco AnyConnect Secure Mobility Client SSL VPN–specific attributes are discussed in detail in the next few sections of this chapter.
Note
Configure a user policy by choosing Configuration > Remote Access VPN > AAA/Local Users > Local Users.
Example 23-1 illustrates how to define a user group policy called Cisco AnyConnect Secure Mobility Client GroupPolicy. This policy allows only the IPsec tunnels to be terminated on the group.
Example 23-1 Group Policy Definition
Chicago(config)# group-policy AnyConnectGroupPolicy internal
Chicago(config)# group-policy AnyConnectGroupPolicy attributes
Chicago(config-group-policy)# vpn-tunnel-protocol svc
Configuring a Tunnel Group
Configure a tunnel group, also known as connection profile, by choosing Configuration > Remote Access VPN > Network (Client) Access > AnyConnect Connection Profiles and clicking Add. As shown in Figure 23-2, a tunnel group called SecureMeAnyConnect has been added. After defining a tunnel group name, you can bind a user group policy to a tunnel group. After a user is connected, the attributes and policies defined under the group policy are applied to the user. A user group policy of AnyConnectGroupPolicy is linked to this tunnel group.

Example 23-2 illustrates how to configure a remote-access tunnel group of SecureMeAnyConnect. The previously defined group policy, AnyConnectGroupPolicy, is added to the tunnel group.
Example 23-2 Tunnel Group Definition
Chicago(config)# tunnel-group SecureMeAnyConnect type remote-access
Chicago(config)# tunnel-group SecureMeAnyConnect general-attributes
Chicago(config-tunnel-general)# default-group-policy AnyConnectGroupPolicy
After configuring a connection profile, you can define a specific URL for users to connect to this tunnel group. This is beneficial if you want to create a specific URL for each connection profile you design. Distribute the URL accordingly so that users do not have to decide to which connection profile to connect.
Define a specific URL by modifying the connection profile. Then, in the Edit AnyConnect Connection Profile dialog box, choose Advanced > SSL VPN in the left pane. Under Group URL, click Add and specify a URL. For the SecureMeAnyConnect connection profile, specify https://sslvpn.securemeinc.org/sslvpnclient as the group URL. Verify that the Enable check box is checked. Click OK to exit. When users need to connect via SSL VPN, they can employ this URL to connect specifically to this tunnel group.
Setting Up User Authentication
Cisco ASA supports a number of authentication servers and authentication methods, such as RADIUS, NT domain, Kerberos, SDI, LDAP, digital certificates, smart cards, and local databases. For small organizations, a local database can be set up for user authentication. For medium to large SSL VPN deployments, it is highly recommended that you use an external authentication server, such as RADIUS or Kerberos, as the user authentication database. If you are deploying the SSL VPN feature for a few users, you can use the local database. You define the users by choosing Configuration > Remote Access VPN > AAA/Local User > Local Users.
Many enterprises either use a RADIUS server or Kerberos to leverage their existing Active Directory infrastructure for user authentication. Before configuring an authentication server on Cisco ASA, you must specify authentication, authorization, and accounting (AAA) server groups by choosing Configuration > Remote Access VPN > AAA/Local User > AAA Server Groups and clicking Add. Specify a server group name that can be referenced by the other AAA processes. Choose an authentication protocol for this server group name. For example, if you plan to use a RADIUS server for authentication, choose RADIUS from the drop-down menu. This option ensures that the security appliance requests the appropriate information from the end users and forwards it to the RADIUS server for authentication and verification.
After enabling RADIUS processing, define a list of the RADIUS servers. The Cisco security appliance checks their availability on a round-robin basis. If a server is available, the security appliance keeps using that server until it fails to receive a response. Upon such a failure, it checks the availability of the next server. It is highly recommended that you set up more than one RADIUS server, in case the first server is not reachable. You can define a RADIUS server entry by navigating to Configuration > Remote Access VPN > AAA/Local User > AAA Server Groups and clicking Add in the Servers in the Selected Group area. You can specify the IP address of the RADIUS server and the interface closest to the server. The security appliance authenticates itself to the RADIUS server by using a shared secret key. Figure 23-3 shows the Cisco ASA configured with an AAA server under the server group called my-radius-group. The server is located toward the inside interface at 192.168.1.40. The shared key is C1$c0123 (obfuscated).

After defining the authentication servers, bind them to the SSL VPN process under a tunnel group. Refer to Figure 23-2 to see that the newly created RADIUS AAA server group (my-radius-group) is mapped to the SecureMeAnyConnect tunnel group. Example 23-3 shows how a RADIUS server is defined. The RADIUS group name is my-radius-group and it is located toward the inside interface at 192.168.1.40. The shared secret is C1$c0123. The RADIUS server is added to SecureMeAnyConnect.
Example 23-3 Defining RADIUS for IPsec Authentication
Chicago(config)# aaa-server Radius protocol radius
Chicago(config)# aaa-server Radius (inside) host 192.168.1.40
Chicago(config-aaa-server-host)# key C1$c0123
Chicago(config-aaa-server-host)# exit
Chicago(config) tunnel-group SecureMeAnyConnect general-attributes
Chicago(config-tunnel-general)# authentication-server-group Radius
Tip
For large VPN deployments (both IPsec and SSL VPNs), you can control user access and policy mapping from an external authentication server. Pass the user group policy name as a RADIUS or LDAP attribute to the security appliance. By doing so, you guarantee that a user always gets the same policy, regardless of the tunnel group name to which the user connects. If you are using RADIUS as the authentication and authorization server, specify the user group policy name as attribute 25 (class attribute). Append the keyword OU= as the value of the class attribute. For example, if you define a user group policy called engineering group, you can enable attribute 25 and specify OU=engineering as its value.
Cisco AnyConnect Secure Mobility Client Configuration Guide
Cisco AnyConnect Secure Mobility Client VPN client can be installed on a user’s computer using one of these methods:
![]() Web-enabled mode: With this method, the client is downloaded to a user computer through a browser. The user opens a browser and references the IP address or the FQDN of Cisco ASA to establish an SSL VPN tunnel. The user is presented with the standard SSL VPN logon page and is prompted for credentials. If the entered credentials are valid, the user is allowed to log in, and if the user is using Internet Explorer, the user is prompted to download the client using ActiveX. Otherwise, the user is prompted to start it manually through the Cisco AnyConnect Secure Mobility Client link. If ActiveX fails, the browser tries to download the client through Java. If either ActiveX or Java is successful, the client is downloaded and installed. After it is installed, it tries to connect to the security appliance and establish an SSL VPN tunnel.
Web-enabled mode: With this method, the client is downloaded to a user computer through a browser. The user opens a browser and references the IP address or the FQDN of Cisco ASA to establish an SSL VPN tunnel. The user is presented with the standard SSL VPN logon page and is prompted for credentials. If the entered credentials are valid, the user is allowed to log in, and if the user is using Internet Explorer, the user is prompted to download the client using ActiveX. Otherwise, the user is prompted to start it manually through the Cisco AnyConnect Secure Mobility Client link. If ActiveX fails, the browser tries to download the client through Java. If either ActiveX or Java is successful, the client is downloaded and installed. After it is installed, it tries to connect to the security appliance and establish an SSL VPN tunnel.
![]() Standalone mode: With this method, the client is downloaded as a standalone application from a file server or directly from Cisco.com. The Windows Installer is executed to install the client to the workstation. If the client is not preconfigured, the user needs to specify the IP address or FQDN of the security appliance, the tunnel group to connect to, the username, and the associated password.
Standalone mode: With this method, the client is downloaded as a standalone application from a file server or directly from Cisco.com. The Windows Installer is executed to install the client to the workstation. If the client is not preconfigured, the user needs to specify the IP address or FQDN of the security appliance, the tunnel group to connect to, the username, and the associated password.
Note
If you receive the following message, you need to copy MSVCP60.dll and MSVCRT.dll into the system32 directory. Please consult Microsoft article KB259403 for more information.
“The required system DLL filename is not present on the system.”
In the case of mobile devices (such as iPhones, iPads, and Android devices), Cisco AnyConnect Secure Mobility Client can be downloaded directly from the Apple App Store or from Google Play, respectively.
The configuration of Cisco AnyConnect Secure Mobility Client VPN client is a two-step process:
1. Load the Cisco AnyConnect Secure Mobility Client package.
2. Define Cisco AnyConnect Secure Mobility Client VPN client attributes.
Loading the Cisco AnyConnect Secure Mobility Client Package
Before you define configuration policies for the Cisco AnyConnect Secure Mobility Client, load the Cisco AnyConnect Secure Mobility Client VPN client package in the local flash of the security appliance. Verify whether it is installed by choosing Configuration > Remote Access VPN > Network (Client) Access > AnyConnect Client Software. If an Cisco AnyConnect Secure Mobility Client image is not installed, click Add to
![]() Browse through the local flash of the security appliance and select the Cisco AnyConnect Secure Mobility Client file you want to use. As shown in Figure 23-4, the OS X client anyconnect-macosx-i386-3.1.04074-k9.pkg is being added from the local flash of the security appliance.
Browse through the local flash of the security appliance and select the Cisco AnyConnect Secure Mobility Client file you want to use. As shown in Figure 23-4, the OS X client anyconnect-macosx-i386-3.1.04074-k9.pkg is being added from the local flash of the security appliance.

![]() Upload a file from the local computer to the local flash of Cisco ASA. Check for the latest version of the Cisco AnyConnect Secure Mobility Client package file at Cisco.com.
Upload a file from the local computer to the local flash of Cisco ASA. Check for the latest version of the Cisco AnyConnect Secure Mobility Client package file at Cisco.com.
Note
You can upload multiple SSL VPN client packages. The order in which the files are listed reflects the order in which they are presented to a user to be downloaded.
Do not rename the package files that you download from Cisco.com. If you change the filename, the hash verification that includes the filename fails.
Example 23-4 shows a Cisco AnyConnect Secure Mobility Client image, anyconnect-macosx-i386-3.1.04074-k9.pkg, being installed in the security appliance.
Example 23-4 Enabling Cisco AnyConnect Secure Mobility Client SSL VPN
Chicago(config)# webvpn
Chicago(config-webvpn)# svc image disk0:/anyconnect-macosx-i386-3.1.04074-k9.pkg
Defining the Cisco AnyConnect Secure Mobility Client Attributes
After loading the Cisco AnyConnect Secure Mobility Client package in the security appliance’s configuration, you can define client parameters such as the IP address that client should receive via ASDM. Before an Cisco AnyConnect Secure Mobility Client SSL VPN tunnel is functional, you have to configure the following two required actions:
![]() Enabling Cisco AnyConnect Secure Mobility Client connections
Enabling Cisco AnyConnect Secure Mobility Client connections
![]() Address pool definition
Address pool definition
These two attributes are discussed in this section.
Optionally, you can define other attributes to enhance the functionality of the Cisco AnyConnect Secure Mobility Client configuration. They include the following:
![]() Keeping SSL VPN client installed
Keeping SSL VPN client installed
Several of these options are defined in the next section, “Advanced Full Tunnel Features.”
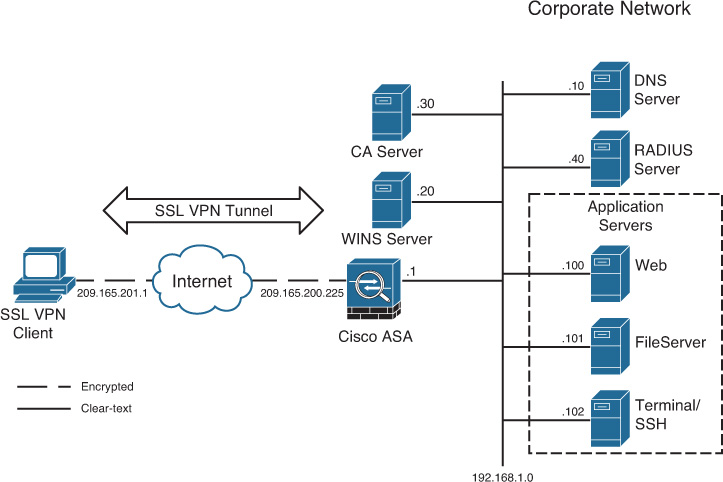
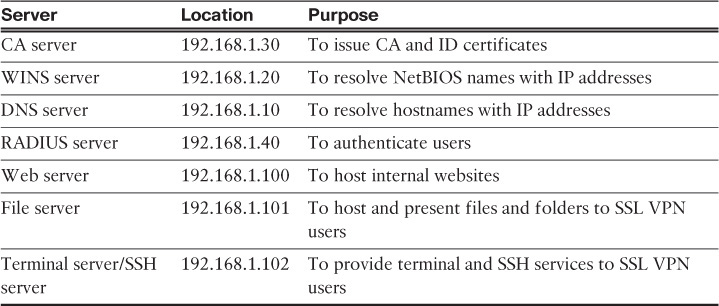
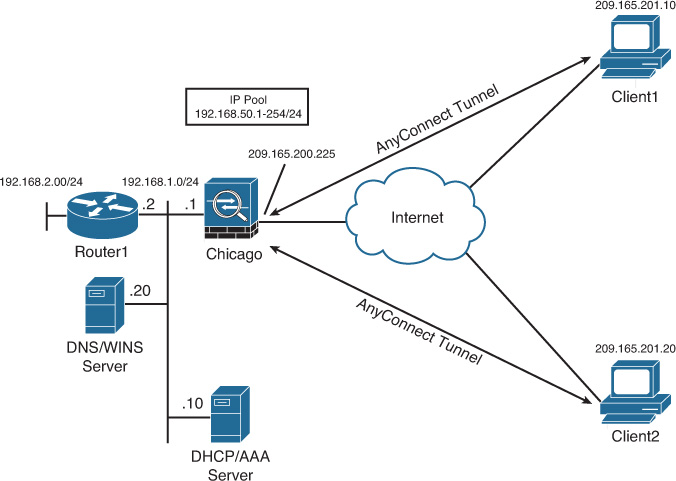
Figure 23-5 is used throughout these sections to demonstrate how to set up Cisco ASA for Cisco AnyConnect Secure Mobility Client users. As shown in this figure, the security appliance is set up to accept the SSL VPN connections from hosts on the Internet. The private network of the security appliance includes several servers, which are described in Table 23-2.
Enabling Cisco AnyConnect Secure Mobility Client VPN Client Functionality
After the Cisco AnyConnect Secure Mobility Client is loaded into flash, enable the AnyConnect Client functionality on the interface that terminates the connection. You do so by navigating to Configuration > Remote Access VPN > Network (Client) Access > AnyConnect Connection Profiles and checking Enable Cisco AnyConnect Secure Mobility Client or Legacy SSL VPN Client Access on the Interfaces Selected in the Table Below. In the table, check the All Access and Enable DTLS check boxes under SSL Access for the outside interface if it is the interface that will terminate the SSL VPN connection. This is shown in Figure 23-6. Specify the SSL VPN port that the clients should be using to establish the VPN tunnel. By default, it is TCP port 443 and DTLS on UDP port 443. DTLS is discussed later in this chapter.

Example 23-5 shows that Cisco AnyConnect Secure Mobility Client functionality is enabled on the outside interface.
Example 23-5 Enabling SSL VPN on the Outside Interface
Chicago(config)# webvpn
Chicago(config-webvpn)# enable outside
The Cisco AnyConnect Secure Mobility Client client requires administrative privileges on the client computer when it is installed. When Cisco AnyConnect Secure Mobility Client is launched, no administrative privileges are required subsequently.
Defining a Pool of Addresses
During the SSL VPN tunnel negotiations, an IP address is assigned to the VPN adapter of the Cisco AnyConnect Secure Mobility Client. The client uses this IP address to access resources on the protected side of the tunnel. Cisco ASA supports three different methods to assign an IP address back to the client:
![]() Local address pool
Local address pool
![]() DHCP server
DHCP server
![]() RADIUS server
RADIUS server
Many organizations prefer assigning an IP address from the local pool of addresses for flexibility. You assign the IP address by configuring an address pool and then linking the pool to a policy group. You can either create a new pool of addresses or select a preconfigured address pool. Define a new pool of addresses by choosing Configuration > Remote Access VPN > Network (Client) Access > Address Assignment > Address Pools and clicking Add to open the Add IP Pool dialog box, shown in Figure 23-7.
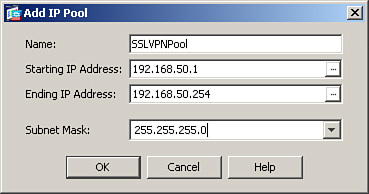
Configure the following attributes as illustrated in Figure 23-7:
![]() Name: An alphanumeric name to be assigned to this pool. A pool name of SSLVPNPool is assigned in this example.
Name: An alphanumeric name to be assigned to this pool. A pool name of SSLVPNPool is assigned in this example.
![]() Starting IP Address: The first IP address to be assigned to a client. A starting IP address of 192.168.50.1 is assigned.
Starting IP Address: The first IP address to be assigned to a client. A starting IP address of 192.168.50.1 is assigned.
![]() Ending IP Address: The last IP address to be assigned to a client. An ending IP address of 192.168.50.254 is assigned.
Ending IP Address: The last IP address to be assigned to a client. An ending IP address of 192.168.50.254 is assigned.
![]() Subnet Mask: The associated subnet mask for this pool of addresses. A subnet mask of 255.255.255.0 is configured.
Subnet Mask: The associated subnet mask for this pool of addresses. A subnet mask of 255.255.255.0 is configured.
By default, all address assignment methods are allowed. If you want to disable a specific address assignment method, you can do so by navigating to Configuration > Remote Access VPN > Network (Client) Access > Address Assignment > Assignment Policy.
Cisco ASA now supports IPv6 for SSL VPN. You can also create IPv6 pools using the same methodology.
If all three methods are configured for address assignment, Cisco ASA prefers RADIUS over DHCP and internal address pools. If Cisco ASA is not able to get an address from the RADIUS server, it contacts the DHCP server for address allocation. If that method also fails, Cisco ASA checks the local address pool as the last resort.
After defining a pool of addresses, map the pool to a user group policy. Choose Configuration > Remote Access VPN > Network (Client) Access > Group Policies, select AnyConnectGroupPolicy, and click Edit. Uncheck the Inherit check box for Address Pools and then click Select to choose a predefined pool of addresses. A dialog box pops up with all the preconfigured address pools. Select the address pool you want to use and click Assign to map the pool to this policy. In Figure 23-8, SSLVPNPool is being assigned to AnyConnectGroupPolicy. Click OK when finished.
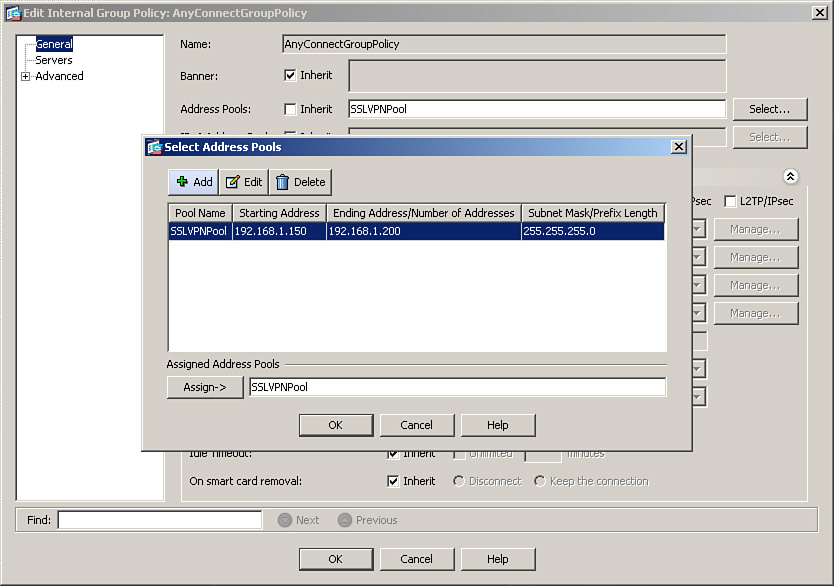
Example 23-6 shows how to assign an address from a pool called SSLVPNPool, which is mapped to a group policy called AnyConnectGroupPolicy.
Example 23-6 Defining Pool of Addresses
Chicago(config)# ip local pool SSLVPNPool 192.168.50.1-192.168.50.254 mask 255.255.255.0
Chicago(config) group-policy AnyConnectGroupPolicy attributes
Chicago(config-group-policy)# address-pools value SSLVPNPool
Tip
You can also link a pool of addresses to the tunnel group. However, if a pool is mapped to a group policy and a different pool is mapped to a tunnel group, then the security appliance prefers the pool that is linked to the group policy.
Advanced Full Tunnel Features
After setting up basic full tunnel client parameters, you can configure some of the advanced parameters to enhance the SSL VPN implementation in your network. These important full tunnel features are discussed in the following sections:
![]() Keeping the SSL VPN client installed
Keeping the SSL VPN client installed
Split Tunneling
After the tunnel is established, the default behavior of the Cisco AnyConnect Secure Mobility Client is to encrypt traffic to all the destination IP addresses. This means that if an SSL VPN user wants to browse to http://www.cisco.com over the Internet, as illustrated in Figure 23-9, the packets are encrypted and sent to Cisco ASA. After decrypting them, the security appliance searches its routing table and forwards the packet to the appropriate next-hop IP address in clear text. These steps are reversed when traffic returns from the web server and is destined to the SSL VPN client.
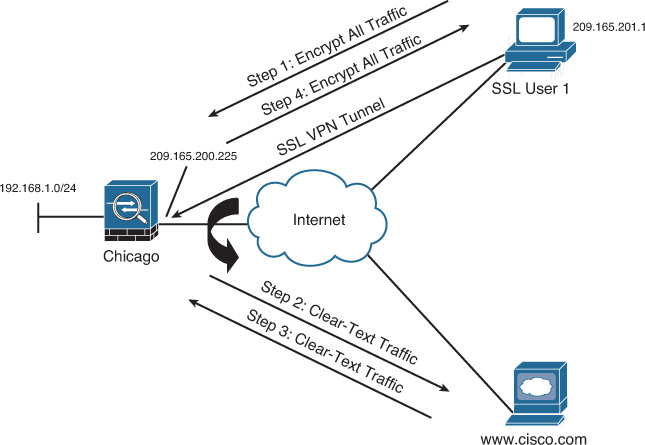
This behavior might not always be desirable for the following two reasons:
![]() Traffic destined to the non-secure networks traverses over the Internet twice: once encrypted and once in clear text.
Traffic destined to the non-secure networks traverses over the Internet twice: once encrypted and once in clear text.
![]() Cisco ASA handles extra VPN traffic destined to the non-secure subnet. The security appliance analyzes all traffic leaving and coming from the Internet.
Cisco ASA handles extra VPN traffic destined to the non-secure subnet. The security appliance analyzes all traffic leaving and coming from the Internet.
With split tunneling, the security appliance notifies the Cisco AnyConnect Secure Mobility Client about the secured subnets. The VPN client, using the secured routes, encrypts only those packets that are destined for the networks behind the security appliance.
Caution
With split tunneling, the remote computer is susceptible to hackers, who can potentially take control over the computer and direct traffic over the tunnel. To mitigate this behavior, a personal firewall is highly recommended on the Cisco AnyConnect Secure Mobility Client workstations.
Split tunneling can be configured under a user policy, user group policy, or default group policy. Choose Configuration > Remote Access VPN > Network (Client) Access > Group Policies, select AnyConnectGroupPolicy, click Edit, and choose Advanced > Split Tunneling. For both Policy and Network List, uncheck the Inherit check box. Choose Tunnel Network List Below from the Policy drop-down menu. Additionally, choose a network list from the drop-down menu. If you would rather define a new network list, click the Manage button. Cisco ASDM launches the ACL Manager and prompts you to define a new list. Under the Standard ACL tab, click Add to add an ACL. As shown in the ACL Manager dialog box in Figure 23-10, a new ACL called SplitTunnelList has been added. Select the newly defined list, click Add again on the Standard ACL tab, and add an ACE in the Add ACE dialog box. In Figure 23-10, an ACE entry for 192.168.1.0/24 has been added with a description of List to Allow Access to Inside Network.
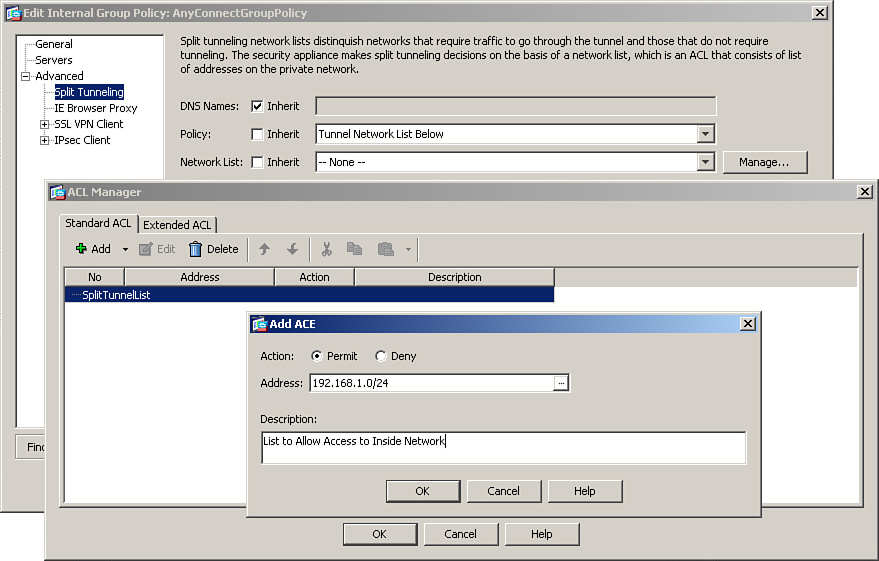
Example 23-7 shows the CLI equivalent of Figure 23-10.
Example 23-7 CLI Split Tunneling Configuration
Chicago(config)# access-list SplitTunnelList standard permit 192.168.0.0 255.255.255.0
Chicago(config)# group-policy AnyConnectGroupPolicy attributes
Chicago(config-group-policy)# split-tunnel-policy tunnelspecified
Chicago(config-group-policy)# split-tunnel-network-list value SplitTunnelList
Note
Cisco AnyConnect Secure Mobility Client supports split DNS functionality for Windows and OS X operating systems. It tunnels any DNS queries that match specified domain names to the private corporate DNS server. True split DNS allows tunnel access only to DNS requests that match the domains pushed to the client by the ASA. This DNS traffic is encrypted; however, if the DNS requests do not match the domains sent by the ASA, Cisco AnyConnect Secure Mobility Client permits the client operating system’s DNS resolver to submit the hostname in the clear for DNS resolution.
The Cisco AnyConnect Secure Mobility Client supports Cisco Cloud Web Security when the Web Security module is installed. This module is an endpoint component that sends HTTP traffic to a Cisco Cloud Web Security scanning proxy to inspect and block potentially harmful websites and content.
When a VPN connection is established, all network traffic is sent through the VPN tunnel. However, when Cisco AnyConnect Secure Mobility Client users employ Web Security, the HTTP traffic originating at the endpoint needs to be excluded from the tunnel and sent directly to the Cloud Web Security scanning proxy. Therefore, split tunneling must be enabled so the Cloud Web Security scanning proxy can inspect the traffic. Use the Set Up Split Exclusion for Web Security button in a group policy (as described next). To configure split tunneling for Web Security, complete the following steps:
1. Navigate to Remote Access VPN > Configuration > Group Policies.
2. Select the group policy you want to configure and click Edit.
3. Choose Advanced > Split Tunneling.
4. Click Set Up Split Exclusion for Web Security.
5. Enter a new, or select an existing, ACL used for Web Security split exclusion. ASDM sets up the ACL for use in the network list.
6. Click Create Access List.
7. Click OK.
DNS and WINS Assignment
For the Cisco AnyConnect Secure Mobility Clients, you can assign DNS and WINS server IP addresses so they can browse and access internal sites after their SSL tunnel is established. To configure these attributes, choose Configuration > Remote Access VPN > Network (Client) Access > Group Policies, select AnyConnectGroupPolicy, click Edit, and then click Servers. To add multiple DNS or WINS servers, use a comma (,) to separate the entries. In Figure 23-11, the primary DNS server is defined as 192.168.1.10 and the secondary DNS server is defined as 192.168.1.20. The primary WINS server is 192.168.1.10, and the secondary WINS server is 192.168.1.20. The default domain name to be pushed to the AnyConnect VPN client is securemeinc.org.

Example 23-8 shows the CLI equivalent of Figure 23-11.
Example 23-8 Defining DNS and WINS Servers for Cisco AnyConnect Secure Mobility Clients
Chicago(config)# group-policy AnyConnectGroupPolicy attributes
Chicago(config-group-policy)# dns-server value 192.168.1.10 192.168.1.20
Chicago(config-group-policy)# wins-server value 192.168.1.20 192.168.1.10
Chicago(config-group-policy)# default-domain value securemeinc.org
Keeping the SSL VPN Client Installed
After the AnyConnect client is successfully installed, the security appliance, by default, keeps the client installed on the computer, even if the tunnel is disconnected. Keep this option enabled so that users do not need to go through the process of installing the client. Additionally, the initial AnyConnect Client installation requires administrative rights. If you do not allow your end users to have administrative privileges, keep the client installed on the workstation. If you want to uninstall the client after the user disconnects the SSL VPN tunnel, navigate to Configuration > Remote Access VPN > Network (Client) Access > Group Policies, select AnyConnectGroupPolicy, click Edit, choose Advanced > SSL VPN Client, deselect the Keep Installer on Client System option, and select No.
Example 23-9 shows how to uninstall the client after the user disconnects the SSL VPN tunnel through the CLI.
Example 23-9 Uninstalling AnyConnect Client After Session Disconnects
Chicago(config)# group-policy AnyConnectGroupPolicy attributes
Chicago(config-group)# webvpn
Chicago(config-group-webvpn)# svc keep-installer none
Configuring DTLS
Datagram Transport Layer Security (DTLS), defined in RFC 6347, provides security and privacy for UDP packets. This allows UDP-based applications to send and receive traffic in a secure fashion without concern about packet tampering and message forgery. Thus, applications can avoid the delays associated with TCP but still communicate securely by using DTLS.
Cisco AnyConnect Client supports both SSL and DTLS transport protocols. DTLS is enabled, by default, on the security appliance. If it is enabled and UDP is blocked or filtered, communication between the client and the security appliance reverts to the TCP-based SSL protocol.
To disable or re-enable DTLS, choose Configuration > Remote Access VPN > Network (Client) Access > Group Policies, select AnyConnectGroupPolicy, click Edit, choose Advanced > SSL VPN Client, uncheck the Inherit box for the Datagram TLS option, and choose either Enable or Disable.
Note
If the security appliance is set up to use RC4-MD5 encryption, the AnyConnect client fails to establish a DTLS tunnel. You can use any other encryption type. DTLS requires a block-based encryption algorithm, and RC4-MD5 and RC4-SHA are not block based.
Example 23-10 shows how to disable DTLS for the AnyConnectGroupPolicy group policy, using the CLI.
Chicago(config)# group-policy AnyConnectGroupPolicy attributes
Chicago(config-group)# webvpn
Chicago(config-group-webvpn)# svc dtls none
Configuring Traffic Filters
In its default firewall role, the Cisco ASA allows decrypted traffic to pass through. This is extremely useful if you trust all your remote AnyConnect VPN clients. Cisco ASA permits all decrypted SSL VPN packets to pass through it without inspecting them against the configured ACL.
You can change this default behavior if you want the outside interface ACL to inspect the SSL VPN-protected traffic by navigating to Configuration > Remote Access VPN > Network (Client) Access > Advanced > SSL VPN > Bypass Interface Access List. Uncheck the Enable Inbound IPsec Sessions to Bypass Interface Access Lists check box. If you prefer to use the CLI, issue the no sysopt connection permit-vpn command and define appropriate ACLs to allow VPN traffic to pass through. This confirmation applies to both IPsec and SSL VPN traffic. Example 23-11 shows that only the Telnet traffic from the VPN pool of addresses (192.168.50.0/24) to an inside host located at 192.168.1.10 is allowed to pass through the security appliance.
Example 23-11 Disabling Sysopt and Configuring ACLs
Chicago(config)# no sysopt connection permit-vpn
Chicago(config)# access-list outside_acl extended permit tcp
192.168.50.0 255.255.255.0 host 192.168.1.10 eq 23
Chicago(config)# access-group outside_acl in interface outside
If you do not want to disable sysopt connection permit-vpn and still want to filter VPN traffic for a specific user or group policy, define an access list to allow or deny specific traffic and map that access list to a user or group policy.
If you prefer to use ASDM, choose Configuration > Remote Access VPN > Network (Client) Access > Group Policies > AnyConnectGroupPolicy > Edit > General > More Options, uncheck the Inherit check box for the IPv4 Filter option, and choose an ACL from the drop-down menu.
Example 23-12 shows that only the Telnet traffic from the VPN pool of addresses (192.168.50.0/24) to an inside host located at 192.168.1.10 is allowed to pass through the AnyConnectGroupPolicy.
Example 23-12 Filtering SSL VPN Traffic
Chicago(config)# access-list FilterTelnet extended permit tcp
192.168.50.0 255.255.255.0 host 192.168.1.10 eq telnet
Chicago(config)# group-policy AnyConnectGroupPolicy attributes
Chicago(config-group)# vpn-filter value FilterTelnet
AnyConnect Client Configuration
The AnyConnect client must be configured so that it can be connected to the correct security appliance. You do so by defining a client profile and then loading the profile on the client machine.
Creating AnyConnect Client Profile
These configuration settings are stored in the form of user profiles that are automatically delivered to a client machine during connection setup. Some of the things you want to define in the user profile include the following:
![]() The hostname or the IP address of the security appliance
The hostname or the IP address of the security appliance
![]() Any backup security appliances
Any backup security appliances
![]() The tunnel group name to which you want to connect
The tunnel group name to which you want to connect
![]() The username that you want to use for authentication
The username that you want to use for authentication
A user profile is stored locally on the AnyConnect client in an XML file. The name of the file is AnyConnectProfile.xml, and the file can be found at the following locations, depending on the operating system.
For Windows-based clients, excluding Vista:
C:Documents and SettingsAll UsersApplication DataCiscoCisco AnyConnect Secure Mobility ClientProfile
For Windows Vista–based clients:
C:ProgramDataCiscoCisco AnyConnect Secure Mobility ClientProfile
For OS X and Linux, the path is as follows:
/opt/cisco/vpn/profile
There are two ways to create/modify the AnyConnectProfile.xml file:
![]() Manual method
Manual method
![]() Profile editor
Profile editor
Manual Method
The manual method allows you to create or modify the AnyConnectProfile.xml file by using any XML editor such as XML Notepad, Sublime Text, or Oxygen XML Editor. Example 23-13 shows the output of an AnyConnectProfile.xml file. The IP address of the headend security appliance is defined as 209.165.200.225 and the remote users are allowed to log in to the workstations to launch the AnyConnect client.
Note
When the AnyConnect client is installed, it also copies a profile template named AnyConnectProfile.tmpl. You can use this template to create the AnyConnectProfile.xml file.
Example 23-13 Output of AnyConnectProfile.xml File
<?xml version="1.0" encoding="UTF-8"?>
<AnyConnectProfile xmlns="http://schemas.xmlsoap.org/encoding/"
xmlns:xsi="http://www.w3.org/2001/XMLSchema-instance"
xsi:schemaLocation="http://schemas.xmlsoap.org/encoding/ AnyConnectProfile.xsd">
<ClientInitialization>
<UseStartBeforeLogon UserControllable="true">false</UseStartBeforeLogon>
<ShowPreConnectMessage>false</ShowPreConnectMessage>
<LocalLanAccess UserControllable="true">true</LocalLanAccess>
<AutoReconnect UserControllable="false">true
<AutoReconnectBehavior UserControllable="false">DisconnectOnSuspend</AutoReconnectBehavior>
</AutoReconnect>
<AutoUpdate UserControllable="false">true</AutoUpdate>
<WindowsLogonEnforcement>SingleLocalLogon</WindowsLogonEnforcement>
<WindowsVPNEstablishment>AllowRemoteUsers</WindowsVPNEstablishment>
</ClientInitialization>
<ServerList>
<HostEntry>
<HostName>209.165.200.225</HostName>
</HostEntry>
</ServerList>
</AnyConnectProfile>
Note
In AnyConnect version 2.3, Cisco introduced the support to allow remote users to log in to a workstation via Windows Remote Desktop. You can now create a VPN connection to a secure gateway from within the Remote Desktop Protocol (RDP) session. However, this feature requires that you enable split tunneling on the security appliance.
ASDM AnyConnect Profile Editor
You can configure a profile using the AnyConnect profile editor, a convenient GUI-based configuration tool launched from ASDM. The AnyConnect software package, version 2.5 and later (for all OSs), includes the editor, which activates when you load the AnyConnect package on the ASA as an AnyConnect client image. Alternatively, you can manually edit the XML file and import the file to the ASA as a profile, as previously mentioned.
You can configure the ASA to deploy profiles globally for all AnyConnect users or to users based on their group policy. Typically, a user has a single profile file for each AnyConnect module installed. In some cases, you might want to provide more than one profile for a user. Someone who works from multiple locations might need more than one profile. Some profile settings are stored locally on the user computer in a user preferences file or a global preferences file. The user file has information the client needs to display user-controllable settings in the Preferences tab of the client GUI and information about the last connection, such as the user, the group, and the host.
To access the ASDM profile editor, navigate to Configuration > Remote Access VPN > Network (Client) Access > AnyConnect Client Profile.
Alternatively, you can upload an XML profile directly to ASDM. After loading the client profile to the security appliance, apply the profile to the appropriate group policy. This way, any user connecting to the tunnel group that has the group policy with the profile mapped can receive the updated client policy. Navigate to Configuration > Remote Access VPN > Network (Client) Access > Group Policies, select AnyConnectGroupPolicy, click Edit, choose Advanced > SSL VPN Client, uncheck the Inherit check box next to Client Profiles to Download, and select EmployeeProfile that was defined earlier.
Example 23-14 shows a client profile called EmployeeProfile is loaded from the local flash. It is being applied to a group policy called AnyConnectGroupPolicy.
Example 23-14 Loading and Applying Client Profile
Chicago(config)# webvpn
Chicago(config-webvpn)# svc profiles EmployeeProfile disk0:/EmployeeProfile.xml
Chicago(config-webvpn)# exit
Chicago(config)# group-policy AnyConnectGroupPolicy attributes
Chicago(config-group)# webvpn
Chicago(config-group-webvpn)# svc profiles value EmployeeProfile
Connecting from AnyConnect Client
As mentioned earlier in this chapter, there are two ways (web-enabled and standalone) to install the AnyConnect Client to a computer. In the web-enabled mode, the VPN client is downloaded from the security appliance. After it is downloaded, the client connects to the security appliance. For this configuration example, use the web-enabled mode to connect to the appliance, launch a web browser, and navigate to https://sslvpn.securemeinc.org/sslvpnclient.
In standalone mode, the client is downloaded as a standalone application. If the client is not preconfigured, the user needs to specify the IP address or FQDN of the security appliance, the tunnel group to connect to, the username, and the associated password.
Deployment Scenario of AnyConnect Client
The Cisco SSL VPN solution is useful in deployments where remote and home users need access to corporate networks and administrators want to control their access based on a number of attributes. The SSL VPN solution can be deployed in many ways; however, this chapter focuses on one design scenario for ease of understanding.
SecureMe has recently learned about the SSL VPN functionality in Cisco ASA and wants to deploy it for a number of remote employees in Chicago. These employees need full access to the internal network without restriction to complete their tasks if they meet criteria defined by the administrator.
Figure 23-12 shows SecureMe’s network topology for AnyConnect Client.
SecureMe’s security requirements are as follows:
![]() Allow full access to the internal network when a user machine is deemed a corporate asset.
Allow full access to the internal network when a user machine is deemed a corporate asset.
![]() Use a RADIUS server as the external database for user lookup.
Use a RADIUS server as the external database for user lookup.
![]() Apply appropriate policies on users based on their user authentication.
Apply appropriate policies on users based on their user authentication.
![]() Encrypt all traffic from the client to the security appliance.
Encrypt all traffic from the client to the security appliance.
![]() Provide Internet access to remote users via the security appliance.
Provide Internet access to remote users via the security appliance.
To achieve SecureMe’s requirements, the administrator has proposed that the security appliance use CSD and collect information from the remote workstation. If workstations have a registry key of HKLMSYSTEMCurrentControlSetControlCorp and their IP addresses do not fall within the corporate network range, they are declared CorpOwnedHomeMachine. Users are prompted for credentials, and those credentials are checked against the RADIUS database. If users are successfully authenticated, they are allowed to establish an SSL VPN tunnel through the AnyConnect Client. After an AnyConnect Client is loaded on the workstation, it should remain installed. On the security appliance, address translation rules need to be configured to provide Internet access to the AnyConnect VPN users.
The steps to implement the proposed solution are as follows:
1. Set up CSD for registry check.
2. Set up RADIUS for authentication.
3. Configure AnyConnect SSL VPN.
4. Enable address translation for Internet access.
The following sections cover these steps in detail.
Step 1: Set Up CSD for Registry Check
The first step in achieving the listed goals is to create a secure environment for remote users. You do so by following these steps:
1. Choose Configuration > Remote Access VPN > Secure Desktop Manager > Setup, click Browse Flash to select the CSD file you want to use, and check Enable Secure Desktop.
2. Choose Configuration > Remote Access VPN > Secure Desktop Manager > Prelogin Policy and define a prelogin sequence based on registry key and IP address range. Create a new Windows location called CorpOwnedHomeMachines that has a registry key check of HKLMSYSTEMCurrentControlSetControlCorp and an address check where the address should not fall in the 209.165.200.224/27 subnet.
3. Choose Configuration > Remote Access VPN > Secure Desktop Manager > CorpOwnedHomeMachines and uncheck the Secure Desktop and Cache Cleaner check boxes.
Step 2: Set Up RADIUS for Authentication
The second step is to set up a RADIUS server for user authentication. Do so by following these guidelines:
1. Choose Configuration > Remote Access VPN > AAA/Local Users > AAA Server Groups and click Add. Specify the server group called RADIUS and choose RADIUS from the drop-down menu. Click OK when finished.
2. Click the newly created server group, and under Servers in the Selected Groups, click Add. From the Interface Name drop-down menu, choose inside, and specify 192.168.1.10 as the IP address of the RADIUS server. Configure a Server Secret Key of SecureMe123 and click OK when finished.
Step 3: Configure AnyConnect SSL VPN
The third step needed to meet the listed requirements is to configure AnyConnect VPN client on the security appliance for remote users. Follow these guidelines to achieve the goals:
1. Choose Configuration > Remote Access VPN > Network (Client) Access > Advanced > SSL VPN > Client Settings and click Add. Click Browse Files, select the Cisco AnyConnect Secure Mobility Client file, and click OK.
2. After loading the AnyConnect Client, enable full tunnel client functionality on the outside interface. This is achieved by navigating to Configuration > Remote Access VPN > Network (Client) Access > AnyConnect Connection Profiles, checking the Enable Cisco AnyConnect Secure Mobility Client or Legacy SSL VPN Client Access on the Interfaces Selected in the Table Below, and checking the Allow Access check box for the outside interface. Also check the Enable DTLS option. Click Apply.
3. Choose Configuration > Remote Access VPN > Network (Client) Access > Address Assignment > Address Pools and click Add. In the Name field, specify SSLVPNPool. Configure 192.168.50.1 through 192.168.50.254 as the pool of addresses and specify a mask of 255.255.255.0. Click OK.
4. Choose Configuration > Remote Access VPN > Network (Client) Access > Group Policies and click Add. Specify AnyConnectGroupPolicy as the group policy name. For the Address Pools option, uncheck the Inherit check box, click Select, and select SSLVPNPool.
5. Choose Advanced > Split Tunneling in the left pane. For the Policy option, uncheck the Inherit check box and choose Tunnel All Networks from the drop-down list.
6. Click the Servers option in the left pane and configure 192.168.1.20 as the WINS and DNS server addresses.
7. Choose Advanced > SSL VPN Client in the left pane and make sure that Keep Installer on Client System option is enabled and set to Yes. Click OK when you are finished.
8. Create a new tunnel group by choosing Configuration > Remote Access VPN > Network (Client) Access > AnyConnect Connection Profiles. In the Connection Profiles area, click Add and specify SecureMeAnyConnect as the tunnel group name. In the Authentication area, choose RADIUS from the AAA Server Group drop-down menu. In the Default Group Policy area, choose AnyConnectGroupPolicy from the Group Policy drop-down menu. Make sure that the Enable SSL VPN Client Protocol check box is checked.
9. Choose Advanced > SSL VPN in the left pane. Under Group URL, click Add and specify https://sslvpn.securemeinc.org/sslvpnclient. Verify that the Enable check box is checked. Click OK to exit.
Step 4: Enable Address Translation for Internet Access
The final step is to define address translation. The AnyConnect clients send all encrypted data to the security appliance. For the AnyConnect clients to access the Internet, you must define address translation rules for the pool of addresses handed out to the clients. You do so by following these guidelines:
1. Choose Configuration > Device Setup > Interfaces and check Enable Traffic Between Two or More Hosts Connected to the Same Interface.
2. Choose Configuration > Firewall > NAT Rules and click Add. In the Match Criteria: Original Packet area, choose inside from the Source Interface drop-down menu and specify the inside network (192.168.1.0/24) in the Source Address field.
3. Choose outside from the Destination Interface drop-down menu. In the Destination Address, enter 192.168.50.0/24, which is the address of the VPN address pool.
You can now connect to the ASA, using the following URL in your browser: https://sslvpn.securemeinc.org/sslvpnclient.
Monitoring and Troubleshooting AnyConnect SSL VPNs
The following sections discuss the troubleshooting steps that are available to help you in running the SSL VPN solution smoothly on a security appliance.
Troubleshooting SSL VPN
Cisco ASA provides a number of troubleshooting and diagnostic commands for SSL VPNs. The following sections focus on two troubleshooting scenarios related to SSL VPN.
Troubleshooting SSL Negotiations
If you have a user who is not able to connect to the security appliance using SSL, follow these steps to isolate the SSL negotiation issues:
1. Verify that the user’s computer can ping the security appliance’s outside IP address.
2. If the user’s workstation can ping the address, issue the show running all | include ssl command on the security appliance and verify that SSL encryption is configured.
3. If SSL encryption is properly configured, use an external sniffer to verify whether the TCP three-way handshake is successful.
Note
AnyConnect clients will fail to establish connection if the security appliances are configured to accept connection with SSL Server version v3. You must use TLSv1 for AnyConnect clients. Navigate to Configuration > Remote Access VPN > Advanced > SSL Settings to specify the SSL encryption type and version that you want to use.
Troubleshooting AnyConnect Client Issues
The following sections provide guidelines on troubleshooting the two most common AnyConnect VPN client issues and how to troubleshoot them.
Initial Connectivity Issues
If you employ AnyConnect VPN client in your environment and a user is having initial connectivity issues, enable debug webvpn svc on the security appliance and analyze the debug messages. You can fix most of the configuration-specific issues easily by looking at the error messages. For example, if your security appliance is not configured to assign an IP address, you receive a “No assigned address” error message in the debugs. This is highlighted in Example 23-15.
Example 23-15 debug webvpn svc Command
Chicago# debug webvpn svc
CSTP state = HEADER_PROCESSING
http_parse_cstp_method()
...input: 'CONNECT /CSCOSSLC/tunnel HTTP/1.1'
webvpn_cstp_parse_request_field()
...input: 'Host: 209.165.200.225'
<snip>
Processing CSTP header line: 'X-DTLS-CipherSuite: AES256-SHA:AES128-
SHA:DES-CBC3-SHA:DES-CBC-SHA'
Validating address: 0.0.0.0
CSTP state = WAIT_FOR_ADDRESS
webvpn_cstp_accept_address: 0.0.0.0/0.0.0.0
webvpn_cstp_accept_address: no address?!?
CSTP state = HAVE_ADDRESS
No assigned address
webvpn_cstp_send_error: 503 Service Unavailable
CSTP state = ERROR
The debug webvpn svc command has been replaced by debug webvpn anyconnect in recent versions of Cisco ASA.
Alternatively, you can enable an SVC-specific syslog on the security appliance and look at the messages. For example, if the security appliance does not assign an IP address to an AnyConnect client, you should see the “No address available for SVC connection” message as shown in Example 23-16.
Chicago(config)# logging on
Chicago(config)# logging class svc buffered debugging
Chicago(config)# exit
Chicago# show logging
%ASA-3-722020: TunnelGroup <SSLVPNTunnel> GroupPolicy
<AnyConnectGroupPolicy> User <sslvpnuser> IP <209.165.200.230> No
address available for SVC connection
Additionally, you can look at the AnyConnect VPN client logs in Windows Event Viewer. Choose Start > Settings > Control Panel > Administrative Tools > Event Viewer > Cisco AnyConnect Secure Mobility Client and review the logs. If an address is not being assigned, you should see an error message.
Traffic-Specific Issues
If you are able to connect but unable to successfully send traffic over the SSL VPN tunnel, look at the traffic statistics on the client to verify that traffic is being received and transmitted by the client. Detailed client statistics are available in all versions of AnyConnect (including mobile devices). If the client shows that traffic is being sent and received, check the security appliance for received and transmitted traffic. If the security appliance applies a filter, the filter name is shown and you can look at the ACL entries to check whether your traffic is being dropped.
Common issues that users experience are:
![]() Routing issues behind the ASA—internal network unable to route packets back to the assigned IP addresses and VPN clients
Routing issues behind the ASA—internal network unable to route packets back to the assigned IP addresses and VPN clients
![]() Access control lists blocking traffic
Access control lists blocking traffic
![]() Network Address Translation not being bypassed for VPN traffic
Network Address Translation not being bypassed for VPN traffic
Summary
This chapter provided details about the AnyConnect SSL VPN functionality in Cisco ASA. Using the robust features available in Cisco ASA SSL VPN remote access, security administrators can deploy Cisco ASA in almost any network topology. The chapter also focused on using the AnyConnect profile editor to show how a client profile can be defined. To reinforce learning, a deployment scenario was presented, along with configurations. This chapter covered a few show and debug commands to assist in troubleshooting complicated AnyConnect VPN deployments.